


Air Campaigns
Want to start or join a group build? This is where to start.
Want to start or join a group build? This is where to start.
Hosted by Frederick Boucher, Michael Satin
OFFICIAL: Mischievous MiGs Campaign
Red4

Joined: April 01, 2002
KitMaker: 4,287 posts
AeroScale: 1,164 posts

Posted: Thursday, May 05, 2011 - 01:02 AM UTC
Well that does it. After seeing pics of this kit, it has moved onto my radar of acquisition. Will be attending a few shows here soon and will look for one there. Thanks for posting your work Jean-Luc. "Q"

TedMamere

Joined: May 15, 2005
KitMaker: 5,653 posts
AeroScale: 4,347 posts

Posted: Monday, May 09, 2011 - 01:16 AM UTC
Hi all,
My entry is finished...
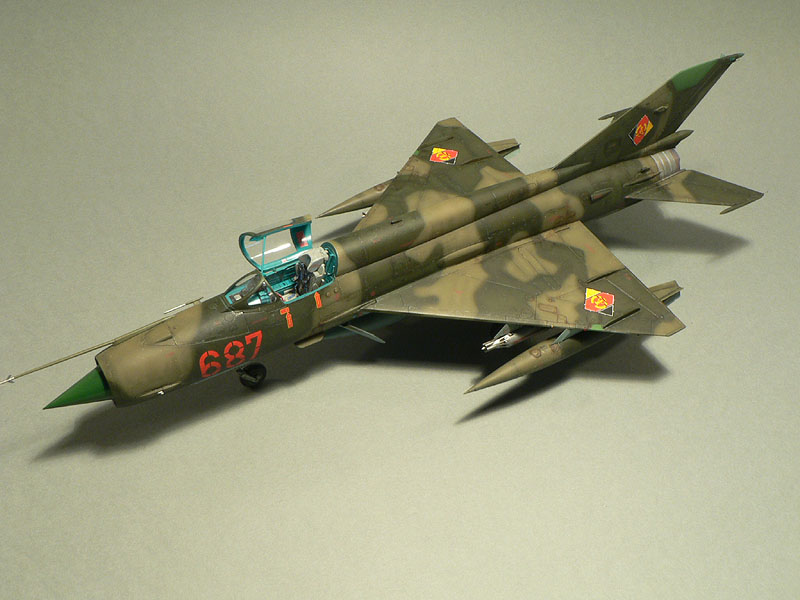

Jean-Luc
My entry is finished...
Jean-Luc


betheyn

#019


Joined: October 14, 2004
KitMaker: 4,560 posts
AeroScale: 2,225 posts

Posted: Friday, May 13, 2011 - 11:09 AM UTC
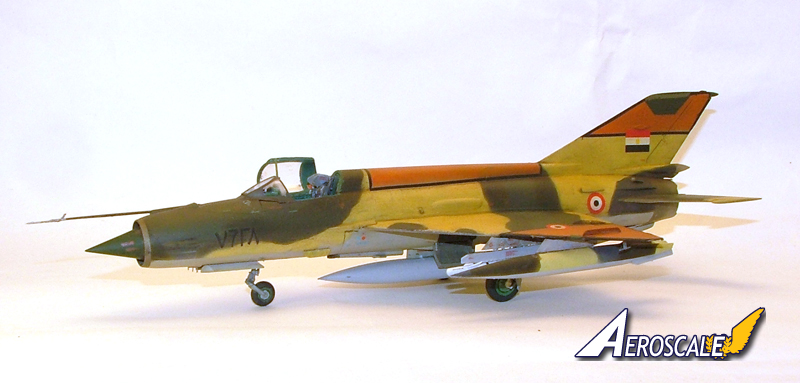
Following in Jean-Lucs airspace, with my poorer effort is my entry.
Eduard's 1/48th MiG-21MF, done in the markings of No.7628, Egyptian Air Force, unit unknown, Tanta Airbase, 1988.
Andy
Eduard's 1/48th MiG-21MF, done in the markings of No.7628, Egyptian Air Force, unit unknown, Tanta Airbase, 1988.
Andy


Middle_Franconian

Joined: January 02, 2011
KitMaker: 279 posts
AeroScale: 239 posts

Posted: Saturday, May 14, 2011 - 10:06 AM UTC
Hello Jean-Luc,
outstanding work! A really nice looking NVA MiG-21. The original is exhibit in the Deutsches Museum in Oberschleissheim in the north of Munich. Is that the reason why you have chosen this particular plane?
All this MiGs make me thinking about participating in this campaign with my 48er Hobby Boss MiG-17 or Academy MiG-21 PF... but I think I can not finish in time. Too much other projects...
Servus,
Sebastian

Rebilda
#057
Joined: May 11, 2010
KitMaker: 248 posts
AeroScale: 123 posts

Posted: Tuesday, May 17, 2011 - 01:05 AM UTC
Awww, MF, you'll best it! Let's do a weekend Blitzbau in two weeks, waddayasay??!!
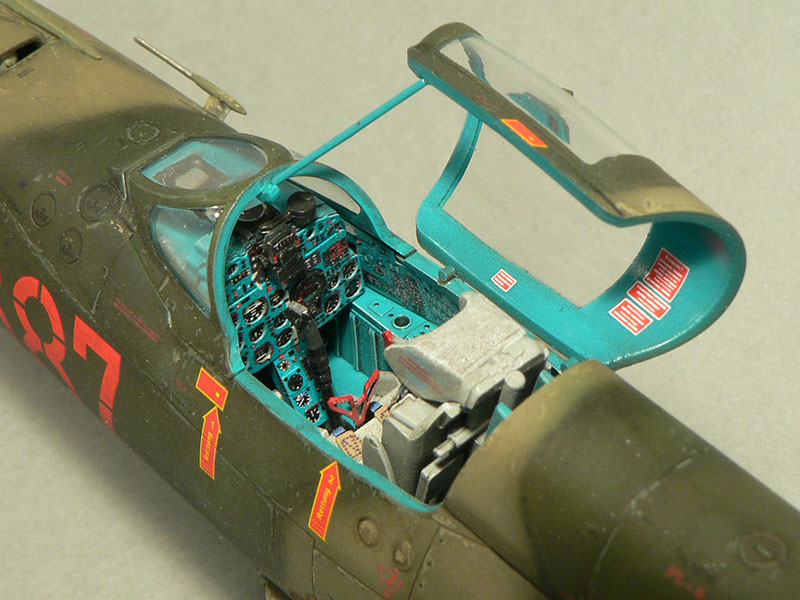
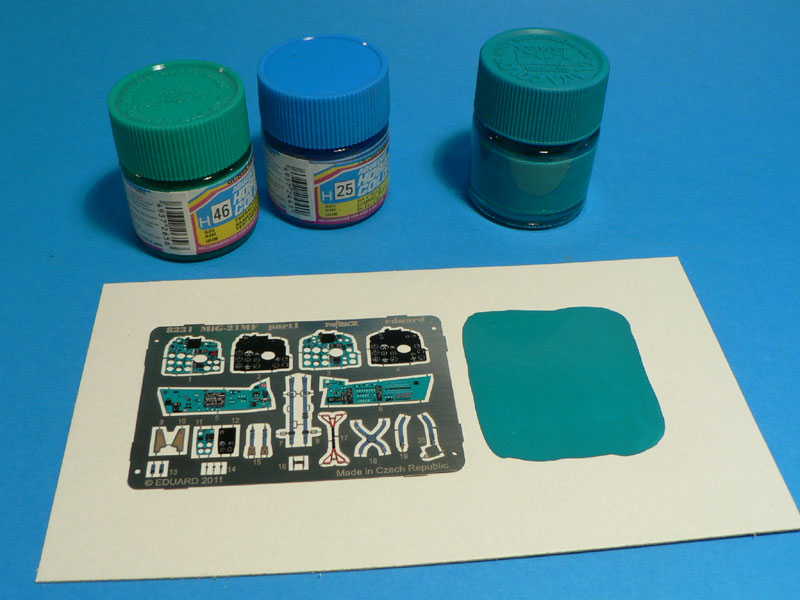
Jean-Luc, awesome cockpit!!! What colour pray tell did you use for the interior???!!!
Jean-Luc, awesome cockpit!!! What colour pray tell did you use for the interior???!!!

eoinryan

Joined: April 30, 2010
KitMaker: 232 posts
AeroScale: 66 posts

Posted: Tuesday, May 17, 2011 - 11:36 AM UTC
Hi folks,
A bit late off the mark here... I'm building's Airfix's 1/72 MiG-15...

I had a few fit issues with the cockpit, mainly it was too big for the fuselage- dry-fitting was a tad difficult, so I had more filling, filing and sanding that I had expected.
We'll see how the rest of it goes.
Eoin
Removed by original poster on 05/23/11 - 20:47:41 (GMT).
Removed by original poster on 05/23/11 - 20:50:17 (GMT).

Buckeye198
Joined: May 02, 2010
KitMaker: 596 posts
AeroScale: 197 posts

Posted: Monday, May 23, 2011 - 09:50 AM UTC
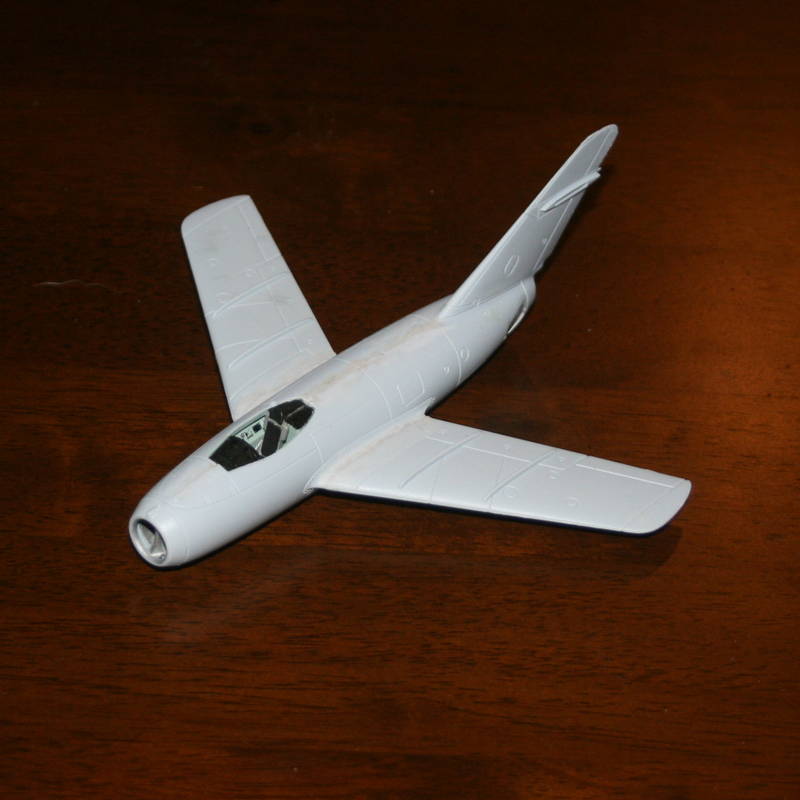
I have recently been given the gift of time and so now I'm done with my entry! Sorry for the poor quality of the first three pics...taken with my phone...

Fixed the blemishes as best as I could. Covered the canopy with Parafilm (love that stuff!) and plugged the intake and exhaust with simple foam.

Sprayed it all with flat black primer.

Initial coat of 1 part Aluminum to 1 part Silver (both Testors). This is essentially what I did for my F-86. Simple enough and easy enough for a NMF amateur like myself.

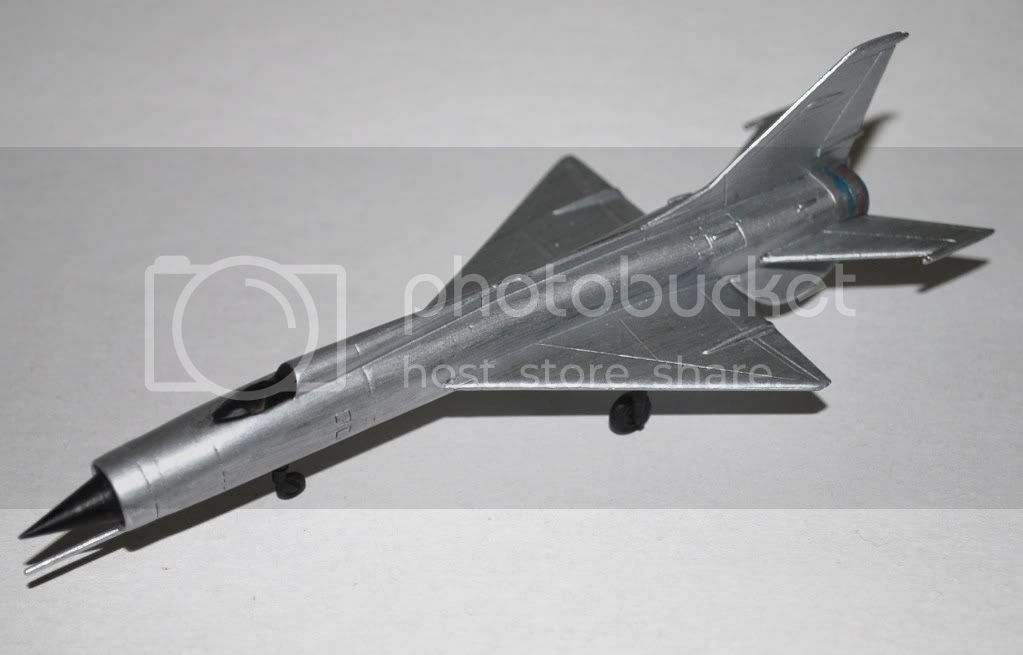
This is where I try a new technique. I wanted a more "used" look to my model, so I sprayed the interior of the panels with a mixture of equal parts Testors Aluminum, Silver, and Gloss White. (Check out this link: http://hyperscale.com/features/2002/gekkogc_3.htm ) I didn't make the fade coat light enough, but that was okay since I didn't have enough of the blend coat to really go through fully like in the article. Also, my airbrush skills aren't quite good enough to spray exactly within the panels, so my fade coat is kinda sloppy. Still looks better than just a pure color though, in my opinion.


Here's the finished project! The fade effect worked well, Tamiya's decals were excellent (as always), and I think I have a thing for weighing tires and stretching sprue

Being tailed by my Sabre, just the way things should be
All in all, a good build filled with lots of learning and smiles and so on. Hope everyone else's entries are going well!
Fixed the blemishes as best as I could. Covered the canopy with Parafilm (love that stuff!) and plugged the intake and exhaust with simple foam.
Sprayed it all with flat black primer.
Initial coat of 1 part Aluminum to 1 part Silver (both Testors). This is essentially what I did for my F-86. Simple enough and easy enough for a NMF amateur like myself.
This is where I try a new technique. I wanted a more "used" look to my model, so I sprayed the interior of the panels with a mixture of equal parts Testors Aluminum, Silver, and Gloss White. (Check out this link: http://hyperscale.com/features/2002/gekkogc_3.htm ) I didn't make the fade coat light enough, but that was okay since I didn't have enough of the blend coat to really go through fully like in the article. Also, my airbrush skills aren't quite good enough to spray exactly within the panels, so my fade coat is kinda sloppy. Still looks better than just a pure color though, in my opinion.
Here's the finished project! The fade effect worked well, Tamiya's decals were excellent (as always), and I think I have a thing for weighing tires and stretching sprue
Being tailed by my Sabre, just the way things should be
All in all, a good build filled with lots of learning and smiles and so on. Hope everyone else's entries are going well!
TedMamere
Joined: May 15, 2005
KitMaker: 5,653 posts
AeroScale: 4,347 posts
Posted: Wednesday, May 25, 2011 - 05:01 AM UTC
Hi Leo,
Sorry for the VERY late answer...
I have used the following mixture: 50% Gunze H46 (Emerald Green) and 50% Gunze H25 (Sky Blue)...
Jean-Luc
Sorry for the VERY late answer...
Quoted Text
Jean-Luc, awesome cockpit!!! What colour pray tell did you use for the interior???!!!
I have used the following mixture: 50% Gunze H46 (Emerald Green) and 50% Gunze H25 (Sky Blue)...
Jean-Luc

SmashedGlass
Joined: October 26, 2006
KitMaker: 105 posts
AeroScale: 62 posts

Posted: Sunday, May 29, 2011 - 11:19 AM UTC
I'm also a bit tardy, being as I'm one of the people who originally signed on (last year!) before the campaign was official. The issue was impending deployment to Afghanistan and lack of time thereof....
Well, that issue has been solved! Not going back over and set to military retirement glide slope. So I guess I'd better dig in and finish my Hobby Boss MiG-15Uti nee SBLim-2Art. Pictures of current (stalled) progress forthcoming.
Well, that issue has been solved! Not going back over and set to military retirement glide slope. So I guess I'd better dig in and finish my Hobby Boss MiG-15Uti nee SBLim-2Art. Pictures of current (stalled) progress forthcoming.
Red4
Joined: April 01, 2002
KitMaker: 4,287 posts
AeroScale: 1,164 posts
Posted: Friday, June 10, 2011 - 01:29 AM UTC
Alright everybody, you have a little over 2 and a half months to get your builds wrapped up. We've seen some nice work over the last couple months. Tighten up your shot groups and lets see some more. Thanks for participating, "Q"
Thanks for participating, "Q" 
Emeritus

Joined: March 30, 2004
KitMaker: 2,845 posts
AeroScale: 1,564 posts
Posted: Wednesday, June 15, 2011 - 11:12 PM UTC
Picking up the project after a while, I've worked on the engine and some smaller bits as well.
The Zvezda kit depicts an R-11 engine carried over from their PFM kit. While correct for that version, the BIS had an R-25 with annular flame holders so it needed some work.
The older of the two Eduard PE sets I got for this build includes parts for the engine, but the flame holders aren't that much better, mostly resembling an R-13 engine instead. Fortunately, the flame holder component was still useful and fit well with the Zvezda kit.
To make the annular flame holders characteristic of the R-25, I formed rings from 0.4mm copper wire and squash-moulded the round central part from a piece of sprue.
The inside detail on the jet nozzle was good, but the walls were thick and the outside featureless. To improve it, I sanded down the thickness near the end of the tube and added detail with thin styrene strips.
Here's all the engine components prior to assembly. The incorrect (for BIS) flame holders of the kit parts will be covered by the new one. The "fingers" radiating inward from the outermost ring of the flame holder PE part (depicting an R-13) have been cut off already.

The corrugated lining missing from the kit parts is made from thin aluminium sheet burnished over a pin vice handle.

While I'm using the main wheel wells from the Pavla resin set, I decided to go with the kit part for the front wheel well.

The resin part has better detail on the bottom, but it's shallower and lacks the characteristic ribs on the sides. I reasoned the better detail in the bottom would be all but covered by the front landing gear and the plastic part will be easier to glue in place and ensure it's positioned correctly.
Same as with the engine, Zvezda's kit has earlier style main wheels carried over from their PFM kit. Pavla's gear well and wheel set also includes wheels with the older style hubs. The older one of the Eduard PE sets has hubs correct for the BIS, but have only one hole whereas there should be three. To make marks for drilling the two extra holes, I drew up this little contraption:

To be really accurate, the holes should be a bit closer to the center, but that would require making the hubs from scratch, so I'll just live with these.
PS. Just in case those picture links of the engine pics don't work for some reason, you can see them here: http://inscale.org/pub/index.php?topic=1151.0
The Zvezda kit depicts an R-11 engine carried over from their PFM kit. While correct for that version, the BIS had an R-25 with annular flame holders so it needed some work.
The older of the two Eduard PE sets I got for this build includes parts for the engine, but the flame holders aren't that much better, mostly resembling an R-13 engine instead. Fortunately, the flame holder component was still useful and fit well with the Zvezda kit.
To make the annular flame holders characteristic of the R-25, I formed rings from 0.4mm copper wire and squash-moulded the round central part from a piece of sprue.
The inside detail on the jet nozzle was good, but the walls were thick and the outside featureless. To improve it, I sanded down the thickness near the end of the tube and added detail with thin styrene strips.
Here's all the engine components prior to assembly. The incorrect (for BIS) flame holders of the kit parts will be covered by the new one. The "fingers" radiating inward from the outermost ring of the flame holder PE part (depicting an R-13) have been cut off already.
The corrugated lining missing from the kit parts is made from thin aluminium sheet burnished over a pin vice handle.
While I'm using the main wheel wells from the Pavla resin set, I decided to go with the kit part for the front wheel well.
The resin part has better detail on the bottom, but it's shallower and lacks the characteristic ribs on the sides. I reasoned the better detail in the bottom would be all but covered by the front landing gear and the plastic part will be easier to glue in place and ensure it's positioned correctly.
Same as with the engine, Zvezda's kit has earlier style main wheels carried over from their PFM kit. Pavla's gear well and wheel set also includes wheels with the older style hubs. The older one of the Eduard PE sets has hubs correct for the BIS, but have only one hole whereas there should be three. To make marks for drilling the two extra holes, I drew up this little contraption:
To be really accurate, the holes should be a bit closer to the center, but that would require making the hubs from scratch, so I'll just live with these.
PS. Just in case those picture links of the engine pics don't work for some reason, you can see them here: http://inscale.org/pub/index.php?topic=1151.0
Red4
Joined: April 01, 2002
KitMaker: 4,287 posts
AeroScale: 1,164 posts
Posted: Saturday, June 25, 2011 - 09:11 AM UTC
Looking good Eetu. Keep at it. "Q"
Emeritus
Joined: March 30, 2004
KitMaker: 2,845 posts
AeroScale: 1,564 posts
Posted: Tuesday, July 05, 2011 - 08:51 AM UTC
Finally got some more progress to show: engine components ready for assembly:


Littorio
Joined: September 15, 2004
KitMaker: 4,728 posts
AeroScale: 1,351 posts

Posted: Friday, July 08, 2011 - 09:44 PM UTC
A very late start coming in from me, parts still in their bag 
This is an Anigrand 1/144 Mig Ye-152A 'Flipper'

Build progress to follow.
This is an Anigrand 1/144 Mig Ye-152A 'Flipper'
Build progress to follow.


Blueheeler

Joined: March 18, 2008
KitMaker: 347 posts
AeroScale: 223 posts
Posted: Friday, July 15, 2011 - 02:19 AM UTC
My entry, Academy 1/72 MiG-27 Flogger.

Cheers,
Nick
Cheers,
Nick

Littorio
Joined: September 15, 2004
KitMaker: 4,728 posts
AeroScale: 1,351 posts
Posted: Saturday, July 16, 2011 - 10:56 AM UTC
OK guy's here's that Ye-152A so far, base coat on and the heat shielding around the exhaust cans done, next is to get the cockpit painted, canopy on and paint the landing gear and nose cone.

SmashedGlass
Joined: October 26, 2006
KitMaker: 105 posts
AeroScale: 62 posts
Posted: Sunday, July 31, 2011 - 08:02 AM UTC
Well, as promised days (..weeks? months??) ago, here are some shots of my decidedly super slo-mo build of the HB MiG-15Uti as a Polish SBLim-2Art. Just now finishing off the internal detailings and modifications.
In these pics are the mods to the kit cockpits and seats (only one shown, other is in for a repair....have broken off side rails 3 times lol), along with punched panels, all based from the limited photos I could find for the Polish artillery spotter version.


More pics this evening
In these pics are the mods to the kit cockpits and seats (only one shown, other is in for a repair....have broken off side rails 3 times lol), along with punched panels, all based from the limited photos I could find for the Polish artillery spotter version.
More pics this evening

doubtingthomas
Joined: March 17, 2009
KitMaker: 156 posts
AeroScale: 153 posts
Posted: Sunday, July 31, 2011 - 04:56 PM UTC
Hello all-
There's some great work going on here!
I've made a bit of progress on my entry - the 1:72 MPM MiG-9. Cockpit is assembled, painted, and installed:

Although the MPM instructions include sketches and photo reproductions, they kit parts bear little resemblance to these. Given that I'm on a tight deadline here, I'm not scratchbuilding anything in 1:72 that I don't just HAVE to.
Biggest problem thus far is that the engine exhausts are too wide for the fuselage, but I think I've got that sorted. The plastic is thick enough that grinding is ALWAYS an option
Later-
Tom
There's some great work going on here!
I've made a bit of progress on my entry - the 1:72 MPM MiG-9. Cockpit is assembled, painted, and installed:
Although the MPM instructions include sketches and photo reproductions, they kit parts bear little resemblance to these. Given that I'm on a tight deadline here, I'm not scratchbuilding anything in 1:72 that I don't just HAVE to.
Biggest problem thus far is that the engine exhausts are too wide for the fuselage, but I think I've got that sorted. The plastic is thick enough that grinding is ALWAYS an option
Later-
Tom

Philippus
Joined: March 13, 2007
KitMaker: 182 posts
AeroScale: 65 posts

Posted: Friday, August 05, 2011 - 09:39 AM UTC
Hi all,
Bit of a late starter but here we go:
I'm building this kit:

And some progress:


More to follow over the weekend.
Thanks,
Philip
Bit of a late starter but here we go:
I'm building this kit:
And some progress:
More to follow over the weekend.
Thanks,
Philip
Emeritus
Joined: March 30, 2004
KitMaker: 2,845 posts
AeroScale: 1,564 posts
Posted: Sunday, August 07, 2011 - 03:59 AM UTC
Too long time, no updates...
Well, here's some update. Hope I can finish this in time.
The nose cone. Good shape, but a little blunt. You can probably tell what's coming?

Yep, drill it out from the rear, glue in the pin, blend in with the rest with Milliput:

...And primed:

I also added (some of) the missing holes to the rear portion. Did it freehand, should have used some sort of an alignment device as the holes ended up somewhat all over the place. Well, at least it won't be that obvious in the finished model.
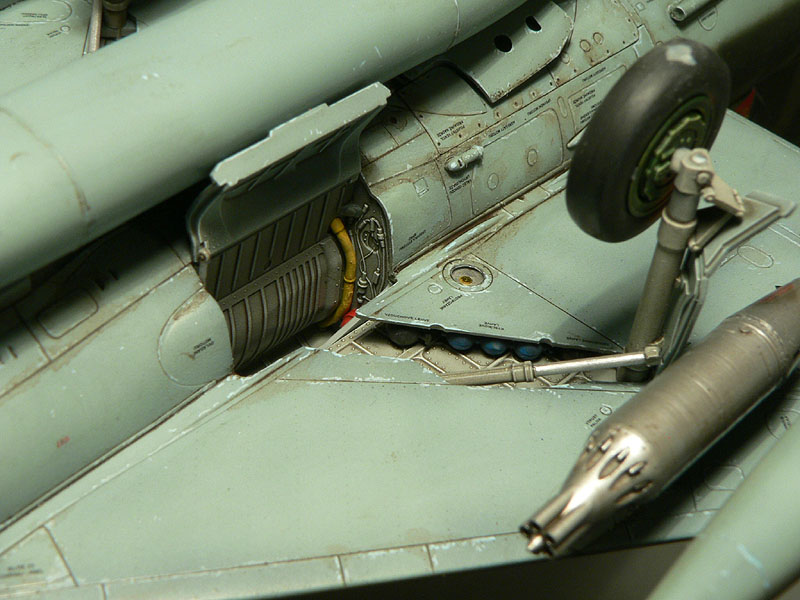
Here's the landing gear wells painted up and ready. The main gear wells are from the Pavla resin set and the nose gear well is the plastic kit part. The nose well turned out to be a bit too narrow when I tried to glue it in the first time, so styrene sheet shims were glued to both sides to make it line up properly.

The cockpit components, pretty much ready for assembly. Still working on the ejection seat, pics coming in the next update. The instrument panel and side consoles are from the new Eduard PE set, rudder pedals are from the really old one (not 100% accurate, but certainly decent enough), the throttle handle is cannibalized from Pavla's MiG-21FM cockpit set. I also added some buttons and the brake handle to the control stick.

Finally, here's the fuselage halves with stuff being glued in.

Next: finishing & installing the cockpit, then fuselage assembly.
Well, here's some update. Hope I can finish this in time.
The nose cone. Good shape, but a little blunt. You can probably tell what's coming?
Yep, drill it out from the rear, glue in the pin, blend in with the rest with Milliput:
...And primed:
I also added (some of) the missing holes to the rear portion. Did it freehand, should have used some sort of an alignment device as the holes ended up somewhat all over the place. Well, at least it won't be that obvious in the finished model.
Here's the landing gear wells painted up and ready. The main gear wells are from the Pavla resin set and the nose gear well is the plastic kit part. The nose well turned out to be a bit too narrow when I tried to glue it in the first time, so styrene sheet shims were glued to both sides to make it line up properly.
The cockpit components, pretty much ready for assembly. Still working on the ejection seat, pics coming in the next update. The instrument panel and side consoles are from the new Eduard PE set, rudder pedals are from the really old one (not 100% accurate, but certainly decent enough), the throttle handle is cannibalized from Pavla's MiG-21FM cockpit set. I also added some buttons and the brake handle to the control stick.
Finally, here's the fuselage halves with stuff being glued in.
Next: finishing & installing the cockpit, then fuselage assembly.
AIRGUNNER
Joined: September 27, 2006
KitMaker: 246 posts
AeroScale: 234 posts
Posted: Thursday, August 11, 2011 - 04:37 AM UTC
Finished mine. Total 'what if? ' based on a Slovak MiG29 I saw at Farnborough last year, but thought digital camo would look nice with red stars.


Comments good or bad welcome, thanks for looking.
Steve
Comments good or bad welcome, thanks for looking.
Steve
Buckeye198
Joined: May 02, 2010
KitMaker: 596 posts
AeroScale: 197 posts
Posted: Thursday, August 11, 2011 - 04:57 AM UTC
Steve that is an outstanding scheme! I can't imagine how long it must have taken you to mask everything off there. Did you just use masking tape or something else? Well done all around!
SmashedGlass
Joined: October 26, 2006
KitMaker: 105 posts
AeroScale: 62 posts
Posted: Thursday, August 11, 2011 - 10:53 AM UTC
More (rather slow!) progress. Not completely happy with my results, but


 |

WEB HOSTING BY


Copyright ©2021 AeroScale and Kitmaker Network, a subsidiary of Silver Star Enterprises
All Rights Reserved. Please read our Conditions of Use and Privacy Policy.
All Rights Reserved. Please read our Conditions of Use and Privacy Policy.