Air Campaigns
Want to start or join a group build? This is where to start.
OFFICIAL: Mischievous MiGs Campaign
Emeritus
_VISITCOMMUNITY
Uusimaa, Finland
Joined: March 30, 2004
KitMaker: 2,845 posts
AeroScale: 1,564 posts
Posted: Monday, January 10, 2011 - 08:12 AM UTC
Nice projects going (and finished too!) here.

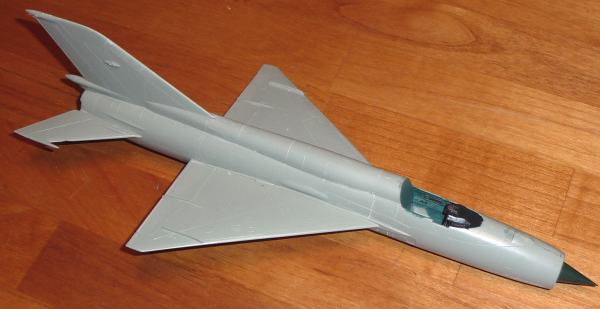
Here's what I'm planning to build for this campaign: Zvezda's 1:72 MiG-21BIS.

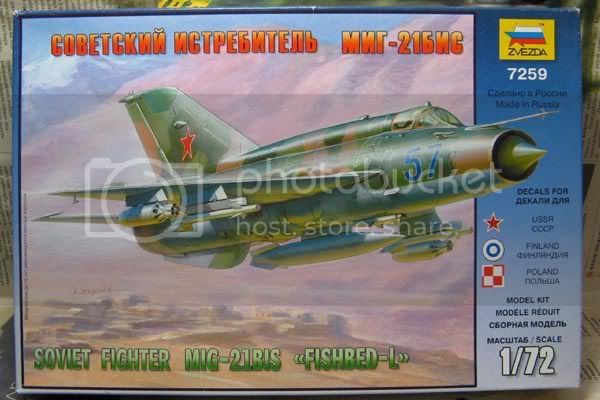
Looks like a real nice kit. Cleanly moulded and good details, though not that extensive as on the Revell MiG-21F-13 kit.
Based on looking in the box, my only gripes would be the somewhat shallow wheel wells in the wings and that the kit provides only the early type windscreen with rounded front corners.

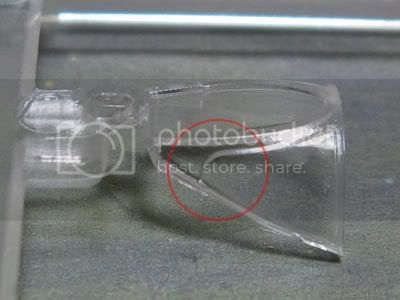
I can't but doubt that throwing in the later "angled corner" windscreen as well to be that much of a burden. It's bit of a shame as it's inclusion would have hugely expanded the building potential of the kit. For example, out of the 26 MiG21BIS aircraft operated by the Finnish Air Force, only the first two had the early type windscreen.
I've been hoping that aftermarket canopies would be released, either alone or part of a cockpit update set, but I've seen none so far. So either MG-111 or MG-114 it is that I'll be building.

From what I've seen, it seems that Fujimi's BIS has the late style windscreen, can anyone confirm that?

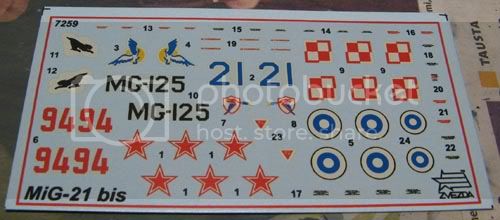
After buying the kit a few years ago, the usual, seemingly all but inevitable hoarding of aftermarket goodies started. One of the first things on my list were decals, as the kit's decal sheet suffered from colour spattering on some of the markings (could be just my sample, as I haven't seen reviews mentioning the same issue) and the Finnish marking option would need the late style windscreen to be accurate.


So, decal hunting ensued.

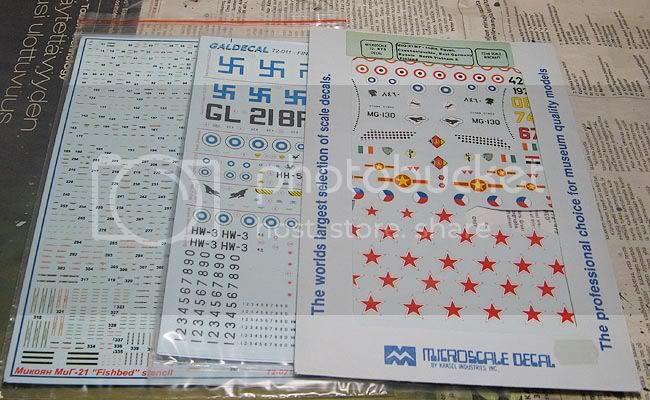
First I got the Begemot stencil sheet (left), Russian language stenciling for about every MiG-21 variant there is. However, I'm not sure how much of those I'll be using in the end. These Finnish MiGs went through several overhauls and the camoflage schemes changed and I don't know yet what timeframe I want to depict my entry in.
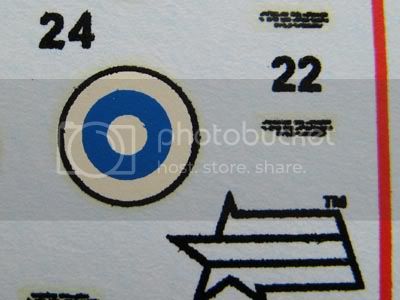
On the right is an old Microscale sheet I got from Ebay. Finnish roundels (and quite many others as well) useless due to bad colour registration, but the registry numbers and lynx emblems look nice (can't use those MG-130 codes though).
In the middle is Galdecal's sheet, which I'll probably use. Has low-visibility markings for MiGs in the 90's.

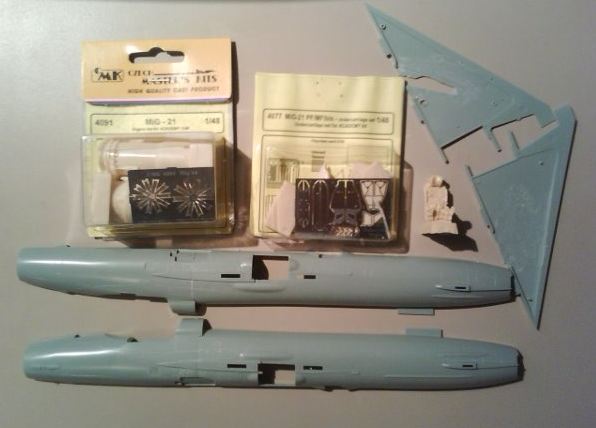
Now for the AM madness, again results of Ebaying, LHS shopping and some spares box digging :

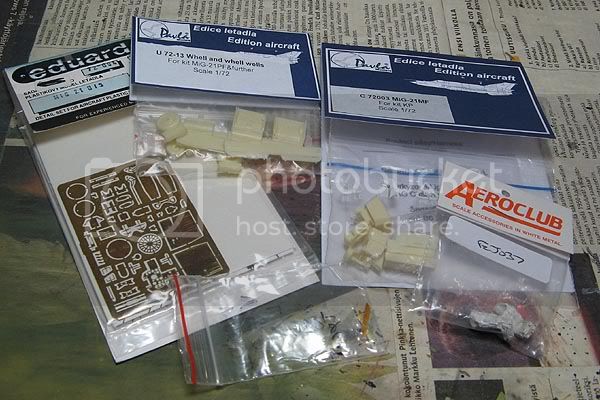
- Wheel & wheel well and cockpit (MF) sets from Pavla
- a really OLD Eduard PE set (originally for Fujimi kit)
- KM-1 seats from Aeroclub
- front gear well doors left over from PART's MiG-21F-13 set
As with the decals, I probably won't be using all of that, but comparing them to kit parts in order to decide what to replace, detail my self or leave alone.
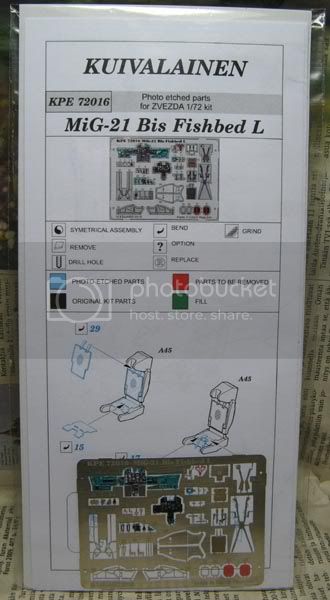
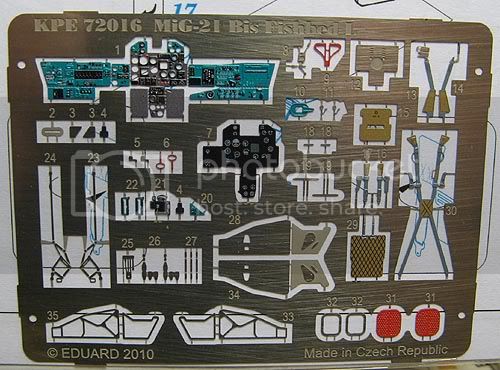
I also bought Eduard masks for the canopy but forgot to include them in the photo.

After the release of Zvezda's kit, I was looking forward for Eduard to release a PE set to go with their masks. But there was nothing.
Until The Man running a LHS had such a set made by Eduard:


I'll get going when I get my current project finished and off the workbench. With all the AM, I hope this won't take all year. Or two.

VonCuda
_VISITCOMMUNITY
North Carolina, United States
Joined: November 28, 2005
KitMaker: 2,216 posts
AeroScale: 1,080 posts
Posted: Monday, January 10, 2011 - 09:44 AM UTC
I just recieved my resin cockpit today from Pacific Coast for my Mig-29 UB. I'll get some pictures up later but I have some other things to take care of first.

Hermon
Bigrip74
_VISITCOMMUNITY
Texas, United States
Joined: February 22, 2008
KitMaker: 5,026 posts
AeroScale: 2,811 posts
Posted: Monday, January 10, 2011 - 02:47 PM UTC
MIG 17 QUESTIONS:

1. cockpit interior color.
2. wheel well color.
3. intake interior color.

I just realized that I know nothing regarding Migs.

Bob
SGTJKJ
#041
_VISITCOMMUNITY
Kobenhavn, Denmark
Joined: July 20, 2006
KitMaker: 10,069 posts
AeroScale: 3,788 posts
Posted: Tuesday, January 11, 2011 - 01:37 AM UTC
Nice choice, Eetu. I am looking forward to see what you get from the Zvezda kit. The aftermarket products must be several times the cost of the kit itself, but I am sure it will be worth it.

I have been digging a little around and it seems like I also need some after market accessories for my Academy MiG-29 - at least for the cockpit and for some missiles. Alternatively I will leave of the missiles all together.

Here is the scheme I will be using - luckily supplied by Academy as decals.

atoplu
_VISITCOMMUNITY
Ontario, Canada
Joined: August 17, 2003
KitMaker: 753 posts
AeroScale: 174 posts
Posted: Tuesday, January 11, 2011 - 02:22 AM UTC
Little movement in my Mig-15.


Bigrip74
_VISITCOMMUNITY
Texas, United States
Joined: February 22, 2008
KitMaker: 5,026 posts
AeroScale: 2,811 posts
Posted: Tuesday, January 11, 2011 - 07:36 AM UTC
I broke down and opened the kit box to start and this is what was done. Typical Hobbycraft thick plastic.

Photobucket
Photobucket

When finished I wish to paint this in Syrian markings.

Bob
vanize
_VISITCOMMUNITY
Texas, United States
Joined: January 30, 2006
KitMaker: 1,954 posts
AeroScale: 1,163 posts
Posted: Thursday, January 13, 2011 - 04:57 PM UTC
Well, I think I am going to have to do the Academy 1/48 MiG-21bis (they call it an MF, but it is closer to a bis).

This is because I need to get this thing done before the Eduard MiG-21MF comes out - otherwise I'll never build it and I have like 3 aftermarket sets invested into this kit.
vanize
_VISITCOMMUNITY
Texas, United States
Joined: January 30, 2006
KitMaker: 1,954 posts
AeroScale: 1,163 posts
Posted: Friday, January 14, 2011 - 08:04 AM UTC
Started my Academy 1/48 Mig-21bis last night:

1. added forward fuselage halves to main body halves.
2. removed main wheel well detail to make way for the CMK upgrade for this area.


I also have the CMK engine set for this kit, as well as the Eduard color photo-etch interior and a resin ejection seat (can't remember the manufacturer of the seat)
warreni
_VISITCOMMUNITY
South Australia, Australia
Joined: August 14, 2007
KitMaker: 5,926 posts
AeroScale: 2,201 posts
Posted: Friday, January 14, 2011 - 08:30 AM UTC
Vanize, for those of us who do not know why (I think I do) why did you glue the fuselage fronts to the main part instead of to each other and then onto the main parts after they were glued together?
Bigrip74
_VISITCOMMUNITY
Texas, United States
Joined: February 22, 2008
KitMaker: 5,026 posts
AeroScale: 2,811 posts
Posted: Friday, January 14, 2011 - 08:36 AM UTC

Quoted Text

Vanize, for those of us who do not know why (I think I do) why did you glue the fuselage fronts to the main part instead of to each other and then onto the main parts after they were glued together?


Also Vance, what do you think of this kit in regards to construction?

Bob
SmashedGlass
_VISITCOMMUNITY
Florida, United States
Joined: October 26, 2006
KitMaker: 105 posts
AeroScale: 62 posts
Posted: Saturday, January 15, 2011 - 09:00 AM UTC
One question, in the (sort of) immortal words of Clara Peller..............

"Where's the Banner?!?"

Bigrip74
_VISITCOMMUNITY
Texas, United States
Joined: February 22, 2008
KitMaker: 5,026 posts
AeroScale: 2,811 posts
Posted: Saturday, January 15, 2011 - 11:09 AM UTC
And how is Fort Carson these days Erik? BTW make a banner so we can vote to see if it will become this campaigns banner you may have what it takes to dream up the right one. I am sure Matt would appreciate the effort and help. The more the merrier.

Bob
Red4
_VISITCOMMUNITY
California, United States
Joined: April 01, 2002
KitMaker: 4,287 posts
AeroScale: 1,164 posts
Posted: Saturday, January 15, 2011 - 01:25 PM UTC
Yeah Erik, what Bob said. Erik and I served together in the same unit at Carson. Speaking of which, since you asked about it Bob, Carson is getting huge. A lot of construction. I retired over 6 years ago and construction has not stopped since. "Q"
Bigrip74
_VISITCOMMUNITY
Texas, United States
Joined: February 22, 2008
KitMaker: 5,026 posts
AeroScale: 2,811 posts
Posted: Saturday, January 15, 2011 - 02:43 PM UTC
has the BX (post exchange) changed any, spent many hours there with the wife picking out Christmas presents for the grand kiddies and spending way too much money.

Bob
SmashedGlass
_VISITCOMMUNITY
Florida, United States
Joined: October 26, 2006
KitMaker: 105 posts
AeroScale: 62 posts
Posted: Saturday, January 15, 2011 - 07:35 PM UTC
Lol, we're getting a bit off-topic but, yes. Carson's PX is currently under expansion to roughly double it's old size, and we're getting a slew of other shops around post such as a Gun Shop!.... Where the washers and dryers were sold in the furniture store
vanize
_VISITCOMMUNITY
Texas, United States
Joined: January 30, 2006
KitMaker: 1,954 posts
AeroScale: 1,163 posts
Posted: Saturday, January 15, 2011 - 08:39 PM UTC

Quoted Text

Vanize, for those of us who do not know why (I think I do) why did you glue the fuselage fronts to the main part instead of to each other and then onto the main parts after they were glued together?


Good question.

any time there is a mating of parts like that (front fuselage to back, wing tips to wing, etc), there is almost always a slight miss-match in width.

If you glue the front halves together, and the back halves together, you have to deal with that where the front and back parts of the fuselage meet, and it will usually have a bit of a step, which is a royal pain in the rear and usually means lots on destroyed panel lines in the process of trying to get rid of it.

but if you attached half sides front and rear together first before mating entire left to right halves of the fuselage, then you can ensure the front to back step is minimized or totally eliminated (keeping in mind that the plastic is more flexible when half round rather than glued together full-round).

Any remaining mismatch in fuselage circumference front to back can then be dealt with along the main left/right seam instead of circumference of the fuselage, which is easier to hide, much simpler to deal with, and something you have to sort out anyway.

I mentioned wingtips mated to wings - the specific example I am thinking of is the otherwise very good dragon 1/48 Ju-88. if you follow the instructions and glue main top and bottom wing halves together, glue the top and bottom wing tips together, and then try to mate wingtip to main wing, you get a significant step that is enough of a problem to be infuriating (this kit is notorious for this).

But, if you instead glue wingtip top to main wing top, and the same with the bottom, then mate completed top to completed bottom, there is no step to deal with, and only a slight gap on the wing leading edge to fill (which takes a couple minutes).

basically it is a matter of using some fore-thought and being willing to deviate from the instructions to avoid common trouble areas of a build.

hope that helps in your future builds!
vanize
_VISITCOMMUNITY
Texas, United States
Joined: January 30, 2006
KitMaker: 1,954 posts
AeroScale: 1,163 posts
Posted: Saturday, January 15, 2011 - 09:00 PM UTC

Quoted Text


Quoted Text

Vanize, for those of us who do not know why (I think I do) why did you glue the fuselage fronts to the main part instead of to each other and then onto the main parts after they were glued together?


Also Vance, what do you think of this kit in regards to construction?

Bob


Actually I am rather pleased with it thus far.

For some reason I had been putting off this kit (for like 10 years!) thinking it was going to be trouble, but that has not turned out to be the case.

The biggest issue I have had so far is getting the Eduard photo-etch to fit properly into the cockpit, which is not the kit's fault.

More info about that coming soon with my next update.
mykroft
_VISITCOMMUNITY
Ontario, Canada
Joined: November 14, 2009
KitMaker: 270 posts
AeroScale: 264 posts
Posted: Sunday, January 16, 2011 - 12:58 AM UTC
Looks like I'm in for this one, picked up the Zvezda MiG-31 on Friday and decided to start it. Going to do the more complex 3-tone scheme rather than the plain grey scheme.
warreni
_VISITCOMMUNITY
South Australia, Australia
Joined: August 14, 2007
KitMaker: 5,926 posts
AeroScale: 2,201 posts
Posted: Sunday, January 16, 2011 - 06:53 AM UTC
Check your parts carefully before you start to make sure none are broken or missing.
VonCuda
_VISITCOMMUNITY
North Carolina, United States
Joined: November 28, 2005
KitMaker: 2,216 posts
AeroScale: 1,080 posts
Posted: Sunday, January 16, 2011 - 07:02 AM UTC
Vance, the method you're talking about with mating front and rear fuselage sections together is the same way I do it. I learned this the hard way a few years ago when I built my first P-40 kit from Hasegawas new tooling. I followed the instructions and ended up spending 2 full weeks filling and sanding and rescribing panel lines to make it passable. The second of those kits I built using your method and only had to add a tiny bit of styrene stock on the bottom side to make everything perfect.


Hermon
Keeperofsouls2099
_VISITCOMMUNITY
Florida, United States
Joined: January 14, 2009
KitMaker: 2,798 posts
AeroScale: 2,443 posts
Posted: Sunday, January 16, 2011 - 07:45 AM UTC
What are instructions?
Bigrip74
_VISITCOMMUNITY
Texas, United States
Joined: February 22, 2008
KitMaker: 5,026 posts
AeroScale: 2,811 posts
Posted: Sunday, January 16, 2011 - 10:27 AM UTC

Quoted Text

What are instructions?


Thats the appetizer before you glue anything together Justin LOL and I just learned quite a bit and it overloads the brain, but thanks for all of the information regarding the attachement sequence of fuselage or wing halves, it makes sense.

Bob
vanize
_VISITCOMMUNITY
Texas, United States
Joined: January 30, 2006
KitMaker: 1,954 posts
AeroScale: 1,163 posts
Posted: Sunday, January 16, 2011 - 03:30 PM UTC
The Academy Mig-21Bis is falling together much faster than I expected, and I am actually much more excited about this build than anticipated.

Eduard color photo-etch cockpit, still in progress. Had an interesting time matching Eduard's choice for the russian interior blue, but think I did fair enough. Note the fore/aft fuselage seam and how well it mates if you do that first on each side and then mate the completed sides (as per my previous post) - lost almost no panel line or rivet detail:


The CMK afterburner can. I elected to not use their resin tail end and instead adapt the kit plastic to receive the CMK engine:


CMK main wheel wells. These went in with less fuss than expected. However, I decided the nose wheel well supplied with the same aftermarket set was too much hassle and went with the kit part in that case:


The whole thing is coming together remarkably fast and with few hassles. Note that the Academy kit has separate flaps and ailerons, but a search of MiG-21 pictures reveals that these are almost never in any position other than neutral when the plane is sitting on the ground. They also provide positionable air brakes, but again these are almost always closed on the ground, so I also posed these closed.


vanize
_VISITCOMMUNITY
Texas, United States
Joined: January 30, 2006
KitMaker: 1,954 posts
AeroScale: 1,163 posts
Posted: Sunday, January 16, 2011 - 05:25 PM UTC
Does anyone know where to get a reasonable facsimile of an R-60 (AA-8 Aphid) missle in 1/48?

I could source them from my Academy MiG-29, but I'd really rather start with something better than those.
Emeritus
_VISITCOMMUNITY
Uusimaa, Finland
Joined: March 30, 2004
KitMaker: 2,845 posts
AeroScale: 1,564 posts
Posted: Sunday, January 16, 2011 - 08:23 PM UTC

Quoted Text

Does anyone know where to get a reasonable facsimile of an R-60 (AA-8 Aphid) missle in 1/48?


Tally Ho! does (did?) a set of two resin & PE Aphids. Some pics here.

Real nice work on the kit so far!
Good job matching the pre-painted interior colour of the PE. Seems spot-on to me. Btw, what paints did you use?
There's always the possibility of another shade being used on the set I got for my Zvezda BIS kit, but any tips and pointers would sure come in handy.

I did some searching and surprisingly few paint manufacturers seem to have Soviet interior turquoise in their range. Model Master has an acrylic (2135), but it's availability is practically nil over here and ordering acrylics in the middle of the winter doesn't seem like a great idea. And of course, the paint would need to match the PE reasonably well.
Perhaps I should start looking at Vallejo's two turquoise colours first?