

Air Campaigns
Want to start or join a group build? This is where to start.
Want to start or join a group build? This is where to start.
Hosted by Frederick Boucher, Michael Satin
OFFICIAL: Mischievous MiGs Campaign

Tomcat31

#042

Joined: November 18, 2006
KitMaker: 2,828 posts
AeroScale: 1,720 posts

Posted: Thursday, August 11, 2011 - 11:09 AM UTC
Very Nice Steve, don't forget to post a picture in the official gallery


Emeritus

Joined: March 30, 2004
KitMaker: 2,845 posts
AeroScale: 1,564 posts

Posted: Friday, August 12, 2011 - 03:40 AM UTC
Update time! About time for me to start picking up the pace I think.
As I did with the main instrument panel, I decided to separate the side consoles/sidewalls to make them easier to assemble and align, as the side consoles are part of the cockpit tub instead fuselage halves (or separate parts).
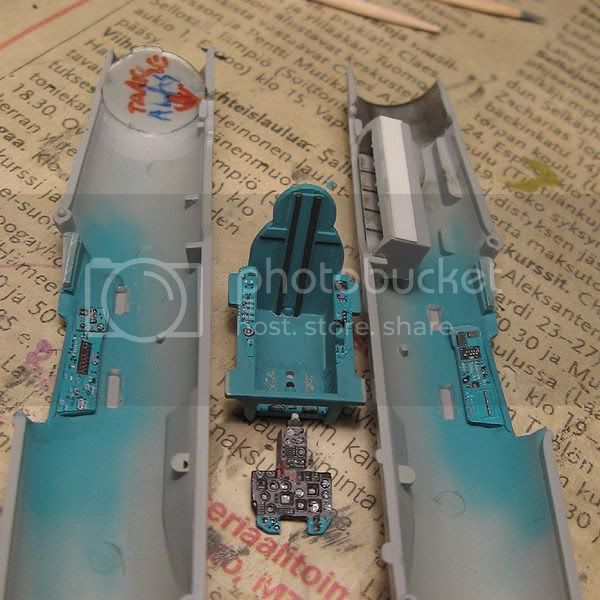
The interior colour is a mix of Lifecolor acrylics: 1 part UA055 - 3 parts LC08. Also note the grey Finnish-modified main instrument panel sections, correctly depicted in the Eduard PE set.
The nose wheel well turned out to be too narrow when I tried to glue it in the first time. After pulling it off I glued a piece of styrene sheet on both sides to make it align properly.
After gluing the fuselage together, which was a very nice fit, it was time to start tackling (some of) the surface detail issues in the kit.
First I took care of the front speed brakes. For some reason, the kit designers made the hinge parts separate. I can't think of any other reason than some physical moulding limitations, since the shape of the hinge is simple and doesn't have any undercuts or such. Perhaps it's because the brakes are located on the edges of the fuselage halves and the hinges have right angles?
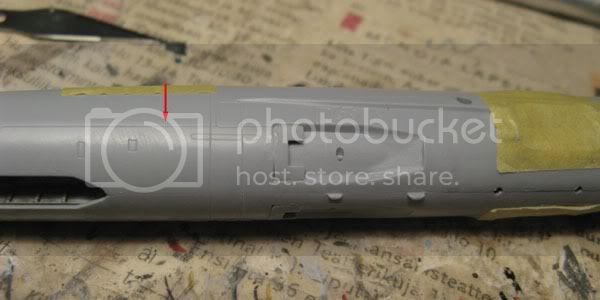
Anyway, the hinge parts left seams that needed filling. Also, panel lines running along the front of the nose weren't supposed to be there and needed to go (pointed by the arrow in the pic).
Simple enough. Milliput to blend in the speed brake hinge and superglue for the imaginary panel line:

Then I moved on to the more laborous part of the kit, in what come to correcting surface detail: the rudder / tail fin and the fuselage spine.
I don't know whether there was an acute shortage of reference material (I highly doubt it...) or that the designers got lazy with the Bis-specific components, but a majority of the spine and fin detailing is either in the wrong place or completely superfluous.
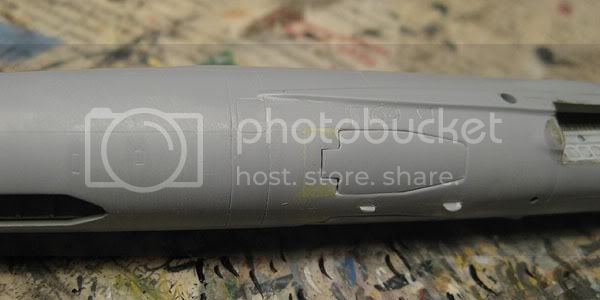
Here's the spine for starters:

Every single panel line except the frontmost one was completely out of place, and same goes for the details. Both the hole for the fuel tank ventilation scoop (hole in the spine) and the recessed circle representing the fuel tank opening are too far back - the tank opening is approximately where the ventilation scoop should be located.
The cure? More superglue followed by sanding!

(arrows point to filled details)
Here's the spine after more accurately placed lines have been scribed. Note the ventilation scoop mounting hole filled with milliput.

The tail fin was simpler to fix as it had panel lines and details mostly more or less correctly placed, the problem was just there was much more of it than in the real thing!
Also, all the maintanence and access hatches were moulded on both sides of the fin. These hatches were present only on the left side so they needed to be filled from the right.

Again, arrows point to details that weren't supposed to be there.
Phew!
I think that's the worst bunch taken care of. There's still some smaller issues in the fuselage detailing, but I think I'll leave them alone, as they're much less serious and don't have such strong an effect on the whole as those found on the spine and fin.
Also, keep in mind that I took some slight shortcuts with the spine and fin so the panel lines aren't 100% accurate, only more accurate than out-of-the-box. I kind of played along with that there was. So don't take this as a reference!

As I did with the main instrument panel, I decided to separate the side consoles/sidewalls to make them easier to assemble and align, as the side consoles are part of the cockpit tub instead fuselage halves (or separate parts).
The interior colour is a mix of Lifecolor acrylics: 1 part UA055 - 3 parts LC08. Also note the grey Finnish-modified main instrument panel sections, correctly depicted in the Eduard PE set.
The nose wheel well turned out to be too narrow when I tried to glue it in the first time. After pulling it off I glued a piece of styrene sheet on both sides to make it align properly.
After gluing the fuselage together, which was a very nice fit, it was time to start tackling (some of) the surface detail issues in the kit.
First I took care of the front speed brakes. For some reason, the kit designers made the hinge parts separate. I can't think of any other reason than some physical moulding limitations, since the shape of the hinge is simple and doesn't have any undercuts or such. Perhaps it's because the brakes are located on the edges of the fuselage halves and the hinges have right angles?
Anyway, the hinge parts left seams that needed filling. Also, panel lines running along the front of the nose weren't supposed to be there and needed to go (pointed by the arrow in the pic).
Simple enough. Milliput to blend in the speed brake hinge and superglue for the imaginary panel line:
Then I moved on to the more laborous part of the kit, in what come to correcting surface detail: the rudder / tail fin and the fuselage spine.
I don't know whether there was an acute shortage of reference material (I highly doubt it...) or that the designers got lazy with the Bis-specific components, but a majority of the spine and fin detailing is either in the wrong place or completely superfluous.
Here's the spine for starters:
Every single panel line except the frontmost one was completely out of place, and same goes for the details. Both the hole for the fuel tank ventilation scoop (hole in the spine) and the recessed circle representing the fuel tank opening are too far back - the tank opening is approximately where the ventilation scoop should be located.
The cure? More superglue followed by sanding!
(arrows point to filled details)
Here's the spine after more accurately placed lines have been scribed. Note the ventilation scoop mounting hole filled with milliput.
The tail fin was simpler to fix as it had panel lines and details mostly more or less correctly placed, the problem was just there was much more of it than in the real thing!
Also, all the maintanence and access hatches were moulded on both sides of the fin. These hatches were present only on the left side so they needed to be filled from the right.
Again, arrows point to details that weren't supposed to be there.
Phew!
I think that's the worst bunch taken care of. There's still some smaller issues in the fuselage detailing, but I think I'll leave them alone, as they're much less serious and don't have such strong an effect on the whole as those found on the spine and fin.
Also, keep in mind that I took some slight shortcuts with the spine and fin so the panel lines aren't 100% accurate, only more accurate than out-of-the-box. I kind of played along with that there was. So don't take this as a reference!
Emeritus
Joined: March 30, 2004
KitMaker: 2,845 posts
AeroScale: 1,564 posts
Posted: Friday, August 12, 2011 - 08:32 AM UTC
Just finished the ejection seat, though I'm still kind of thinking whether to add foot rests. I'll have to see if I could fit them in there with the control stick and all.
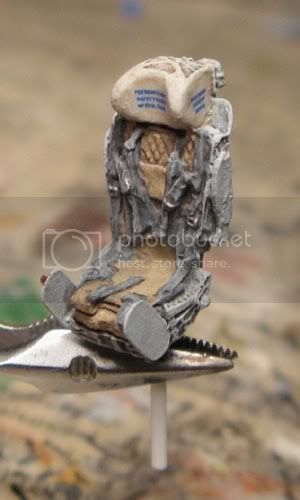
I scrounged my spare decals for the warning stencils on the headrest and settled on these left-over stencils from Revell's MiG-21 F-13.
I scrounged my spare decals for the warning stencils on the headrest and settled on these left-over stencils from Revell's MiG-21 F-13.

SmashedGlass

Joined: October 26, 2006
KitMaker: 105 posts
AeroScale: 62 posts

Posted: Sunday, August 14, 2011 - 09:11 AM UTC
Moar progress! That's what this campaign needs, moar progress!
Installed extension for much too short tail pipe from beveled brass tube and kit part:

Fabricated two NR-23 cannon fairings and related shell ejectors from rod and scrap. As the SBLim-2A was not a "UTI" but built by the Poles from existing single-seat MiGs, it retained the twin 23mm cannon armament; the HB kit, being a plain-Jane UTI, came with the single 12.7mm fairing:

In hindsight, next time I build an SBLim-2, I'll just purchase a single seater to use the lower fuselage from as I'm not happy with my result and 'twould be much easier that way.
The beginning of many, many, MANY! rivets! Still trying to decide if I like the look or not, we shall see how it subdues under paint:

And here is where we sit as of late last night

Today began seam filling. Though the kit does fit together reasonably well, there were still a few gaps (need to get some Ambroid) and I'm still trying to figure out how I want to deal with the wing root canyons. I have a plan for eliminating (well, mostly) the seam line inside the intakes already, to be revealed in a future posting.....
Installed extension for much too short tail pipe from beveled brass tube and kit part:
Fabricated two NR-23 cannon fairings and related shell ejectors from rod and scrap. As the SBLim-2A was not a "UTI" but built by the Poles from existing single-seat MiGs, it retained the twin 23mm cannon armament; the HB kit, being a plain-Jane UTI, came with the single 12.7mm fairing:
In hindsight, next time I build an SBLim-2, I'll just purchase a single seater to use the lower fuselage from as I'm not happy with my result and 'twould be much easier that way.
The beginning of many, many, MANY! rivets! Still trying to decide if I like the look or not, we shall see how it subdues under paint:
And here is where we sit as of late last night
Today began seam filling. Though the kit does fit together reasonably well, there were still a few gaps (need to get some Ambroid) and I'm still trying to figure out how I want to deal with the wing root canyons. I have a plan for eliminating (well, mostly) the seam line inside the intakes already, to be revealed in a future posting.....
vanize
Joined: January 30, 2006
KitMaker: 1,954 posts
AeroScale: 1,163 posts
Posted: Thursday, August 18, 2011 - 07:19 AM UTC
After not modeling for a few months at all, I am back, and can hopefully finish up my Academy 1/48 MiG-21Bis by this time next week.
Progress pics (not much as you can see) below.
decided to go with grey (instead of blue) underside:
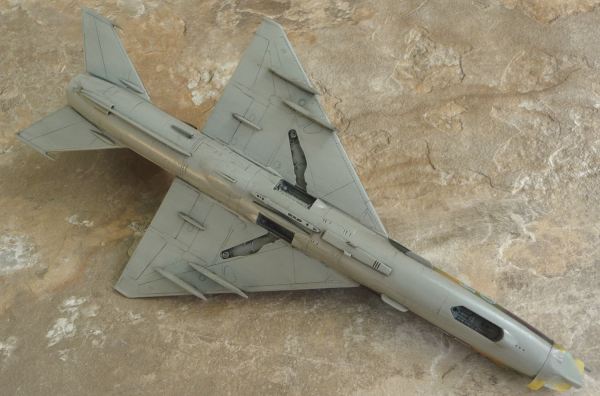
got some decals on - Stars and a/c number:

Need to finish up the decals (mostly stencils at this point), flat-coat it (will be problematic, as local hobby shop is having supply problems and i am almost out of my personal stock), and get the landing gear on.
Progress pics (not much as you can see) below.
decided to go with grey (instead of blue) underside:
got some decals on - Stars and a/c number:
Need to finish up the decals (mostly stencils at this point), flat-coat it (will be problematic, as local hobby shop is having supply problems and i am almost out of my personal stock), and get the landing gear on.
vanize
Joined: January 30, 2006
KitMaker: 1,954 posts
AeroScale: 1,163 posts
Posted: Thursday, August 18, 2011 - 07:20 AM UTC
Does anyone know how common it was for circa 1980s MiG-21s to have under-wing stars?
SGTJKJ
#041

Joined: July 20, 2006
KitMaker: 10,069 posts
AeroScale: 3,788 posts

Posted: Saturday, August 20, 2011 - 01:08 PM UTC
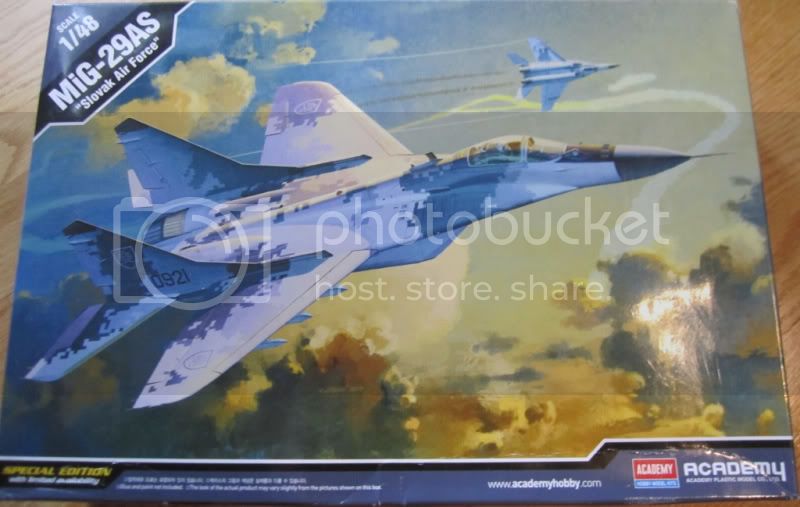
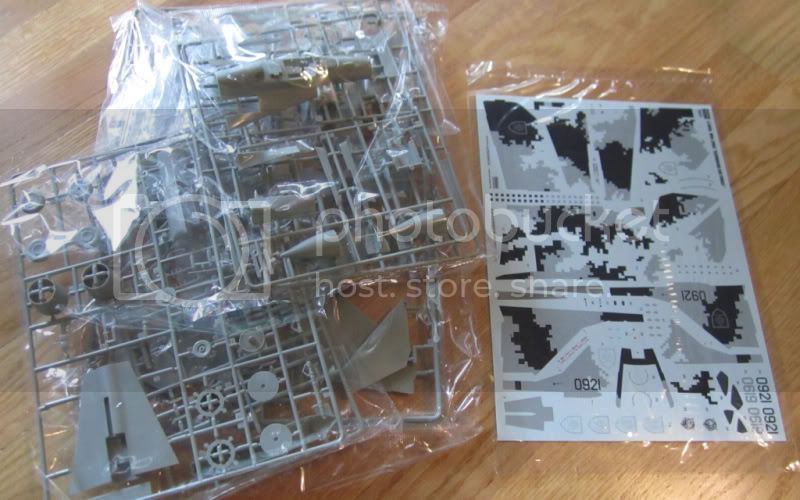
Great build, Steve. I am going to build the Slovak MiG OOB from the Academy. Did you mask and paint the digital camo yourself or did you use decals?
I am getting started on my build now and hope to be able to finish it before the deadline. It will be interesting to see how the decals will settle. Luckily not "standard" Academy decals, but Cartograph decals.
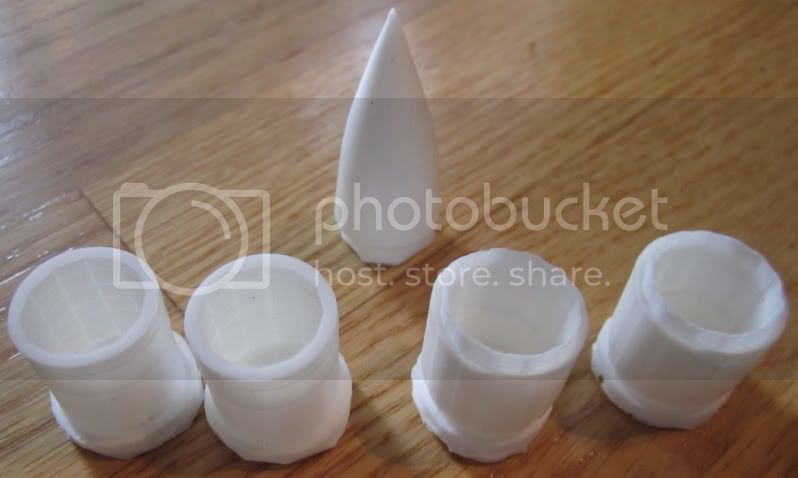
I also invested in a set of resin exhausts and a new nose cone. However, the exhausts seem too be too big so major surgery might be needed.....
More to follow
I am getting started on my build now and hope to be able to finish it before the deadline. It will be interesting to see how the decals will settle. Luckily not "standard" Academy decals, but Cartograph decals.
I also invested in a set of resin exhausts and a new nose cone. However, the exhausts seem too be too big so major surgery might be needed.....
More to follow


Littorio

Joined: September 15, 2004
KitMaker: 4,728 posts
AeroScale: 1,351 posts

Posted: Saturday, August 20, 2011 - 01:39 PM UTC
You do like a challenge Jesper a ten day build, go get 'em.
As for me I have three and a half days to get mine finished as work will then take over, so I'll be chained to the bench tomorrow
a ten day build, go get 'em.As for me I have three and a half days to get mine finished as work will then take over, so I'll be chained to the bench tomorrow


eMan

#298

Joined: August 08, 2002
KitMaker: 1,182 posts
AeroScale: 351 posts

Posted: Saturday, August 20, 2011 - 05:27 PM UTC
Progress pic of my entry,Trumpeter 1/32 PLAAF Mig-15.
SGTJKJ
#041
Joined: July 20, 2006
KitMaker: 10,069 posts
AeroScale: 3,788 posts
Posted: Saturday, August 20, 2011 - 06:18 PM UTC
Quoted Text
You do like a challenge Jesper
Yes, very much. However, this aircraft has the same colour for landing gear upper and lower fuselage, so I hope I will be able to pull it of. Construction has already progressed rather well, so hope to have the main construction finished by tomorrow.
More to follow soon....
eoinryan

Joined: April 30, 2010
KitMaker: 232 posts
AeroScale: 66 posts

Posted: Sunday, August 21, 2011 - 12:05 AM UTC
Hi folks,
There's some great builds out there- I'm tempted to add the Academy MiG-29 to my stash...
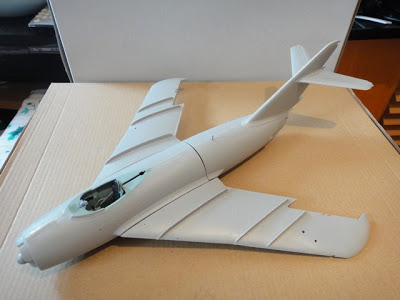
Anywho, here's the basic paint job gone on my North Korean MiG-15:
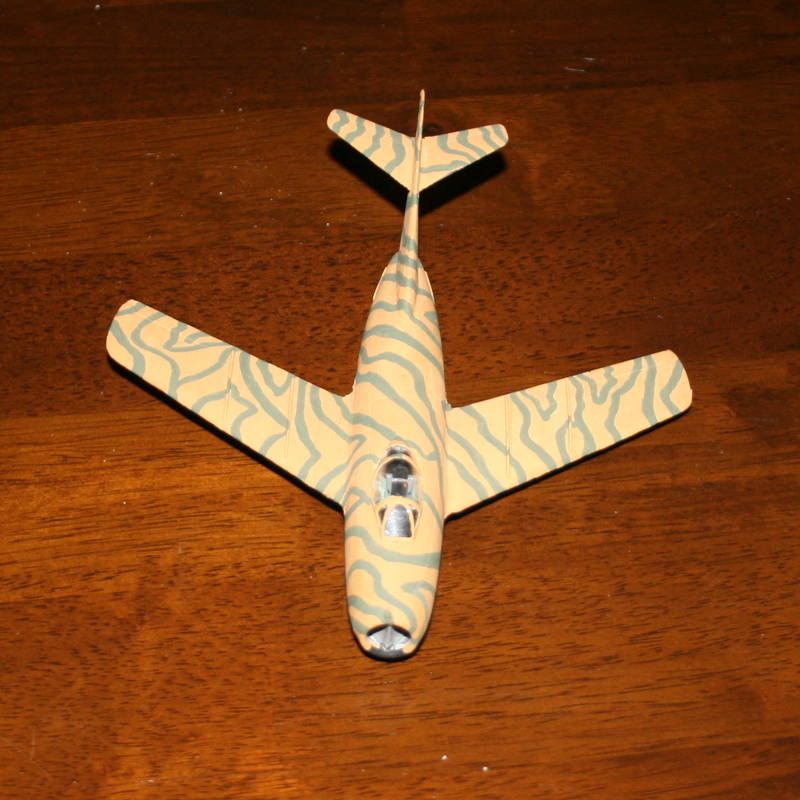
The MiG-15 is a great subject, but I'm feeling fairly indifferent about the 1/72 Airfix kit. In fairness though, I heard that their Sabre kit is much better.
I hand-painted (why??) the airplane using enamel paints (why??). Maybe it wa nostalgia... All I know is that it will be all Air-brushes Vallejo air from now on.
I've got to add the undercarriage, add decals and then weather this bird up!
Eoin

Buckeye198
Joined: May 02, 2010
KitMaker: 596 posts
AeroScale: 197 posts

Posted: Sunday, August 21, 2011 - 04:27 AM UTC
Eoin, as I looked at your pictures, I was planning on asking if you used the putty trick to spray those tiger stripes. Then I read what you wrote, and I was blown away! My first model I ever finished was Tamiya's Me262A -2A and I also did an incredibly intricate camo job by hand with enamels. The control I had painting by hand was fantastic, but it took way too long and you can see all the brush strokes when you get up close. Does your paint look smooth as if you used an airbrush?
SGTJKJ
#041
Joined: July 20, 2006
KitMaker: 10,069 posts
AeroScale: 3,788 posts
Posted: Sunday, August 21, 2011 - 05:45 AM UTC
Great looking camouflage, Eoin.
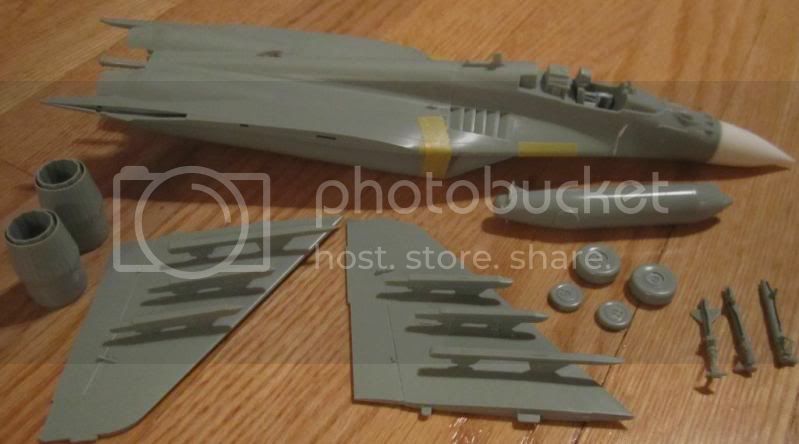
A little progress on my MiG-29. So far only a few minor problems with the kit.
It is another issue with the after market resin. The engine exhausts did not fit - at all! So I will be using the kit exhausts. The nose cone was fine so that has been added.
More to follow
A little progress on my MiG-29. So far only a few minor problems with the kit.
It is another issue with the after market resin. The engine exhausts did not fit - at all! So I will be using the kit exhausts. The nose cone was fine so that has been added.
More to follow

alpha_tango

Joined: September 07, 2005
KitMaker: 5,609 posts
AeroScale: 5,231 posts
Posted: Sunday, August 21, 2011 - 06:38 AM UTC
Hmm thats the difference .. I am fighting my Eduard kit since months --- not because it is a bad kit, in contrary --- and other people just build things in a few days .....
Still hope I will make it ... and I am pretty sure you will, Jesper.
all the best
Steffen
P.S. I have a similar project on the bench, but my MiG-29AS cockpit got lost on delivery and Lucky is out of stock of it at the moment (I will use the more colourful kopro decals though)
Still hope I will make it ... and I am pretty sure you will, Jesper.
all the best
Steffen
P.S. I have a similar project on the bench, but my MiG-29AS cockpit got lost on delivery and Lucky is out of stock of it at the moment (I will use the more colourful kopro decals though)

SGTJKJ
#041
Joined: July 20, 2006
KitMaker: 10,069 posts
AeroScale: 3,788 posts
Posted: Sunday, August 21, 2011 - 11:18 AM UTC
Thanks for the comment, Steffen.
The kit is quite nice and comes together well, although it could really do with a replacement cockpit.
Also the larger AA-10 Alamo missiles seem to underscale - even for a non-rivet counter like myself.
I added a new nose cone as the kit supplied nose cone should be inaccurate and slightly underscale. Difficult for me to tell, but on the nose cone I trusted the internet experts. (Very dangerous I know )
)
I also added a bit of wiring for the landing gear, but otherwise build OOB
A little more progress - next a basecoat.

The kit is quite nice and comes together well, although it could really do with a replacement cockpit.
Also the larger AA-10 Alamo missiles seem to underscale - even for a non-rivet counter like myself.
I added a new nose cone as the kit supplied nose cone should be inaccurate and slightly underscale. Difficult for me to tell, but on the nose cone I trusted the internet experts. (Very dangerous I know
)I also added a bit of wiring for the landing gear, but otherwise build OOB
A little more progress - next a basecoat.
SmashedGlass
Joined: October 26, 2006
KitMaker: 105 posts
AeroScale: 62 posts
Posted: Sunday, August 21, 2011 - 12:11 PM UTC
A bit more accomplished this morning 
The wing root gaps were first addressed with stretched sprue and then sanded down, and then I decided to try a technique I found on Rato Marzcak's website Primer Fillets

I'm actually pretty happy with the result, a slight over-lapped effect, though it may be a little too pronounced.
I also came up with a way to deal with the gaps inside the intake (HB MiG's fuselages are split horizontal, not vertical)
using .005 card:

Result is acceptable, but next time I'll make the piece long enough to reach all the way to the back of the cockpit.
As I did it, the card stops about 3cm back, but I think one would only notice if they crammed their eye ball right up
to the intake
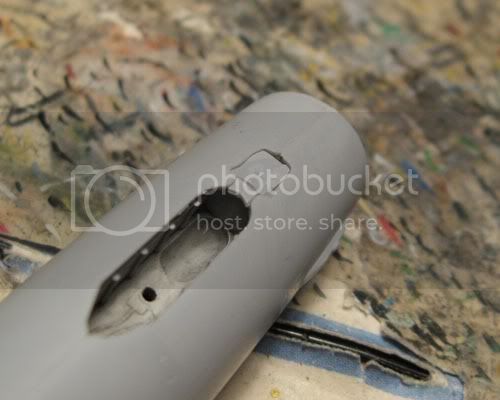
And here is the AFA-39 camera housing under the fuselage:

Scribing in the lens aperture cover gave me no end of trouble
It for now, tune in for next installment soon!!
The wing root gaps were first addressed with stretched sprue and then sanded down, and then I decided to try a technique I found on Rato Marzcak's website Primer Fillets
I'm actually pretty happy with the result, a slight over-lapped effect, though it may be a little too pronounced.
I also came up with a way to deal with the gaps inside the intake (HB MiG's fuselages are split horizontal, not vertical)
using .005 card:
Result is acceptable, but next time I'll make the piece long enough to reach all the way to the back of the cockpit.
As I did it, the card stops about 3cm back, but I think one would only notice if they crammed their eye ball right up
to the intake
And here is the AFA-39 camera housing under the fuselage:
Scribing in the lens aperture cover gave me no end of trouble
It for now, tune in for next installment soon!!

Jessie_C


Joined: September 03, 2009
KitMaker: 6,965 posts
AeroScale: 6,247 posts

Posted: Sunday, August 21, 2011 - 12:32 PM UTC

SmashedGlass
Joined: October 26, 2006
KitMaker: 105 posts
AeroScale: 62 posts
Posted: Sunday, August 21, 2011 - 12:48 PM UTC
Quoted Text
The link is broken
Link is fixed.
eoinryan
Joined: April 30, 2010
KitMaker: 232 posts
AeroScale: 66 posts
Posted: Monday, August 22, 2011 - 03:06 AM UTC
Hey Robbie,
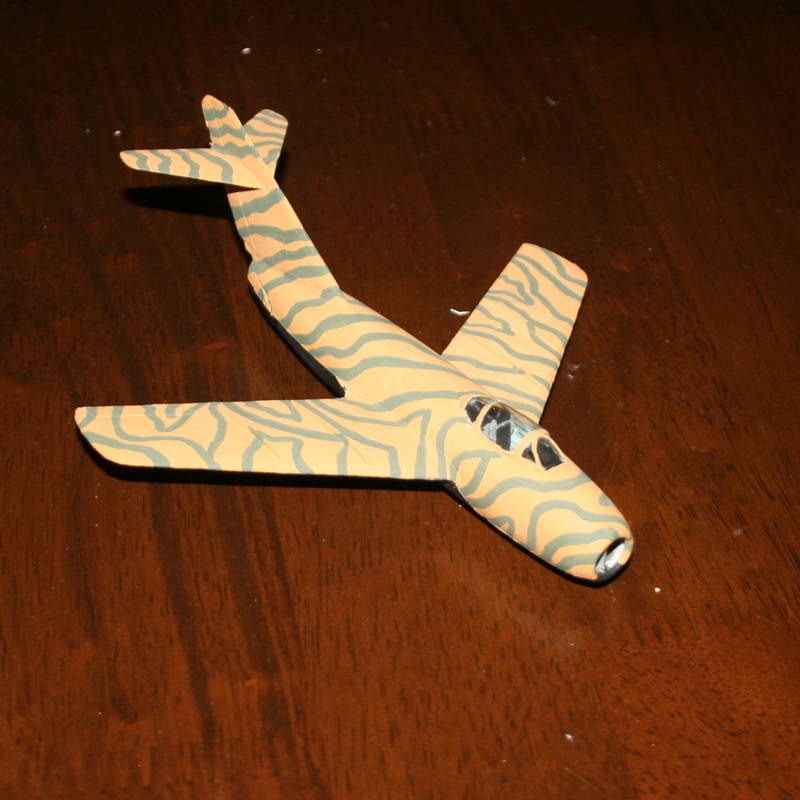
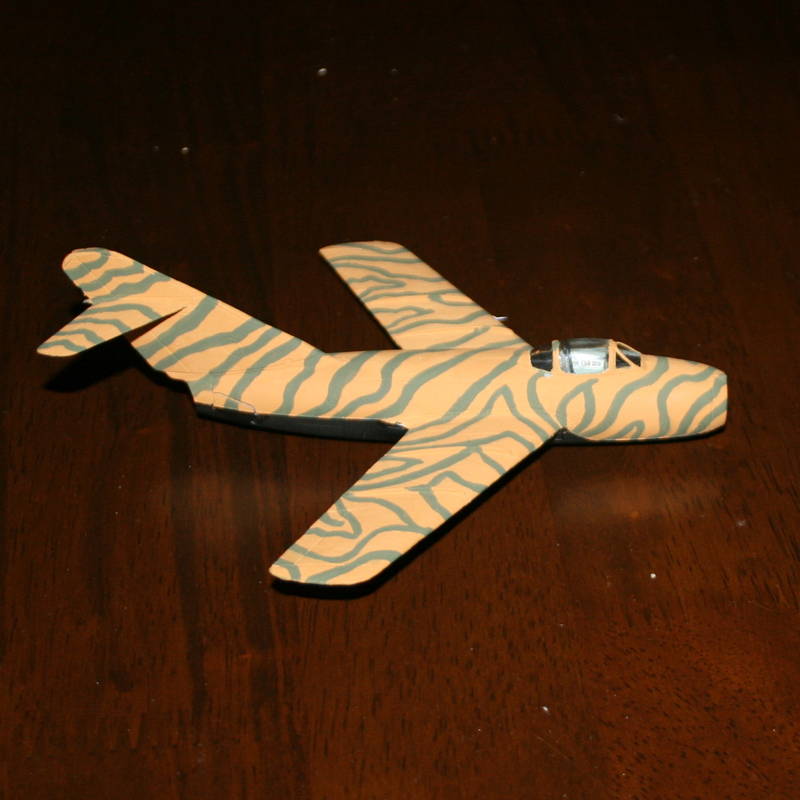
You were asking how the hand-painted tiger stripes turned out... Up close it's pretty obvious that the model is handpainted- lines are uneven and the coat is uneven too. With a wash though, it certainly tones it down a bit.
I still don't know why I decided to hand-paint the kit. I suppose it was because I had all the enamel colours and that the kit was a 1/72 scale. When I airbrush I'm used to using acryllics. Maybe I had intended to run some thinned enamels through the airbrush but then I heard that Humbrol enamels, no matter how thinned, tend to clog the airbrush.
I then applied the decals badly (I was impatient and in a rush) and then applied a dark wash to dirty it up a bit. Here's the results:
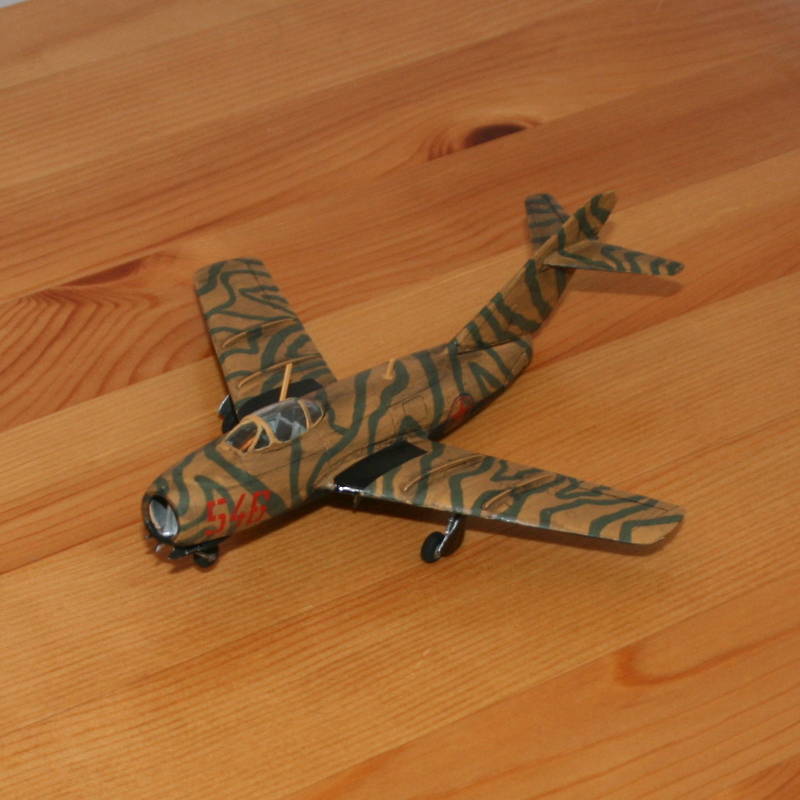
The recommended 3g noseweight wan't enough, so it's nose is sticking up in the air.
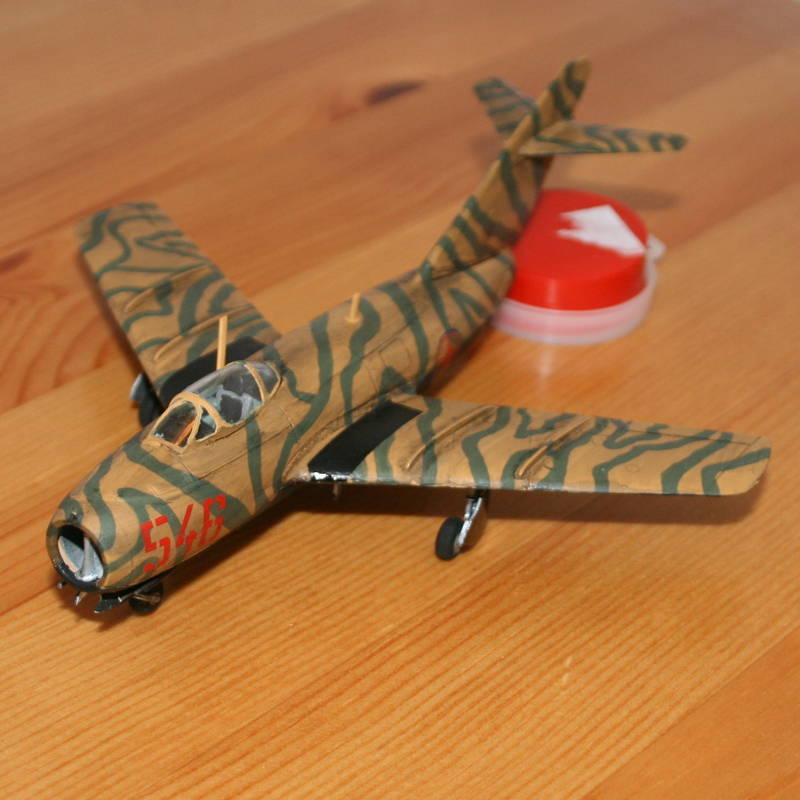
This is what it should look like.

The bubble canopy gives a good view into the cockpit. I've seen a few aftermarket cockpits come out for the kit, which could make it a more decent prospect, but all in all, I reckon I'm done.
Good luck with everyone's builds!
Eoin
Buckeye198
Joined: May 02, 2010
KitMaker: 596 posts
AeroScale: 197 posts
Posted: Monday, August 22, 2011 - 10:43 AM UTC
Yeah, the finish looks like that of my Messerschmitt I was talking about. Still a mighty fine build, though. You should be proud!
Emeritus
Joined: March 30, 2004
KitMaker: 2,845 posts
AeroScale: 1,564 posts
Posted: Tuesday, August 23, 2011 - 02:20 AM UTC
Seconded. Nice work! 
Talking of finished entries, I'm beginning to doubt my chances of getting mine done before the deadline... Still under construction.
But anyway, on to the update.
Here's the wings, pretty much done and ready to be attached to the fuselage.

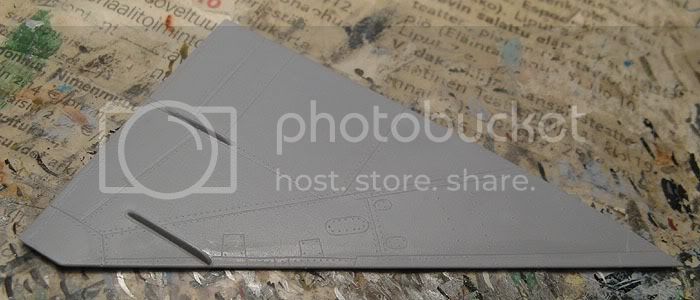
As there's not much that can be done about the shallow wheel wells (at least without excessive amounts of hacking and rebuilding), I settled for filling the large pin ejector mark in the middle of each well, then built some internal structure from styrene strips.
A welcome change from the spine and fin, the panel lines were more or less where they should be (I did just a few corrections I deemed a must). The incorrectly positioned langing lights under the wings were filled and new ones represented with shallow holes drilled in more accurate (peculiarly asymmetrical) places with a suitably sized drill bit.
Finally, basic riveting was done with an RB Produtions riveting tool.
The rest of the model was naturally riveted as well. Here's the fuselage with the fin and spine already in place. Intake scoops are in place and drilled out.

The moulded-in locator aids for the rearmost upper fuselage scoop was right were it was supposed to, but the one in front of it (between the wing and stabilizer) as well as the lower scoop above the ventral fin were out of whack and needed tweaking.
In addition to the lower scoop's location, that area was missing the rectangular electronics panel under it. I initially planned to simply scribe it in, but noticed a suitable part on the Eduard PE set I was using: The bottom frame part of the auxiliary intake cover was about the right size and shape and as I wasn't planning to use it anyway, it found a new home in the rear fuselage.
After I had glued the intake scoop in place, I noticed how it was too long, so I trimmed it to a more correct length and drilled it open as well. The circular hatch behind the scoop wasn't 100% perfectly located, but I decided to leave it alone.
Fuselage insert in front of the nose wheel bay: more milliput & sanding needed!
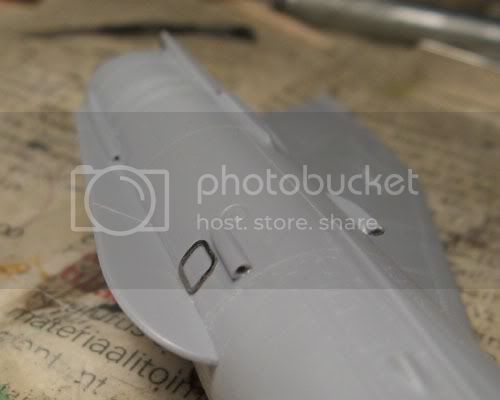
After all the rescribing and riveting, there was still some work to be done on the spine. I started by relocating the fuel filler cap and fuel tank ventilation scoop. The scoop itselft was a simple fix: fill in the old locating hole, drill a hole, glue in the scoop. The filler cap was trickier as I needed a small circular template for scribing in the detail. Lacking such templates, I dug into my left-over PE sets. After a little while, I found just the right size hole in a Panzer IV fender support. Bingo!

The rest was smooth sailing. Tape the PE part in place, scribe in circle with a needle. Note the original, now filled-in locator hole of the ventilation scoop: waaaay to far back.

Adding a missing teardrop-shaped bulge in front of the spine and drilling in two small ports (Breather holes perhaps? I don't know....) to side rounded off the spine (for now, as antenna equipment is still to be added).
Talking of finished entries, I'm beginning to doubt my chances of getting mine done before the deadline... Still under construction.
But anyway, on to the update.
Here's the wings, pretty much done and ready to be attached to the fuselage.
As there's not much that can be done about the shallow wheel wells (at least without excessive amounts of hacking and rebuilding), I settled for filling the large pin ejector mark in the middle of each well, then built some internal structure from styrene strips.
A welcome change from the spine and fin, the panel lines were more or less where they should be (I did just a few corrections I deemed a must). The incorrectly positioned langing lights under the wings were filled and new ones represented with shallow holes drilled in more accurate (peculiarly asymmetrical) places with a suitably sized drill bit.
Finally, basic riveting was done with an RB Produtions riveting tool.
The rest of the model was naturally riveted as well. Here's the fuselage with the fin and spine already in place. Intake scoops are in place and drilled out.
The moulded-in locator aids for the rearmost upper fuselage scoop was right were it was supposed to, but the one in front of it (between the wing and stabilizer) as well as the lower scoop above the ventral fin were out of whack and needed tweaking.
In addition to the lower scoop's location, that area was missing the rectangular electronics panel under it. I initially planned to simply scribe it in, but noticed a suitable part on the Eduard PE set I was using: The bottom frame part of the auxiliary intake cover was about the right size and shape and as I wasn't planning to use it anyway, it found a new home in the rear fuselage.
After I had glued the intake scoop in place, I noticed how it was too long, so I trimmed it to a more correct length and drilled it open as well. The circular hatch behind the scoop wasn't 100% perfectly located, but I decided to leave it alone.
Fuselage insert in front of the nose wheel bay: more milliput & sanding needed!
After all the rescribing and riveting, there was still some work to be done on the spine. I started by relocating the fuel filler cap and fuel tank ventilation scoop. The scoop itselft was a simple fix: fill in the old locating hole, drill a hole, glue in the scoop. The filler cap was trickier as I needed a small circular template for scribing in the detail. Lacking such templates, I dug into my left-over PE sets. After a little while, I found just the right size hole in a Panzer IV fender support. Bingo!
The rest was smooth sailing. Tape the PE part in place, scribe in circle with a needle. Note the original, now filled-in locator hole of the ventilation scoop: waaaay to far back.
Adding a missing teardrop-shaped bulge in front of the spine and drilling in two small ports (Breather holes perhaps? I don't know....) to side rounded off the spine (for now, as antenna equipment is still to be added).
Red4
Joined: April 01, 2002
KitMaker: 4,287 posts
AeroScale: 1,164 posts
Posted: Tuesday, August 23, 2011 - 05:39 AM UTC
Getting close to the finish line folks....keep at it. Some nice looking builds so far. Make sure to post a pic or two in the gallery so I can award you your ribbon once all is said and done. Thanks again for participating everybody! "Q"
Buckeye198
Joined: May 02, 2010
KitMaker: 596 posts
AeroScale: 197 posts
Posted: Tuesday, August 23, 2011 - 02:53 PM UTC
Your build is fantastic Eetu, and I can't wait to see the final product! You're putting in a lot of detail into this bird and it'll pay out in the end
SGTJKJ
#041
Joined: July 20, 2006
KitMaker: 10,069 posts
AeroScale: 3,788 posts
Posted: Wednesday, August 24, 2011 - 06:58 AM UTC
Nice build, Eoin. Although it is a petty with the decals. All in all you should be satisfied.
Nice progress, Eetu. I admire your attention to detail. Looking forward to see more.
Nice progress, Eetu. I admire your attention to detail. Looking forward to see more.
SmashedGlass
Joined: October 26, 2006
KitMaker: 105 posts
AeroScale: 62 posts
Posted: Wednesday, August 24, 2011 - 04:27 PM UTC
Quoted Text
Seconded. Nice work!
Talking of finished entries, I'm beginning to doubt my chances of getting mine done before the deadline... Still under construction.
Serious doubt here for mine, too...

I got started hard at it just too late, and keep finding "just one more thing" I want to do with it. Blimey.
Well, at least I'm making progress lol! Almost finished modifying the HB airbrakes to fit in the closed and flush position, which they are in no way intended to be by the manufacturer; and also got a start on the fuselage riveting [sorry, no pics tonite].
 |

WEB HOSTING BY


Copyright ©2021 AeroScale and Kitmaker Network, a subsidiary of Silver Star Enterprises
All Rights Reserved. Please read our Conditions of Use and Privacy Policy.
All Rights Reserved. Please read our Conditions of Use and Privacy Policy.