OFFICIAL: Cold War Jets Campaign
California, United States
Joined: April 01, 2002
KitMaker: 4,287 posts
AeroScale: 1,164 posts
Posted: Sunday, February 06, 2011 - 02:59 AM UTC
"Don't fear the night, fear what hunts at night"
California, United States
Joined: April 01, 2002
KitMaker: 4,287 posts
AeroScale: 1,164 posts
Posted: Sunday, February 06, 2011 - 06:14 AM UTC
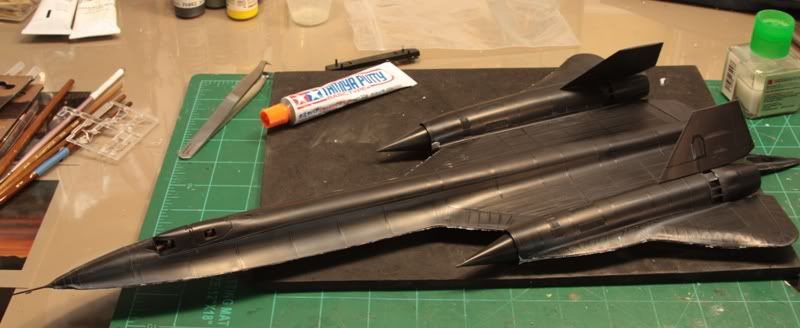
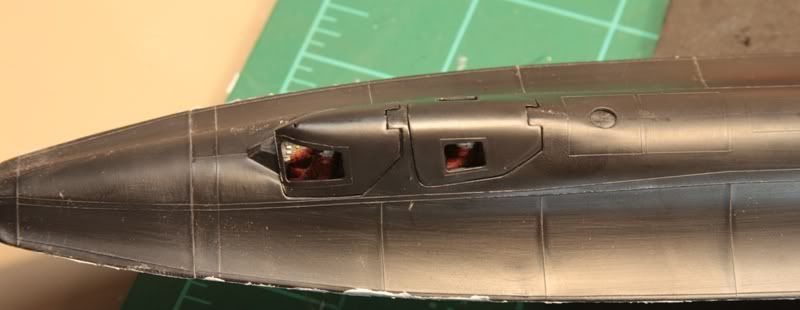
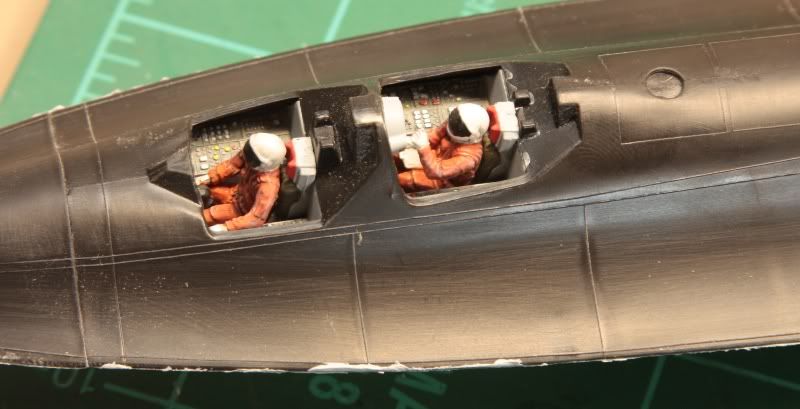
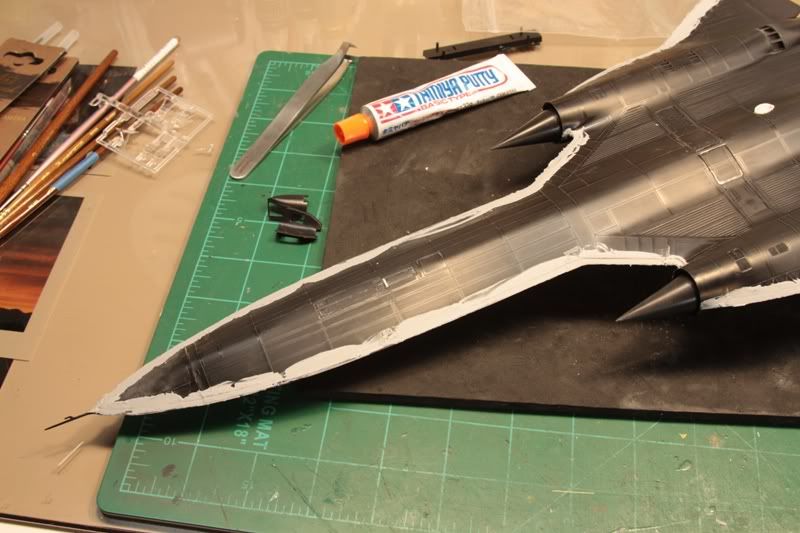
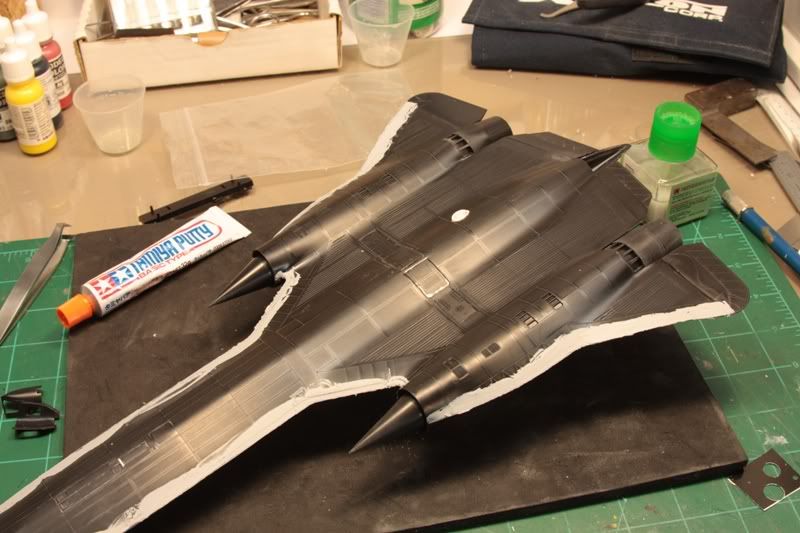
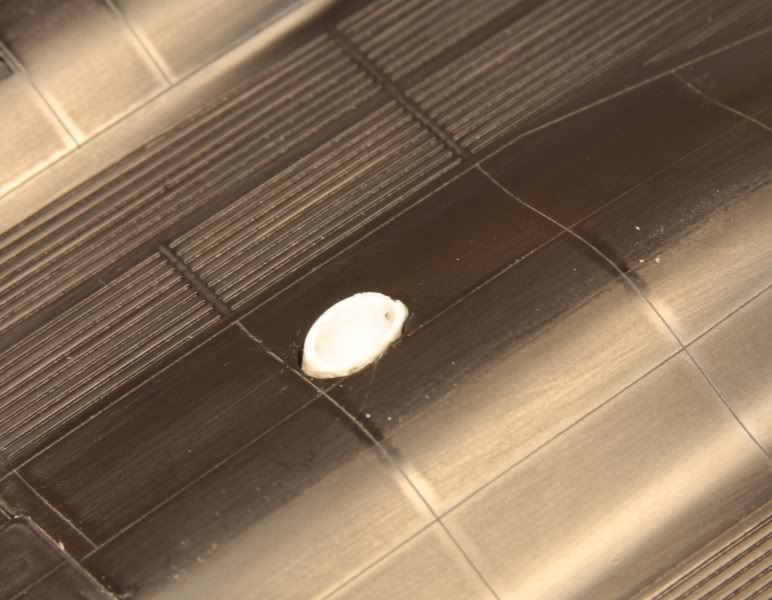
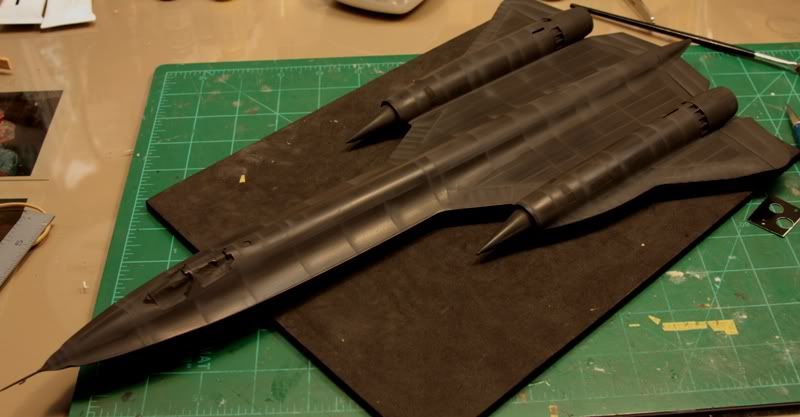
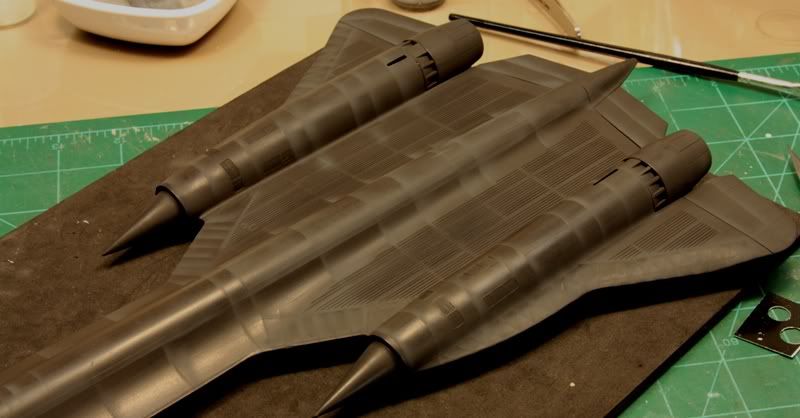
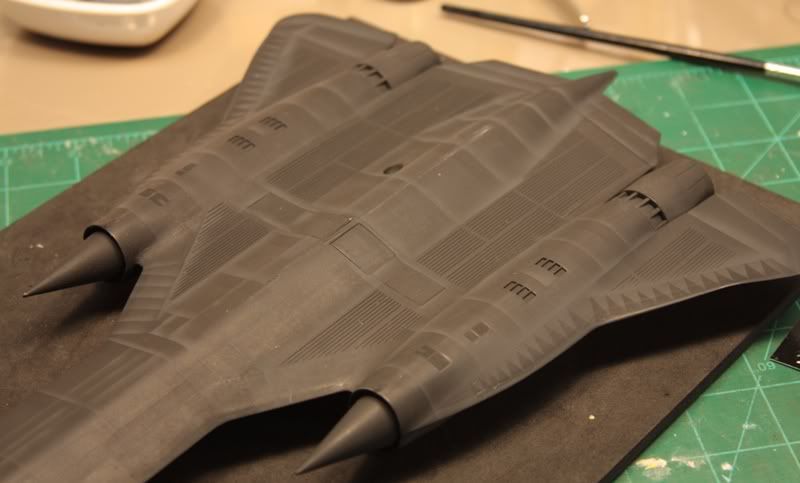
They putty dried on the Blackbird and I got everything sanded down. Had to redo a couple spots, but for the most part everything is looking good. I tinkered with the base and came up with the following display for it. Patches will be on either side of the base. I have something else in store for it but need to see how things play out with the patches first. Thanks, "Q"


"Don't fear the night, fear what hunts at night"

#042
England - North East, United Kingdom
Joined: November 18, 2006
KitMaker: 2,828 posts
AeroScale: 1,720 posts
Posted: Sunday, February 06, 2011 - 06:33 AM UTC
Wow Matt, That just wants me to go out and get another one to build.
I did start a while back a 'Skunk Works' project and planned on having an SR-71, U2 & F-117 all on a base in 1/72. I only ever got as far as building the SR-71 but I think the rest of the kit are still in the stash somewhere

Modellers Creed: This is my toolbox. There are many like it, but this one is mine. My toolbox is my best friend. It is my life. I must master it as I must master my life. My toolbox, without me, is useless. Without my toolbox, I am useless.
California, United States
Joined: April 01, 2002
KitMaker: 4,287 posts
AeroScale: 1,164 posts
Posted: Sunday, February 06, 2011 - 07:02 AM UTC
Thanks Allen. Glad to be of help.

I'm working on the base at the moment. I need my patches to arrive before I can do anything else to the base as I have something special in mind, but if the patches are going to dominate the base, I'll have to rethink things. Your display idea sounds likes it would be really cool. You ought to pick it back up.
I have a U2 on a stick currently and even in 1/72 it takes up some space. I can imagine what three planes on a single base would be like.
"Q"

"Don't fear the night, fear what hunts at night"
#372
United Kingdom
Joined: March 10, 2010
KitMaker: 2,568 posts
AeroScale: 1,619 posts
Posted: Sunday, February 06, 2011 - 09:26 AM UTC
Quoted Text
Check out the rules/regs on the campaign tab. Should answer your questions...
Thanks for joining in. "Q"
Thanks. Well the rules state 'There really is something for everyone here,
not only do we have the fighters such as phantoms,jaguars,migs etc but also bombers,not to mention nearly every airforce in the world had sympathies to one side or another.'
So I'm assuming that my idea of an EAF Su-7 is cool. If not there are other kits in my to-build-pile to choose from for the build.
Nice work on the Blackbird by the way.
On the bench: 1/72 Mosquito, Lightning F.6, DH.2,
AMT Vulcan Shuttle Surak.
Cyber-Hobby 1:35 Sherman Firefly IC - still stalled.
England - North East, United Kingdom
Joined: May 22, 2008
KitMaker: 649 posts
AeroScale: 434 posts
Posted: Sunday, February 06, 2011 - 10:12 AM UTC
I'm making progress with my Mirage IV. The cockpit is done, the fuselage has been stuck together and wings added. There's a ton of weight just behind the cockpit but well forward of the main landing gear, so it's very nose heavy at the moment.
This is not the quick easy build I hoped for! The fit of the parts is generally poor and lots of filling and sanding will be required. I've already started and finished a Spitfire PR XIX during the build and I'm half way through a Spitfire IX! Still the Mirage IV will be a big impressive looking beast when finished.
thanks
Mike
#372
United Kingdom
Joined: March 10, 2010
KitMaker: 2,568 posts
AeroScale: 1,619 posts
Posted: Monday, February 07, 2011 - 05:04 AM UTC
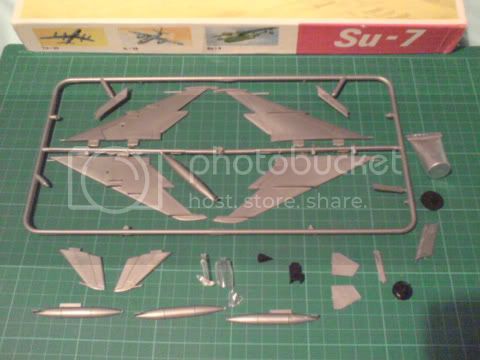
Heres my entry, the VEB 1:72 Su-7 Fitter.
I got this from King Kit a few weeks ago for pennies. I had expected to get a rebox of the KP Su-7, instead I got an East German kit. I suppose theres a lesson in this, ALWAYS look up unknown eastern european kits before you buy.
Despite the initial shock its not actually that bad. A bit simple but everything fits and theres hardly any gaps. It even comes with a stand! Most of the parts had come off the sprue but luckily everything was still here. Should be a quick and simple build and I like the idea of building an authentic Eastern Bloc kit for this campaign

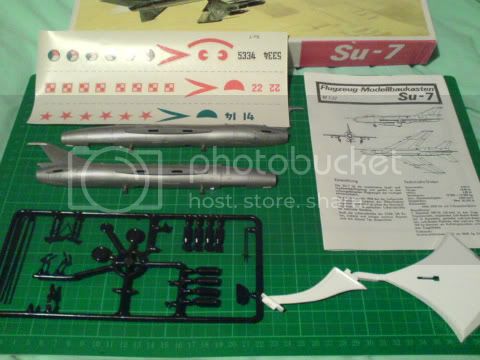
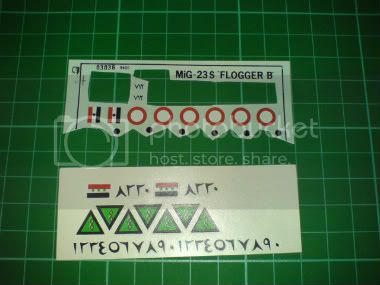
These are the marking I intend to put on it. Spares from the Airfix Mig-23, and arabic numbers from an old misprinted Iraqi set (I think they were from a Hobbycraft Su-25).
On the bench: 1/72 Mosquito, Lightning F.6, DH.2,
AMT Vulcan Shuttle Surak.
Cyber-Hobby 1:35 Sherman Firefly IC - still stalled.
California, United States
Joined: April 01, 2002
KitMaker: 4,287 posts
AeroScale: 1,164 posts
Posted: Monday, February 07, 2011 - 07:58 AM UTC
"Don't fear the night, fear what hunts at night"
New South Wales, Australia
Joined: March 09, 2006
KitMaker: 248 posts
AeroScale: 160 posts
Posted: Monday, February 07, 2011 - 09:43 AM UTC
Hi all,
I will be doing the Hobby Boss F-105. I am hoping someone might have a copy of the Albatros Decals ALC-005 sheet? I would be very keen to purchase if there is one out there?
Thanks,
Mark
On the Workbench:
1/48 Academy P-38L (Pin ups II Campaign)
1/35 Dragon King Tiger
California, United States
Joined: April 01, 2002
KitMaker: 4,287 posts
AeroScale: 1,164 posts
Posted: Monday, February 07, 2011 - 10:24 AM UTC
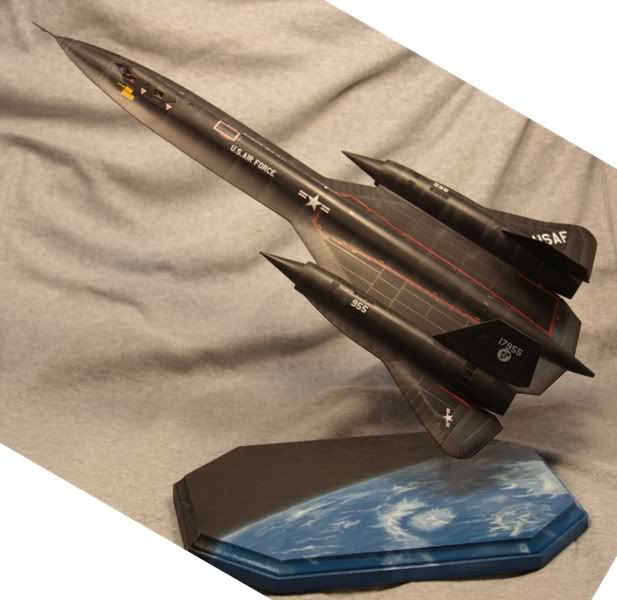
With the majority of the painting on the plane complete, I decided to work on the base this afternoon. I had found a really cool picture of the curvature of the earth and decided to use that as a back drop for the plane. Rather than print and glue it to the base, I tried my hand at painting it. At first I wasn't all that thrilled as my airbrush kept balking on me. I changed airbrushes and things went considerably better. Anyway, here is what the base looks like currently. Waiting on a couple of patches for it and for the gloss coat on it to dry. Thanks, "Q"

"Don't fear the night, fear what hunts at night"
#042
England - North East, United Kingdom
Joined: November 18, 2006
KitMaker: 2,828 posts
AeroScale: 1,720 posts
Posted: Monday, February 07, 2011 - 10:32 AM UTC
OMG, Matt's back and with a vengeance
Simply some stunning work Matt, keep it up
Modellers Creed: This is my toolbox. There are many like it, but this one is mine. My toolbox is my best friend. It is my life. I must master it as I must master my life. My toolbox, without me, is useless. Without my toolbox, I am useless.
California, United States
Joined: April 01, 2002
KitMaker: 4,287 posts
AeroScale: 1,164 posts
Posted: Monday, February 07, 2011 - 10:35 AM UTC
lol...Thanks Allen. "Q"
"Don't fear the night, fear what hunts at night"
California, United States
Joined: April 01, 2002
KitMaker: 4,287 posts
AeroScale: 1,164 posts
Posted: Monday, February 07, 2011 - 11:52 AM UTC
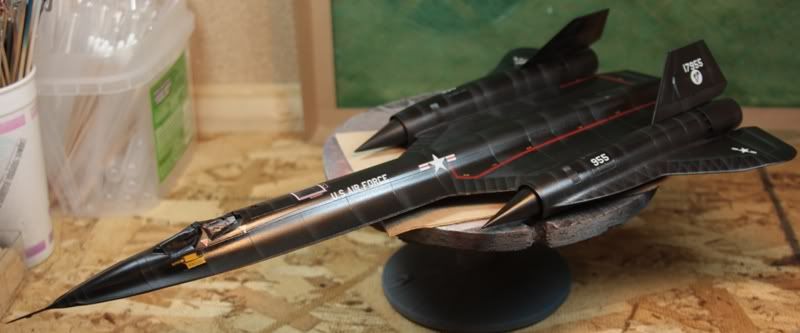
Here's a shot with the plane mounted on the base. Waiting for the gloss to dry so I can decal. "Q"

"Don't fear the night, fear what hunts at night"
litespeed
 News Reporter
England - North West, United Kingdom
Joined: October 15, 2009
KitMaker: 1,976 posts
AeroScale: 1,789 posts
Posted: Monday, February 07, 2011 - 12:30 PM UTC
Outstanding work Matt. Nice work on what has to be my favourite aircraft of all time. Excellent.
I cant wait to see the images of your Mirage IV Michael, you will have to borrow a camera to take some images. How big is the IV Michael, in cm's s'il vous plait.
All the best.
tim
New York, United States
Joined: January 29, 2004
KitMaker: 3,836 posts
AeroScale: 1,036 posts
Posted: Monday, February 07, 2011 - 01:57 PM UTC
Thungggk...jaw hitting floor. Q' that is just awesome, really dig the base and your painting skills. Great job all around
Happy Modeling,
Joe
It feels like bible camp
Only Im not crying pretending Im somewhere else.
Happy Modeling
Joe
Florida, United States
Joined: January 14, 2009
KitMaker: 2,798 posts
AeroScale: 2,443 posts
Posted: Tuesday, February 08, 2011 - 12:31 AM UTC
I second joes comment
"From time to time, the tree of liberty must be watered with the blood of
tyrants and patriots."
- Thomas Jefferson
IPMS#47611
California, United States
Joined: April 01, 2002
KitMaker: 4,287 posts
AeroScale: 1,164 posts
Posted: Tuesday, February 08, 2011 - 02:25 AM UTC
Thanks guys, much appreciated.

Well, we had a minor setback/disaster last night. We had a snowstorm move in that had some seriously strong winds attached to it. Strong enough that they blew in the window insert I had for my exhaust fan on the paint booth. I knew something was up this morning when I came downstairs to my room and it was bitterly cold. The insert had blown in far enough that I had approximately 2" of snow in my paint booth and scattered across a good portion of my build area. Luckily no damage, just a lot of snow to clean up. I used a hair dryer and some bath towels to make quick work of it and should be back in business in a couple of hours. Going to use this opportunity to reduce the size of my booth so I can get to the window easier to close it each night so this doesn't happen again. It was cold enough that the Windex I had sitting out was frozen. Luckily my acrylic paints were across the room in another drawer or they would have perished. Thanks again for the kudos. Hoping to get to the decals today. "Q"
"Don't fear the night, fear what hunts at night"
California, United States
Joined: April 01, 2002
KitMaker: 4,287 posts
AeroScale: 1,164 posts
Posted: Tuesday, February 08, 2011 - 01:18 PM UTC
I was able to recover after this mornings snow incident and I now have a more user friendly paint booth and a decaled SR-71. I just shot another gloss coat over the decals which is drying. I should be able to flat coat it here in a couple of hours and then mount her to the base. I have a few touch ups to do on the decals, but for the most part all is well. More to follow soon. "Q"
"Don't fear the night, fear what hunts at night"
South Australia, Australia
Joined: August 14, 2007
KitMaker: 5,926 posts
AeroScale: 2,201 posts
Posted: Tuesday, February 08, 2011 - 02:05 PM UTC
Why is it that my gloss coats never seem to turn out glossy? Normally just semi-gloss at beast or orange-peeled... Hints please Mr Q... But no hints on keeping snow out of a room..
You may be right, I may be crazy.
California, United States
Joined: April 01, 2002
KitMaker: 4,287 posts
AeroScale: 1,164 posts
Posted: Tuesday, February 08, 2011 - 04:03 PM UTC
I shoot Future and do it one of two ways. Multiple coats, or just keep shooting until it gets really glossy then leave it set for 72 hours. The 72 hours will ensure it is rock hard when dry and won't react with Solvaset or other decal setting solutions. Since Future is self leveling it will do just that and you will have a nice even glossy surface to work with. I didn't let mine set for 72 hours this go round, but got lucky with it. Hope that helps. "Q"
"Don't fear the night, fear what hunts at night"
England - North East, United Kingdom
Joined: May 22, 2008
KitMaker: 649 posts
AeroScale: 434 posts
Posted: Tuesday, February 08, 2011 - 09:48 PM UTC
Tim, the Mirage IV give or take a few mm is 32cm. It is quite large for what is essentially a scaled up fighter. This build will take time with all the ill fitting parts and filling and sanding that needs doing. As a result, I've started to build Airfix's new tool Sabre, which I have to say i'm reasonably impressed with in terms of how well it all goes together. I'll be entering both in this one.
thanks
Mike
California, United States
Joined: April 01, 2002
KitMaker: 4,287 posts
AeroScale: 1,164 posts
Posted: Wednesday, February 09, 2011 - 03:17 AM UTC
With the exception of a coupe of patches for the base, I'm calling this one complete. I just acquired a book a couple of days ago on the Blackbird and there are some really cool looking markings out there for these things. Might have to find me another one to do some of the more eye catching schemes. Hope you guys like it. It is hard to photograph though.... "Q"
"Don't fear the night, fear what hunts at night"
Florida, United States
Joined: January 14, 2009
KitMaker: 2,798 posts
AeroScale: 2,443 posts
Posted: Wednesday, February 09, 2011 - 02:03 PM UTC
Thats a great set up Q very cool looking.Good job Sir
"From time to time, the tree of liberty must be watered with the blood of
tyrants and patriots."
- Thomas Jefferson
IPMS#47611
California, United States
Joined: April 01, 2002
KitMaker: 4,287 posts
AeroScale: 1,164 posts
Posted: Wednesday, February 09, 2011 - 03:15 PM UTC
Thanks Justin. Glad you like it. I bought another SR-71 this evening to do one of the NASA birds in my new book.
"Q"
"Don't fear the night, fear what hunts at night"
New York, United States
Joined: January 29, 2004
KitMaker: 3,836 posts
AeroScale: 1,036 posts
Posted: Wednesday, February 09, 2011 - 05:48 PM UTC
Here's an update, I'm just about ready to paint. As I said it was going to be an OOB build, well I decided to rescribe the kit. The kit went together pretty well; hardest part was masking the canopy pieces.


I should be finish by the weekend.
Happy Modeling,
Joe
It feels like bible camp
Only Im not crying pretending Im somewhere else.
Happy Modeling
Joe