OFFICIAL: Cold War Jets Campaign
Wisconsin, United States
Joined: March 30, 2011
KitMaker: 199 posts
AeroScale: 150 posts
Posted: Thursday, April 21, 2011 - 06:18 AM UTC
The progress on your kit looks good! I always love seeing middle eastern aircraft. As far as my kit goes, they promised just a new piece, so hopefully I should have it soon. Due to my inherent lack of patience while working on kits, I picked up the Hasegawa 1/72 F-15E, as well as the 1/72 Hasegawa smart bomb kit, so I started a little bit on it this morning before work, and will get a bunch done on it this weekend since I have off.
On a side note with your mig that you are working on: My first time going to airventure they had a number of migs on display, and there was a man who seemed rather attatched to them. I asked if he flew them, and his reply was no, He was from Israel, and he proudly stated that his unit shot plenty of them down.
I was also wondring if anyone has purchased the Eduard Mig-21 Kit that was recently released. I really want to get my hands on one, and have dealt with their PE kits, but never a full model kit. I assume they are of good quality knowing the manufacturer. Seeing you building a mig gives me the itch to build one in an Egyptian scheme.

On the Bench: 1/72 Italeri Tornado Pinup Campaign
On Deck: ?
New South Wales, Australia
Joined: March 09, 2006
KitMaker: 248 posts
AeroScale: 160 posts
Posted: Thursday, April 21, 2011 - 08:48 AM UTC
Michael,
I have purchased the new Eduard Mig-21 and it is a fantastic kit. the quality of the parts looks great. I have ordered another one and also pre-ordered the new SMT version. A mate of mine already has his one almost built and he said it was as good or better than anything Tamiya has released with the fit of the parts!
On the Workbench:
1/48 Academy P-38L (Pin ups II Campaign)
1/35 Dragon King Tiger
South Australia, Australia
Joined: August 14, 2007
KitMaker: 5,926 posts
AeroScale: 2,201 posts
Posted: Thursday, April 21, 2011 - 09:02 AM UTC
@ Stephen, I had that kit in my stash for years but sold it when I got rid of my 1/72 stuff. It is good to see someone building one. I follow with interest.
You may be right, I may be crazy.

#372
United Kingdom
Joined: March 10, 2010
KitMaker: 2,568 posts
AeroScale: 1,619 posts
Posted: Thursday, April 21, 2011 - 09:30 AM UTC
Its not a bad kit and I've have had far worse from airfix and revell. A bit simple and the wings are chunky but it all fits together ok. Picked it up for a couple of quid from a second hand kit retailer. Recently someone in Poland was trying to sell one as a collectors item on evilbay for £100! I somehow doubt anyone went for that.
As far as I know this and the KP kit are the only games in town at 1:72. I was looking at some pics of the sprues in the KP SU-7 and it does look to me to have been based on this kit, if not a direct copy of it. I've also got a 1:25 kit of the Vostock 1 originally made by VEB in the early 80's. Its a 90's rebox by some other company.
On the bench: 1/72 Mosquito, Lightning F.6, DH.2,
AMT Vulcan Shuttle Surak.
Cyber-Hobby 1:35 Sherman Firefly IC - still stalled.
Ontario, Canada
Joined: November 14, 2009
KitMaker: 270 posts
AeroScale: 264 posts
Posted: Friday, April 22, 2011 - 07:40 AM UTC
That Su-7's coming along nicely. May have to keep an eye out for that kit, my local pusher has all sorts of oddities and may get one in.
Wisconsin, United States
Joined: March 30, 2011
KitMaker: 199 posts
AeroScale: 150 posts
Posted: Saturday, April 23, 2011 - 04:38 AM UTC
On the Bench: 1/72 Italeri Tornado Pinup Campaign
On Deck: ?
Wisconsin, United States
Joined: March 30, 2011
KitMaker: 199 posts
AeroScale: 150 posts
Posted: Sunday, April 24, 2011 - 12:42 PM UTC
On the Bench: 1/72 Italeri Tornado Pinup Campaign
On Deck: ?
Wisconsin, United States
Joined: March 30, 2011
KitMaker: 199 posts
AeroScale: 150 posts
Posted: Monday, April 25, 2011 - 04:09 PM UTC
On the Bench: 1/72 Italeri Tornado Pinup Campaign
On Deck: ?
California, United States
Joined: April 01, 2002
KitMaker: 4,287 posts
AeroScale: 1,164 posts
Posted: Tuesday, April 26, 2011 - 01:50 AM UTC
Well done Michael. Make sure to post a pic or two in the gallery. "Q"

"Don't fear the night, fear what hunts at night"
Dublin, Ireland
Joined: November 11, 2004
KitMaker: 388 posts
AeroScale: 225 posts
Posted: Tuesday, April 26, 2011 - 05:21 AM UTC
Update time:
I gave the cockpit a wash with Badab Black from the Citadel Wash range and then fixed the cockpit into the fuselage with the bomb bay and the tail boom; then the troubles began.
For the life of me I wasn't able to make the fuselage line of properly particularly around the nose cone. I did my best but the Viking will need plenty of sanding and filling which I was hoping to avoid on the nose cone as I don't want to mess up its natural shape.

The cockpit is actually lighter than the pictures imply.

And here's a shot of the underside with the slightly detailed bomb bay.

In other news I decided to purchase a squadron patch for the Viking, corresponding with the decals, and squadron VS-38 "Red Griffons".
It hasn't arrived yet bet it'll look similar to this only more fabricy.

Nordrhein-Westfalen, Germany
Joined: May 26, 2008
KitMaker: 1,168 posts
AeroScale: 199 posts
Posted: Monday, May 02, 2011 - 04:45 AM UTC
Gentlemen,
I see very nice progress being made in this blog and I feel very inspired by it.
I have been making progress with the 32nd Crusader from Trumpeter. Most of the fuselage has been assembled around the office. Inserting the nose conversion by Fisher Models did need a bit of tweaking, plastic strip and filler. I am reasonably certain that the larger gaps could have been avoided and occured solely due to my incompetence. I needed to dig out the resin nose quite a bit to make the kit's cockpit fit.
Next in line will be adding the landing gear which is included in the Fisher Models set, as well. I haven't decided on the weapons, yet but I guess I will go with a simple sidewinder set-up.
So far the build has been fun, even though the fit of the Trumpi kit is not really great.
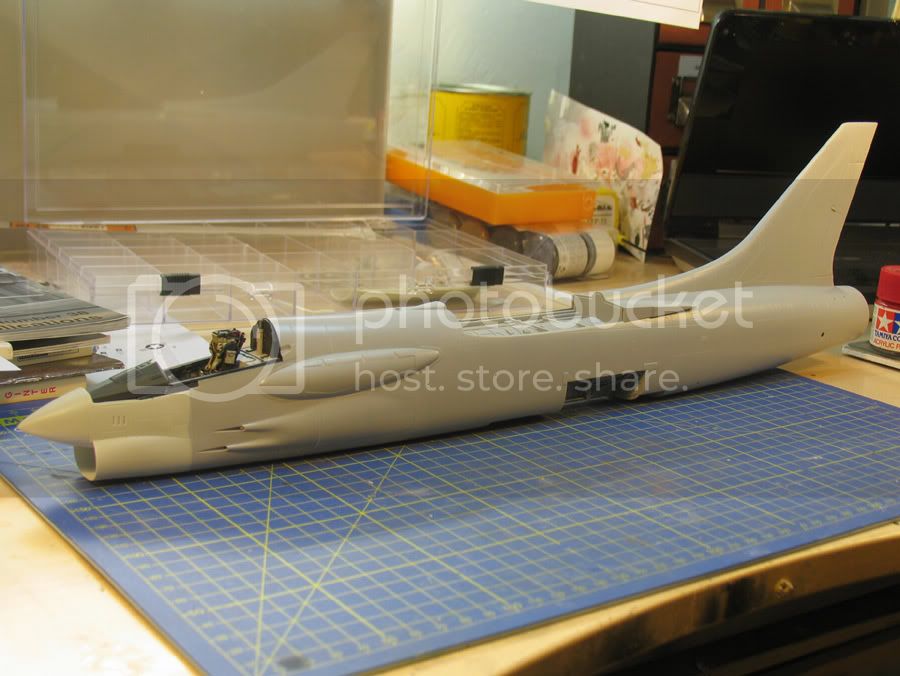
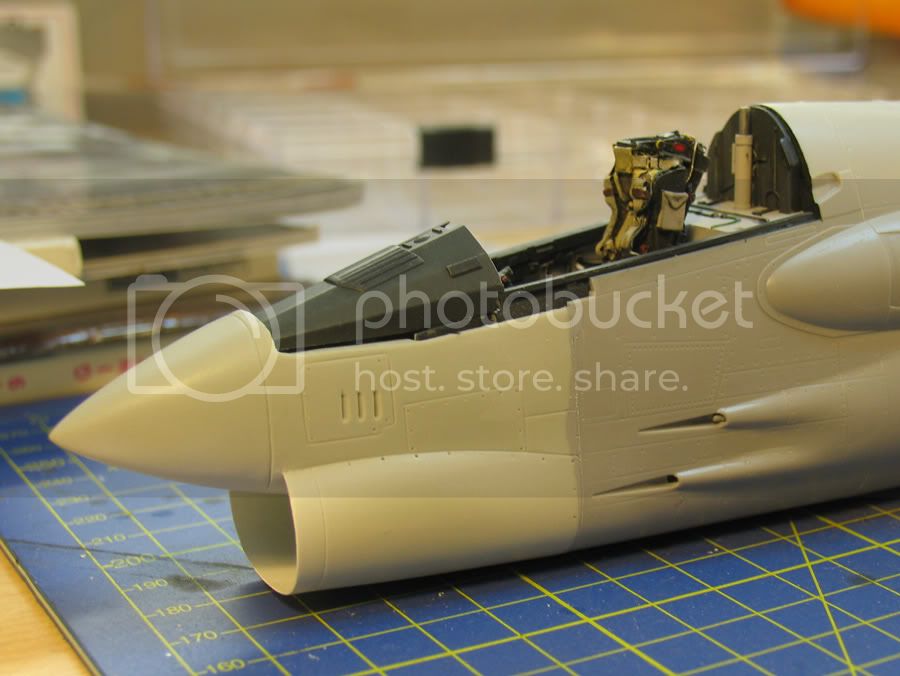
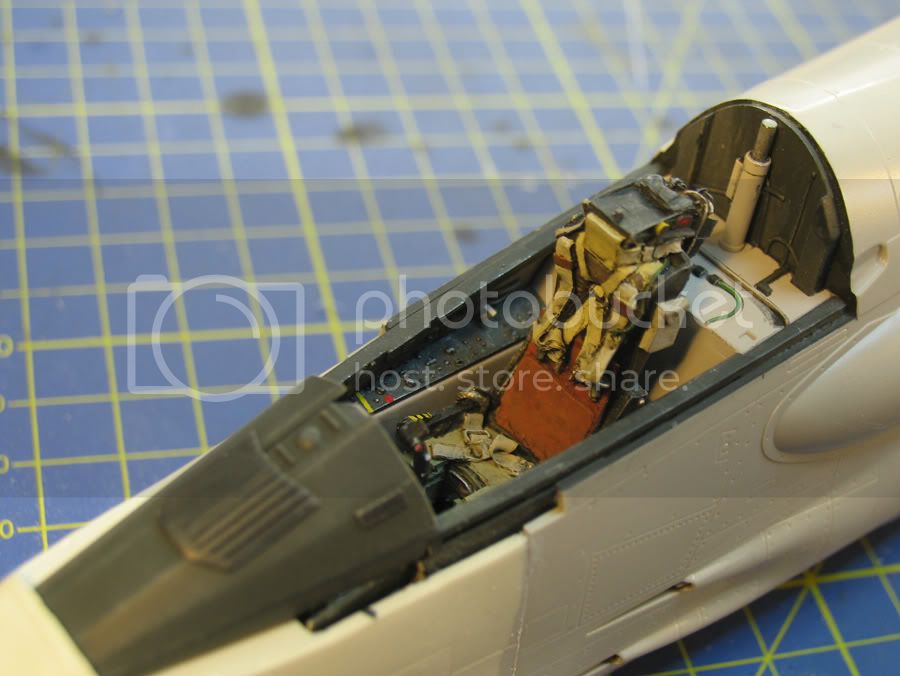
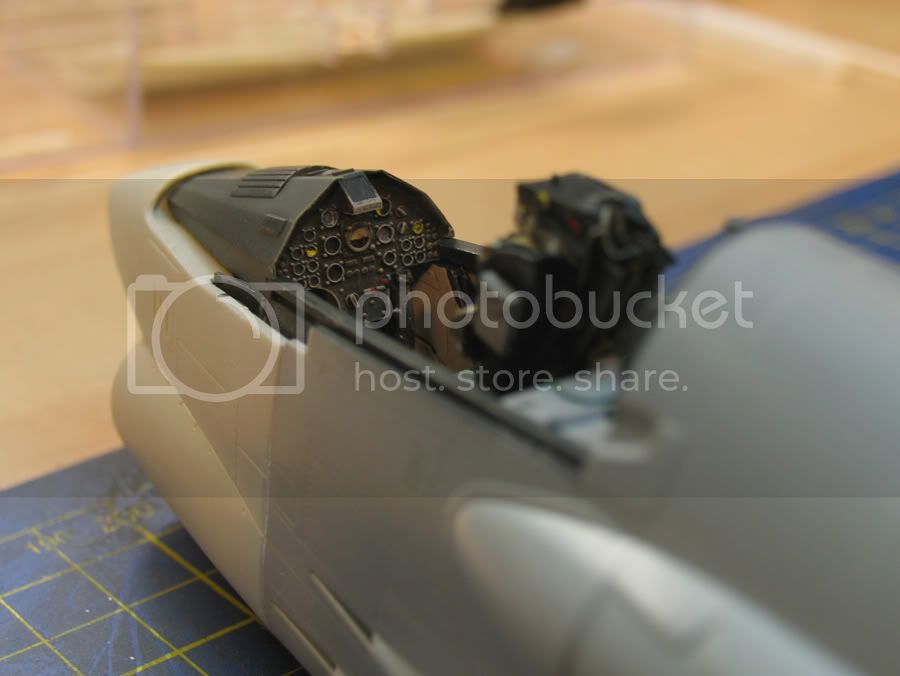
Especially closing the hatches and panels is a pain. I can't get to make them sit flush with the rest of the surface.
I spared myself adding the engine detail on the inside as nothing of the whiole assembly can be seen from the outside.
Cheers,
Guido
AKA "Tailor" -VMF'06 - German Gamblers
http://www.youtube.com/channel/UCk8zhb1sc4Pe3BRLqq3d-SQ
Wisconsin, United States
Joined: March 30, 2011
KitMaker: 199 posts
AeroScale: 150 posts
Posted: Monday, May 02, 2011 - 04:52 AM UTC
that ejection seat looks sick, cant wait to see more progress on it!
On the Bench: 1/72 Italeri Tornado Pinup Campaign
On Deck: ?
Ontario, Canada
Joined: November 14, 2009
KitMaker: 270 posts
AeroScale: 264 posts
Posted: Tuesday, May 03, 2011 - 04:12 AM UTC
Some actual progress to report.
Got the basic scheme down then painted the details:
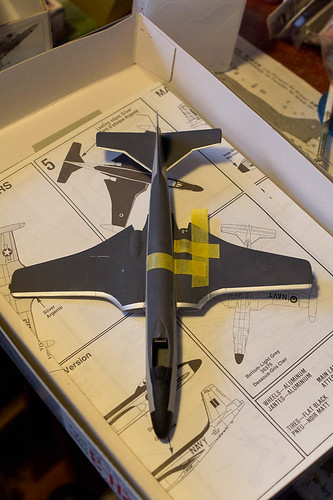 Hobbycraft F2H-3 Banshee
 by
mawz_models, on Flickr
Once that was done, a coat of Acryl Clear Gloss and it's decal time:
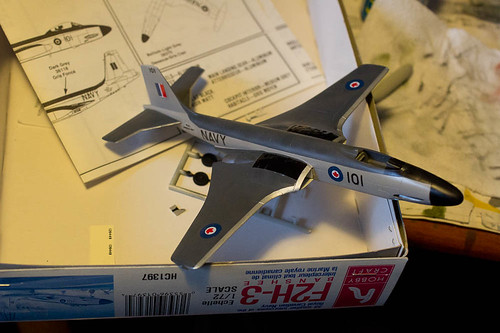 Hobbycraft F2H-3 Banshee
 by
mawz_models, on Flickr
2 decals left and then it's time for a flat coat and to finish the fiddly bits.
United States
Joined: March 09, 2011
KitMaker: 18 posts
AeroScale: 17 posts
Posted: Wednesday, May 11, 2011 - 05:21 AM UTC
WOW So many great looking models. Have been a bit slow myself, with spring cleaning and yardwork this time of year, but have been making progress on the cougar. Want to make sure and have it finished before Scalefest, which is only ten days away now!!
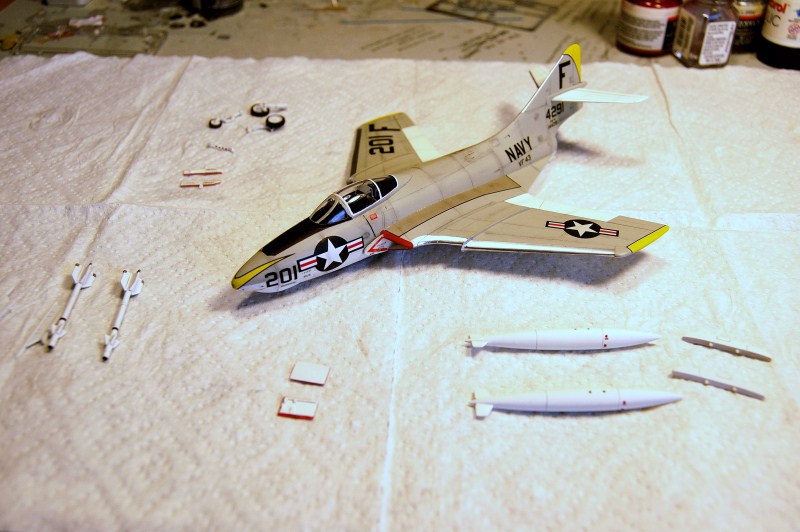
Some strange artifacts showed up during resizing this pic, but when finished will post a nicer one.
Nevada, United States
Joined: December 12, 2010
KitMaker: 24 posts
AeroScale: 18 posts
Posted: Saturday, May 14, 2011 - 09:21 AM UTC
im a tad late to the party here but i hope i can make up with academy"s f-15c eagle this is as far as i've gotten so far


your future hasn't been written yet. No one's has. Your future is whatever you make it. So make it a good one
Tennessee, United States
Joined: September 20, 2005
KitMaker: 1,747 posts
AeroScale: 1,673 posts
Posted: Saturday, May 14, 2011 - 12:51 PM UTC
Oh Canada! That Banshee looks sharp! Really good work there. Russell

To Thine Own Self Be True
Siderius
A.K.A., RTA
Ontario, Canada
Joined: November 14, 2009
KitMaker: 270 posts
AeroScale: 264 posts
Posted: Wednesday, May 18, 2011 - 07:34 AM UTC
Thanks Russell, The Banshee's now done, although I didn't choose to fix the missing markings (Hobbycraft's old decal sheets suck and were missing parts of the tail markings)
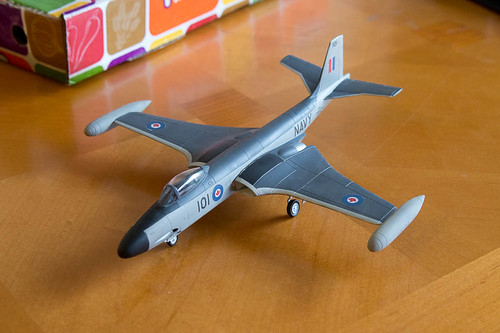 Hobbycraft F2H-3 Banshee
 by
mawz_models, on Flickr
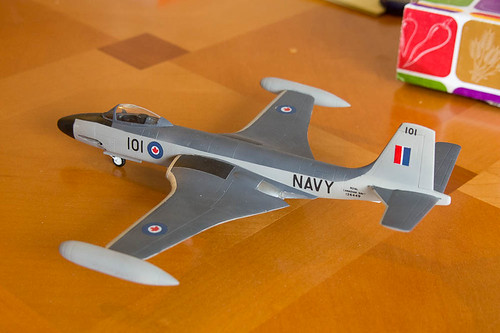 Hobbycraft F2H-3 Banshee
 by
mawz_models, on Flickr
New South Wales, Australia
Joined: April 15, 2006
KitMaker: 158 posts
AeroScale: 70 posts
Posted: Saturday, May 21, 2011 - 08:55 PM UTC
Hi all,
I started the Eduard Mig-21 MF yesterday.
so far I have worked on the exhaust and part of the cockpit.


More pics to come
Cheers

California, United States
Joined: April 01, 2002
KitMaker: 4,287 posts
AeroScale: 1,164 posts
Posted: Tuesday, May 24, 2011 - 02:46 AM UTC
Nice work everybody. I've been out of town for several weeks. Nice to return and see so much progress being made. Keep at it. "Q"

"Don't fear the night, fear what hunts at night"
Dublin, Ireland
Joined: November 11, 2004
KitMaker: 388 posts
AeroScale: 225 posts
Posted: Thursday, May 26, 2011 - 03:57 AM UTC
A few updates with me, the pictures do most of the talking.

A top down view of the Viking with the wings attached. I was surprised at how large they made the aircraft. The join wasn't great and I've been trying to sand them flush before filling the gaps.

A shot of the Vikings bomb bay, basic but not to basic.

A shot of the Vikings sonobouy bay, there's a problem here in that the piece for the bay doesn't actually fit. It's a pretty bad fit and it'll require some careful sanding to fix.
I don't believe I'll be able to finish the Viking in time for the deadline, there's a lot of work left to be done and I have another campaign finishing the day before. I'll keep working on her though.
United States
Joined: March 09, 2011
KitMaker: 18 posts
AeroScale: 17 posts
Posted: Saturday, May 28, 2011 - 06:27 AM UTC
Great work everyone! Some cool looking models...
Attended Scalefest this past weekend and had a great time. The finished Cougar took first in it's category

Hope everyone has a grear holiday weekend!
Removed by original poster on 05/28/11 - 17:30:46 (GMT).
United States
Joined: March 09, 2011
KitMaker: 18 posts
AeroScale: 17 posts
Posted: Saturday, May 28, 2011 - 06:33 AM UTC
Ontario, Canada
Joined: November 14, 2009
KitMaker: 270 posts
AeroScale: 264 posts
Posted: Saturday, May 28, 2011 - 02:31 PM UTC
Leon, that's one First Class build.
California, United States
Joined: April 01, 2002
KitMaker: 4,287 posts
AeroScale: 1,164 posts
Posted: Monday, May 30, 2011 - 01:10 AM UTC
Congrats and nicely done Leon. "Q"

"Don't fear the night, fear what hunts at night"


