

Air Campaigns
Want to start or join a group build? This is where to start.
Want to start or join a group build? This is where to start.
Hosted by Frederick Boucher, Michael Satin
OFFICIAL: P-40, Work Horse of WWII Campaign

md72

#439

Joined: November 05, 2005
KitMaker: 4,950 posts
AeroScale: 3,192 posts

Posted: Tuesday, April 19, 2011 - 08:23 AM UTC
Leo, Nice work. What scale? Love the seat belt buckles, how did you do them?


29Foxtrot

Joined: September 19, 2003
KitMaker: 708 posts
AeroScale: 674 posts

Posted: Tuesday, April 19, 2011 - 08:54 AM UTC
Matt,
Excellent workmanship on your 24 scale AVG bird.
Leo,
Is that the 32 scale P40m from Hasegawa ?
All,
I've gone back to do a little more on 'Haydes Harlot' now the stencils are all on and some softner to be applied. The dull coat is the next step and applied in the next day or so before some weathering is added.


The instrument panel is the kit supplied decal, the clear wingtip nav light lenses have been painted in clear red or clear blue on the peg, as the whole has been drilled out of the wing and tail surfaces where they are located.
Excellent workmanship on your 24 scale AVG bird.
Leo,
Is that the 32 scale P40m from Hasegawa ?
All,
I've gone back to do a little more on 'Haydes Harlot' now the stencils are all on and some softner to be applied. The dull coat is the next step and applied in the next day or so before some weathering is added.
The instrument panel is the kit supplied decal, the clear wingtip nav light lenses have been painted in clear red or clear blue on the peg, as the whole has been drilled out of the wing and tail surfaces where they are located.


Bigrip74
Joined: February 22, 2008
KitMaker: 5,026 posts
AeroScale: 2,811 posts

Posted: Tuesday, April 19, 2011 - 08:55 AM UTC
Leo, the top view of the cockpit is real yes! As Mark stated what is your process in making the belts.
Bob
Bob

chris1

Joined: October 25, 2005
KitMaker: 949 posts
AeroScale: 493 posts
Posted: Tuesday, April 19, 2011 - 09:37 AM UTC
Hi all
Updated photos of Gloria Lyons:
Underside with initial coat of paint.

Left and right side images again with first coats of paint


The landing gear completed painted and weathered,I added brake lines from copper wire, so far the bit I'm most proud of.

Painted drop tank with chipping to be weathered

The plan for the next few days is to get the painting done ready for weathering
along with the exhausts.
As usual comments welcome.
Chris
Updated photos of Gloria Lyons:
Underside with initial coat of paint.
Left and right side images again with first coats of paint
The landing gear completed painted and weathered,I added brake lines from copper wire, so far the bit I'm most proud of.
Painted drop tank with chipping to be weathered
The plan for the next few days is to get the painting done ready for weathering
along with the exhausts.
As usual comments welcome.
Chris
Bigrip74
Joined: February 22, 2008
KitMaker: 5,026 posts
AeroScale: 2,811 posts
Posted: Tuesday, April 19, 2011 - 09:50 AM UTC
Chris,
I agree with you on your landing gear, they look really good.
Bob
I agree with you on your landing gear, they look really good.
Bob
Rebilda

#057

Joined: May 11, 2010
KitMaker: 248 posts
AeroScale: 123 posts

Posted: Tuesday, April 19, 2011 - 07:43 PM UTC
Chris, real cool olive drab. What brand/mix is it?
Thanks for your comments, guys. The belts are my first ones really so I#m not an expert. Was just an experiment.
The belts are Tamiya tape strips. The adjusting ''buckles'' really are two layers of tape cut to squares and stuck in place. The closing buckles are 0.4mil brass wire bent with forceps and fingernails.
Painted with vallejo Kaki and a silver laquer pen (the kind your wife has for writing christmas cards).
That's all.
Thanks for the interest!


warreni
Joined: August 14, 2007
KitMaker: 5,926 posts
AeroScale: 2,201 posts

Posted: Tuesday, April 19, 2011 - 07:56 PM UTC
Greetings fellow P-40ists..
Here are some progress shots on my Trumpeter 1/32 P-40B Tomahawk. I have used the Eduard P-40B Interior PE set and as usual it is awesome to use and work with.

Firstly the engine. Oh that's right , due to the Trumpeter ones being total rubbish I also used resin exhausts for this kit, but I can't remember who makes them. They fit perfectly after a little clean up and required much less effort than the Trumpeter blobs would have. Minimal painting and lots of parts left off as you won't be able to see much of the engine after the fuselage is buttoned up and the panels glued in place. You can't see them well but the Eduard screens for the three coolers are very fine, much finer than the Trumpeter PE ones.

Here are the two side panels with the PE installed.

Eduard provide a replacement seat in metal which means you don't have to paint it as it is the right colour. Most of the PE for the interior is pre-painted.
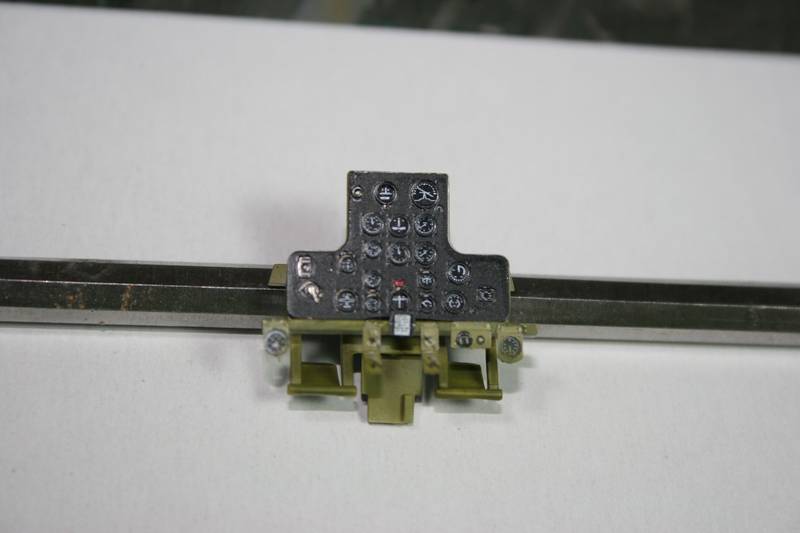
And even though it is not a very good photo here is the complete replacement panel that Eduard provides, again pre-painted. The detail on the dials is much much finer than I could possibly do myself, as is the stitching on the seat-belts.
Thanks for looking and keep up the great modelling.
Here are some progress shots on my Trumpeter 1/32 P-40B Tomahawk. I have used the Eduard P-40B Interior PE set and as usual it is awesome to use and work with.
Firstly the engine. Oh that's right , due to the Trumpeter ones being total rubbish I also used resin exhausts for this kit, but I can't remember who makes them. They fit perfectly after a little clean up and required much less effort than the Trumpeter blobs would have. Minimal painting and lots of parts left off as you won't be able to see much of the engine after the fuselage is buttoned up and the panels glued in place. You can't see them well but the Eduard screens for the three coolers are very fine, much finer than the Trumpeter PE ones.
Here are the two side panels with the PE installed.
Eduard provide a replacement seat in metal which means you don't have to paint it as it is the right colour. Most of the PE for the interior is pre-painted.
And even though it is not a very good photo here is the complete replacement panel that Eduard provides, again pre-painted. The detail on the dials is much much finer than I could possibly do myself, as is the stitching on the seat-belts.
Thanks for looking and keep up the great modelling.

wilbhi2
Joined: May 22, 2005
KitMaker: 41 posts
AeroScale: 13 posts
Posted: Wednesday, April 20, 2011 - 11:55 PM UTC
Gentlemen...great work so far. All these builds are coming along nicely.
Ermie and Matt - great looking finish on those birds. I can only hope mine comes out as nice.
Warren cockpit looks really good. Next time you are into one of these projects, if I may make a suggestion, look into the seatbelts produced by RB productions - They are superior in every way to the pre-painted PE belts and I think you'll be very happy with the results.

SUNDON

Joined: January 19, 2009
KitMaker: 158 posts
AeroScale: 155 posts

Posted: Thursday, April 21, 2011 - 01:11 AM UTC
My first update for a few days .

Went together quite well with only a little bit a filler required.
Decided to go with an aircraft from 112 Sqn so on with the desert colours.
First the Azure blue .

Then the middle stone.

on with some marsking.

And finally Earth brown.

Just waiting for the decals to arrive in the post ,so with it being a Bank Holiday weekend it may be some time.
Thanks
Martin
Went together quite well with only a little bit a filler required.
Decided to go with an aircraft from 112 Sqn so on with the desert colours.
First the Azure blue .
Then the middle stone.
on with some marsking.
And finally Earth brown.
Just waiting for the decals to arrive in the post ,so with it being a Bank Holiday weekend it may be some time.
Thanks
Martin
Red4
Joined: April 01, 2002
KitMaker: 4,287 posts
AeroScale: 1,164 posts

Posted: Thursday, April 21, 2011 - 01:53 AM UTC
Thanks for the kudos Bud, much appreciated.
Martin, that desert Hawk is looking great. Looking forward to seeing more.
"Q"
Martin, that desert Hawk is looking great. Looking forward to seeing more.
"Q"
chris1
Joined: October 25, 2005
KitMaker: 949 posts
AeroScale: 493 posts
Posted: Thursday, April 21, 2011 - 09:40 AM UTC
Hi Guys
Bob and Leo thanks for the kind words.
Leo- in answer to your query the OD is Tamiya TS 28 Olive Drab 2, which has been recommended as a good match for RNZAF a/c of WW2.
However you should see her now,the initial coats reveal that more sanding was required and now looks as if shes went 12 rounds with Mike Tyson.
Weather permitting next coat of paint on today.
Chris

mykroft

Joined: November 14, 2009
KitMaker: 270 posts
AeroScale: 264 posts

Posted: Friday, April 22, 2011 - 07:38 AM UTC
I'm going to jump in here too, never can be in too many group build. I'm building an RAF P-40M from the Academy P-40M/N kit in 1/72.

Academy P-40M/N Warhawk 1/72 by mawz_models, on Flickr
It's a sweet-looking little kit from first inspection. Picked the RAF bird because the combo of a sharkmouth and the TLS scheme is a little different from the usual desert or Pacific schemes.
Academy P-40M/N Warhawk 1/72 by mawz_models, on Flickr
It's a sweet-looking little kit from first inspection. Picked the RAF bird because the combo of a sharkmouth and the TLS scheme is a little different from the usual desert or Pacific schemes.
md72
#439
Joined: November 05, 2005
KitMaker: 4,950 posts
AeroScale: 3,192 posts
Posted: Friday, April 22, 2011 - 07:57 AM UTC
Picked this one up at a show earlier this month. Haven't decided how to mark it yet. Sticking with the Hase -E for this campaign. Look forward to how you take care of the blend for the back of the cockpit. 
Bigrip74
Joined: February 22, 2008
KitMaker: 5,026 posts
AeroScale: 2,811 posts
Posted: Friday, April 22, 2011 - 10:01 AM UTC
Adam, welcome to the party and you are correct there are never too many in a GB.
Bob
Bob
wilbhi2
Joined: May 22, 2005
KitMaker: 41 posts
AeroScale: 13 posts
Posted: Friday, April 22, 2011 - 02:43 PM UTC
Well....I've gotten some more work done on the Mauve/eduard P-40M/N
Changed the color on the area behind the seat to reflect the OD the was painted there.

Also painted the interior of the canopy and added the center line spine with pre-painted clear decal film. After doing this...it dawned on me (yeah, I'm a little slow) that I could have just done decal film instead of going through the whole process of masking then painting. Oh how to make life easier

I also painted the resin wheel interiors before attaching them to the wings.

Why do we subject ourselves to such pain - all the grinding (Thank you dremel)
and still a poor fit. On hind site, I could have helped myself a bit by further sanding down the resin wheel wells - oh well, hind sight is 100%. You can see the horrid gaps and lack of dihedral as well as a mis fit of the trailing edge fillets


Corrected the dihedral with force and shoved a bunch of milliput into the gaps as they were too big for epoxy or CA. Hpefully, the milliput will make a good bond and maintain the dihedral. I'll know in 24.


Changed the color on the area behind the seat to reflect the OD the was painted there.
Also painted the interior of the canopy and added the center line spine with pre-painted clear decal film. After doing this...it dawned on me (yeah, I'm a little slow) that I could have just done decal film instead of going through the whole process of masking then painting. Oh how to make life easier
I also painted the resin wheel interiors before attaching them to the wings.
Why do we subject ourselves to such pain - all the grinding (Thank you dremel)
and still a poor fit. On hind site, I could have helped myself a bit by further sanding down the resin wheel wells - oh well, hind sight is 100%. You can see the horrid gaps and lack of dihedral as well as a mis fit of the trailing edge fillets
Corrected the dihedral with force and shoved a bunch of milliput into the gaps as they were too big for epoxy or CA. Hpefully, the milliput will make a good bond and maintain the dihedral. I'll know in 24.
Bigrip74
Joined: February 22, 2008
KitMaker: 5,026 posts
AeroScale: 2,811 posts
Posted: Friday, April 22, 2011 - 02:58 PM UTC
Bud, OUCH on those gaps. You and Matt picked up the same type of stand also.
Bob
Bob
mykroft
Joined: November 14, 2009
KitMaker: 270 posts
AeroScale: 264 posts
Posted: Saturday, April 23, 2011 - 03:45 PM UTC
The P-40M's coming along right quickly, it's a beautifully engineered kit with only one potential troublespot, the fit of the insert behind the cockpit.

Academy P-40M/N Warhawk 1/72 by mawz_models, on Flickr

Academy P-40M/N Warhawk 1/72 by mawz_models, on Flickr

Academy P-40M/N Warhawk 1/72 by mawz_models, on Flickr
And after the basic steps, it just fell together.

Academy P-40M/N Warhawk 1/72 by mawz_models, on Flickr
As you can see, the fit on the insert is good but not perfect. It's a little fiddly and I didn't quite nail it. The trick is getting the right amount of pressure in the right spot on the fuselage.

Academy P-40M/N Warhawk 1/72 by mawz_models, on Flickr
A little filler will set it right though.
Academy P-40M/N Warhawk 1/72 by mawz_models, on Flickr
Academy P-40M/N Warhawk 1/72 by mawz_models, on Flickr
Academy P-40M/N Warhawk 1/72 by mawz_models, on Flickr
And after the basic steps, it just fell together.
Academy P-40M/N Warhawk 1/72 by mawz_models, on Flickr
As you can see, the fit on the insert is good but not perfect. It's a little fiddly and I didn't quite nail it. The trick is getting the right amount of pressure in the right spot on the fuselage.
Academy P-40M/N Warhawk 1/72 by mawz_models, on Flickr
A little filler will set it right though.
warreni
Joined: August 14, 2007
KitMaker: 5,926 posts
AeroScale: 2,201 posts
Posted: Sunday, April 24, 2011 - 09:18 AM UTC
Hi Bud.
I got the lengths wrong on the belts but have since adjusted them.
The belts came with the PE kit for the interior but I will keep the oother ones in the back of my mind for future projects.
I got the lengths wrong on the belts but have since adjusted them.
The belts came with the PE kit for the interior but I will keep the oother ones in the back of my mind for future projects.
SUNDON
Joined: January 19, 2009
KitMaker: 158 posts
AeroScale: 155 posts
Posted: Sunday, April 24, 2011 - 10:10 PM UTC
I've been busy this weekend my Barracuda decals arrived on Saturday so I managed to finish my Tomahawk.

Finished off in the markings of Neville Duke's MK IIb Ak402 GA-F.

I used a mixture of paints from Revell , Tamiya ,Vallejo and Xtracrylics for this build.

A light oil wash was used for weathering with some exhaust stains added to finish.

This was built with some small parts added from the spares box to improve the details a bit but found the kit a nice quick build.

Thanks for looking
Martin
Finished off in the markings of Neville Duke's MK IIb Ak402 GA-F.
I used a mixture of paints from Revell , Tamiya ,Vallejo and Xtracrylics for this build.
A light oil wash was used for weathering with some exhaust stains added to finish.
This was built with some small parts added from the spares box to improve the details a bit but found the kit a nice quick build.
Thanks for looking
Martin

mpatman
Joined: March 09, 2006
KitMaker: 248 posts
AeroScale: 160 posts
Posted: Sunday, April 24, 2011 - 11:17 PM UTC
Nice work there Martin, Maybe you can tell me, but what are the differences between a Warhawk, a Kittyhawk and a Tomahawk 
SUNDON
Joined: January 19, 2009
KitMaker: 158 posts
AeroScale: 155 posts
Posted: Monday, April 25, 2011 - 12:00 AM UTC
Quoted Text
Nice work there Martin, Maybe you can tell me, but what are the differences between a Warhawk, a Kittyhawk and a Tomahawk
I belive The names Tomahawk and Kittyhawk were only used by the British Commonwealth for early and late P-40s and all Curtiss P-40 were called the Warhawk in US service.
Martin.
Removed by original poster on 04/25/11 - 11:04:30 (GMT).
mykroft
Joined: November 14, 2009
KitMaker: 270 posts
AeroScale: 264 posts
Posted: Monday, April 25, 2011 - 02:58 AM UTC
A Tomahawk is a Hawk Model 81 or a P-40 through P-40C, a KittyHawk is a P-40D or later. A Warhawk is any P-40 in US Service.
Essentially if it has nose guns it's a Tomahawk unless it's in US Service. Note that Tomahawks differed from the equivalent Warhawks, usually in armament (.303's instead of .30's) and other minor details while the later Kittyhawks were the same aircraft as the equivalent Warhawks.
Essentially if it has nose guns it's a Tomahawk unless it's in US Service. Note that Tomahawks differed from the equivalent Warhawks, usually in armament (.303's instead of .30's) and other minor details while the later Kittyhawks were the same aircraft as the equivalent Warhawks.
mpatman
Joined: March 09, 2006
KitMaker: 248 posts
AeroScale: 160 posts
Posted: Tuesday, April 26, 2011 - 11:59 AM UTC
Thanks for the info guys!
warreni
Joined: August 14, 2007
KitMaker: 5,926 posts
AeroScale: 2,201 posts
Posted: Wednesday, April 27, 2011 - 10:58 AM UTC
Captain "Wild Bill' Cramp climbed into the beautiful summer morning sky for a local area circuit or two before a brief aerobatics practice for the upcoming airshow to show off his new P-40B to the public just days after converting to the new fighter.
As he climbed he slid back the canopy for some fresh air and felt a small bump through his rudder pedals. Thinking it nothing more than a little light turbulence he ignored it and continued his climb to 2000 for his circuits.
he radio suddenly crackled into life,
"Bravo 619, Tower over".
"Tower this is 619, over"
"Umm 619, we think something just fell off your aircraft. over."
With that statement ringing in his ears Cramp waggled his wings and pshed his rudder pedals back and forth.
"Seems fine here John." Then Cramp looked over his shoulder for another quick visual and noticed to his total surprise that his canopy was missing.
"Tower this is 619, it would appear that my canopy has fallen off the plane.. I will return to base immediately. Permission to land. over"
"Permission to land granted 619."
The landing was uneventful and the Captain pulled into the vacant spot on the flight line. The ground crew came running over when the aircraft was shut down and started bombarding Cramp with questions...
No fault ever pinpointed for departure of canopy, blah blah..
Airshow went off without a hitch blah blah..
And here is the very plane in that story....
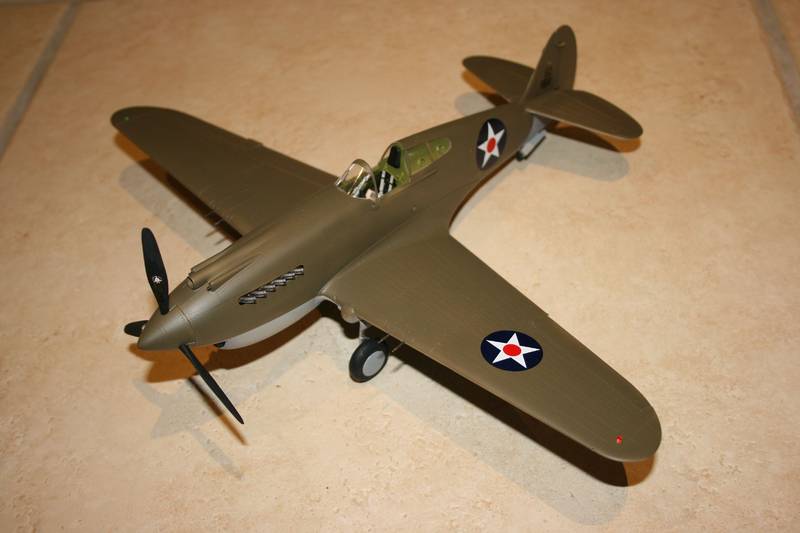

Now for the real story of the missing canopy, that is it... it is missing.. I have no idea where it has gone. I remember painting it yesterday and now.. poof.. gone.. So until I find it this is how my Trumpeter P-40B Tomahawk will remain as I don't want to but another kit just for the canopy...
Cheers
As he climbed he slid back the canopy for some fresh air and felt a small bump through his rudder pedals. Thinking it nothing more than a little light turbulence he ignored it and continued his climb to 2000 for his circuits.
he radio suddenly crackled into life,
"Bravo 619, Tower over".
"Tower this is 619, over"
"Umm 619, we think something just fell off your aircraft. over."
With that statement ringing in his ears Cramp waggled his wings and pshed his rudder pedals back and forth.
"Seems fine here John." Then Cramp looked over his shoulder for another quick visual and noticed to his total surprise that his canopy was missing.
"Tower this is 619, it would appear that my canopy has fallen off the plane.. I will return to base immediately. Permission to land. over"
"Permission to land granted 619."
The landing was uneventful and the Captain pulled into the vacant spot on the flight line. The ground crew came running over when the aircraft was shut down and started bombarding Cramp with questions...
No fault ever pinpointed for departure of canopy, blah blah..
Airshow went off without a hitch blah blah..
And here is the very plane in that story....
Now for the real story of the missing canopy, that is it... it is missing.. I have no idea where it has gone. I remember painting it yesterday and now.. poof.. gone.. So until I find it this is how my Trumpeter P-40B Tomahawk will remain as I don't want to but another kit just for the canopy...
Cheers
 |

WEB HOSTING BY


Copyright ©2021 AeroScale and Kitmaker Network, a subsidiary of Silver Star Enterprises
All Rights Reserved. Please read our Conditions of Use and Privacy Policy.
All Rights Reserved. Please read our Conditions of Use and Privacy Policy.