Air Campaigns
Want to start or join a group build? This is where to start.
OFFICIAL: P-40, Work Horse of WWII Campaign
AussieReg
Staff MemberAssociate Editor
AUTOMODELER
#007
_VISITCOMMUNITY
Victoria, Australia
Joined: June 09, 2009
KitMaker: 8,156 posts
AeroScale: 3,756 posts
Posted: Tuesday, March 08, 2011 - 11:46 PM UTC
Wow, there's some awesome work going on here already ! I must humbly apologise for my absence so far but work has me running a bit at the moment.

Bob, I noticed a "?" against my name in the spreadsheet, so here's the kit that I'm going to be making a big mess of . . . . . .


along with these decals . . .


(the semi naked pin-up type nose art, of course )

and some PE belts to comply with OH&S regulations.


I might even make a small start tonight, maybe.
AussieReg
Staff MemberAssociate Editor
AUTOMODELER
#007
_VISITCOMMUNITY
Victoria, Australia
Joined: June 09, 2009
KitMaker: 8,156 posts
AeroScale: 3,756 posts
Posted: Wednesday, March 09, 2011 - 01:18 AM UTC
Ok, as promised I have now formally joined the party . . .


Bigrip74
_VISITCOMMUNITY
Texas, United States
Joined: February 22, 2008
KitMaker: 5,026 posts
AeroScale: 2,811 posts
Posted: Wednesday, March 09, 2011 - 08:28 AM UTC
@ Damian: you are now updated.

@ Chris: your photos did not display, could you post them again?

Photobucket

WIP:
P-40E
Photobucket
Photobucket
Photobucket

P-40F
Photobucket
Photobucket

P-36A/C
Photobucket
Photobucket
Photobucket
Photobucket

Bob
ppawlak1
_VISITCOMMUNITY
Victoria, Australia
Joined: March 14, 2006
KitMaker: 1,973 posts
AeroScale: 59 posts
Posted: Wednesday, March 09, 2011 - 09:13 AM UTC
@ Bob - For your table, mine will be the P-40M in 1/48 by Italeri


Cheers

Paul
emroglan
_VISITCOMMUNITY
Istanbul, Turkey / Türkçe
Joined: December 16, 2004
KitMaker: 1,163 posts
AeroScale: 255 posts
Posted: Wednesday, March 09, 2011 - 10:09 AM UTC
Here's more progress. Fuselage is mated and sanded to fit, area over the nose required some putty.


And she's got her wings now. I first attached the top half of the wings to the fuselage, then glued the bottom part. I'm currently working on the Master metal barrels. It seems they are larger in size compared to kit barrels and don't fit properly, as you can see. I'll have to use a lot of putty to cover up the areas I had to carve.

Bigrip74
_VISITCOMMUNITY
Texas, United States
Joined: February 22, 2008
KitMaker: 5,026 posts
AeroScale: 2,811 posts
Posted: Wednesday, March 09, 2011 - 01:36 PM UTC
@ Paul: noted and will be on the next post. Nice looking kit.

@ Emre: what are your plans on dealing with the gaps around the barrels. I will have the same problems on my P-36.

Here is my aircompressor that I purchased at Harbor Freight over a year and a half ago. I have been able to do general coverages, but no fine work. My problems have been.

1. PSI not adjustable
2. after a long search just found some brass fittings to mount a PSI regulator.
3. not tested as of this photo.
4. what pressure works for your painting. would love to here your advice.

BEFORE:
Photobucket

AFTER:
Photobucket

Bob
md72
#439
_VISITCOMMUNITY
Washington, United States
Joined: November 05, 2005
KitMaker: 4,950 posts
AeroScale: 3,192 posts
Posted: Wednesday, March 09, 2011 - 03:25 PM UTC
Bob, I've upgraded to a full up compressor with 7 gal tank. Use it for woodworking and remodeling also. For airbrushing, I've added a moisture trap, shutoff and a second pressure gauge. My latest efforts have used the regulator set ~20psi. The second gauge shows that the pressure drops to 15 psi when I trigger the brush. I'm thinning the paint 2:1 (P:T) or even 1:1.

Red4
_VISITCOMMUNITY
California, United States
Joined: April 01, 2002
KitMaker: 4,287 posts
AeroScale: 1,164 posts
Posted: Wednesday, March 09, 2011 - 04:27 PM UTC
Here is my set up....I shoot with a 20lb Co2 tank. Psi is set between 10-13 psi. Anything more and I run into problems with the paint drying before it hits the model which is akin to non-skid texture which isn't good on anything but a tank.. 
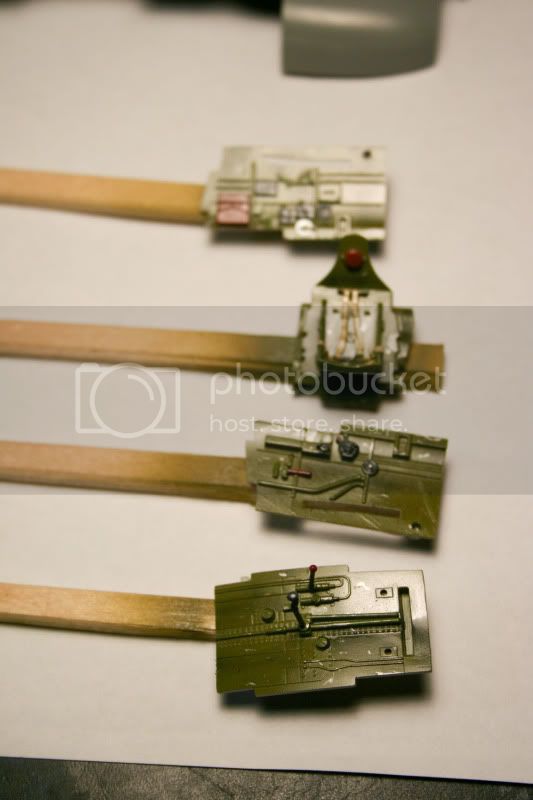
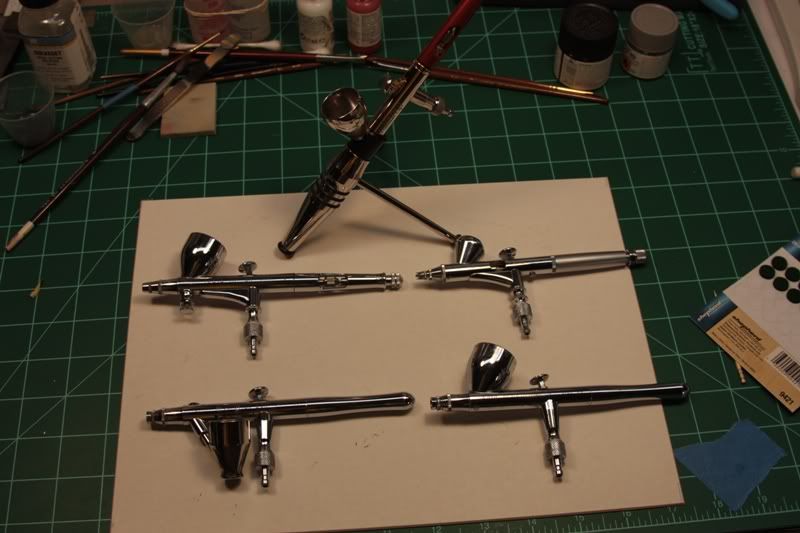
Very rarely do I ever have to increase this. I cut all my paints with lacquer thinner, Tamiya acrylics as well. I have 5 dedicated brushes that are used for a specific purpose in mind. The bottom two brushes are Iwata revolutions. The one on the left is for metallic only. The one on the bottom right is for acrylics and future. I cut my acrylics, other than Tamiya with Windex and they shoot well. I don't have a ratio, it is just something that I have come to be able to eyeball anymore. Top left is an Iwata HP-CH which I use for 90% of my work. Top right is an Iwata Custom Micron B which I use for extremely tight pattern work...think 1/72 or smaller German squiggle pattern camo. And last but not least in the middle looking like a bong of some sort is a Harder and Steenbeck Infinity. The funky looking tripod thing is its stand. I use this one also for tight pattern and detail work. I have all my brushed equipped with quick disconnects so I can change from one to the next easily. I used to have a 5 valve manifold, but it was constantly leaking and counter productive when I thought about it. All my brushes had the QD's on them, so I didn't really need the manifold. Something else I do with my brushes is seal the threads on the head assemblies with bees-wax. This ensures I always have a good seal and good airflow. When I'm done shooting for the day, the brushes get a thorough cleaning and a spritz of WD-40 in their paint cups then a couple pulls on the trigger to run it through. This helps keep the needles free from sticking should any paint residue still remain inside...It's important to remember to blast the WD-40 out though before you paint next or the first shot will be really glossy.. I've done it a few times. A couple drops of lacquer thinner cleans it out and I'm ready to paint.....


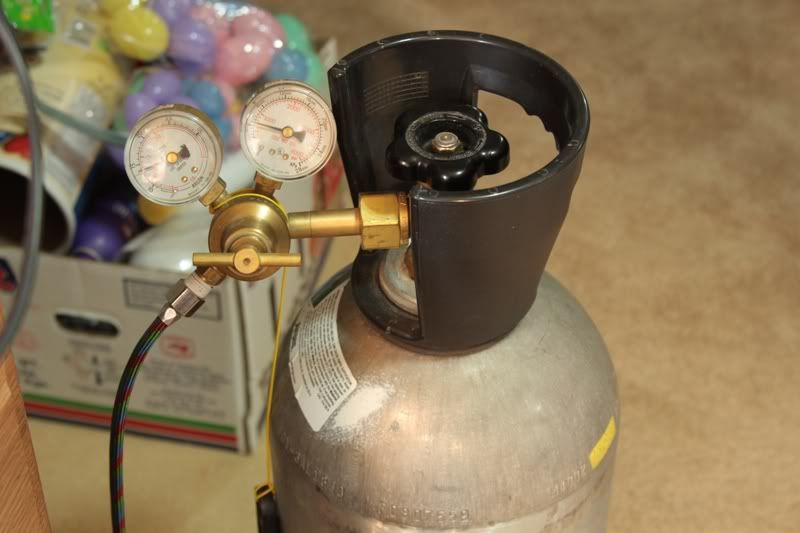
I used to run a compressor and had many of the same problems you had Bob. One of the biggest was the pressure drop, and the accumulation of moisture...I was living in the south at the time. I can't count how many paint jobs I had ruined because of that. Moisture traps didn't last long with the amount of water that was being produced. Once I made the switch to Co2 I never looked back. Initial set up was a little steep at around $200 and refills run just shy of $30, but I only have to have that done maybe 3 times a year. 1 for 1 exchange and no hydro testing every 5 years. No moving parts either...and it is whisper quiet. All fittings at the Co2 tank are wrapped with Teflon tape to ensure good tight seals.
Looking at your set up, I would suggest adding an additional inline water trap as close to the handle as you can. Paasche makes one that slips onto the line. I used to run one of these on my old VL brush. Even with the one coming out of the cylinder, moisture will accumulate in the hose before it hits your brush. Think of it as added insurance.
Sorry to get off topic, but I hope this helps. "Q"
Bigrip74
_VISITCOMMUNITY
Texas, United States
Joined: February 22, 2008
KitMaker: 5,026 posts
AeroScale: 2,811 posts
Posted: Wednesday, March 09, 2011 - 05:49 PM UTC
@ Mark: thanks for the information I had a 7 gallon set in the past but the stupid thing would never act right.

@ Matt: I printed your tips out and highlighted some areas to follow while playing with my setup. Do you really thin with laquer thinner for enamel, and Tamiya acrylics? It has to work, I have seen the results on your posts. Thanks for the help.

Bob
mpatman
_VISITCOMMUNITY
New South Wales, Australia
Joined: March 09, 2006
KitMaker: 248 posts
AeroScale: 160 posts
Posted: Wednesday, March 09, 2011 - 09:21 PM UTC
Hi Ladies & Gents,

i have made so progress on my build so time for an update:

Shot of my fuselage half after the My Surfacer 1000/sanding/rescribing of the infamous Hasegawa tail section. Gave it a quick shot of Tamiya grey primer to see how she looks...I'm happy


Quick shot of the beautiful Ultracast resin seat


Cockpit painted and glossed with a coat of future ready for a oil wash. (sorry about the reflective shot, i'll post a better pic once I have put a flat coat on it.


Cheers,

Mark
emroglan
_VISITCOMMUNITY
Istanbul, Turkey / Türkçe
Joined: December 16, 2004
KitMaker: 1,163 posts
AeroScale: 255 posts
Posted: Wednesday, March 09, 2011 - 09:48 PM UTC
@Matthew... Did I understand what you wrote about WD-40 correct? At the end of the day, you clean up the airbrush. Of course, there's always a tiny bit of paint sticking inside, so you squirt WD 40 into the cup and pull the trigger a couple of times so it moves onto the needle. Then the next day, before you paint you use lacquer thinner to clean WD-40?

Because of that paint issue I always remove my needles at the end of the day, but it's a tedious job and risking the needle itself. I was desperately looking for a solution.

I was even afraid to use WD 40 to wipe the airbrush needles, fearing it would affect the paints and go pyscho. Would Tamiya's Lacquer thinner work to clean it? I use an Iwata HP-CH and it's very hard to import it to Turkey, so I'm very very afraid to risk it

@ Bob. I also use Lacquer Thinner for Tamiya and Gunze Acyrlics. I found out it works a lot better than Tamiya's own thinner or the ethyl alcohol which I used to use. Alcohol gives a quicker drying time, but the paint does not adhere well to the surface and tends to whiten unless you use a gloss coat. Lacquer makes acyrlics act like enamels, they dry slower (still cure fast though), but since it eats into plastic a little you have a much smoother finish and the faint sticks well. I haven't tried it with enamels though, still using enamel thinner for those. Not using enamels much recently anyway.
Red4
_VISITCOMMUNITY
California, United States
Joined: April 01, 2002
KitMaker: 4,287 posts
AeroScale: 1,164 posts
Posted: Thursday, March 10, 2011 - 12:43 AM UTC

Quoted Text

Do you really thin with laquer thinner for enamel, and Tamiya acrylics? It has to work, I have seen the results on your posts. Thanks for the help.


Yep sure do, even with their metallic colors. I had read about guys doing this awhile back, but never thought to try it. I kept getting iffy results using Tamiya and water, Windex, alcohol, etc. The paint would bead up as soon as it hit plastic, which told me I was thinning it too much....BUT, once I tried the lacquer thinner it went down like melted butter. It seems to actually like lacquer thinner too. Hope the tips help. "Q"
Red4
_VISITCOMMUNITY
California, United States
Joined: April 01, 2002
KitMaker: 4,287 posts
AeroScale: 1,164 posts
Posted: Thursday, March 10, 2011 - 12:50 AM UTC

Quoted Text

@Matthew... Did I understand what you wrote about WD-40 correct? At the end of the day, you clean up the airbrush. Of course, there's always a tiny bit of paint sticking inside, so you squirt WD 40 into the cup and pull the trigger a couple of times so it moves onto the needle. Then the next day, before you paint you use lacquer thinner to clean WD-40?

Because of that paint issue I always remove my needles at the end of the day, but it's a tedious job and risking the needle itself. I was desperately looking for a solution.

I was even afraid to use WD 40 to wipe the airbrush needles, fearing it would affect the paints and go pyscho. Would Tamiya's Lacquer thinner work to clean it? I use an Iwata HP-CH and it's very hard to import it to Turkey, so I'm very very afraid to risk it


Hi Emre,
Yes, WD-40 into the paint cup at the end of the day. A little squirt of lacquer thinner before the next painting and she is good to go. I used to take my brushes all the way down about once a week due to paint build up effecting my painting. Tried using the WD-40 and things were great. No more sticking needles and I could focus on painting instead of cleaning. I still tear the brushes down about once a month for a good thorough cleaning though. I don't know if Tamiya's lacquer thinner is any different than what is out there commercially, but you could try it. And, as you said, Gunze paints thin well with it too.
Don't try it with Pollyscale though. Been there, done that and it was ugly. Does not like lacquer thinner. Windex on the other hand works well.
"Q"
emroglan
_VISITCOMMUNITY
Istanbul, Turkey / Türkçe
Joined: December 16, 2004
KitMaker: 1,163 posts
AeroScale: 255 posts
Posted: Thursday, March 10, 2011 - 01:07 AM UTC
I don't use Lacquer thinner with acyrlics other than Gunze and Tamiya. They tend to turn into slimy muck Tested it with Vallejo on a cup, could be ideal if you want to model a swamp!

If Windex is a product that is bluish and used for cleaning windows and glass, then yes, those products work well with Vallejo and Pollyscale. Still, in the whole acyrlic range my favorite is Gunze Mr Hobby colors thinned with lacquer thinner.

Thanks for the WD 40 tip Matthew. I'll try it as soon as I can. Could be a life-saver tip.
Bigrip74
_VISITCOMMUNITY
Texas, United States
Joined: February 22, 2008
KitMaker: 5,026 posts
AeroScale: 2,811 posts
Posted: Thursday, March 10, 2011 - 06:30 AM UTC
@ Matt & Emre & Mark: this is an example of the limit of fine work that I have been able to perform until now. This is a Revell 1/35 M4 that is being built for the Sherman campaign, the colors are Vallejo OD and my own mixture for tires. The lowest psi that the compressor let me shoot with had been 25-30. This is the main reason that I have not finished many a/c for the past couple of years. Again thanks for the information to all who have shared their tips. I plan to use those tips on my builds (P-40B,E,F, P-36, P-47, Piper J3, Mig 17, Hawker Hurricane II, Bf 110, P-38, Spitfire Mk XIV) that are up next in the 1001 campaigns that I just had no control over myself when I enlisted.
Photobucket

@ Mark: the tail looks nice, I cannot tell where the line is. I like Ultra Cast products and your office will make your efforts with that tail even better.

Bob
md72
#439
_VISITCOMMUNITY
Washington, United States
Joined: November 05, 2005
KitMaker: 4,950 posts
AeroScale: 3,192 posts
Posted: Thursday, March 10, 2011 - 07:25 AM UTC
Getting happy with the airbrush is the greatest step forward in getting models done. I had been using higher pressures 30-40 and thicker paints 3:1. I used to start with the needle all the way closed and then try to turn it back till the paint flowed. Every session was difficult. Painting was a chore that only got done if there was enough 'pressure' to finish. The SBD and A4D-1 I'm working on for the Hanger Queens were started years ago (2001-2002?).

Talking with other modelers led me to trying lower pressures and thinner paints. I start with the needle further back (1/8"?) and adjust for flow. I also got frustrated at how much paint I had to mix up and then throw away because the siphon tube needed so much paint to actually suck. I picked up a flat bottom gravity cup for my Badger 200 a couple of weeks ago.

Now I'm braving the cold and wet to get out to the garage about 2x per week to shoot a little paint.

FWIW, I hadn't thought of WD-40 as a cleaner, figured it would eat the seals. At the end of each paint session, I remove the paint source, fill the 'carrier tube' with thinner and shoot it while moving the needle in and out till it runs out until no more paint / thinner flows out. Then I take the brush back to my bench, disassemble it and clean it all out.
Red4
_VISITCOMMUNITY
California, United States
Joined: April 01, 2002
KitMaker: 4,287 posts
AeroScale: 1,164 posts
Posted: Thursday, March 10, 2011 - 08:57 AM UTC

Quoted Text

FWIW, I hadn't thought of WD-40 as a cleaner


I don't use it so much as a cleaner, but as a lubricant to keep paint from sticking to the needle and the head assembly. When the next painting takes place, the paint that is still there...if any, gets blasted out with the first shot of lacquer thinner. WD-40 is considerably less hot than the thinners we shoot through the brushes so there should be no problem with it attacking anything. "Q"
md72
#439
_VISITCOMMUNITY
Washington, United States
Joined: November 05, 2005
KitMaker: 4,950 posts
AeroScale: 3,192 posts
Posted: Thursday, March 10, 2011 - 09:43 AM UTC
Had kinda considered that most of our thinners are way hotter than WD-40. Then I remembered Cub Scouts lubricating their Pine Wood Derby cars with it and it attacking the plastic, I realize that the WD stands for Water Displacing, but I've had enough painting catastrophes, so I try to be very careful.

Your Mileage Might Vary...
Red4
_VISITCOMMUNITY
California, United States
Joined: April 01, 2002
KitMaker: 4,287 posts
AeroScale: 1,164 posts
Posted: Friday, March 11, 2011 - 12:44 AM UTC
I hear ya' Well, I got absolutely no modeling in yesterday I have a bunch of camera equipment I'm selling off and needed to get prices for it etc. That took me the better part of the day. Then a small list of honey do's to be taken care of. BUT! today I have all day to myself. Hoping to make good headway on Newkirk's mount, white 34. Will get some WIP's posted here shortly. TGIF.
"Q"
29Foxtrot
_VISITCOMMUNITY
Victoria, Australia
Joined: September 19, 2003
KitMaker: 708 posts
AeroScale: 674 posts
Posted: Friday, March 11, 2011 - 03:20 AM UTC
Hi All,

Made a little more progress on the P-40k Kittyhawk, which depicts 'Hayde's Harlot' with a distinctive Cobra Head, this is an OOB build. Still have all the stencil decals to add to this bird and a little touch up here and there.


More later.
Red4
_VISITCOMMUNITY
California, United States
Joined: April 01, 2002
KitMaker: 4,287 posts
AeroScale: 1,164 posts
Posted: Friday, March 11, 2011 - 05:24 AM UTC
Interesting markings Rob. Nicely done. Making some headway with the giant sized Trumpeter P-40. I ended up having to reshoot the cockppit floor and rear bulkhead as I ran out of interior green paint, and the stuff I bought to replace it had a different color to it. It was slightly darker. Not a big problem as most of what is in the office won't be seen once buttoned up. The only thing visible on the engine will be the very top of it if the top of the fuselage is removed. It's a real shame too as the engine looks pretty good. Working on the tail wheel assembly and rudder so I can get thing closed up and move onto to wings...hopefully this afternoon. More to follow soon. "Q"


Red4
_VISITCOMMUNITY
California, United States
Joined: April 01, 2002
KitMaker: 4,287 posts
AeroScale: 1,164 posts
Posted: Friday, March 11, 2011 - 06:32 AM UTC
Fuselage is together and going to stay wrapped up until tomorrow. There is a small gap at the rear just in front of the tail wheel I'll need to fill with sheet, but otherwise, everything clicked into place really well. I got a clanky thing to work on now. More to follow soon. "Q" :_

AussieReg
Staff MemberAssociate Editor
AUTOMODELER
#007
_VISITCOMMUNITY
Victoria, Australia
Joined: June 09, 2009
KitMaker: 8,156 posts
AeroScale: 3,756 posts
Posted: Friday, March 11, 2011 - 09:21 AM UTC
Looking good Rob. Like Q stated, those markings are unusual and quite striking . As usual you're almost done and I'm still just getting started !

Q, like you said it's a shame about the powerplant being hidden, it looks very nice indeed. Your build is coming along very nicely as well.

I spent a couple of hours last night cutting and sanding and putting together the sub-assemblies, as well as putting a fresh pointy blade in the knife and scraping out the exhaust "fishtails". No colour yet

Cheers, D
Red4
_VISITCOMMUNITY
California, United States
Joined: April 01, 2002
KitMaker: 4,287 posts
AeroScale: 1,164 posts
Posted: Friday, March 11, 2011 - 09:47 AM UTC
Fishtails....argh. Been there, done that with another build. Keep at it D. Looking forward to seeing yours come together. Thanks for the kudos on mine. "Q"
Bigrip74
_VISITCOMMUNITY
Texas, United States
Joined: February 22, 2008
KitMaker: 5,026 posts
AeroScale: 2,811 posts
Posted: Friday, March 11, 2011 - 11:29 AM UTC
@ D & Matt: I dont like fishtails, long live just plain ole round pipe exhaust. Much easier to work with and paint in my case. I just had a brain freeze, has there been a thread on everyones airbrush setup?

Bob