OFFICIAL: P-40, Work Horse of WWII Campaign
California, United States
Joined: April 01, 2002
KitMaker: 4,287 posts
AeroScale: 1,164 posts
Posted: Monday, March 14, 2011 - 12:54 PM UTC
"Don't fear the night, fear what hunts at night"
Texas, United States
Joined: February 22, 2008
KitMaker: 5,026 posts
AeroScale: 2,811 posts
Posted: Monday, March 14, 2011 - 01:33 PM UTC
OUCH!

Bob
If it aint broke dont fix it.
Victoria, Australia
Joined: September 19, 2003
KitMaker: 708 posts
AeroScale: 674 posts
Posted: Monday, March 14, 2011 - 03:15 PM UTC
Bob and Matthew,
Thanks and I hope some of the info is helpful.
Matthew,
Nice camo work, pity with the clear coat, I've encountered a few similar issues in the past with some paints and use the Testor's ELO and start over from scratch again.
I'm still toying with the idea of getting that Trumpeter kit to do an RAF 112 Sqn bird.
President:- Southern Model Club.
Those who never learn from history will always repeat it.
"When you go home tell them of us and say.
For your tomorrow we gave our today."
Istanbul, Turkey / Türkçe
Joined: December 16, 2004
KitMaker: 1,163 posts
AeroScale: 255 posts
Posted: Monday, March 14, 2011 - 09:05 PM UTC
Quoted Text
Emre,
Model Master make the RAF Azure Blue in both enamel and acrylic, Gunze Sangyo also have RAF Azure Blue in one of their Aircraft Paint sets I'm not familar with which set number it is, {CS-652 or CS-654}, Life Color have Azure Blue in one of their paint sets.
Humbrol #157 is to dark for the RAF Azure Blue, Humbrol #47 would be the closest match from a Humbrol tinlet of Azure Blue.
The RAF and the USAAC both had Azure Blue but the USA mix was a different formula to the RAF colour.
Can you tell me which camo scheme and which P40 version you are building.
Hope this helps a little.
Thanks a lot for the info Rob!
This is the P-40 I want to build.
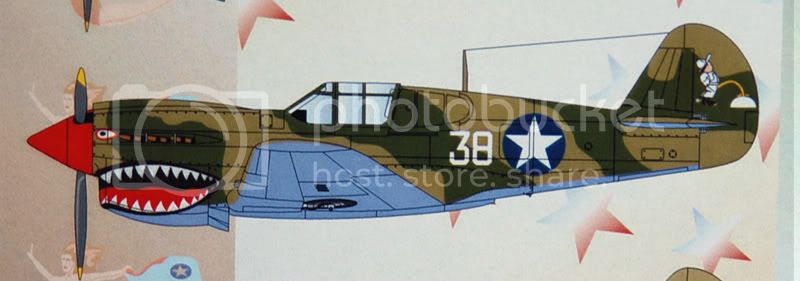
However, even the Eagle Cal decal sheet instructions are not sure about the actual colors of this aircraft. They state the colors are Azure Blue for the undersurfaces, while Dark Green OR Dark Brown over Middlestone. They believe it is more likely green, so the illustrations are green, which I'll follow.
If you have further input about colors, I'll be very glad if you can share.
Proud Supporter of Armorama Campaigns
Victoria, Australia
Joined: September 19, 2003
KitMaker: 708 posts
AeroScale: 674 posts
Posted: Tuesday, March 15, 2011 - 01:24 AM UTC
Emre,
The US applied colours on that P-40 Medium Green/Sand over Light Blue, Model Master Medium Green is listed as US Medium Green 42, the Sand is Model Master Wood. Light Blue can be made as a 50/50 mix of Humbrol #47 and #130.
In the Gunze range the closest to Medium Green is H-340 Field Green and 19 Sandy Brown as the closest colours for the camo scheme.


This model subject was painted in the Light Blue {a 50/50 mix} on the under surfaces, the upper scheme is Olive Drab/Wood from the Model Master range.

I hope this info is helpfull
President:- Southern Model Club.
Those who never learn from history will always repeat it.
"When you go home tell them of us and say.
For your tomorrow we gave our today."
Istanbul, Turkey / Türkçe
Joined: December 16, 2004
KitMaker: 1,163 posts
AeroScale: 255 posts
Posted: Tuesday, March 15, 2011 - 01:45 AM UTC
Thanks Rob, very helpful indeed. The only problem is that I don't have any of the colors you mention

Let me see what I can do about that.
One question about the P-40 you built. It has a shark-mouth, but where are the eyes?
Proud Supporter of Armorama Campaigns
California, United States
Joined: April 01, 2002
KitMaker: 4,287 posts
AeroScale: 1,164 posts
Posted: Tuesday, March 15, 2011 - 05:18 AM UTC
"Don't fear the night, fear what hunts at night"
Texas, United States
Joined: February 22, 2008
KitMaker: 5,026 posts
AeroScale: 2,811 posts
Posted: Tuesday, March 15, 2011 - 06:03 AM UTC
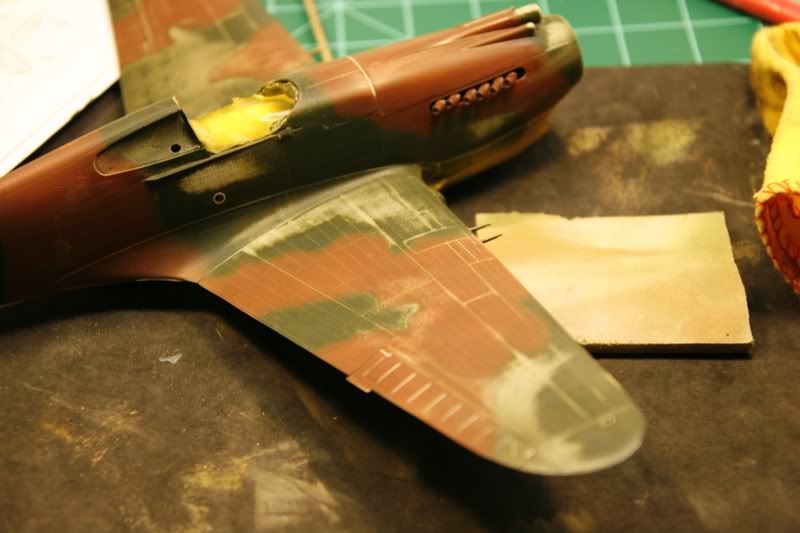
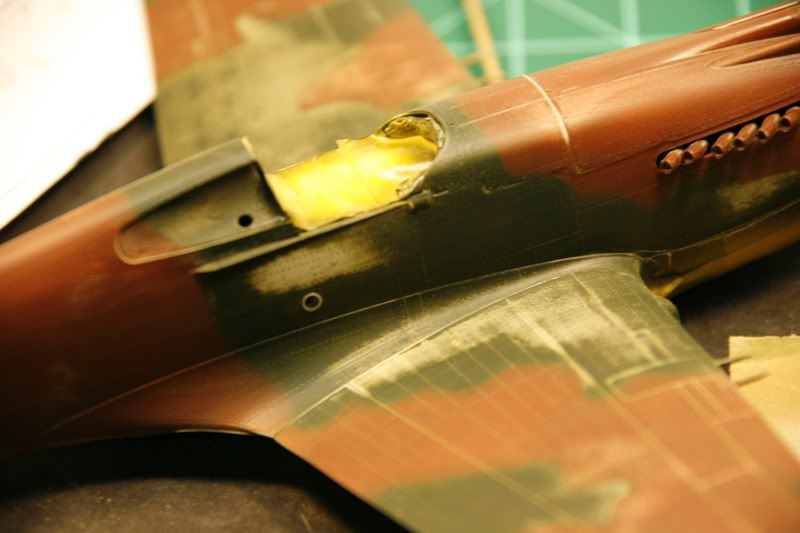
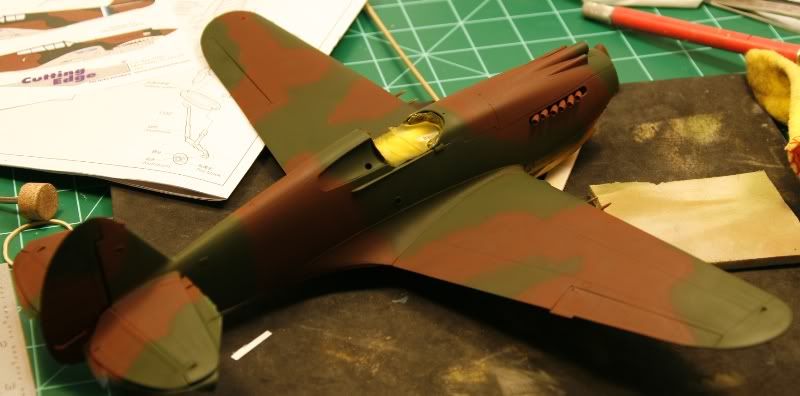
@ Matt: how much data will you lose or is the sanding stick not abrasive enough to worry about. I HATE SANDING, I HATE SANDING, I HATE SANDING
but, I do love to build. I have been eyeing the brown that you have used, what color is that?
@ Emre: after looking at the a/c that you plan to modle I seem to remeber seeing the marking of the individual on the rudder pissing on the red rising sun. Am I wrong or ha PC taken over?
Bob
If it aint broke dont fix it.
Istanbul, Turkey / Türkçe
Joined: December 16, 2004
KitMaker: 1,163 posts
AeroScale: 255 posts
Posted: Tuesday, March 15, 2011 - 06:29 AM UTC
Quoted Text
@ Emre: after looking at the a/c that you plan to modle I seem to remeber seeing the marking of the individual on the rudder pissing on the red rising sun. Am I wrong or ha PC taken over?
Bob
Bob, you lost me there. I don't understand your question?
Proud Supporter of Armorama Campaigns
Texas, United States
Joined: February 22, 2008
KitMaker: 5,026 posts
AeroScale: 2,811 posts
Posted: Tuesday, March 15, 2011 - 06:48 AM UTC
Emre
I am going senile, I just found my CURTISS P-40 book and it shows that marking as you displayed. What I meant to state is that I thought that I recalled the little man was urinating on not a white mound but a rising sun like the Japanese military flag of WWII. It seems that the mind can be a dangerous thing to have (especially in my case) Anyway nice choice of markings for your build. I still like the MTO scheme for my F, North Africa RAF for the C, China (Robert L Scott) for the E. and France 1940 for the P-36.
If it aint broke dont fix it.
California, United States
Joined: April 01, 2002
KitMaker: 4,287 posts
AeroScale: 1,164 posts
Posted: Tuesday, March 15, 2011 - 06:53 AM UTC
"Don't fear the night, fear what hunts at night"
Victoria, Australia
Joined: September 19, 2003
KitMaker: 708 posts
AeroScale: 674 posts
Posted: Tuesday, March 15, 2011 - 07:02 AM UTC
Bob,
The urinating individual on the P40e tail was done many years ago by the now OOP AeroMaster Decals.
Matthew,
Have you thought of using the Gunze 'Paint and Decal' remover on the camo instead of sanding.
Emre,
To answer your question the the RAAF P40e {that I added as a guide to your painting scheme} about not having the 'Eye' added, this particular bird in actual service life, lasted 5 days before it was damaged in a take off accident at Milne Bay. I have DVD with a 20 second film clip of this bird taxing at Milne Bay the day it arrived and there is no 'Eye' on the cowling.
President:- Southern Model Club.
Those who never learn from history will always repeat it.
"When you go home tell them of us and say.
For your tomorrow we gave our today."
California, United States
Joined: April 01, 2002
KitMaker: 4,287 posts
AeroScale: 1,164 posts
Posted: Tuesday, March 15, 2011 - 08:18 AM UTC
I thought of that, but didn't want to risk getting anything that would strip paint in the cockpit. It took no time at all to remove the damaged areas by sanding and then buffing out the affected areas. She's currently drying with her new coat of paint. Working on masking the canopy and windscreen at the moment. Thanks, "Q"

"Don't fear the night, fear what hunts at night"
Attica, Greece / Ελλάδα
Joined: May 01, 2008
KitMaker: 1,437 posts
AeroScale: 1,241 posts
Posted: Tuesday, March 15, 2011 - 08:20 AM UTC
California, United States
Joined: April 01, 2002
KitMaker: 4,287 posts
AeroScale: 1,164 posts
Posted: Tuesday, March 15, 2011 - 10:17 AM UTC
Good progress Nick.
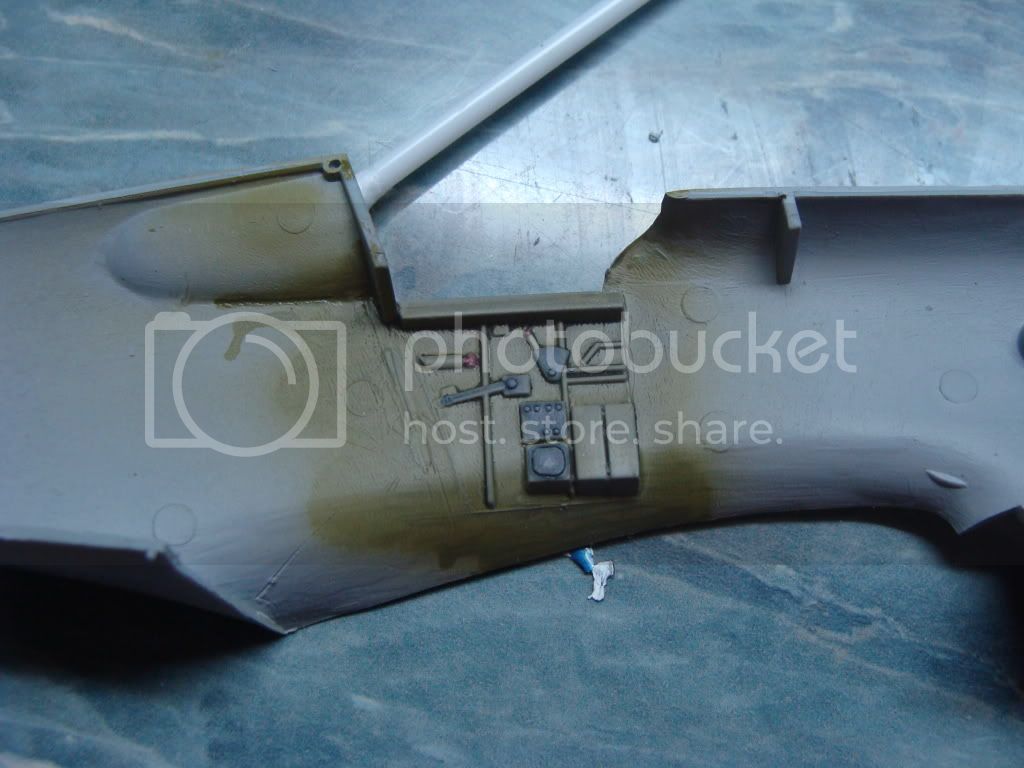
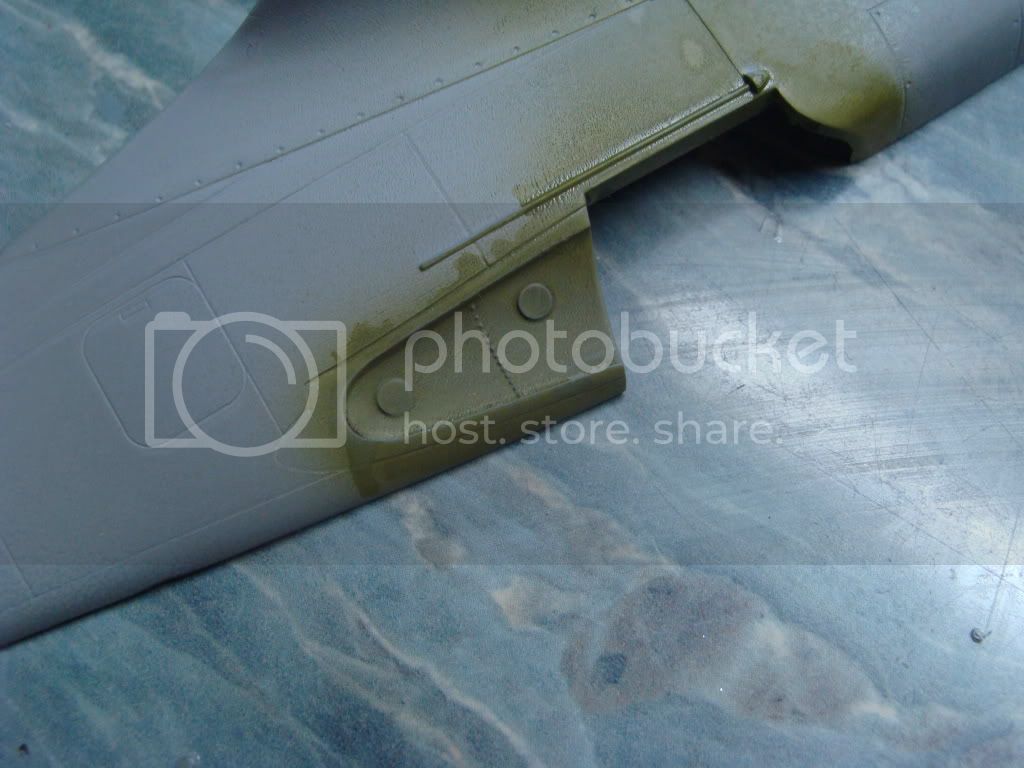
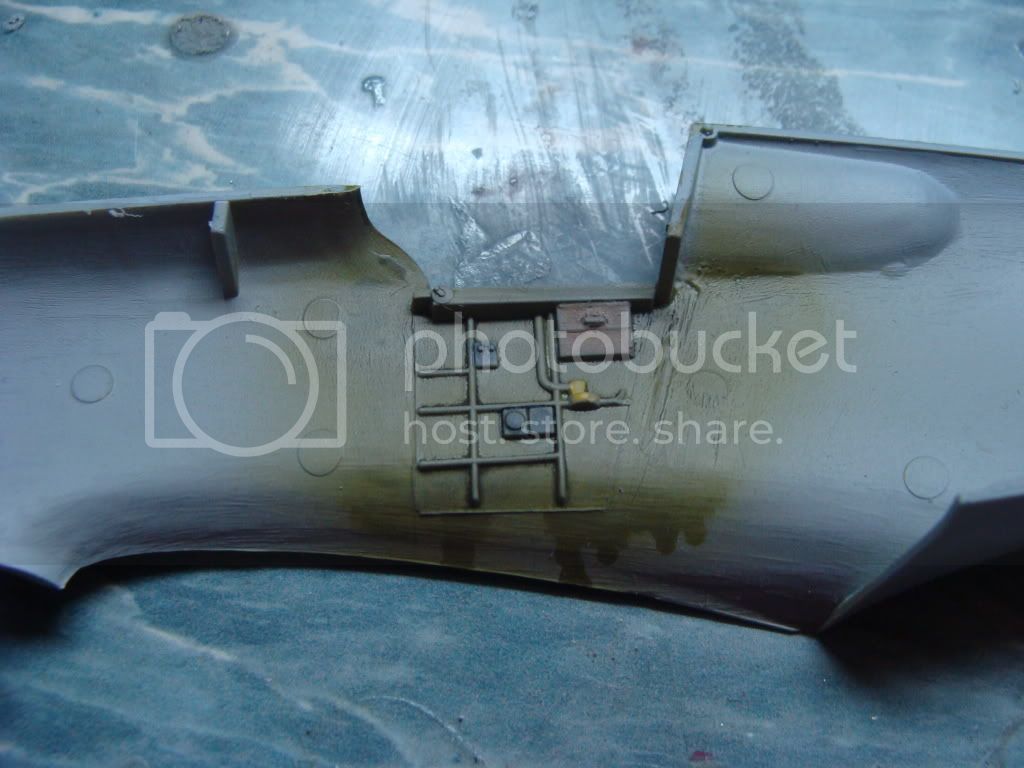
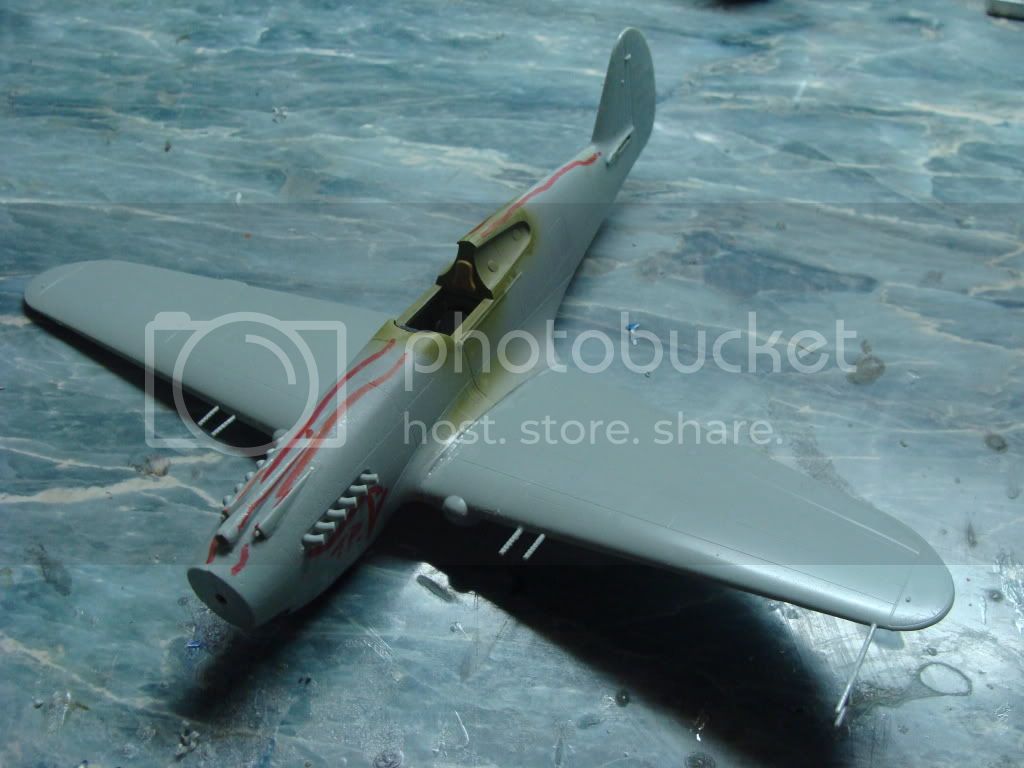
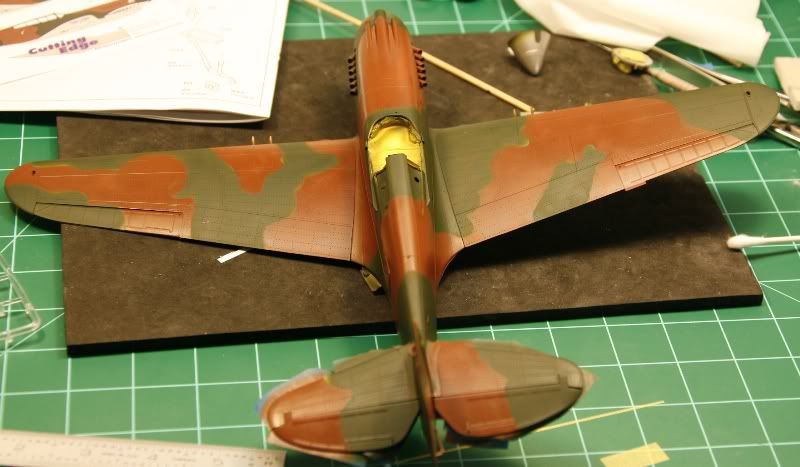
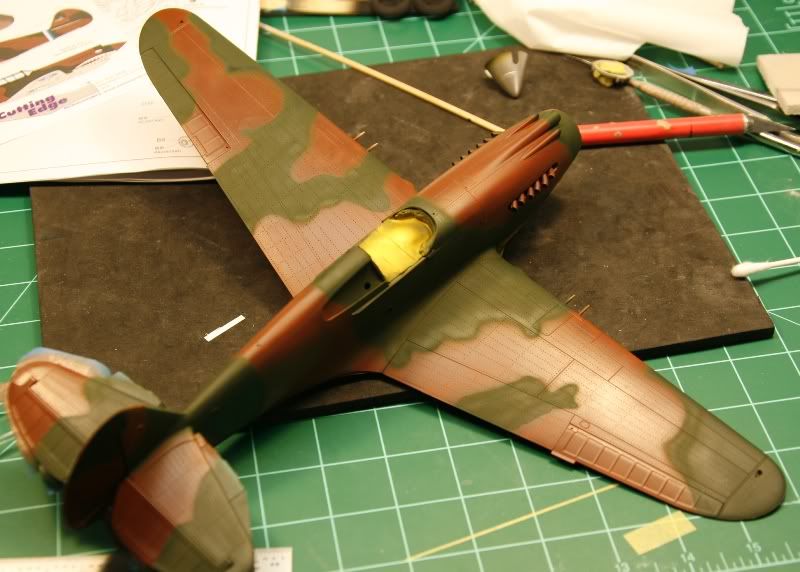
One thing you might want to change is the area behind the cockpit. This was usually painted the same as the exterior of the plane and not the interior green. The persplex panels were easily removed so when it was time to paint, they were removed and replaced once painting was complete. What are all the red markings on the fuselage and wings....seam lines you intend to clean up? Keep at it, looking good.
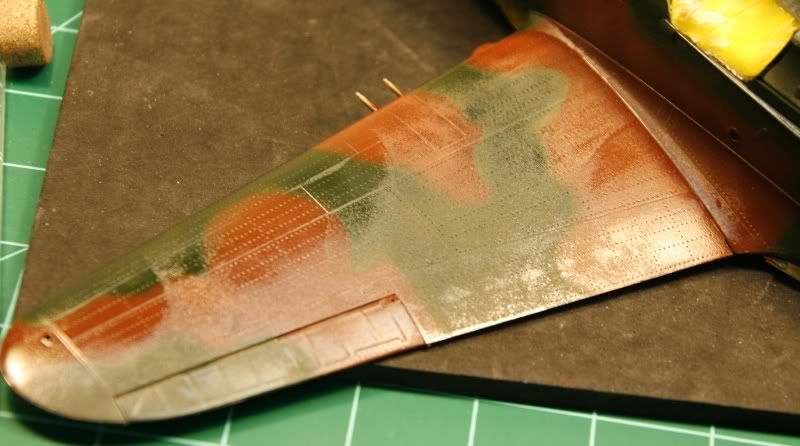
I need to redo the brown on my build. It is too dark compared to the reference pics I have of the planes. yay...more work. No biggee. I think a little dark earth and I'm back in business.
"Q"
"Don't fear the night, fear what hunts at night"
Istanbul, Turkey / Türkçe
Joined: December 16, 2004
KitMaker: 1,163 posts
AeroScale: 255 posts
Posted: Tuesday, March 15, 2011 - 10:18 AM UTC
Quoted Text
Emre,
To answer your question the the RAAF P40e {that I added as a guide to your painting scheme} about not having the 'Eye' added, this particular bird in actual service life, lasted 5 days before it was damaged in a take off accident at Milne Bay. I have DVD with a 20 second film clip of this bird taxing at Milne Bay the day it arrived and there is no 'Eye' on the cowling.
A blind sharkie... naah, doesn't look cool

Proud Supporter of Armorama Campaigns
Auckland, New Zealand
Joined: October 25, 2005
KitMaker: 949 posts
AeroScale: 493 posts
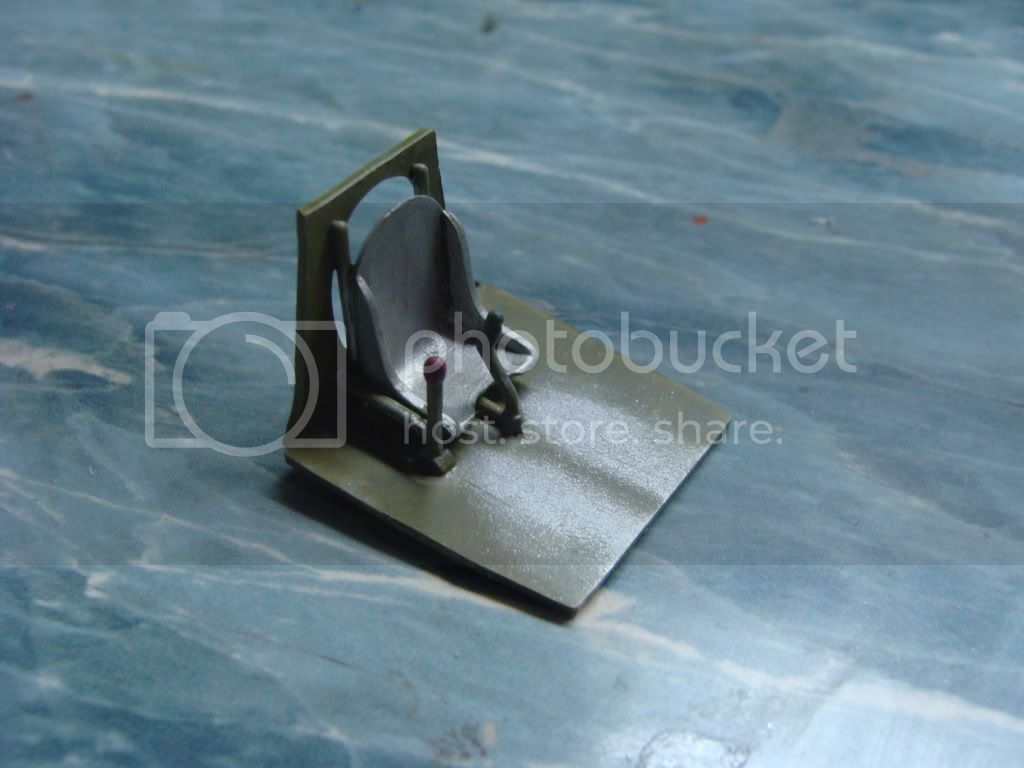
Posted: Tuesday, March 15, 2011 - 02:55 PM UTC
Hi Guys
2nd attempt at posting some photos.
Box art and Gloria Lyons decals


Cockpit nearly complete only need to add the scratch built seat belts.


More soon.
Hope the photos work this time.
Comments welcome.
chris
"A Geek is someone who has found something more interesting than sex."
Neil Degrasse Tyson
Texas, United States
Joined: February 22, 2008
KitMaker: 5,026 posts
AeroScale: 2,811 posts
Posted: Tuesday, March 15, 2011 - 05:11 PM UTC
Chris: nice looking office, what tape are you using it looks medical.
Bob
If it aint broke dont fix it.
Attica, Greece / Ελλάδα
Joined: May 01, 2008
KitMaker: 1,437 posts
AeroScale: 1,241 posts
Posted: Wednesday, March 16, 2011 - 12:48 AM UTC
Roger that, I'll paint them properly, later
Excactly the red marker lines I drew, is to remind me to apply putty and rub to close the gaps
Thank you very much Mr. Mathew

Cheers Nick

California, United States
Joined: April 01, 2002
KitMaker: 4,287 posts
AeroScale: 1,164 posts
Posted: Wednesday, March 16, 2011 - 05:06 AM UTC
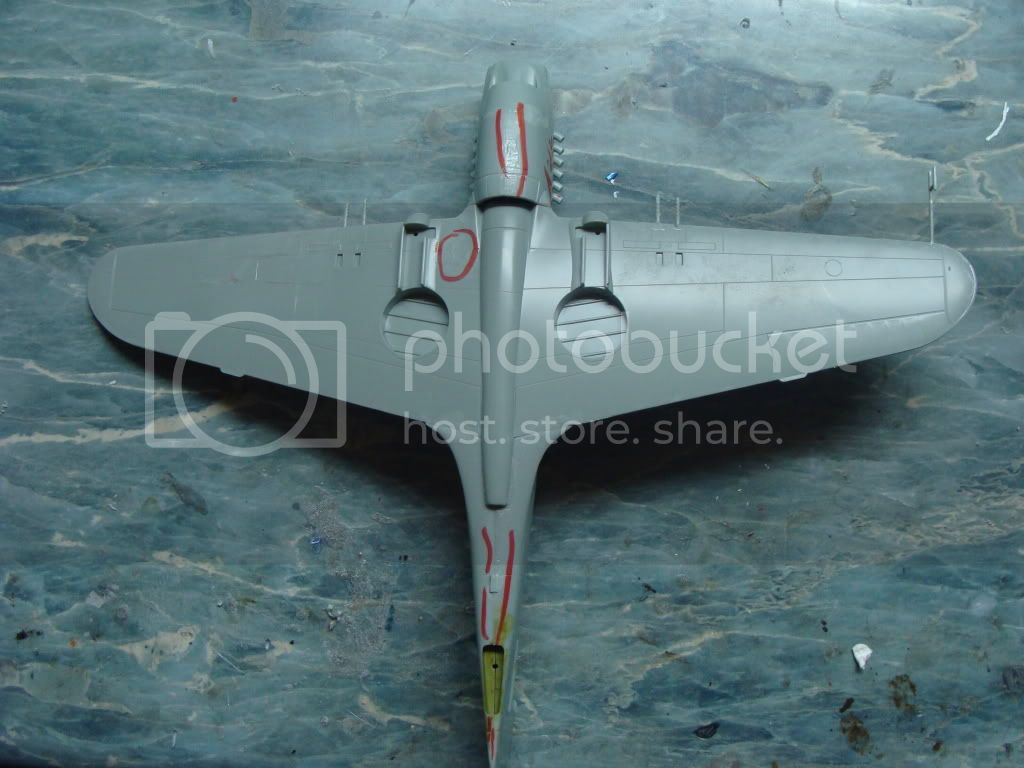
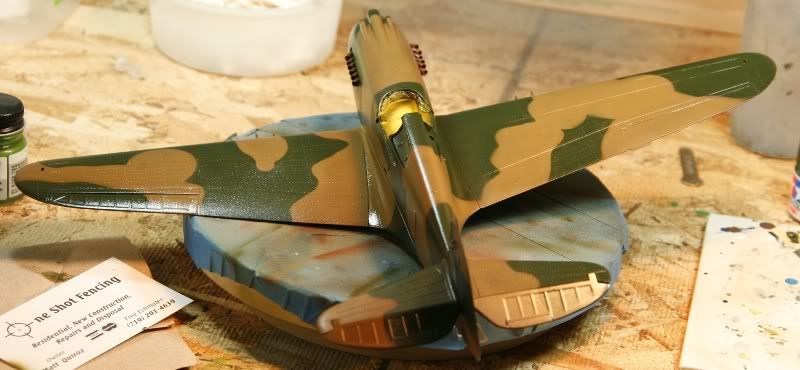
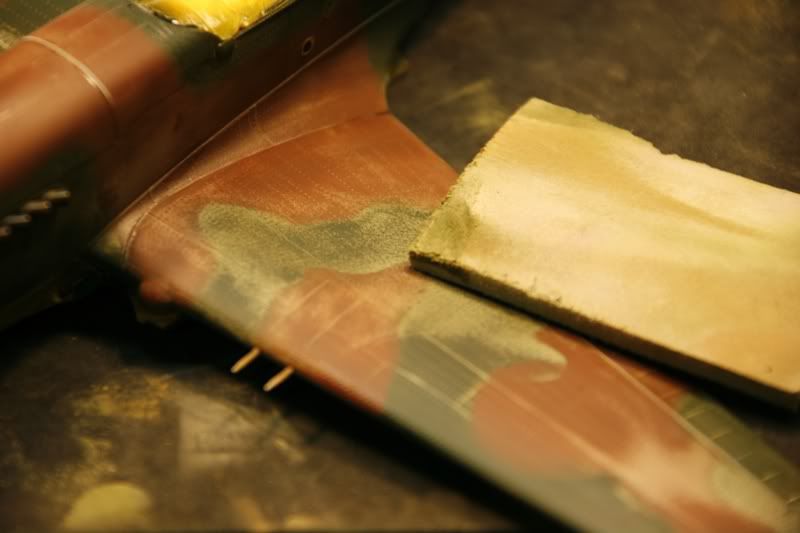
Well after a quick remaksing job she now has a better color applied. Quite a bit of a difference between the old and the new. The brown I initially used made this thing look like a Russian plane. I went through my references and pics I found online and the dark earth looks considerably closer. Not sure why I chose the flat brown when I did...must be getting old or something.. lol

Anyway, she has been repainted and is wearing her gloss coat. Once this has dried for a couple of days I'll get at it with decals. Not a lot of them on this particular bird so that should go rather quickly. More to follow. "Q"
Old color...
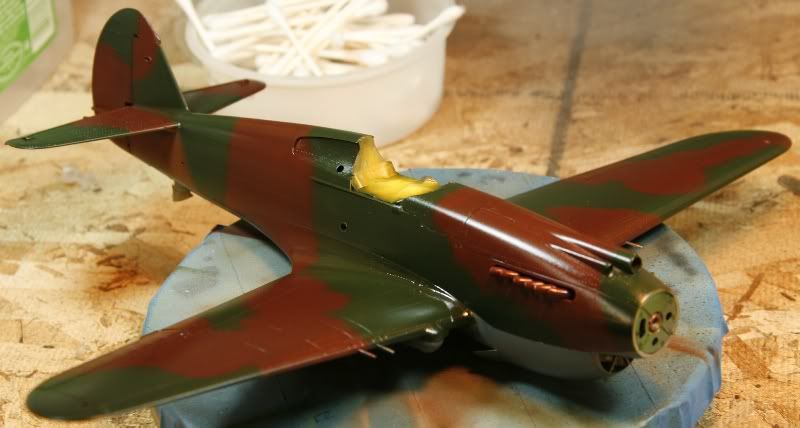
New color...


I masked off where the US insignia would have been painted over. These markings are pretty obvious in pics I have seen. I think it adds some visual interest as well....
"Don't fear the night, fear what hunts at night"
Attica, Greece / Ελλάδα
Joined: May 01, 2008
KitMaker: 1,437 posts
AeroScale: 1,241 posts
Posted: Wednesday, March 16, 2011 - 08:20 AM UTC
Hello again!
When I first saw the initial colouring I thought that It was going to be a "mysterious" P-40, but now the colors look so familiar! How the heck did you managed to confuse it Mr. Matthew ?
It's very nice until now, but watch out, I can see some overspray in places
Cheers NIck
California, United States
Joined: April 01, 2002
KitMaker: 4,287 posts
AeroScale: 1,164 posts
Posted: Wednesday, March 16, 2011 - 08:32 AM UTC
Thanks Nick. I can assure you, there isn't any over-spray. Just some tricks played by the lighting.
"Q"
"Don't fear the night, fear what hunts at night"

#439
Washington, United States
Joined: November 05, 2005
KitMaker: 4,950 posts
AeroScale: 3,192 posts
Posted: Wednesday, March 16, 2011 - 09:34 AM UTC
Yea, the lighting isn't helping. Tail on view, the port stab looks brown, almost can,'t see the demarcation line. Both stabs look like the fabric got peeled off, not that way in the side on views.
Hanger Queens in Waiting:
Monogram 1/72 F8F-1
Corsair the Sky Pirate - 1/72 Ace A-7D
Century Series - Airfix 1/72 F-105G
Anti Shipping - Academy 1/72 PBJ-1D
Academy 1/72 F-84E
Auckland, New Zealand
Joined: October 25, 2005
KitMaker: 949 posts
AeroScale: 493 posts
Posted: Wednesday, March 16, 2011 - 10:07 AM UTC
Hi Bob
Thanks for the comment,it's coming along.
The tape is just bog standard masking tape,I've yet to figure out how to use our camera properly so the photo aren't quite true.
Chris

"A Geek is someone who has found something more interesting than sex."
Neil Degrasse Tyson
California, United States
Joined: August 03, 2003
KitMaker: 197 posts
AeroScale: 42 posts
Posted: Friday, March 18, 2011 - 08:12 AM UTC
Still here, just fighting with the NMF finish. Getting ready for attempt #3. Attempt #2 wasn't bad until I blew dust all over the still wet surface.


 )
)