Air Campaigns
Want to start or join a group build? This is where to start.
OFFICIAL: What If? Campaign Thread
windysean
_VISITCOMMUNITY
Wisconsin, United States
Joined: September 11, 2009
KitMaker: 1,917 posts
AeroScale: 563 posts
Posted: Thursday, December 15, 2011 - 02:29 AM UTC
Painting has begun on my build. Since this is a what if, I'm painting it how I want, so it's getting a white undersides, dark sea blue sides, and a top camo similar to the PT boats that would have operated in that theater at small island bases alongside my floatplane.
WhiteBase-20111211-1934.jpg
I then masked off the white, but I have no photo of painting the sea blue sides. Next for a light green first camo color, I used some SAC Bomber Green I had around. A corsair sure looks weird in SAC Bomber Green!
I'm slightly concerned that the gloss of the sea blue was still slightly tacky as I was applying the masking tape for the top camo. I hope it turns out okay-- still two more colors to apply before I can remove the tape and see if it lifts paint.
SACbomberGreen-20111214-2157.jpg
Cheers!
-Sean H.
TaiidanTomcat
_VISITCOMMUNITY
Alabama, United States
Joined: January 04, 2009
KitMaker: 45 posts
AeroScale: 31 posts
Posted: Thursday, December 15, 2011 - 06:15 AM UTC
I like the PT Boat Camo Idea
Tomcat31
#042
_VISITCOMMUNITY
England - North East, United Kingdom
Joined: November 18, 2006
KitMaker: 2,828 posts
AeroScale: 1,720 posts
Posted: Thursday, December 15, 2011 - 07:18 AM UTC
Hey All, Deputy leader checking in...

Sam's laid up at the moment with a bad back so it'll be a while before she has any updates. Mine on the other hand will be hopefully starting this weekend.

Ben - Cockpit looks good so far, I might of missed it but which Testors kit are you building and what is you' what if' theme?

Sean - great progress so far, finger crossed that the paint job doesn't lift
JClapp
#259
_VISITCOMMUNITY
Massachusetts, United States
Joined: October 23, 2011
KitMaker: 2,265 posts
AeroScale: 1,715 posts
Posted: Thursday, December 15, 2011 - 08:49 AM UTC

Quoted Text

Painting has begun on my build.


Thats old-timey model airplane making, that is. and well done.
this is relevant to my interests.
It brings back memories of when I was a kid, my dad made model airplanes. He'd start with a block of wood and a sheet of half templates, which he would paste onto card and carefully cut out., Then he'd sand and sand and try the templates until they fit. I never had the patience to attempt it, and anyway molded styrene kits were a million times cooler....

mykroft
_VISITCOMMUNITY
Ontario, Canada
Joined: November 14, 2009
KitMaker: 270 posts
AeroScale: 264 posts
Posted: Thursday, December 15, 2011 - 01:14 PM UTC
And the basic airframe is together. Need to add the intake, wing cannon and do a little filling on the leading edge roots and then the Spiteful will be ready for paint.


AZmodel Supermarine Spiteful 1/72 by mawz_models, on Flickr

Note I'm not going with the box scheme (this IS a What If boxing, all schemes are fictional) but rather the Finnish Green over RLM65 scheme that the Ilmavoimat's Bf109G's wore late in their life.
windysean
_VISITCOMMUNITY
Wisconsin, United States
Joined: September 11, 2009
KitMaker: 1,917 posts
AeroScale: 563 posts
Posted: Friday, December 16, 2011 - 01:51 AM UTC
Thanks, guys!
I can't vouch for the accuracy of my PT boat scheme. I'm trying to use slightly smaller sworls, the plane being much smaller than the boats. Anyway, my second camo color was almost Africa Mustard...
2ndCamoColor-20111215-2227.jpg
...but good golly, that's yellow, so I overcoated that with some almond or nutmeg that I had around.
More photos to follow. You can barely see the masking tape shapes on the upper surfaces.
-Sean H.
SGTJKJ
#041
_VISITCOMMUNITY
Kobenhavn, Denmark
Joined: July 20, 2006
KitMaker: 10,069 posts
AeroScale: 3,788 posts
Posted: Friday, December 16, 2011 - 10:34 AM UTC
Looks good, Sean.

Looking forward to see more when the masking comes of.
Jessie_C
_VISITCOMMUNITY
British Columbia, Canada
Joined: September 03, 2009
KitMaker: 6,965 posts
AeroScale: 6,247 posts
Posted: Friday, December 16, 2011 - 05:07 PM UTC
The Traveller is now in primer! I've hung the cowling on just to see how it'll look

The windscreen doesn't have the greatest fit, and I was reluctant to bend it for fear of breaking it.


Here's the finished engine looking sharp against the grey background.


windysean
_VISITCOMMUNITY
Wisconsin, United States
Joined: September 11, 2009
KitMaker: 1,917 posts
AeroScale: 563 posts
Posted: Saturday, December 17, 2011 - 05:12 AM UTC
Thanks, Jesper!
Jessie, that's looking good in primer. You're right not to try to bend brittle clear plastic. I've tried that myself before, never with good results.

I made several mistakes, being too hasty not to let all the paint cure before moving on, not having a plan for my camo instead of "winging it" with my masking tape, and not really choosing my colors well.
I was hurrying a bit to avoid letting the masking tape get too old on the plane. I now have some serious sanding and touch-up ahead of me. There are tall ridges at the edges of each color. I'll build up gloss for decaling, and sand that to smooth the ridges, hopefully.
Nutmeg2ndColor-20111216-1935.jpg
The camouflage is distinct, to say the least-- and to me, it does have a passing similarity to the PT boat standard camo that I went by.
TapeOff-20111217-1019.jpg
I'm still confident that more clean-up and finally decals will improve the appearance.
Cheers!
-Sean H.
Jessie_C
_VISITCOMMUNITY
British Columbia, Canada
Joined: September 03, 2009
KitMaker: 6,965 posts
AeroScale: 6,247 posts
Posted: Saturday, December 17, 2011 - 06:49 AM UTC
I think that the windscreen issue was caused by the fact that the fuselage halves were nearly crushed in the post. You can see the stress lines here:

I tried to bend them back into shape as well as I could without damaging them even farther. It may be that the fuselage is not as wide as it should be, and that the windscreen would have fit if it were the proper width. I'll know for sure when my next Staggerwing arrives.
c4willy
#305
_VISITCOMMUNITY
Christchurch, New Zealand
Joined: February 01, 2006
KitMaker: 1,673 posts
AeroScale: 1,517 posts
Posted: Saturday, December 17, 2011 - 09:06 AM UTC
@Jessie: All I can say is OUCH! No modeller likes to see that kind of plastic stress on his/her model! I think you've recovered it very well Jessie and the canopy seems quite good from what I can see in the pictures provided. But every modeller is harder on their own work than anyone else. I think you're doing a damn fine job so far.

@Sean: I like the camo job Sean looks really interesting it'll look even better with the floats and decals on! Great work looking forward to seeing it complete!

@ Allen: Tell Sam to be more careful! And pass on my best wishes and my hopes for a speedy recovery, we need her back ASAP! LOL we miss her already!
TaiidanTomcat
_VISITCOMMUNITY
Alabama, United States
Joined: January 04, 2009
KitMaker: 45 posts
AeroScale: 31 posts
Posted: Sunday, December 18, 2011 - 05:17 AM UTC

Quoted Text

Hey All, Deputy leader checking in...

Ben - Cockpit looks good so far, I might of missed it but which Testors kit are you building and what is you' what if' theme?


Here is the kit:

http://www.fantastic-plastic.com/REVELL%20B-2%20HIGH%20TECHNOLOGY%20BOMBER%20PAGE.htm

Described as a "giant lump of plastic" LOL I plan on making it a "WWII never ended, Japanese, 1960's cold war atom bomber." went with brown and tan because the Japanese seem to have that unique color combo.

That corsair Camo is superb
camogirl
_VISITCOMMUNITY
England - North East, United Kingdom
Joined: October 20, 2005
KitMaker: 1,045 posts
AeroScale: 622 posts
Posted: Monday, December 19, 2011 - 03:24 AM UTC
Some great progress guys and such a diveristy of subjects
Im still having to spend most of my time laying down (not a good thing for me) so sitting at the bench is currently out going to attempt some sitting down and decalling later in the week but not sure how it will go with having to sit for quite some time and also slightly lean over my work bench. Currently feel like a human yo-yo can sit down for 10-15 mins then have to either stand up or lay down.
Jessie_C
_VISITCOMMUNITY
British Columbia, Canada
Joined: September 03, 2009
KitMaker: 6,965 posts
AeroScale: 6,247 posts
Posted: Monday, December 19, 2011 - 12:27 PM UTC
I can't let the Kermode feel neglected. SAR aircraft need spotters' windows. Sadly the kit only includes flat panes for what would be the spotters' windows. Since that's not satisfactory, I sought to overcome the deficiencies of the kit.

First, I butchered up a chopstick, since I had one lying about and it was about the right width. I had to chop the chopstick and glue a piece onto one side to make it the correct height, then I filed it to shape, stopping frequently and checking to make sure I didn't get it misshapen.


Now it's got a generous dollop of Mr Surfacer 500 drying on it, after which I'll do some more smoothing, then I'll stretch form the spotters' windows.
TaiidanTomcat
_VISITCOMMUNITY
Alabama, United States
Joined: January 04, 2009
KitMaker: 45 posts
AeroScale: 31 posts
Posted: Wednesday, December 21, 2011 - 03:43 PM UTC
that shop stick is creative! Way to pay attention to detail! Have you stretch formed before? I am hoping to try it sometime it looks fun, probably a bit of a learning curve...
Jessie_C
_VISITCOMMUNITY
British Columbia, Canada
Joined: September 03, 2009
KitMaker: 6,965 posts
AeroScale: 6,247 posts
Posted: Wednesday, December 21, 2011 - 04:47 PM UTC
I haven't done too much. The biggest piece I've done is the nose of a 1/72 Arifix Halifax that I inherited from my cousin about 40 years ago.These will be a little smaller
windysean
_VISITCOMMUNITY
Wisconsin, United States
Joined: September 11, 2009
KitMaker: 1,917 posts
AeroScale: 563 posts
Posted: Thursday, December 22, 2011 - 01:54 AM UTC

Quoted Text

that shop stick is creative! Way to pay attention to detail! Have you stretch formed before? I am hoping to try it sometime it looks fun, probably a bit of a learning curve...


I don't know what you're talking about, so I'll be watching this operation intently!
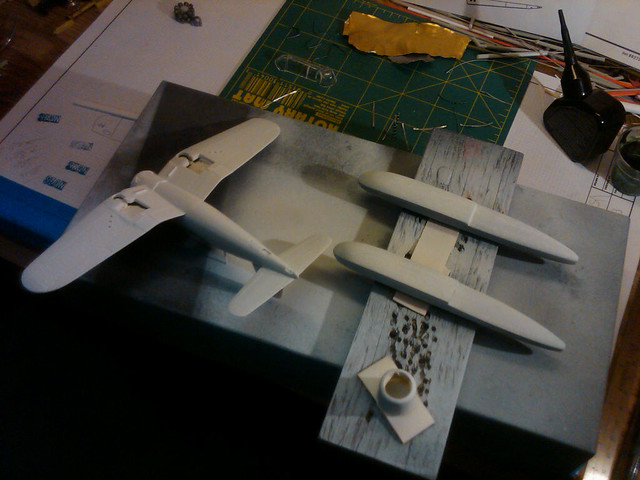
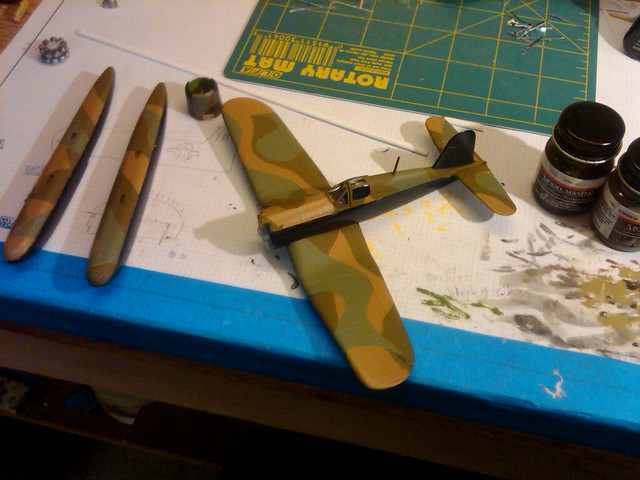
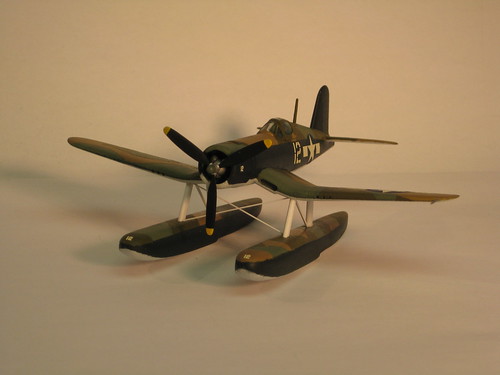
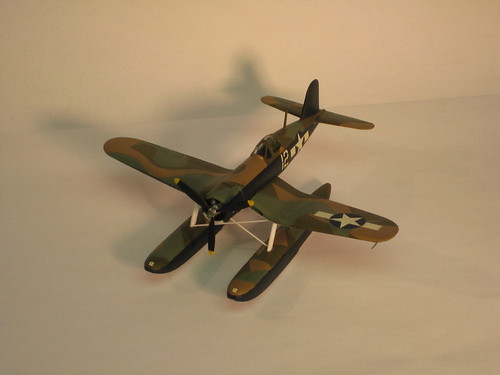
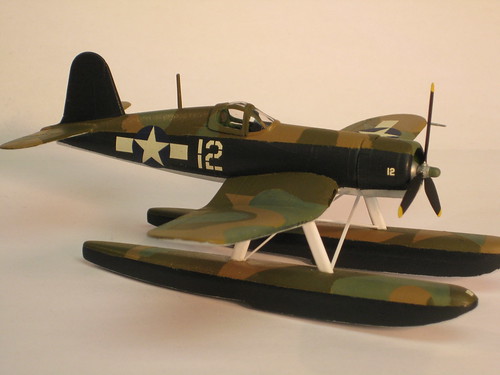
For my part, I worked up (measuring, remeasuring, cutting, remeasuring, trimming, etc.) legs for my pontoons out of styrene strip stock. No easy way to line them up that I could discern, except by eyeball. I attached the legs to the plane with normal Testors plastic cement, but set the bottoms into carved grooves in the wood pontoons and glued with a healthy dose of Aleene's Tacky Craft Glue, which dries clear.
MountingPontoons-20111219-2050.jpg
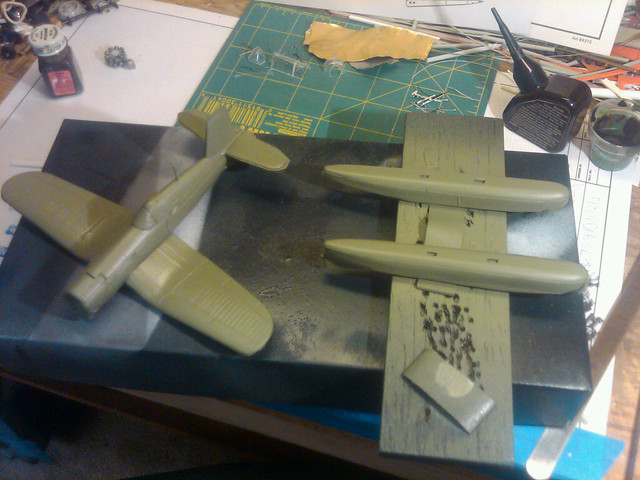
and made bracing from finer strip stock (carefully choosing whatever size I had the most of! )
Bracing-20111221-2147.jpg
PontoonsDone-20111221-2206.jpg
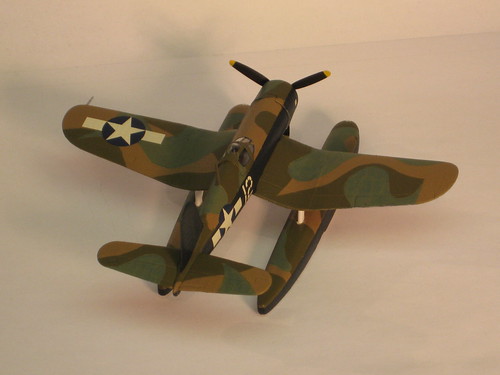
and pontoons are done! I like the white, so I probably won't even paint the pontoon mountings.
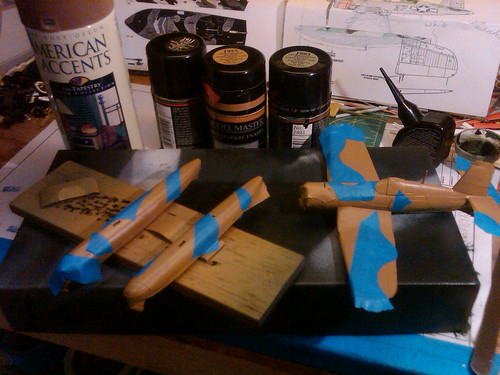
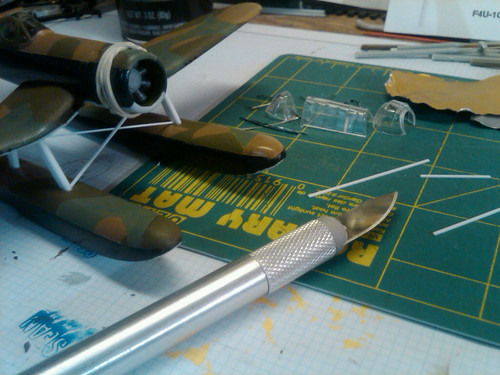
The rubber band is to hold the cowl while my reglueing set, because it had split open during final assembly. There's no definite attachment point on the cowl of this Heller/Humbrol kit to sand and cement, so I didn't even use plastic cement-- I used craft glue instead, for a heavy coating applied around the outside of the cylinders that's sure to grab somewhere on the inside of the cowl for a decent hold.
Retouching the blue and painting and installing the prop next.
Cheers!
Sean H.
Grenadier37
_VISITCOMMUNITY
Texas, United States
Joined: June 02, 2008
KitMaker: 232 posts
AeroScale: 155 posts
Posted: Thursday, December 22, 2011 - 05:28 AM UTC
I've laid the XB-70 aside for the time being; the wings are warped and I didn't notice until they were glued and puttied.

Either a hair dryer or sledge hammer is in order, I'm not sure which.
Jessie_C
_VISITCOMMUNITY
British Columbia, Canada
Joined: September 03, 2009
KitMaker: 6,965 posts
AeroScale: 6,247 posts
Posted: Thursday, December 22, 2011 - 05:43 AM UTC
As I recall that AMT plastic is quite soft. A hair dryer just might do the trick, or perhaps pouring on nearly boiling water, bending and letting it cool would work?
Tomcat31
#042
_VISITCOMMUNITY
England - North East, United Kingdom
Joined: November 18, 2006
KitMaker: 2,828 posts
AeroScale: 1,720 posts
Posted: Thursday, December 22, 2011 - 09:49 AM UTC
Wow Sean some great progress there and I concur that the white gives a nice contrast to the camo scheme.

Grenadier - I agree with Jessie and try warming the wings. I've found running under a running hot tap to warm the part, straighten and then place under cold water.

I've made a little progress by starting the Tomcat and getting the cockpit painted. Hopefully I'll have some progress picture by the weekend.
Jessie_C
_VISITCOMMUNITY
British Columbia, Canada
Joined: September 03, 2009
KitMaker: 6,965 posts
AeroScale: 6,247 posts
Posted: Friday, December 23, 2011 - 02:56 PM UTC
They call it mellow yellow
Okay, first coat of yellow is on. I see that I got sloppy and allowed a couple of sags near the windscreen on both sides and there are a few places here and there where the paint is a bit thin. I'll see about fixing those when I come back from Christmas visiting.


And an elevator mass balance has gone to feed the carpet monster. Something else to make. Of course I'll have just finished gluing on the replacement when I'll find the original piece...


oraora
_VISITCOMMUNITY
Kuching, Malaysia
Joined: June 19, 2002
KitMaker: 216 posts
AeroScale: 128 posts
Posted: Monday, December 26, 2011 - 04:01 AM UTC
I have just completed my ROCAF Kfir. I have given it a 2 tone grey scheme (like their Mirage 2000s). Mostly built out of the box except for the modified nose and the added sparrow launchers. I have equipped it with 1 fuel tank, 2 x AIM 7 and 2 x AIM 9. National markings are from bestfong decals, the squadron marking from albatros modelworks for f104s and the numbers from spares.

I hope you like it.


TaiidanTomcat
_VISITCOMMUNITY
Alabama, United States
Joined: January 04, 2009
KitMaker: 45 posts
AeroScale: 31 posts
Posted: Tuesday, December 27, 2011 - 03:33 AM UTC
WOW!!
SGTJKJ
#041
_VISITCOMMUNITY
Kobenhavn, Denmark
Joined: July 20, 2006
KitMaker: 10,069 posts
AeroScale: 3,788 posts
Posted: Tuesday, December 27, 2011 - 04:40 AM UTC
Love the camouflage, Sean. It looks great.

Nice build, Ken. Cool camouflage scheme that contrasts well with the red stencilling.
windysean
_VISITCOMMUNITY
Wisconsin, United States
Joined: September 11, 2009
KitMaker: 1,917 posts
AeroScale: 563 posts
Posted: Wednesday, December 28, 2011 - 10:30 AM UTC
Thanks for the encouragement, all!
Ken, I agree with Jesper that your Kfir looks fantastic!

My decals were yellowed slightly (20 years old, now that I've thought about it), and that was discouraging. I completed it and got a layer of Testor's Dullcote overall. I'm calling it done, although I might come back later to weather it...
IMG_1396
IMG_1398
CamouflageTopside
IMG_1404
And finally, next to her sister from the Corsairs campaign for comparison...
Comparison_Floatplane to Actual
Of course, I'll post final photos in the gallery when the Kitmaker gallery is up and running again.
Cheers and best wishes for 2012!
-Sean H.