I do dabble in aircraft, but in either 1/72 or 1/32, but mostly building armor.
Thanks so much for the pictures. Your homemade rack is brilliant!
I was wracking my breain trying to figue out what it was or what it was before it was modified.
I will have to dig out some old hangers and the soldering iron and try to bash something half as good together.
World War II
Discuss WWII and the era directly before and after the war from 1935-1949.
Discuss WWII and the era directly before and after the war from 1935-1949.
Hosted by Rowan Baylis
What lately left my assembly line
MLD

Joined: July 21, 2002
KitMaker: 3,569 posts
AeroScale: 419 posts

Posted: Saturday, January 07, 2012 - 10:04 AM UTC

BlackWidow

Joined: August 09, 2009
KitMaker: 1,732 posts
AeroScale: 1,336 posts

Posted: Sunday, February 12, 2012 - 07:44 AM UTC
Thanks for leading this thread to the next page, Mike!  And good luck for building your own rack.
Well folks, the first Germans have arrived here ....
Maybe a few of you follow the "Würger" Campaign for which I've built these 2 beauties.
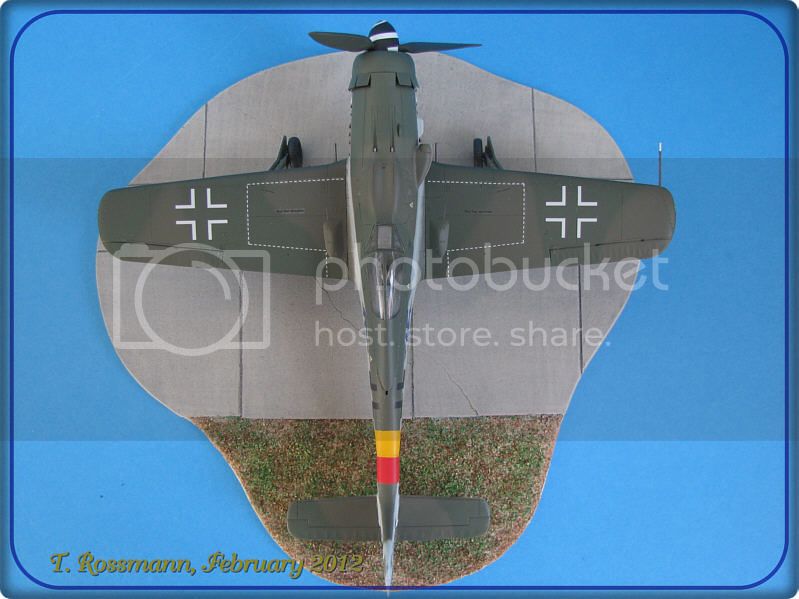
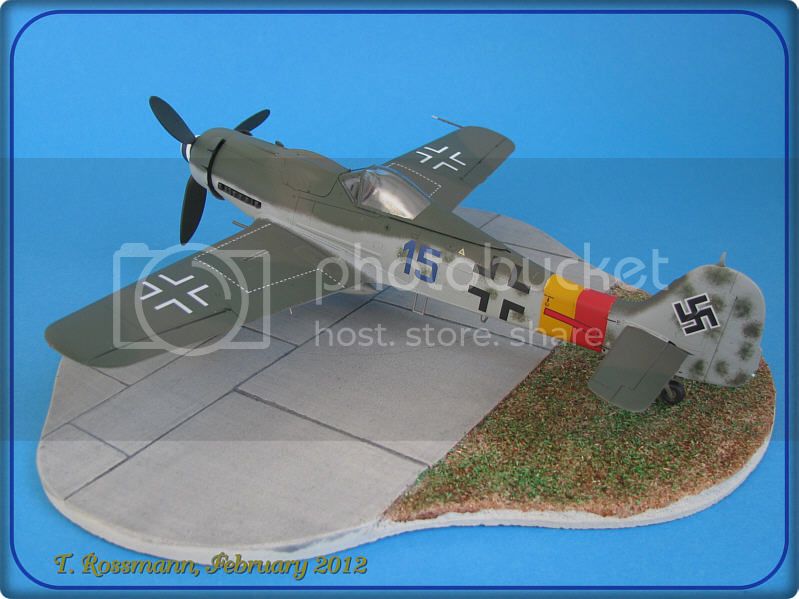
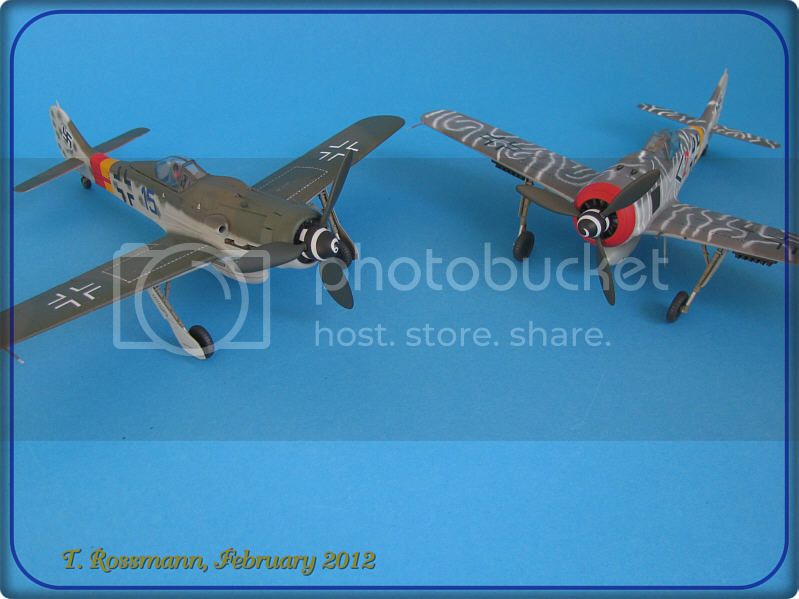
First I want to show you my new Fw 190 D-9 from Tamiya in 1/48 (of course .... )
)
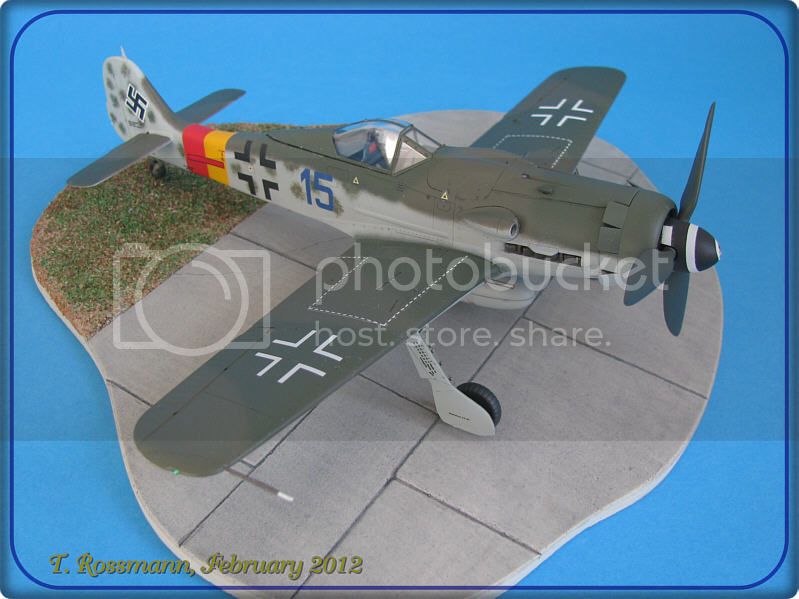
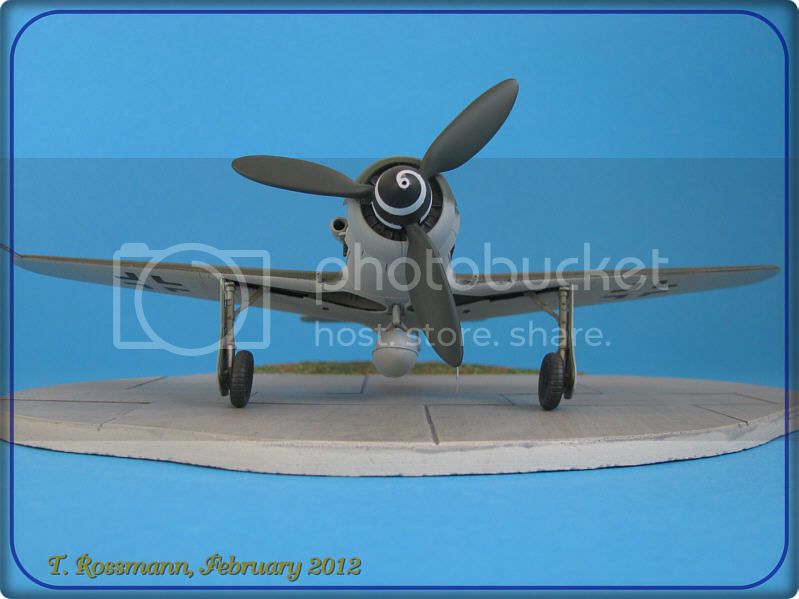
Kurt Tank called the "Dora 9" just a compromise on the way to the Ta 152. The "Langnasen Dora" was powered by a Jumo 213 engine with about 1700 hp. Originally that was a bomber engine, also used in the Ju 88. That's why many pilots first thought, the D-9 would be slow and a lame duck. But they learned better .... As we know today, the D-9 was one of the best fighter aircrafts in the German Luftwaffe, which at least equals all allied fighters like Spitfire and Mustang. The armament consisted of two 20 mm MG 151 in the wings and two 13 mm MG 131 in the fuselage.


Tamiya offers 3 decal versions and I've chosen the one on the box from 4./JG 301 in 1945 with this colourful fuselage band. Building the kit is no problem at all. Everything fits together perfect and no filler is needed. Just a bit of sanding, that's all. But somehow the canopy doesn't fit properly since I've opened it. Sorry for that.
But this lady gave me a really hard job with the paint. For the first time I used Testors paints and airbrushed RLM 76 but that came off again with the tape .... So I took Gunze's RLM 76 and everything went fine. Next colour was RLM 81 Brownviolet and for the first time my ever faithful Agama paint let me down and made a mess when it left a grey shade on the kit which looked like dust. I've never seen this before ....
  Overspraying didn't help so here I picked Gunze again and everything was fine. Finally, when everything was finished and the masks were taken from the canopy, there she stood in all her beauty, my new Focke-Wulf 190! When I took the model away from the workbench to store it on the shelf, I banged my ellbow on the stool and the brandnew model fell about 1,50 meter on the floor ....
  I must have been shocked for a minute or so when I finally looked for the damage. Puh! Lucky me! Nothing serious happened, because the kit fell on the landing gear. Only the fragile Morane antenna broke off and one main wheel got loose. Repairs took 5 minutes.
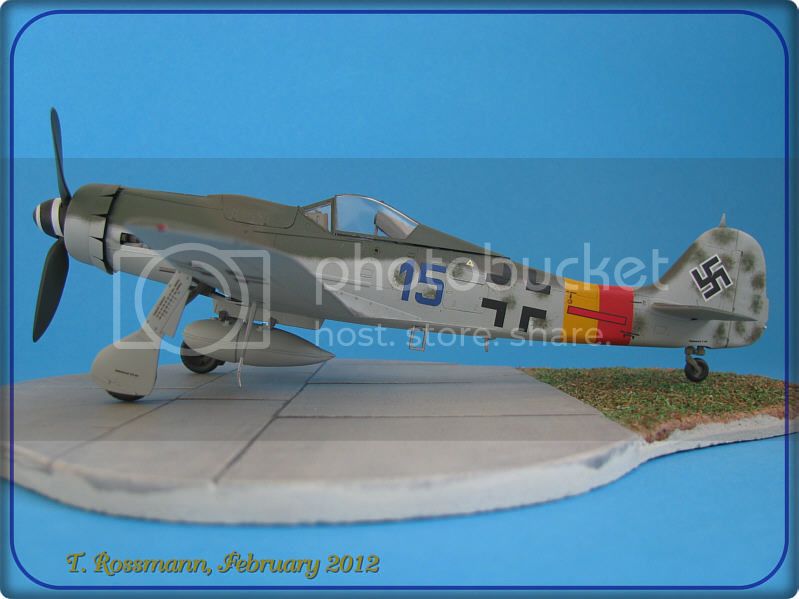
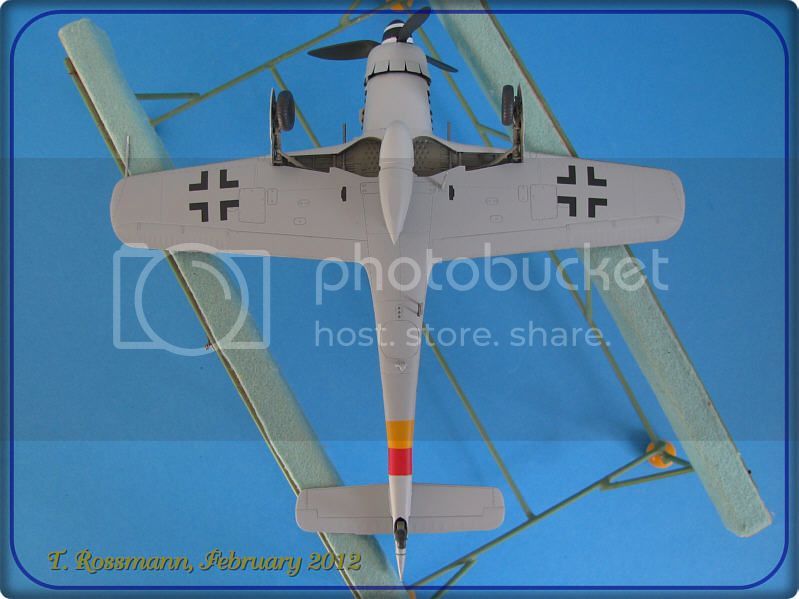
As I mentioned, I mostly used Gunze on this bird. RLM 76 is H 417, RLM 81 is H 421 and RLM 83 (Dark Green not Light Green!) is H 423. The yellow/red fuselage band was painted with Revell 310 und 36. For the canopy I used the Eduard mask EX 005. As always I've built out of box and not weathered.
Happy modelling!
Torsten
 And good luck for building your own rack.
Well folks, the first Germans have arrived here ....

Maybe a few of you follow the "Würger" Campaign for which I've built these 2 beauties.
First I want to show you my new Fw 190 D-9 from Tamiya in 1/48 (of course ....
 )
)

Kurt Tank called the "Dora 9" just a compromise on the way to the Ta 152. The "Langnasen Dora" was powered by a Jumo 213 engine with about 1700 hp. Originally that was a bomber engine, also used in the Ju 88. That's why many pilots first thought, the D-9 would be slow and a lame duck. But they learned better .... As we know today, the D-9 was one of the best fighter aircrafts in the German Luftwaffe, which at least equals all allied fighters like Spitfire and Mustang. The armament consisted of two 20 mm MG 151 in the wings and two 13 mm MG 131 in the fuselage.


Tamiya offers 3 decal versions and I've chosen the one on the box from 4./JG 301 in 1945 with this colourful fuselage band. Building the kit is no problem at all. Everything fits together perfect and no filler is needed. Just a bit of sanding, that's all. But somehow the canopy doesn't fit properly since I've opened it. Sorry for that.


But this lady gave me a really hard job with the paint. For the first time I used Testors paints and airbrushed RLM 76 but that came off again with the tape ....
 So I took Gunze's RLM 76 and everything went fine. Next colour was RLM 81 Brownviolet and for the first time my ever faithful Agama paint let me down and made a mess when it left a grey shade on the kit which looked like dust. I've never seen this before ....
  Overspraying didn't help so here I picked Gunze again and everything was fine. Finally, when everything was finished and the masks were taken from the canopy, there she stood in all her beauty, my new Focke-Wulf 190! When I took the model away from the workbench to store it on the shelf, I banged my ellbow on the stool and the brandnew model fell about 1,50 meter on the floor ....
  I must have been shocked for a minute or so when I finally looked for the damage. Puh! Lucky me! Nothing serious happened, because the kit fell on the landing gear. Only the fragile Morane antenna broke off and one main wheel got loose. Repairs took 5 minutes.

As I mentioned, I mostly used Gunze on this bird. RLM 76 is H 417, RLM 81 is H 421 and RLM 83 (Dark Green not Light Green!) is H 423. The yellow/red fuselage band was painted with Revell 310 und 36. For the canopy I used the Eduard mask EX 005. As always I've built out of box and not weathered.
Happy modelling!
Torsten

Siderius

Joined: September 20, 2005
KitMaker: 1,747 posts
AeroScale: 1,673 posts

Posted: Sunday, February 12, 2012 - 08:12 AM UTC
Excellent recovery Torsten! Your bird looks great! Thanks for sharing it with us. Russell

BlackWidow

Joined: August 09, 2009
KitMaker: 1,732 posts
AeroScale: 1,336 posts

Posted: Sunday, February 12, 2012 - 08:28 AM UTC
The other half of my first dual combo this year is the Fw 190 F-8, also from Tamiya and in 1/48 again, finished just a day after the D-9.
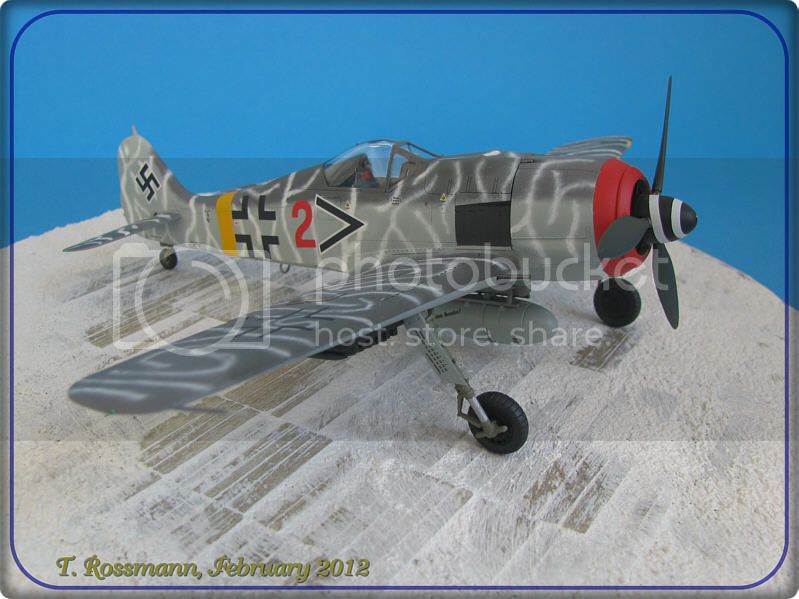
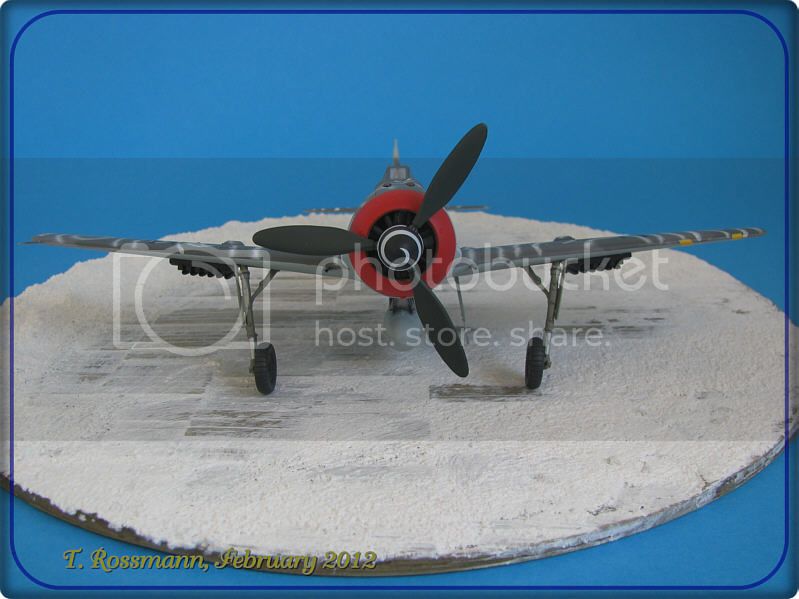
The "Friedrich" was the fighter bomber version of the fighter, also powered by a BMW 801 with about 1700 hp. The aircraft was more armoured than the fighter and had a stronger landing gear to carry bigger bombs. On the other hand the weapons were reduced to only two MG 151 in the wings and two MG 17 in the fuselage. In the Schlachtgeschwader (fighter bomber wings) it replaced the famous Ju 87 Stuka, which became more and more obsolete.
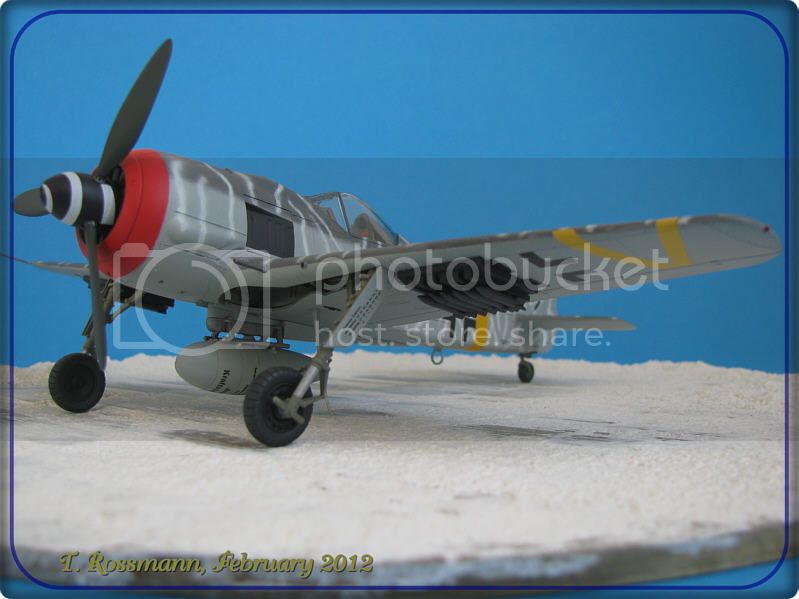
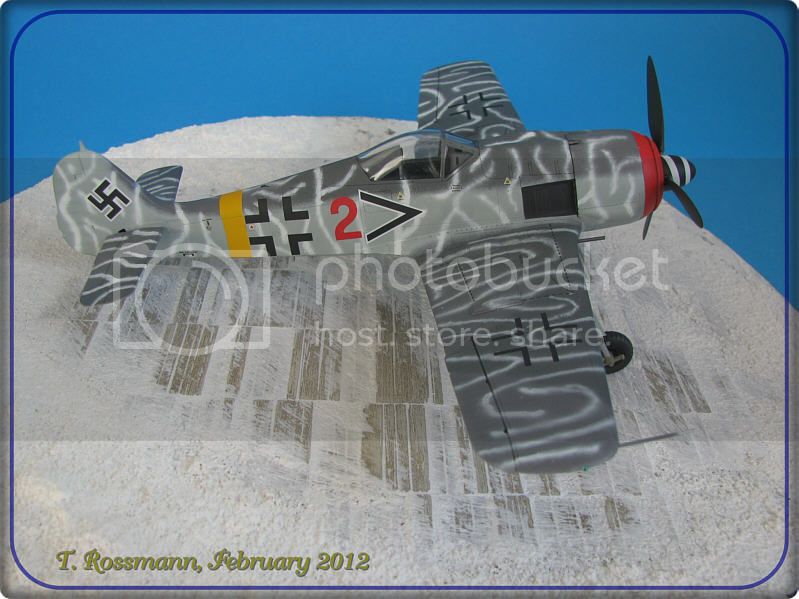
Tamiya offers 4 decal versions for this kit and I went for this one in winter camouflage from I./SG 2 in Hungary, January 1945. Building it is the same fun as the D-9. Again no problems at all.
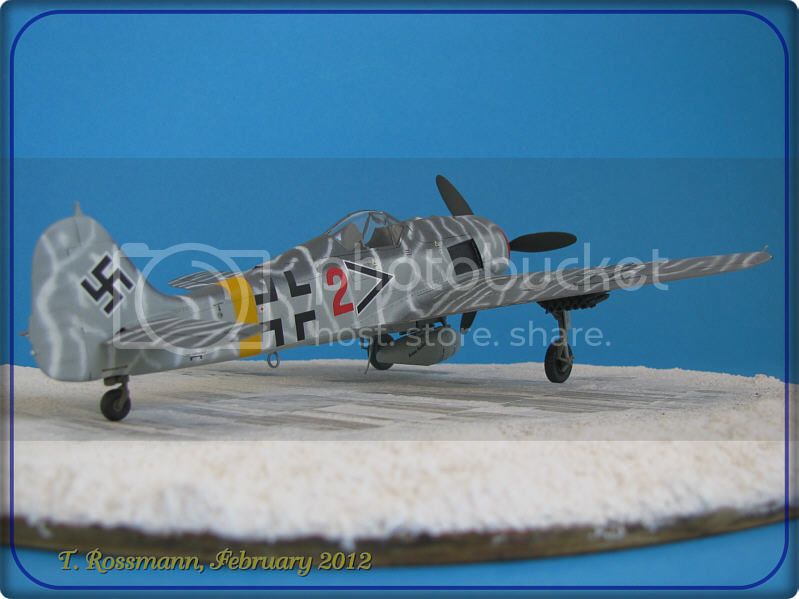
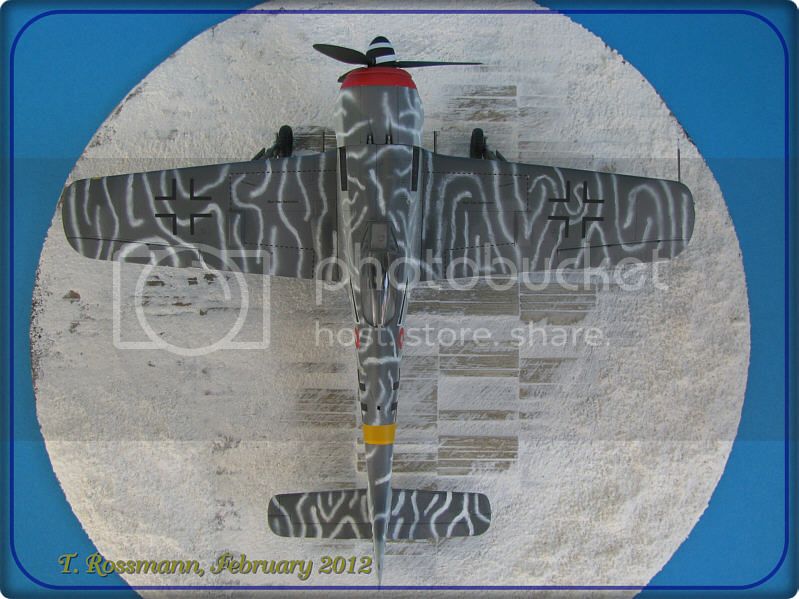
Except for the white camo the painting is nothing difficult. For the white lines I used the 0,25 mm needle and painting it took me 3 days .... That was the difficult part. Comparing it with the original photo the lines could be a bit wider but I like them the way they are now.
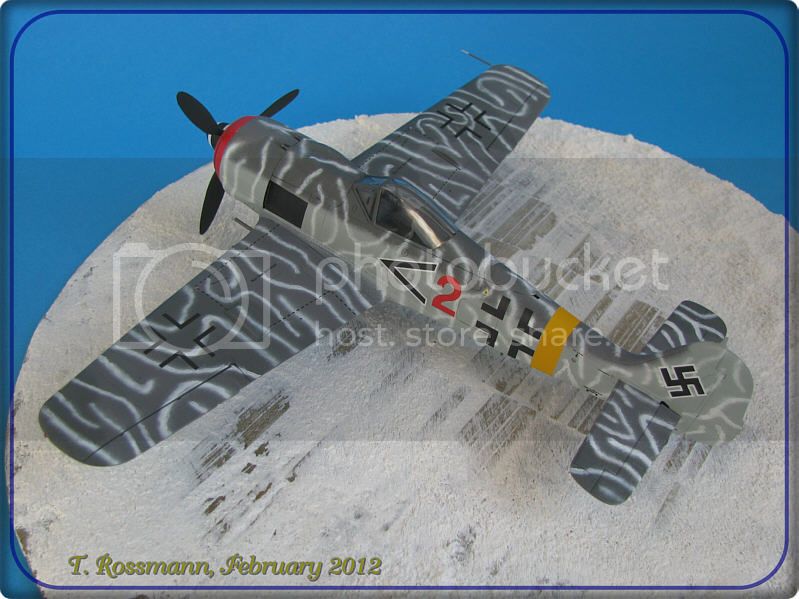
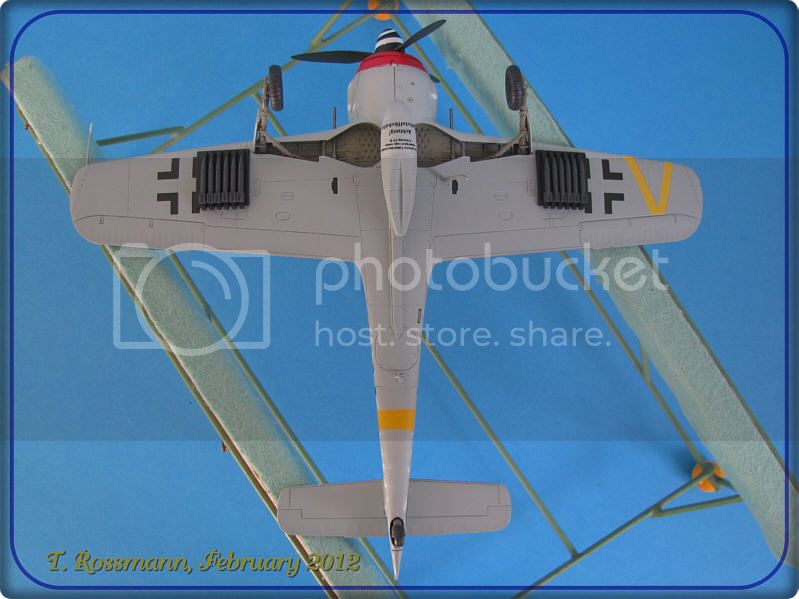
For the attack armament I've chosen the anti tank rockets "Panzerblitz", as I'm sure there were many T-34 crawling around in Hungary in those days. Note the missing lower part of the landing gear covers. That was quite common in winter time, when the aircrafts were taxiing through the snow. For the colours of RLM 74/75/76 I used Agama again and no problems here this time. Maybe the RLM 81 colour was too old ... Red and Yellow on the fuselage come from Revell again as on the D-9. The canopy was masked with Eduard EX 054. I have another F-8 in my stash and that will be build one day as a SG 2 aircraft with desert camo.
And here are my 2 newbies to my Plastic Air Force together....

I say "Vielen Dank" for looking and hope you enjoyed walking around.
Happy modelling!
Torsten


The "Friedrich" was the fighter bomber version of the fighter, also powered by a BMW 801 with about 1700 hp. The aircraft was more armoured than the fighter and had a stronger landing gear to carry bigger bombs. On the other hand the weapons were reduced to only two MG 151 in the wings and two MG 17 in the fuselage. In the Schlachtgeschwader (fighter bomber wings) it replaced the famous Ju 87 Stuka, which became more and more obsolete.


Tamiya offers 4 decal versions for this kit and I went for this one in winter camouflage from I./SG 2 in Hungary, January 1945. Building it is the same fun as the D-9. Again no problems at all.


Except for the white camo the painting is nothing difficult. For the white lines I used the 0,25 mm needle and painting it took me 3 days ....
 That was the difficult part. Comparing it with the original photo the lines could be a bit wider but I like them the way they are now.

For the attack armament I've chosen the anti tank rockets "Panzerblitz", as I'm sure there were many T-34 crawling around in Hungary in those days. Note the missing lower part of the landing gear covers. That was quite common in winter time, when the aircrafts were taxiing through the snow. For the colours of RLM 74/75/76 I used Agama again and no problems here this time. Maybe the RLM 81 colour was too old ... Red and Yellow on the fuselage come from Revell again as on the D-9. The canopy was masked with Eduard EX 054. I have another F-8 in my stash and that will be build one day as a SG 2 aircraft with desert camo.
And here are my 2 newbies to my Plastic Air Force together....


I say "Vielen Dank" for looking and hope you enjoyed walking around.
Happy modelling!
Torsten


BlackWidow

Joined: August 09, 2009
KitMaker: 1,732 posts
AeroScale: 1,336 posts

Posted: Monday, February 13, 2012 - 08:40 AM UTC
Russell, thanks for your comment. Yes, I'm really satisfied with my builds after all these troubles and glad, that the crash landing didn't do much damage to my "Dora". But here I see how "strong" I build my models ..... 
Happy modelling!
Torsten

Happy modelling!
Torsten

BlackWidow

Joined: August 09, 2009
KitMaker: 1,732 posts
AeroScale: 1,336 posts

Posted: Wednesday, March 14, 2012 - 02:58 AM UTC
Hi folks!
Working on my new dual combo I had to concentrate on one kit first because I wanted to show it on an expo last weekend. And I finished right in time. And now I can show you my new Nakajima Ki-44 "Shoki" from Hasegawa in 1/48.
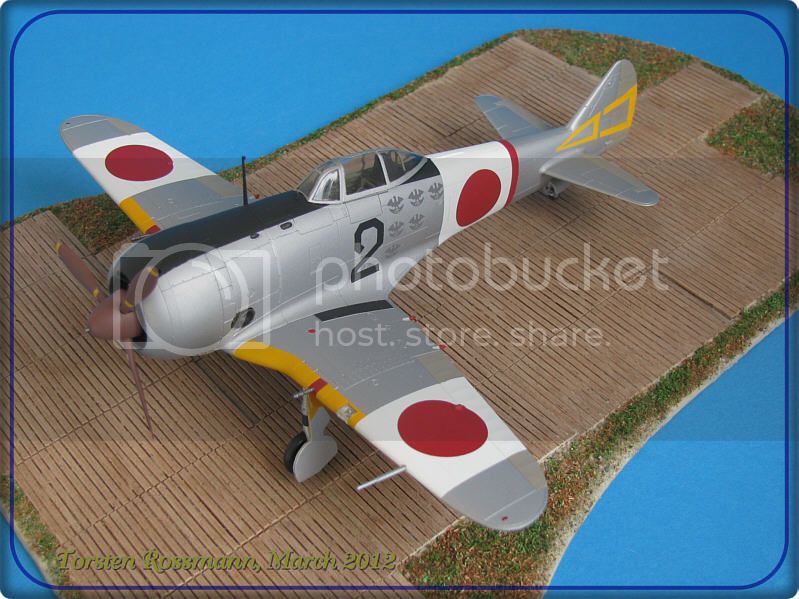
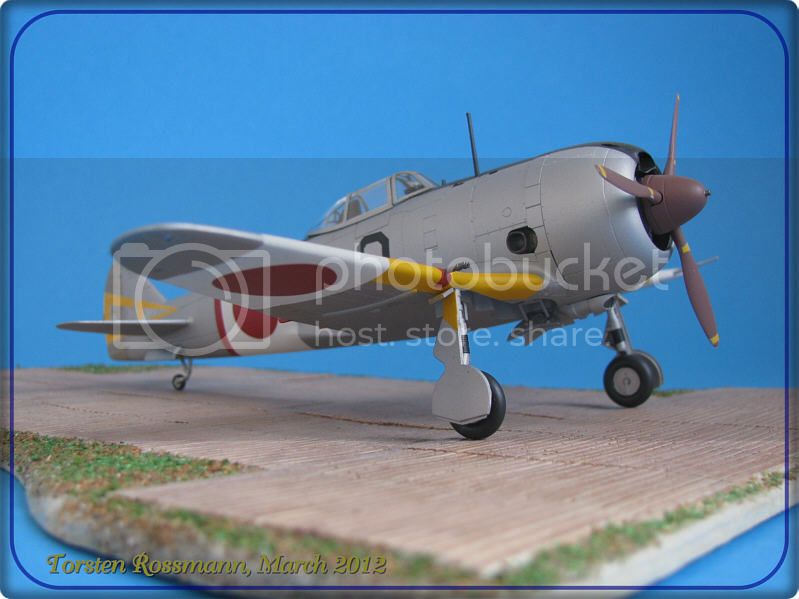
The Shoki (or "Tojo" as her allied code name was) was more or less developed simultaniously to the Ki-43 Hayabusa ("Oscar"). The wing loading of the new aircraft was high and landing speed was fast so that at first only pilots with more than 1000 flying hours were allowed to fly the Shoki. It was powered by a Nakajima Ha-109 14 cylinder radial piston engine with 1520 hp which gave the aircraft a speed of 605 km/h at 5200 meters. The maximum service ceiling was 11200 meters. The armament consisted of two 7,7 mm MG in the fuselage and two 12,7 mm MG in the wings. Later during the home defense some Ki-44 were equipped with two 40 mm canons in the wings ....
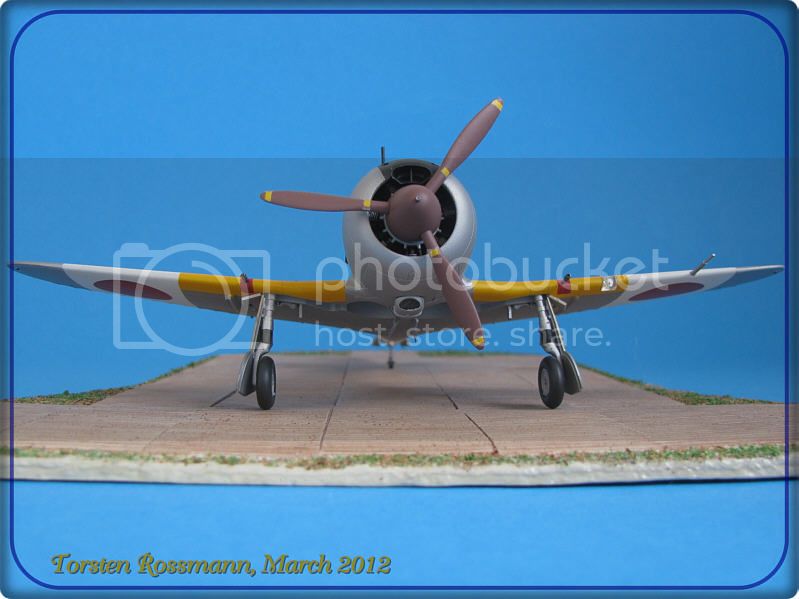
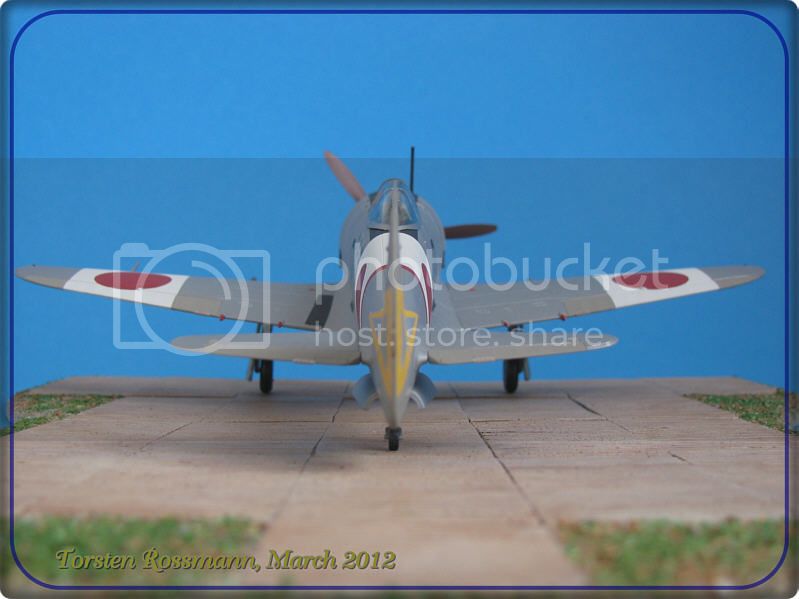
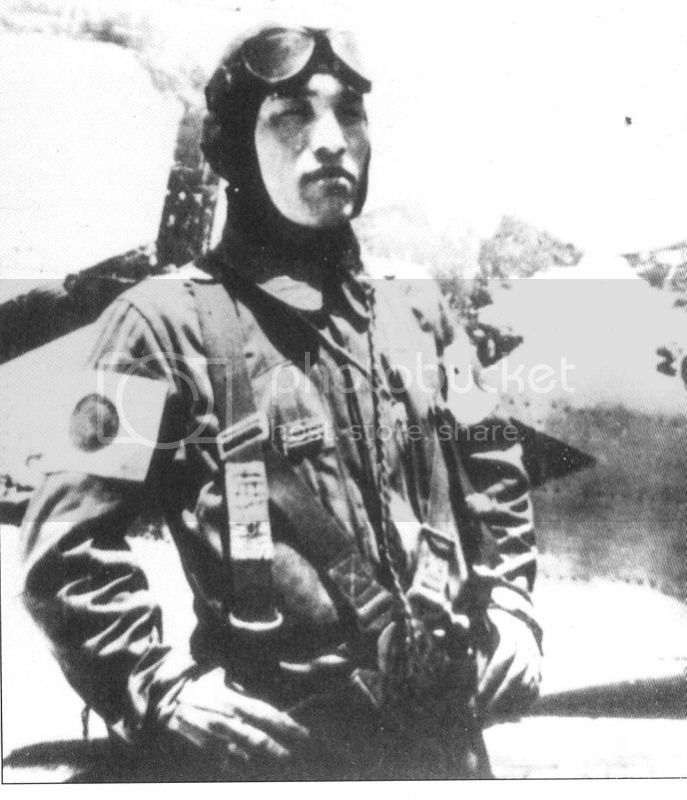
I have build an aircraft of the 70. Sentai, flown by 2Lt Makoto Ogawa in 1945. And here I can show you at least a picture of the pilot (source Osprey Publishing). Ogawa was born in 1917 and the top ace of his unit. He shot down seven B-29 and was awarded the Bukosho on 9. July 1945. In the final days of the war he added two Mustangs to his tally. Ogawa survived the war and became a businessman in Tokyo. It was not often that Japanese pilots painted kill marks on their aircrafts but Ogawa was one of them.
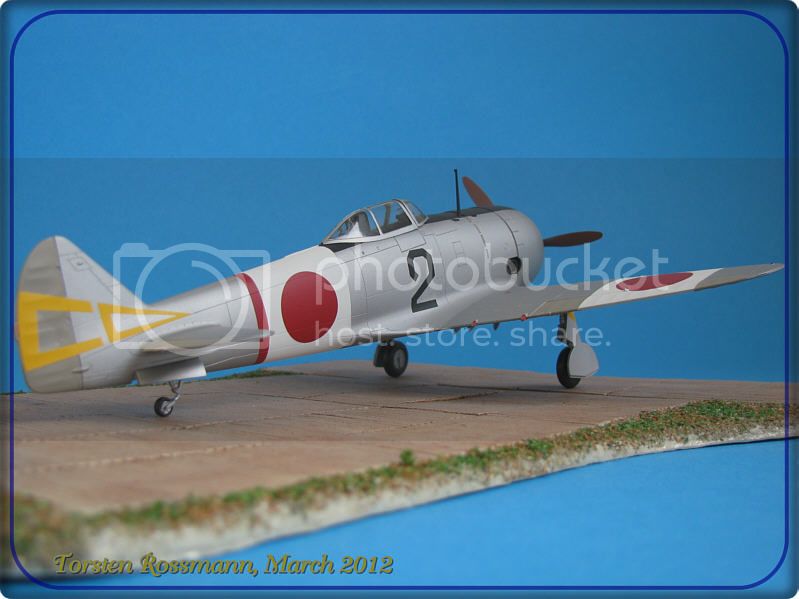
The kit is an older one from Hasegawa and no longer in their standard progam but every now and then they throw it on the market again as a "limited edition". The fitting is still very good, only at the famous wings/fuselage areas is some little filler needed. A bit of sanding does the rest. It's no difficult kit. The decals are taken from Eagle Strike's "Shokis of the IJAAF Part 1" sheet. Some nice versions on that one!
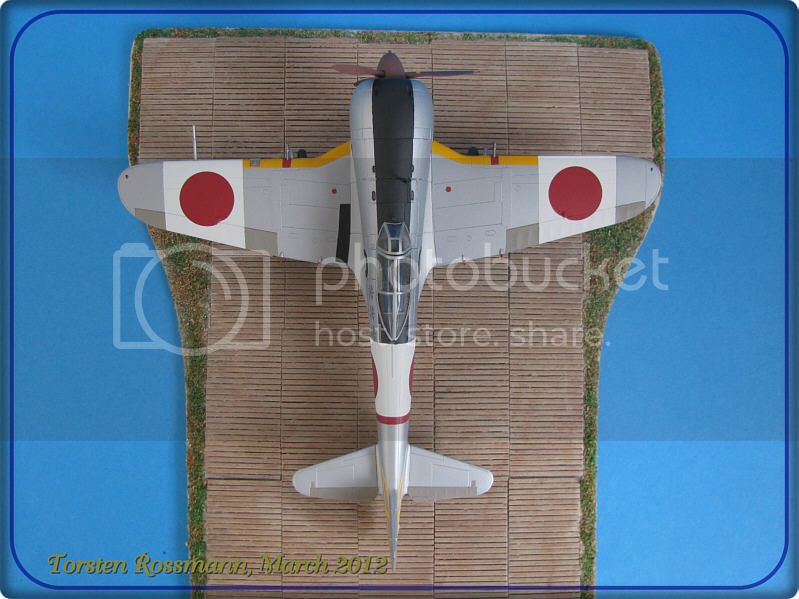

The whole kit is painted completly with Revell paints this time. As I had so much bad luck on my Fw 190 D-9 recently (you might remember), I used White 5 as a primer. Black is No. 302, Grey (for the fabric covered parts of the rudders)is No. 75, White is No. 301, Yellow (for the leading wing edges) is No. 310, Aluminium (for the wheel wells) is No. 99, Silver is No. 90, Dark Red (for the fuselage band) is No. 331 and the interior was painted with No. 362. Oh, and the propeller is painted with No. 83.
After two Thunderbolts in 2008 this only my third silver bird. And I have 3 more Shokis in my stash .....
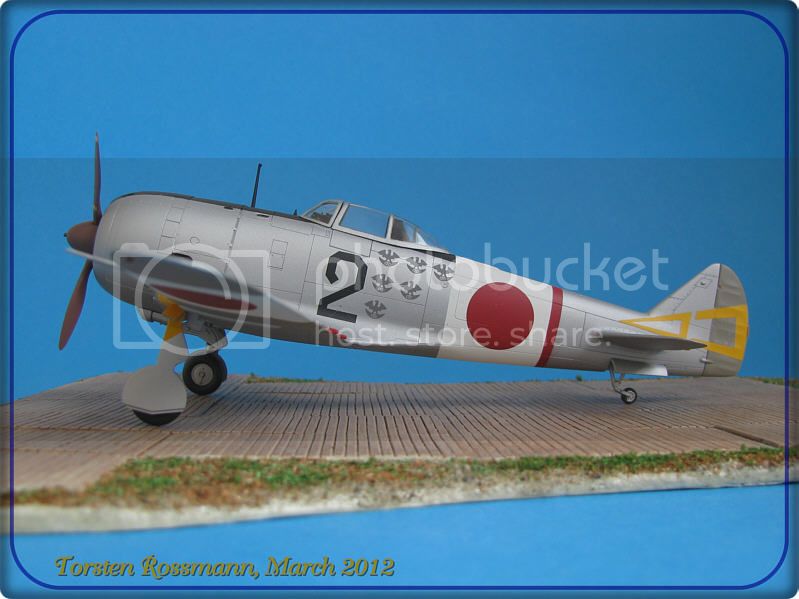

I say "domo arigato" for watching and hope you enjoyed my little walk around. As always, comments and questions are welcome.
Happy modelling!
Torsten
Working on my new dual combo I had to concentrate on one kit first because I wanted to show it on an expo last weekend. And I finished right in time.
 And now I can show you my new Nakajima Ki-44 "Shoki" from Hasegawa in 1/48.

The Shoki (or "Tojo" as her allied code name was) was more or less developed simultaniously to the Ki-43 Hayabusa ("Oscar"). The wing loading of the new aircraft was high and landing speed was fast so that at first only pilots with more than 1000 flying hours were allowed to fly the Shoki. It was powered by a Nakajima Ha-109 14 cylinder radial piston engine with 1520 hp which gave the aircraft a speed of 605 km/h at 5200 meters. The maximum service ceiling was 11200 meters. The armament consisted of two 7,7 mm MG in the fuselage and two 12,7 mm MG in the wings. Later during the home defense some Ki-44 were equipped with two 40 mm canons in the wings ....


I have build an aircraft of the 70. Sentai, flown by 2Lt Makoto Ogawa in 1945. And here I can show you at least a picture of the pilot (source Osprey Publishing). Ogawa was born in 1917 and the top ace of his unit. He shot down seven B-29 and was awarded the Bukosho on 9. July 1945. In the final days of the war he added two Mustangs to his tally. Ogawa survived the war and became a businessman in Tokyo. It was not often that Japanese pilots painted kill marks on their aircrafts but Ogawa was one of them.


The kit is an older one from Hasegawa and no longer in their standard progam but every now and then they throw it on the market again as a "limited edition". The fitting is still very good, only at the famous wings/fuselage areas is some little filler needed. A bit of sanding does the rest. It's no difficult kit. The decals are taken from Eagle Strike's "Shokis of the IJAAF Part 1" sheet. Some nice versions on that one!


The whole kit is painted completly with Revell paints this time. As I had so much bad luck on my Fw 190 D-9 recently (you might remember), I used White 5 as a primer. Black is No. 302, Grey (for the fabric covered parts of the rudders)is No. 75, White is No. 301, Yellow (for the leading wing edges) is No. 310, Aluminium (for the wheel wells) is No. 99, Silver is No. 90, Dark Red (for the fuselage band) is No. 331 and the interior was painted with No. 362. Oh, and the propeller is painted with No. 83.
After two Thunderbolts in 2008 this only my third silver bird. And I have 3 more Shokis in my stash .....


I say "domo arigato" for watching and hope you enjoyed my little walk around. As always, comments and questions are welcome.
Happy modelling!
Torsten

mtnflyer

Joined: March 08, 2009
KitMaker: 394 posts
AeroScale: 360 posts

Posted: Wednesday, March 14, 2012 - 03:17 AM UTC
Hi Torsten.
I just picked up on your thread. Beautiful group of models and wonderful subjects. It seems you like the new look and aren't big on weathering. Still, your giving outstanding effort. Very nice, indeed.
I just picked up on your thread. Beautiful group of models and wonderful subjects. It seems you like the new look and aren't big on weathering. Still, your giving outstanding effort. Very nice, indeed.

BlackWidow

Joined: August 09, 2009
KitMaker: 1,732 posts
AeroScale: 1,336 posts

Posted: Thursday, March 15, 2012 - 04:30 AM UTC
Guy, thanks for your kind words about my models!  You're right, I like them clean, factory fresh with a dozen kill marks on the rudder, so to say ....
  I'm not really a fan of weathering. You sure can increase the value of a model with that in a few minutes. But on the other hand you can spoil the work of weeks or months within seconds if you do too much weathering. I probably might not like my models afterwards. Instead I leave them to "natural weathering". Just put it on the shelf and wait for the dust to fall .....
Happy modelling!
Torsten
 You're right, I like them clean, factory fresh with a dozen kill marks on the rudder, so to say ....
  I'm not really a fan of weathering. You sure can increase the value of a model with that in a few minutes. But on the other hand you can spoil the work of weeks or months within seconds if you do too much weathering. I probably might not like my models afterwards. Instead I leave them to "natural weathering". Just put it on the shelf and wait for the dust to fall .....
Happy modelling!
Torsten


Siderius

Joined: September 20, 2005
KitMaker: 1,747 posts
AeroScale: 1,673 posts

Posted: Friday, March 16, 2012 - 07:20 AM UTC

BlackWidow

Joined: August 09, 2009
KitMaker: 1,732 posts
AeroScale: 1,336 posts

Posted: Sunday, March 18, 2012 - 08:23 AM UTC
Russell, thanks for your compliment about my Shoki. Yes, she's also looking fine to me. 
Thanks for showing us your little Ki-44. Are the cowling flaps open there? That's not possible on the 1/48 kit. She needs to be cleaned up a bit, right? Standing in a sand .... err .... dust storm. Well, that's what I call "natural weathering".
Happy modelling!
Torsten
PS: I have finished the other half of my dual combo today, but at the moment no time for the photographer. So stay tuned, come time, come photos .....

Thanks for showing us your little Ki-44. Are the cowling flaps open there? That's not possible on the 1/48 kit. She needs to be cleaned up a bit, right? Standing in a sand .... err .... dust storm. Well, that's what I call "natural weathering".

Happy modelling!
Torsten

PS: I have finished the other half of my dual combo today, but at the moment no time for the photographer. So stay tuned, come time, come photos .....

Posted: Sunday, March 18, 2012 - 10:45 PM UTC
Hi Torsten. Once again I have enjoyed reading through your thread, and once again you have shown us some very nice work on your latest builds. I love the winter paint on the F-8, and the NMF on the Shoki came up really well also.
Keep up the great work mate.
Cheers, D
Keep up the great work mate.
Cheers, D
Posted: Monday, March 19, 2012 - 05:42 AM UTC
Hi Torsten,
Me too, I do like the look. Sounds funny coming from me, Mr. Severe Weathering; during my modeling hiatus, I am gravitating back to the "airshow" look. Let our imaginations do the rest!
Awesome stable of sky steeds!


Quoted Text
I like them clean, factory fresh...
Me too, I do like the look. Sounds funny coming from me, Mr. Severe Weathering; during my modeling hiatus, I am gravitating back to the "airshow" look. Let our imaginations do the rest!
Awesome stable of sky steeds!


BlackWidow

Joined: August 09, 2009
KitMaker: 1,732 posts
AeroScale: 1,336 posts

Posted: Tuesday, March 20, 2012 - 08:35 AM UTC
Thank you guys for your feedback! I really appreciate that! 
Damian, the camo on my "Butcherbird" took me 3 evenings (fuselage, then left wing, then right wing). My eyes got hypnotized staring at the lines .... The stripes are not as wide as they should be, if I compare them with the original photo. But now I'm glad they tured out this good. First time ever I used my thin needle. I will carry on in this thread as long as there is interest in it by the users. At least there are coming about 10 aircraft from my assembly line each year. But I not just build WW2 aircraft ....
Fred, thanks for your words about my models. Yes, weathering is "state of the art" these days, I guess, but I like to swim against the stream. It's not always easy, but it's fun. Meanwhile my "style" of building has been accepted on expos and many visitors come to my table and talk about my factory fresh models. Most of them also tell an interesting story, like my Shoki. I have also noticed that some modellers go back the way you go. Less is often more ....
PS: It will take about 2 weeks before I can show you my newest model as I have another expo next weekend here in my hometown (3 expos in 4 weeks). But afterwards I will take a few shots.

Damian, the camo on my "Butcherbird" took me 3 evenings (fuselage, then left wing, then right wing). My eyes got hypnotized staring at the lines ....
 The stripes are not as wide as they should be, if I compare them with the original photo. But now I'm glad they tured out this good. First time ever I used my thin needle. I will carry on in this thread as long as there is interest in it by the users. At least there are coming about 10 aircraft from my assembly line each year. But I not just build WW2 aircraft ....
Fred, thanks for your words about my models. Yes, weathering is "state of the art" these days, I guess, but I like to swim against the stream. It's not always easy, but it's fun. Meanwhile my "style" of building has been accepted on expos and many visitors come to my table and talk about my factory fresh models. Most of them also tell an interesting story, like my Shoki. I have also noticed that some modellers go back the way you go. Less is often more ....
PS: It will take about 2 weeks before I can show you my newest model as I have another expo next weekend here in my hometown (3 expos in 4 weeks). But afterwards I will take a few shots.

BlackWidow

Joined: August 09, 2009
KitMaker: 1,732 posts
AeroScale: 1,336 posts

Posted: Monday, April 02, 2012 - 06:32 AM UTC
Finally yesterday I had time to take pictures of my latest model and now I can show you my new Nakajima Ki-84 Hayate from Hasegawa in 1/48. I started it simultaniously with the Shoki but I had to concentrate on one model for the expo early in March.


The Ki-84 was another famed aircraft in the Nakajima fighter line beginning with the Ki-27, Ki-43 and Ki-44. It had excellent speed, manoeuvrability, fire power and defensive armor. The engine, a Nakajima Ha 45, had 2000 hp and gave the aircraft a speed of over 600 km/h at 6500 meters. The "Frank", as her allied code name was, was used in every possible role, as fighter, as fighter bomber and even as dive bomber. The armament consisted of two 12,7 mm guns in the fuselage and two 20 mm cannons in the wings. The Hayate was the third-most produced Japanese fighter behind the A6M Zero and the Ki-43 Hayabusa with approximatly 3500 aircraft produced. Sadly only a handfull survived until today. The USA tested the Hayate and said it was the best Japanese fighter aircraft of the war.
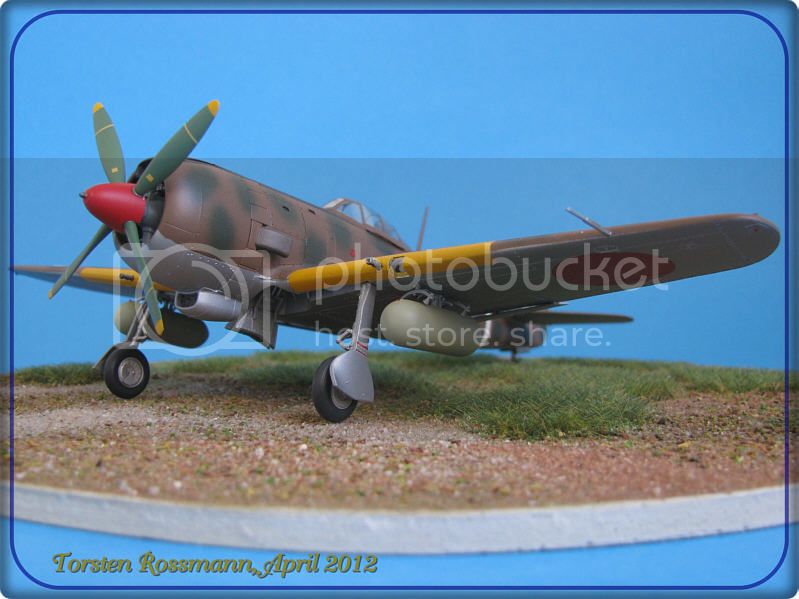
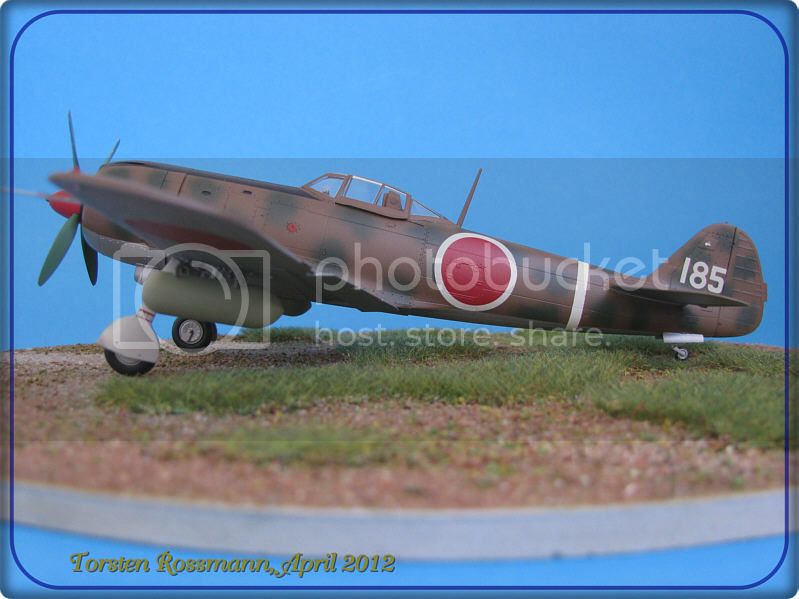
I have build an aircraft of the 22. Sentai, flown by Major Iwasaki Jyozo in China, September 1944. Haven't found any informations about this guy yet ....
The kit is another great one from Hasegawa, which came out in 2007 as a limited edition. This aircraft is a pre-production one as you can see from the unusual big exhaust stacks. It is highly detailed - especially the cockpit - and has no fitting issues. It's really a fun build, which I highly recommend.
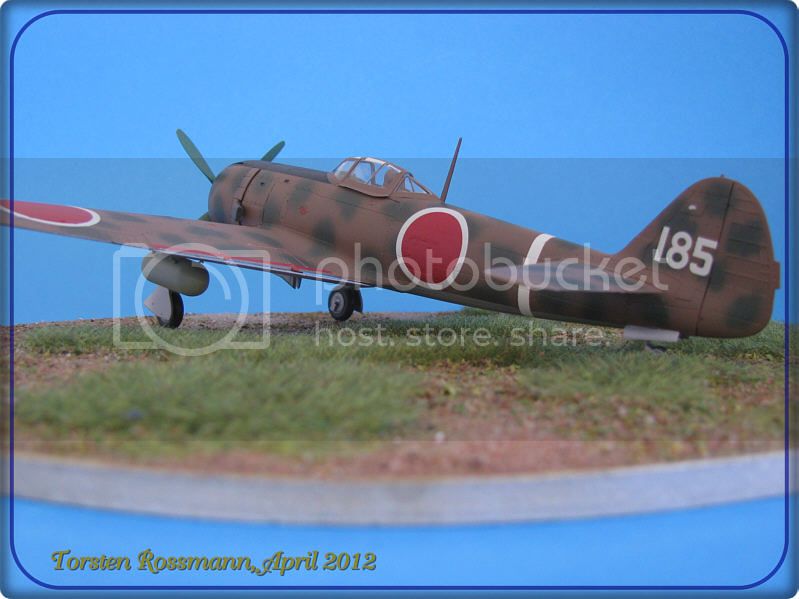

As with the Ki-44 here again I mostly used Revell paints. First came White 5 as a primer on it. Silver for the underside is No. 90, Aluminium for the wheel wells is No. 99, Brown for the upperside is No. 381, Black for the anti glare panel is No. 302, Red for the spinner is No. 36 and Yellow is again No. 310. The green mottling is made with thinned IJA Green from Tamiya and the external fuel tanks are painted in IJA Grey Green again from Tamiya. A bit strange to me looks the propeller which is H 319 Light Green from Gunze. But maybe the Hayates had this colour. For the canopy I used the Eduard mask EX 060. The decals look a bit thick on the paper but when they are on the model they become veeeery thin. No softener is needed as they might be destroyed. Like all my models this one is also not weathered, but I'm sure you know that already.

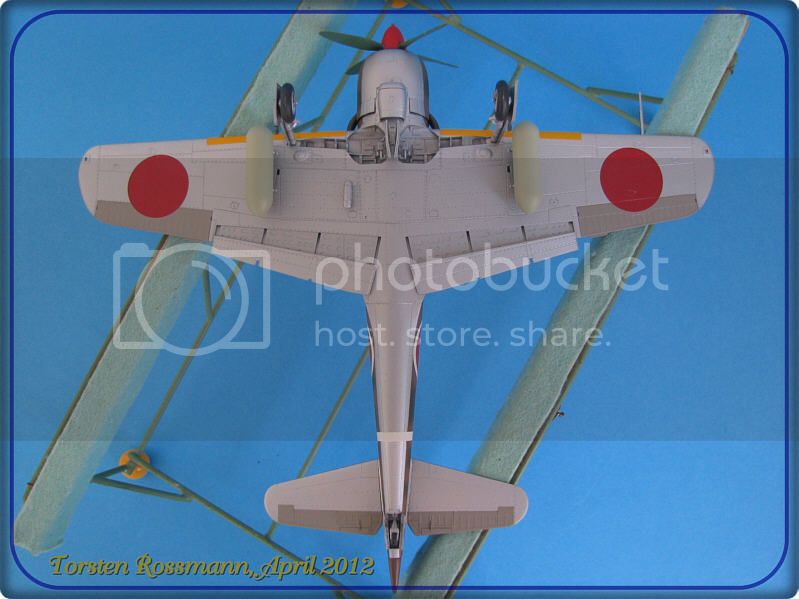
The first expo for this beauty will be on the Easter weekend at the Technical Museum in Speyer in southwest Germany. There's no better place to show your models sitting between all the originals.
I thank you for looking and hope you enjoyed my little trip around. I have two more Ki-84 in my stash, so there are more to come. As always, comments are welcome.
Happy modelling!
Torsten


The Ki-84 was another famed aircraft in the Nakajima fighter line beginning with the Ki-27, Ki-43 and Ki-44. It had excellent speed, manoeuvrability, fire power and defensive armor. The engine, a Nakajima Ha 45, had 2000 hp and gave the aircraft a speed of over 600 km/h at 6500 meters. The "Frank", as her allied code name was, was used in every possible role, as fighter, as fighter bomber and even as dive bomber. The armament consisted of two 12,7 mm guns in the fuselage and two 20 mm cannons in the wings. The Hayate was the third-most produced Japanese fighter behind the A6M Zero and the Ki-43 Hayabusa with approximatly 3500 aircraft produced. Sadly only a handfull survived until today. The USA tested the Hayate and said it was the best Japanese fighter aircraft of the war.


I have build an aircraft of the 22. Sentai, flown by Major Iwasaki Jyozo in China, September 1944. Haven't found any informations about this guy yet ....

The kit is another great one from Hasegawa, which came out in 2007 as a limited edition. This aircraft is a pre-production one as you can see from the unusual big exhaust stacks. It is highly detailed - especially the cockpit - and has no fitting issues. It's really a fun build, which I highly recommend.


As with the Ki-44 here again I mostly used Revell paints. First came White 5 as a primer on it. Silver for the underside is No. 90, Aluminium for the wheel wells is No. 99, Brown for the upperside is No. 381, Black for the anti glare panel is No. 302, Red for the spinner is No. 36 and Yellow is again No. 310. The green mottling is made with thinned IJA Green from Tamiya and the external fuel tanks are painted in IJA Grey Green again from Tamiya. A bit strange to me looks the propeller which is H 319 Light Green from Gunze. But maybe the Hayates had this colour. For the canopy I used the Eduard mask EX 060. The decals look a bit thick on the paper but when they are on the model they become veeeery thin. No softener is needed as they might be destroyed. Like all my models this one is also not weathered, but I'm sure you know that already.


The first expo for this beauty will be on the Easter weekend at the Technical Museum in Speyer in southwest Germany. There's no better place to show your models sitting between all the originals.
I thank you for looking and hope you enjoyed my little trip around. I have two more Ki-84 in my stash, so there are more to come. As always, comments are welcome.
Happy modelling!
Torsten


Siderius

Joined: September 20, 2005
KitMaker: 1,747 posts
AeroScale: 1,673 posts

Posted: Monday, April 02, 2012 - 07:06 AM UTC
Torsten, super fantastic looking "Frank"! One of my favorite Japanese aircraft for sure. I love the camoflauge job you did on it. Russell 
P.S. Here a couple shots of my "Frank" in 72 scale. It is the old Hasegawa kit. Enjoy.


P.S. Here a couple shots of my "Frank" in 72 scale. It is the old Hasegawa kit. Enjoy.


Siderius

Joined: September 20, 2005
KitMaker: 1,747 posts
AeroScale: 1,673 posts

Posted: Monday, April 02, 2012 - 07:24 AM UTC
Here is the 72 scale Hasegawa "Shoki" I built in Japanese Home Defense markings. Hope you enjoy comparing it to the excellent work done by Torsten! Russell


P.S. second shot is sort of fuzzy


P.S. second shot is sort of fuzzy


Siderius

Joined: September 20, 2005
KitMaker: 1,747 posts
AeroScale: 1,673 posts

Posted: Monday, April 02, 2012 - 07:36 AM UTC
Wanted to show my 72 scale "Raiden" in comparison to what Torsten posted. Enjoy looking. Russell


P.S. I swear I cleaned the models before shooting them with the camera?


P.S. I swear I cleaned the models before shooting them with the camera?


Snorri23

Joined: March 25, 2010
KitMaker: 514 posts
AeroScale: 244 posts

Posted: Monday, April 02, 2012 - 08:03 AM UTC
I was reading your post here and learned that your masking tape when removed pulled off some paint. Most tapes hold too much glue thus some has to be removed. Just stick it to your forehead and that will remove some of the stickiness. I suspect that you do pre wash your kits. Hopefully this will be helpful.

BlackWidow

Joined: August 09, 2009
KitMaker: 1,732 posts
AeroScale: 1,336 posts

Posted: Wednesday, April 04, 2012 - 06:28 AM UTC
Russell, that camouflage was quite easy. I just thinned the IJA Green with 50 % Isopropanol (normally only 25%), adjusted low pressure on my compressor and used my medium needle (0,35 mm). For everything else I mostly use my big needle (0,50 mm).
Thanks for showing us your work. The decals on your Ki-84 are the same as on the one still sleeping in my stash. I wonder how I'll get that blue arrow on. It was the symbol of the 29. Sentai.
Trevor, thanks for your advice. That's the reason why I'm always careful with the Eduard masks. They stick quite strong to the canopies and might tear the canopy off again .... For masking I use Kip Tape. It's like Tamiya tape, but made in Germany, 50 m x 25 mm on the roll and a lot cheaper here than the Japanese stuff. And the strength is okay. But with my "Langnasen Dora" it was surely not the fault of the tape. I guess the mishap occured, because I didn't use a primer for the Testors paint. Maybe I also used the wrong and/or too much thinner for Testors. If I would use enamels it probably would be okay, but I only use acrylics. Never have this problems with other paints like Revell, Agama or Gunze.
Happy modelling!
Torsten


Naseby

Joined: October 15, 2010
KitMaker: 825 posts
AeroScale: 476 posts

Posted: Wednesday, May 16, 2012 - 05:11 AM UTC
Hallo Torsten,
Danke fur das link. Ich habe die P400 gesehen und die RAF Farben stehen ihr gut. Was sehr interesant ist sind Deine japanische Flugzeuge, die seht Man hier nicht so Oft. Bin gespant auf dein nachstes Projekt.
Danke fur das link. Ich habe die P400 gesehen und die RAF Farben stehen ihr gut. Was sehr interesant ist sind Deine japanische Flugzeuge, die seht Man hier nicht so Oft. Bin gespant auf dein nachstes Projekt.

BlackWidow

Joined: August 09, 2009
KitMaker: 1,732 posts
AeroScale: 1,336 posts

Posted: Wednesday, May 23, 2012 - 07:08 AM UTC
Thanks for your kind comment, Naseby.  Your German is very good! So where are you from?
My main interest is everything that flew around the PTO and CBI. I'm especially focused on IJAAF and IJN, because they are completly unknown over here as there were no German troops in the Pacific - except for some submarines. Really interesting stories. But I also build all other aircrafts. So the new 1/48 PV-1 Ventura stands on my list for this year .... with RNZAF markings.
My latest finished model doesn't fit in this thread. It's the new 1/48 Eurofighter Twinseater from Revell. I hope to shoot some photos of it next weekend. Afterwards I will open a new thread in the "Pre Flight" forum.
And I've just started my dual combo I build for the "Fighters Campaign". So there's also more to come here .....
Happy modelling!
Torsten

 Your German is very good! So where are you from?
My main interest is everything that flew around the PTO and CBI. I'm especially focused on IJAAF and IJN, because they are completly unknown over here as there were no German troops in the Pacific - except for some submarines. Really interesting stories. But I also build all other aircrafts. So the new 1/48 PV-1 Ventura stands on my list for this year .... with RNZAF markings.
My latest finished model doesn't fit in this thread. It's the new 1/48 Eurofighter Twinseater from Revell. I hope to shoot some photos of it next weekend. Afterwards I will open a new thread in the "Pre Flight" forum.
And I've just started my dual combo I build for the "Fighters Campaign". So there's also more to come here .....
Happy modelling!
Torsten


BlackWidow

Joined: August 09, 2009
KitMaker: 1,732 posts
AeroScale: 1,336 posts

Posted: Monday, July 16, 2012 - 06:35 AM UTC
After a trip to the jet age I'm back with a real aircraft. For the Fighter Campaign I've built a Hawker Hurricane Mk. I from Hasegawa in 1/48 scale in non-british livery.

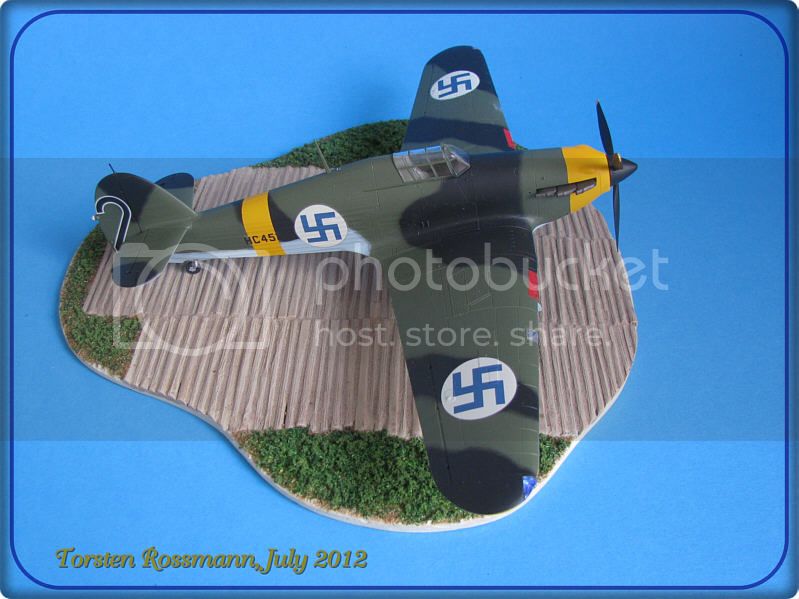
In early 1940 Finland purchased 12 Gloster made Hurricanes from Great Britain. The Finnish pilots took a commercial flight to London and further on to St. Athan, where they were trained by RAF pilots on the new fighter. And they even met King George VI there. The Hurricanes arrived in Finland in March 1940. HC-452 (ex N2394) was flown by several pilots in several units. Most successfull pilot was Lieutnant Esko Ruotsila, who flew this aircraft also with several units and scored 3 kills with it. Sadly he was shot down and killed on 20.05.1943 in MT-203 (a Bf 109 G-2) over the Gulf of Finland aged only 29 years. In October 1942 HC-452 went to the State Aircraft Factory for full scale repairs where the aircraft got also a new painting, the so called "sotamaalaus" (warpaint). In July 1943 the Hurricane was stored at an air depot and in August 1944 she was removed from the inventory records, having flown only 208 hours. There was always an acute problem with spare parts. Captured or downed Russian Hurris where often used as a "donator". Today this old lady can be seen at the Finnish Air Force Museum in Tikkakoski, where she gets a complete restauration ....
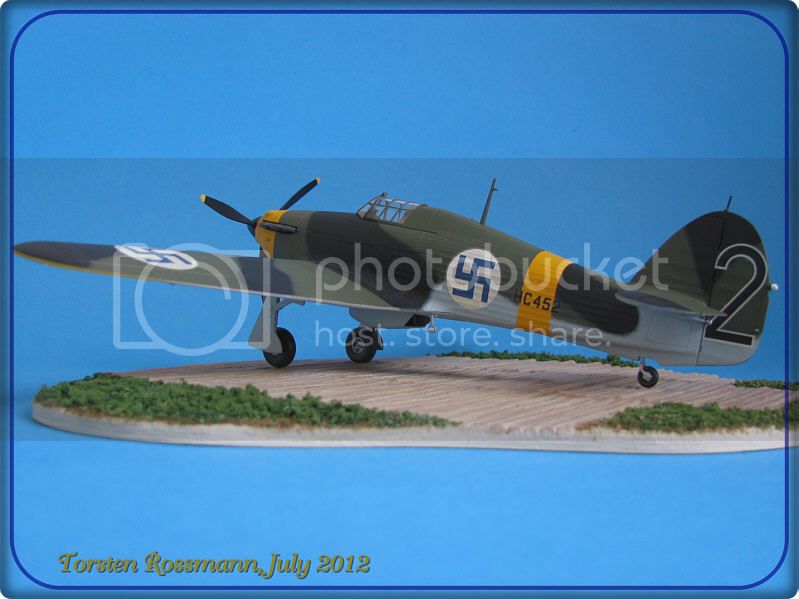
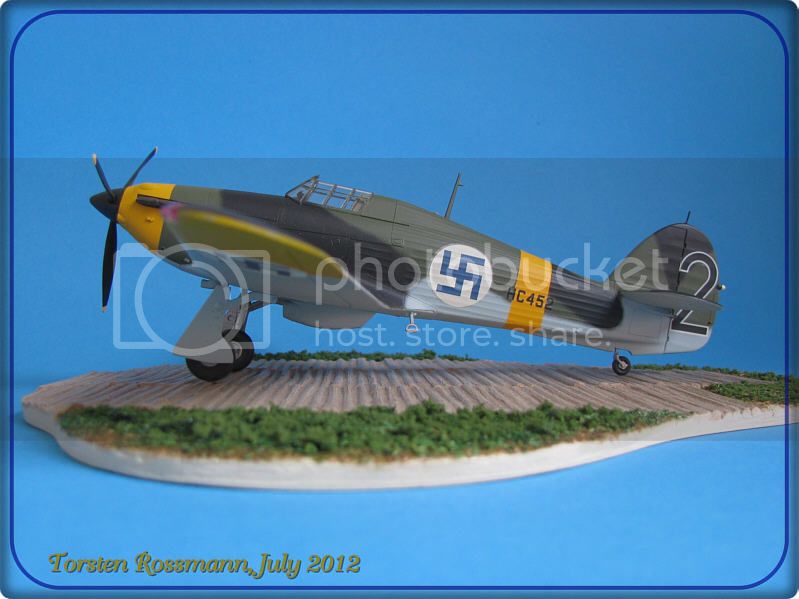
Hasegawa brought out this kit as a limited edition in 2001 and I got it in 2005. So it rested 7 years in my stash before I have built it On the decal sheet Hasegawa offers the option of just plain white disks and white disks with the Hakaristi. I took the plain disks as a "primer" to get the Hakaristi decals opaque. Usually their decals are not so good in that. As this is quite an old kit it still goes together very well and I needed only a tiny bit of filler on the underside where the wings meet the fuselage. Everything else went together like "add glue and shake". Only a bit of sanding here and there was necessary. Also the decals were still of fine quality after all these years in my stash ....
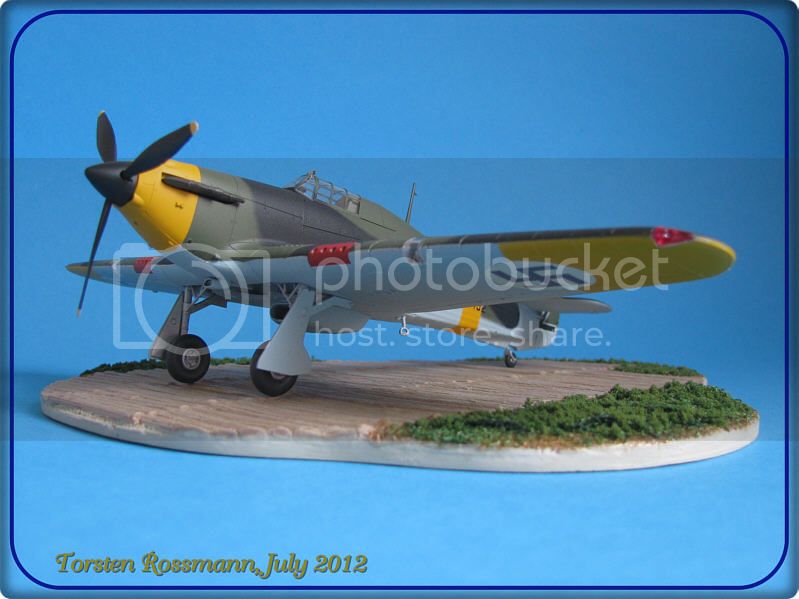

On this kit I used Russian Light Grey Blue R27 from Agama for the underside (same colour as on my Sturmovik). For the upperside camo I completly used Revell Aqua Color, Olive Green 361, Black 302, Yellow 310 and Red 36. The wheel wells are again painted with Aluminium 99. Final coating was made again with satin varnish from Marabu. For the canopy I used the Eduard mask EX 039. My Hurricane shows nearly the warpaint she wore in June 1943 at Kilpasilta, just before she was stored in the depot. Unfortunatly the registration code HC-452 is in small letters. The aircraft got those in her early days in Finland when she still had British camouflage on. I couldn't find bigger letters in my spare box. Sorry for that.
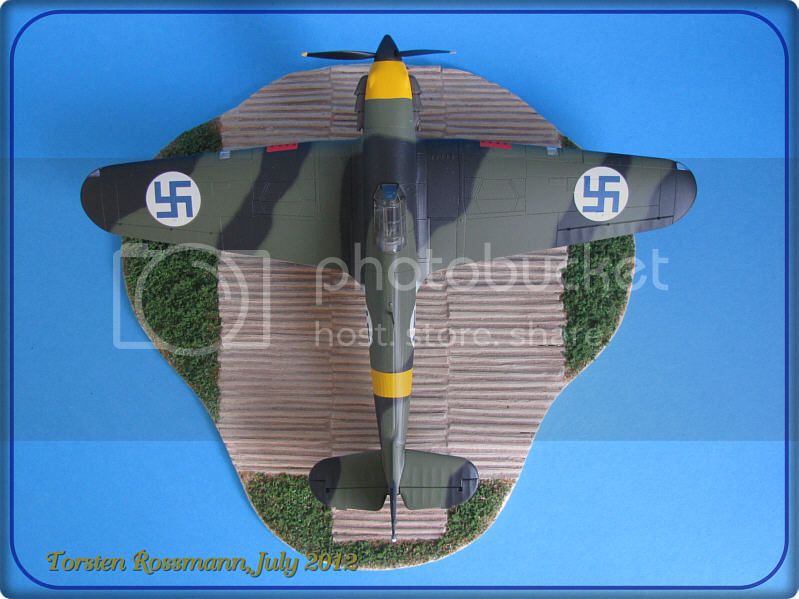
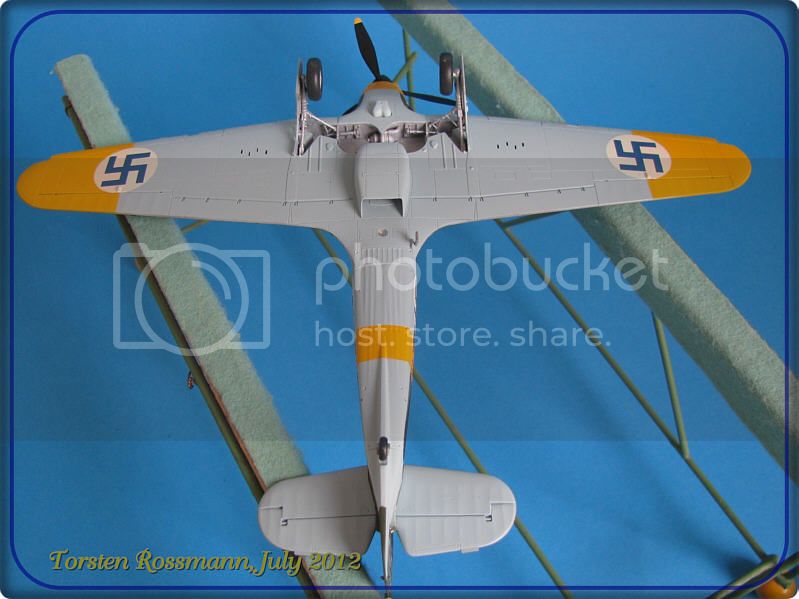
I say "kiitos" for looking and hope you enjoyed my little walk around this old engine, which is still alive today.
A special thanks goes out to my Swiss friend Beat Gysi, who helped me with a lot of information about this special aircraft And if anyone of you has a good photo of the pilot, I would appreciate if you can post it here. As always comments are welcome.
Happy modelling!
Torsten


In early 1940 Finland purchased 12 Gloster made Hurricanes from Great Britain. The Finnish pilots took a commercial flight to London and further on to St. Athan, where they were trained by RAF pilots on the new fighter. And they even met King George VI there. The Hurricanes arrived in Finland in March 1940. HC-452 (ex N2394) was flown by several pilots in several units. Most successfull pilot was Lieutnant Esko Ruotsila, who flew this aircraft also with several units and scored 3 kills with it. Sadly he was shot down and killed on 20.05.1943 in MT-203 (a Bf 109 G-2) over the Gulf of Finland aged only 29 years. In October 1942 HC-452 went to the State Aircraft Factory for full scale repairs where the aircraft got also a new painting, the so called "sotamaalaus" (warpaint). In July 1943 the Hurricane was stored at an air depot and in August 1944 she was removed from the inventory records, having flown only 208 hours. There was always an acute problem with spare parts. Captured or downed Russian Hurris where often used as a "donator". Today this old lady can be seen at the Finnish Air Force Museum in Tikkakoski, where she gets a complete restauration ....


Hasegawa brought out this kit as a limited edition in 2001 and I got it in 2005. So it rested 7 years in my stash before I have built it
 On the decal sheet Hasegawa offers the option of just plain white disks and white disks with the Hakaristi. I took the plain disks as a "primer" to get the Hakaristi decals opaque. Usually their decals are not so good in that. As this is quite an old kit it still goes together very well and I needed only a tiny bit of filler on the underside where the wings meet the fuselage. Everything else went together like "add glue and shake". Only a bit of sanding here and there was necessary. Also the decals were still of fine quality after all these years in my stash ....

On this kit I used Russian Light Grey Blue R27 from Agama for the underside (same colour as on my Sturmovik). For the upperside camo I completly used Revell Aqua Color, Olive Green 361, Black 302, Yellow 310 and Red 36. The wheel wells are again painted with Aluminium 99. Final coating was made again with satin varnish from Marabu. For the canopy I used the Eduard mask EX 039. My Hurricane shows nearly the warpaint she wore in June 1943 at Kilpasilta, just before she was stored in the depot. Unfortunatly the registration code HC-452 is in small letters. The aircraft got those in her early days in Finland when she still had British camouflage on. I couldn't find bigger letters in my spare box. Sorry for that.


I say "kiitos" for looking and hope you enjoyed my little walk around this old engine, which is still alive today.
A special thanks goes out to my Swiss friend Beat Gysi, who helped me with a lot of information about this special aircraft
 And if anyone of you has a good photo of the pilot, I would appreciate if you can post it here. As always comments are welcome.
Happy modelling!
Torsten

Posted: Monday, July 16, 2012 - 02:28 PM UTC
Torsten,
Wonderful Ilmavoimat Hurricane. Finland's camo and markings make a beautiful airplane.


Wonderful Ilmavoimat Hurricane. Finland's camo and markings make a beautiful airplane.


scottew7

Joined: July 12, 2012
KitMaker: 21 posts
AeroScale: 17 posts

Posted: Monday, July 16, 2012 - 03:39 PM UTC
Great looking Builds!

BlackWidow

Joined: August 09, 2009
KitMaker: 1,732 posts
AeroScale: 1,336 posts

Posted: Saturday, July 21, 2012 - 08:56 AM UTC
Thanks for your comments, guys! 
Fred, I also like the way these Finnish aircrafts looked like. As they had so many different aircrafts from all over the world, they had so many different camo schemes. In my stash I have more decals for the only P-40 M (KH-51), for a Curtiss Hawk and of course for a "Mersu", a Bf 109. Recently I bought a Fokker D XXI from Special Hobby. And for my little jet collection there are waiting in line a MiG 21 bis from Eduard and a Saab Draken from Hasegawa. All in 1/48. So there should come more from me for the Suomen Ilmavoimat in the future ....
Happy modelling
Torsten

Fred, I also like the way these Finnish aircrafts looked like. As they had so many different aircrafts from all over the world, they had so many different camo schemes. In my stash I have more decals for the only P-40 M (KH-51), for a Curtiss Hawk and of course for a "Mersu", a Bf 109. Recently I bought a Fokker D XXI from Special Hobby. And for my little jet collection there are waiting in line a MiG 21 bis from Eduard and a Saab Draken from Hasegawa. All in 1/48. So there should come more from me for the Suomen Ilmavoimat in the future ....

Happy modelling
Torsten

 |


