

nice work torsten, pitty you don't weather your builds. they look great now, but they look like they are fresh from the factory. they would be incredible with a little weathering i bet.
joe
World War II
Discuss WWII and the era directly before and after the war from 1935-1949.
Discuss WWII and the era directly before and after the war from 1935-1949.
Hosted by Rowan Baylis
What lately left my assembly line

bomber14

Joined: February 02, 2015
KitMaker: 330 posts
AeroScale: 286 posts
Posted: Monday, April 27, 2015 - 12:46 AM UTC

thegirl

Joined: January 19, 2008
KitMaker: 6,743 posts
AeroScale: 6,151 posts
Posted: Monday, April 27, 2015 - 04:01 AM UTC
Getting caught up on some back log here and I must say Trosten . Very nice builds indeed ! Not sure where and how you find the time .
Nice Job on the Whrilwind by the way . Over all from the builds I seen so far it's not bad kit . But I will pass on this . The Hobbyshop here thinks everyone has deep pockets . Asking price is 69.99...
Terri
Nice Job on the Whrilwind by the way . Over all from the builds I seen so far it's not bad kit . But I will pass on this . The Hobbyshop here thinks everyone has deep pockets . Asking price is 69.99...
Terri
Joel_W
Joined: December 04, 2010
KitMaker: 11,666 posts
AeroScale: 7,410 posts
Posted: Monday, April 27, 2015 - 05:30 PM UTC
Quoted Text
nice work torsten, pitty you don't weather your builds. they look great now, but they look like they are fresh from the factory. they would be incredible with a little weathering i bet.
joe
Joe,
Torsten collection is a miniature representation of museum quality, and perfectly maintained aircraft, so everyone is displayed here in absolute mint condition.
Take the time to go through this entire thread as you'll get a much better understanding of his build and display philosophy. And you'll be treated to some fantastic modeling on a consistent, and very high scale, while viewing every model in that museum display setting.
Joel


AussieReg

#007

Joined: June 09, 2009
KitMaker: 8,156 posts
AeroScale: 3,756 posts
Posted: Monday, April 27, 2015 - 06:01 PM UTC
I really like the look of the Whirlwind, the small fuselage between those big nacelles just gives it a look of great power and speed. It is a real shame that its performance didn't live up to its promise!
Beautiful build Torsten as always, and a good honest appraisal of the kit for those considering it for their stash.
Although I have the greatest respect for your steadfast commitment to museum standard finishes, I must agree with Joe, and if I ever visit your part of the world I plan to sneak into your house with a jar of weathering wash and rectify things!
Cheers, D 😉


JClapp

#259
Joined: October 23, 2011
KitMaker: 2,265 posts
AeroScale: 1,715 posts

Posted: Monday, April 27, 2015 - 08:52 PM UTC
Another beautiful model! I too adore the Westland Whirlwind. It's an expression of the madness of war that bright, brave soldiers would go to battle in such an impossibly dangerous machine. 
As well, we have a debate about weathering. I don't give a fig for weathering. that is all.
As well, we have a debate about weathering. I don't give a fig for weathering. that is all.

Joel_W
Joined: December 04, 2010
KitMaker: 11,666 posts
AeroScale: 7,410 posts
Posted: Monday, April 27, 2015 - 09:04 PM UTC
Quoted Text
Another beautiful model! I too adore the Westland Whirlwind. It's an expression of the madness of war that bright, brave soldiers would go to battle in such an impossibly dangerous machine.
As well, we have a debate about weathering. I don't give a fig for weathering. that is all.
Jonathan,
I don't know if it's a debate or not, as I was just explaining to Joe Torsten's modeling philosophy. Actually, with every build that I post here, I seem to be doing slightly more weathering then with the previous build.
Joel

BlackWidow

Joined: August 09, 2009
KitMaker: 1,732 posts
AeroScale: 1,336 posts
Posted: Tuesday, April 28, 2015 - 11:28 PM UTC
Ooops, been away from the internet for some days (yes, I can survive that!) and been busy working on the turret of my Leopard and now I see all these comments here. Well, thanks a lot for your feedback, folks!
Joel, especially thanks to you for jumping to my side. You nailed my opinion about weathering on the head. And as you said, you noticed that you do more weathering with every kit you build. So you better watch out, less is often more. It would be a pity, if your great builds would be ruined with too much weathering.
Btw, you Spit is coming along really well now and I believe it won't be your only one. Or as Mal always says "You can't have enough Spitfires!" The correct german translation for this is "Man kann nie genug Me 109 haben!"
Terri, there is no secret behind building my models. I try to spend a little time every evening after work with my hobby. So, often it is about 1 hour, sometimes more, sometimes less. As long as it is every day, it is fine. But 70 CAN$ for this Trumpeter kit is brazen! That are about 52 Euros, I paid 29 Euros at my LHS for it, which are about 38 CAN$.
Damian, welcome to Germany! I would be very glad to welcome you here and show you around my little Plastic Air Force Museum. But instead of that weathering pot, you better organize a pitcher of beer and we'll have a jolly good time! I have been in Australia some 25 years ago (am I really that old now?
  ) and visited more or less all famous places in your country, spending New Years Eve 1989/1990 in Perth at about 30°C in the shade. A bit different to what I experienced last New Years Eve in Helsinki ....
Jonathan, thanks for your statement about weathering. That's exactly what I think about it!
Joe, thanks for your feedback. Every now and then someone pops up in this thread and asks me why I don't weather my builds and I explain it. The simple answer is, I don't want to spoil them. I like my models the way they are. Just do as Joel said, take your time, go through this thread and learn more about my philosophy. I know there are many people who like weathered models and it's okay for me. But I prefer the natural way of weathering by dust and time and not the artificial way, which is often over done in my opinion. At least it's just a hobby, no religion, and for the fun we have in our little spare time.
Happy modelling to you all!
Torsten
Oh, btw, it will take a while before I can show you my next build here. I have already started it, but the Leo gets the deserved priority now, which I have started before I begun with the Draken "Dual Combo". So be patienced and stay tuned ....
Joel, especially thanks to you for jumping to my side. You nailed my opinion about weathering on the head. And as you said, you noticed that you do more weathering with every kit you build. So you better watch out, less is often more. It would be a pity, if your great builds would be ruined with too much weathering.
Btw, you Spit is coming along really well now and I believe it won't be your only one. Or as Mal always says "You can't have enough Spitfires!" The correct german translation for this is "Man kann nie genug Me 109 haben!"
Terri, there is no secret behind building my models. I try to spend a little time every evening after work with my hobby. So, often it is about 1 hour, sometimes more, sometimes less. As long as it is every day, it is fine. But 70 CAN$ for this Trumpeter kit is brazen! That are about 52 Euros, I paid 29 Euros at my LHS for it, which are about 38 CAN$.
Damian, welcome to Germany! I would be very glad to welcome you here and show you around my little Plastic Air Force Museum. But instead of that weathering pot, you better organize a pitcher of beer and we'll have a jolly good time!
I have been in Australia some 25 years ago (am I really that old now? ) and visited more or less all famous places in your country, spending New Years Eve 1989/1990 in Perth at about 30°C in the shade. A bit different to what I experienced last New Years Eve in Helsinki ....Jonathan, thanks for your statement about weathering. That's exactly what I think about it!
Joe, thanks for your feedback. Every now and then someone pops up in this thread and asks me why I don't weather my builds and I explain it. The simple answer is, I don't want to spoil them. I like my models the way they are. Just do as Joel said, take your time, go through this thread and learn more about my philosophy. I know there are many people who like weathered models and it's okay for me. But I prefer the natural way of weathering by dust and time and not the artificial way, which is often over done in my opinion. At least it's just a hobby, no religion, and for the fun we have in our little spare time.
Happy modelling to you all!
Torsten
Oh, btw, it will take a while before I can show you my next build here. I have already started it, but the Leo gets the deserved priority now, which I have started before I begun with the Draken "Dual Combo". So be patienced and stay tuned ....

BlackWidow
Joined: August 09, 2009
KitMaker: 1,732 posts
AeroScale: 1,336 posts
Posted: Monday, August 03, 2015 - 12:00 AM UTC
Hi guys!
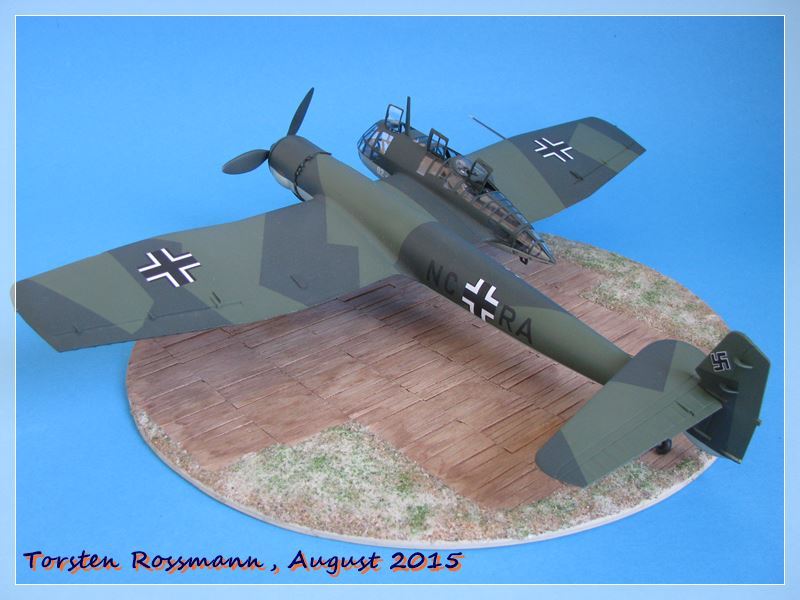
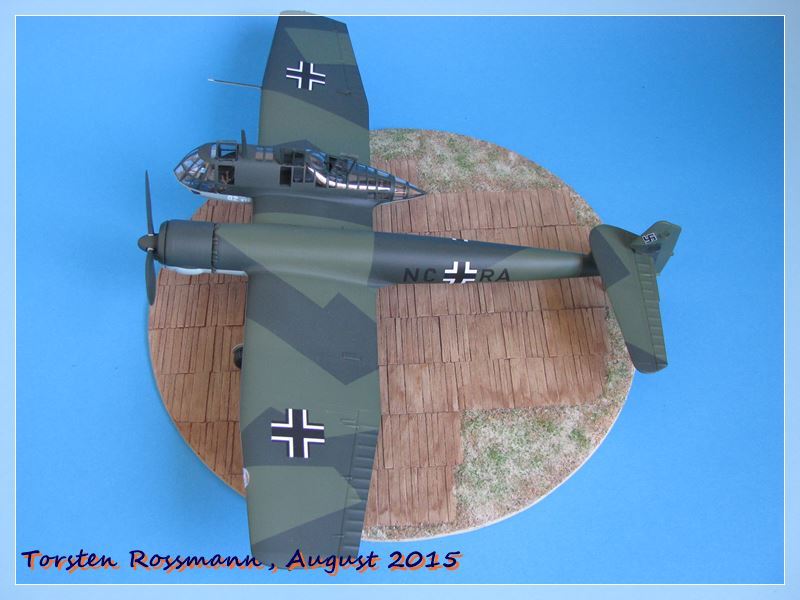
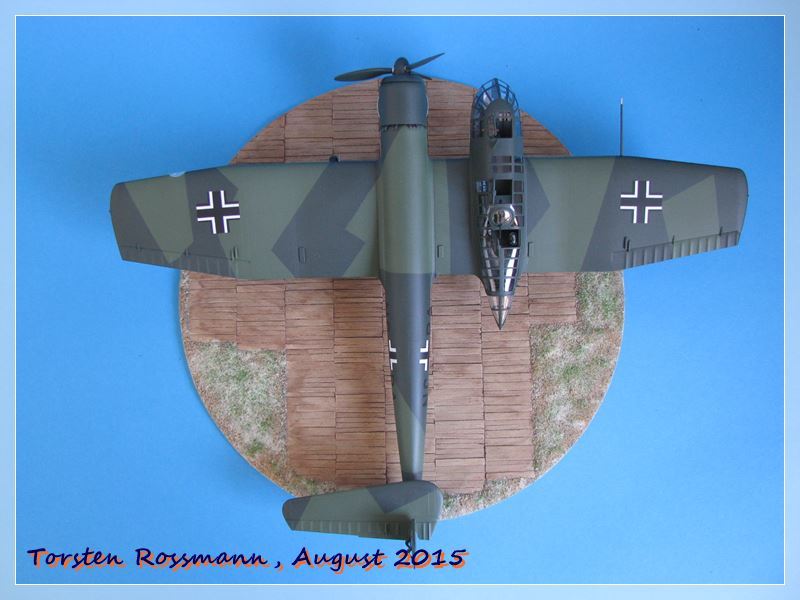
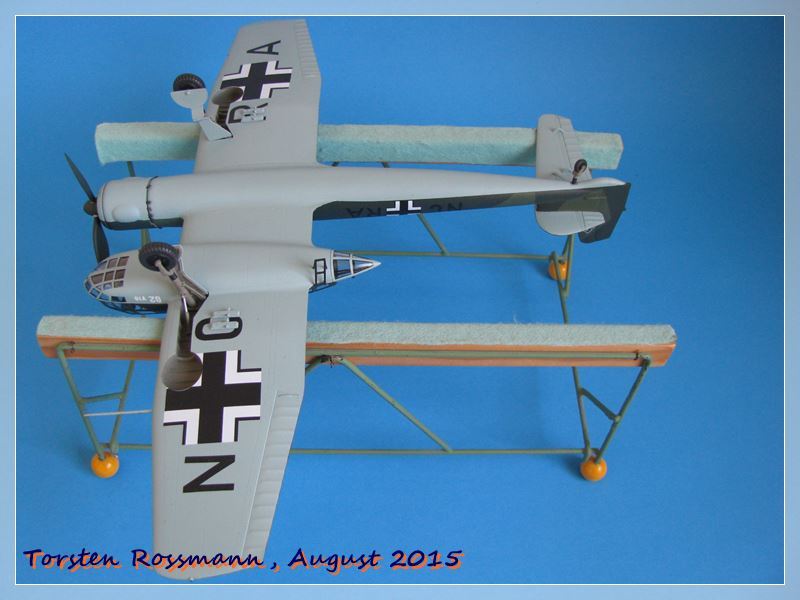
It has been a bit quiet around this thread in the past 3 months. Well, I was busy building my Leopard 1 in May and now I just returned from summer holidays in Estonia. But now I can show you my latest finished kit, the Blohm & Voss BV 141 from Hobbyboss, as always in 1/48 ....
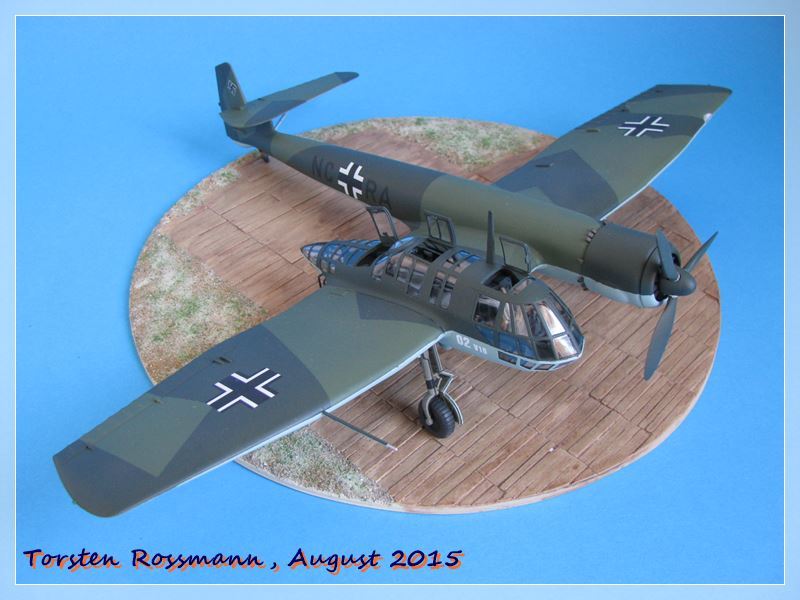
.... in 1937 the Reichsluftfahrtministerium (RLM) gave out an order to develop a single engined reconnaissance aircraft with a crew of 3. Arado, Focke-Wulf and the Hamburger Flugzeugbau Blohm & Voss took part in that competition. The first BV 141 prototype took to the air on the 25. February 1938 and although it had its teething problems the RLM gave out an order for further pre-production models. The BV 141 was fitted with the stronger BMW 801 engine and test flight were mostly successful. It was even possible to fly loopings with this big aircraft. But finally the RLM decided for the Focke-Wulf Fw 189 as the Luftwaffe standard reconnaissance aircraft and the BMW 801 engines were used in the much more needed Focke-Wulf Fw 190 fighters. So the program was brought to hold in 1941 and in 1943 completly stopped. Not more than 20 of these really unusual aircrafts left the assembly lines and most of them were "consumed" at the Eastern Front. At the end of the war British troops captured one BV 141 and sent it to England for examination. It has not survived until today ....
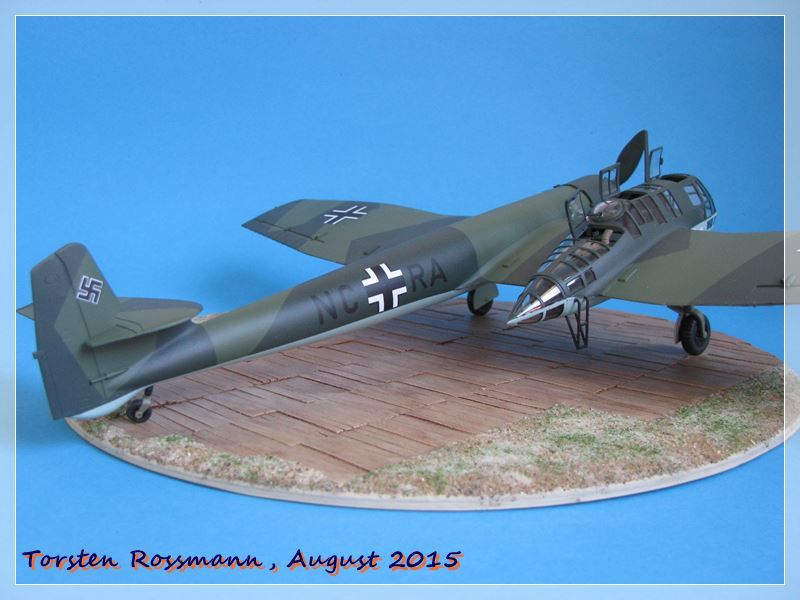
.... I have built the V 10 (V = Versuchsmuster) NC + RA of the BV 141, which had its maiden flight on the 1. June 1941 ....
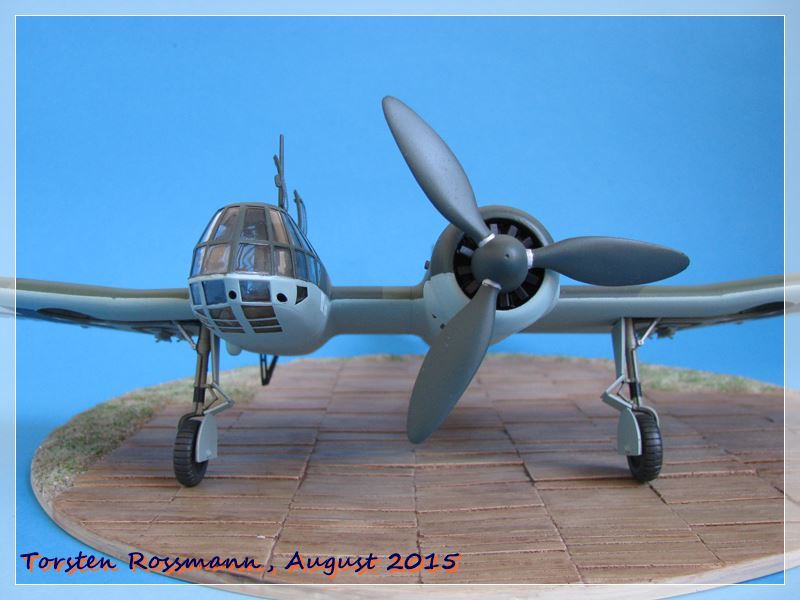
.... some of us have followed the BV 141 build blog of Chris Wilson earlier this year. I also did. The overall fitting of the kit is good, though it has its issues. We know by now that Hobbyboss made a silly mistake with the propeller blades, they turn to the wrong way. I fixed it with a Fw 190 prop from the spare box. Chris also noticed that the BMW 801 has 17 exhaust stacks with only 14 cylinders Okay, 3 cut off. I don't remember if he had the same problem but the stabilizer bar between the elevator and the rear fuselage was a bit too long in my kit to fit in the drill holes. I have cut off less than a millimeter in the middle and glued the halves together again. I also had to modify the entrance ladder to fit correctly. But the rest goes together really easy ....
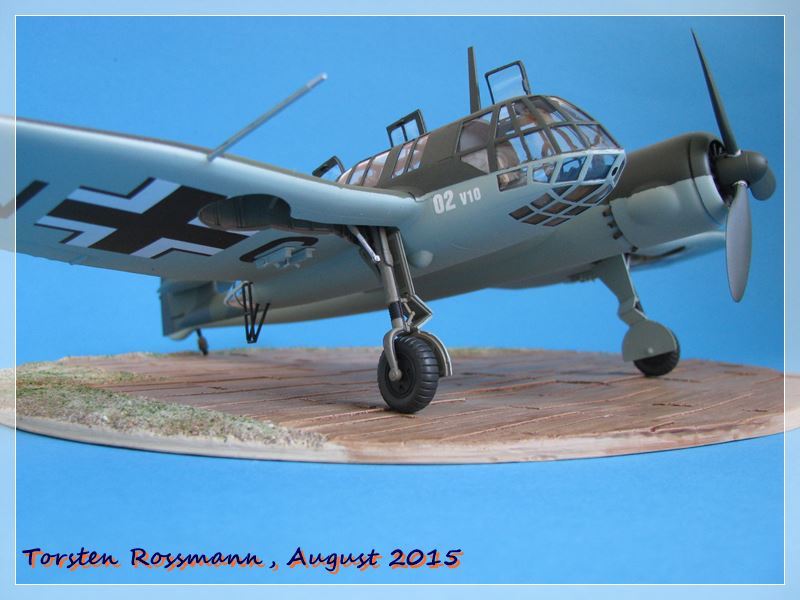
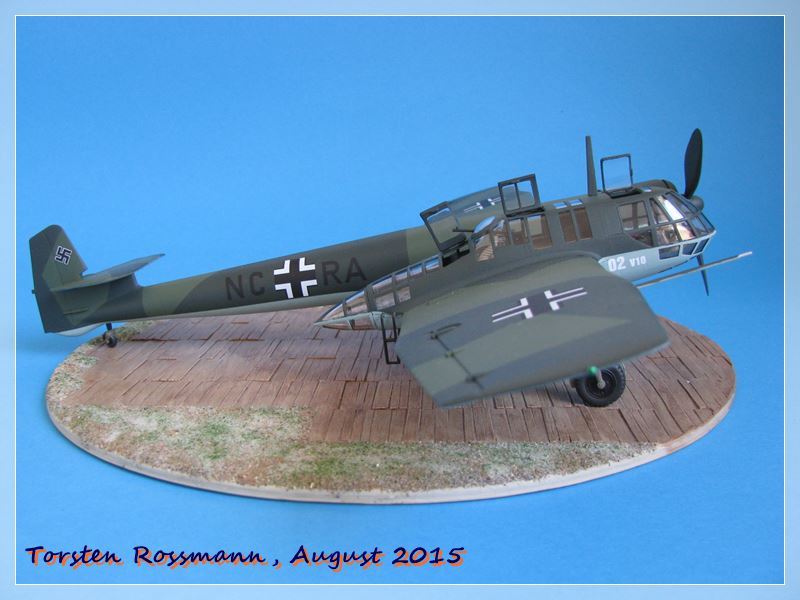
.... when it comes to the painting job I didn't follow Hobbyboss. They suggest a splinter camo of RLM 02 and RLM 71. I took the painting intructions from HPM as a reference. HPM brought out the BV 141 several years ago as a short run kit. A camo of RLM 70 Black Green and RLM 71 Dark Green with RLM 65 Light Blue on the underside looks more realistic to me. All paints come from Revell Aqua. Also the cockpit interior, for which I have used RLM 66. It is essential to use a mask for the clear parts of the cockpit. Although I asked for Eduard, my LHS gave my Montex masks. They have also a sheet for masking the inside which is quite helpfull if you want to open the entrance hatches like I did ....

.... finally a little engine test. Yes, the BMW 801 works perfect with all 14 cylinders running. Okay, ready for take off! With a wing span of 36 cm it's quite a big bird!
I say "Vielen Dank" for stepping in and hope you've enjoyed walking around one of the most unsual aircrafts of WW 2.
Happy modelling!
Torsten
It has been a bit quiet around this thread in the past 3 months. Well, I was busy building my Leopard 1 in May and now I just returned from summer holidays in Estonia. But now I can show you my latest finished kit, the Blohm & Voss BV 141 from Hobbyboss, as always in 1/48 ....
.... in 1937 the Reichsluftfahrtministerium (RLM) gave out an order to develop a single engined reconnaissance aircraft with a crew of 3. Arado, Focke-Wulf and the Hamburger Flugzeugbau Blohm & Voss took part in that competition. The first BV 141 prototype took to the air on the 25. February 1938 and although it had its teething problems the RLM gave out an order for further pre-production models. The BV 141 was fitted with the stronger BMW 801 engine and test flight were mostly successful. It was even possible to fly loopings with this big aircraft. But finally the RLM decided for the Focke-Wulf Fw 189 as the Luftwaffe standard reconnaissance aircraft and the BMW 801 engines were used in the much more needed Focke-Wulf Fw 190 fighters. So the program was brought to hold in 1941 and in 1943 completly stopped. Not more than 20 of these really unusual aircrafts left the assembly lines and most of them were "consumed" at the Eastern Front. At the end of the war British troops captured one BV 141 and sent it to England for examination. It has not survived until today ....
.... I have built the V 10 (V = Versuchsmuster) NC + RA of the BV 141, which had its maiden flight on the 1. June 1941 ....
.... some of us have followed the BV 141 build blog of Chris Wilson earlier this year. I also did. The overall fitting of the kit is good, though it has its issues. We know by now that Hobbyboss made a silly mistake with the propeller blades, they turn to the wrong way. I fixed it with a Fw 190 prop from the spare box. Chris also noticed that the BMW 801 has 17 exhaust stacks with only 14 cylinders
Okay, 3 cut off. I don't remember if he had the same problem but the stabilizer bar between the elevator and the rear fuselage was a bit too long in my kit to fit in the drill holes. I have cut off less than a millimeter in the middle and glued the halves together again. I also had to modify the entrance ladder to fit correctly. But the rest goes together really easy ........ when it comes to the painting job I didn't follow Hobbyboss. They suggest a splinter camo of RLM 02 and RLM 71. I took the painting intructions from HPM as a reference. HPM brought out the BV 141 several years ago as a short run kit. A camo of RLM 70 Black Green and RLM 71 Dark Green with RLM 65 Light Blue on the underside looks more realistic to me. All paints come from Revell Aqua. Also the cockpit interior, for which I have used RLM 66. It is essential to use a mask for the clear parts of the cockpit. Although I asked for Eduard, my LHS gave my Montex masks. They have also a sheet for masking the inside which is quite helpfull if you want to open the entrance hatches like I did ....
.... finally a little engine test. Yes, the BMW 801 works perfect with all 14 cylinders running. Okay, ready for take off! With a wing span of 36 cm it's quite a big bird!
I say "Vielen Dank" for stepping in and hope you've enjoyed walking around one of the most unsual aircrafts of WW 2.
Happy modelling!
Torsten
Joel_W
Joined: December 04, 2010
KitMaker: 11,666 posts
AeroScale: 7,410 posts
Posted: Monday, August 03, 2015 - 12:37 AM UTC
Torsten,
Another quality museum build that meets your very high standards. Ok, I did checkout the canopy green house 1st, as there is so much glass, and I was duly impressed at how perfectly it's painted. Those masks were well worth the cost. Your camo paint scheme and decaling is just perfect, but as you already know, I expect that level of work from you. And once again, you didn't disappoint me.
I also checked out the link to your Leopard 1, and I was more then just impressed. You weathered it!! Now there's something I just wasn't expecting. Just an outstanding build.
Joel

GazzaS
#424
Joined: April 23, 2015
KitMaker: 4,648 posts
AeroScale: 1,938 posts

Posted: Monday, August 03, 2015 - 09:09 AM UTC
Beautifully done, Torsten. I liked your Leopard, too.
Gary
Gary
BlackWidow
Joined: August 09, 2009
KitMaker: 1,732 posts
AeroScale: 1,336 posts
Posted: Monday, August 03, 2015 - 11:06 PM UTC
Thanks for your comments, guys!
Joel, you're too kind. When I looked at the photos, I noticed a mistake I made. I should have done some more sanding at the transition between the cockpit and the outer wing half (see photo 2). But it looks worse on the photo than on the model .... The Montex masks did a good job indeed. At first I thought they would not stick well enough to the clear parts but when I took them off after my holidays they proved me wrong And it was just for 5 Euros. The decals are from the kit and very good. Thin and easy to handle. I only used a little bit of softener. There are no stencils on the sheet.
And thanks to both of you for your kind words about my Leopard tank. Weathering on my military vehicles is obligatory, even if it's just a little pastel chalk. Now they look like coming home from an exercise on a hot dusty summers day, like we have them here in Germany at the moment. In the first year of my army time, that was in 1986 , I was a crew member on a Leopard 2A4, so you can imagine I still have a soft spot for that nice little car ....
  At the moment there is another tank on my workbench (Tank Destroyer "Jaguar") but also a very beautiful aircraft. So stay tuned!
Happy modelling!
Torsten
Joel, you're too kind. When I looked at the photos, I noticed a mistake I made. I should have done some more sanding at the transition between the cockpit and the outer wing half (see photo 2). But it looks worse on the photo than on the model .... The Montex masks did a good job indeed. At first I thought they would not stick well enough to the clear parts but when I took them off after my holidays they proved me wrong
And it was just for 5 Euros. The decals are from the kit and very good. Thin and easy to handle. I only used a little bit of softener. There are no stencils on the sheet. And thanks to both of you for your kind words about my Leopard tank. Weathering on my military vehicles is obligatory, even if it's just a little pastel chalk. Now they look like coming home from an exercise on a hot dusty summers day, like we have them here in Germany at the moment. In the first year of my army time, that was in 1986
, I was a crew member on a Leopard 2A4, so you can imagine I still have a soft spot for that nice little car .... At the moment there is another tank on my workbench (Tank Destroyer "Jaguar") but also a very beautiful aircraft. So stay tuned!Happy modelling!
Torsten
Joel_W
Joined: December 04, 2010
KitMaker: 11,666 posts
AeroScale: 7,410 posts
Posted: Tuesday, August 04, 2015 - 09:17 PM UTC
Torsten,
Of course I'm looking forward to your next installments.
Joel
Of course I'm looking forward to your next installments.
Joel
BlackWidow
Joined: August 09, 2009
KitMaker: 1,732 posts
AeroScale: 1,336 posts
Posted: Monday, September 14, 2015 - 12:12 AM UTC
Earlier this year, Joel finished his P-38 and that gave me the needed kick to build another "Gabelschwanzteufel" for my collection. Finished just last Friday, today I can show you my new Lockheed P-38 J Lightning from Academy in 1/48 ....
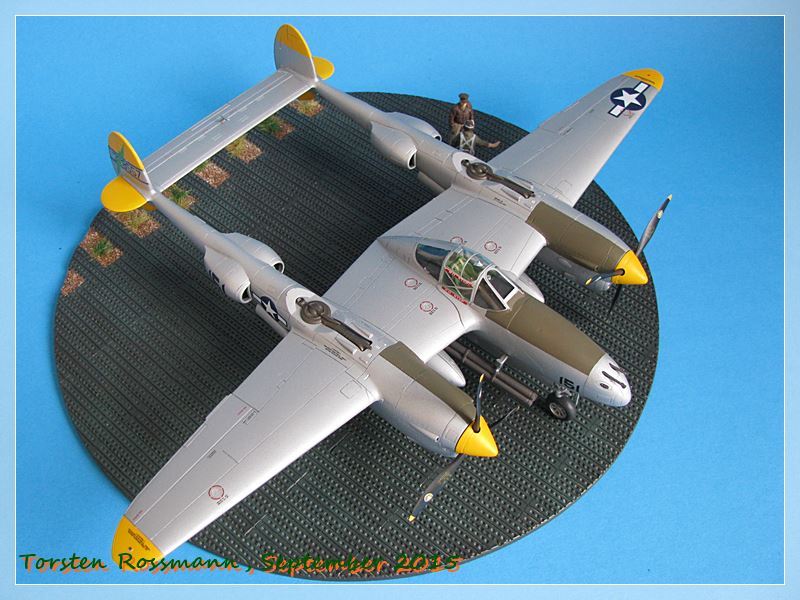
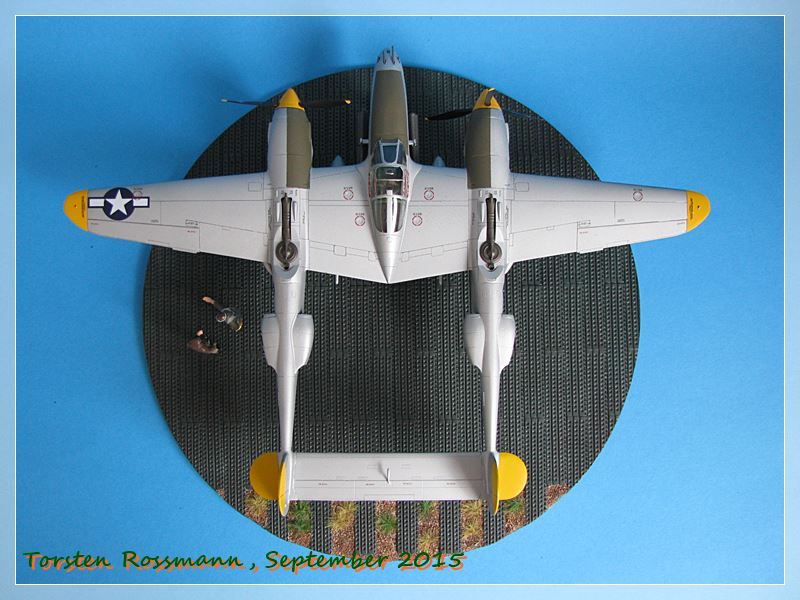
.... the P-38 J was introduced in the USAAF in August 1943. It had several improvements to the earlier versions like more efficient oil coolers forming a kind of "chin", bigger engine radiator intakes and new compressibility or dive recovery flaps. With 2970 machines it was the second biggest version in numbers of all Lightnings built. The aircraft was powered by two Allison V-1710, 12 cylinder liquid cooled inline engines with 1600 hp each which gave the P-38 a speed of over 650 km/h at 7600 meters. The service ceiling was 13400 meters and the range about 2100 miles, which are nearly 3400 kilometers ....
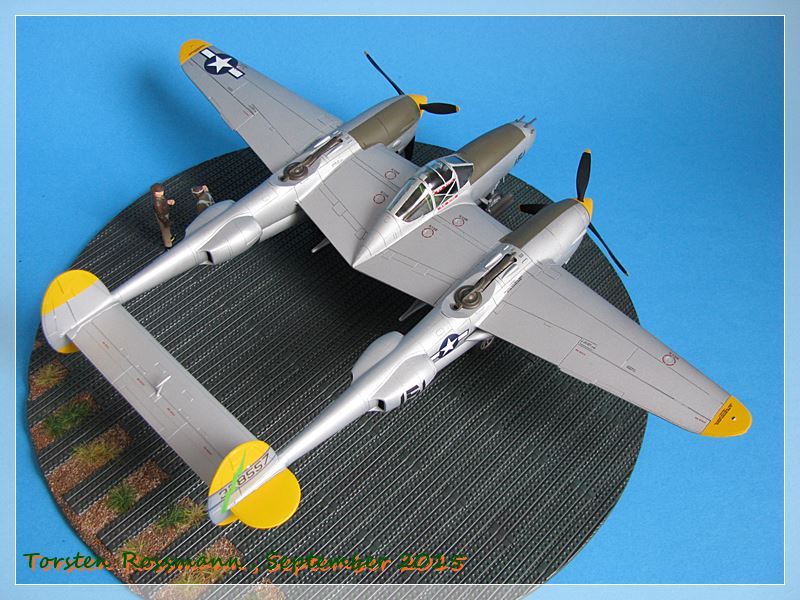
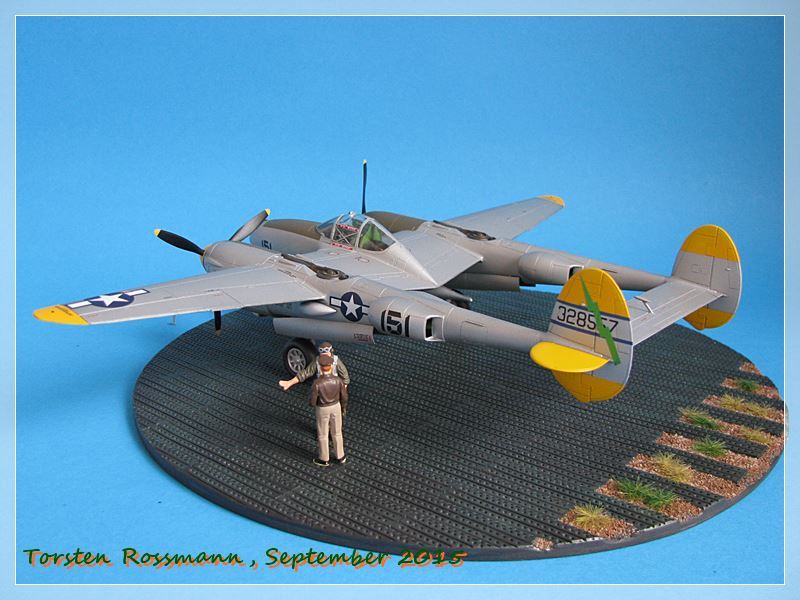
.... I have build "Black 151/Si Si Senor" of the 67th FS/347th FG at Mindoro in the Philippines 1944. They had their Lightnings from 1944 to 1946. The unit still exits today, based at Kadena AB on Okinawa, flying F-15 Eagle ....
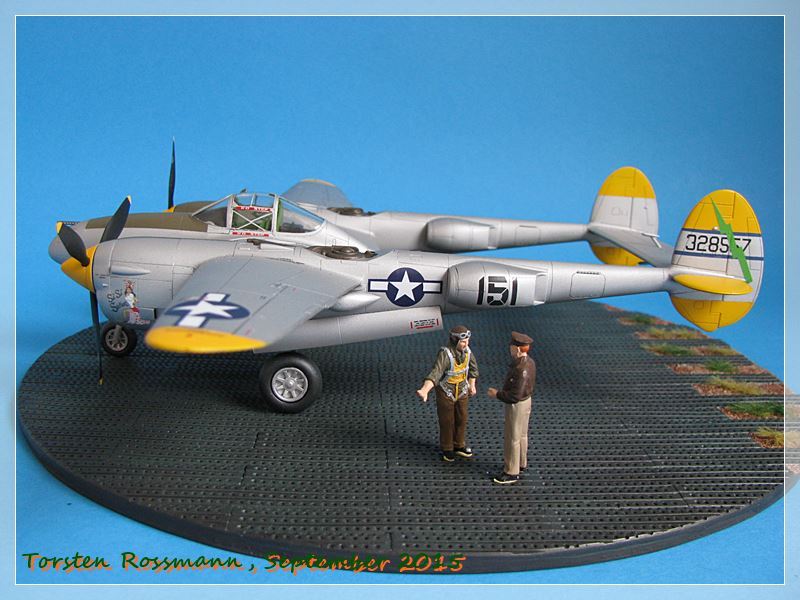
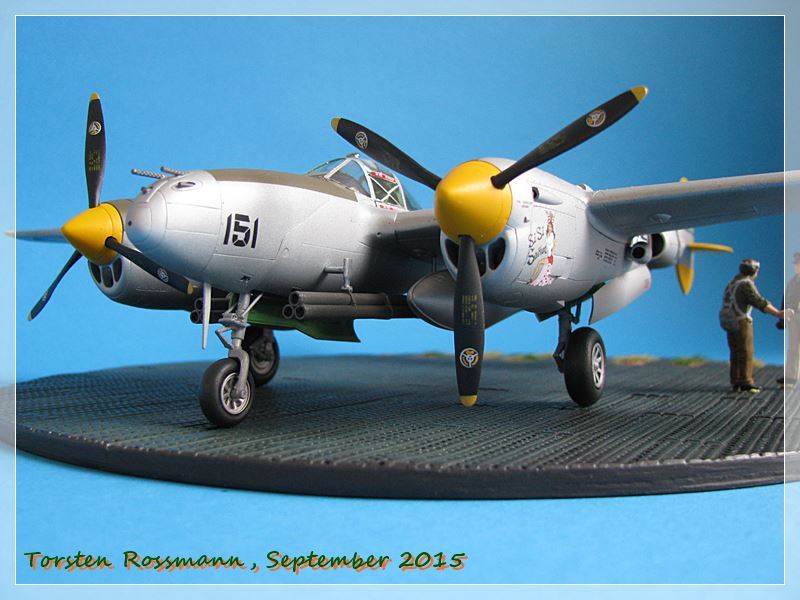
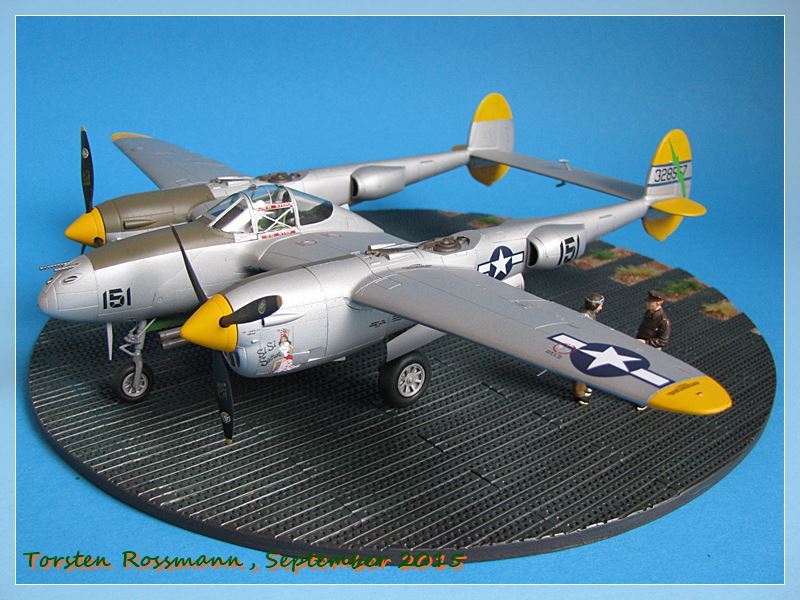
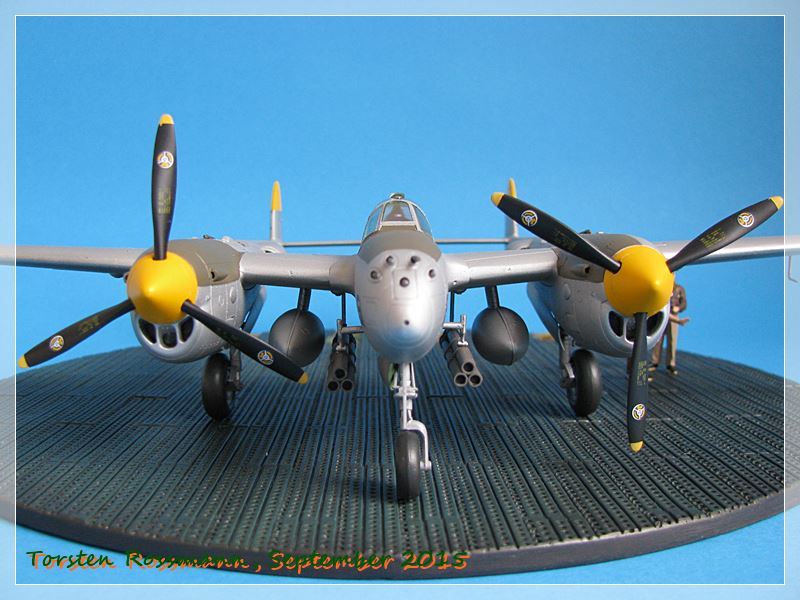
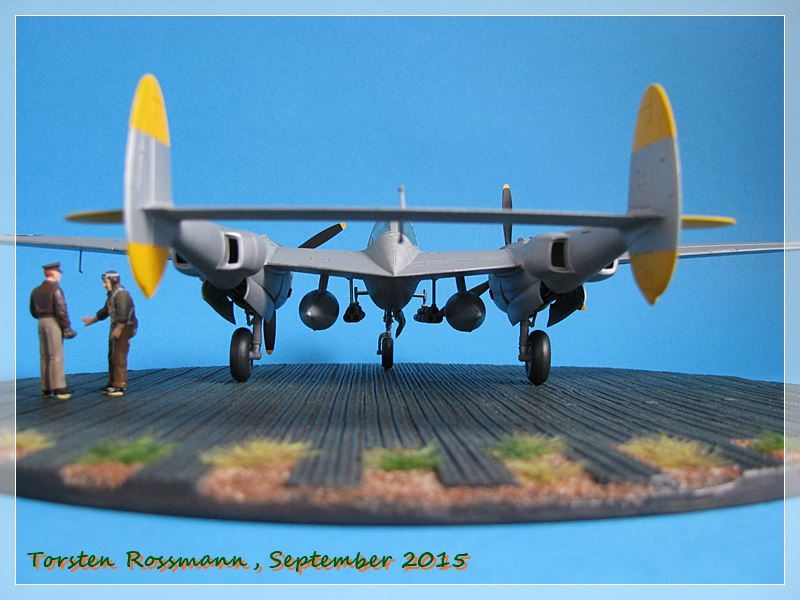
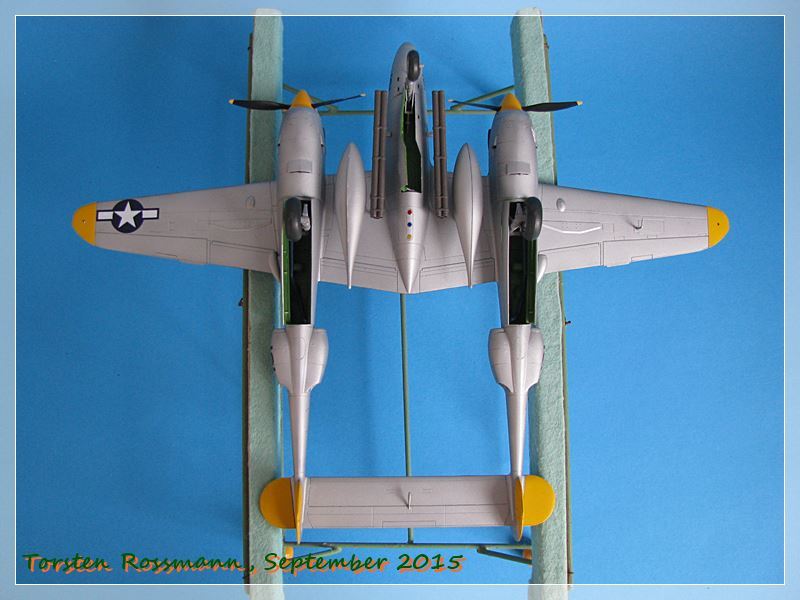
.... the mould of this kit is from 1994, so it has its fitting issues like the one of the early Lightning. But all in all it looks to me as if the fitting is a little better, especially where the twin booms meet the wings. This time I didn't need filler here. But I made countless dry test fittings before glue joined the party. But there's still a lot of sanding to do, here especially in the cockpit area. The kit that Eduard offers in their program now is based on the Academy kit but improved with some brassin and PE goodies. For the canopy I've used the Eduard mask EX098. I have put enough weight in the nose and behind the oil coolers to have no tailsitter in the end. Of all the ordnance Academy offers in this kit, I've chosen the bazooka tubes this time. I think with them the P-38 looks really cool. The paints I used are all from Revell Aqua, mainly Aluminium 99, NATO Olive 46, Yellow 310, Blue 56 and Fern Green 360. Final coating was made with satin varnish from Marabu. The blue lines at the outside of the rudders were airbrushed and covered with Kip Tape of 1 mm width. Stencils and national insignias are taken from the kit, all others come from the Sky Decals sheet "P-38 Lightning Part 1" (No. 48-048), which offers decals for no less than 16 (!!) different P-38, including two captured ones. Amazing! And they are really of very good quality, printed by Cartograph ....
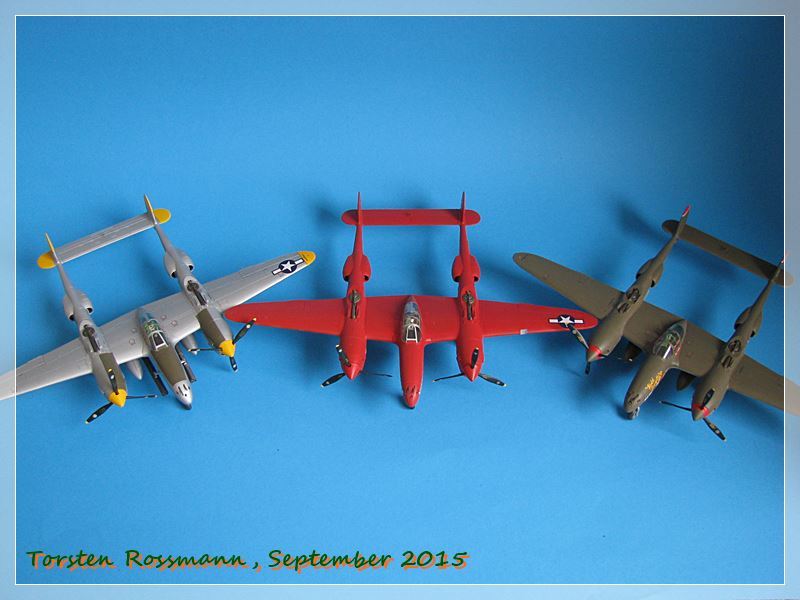
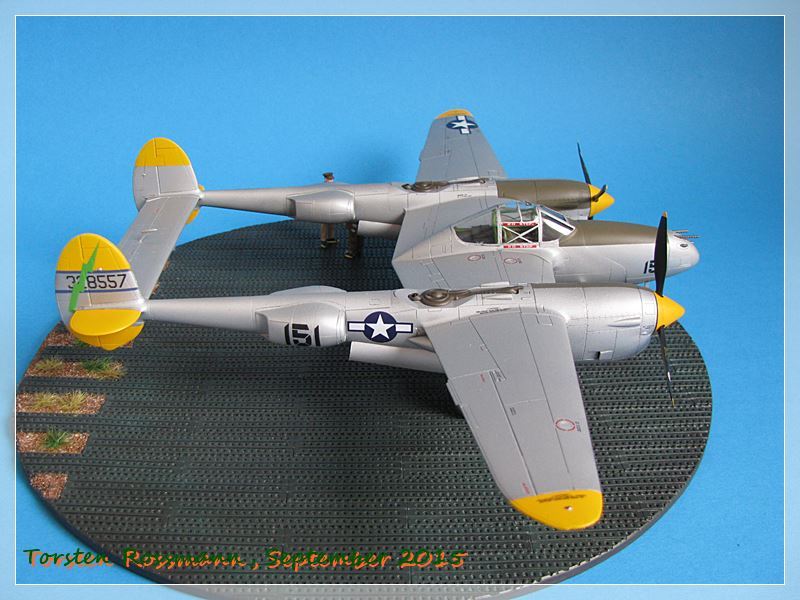
.... and three makes a family! Finally a photo of all my Lightnings I've build over the years. To me the P-38 is still one of the most beautiful military aircrafts ever built. Now I say thanks for stepping in and walking around my new "Fork Tail Devil". Hope you've enjoyed it. For today I will leave you with this amazing video. Lean back and enjoy!
Happy modelling!
Torsten
.... the P-38 J was introduced in the USAAF in August 1943. It had several improvements to the earlier versions like more efficient oil coolers forming a kind of "chin", bigger engine radiator intakes and new compressibility or dive recovery flaps. With 2970 machines it was the second biggest version in numbers of all Lightnings built. The aircraft was powered by two Allison V-1710, 12 cylinder liquid cooled inline engines with 1600 hp each which gave the P-38 a speed of over 650 km/h at 7600 meters. The service ceiling was 13400 meters and the range about 2100 miles, which are nearly 3400 kilometers ....
.... I have build "Black 151/Si Si Senor" of the 67th FS/347th FG at Mindoro in the Philippines 1944. They had their Lightnings from 1944 to 1946. The unit still exits today, based at Kadena AB on Okinawa, flying F-15 Eagle ....
.... the mould of this kit is from 1994, so it has its fitting issues like the one of the early Lightning. But all in all it looks to me as if the fitting is a little better, especially where the twin booms meet the wings. This time I didn't need filler here. But I made countless dry test fittings before glue joined the party. But there's still a lot of sanding to do, here especially in the cockpit area. The kit that Eduard offers in their program now is based on the Academy kit but improved with some brassin and PE goodies. For the canopy I've used the Eduard mask EX098. I have put enough weight in the nose and behind the oil coolers to have no tailsitter in the end. Of all the ordnance Academy offers in this kit, I've chosen the bazooka tubes this time. I think with them the P-38 looks really cool. The paints I used are all from Revell Aqua, mainly Aluminium 99, NATO Olive 46, Yellow 310, Blue 56 and Fern Green 360. Final coating was made with satin varnish from Marabu. The blue lines at the outside of the rudders were airbrushed and covered with Kip Tape of 1 mm width. Stencils and national insignias are taken from the kit, all others come from the Sky Decals sheet "P-38 Lightning Part 1" (No. 48-048), which offers decals for no less than 16 (!!) different P-38, including two captured ones. Amazing! And they are really of very good quality, printed by Cartograph ....
.... and three makes a family! Finally a photo of all my Lightnings I've build over the years. To me the P-38 is still one of the most beautiful military aircrafts ever built. Now I say thanks for stepping in and walking around my new "Fork Tail Devil". Hope you've enjoyed it. For today I will leave you with this amazing video. Lean back and enjoy!
Happy modelling!
Torsten
JClapp
#259
Joined: October 23, 2011
KitMaker: 2,265 posts
AeroScale: 1,715 posts
Posted: Monday, September 14, 2015 - 02:55 AM UTC
Beautiful! I love the family group picture.

Jessie_C

Joined: September 03, 2009
KitMaker: 6,965 posts
AeroScale: 6,247 posts

Posted: Monday, September 14, 2015 - 03:14 AM UTC
Lots of lovely Lightnings laid out lusciously
Joel_W
Joined: December 04, 2010
KitMaker: 11,666 posts
AeroScale: 7,410 posts
Posted: Monday, September 14, 2015 - 03:28 AM UTC
Torsten,
Another absolutely impressive build for your miniature museum. Nice to see that your 3rd P-38 is a J, done in NMF. Just an absolutely perfect build and finish. I'm honored that my P-38 helped bring your build to fruition.
I really do like your choice of those Bazooka tubes. They do add a nice touch.
Your trio of P-38's is more then just impressive.
I watched the video as one doesn't get to see that many P-38s actually in the air. Thanks for taking the time to post that link.
Joel
GazzaS
#424
Joined: April 23, 2015
KitMaker: 4,648 posts
AeroScale: 1,938 posts
Posted: Monday, September 14, 2015 - 09:39 AM UTC
Great looking P-38 Torsten. I'd never known that the Lightning carried bazookas. Makes it look even more menacing.
Well done,
Gary
Well done,
Gary
BlackWidow
Joined: August 09, 2009
KitMaker: 1,732 posts
AeroScale: 1,336 posts
Posted: Tuesday, September 15, 2015 - 10:50 PM UTC
Thanks for all you kind comments! 
Jonathan + Jessie, my P-38 family will still grow in the future as I have another 8 Academy kits of them in my stash and tons of decals. And I still havn't build a Droop Snoot, Pathfinder, Recon, Night Lightning ....
Joel, yes that video is fantastic. We have here in Europe only one P-38 in flying condition. I've seen it once flying a few years ago at an air show in Germany. It's owned (and maybe also powered .... ) by Red Bull and operates from Salzburg Airport in Austria. It's sad that there are only very few of these beautiful aircrafts still flying.
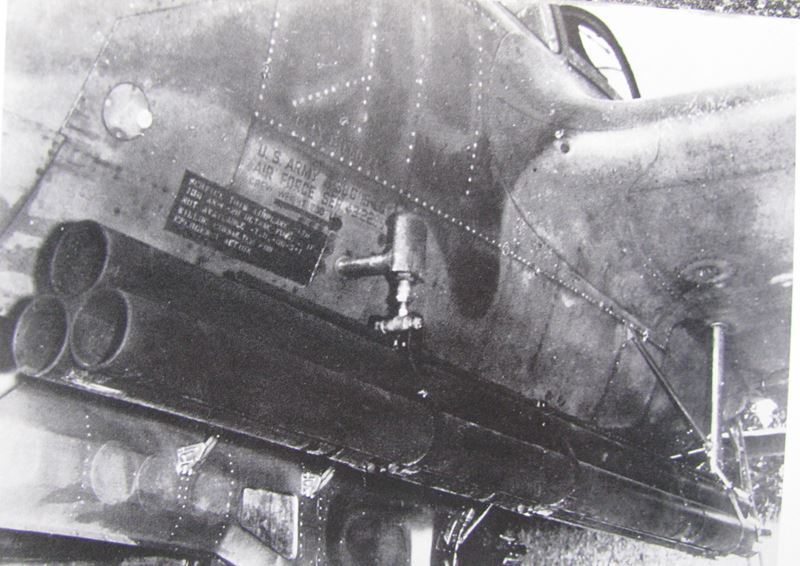
Gary, yes the P-38 could carry all kinds of weapons. Some of them even carried depth charges for anti submarine patrols. Factory specifications called for a max. ordnance load of 725 kg on each underwing pylon. But this was often exceeded in service use. Here is a photo of Bazookas on the aircraft. The photo is taken from Squadron/Signal "Walk Around P-38", a very helpfull book if you want to build the Lightning.
Happy modelling!
Torsten
Jonathan + Jessie, my P-38 family will still grow in the future as I have another 8 Academy kits of them in my stash and tons of decals. And I still havn't build a Droop Snoot, Pathfinder, Recon, Night Lightning ....
Joel, yes that video is fantastic. We have here in Europe only one P-38 in flying condition. I've seen it once flying a few years ago at an air show in Germany. It's owned (and maybe also powered ....
) by Red Bull and operates from Salzburg Airport in Austria. It's sad that there are only very few of these beautiful aircrafts still flying. Gary, yes the P-38 could carry all kinds of weapons. Some of them even carried depth charges for anti submarine patrols. Factory specifications called for a max. ordnance load of 725 kg on each underwing pylon. But this was often exceeded in service use. Here is a photo of Bazookas on the aircraft. The photo is taken from Squadron/Signal "Walk Around P-38", a very helpfull book if you want to build the Lightning.
Happy modelling!
Torsten
BlackWidow
Joined: August 09, 2009
KitMaker: 1,732 posts
AeroScale: 1,336 posts
Posted: Wednesday, November 04, 2015 - 01:25 AM UTC
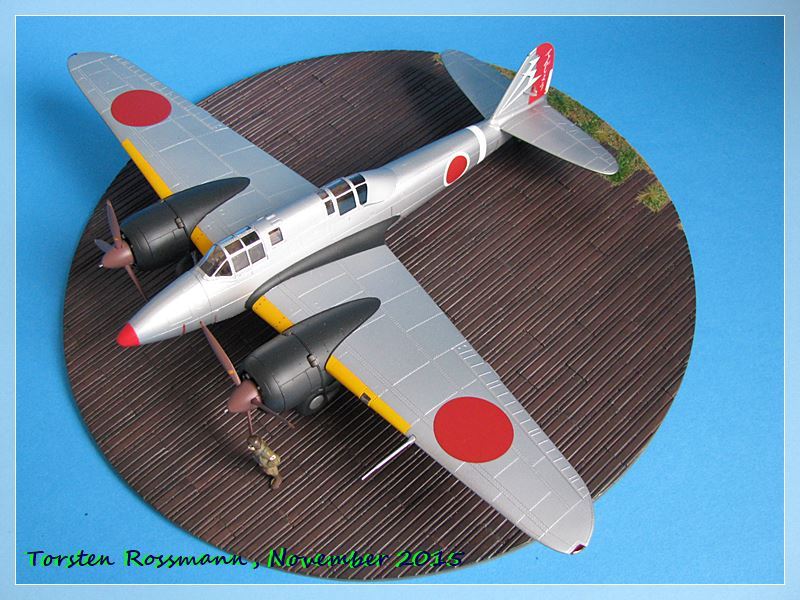
Finished last weekend, today I can present you my lasted model, the Kawasaki Ki-45 Kai Tei "Toryu" from Hasegawa in 1/48 ....
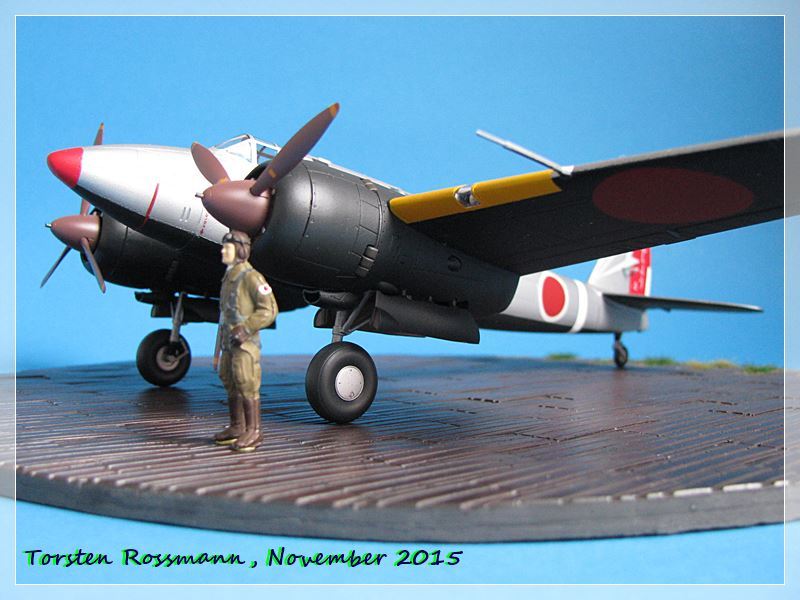
.... in 1937 Kawasaki was asked by the staff of the Imperial Army to develop a twin engined heavy fighter like the german Bf 110. The first prototype started in 1938 under the designation Ki-38 but it was unsuccessful. So Kawasaki's Chief Designer Takeo Doi took over the lead of the development and he integrated some changes like stronger engines and the wings of the light bomber Ki-48. Out came the Ki-45 Kai. "Kai" means something like "upgrated". Tests in August 1941 were successful and the army accepted the aircraft. Already the first dogfights in 1942 against the "Flying Tigers" showed, that the Ki-45 was not really suitable for that. So the plane was given the role as interceptor and fighter bomber and the Ki-45 did well in that, especially during the home defense in 1944/45. There were several versions of the Toryu, which differed mainly in the armament. Main versions were called "Koh", "Otsu", "Hei" and "Tei". The Toryu, or "Nick" as the allied code name for it was, had a weight of about 5,5 tons and was powered by 2 Nakajima Ha-102 engines which gave the aircraft a speed of 540 km/h at 6.000 meters. It had a service ceiling of 10.000 meters and a range of about 2.000 kilometers. 1701 Ki-45 were build, nearly all of them at the Kawasaki plant in Akashi. The usual armament were two 12,7 mm machine guns in the nose and a 20 mm cannon under the fuselage plus a 12,7 mm machine gun for defensive. Several of these aircrafts have been captured by allied forces at the end of the war, but as far as I know, there is only one fuselage left on display at the Udvar-Hazy Museum in Washington DC, a place I still have to visit ....
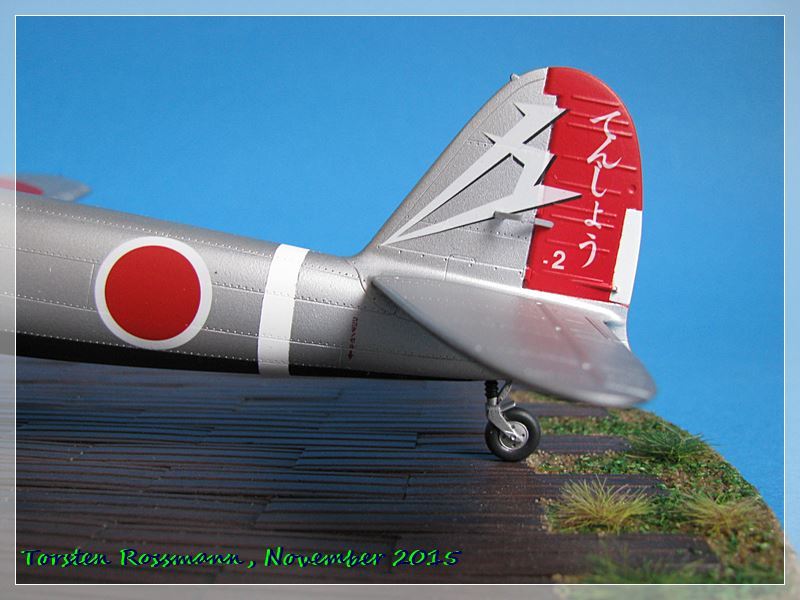
.... this is one of the few kits I have imported from Japan, bought at HLJ, because it was a limited edition from 2010, which I didn't get over here. Hasegawa offers 3 decal options for this kit and I have build a Ki-45 Kai Tei from the 5. Sentai, based at Kiyosu in June 1945. As you can see it is a modified nightfighter, missing the two 20 mm canons "Schräge Musik" behind the pilot and the defensive 12,7 mm machine gun. Only the 20 mm gun under the fuselage is left. A Sentai (= Regiment) usually had 4-5 Chutais (= Squadron) and during the home defense the last Chutai usually was a ram attack unit. And that is what this aircraft was used for. The pilot's name is Major Yoshiaki Yamashita but I couldn't find anything about him in the internet ....
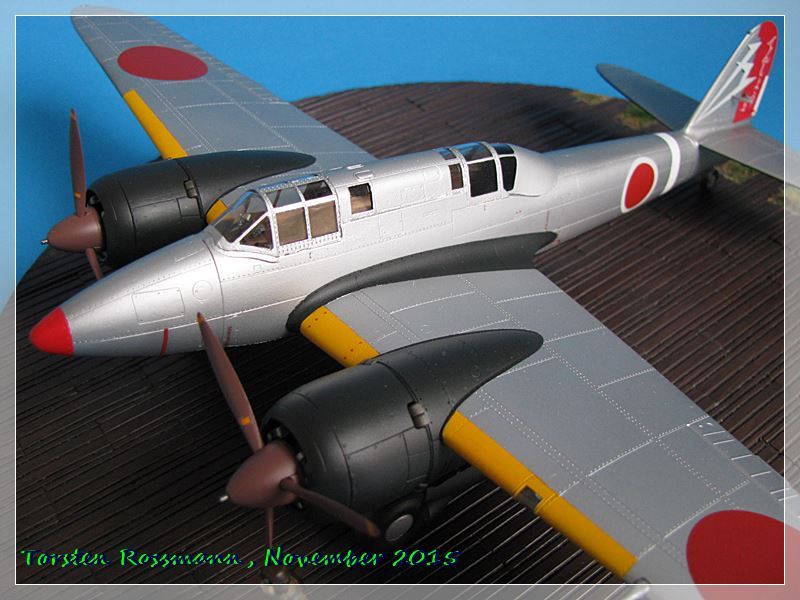
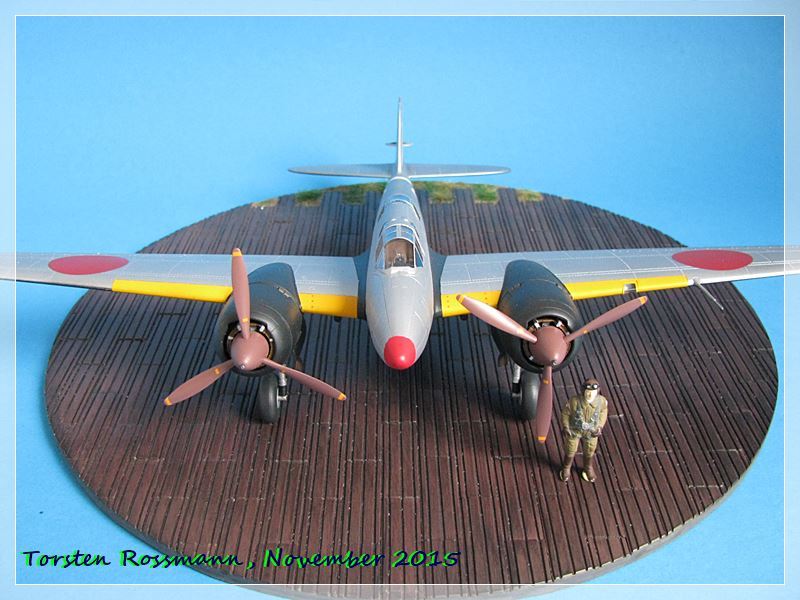
.... building this kit wasn't as easy as I thought. Though I didn't need any filler there was a lot of sanding to do. The fitting of the canopy is not world class, especially the middle part. But I must admit, that some issues are home made, because I didn't work carefull enough .... So if you look at the ring of the right engine cowling, you can see that it is not perfect in the middle. I noticed that only when it was already too late. Don't ask me what I was thinking when glueing the parts together. That makes also sit the oil cooler ring not in the middle. Sh...t happens  But all in all it's a fine kit of a beautiful aircraft ....
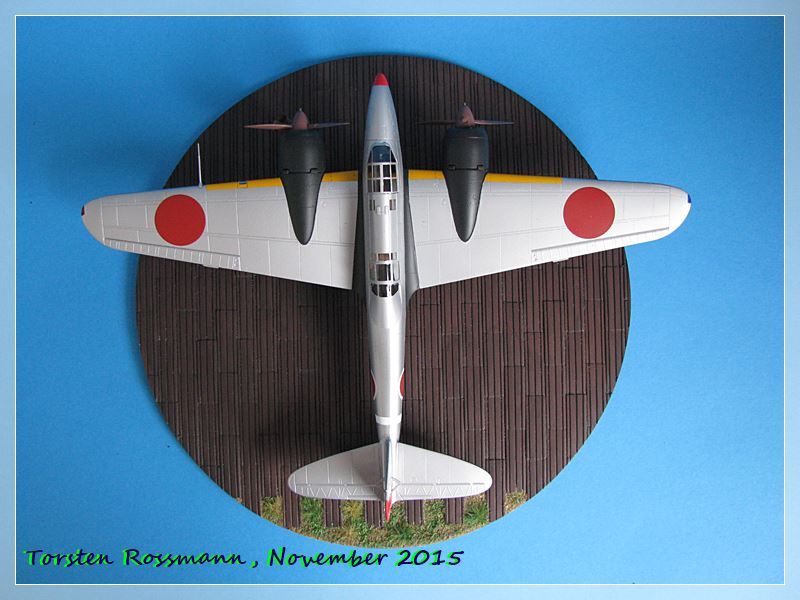
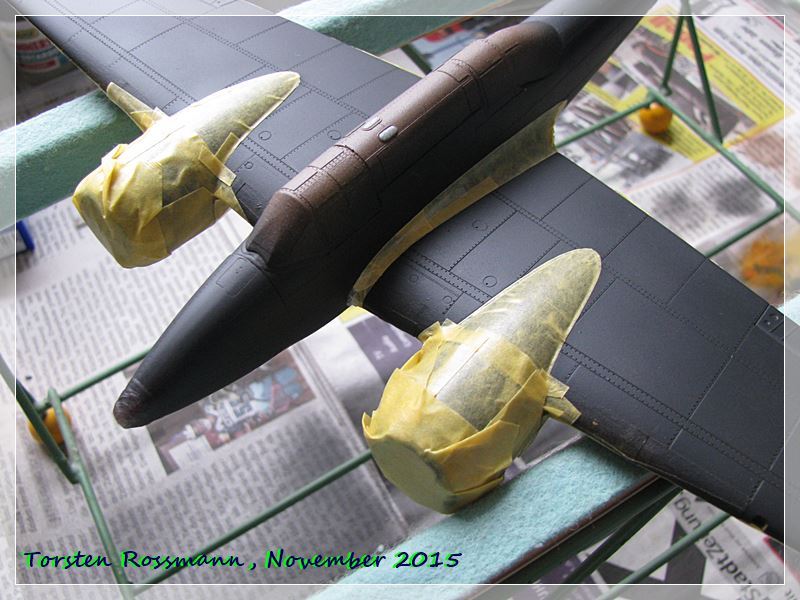
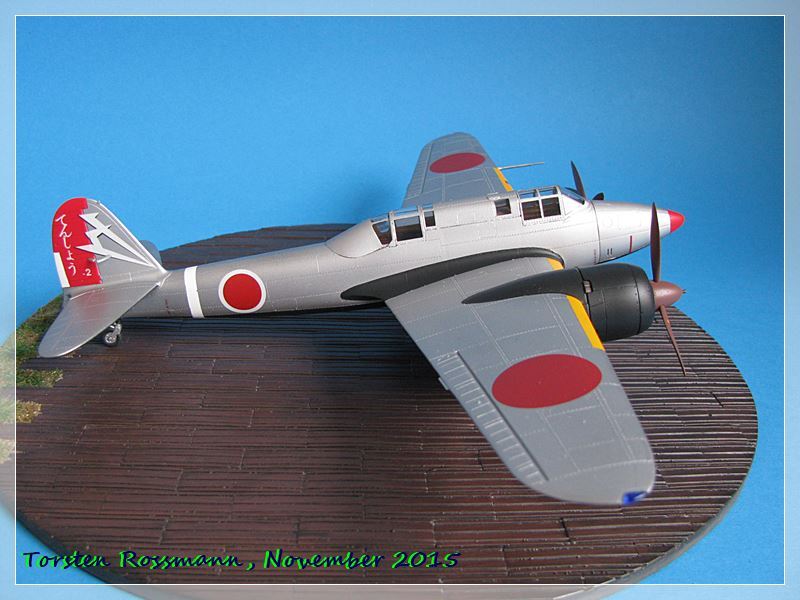
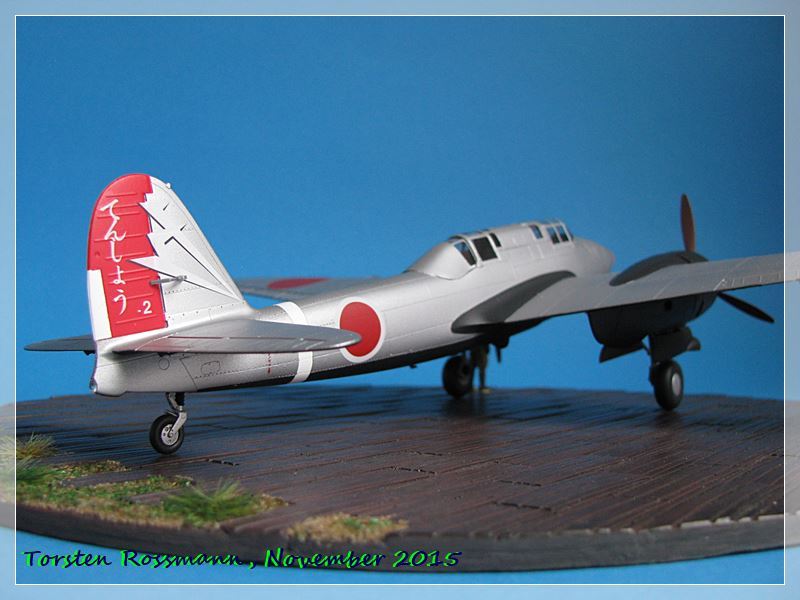
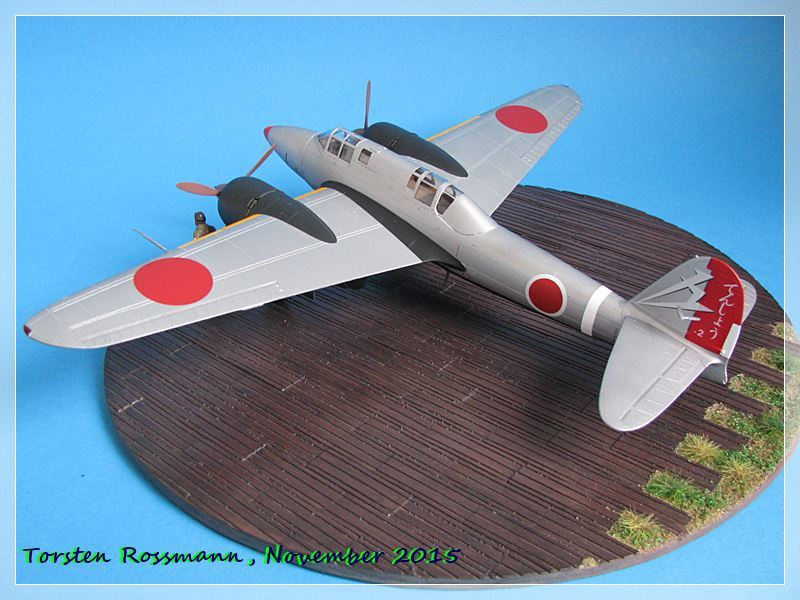
.... as you can see on the photo above I did a lot of masking of the parts which should not become silver. That masking took me 1-2 hours on 5 evenings. Most difficult was masking the wing roots because the edges are very curved. The paints I used are mostly Revell Aquas. Black is No. 6, Yellow is No. 310, Red is No. 36, Silver is No. 90 and Brown (for the interior and the wheel wells) is No. 381. The decals work fine with the softener from Revell. I painted the white fuselage band and masked it with Parafilm just like the small red nose. Final coating was again made with Matt Varnish from Marabu ....
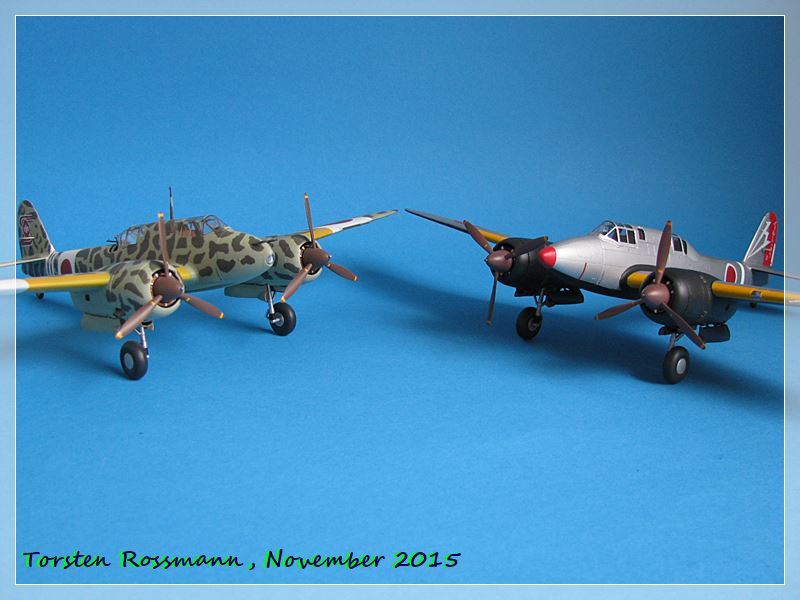
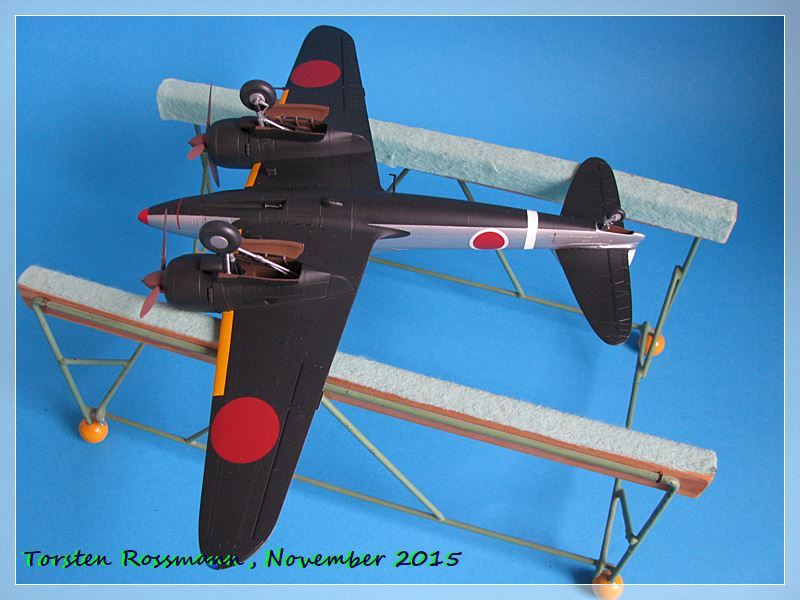
.... very curious about the new arrival to my collection was the other Toryu, which I have build in 2009. Here you can see the different nose sections because of the weapons, the different exhaust stacks and the different position of the landing lights. Btw, the camouflaged Toryu was flown by well known home defense ace and war surviver 1Lt. Isamu Kashiide.
So, again I say "domo arigato" for walking around my new Dragonslayer. Hope you enjoyed it.
Happy modelling!
Torsten

.... in 1937 Kawasaki was asked by the staff of the Imperial Army to develop a twin engined heavy fighter like the german Bf 110. The first prototype started in 1938 under the designation Ki-38 but it was unsuccessful. So Kawasaki's Chief Designer Takeo Doi took over the lead of the development and he integrated some changes like stronger engines and the wings of the light bomber Ki-48. Out came the Ki-45 Kai. "Kai" means something like "upgrated". Tests in August 1941 were successful and the army accepted the aircraft. Already the first dogfights in 1942 against the "Flying Tigers" showed, that the Ki-45 was not really suitable for that. So the plane was given the role as interceptor and fighter bomber and the Ki-45 did well in that, especially during the home defense in 1944/45. There were several versions of the Toryu, which differed mainly in the armament. Main versions were called "Koh", "Otsu", "Hei" and "Tei". The Toryu, or "Nick" as the allied code name for it was, had a weight of about 5,5 tons and was powered by 2 Nakajima Ha-102 engines which gave the aircraft a speed of 540 km/h at 6.000 meters. It had a service ceiling of 10.000 meters and a range of about 2.000 kilometers. 1701 Ki-45 were build, nearly all of them at the Kawasaki plant in Akashi. The usual armament were two 12,7 mm machine guns in the nose and a 20 mm cannon under the fuselage plus a 12,7 mm machine gun for defensive. Several of these aircrafts have been captured by allied forces at the end of the war, but as far as I know, there is only one fuselage left on display at the Udvar-Hazy Museum in Washington DC, a place I still have to visit ....
.... this is one of the few kits I have imported from Japan, bought at HLJ, because it was a limited edition from 2010, which I didn't get over here. Hasegawa offers 3 decal options for this kit and I have build a Ki-45 Kai Tei from the 5. Sentai, based at Kiyosu in June 1945. As you can see it is a modified nightfighter, missing the two 20 mm canons "Schräge Musik" behind the pilot and the defensive 12,7 mm machine gun. Only the 20 mm gun under the fuselage is left. A Sentai (= Regiment) usually had 4-5 Chutais (= Squadron) and during the home defense the last Chutai usually was a ram attack unit. And that is what this aircraft was used for. The pilot's name is Major Yoshiaki Yamashita but I couldn't find anything about him in the internet ....
.... building this kit wasn't as easy as I thought. Though I didn't need any filler there was a lot of sanding to do. The fitting of the canopy is not world class, especially the middle part. But I must admit, that some issues are home made, because I didn't work carefull enough ....
So if you look at the ring of the right engine cowling, you can see that it is not perfect in the middle. I noticed that only when it was already too late. Don't ask me what I was thinking when glueing the parts together. That makes also sit the oil cooler ring not in the middle. Sh...t happens But all in all it's a fine kit of a beautiful aircraft ........ as you can see on the photo above I did a lot of masking of the parts which should not become silver. That masking took me 1-2 hours on 5 evenings. Most difficult was masking the wing roots because the edges are very curved. The paints I used are mostly Revell Aquas. Black is No. 6, Yellow is No. 310, Red is No. 36, Silver is No. 90 and Brown (for the interior and the wheel wells) is No. 381. The decals work fine with the softener from Revell. I painted the white fuselage band and masked it with Parafilm just like the small red nose. Final coating was again made with Matt Varnish from Marabu ....
.... very curious about the new arrival to my collection was the other Toryu, which I have build in 2009. Here you can see the different nose sections because of the weapons, the different exhaust stacks and the different position of the landing lights. Btw, the camouflaged Toryu was flown by well known home defense ace and war surviver 1Lt. Isamu Kashiide.
So, again I say "domo arigato" for walking around my new Dragonslayer. Hope you enjoyed it.
Happy modelling!
Torsten
AussieReg
#007
Joined: June 09, 2009
KitMaker: 8,156 posts
AeroScale: 3,756 posts
Posted: Wednesday, November 04, 2015 - 07:26 AM UTC
Another lovely and colourful build, and another very enjoyable and educational chapter in the encyclopedia of "LuftRossmann."
The NMF looks particularly good in the close-up images, great work!
Cheers, D
The NMF looks particularly good in the close-up images, great work!
Cheers, D
GazzaS
#424
Joined: April 23, 2015
KitMaker: 4,648 posts
AeroScale: 1,938 posts
Posted: Wednesday, November 04, 2015 - 12:15 PM UTC
Beautiful work, Torsten! Your masking is flawless!
Gary
Gary

berndm

Joined: March 26, 2014
KitMaker: 844 posts
AeroScale: 630 posts
Posted: Wednesday, November 04, 2015 - 03:55 PM UTC
Perfectly build and painted aircraft kits, beautiful modelling, Torsten.
BlackWidow
Joined: August 09, 2009
KitMaker: 1,732 posts
AeroScale: 1,336 posts
Posted: Wednesday, November 04, 2015 - 09:36 PM UTC
Thank you guys!
I have not much to complain about my paint job this time either. The masking was indeed a lot of work, more than I expected. Demasking took me just about 1 hour - that's unfair ....
Torsten
I have not much to complain about my paint job this time either. The masking was indeed a lot of work, more than I expected. Demasking took me just about 1 hour - that's unfair ....
Torsten
Joel_W
Joined: December 04, 2010
KitMaker: 11,666 posts
AeroScale: 7,410 posts
Posted: Wednesday, November 04, 2015 - 09:50 PM UTC
Torsten,
Yet another outstanding museum quality model. Your work as usual is flawless. One of the most impressive aspects for me is how you created and worked all that masking tape so skillfully. If it was me, I would have been banging my head against the wall after a while. Curve after curve is just perfect.
Joel
BlackWidow
Joined: August 09, 2009
KitMaker: 1,732 posts
AeroScale: 1,336 posts
Posted: Thursday, November 05, 2015 - 09:28 PM UTC
Don't make me blush, Joel! As I wrote above, masking took quite some time. The engine nacelles were masked quickly, I used a tooth pick and a new sharp blade for my scalpel. More difficult was masking the wing roots because of the curves, were I also used Parafilm beside Kip Tape. Masking one side took me about 90 minutes. I think the result was worth the effort
And as Damian mentioned, this thread indeed turns out into a little encyclopedia about my model kits. I hope you like it.
And as Damian mentioned, this thread indeed turns out into a little encyclopedia about my model kits. I hope you like it.
 |

WEB HOSTING BY


Copyright ©2021 AeroScale and Kitmaker Network, a subsidiary of Silver Star Enterprises
All Rights Reserved. Please read our Conditions of Use and Privacy Policy.
All Rights Reserved. Please read our Conditions of Use and Privacy Policy.