Air Campaigns
Want to start or join a group build? This is where to start.
Want to start or join a group build? This is where to start.
Hosted by Frederick Boucher, Michael Satin
OFFICIAL: De Havilland Campaign
Posted: Wednesday, February 26, 2014 - 07:42 AM UTC
Nice work Dave, what did they do to the lovely Hornet, it certainly didn't improve the looks
Posted: Wednesday, February 26, 2014 - 08:43 AM UTC
Quoted Text
Rowan, I was looking forward to seeing that kit finished after all the problems, shame you ran out of time
Hi Andrew
Don't worry, I'm determined to finish the Vampire - but, realistically, it'll be a week or so too late.
@ Dave - lovely work on the Sea Hornet!

All the best
Rowan


Jessie_C


Joined: September 03, 2009
KitMaker: 6,965 posts
AeroScale: 6,247 posts

Posted: Wednesday, February 26, 2014 - 09:55 AM UTC
A week late isn't that much of a problem in the grand scheme of things.
Posted: Wednesday, February 26, 2014 - 11:44 AM UTC
Quoted Text
Stephen, I'll allow an unofficial extension for you to recover from your disaster. The thread will drop off the "official" list but I won't stop ribbon awards just because the "official" deadline has passed
I've sometimes managed to recover from that "white" problem by applying more Future. It seems to dissolve the white surface and lets it dry clear once again.
Meanwhile, I only see 7 finishers in the gallery and I know that there are more finished models than that in the thread. Don't forget to post your finished model in the gallery, because that's where I'll be looking come award day.
Thanks, I can have it done by next week. I never even thought about trying a re-coat of Future. I know wish I'd asked for advice on this before resorting to drastic measures.
Richard - brilliant work on your DH-60. Its a lovely little model. I'll have to read up your review.
Dave - great work on the Sea Hornet. I'd never seen that version before seeing your model. I take it the radar operator sat under the rear bubble?
ScrapIron

Joined: January 19, 2014
KitMaker: 13 posts
AeroScale: 13 posts

Posted: Wednesday, February 26, 2014 - 12:36 PM UTC
Yes, Stephen, the radar operator sat there, facing rearward.
I was amazed when building this at its overall appearance. Given the Mosquito lineage - and the Mosquito was one of the most beautiful airframes ever built! - I was shocked at how ungainly and awkward this bird appears. And the radar nose sure does make the name Hornet seem to fit.
This was the first short run, multimedia kit that I ever built, but I am pleased with the overall result.
Shanghaied

Joined: June 30, 2011
KitMaker: 189 posts
AeroScale: 82 posts

Posted: Wednesday, February 26, 2014 - 04:59 PM UTC
Hi Dave,
beautiful model and paintwork!
Completely agree, the NF version has more character than beauty
Greetings from Shanghai
beautiful model and paintwork!
Completely agree, the NF version has more character than beauty

Greetings from Shanghai


Jessie_C


Joined: September 03, 2009
KitMaker: 6,965 posts
AeroScale: 6,247 posts

Posted: Thursday, February 27, 2014 - 08:40 PM UTC
Now it's time to let the trained spider loose. First, the cross rigging between the interplane struts
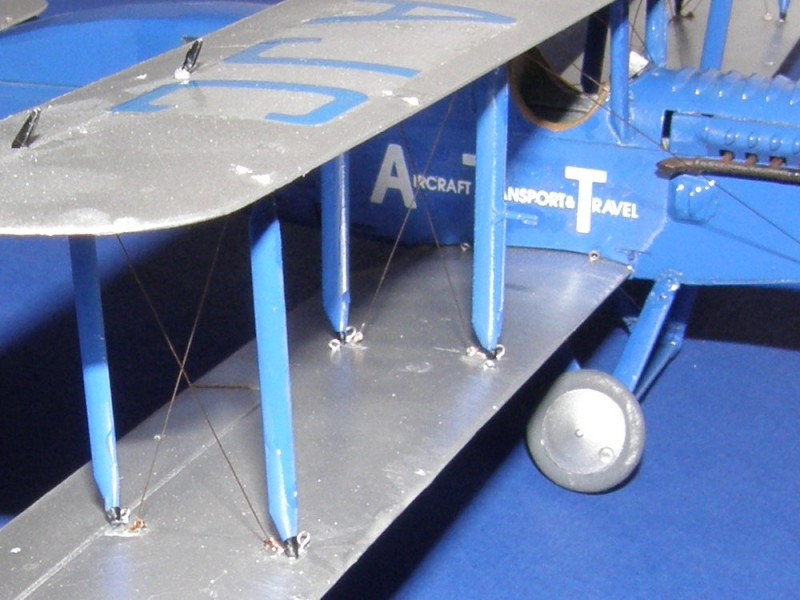
This is anchored by looping the rigging line through the anchor point, wrapping it around once, pulling it tight, and then applying a drop of Superglue.
Next, the flying and landing wires. Thread on a short length of micro tube, run the line through the anchor point, then feed it back through the micro tube
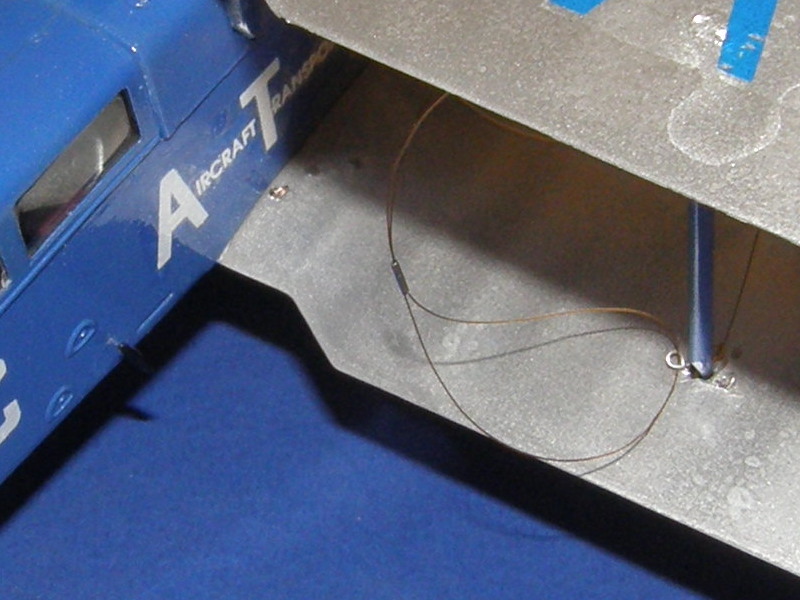
Draw it tight, and anchor it with a drop of superglue on the end of the micro tube away from the anchor point.
Now I have both inner bays done, and I need to take a stress break


This is anchored by looping the rigging line through the anchor point, wrapping it around once, pulling it tight, and then applying a drop of Superglue.
Next, the flying and landing wires. Thread on a short length of micro tube, run the line through the anchor point, then feed it back through the micro tube

Draw it tight, and anchor it with a drop of superglue on the end of the micro tube away from the anchor point.
Now I have both inner bays done, and I need to take a stress break

Posted: Thursday, February 27, 2014 - 11:33 PM UTC
Well here I am coming in at a dead run! LOL with a DH Dragon I'll call done .... well done for now! And here are some pics to prove it.


Posted: Friday, February 28, 2014 - 12:00 AM UTC
Great work Jessica and Chris!


Posted: Friday, February 28, 2014 - 07:33 AM UTC
Hi Jessica, nice work, I have tried it but didn't work for me. Next couple of builds are jets so a break from rigging.
Nice work Chris, looks very attractive, I like silver planes, and a DH89 as well, perfect.
Nice work Chris, looks very attractive, I like silver planes, and a DH89 as well, perfect.

North4003

Joined: August 01, 2012
KitMaker: 960 posts
AeroScale: 391 posts

Posted: Friday, February 28, 2014 - 07:40 AM UTC
"Are we truly going to have a DeHavilland campaign without a single Mosquito?"
Neil, here is an Aussie Mossie for our DeHavilland Campaign. It's a very old Airfix Craft Master release from the mid 1960's. I got a new set of decals from the most recent Airfix kit. My thanks go out to the Airfix spares department for this one; they are are a first rate outfit!
A great feeling to complete another old Airfix kit from my collection.

North4003

Joined: August 01, 2012
KitMaker: 960 posts
AeroScale: 391 posts

Posted: Friday, February 28, 2014 - 07:48 AM UTC
Chris, great looking Dragon. Did you use decals on the cockpit windows? I used decals for the first time during this campaign. I must have applied more than a dozen to the Mossie cockpit.
Posted: Friday, February 28, 2014 - 08:18 AM UTC
Nice ones Brent, Chris and Jessie! 
Sticking with the silver theme, here's where my poor old Vamp is stalled at:

Still a lot to do, and I won't have a chance to get to the workbench until next week sometime.
All the best
Rowan

Sticking with the silver theme, here's where my poor old Vamp is stalled at:

Still a lot to do, and I won't have a chance to get to the workbench until next week sometime.
All the best
Rowan

Posted: Friday, February 28, 2014 - 10:19 AM UTC
@Richard,Andrew, Brent and Rowan:- My thanks gents for your kind comments! I actually really enjoyed building the old Heller kit it has a lot to recommend it. And the Tasman Models additions although simple in nature added a lot to the finished model. The double sided sheet of photographs that came with the kit giving great views of the rigging and interior helped when it came to actually rigging the kit. As the instructions although not vague, I did find a little ambiguous because of the size (about 3 inches square!) of the rigging diagram.
@Brent:- Actually all the glazing was masked, the cockpit with Tamiya yellow tape and the side windows with Humbrol masking solution. It's the formula I usually use for building kits and it works for me. Although I must stress the use of a new and sharp scalpel blade helps immensely when it comes to the framing.
@Jessie:- Awesome work on the rigging Jessie! What are you using as rigging thread? It looks like you can stretch it to create a decent amount of tension? I'm on the look out for a new medium as the thread I use looks great but applying tension to it isn't work to well for me.
@Dave:- I'd like to echo the previous sentiments Dave, awesome work on the Hornet it turned out incredibly well for your first short run multimedia kit.
And my biggest thanks go to Jessie for an outstanding idea for a campaign which as always ran smoothly and efficiently. Great work guys and gal thanks for making this an interesting campaign.

Jessie_C


Joined: September 03, 2009
KitMaker: 6,965 posts
AeroScale: 6,247 posts

Posted: Friday, February 28, 2014 - 11:16 AM UTC
I'm using smoke coloured invisible mending thread for this one. It's thin enough to go through the micro tube easily yet still strong enough to hold some tension.
Posted: Friday, February 28, 2014 - 12:07 PM UTC
Ahhhhhhh thanks Jessie, I had actually thought it might have been one the purpose designed rigging threads.

Jessie_C


Joined: September 03, 2009
KitMaker: 6,965 posts
AeroScale: 6,247 posts

Posted: Friday, February 28, 2014 - 02:06 PM UTC
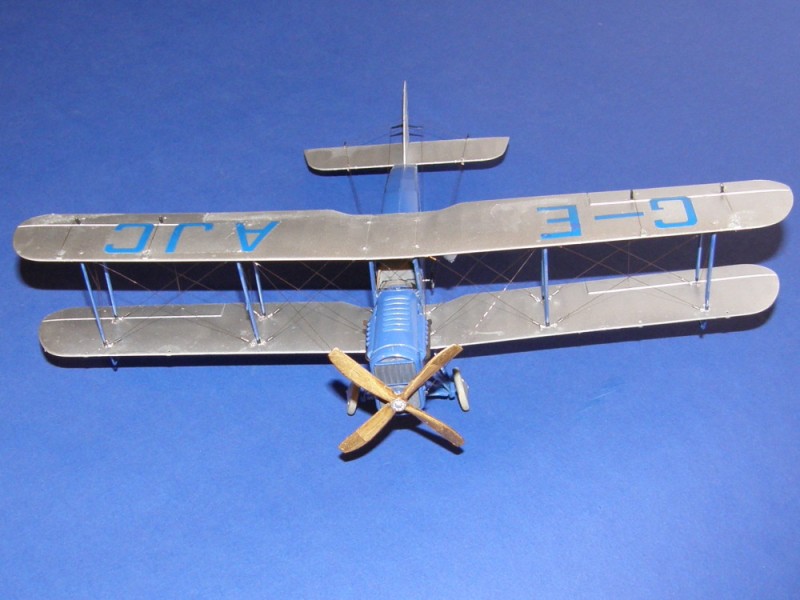
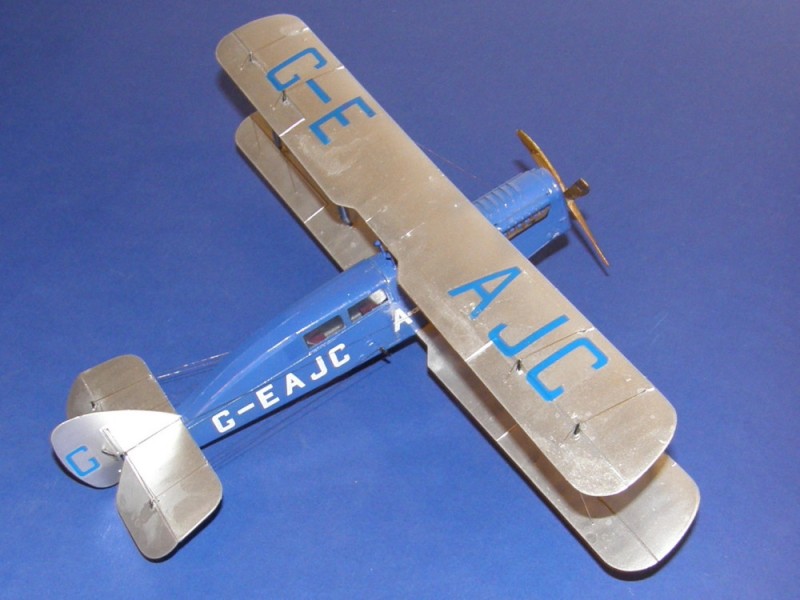
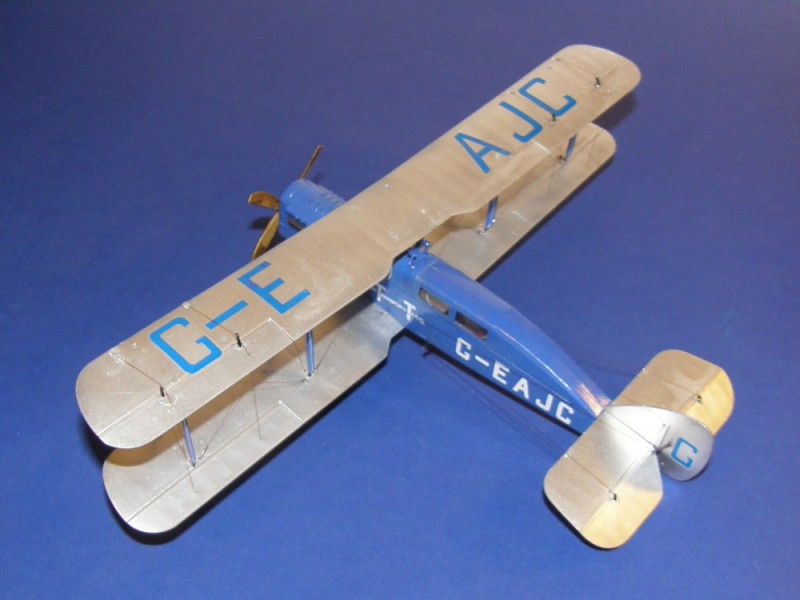
Done!


North4003

Joined: August 01, 2012
KitMaker: 960 posts
AeroScale: 391 posts

Posted: Friday, February 28, 2014 - 05:59 PM UTC
Jessie, great work, thank you for the rigging demonstration. Where do you buy your micro-tube?

Jessie_C


Joined: September 03, 2009
KitMaker: 6,965 posts
AeroScale: 6,247 posts

Posted: Friday, February 28, 2014 - 07:48 PM UTC
I worked for a medical device manufacturer many years ago, and I acquired my supply from the scrap bins. There are many different hypotube suppliers out there on the interwebs.

Jessie_C


Joined: September 03, 2009
KitMaker: 6,965 posts
AeroScale: 6,247 posts

Posted: Saturday, March 01, 2014 - 05:01 AM UTC
I see 11 finishers in the Gallery this morning. If you want your ribbon, make certain that you've got your finished pictures in there along with them.
Posted: Saturday, March 01, 2014 - 05:29 AM UTC
Good news bad news, mines in there. But its been domoted to the second page. 
I thought you had to have a prescription to get hypodermic needles?

I thought you had to have a prescription to get hypodermic needles?

Jessie_C


Joined: September 03, 2009
KitMaker: 6,965 posts
AeroScale: 6,247 posts

Posted: Saturday, March 01, 2014 - 06:18 AM UTC
Needles yes, but not the tubing they're made from.
It isn't "demoted to page two", it's "has enough seniority to move to a new page"
It isn't "demoted to page two", it's "has enough seniority to move to a new page"
MichaelSatin


Joined: January 19, 2008
KitMaker: 3,909 posts
AeroScale: 2,904 posts

Posted: Saturday, March 01, 2014 - 06:29 AM UTC
This campaign is officially ended. Jessie can go ahead and award ribbons (assuming she hasn't already, she's very efficient!)
Great campaign everyone and a big thank you to Jessie for running it!!
Michael
Great campaign everyone and a big thank you to Jessie for running it!!
Michael

Posted: Saturday, March 01, 2014 - 06:53 AM UTC
Quoted Text
It isn't "demoted to page two", it's "has enough seniority to move to a new page"
That's part of the good news. There were so many finishes.


Jessie_C


Joined: September 03, 2009
KitMaker: 6,965 posts
AeroScale: 6,247 posts

Posted: Saturday, March 01, 2014 - 07:16 AM UTC
Okay, that's 11 ribbons out of 31 participants. More than a third of us finished and I'm still convinced that there ought to be more.
I'll keep the ribbon awarding open for a little longer to allow the almost-finished their chance to get in on the action. If you've already finished your model, and not got it into the gallery, now's your opportunity. Can I make this hint any more blatant?
I'll keep the ribbon awarding open for a little longer to allow the almost-finished their chance to get in on the action. If you've already finished your model, and not got it into the gallery, now's your opportunity. Can I make this hint any more blatant?
 |


