OFFICIAL: De Havilland Campaign
England - South East, United Kingdom
Joined: August 15, 2012
KitMaker: 408 posts
AeroScale: 365 posts
Posted: Tuesday, January 07, 2014 - 03:41 AM UTC
Quoted Text
Mike and Lee, great looking Sea Vixens. Lee I may have missed it but which kit is yours?
Thanks Stephen! My kit is the Xtrakit (Hannants) mixed media effort. The box says it can be built as an FAW.2 or D3 variant, but I've discovered you can build it as an FAW.1 (indeed, MPM have reissued the kit as an FAW.1). I am also using FAA Models resin sets (3 of) and the 3 Airwaves PE sets, split between this build and the FAW.2 I'm building for the Frog campaigh (with folded wings and open radome!).
Edit - Oh yeah, I nearly forgot, Pavla Models MB4 bang seats for both builds, plus Printscale's Sea Vixen decal set - all the whistles and bells!
On the workbench
National Pride - 1/72 BAe Nimrod MR2.P
Tiger Meet! - 1/72 Panavia Tornado ECR (Luftwaffe)
Airfix III - 1/72 Hawker Hunter FGA.9
Hairy Brush - 1/72 P-51D Mustang
Mustang 75 - 1/72 P-51D "Ferocious Frankie"

#372
United Kingdom
Joined: March 10, 2010
KitMaker: 2,568 posts
AeroScale: 1,619 posts
Posted: Tuesday, January 07, 2014 - 08:52 AM UTC
I've been watching your build of the Frog kit. Your a brave man with all the improvements your doing to it!
Took a quick snap of my build tonight.
The woodwork needs a brushing with some oil paint and other details painting in. The funny looking 'thing' at the bottom is a scratch built Lewis gun magazine rack. Simply a section of tube the same diameter as the guns mag with some notches cut in it. Its mostly buried in the back but should look perfectly ok. Most of the pictures I've seen of the gunners pit show a recce camera at his feet. I reasoned that a UK based defence aircraft would not have it fitted. It would add too much weight given the role of interception and would be largely redundant anyway.
Comments welcome.
Stephen
On the bench: 1/72 Mosquito, Lightning F.6, DH.2,
AMT Vulcan Shuttle Surak.
Cyber-Hobby 1:35 Sherman Firefly IC - still stalled.
Ohio, United States
Joined: March 09, 2002
KitMaker: 818 posts
AeroScale: 137 posts
Posted: Tuesday, January 07, 2014 - 02:40 PM UTC
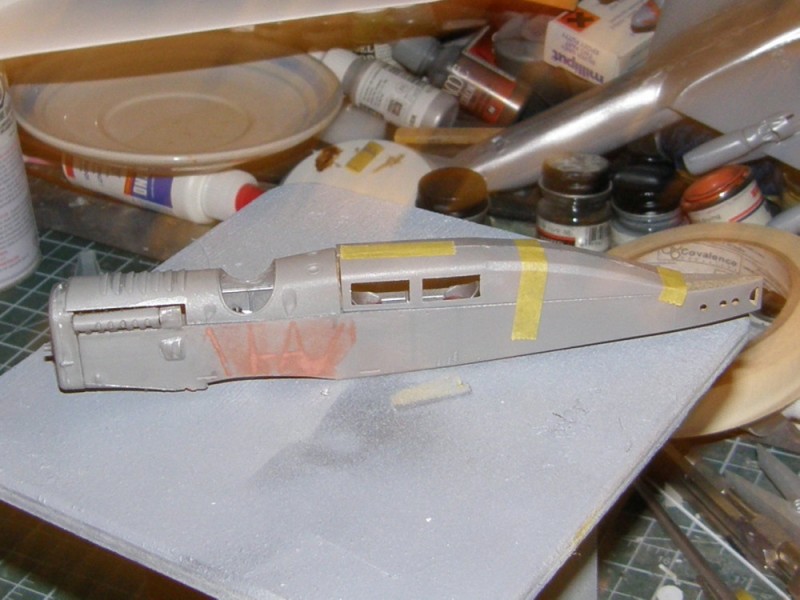
Some paint

England - South East, United Kingdom
Joined: August 15, 2012
KitMaker: 408 posts
AeroScale: 365 posts
Posted: Tuesday, January 07, 2014 - 08:01 PM UTC
Jeez you work fast Mike, you only started the kit last week didn't you? My hat's off to ya!

On the workbench
National Pride - 1/72 BAe Nimrod MR2.P
Tiger Meet! - 1/72 Panavia Tornado ECR (Luftwaffe)
Airfix III - 1/72 Hawker Hunter FGA.9
Hairy Brush - 1/72 P-51D Mustang
Mustang 75 - 1/72 P-51D "Ferocious Frankie"
New York, United States
Joined: March 08, 2010
KitMaker: 3,662 posts
AeroScale: 174 posts
Posted: Wednesday, January 08, 2014 - 12:02 PM UTC
Hey folks I finally got back to my computer so as promised here is my start up photo
And I started a build blog back on New Years Eve here is the link
https://armorama.kitmaker.net/forums/216691Assembly is completed except for the canopy and it has been painted just no photos of that yet

Active Campaigns on the bench:
Operation Fall Gelb - Pz.Kpfw. IV Ausf. C
Engineering the Future - M-26 Recovery Vehicle
115 Campaigns completed
England - South East, United Kingdom
Joined: August 15, 2012
KitMaker: 408 posts
AeroScale: 365 posts
Posted: Thursday, January 09, 2014 - 05:20 AM UTC
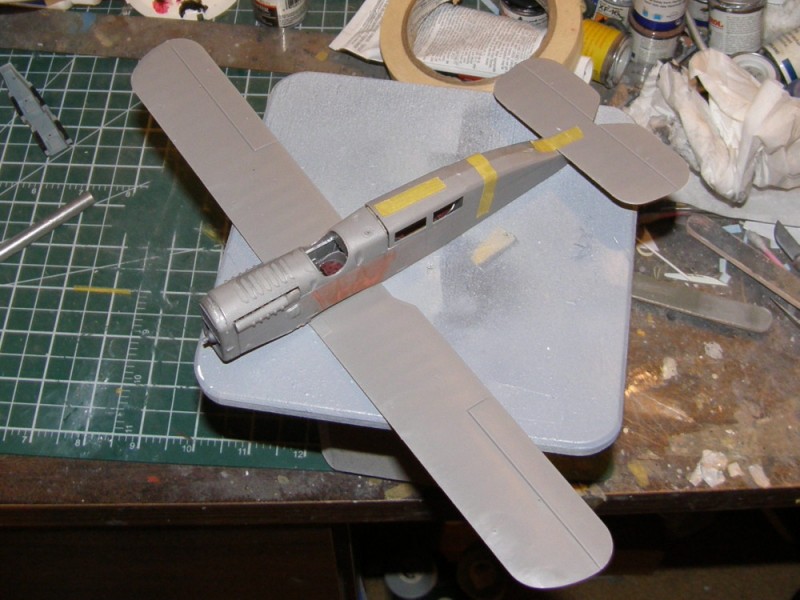
Now the wings are on - just a few more little bits and I'll be ready to get some primer on!
On the workbench
National Pride - 1/72 BAe Nimrod MR2.P
Tiger Meet! - 1/72 Panavia Tornado ECR (Luftwaffe)
Airfix III - 1/72 Hawker Hunter FGA.9
Hairy Brush - 1/72 P-51D Mustang
Mustang 75 - 1/72 P-51D "Ferocious Frankie"
British Columbia, Canada
Joined: September 03, 2009
KitMaker: 6,965 posts
AeroScale: 6,247 posts
Posted: Thursday, January 09, 2014 - 02:15 PM UTC
After a very slow start waiting for the oil paint on the wood grain parts to dry, here's the DH-4's fuselage buttoned up
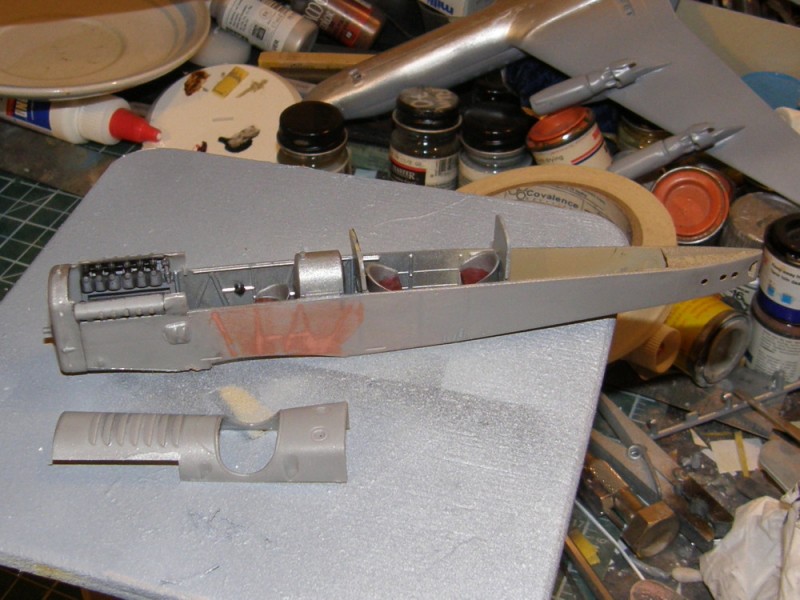
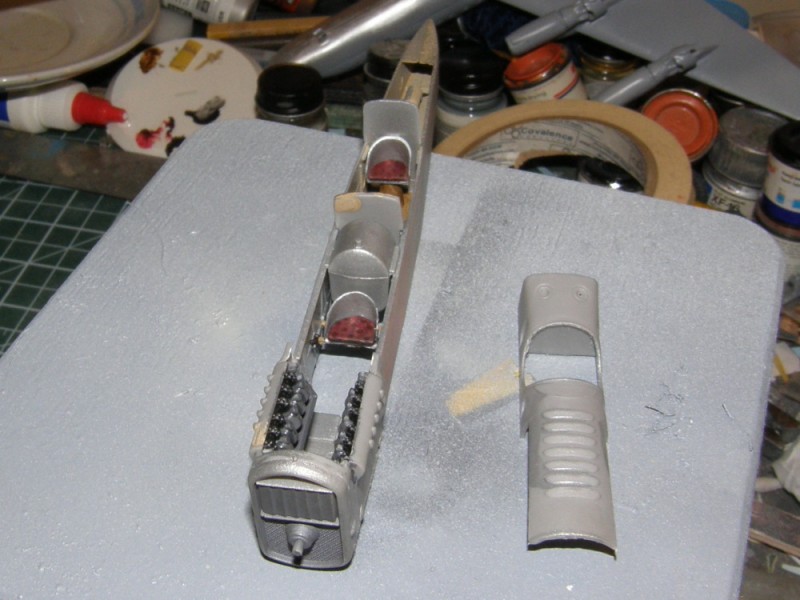
The very strange looking passenger compartment top
And sitting posed on the wings. It's not a small model
When once you have tasted flight you will walk the Earth with your eyes turned skyward.
For there you have been, and there you will always long to return.
-Leonardo Da Vinci
#305
Christchurch, New Zealand
Joined: February 01, 2006
KitMaker: 1,673 posts
AeroScale: 1,517 posts
Posted: Friday, January 10, 2014 - 01:08 PM UTC
Now there's an interesting DH4! Sorry Jessie could you refresh my memory for what colour scheme and markings are you using for this one?
British Columbia, Canada
Joined: September 03, 2009
KitMaker: 6,965 posts
AeroScale: 6,247 posts
Posted: Friday, January 10, 2014 - 01:39 PM UTC
I'll be doing G-EAJC of Air Transport and Travel as supplied by the kit decals.
Here it is on its maiden departure. The fuselage and struts were French blue and the wings and tailplanes aluminium dope.
Interestingly, it was an
Evening Standard reporter who was the world's first commercial airline passenger on that flight.
When once you have tasted flight you will walk the Earth with your eyes turned skyward.
For there you have been, and there you will always long to return.
-Leonardo Da Vinci
#439
Washington, United States
Joined: November 05, 2005
KitMaker: 4,950 posts
AeroScale: 3,192 posts
Posted: Monday, January 13, 2014 - 07:39 PM UTC
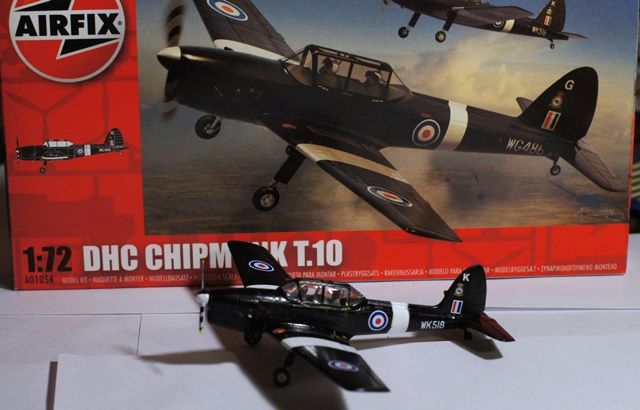
Progress, about 1/2 the decals on the Chipmunk.

Some more decals, a bit of touch up, add the fiddly bits and this one'e done..
Hanger Queens in Waiting:
Monogram 1/72 F8F-1
Corsair the Sky Pirate - 1/72 Ace A-7D
Century Series - Airfix 1/72 F-105G
Anti Shipping - Academy 1/72 PBJ-1D
Academy 1/72 F-84E
Schleswig-Holstein, Germany
Joined: June 30, 2011
KitMaker: 189 posts
AeroScale: 82 posts
Posted: Tuesday, January 14, 2014 - 02:23 AM UTC
Hi Mark
very attractive color combination and real nice bird!
Greetings from Shanghai

#439
Washington, United States
Joined: November 05, 2005
KitMaker: 4,950 posts
AeroScale: 3,192 posts
Posted: Tuesday, January 14, 2014 - 03:38 AM UTC
Well, thanks, but I didn't get to pick the colors. This boxing only supplies markings for the Battle of Britain Memorial Flight. Since most of the 'warbirds' in the BBMF are taildraggers, and most of the pilots don't have experience with them, they keep the two Chipmunks around for training.
Airfix provides the blown canopy for a RCAF trainer in this box, but no decals for the bright yellow marking.

Hanger Queens in Waiting:
Monogram 1/72 F8F-1
Corsair the Sky Pirate - 1/72 Ace A-7D
Century Series - Airfix 1/72 F-105G
Anti Shipping - Academy 1/72 PBJ-1D
Academy 1/72 F-84E
British Columbia, Canada
Joined: September 03, 2009
KitMaker: 6,965 posts
AeroScale: 6,247 posts
Posted: Tuesday, January 14, 2014 - 04:49 AM UTC
Quoted Text
Airfix provides the blown canopy for a RCAF trainer in this box, but no decals for the bright yellow marking.
And, alas, none of the other subtle differences between RAF and RCAF chipmunks
The Airfix kit is and always has been strictly an RAF bird.
When once you have tasted flight you will walk the Earth with your eyes turned skyward.
For there you have been, and there you will always long to return.
-Leonardo Da Vinci
#439
Washington, United States
Joined: November 05, 2005
KitMaker: 4,950 posts
AeroScale: 3,192 posts
Posted: Tuesday, January 14, 2014 - 05:15 AM UTC
Hmm, I saw an old bagged Chipmunk kit with the RCAF markings. At the price, I almost bought it, just for the screaming yellow paint scheme....
Hanger Queens in Waiting:
Monogram 1/72 F8F-1
Corsair the Sky Pirate - 1/72 Ace A-7D
Century Series - Airfix 1/72 F-105G
Anti Shipping - Academy 1/72 PBJ-1D
Academy 1/72 F-84E
British Columbia, Canada
Joined: September 03, 2009
KitMaker: 6,965 posts
AeroScale: 6,247 posts
Posted: Tuesday, January 14, 2014 - 06:14 AM UTC
I had that one way back in the 70s and I was so happy that Airfix would do a Canadian subject but I've learned since that the only concession to the Canadian Chipmunk was the canopy. There are several other differences that Airfix ignored, for example,
the unfaired landing gear legs and pointed elevator tips, among other subtle differences.
When once you have tasted flight you will walk the Earth with your eyes turned skyward.
For there you have been, and there you will always long to return.
-Leonardo Da Vinci
#372
United Kingdom
Joined: March 10, 2010
KitMaker: 2,568 posts
AeroScale: 1,619 posts
Posted: Tuesday, January 14, 2014 - 09:52 AM UTC
Mark, the Chipmunk is coming nicely. I'm half tempted to get one myself.
Jessie, nice to see another DH4. I noticed that you painted your interior aluminium. Was an all metal front end just on the civilian versions or all versions? I as as I painted mine in linen and wood. None of the references I could find or pictures made it clear.
Anyway, here's my latest update. It all just needs fitting in and then I can button up the fuselage.

Can anyone tell me how and where the gunners seatbelts attach? To the fuselage sides or on his little stool?
Thanks
Stephen
On the bench: 1/72 Mosquito, Lightning F.6, DH.2,
AMT Vulcan Shuttle Surak.
Cyber-Hobby 1:35 Sherman Firefly IC - still stalled.
British Columbia, Canada
Joined: September 03, 2009
KitMaker: 6,965 posts
AeroScale: 6,247 posts
Posted: Tuesday, January 14, 2014 - 12:08 PM UTC
Quoted Text
Jessie, nice to see another DH4. I noticed that you painted your interior aluminium. Was an all metal front end just on the civilian versions or all versions?
Roden's instructions call for "silver grey" inside. I'll bet that they were doped silver inside along with the wings. Not too much will be visible through the windows.
I suspect that your gunner's seat belts were attached to the bottom corners of the fuselage frame.
When once you have tasted flight you will walk the Earth with your eyes turned skyward.
For there you have been, and there you will always long to return.
-Leonardo Da Vinci
#372
United Kingdom
Joined: March 10, 2010
KitMaker: 2,568 posts
AeroScale: 1,619 posts
Posted: Wednesday, January 15, 2014 - 10:09 AM UTC
I suppose that's the only logical place they could go. It does make me wonder if the gunner had to unbuckle them if he had to swivel around in his chair!
On the bench: 1/72 Mosquito, Lightning F.6, DH.2,
AMT Vulcan Shuttle Surak.
Cyber-Hobby 1:35 Sherman Firefly IC - still stalled.
#243
England - North East, United Kingdom
Joined: March 21, 2008
KitMaker: 996 posts
AeroScale: 915 posts
Posted: Wednesday, January 15, 2014 - 11:27 AM UTC
In some RFC 2 seaters I know the gunner had a single clip-on strap to the cockpit floor to give him as much freedom as possible. Jessie, I like that version of the 4, it reminds me of my first ever flight in a Fox Moth from Southport beach in the sixties. My memory says the cabin was brown inside, plywood bulkheads and a draughty, flimsy door, but that machine would be built 15 years after yours and would have been about 30 years old at the time. I douby if anybody could now definitively state the internal colour of a civvie 4
Andrew
Pfalz DIIIa, Eduard 1/48 Uffz Max Hitschler Jasta 18 Late 1917
Merlin
 Senior Editor
#017
United Kingdom
Joined: June 11, 2003
KitMaker: 17,582 posts
AeroScale: 12,795 posts
Posted: Thursday, January 16, 2014 - 02:56 AM UTC
Hi again
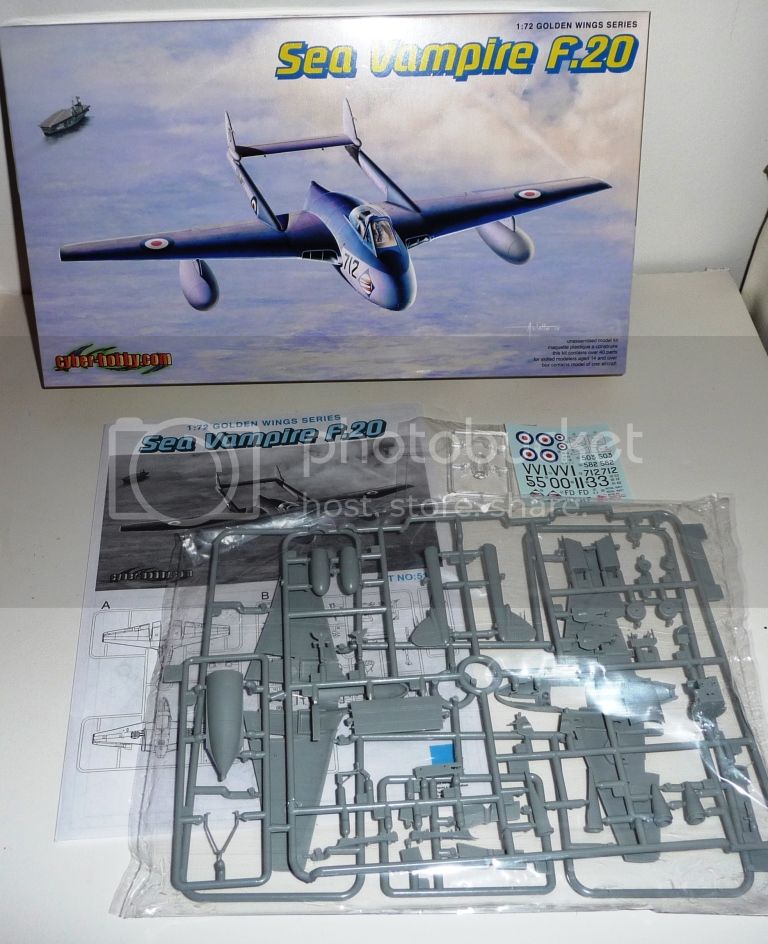
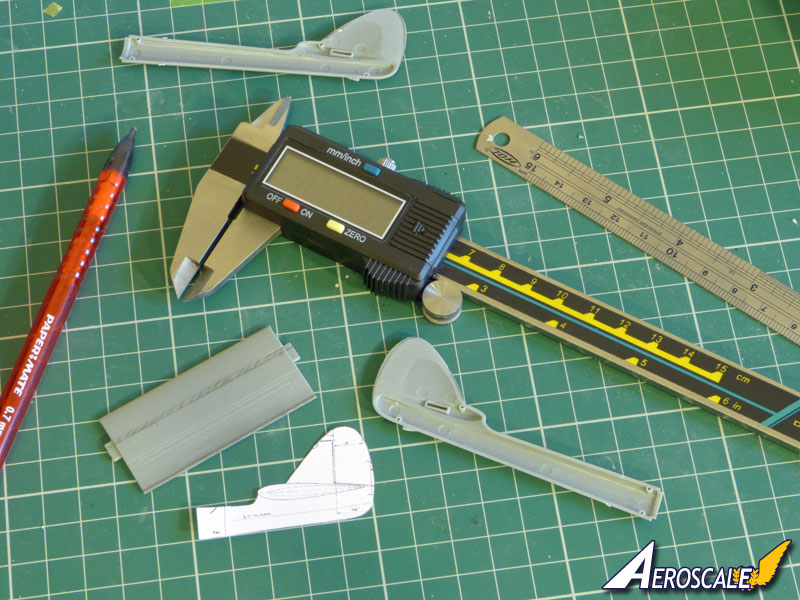
Underway at last! I was a case of start now, or admit defeat before cutting any plastic...

My victim is the Trumpeter Vampire. The kit has a lot of faults, and I certainly won't try to fix all of them, but I hope the end result is a fair bit better.
My first effort is to try to make the tail more accurate. The stabilizer's chord is too great - both elevator and overall, so I'm going to modify it in two ways; take slice out of the middle to remove most of the excess, and sand back the trailing edge - which will kill two birds with one stone by reducing the over-deep trim tab. I reckon re-thinning the trailing edge (with a little scribing to re-do) will be easier than rescribing the whole trim tab.
The fins and rudders are off too (luckily, too large), so I've scaled down the original maker's drawings to make a template and sand them down. I'll remove the fictitious panel lines while I'm at it:
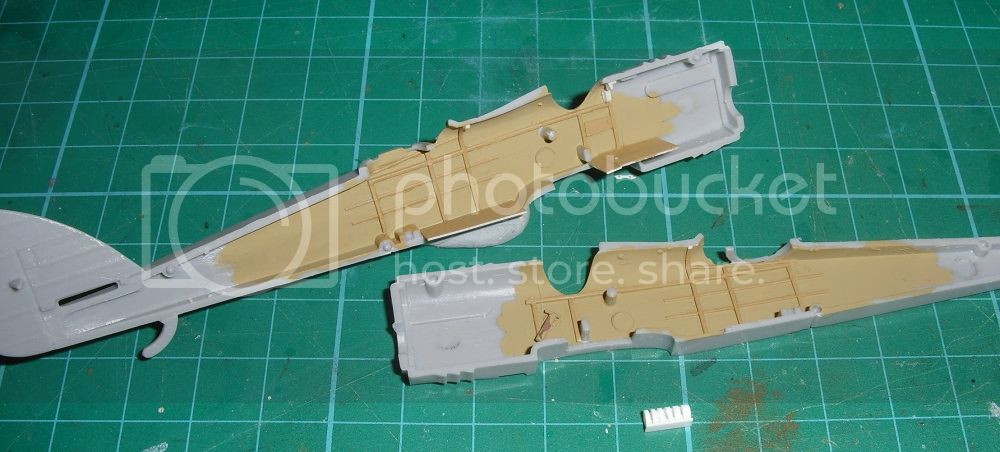
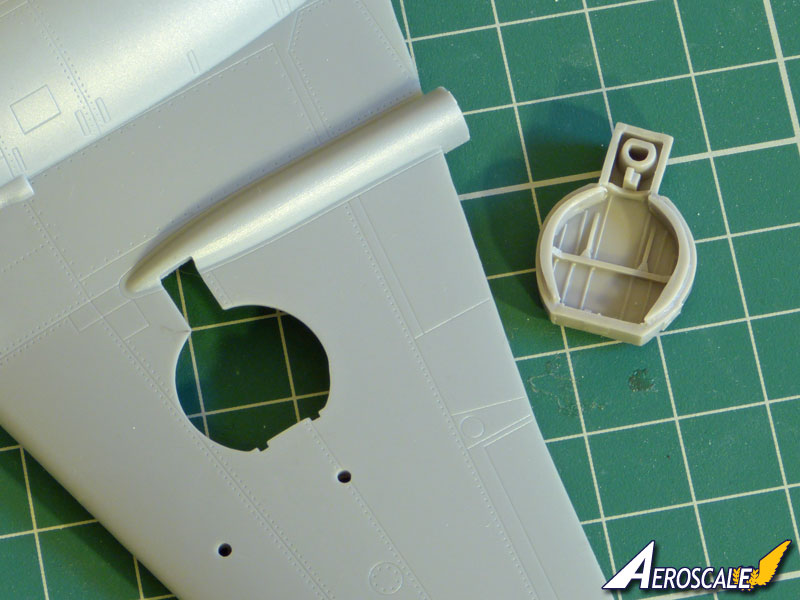
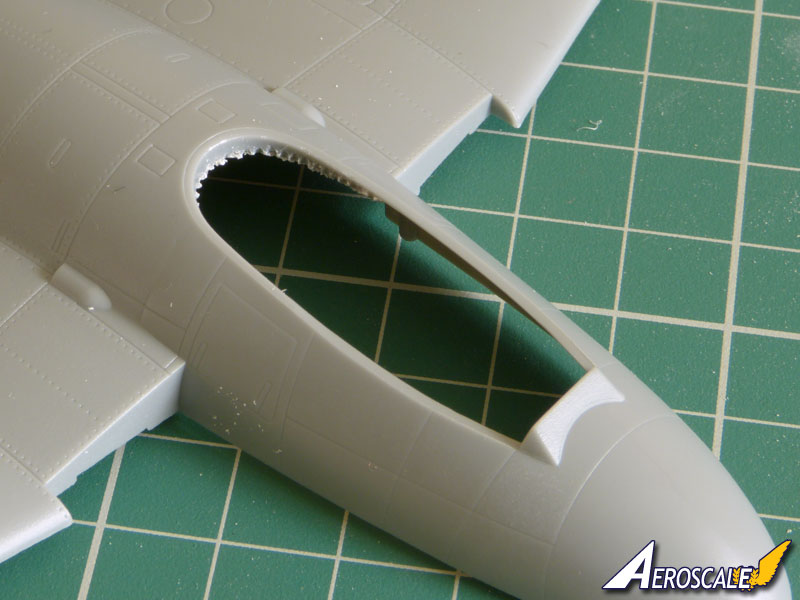
Fixing the bizarre circular mainwheel well openings will be much easier, thanks to the neat correction inserts produced by Pavla Models:
All the best
Rowan
BEWARE OF THE FEW...
As I grow older, I regret to say that a detestable habit of thinking seems to be getting a hold of me. - H. Rider Haggard
Merlin
Senior Editor #017
United Kingdom
Joined: June 11, 2003
KitMaker: 17,582 posts
AeroScale: 12,795 posts
Posted: Thursday, January 16, 2014 - 07:22 AM UTC
Hi again
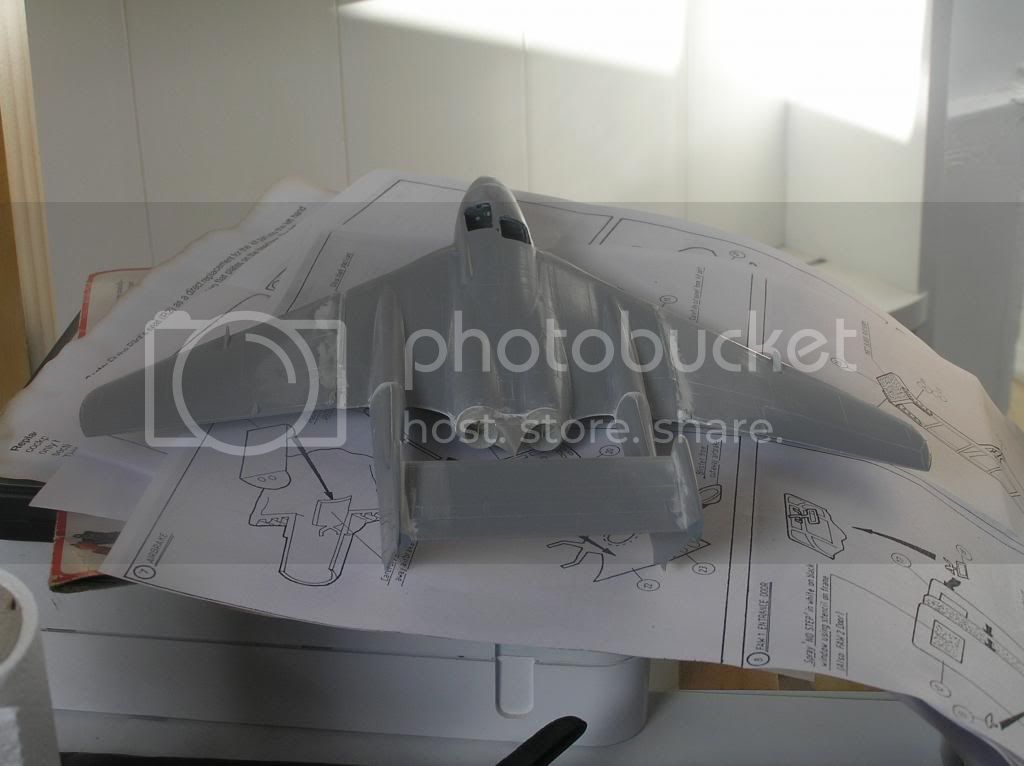
Well, I got a bit of time at the workbench this afternoon and got stuck in. I fitted the wheelwells and modified the stabilizer:
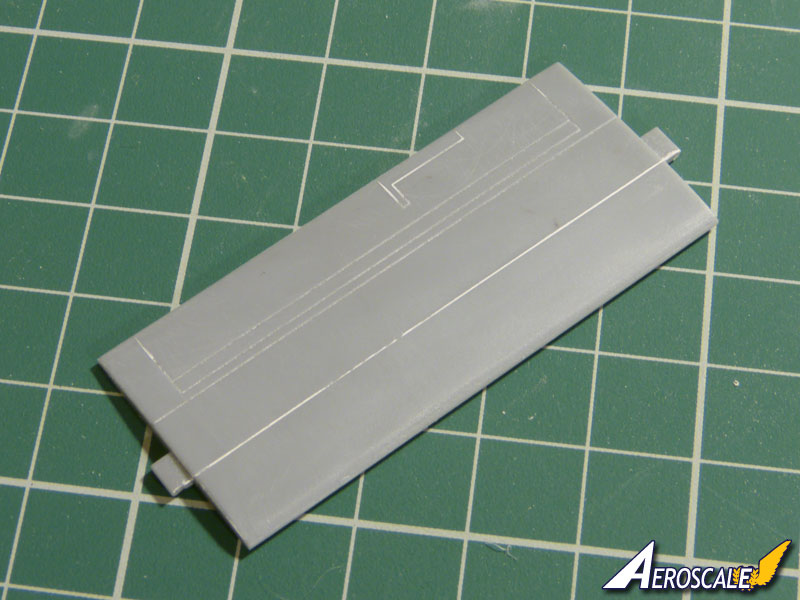
and the fins are underway:
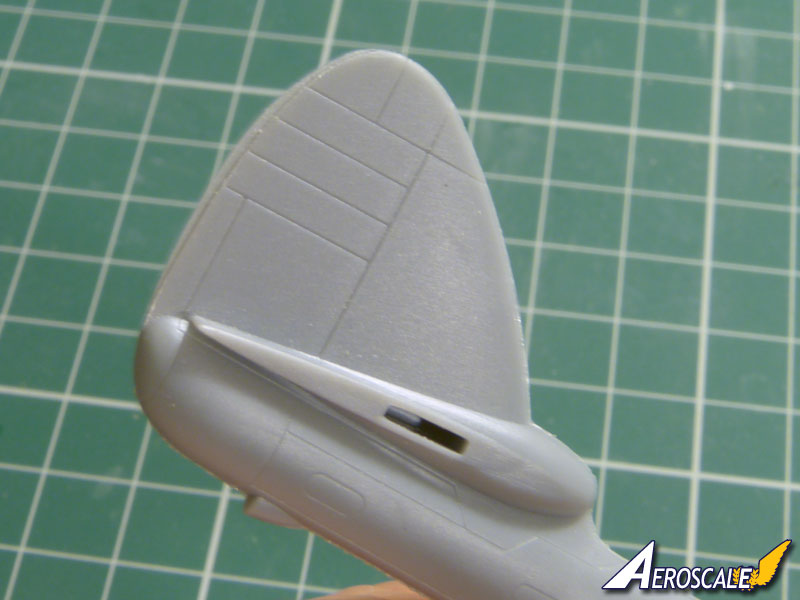
I made a start on the canopy too. It's a bit weird in having a flared fairing at the rear (I think the drawings in Warpaint #27 might the origin of that...) that clearly isn't there in photos of the real thing:
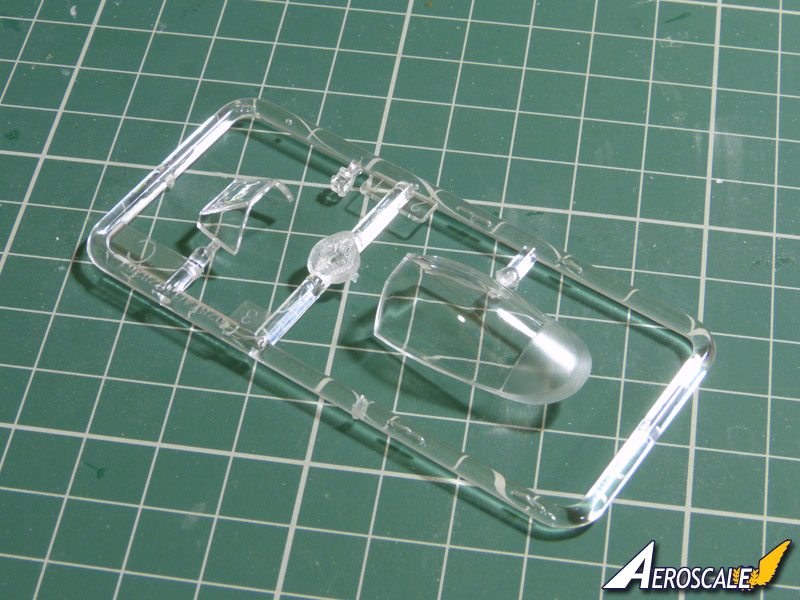
File that down to something more like the correct shape (I doubt it'll ever win a prize for 100% accuracy) and it opens up a gap to fill:
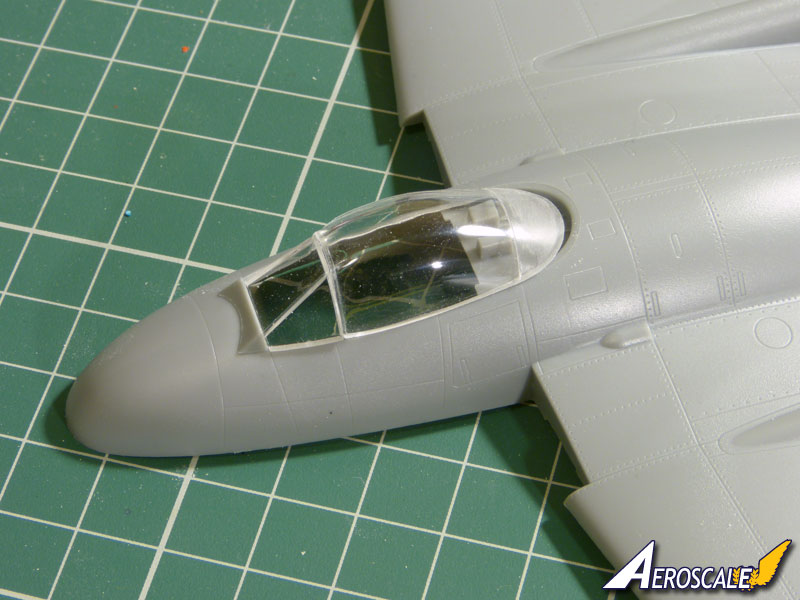

I can see there's going to be plenty of fun ahead!

All the best
Rowan
BEWARE OF THE FEW...
As I grow older, I regret to say that a detestable habit of thinking seems to be getting a hold of me. - H. Rider Haggard
#439
Washington, United States
Joined: November 05, 2005
KitMaker: 4,950 posts
AeroScale: 3,192 posts
Posted: Thursday, January 16, 2014 - 06:26 PM UTC
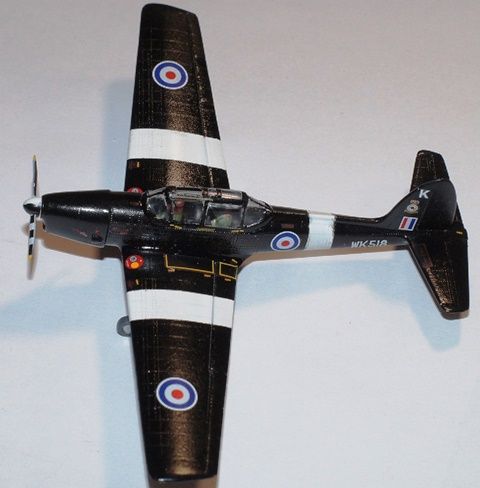
FINISHED!!
Airfix 1/72 Chipmunk T.1
Hanger Queens in Waiting:
Monogram 1/72 F8F-1
Corsair the Sky Pirate - 1/72 Ace A-7D
Century Series - Airfix 1/72 F-105G
Anti Shipping - Academy 1/72 PBJ-1D
Academy 1/72 F-84E
British Columbia, Canada
Joined: September 03, 2009
KitMaker: 6,965 posts
AeroScale: 6,247 posts
Posted: Thursday, January 16, 2014 - 08:07 PM UTC
Our third finisher! Congratulations
When once you have tasted flight you will walk the Earth with your eyes turned skyward.
For there you have been, and there you will always long to return.
-Leonardo Da Vinci
#439
Washington, United States
Joined: November 05, 2005
KitMaker: 4,950 posts
AeroScale: 3,192 posts
Posted: Thursday, January 16, 2014 - 08:27 PM UTC
Nearly a month and a half early, what did I do wrong????
Hanger Queens in Waiting:
Monogram 1/72 F8F-1
Corsair the Sky Pirate - 1/72 Ace A-7D
Century Series - Airfix 1/72 F-105G
Anti Shipping - Academy 1/72 PBJ-1D
Academy 1/72 F-84E
Merlin
Senior Editor #017
United Kingdom
Joined: June 11, 2003
KitMaker: 17,582 posts
AeroScale: 12,795 posts
Posted: Thursday, January 16, 2014 - 11:02 PM UTC
Quoted Text
Nearly a month and a half early, what did I do wrong????
Nice one Mark
Great looking Chipmunk!
Only a month and a half left - I need to get cracking!
So, onwards and downwards with my effort...
I've removed the rear decking behind the pilot's seat ready for Pavla's cockpit set:
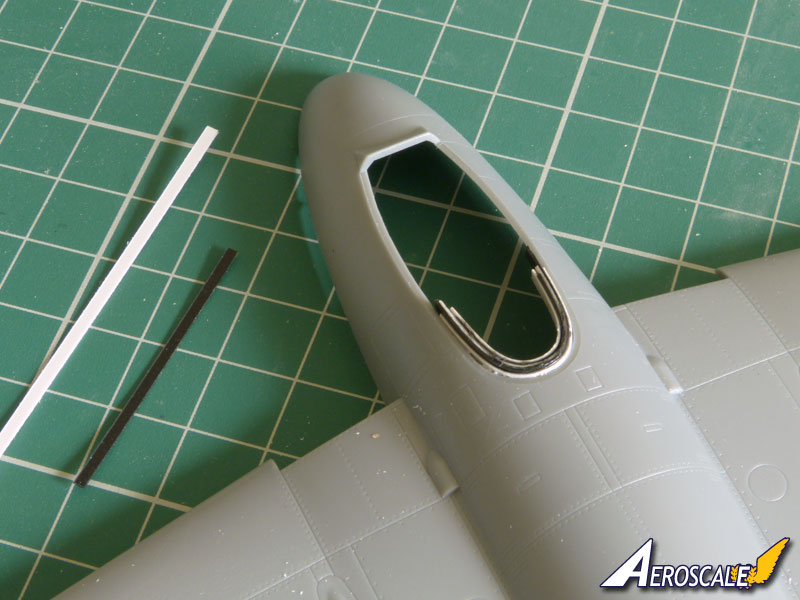
and begun the task of filling the gap left by correcting the canopy by building up a rough sandwich of styrene strips. Using alternating black and white layers will help maintain symmetry when I sand it to shape:
All the best
Rowan
BEWARE OF THE FEW...
As I grow older, I regret to say that a detestable habit of thinking seems to be getting a hold of me. - H. Rider Haggard