OFFICIAL: De Havilland Campaign
Merlin
 Senior Editor
#017
United Kingdom
Joined: June 11, 2003
KitMaker: 17,582 posts
AeroScale: 12,795 posts
Posted: Saturday, March 01, 2014 - 08:38 AM UTC
Hi again
Well, despite my prediction, I did manage to squeeze in an hour at the workbench this morning... and guess what... I did just what I shouldn't have done - I picked holes in where I'd got to and started re-sanding and filling!

Perhaps it was the knowledge that I'd already missed the deadline, but I found several points I couldn't live with, so I got stuck in to remedy them - I think it was only the dash for the line that had made me miss them in the first place.
Anyway, one good outcome of all this is that it's rebuilt my confidence and determination to see a build through to fruition. I went from "Well, that's the end of that then!" to "S*d it! Just get sanding, and do a re-spray!" There were nasty mould-lines on the tail booms and, somehow or other, one of my added canopy guides had been damaged, so that's re-built and, by the end of the day... I'm basically back where I was yesterday - but in hopefully slightly better shape.
As Aeroscale's most notorious Non-Finisher, I'll plough on (medal or not) with updates while the thread's open. Barring disaster, I'm still reckoning a week or so...

All the best
Rowan

BEWARE OF THE FEW...
As I grow older, I regret to say that a detestable habit of thinking seems to be getting a hold of me. - H. Rider Haggard

#243
England - North East, United Kingdom
Joined: March 21, 2008
KitMaker: 996 posts
AeroScale: 915 posts
Posted: Saturday, March 01, 2014 - 09:49 AM UTC
One of my ex-bosses used to say "Perfection is the enemy of the good"
Keep going, keep going.
Andrew
Pfalz DIIIa, Eduard 1/48 Uffz Max Hitschler Jasta 18 Late 1917
England - East Midlands, United Kingdom
Joined: February 07, 2004
KitMaker: 911 posts
AeroScale: 415 posts
Posted: Saturday, March 01, 2014 - 10:05 AM UTC
Quoted Text
"Are we truly going to have a DeHavilland campaign without a single Mosquito?"
Neil, here is an Aussie Mossie for our DeHavilland Campaign. It's a very old Airfix Craft Master release from the mid 1960's. I got a new set of decals from the most recent Airfix kit. My thanks go out to the Airfix spares department for this one; they are are a first rate outfit!
A great feeling to complete another old Airfix kit from my collection.

Well done that man! Wouldn't feel quite right, DH's finest being missing from a DH campaign

"Nelson be damned.......Lets get the hell out of here!"

#305
Christchurch, New Zealand
Joined: February 01, 2006
KitMaker: 1,673 posts
AeroScale: 1,517 posts
Posted: Saturday, March 01, 2014 - 12:52 PM UTC
Sometimes Jessie the hints have to be of the "hit them over the head with a hunk of four by two" variety to get us to take notice! However hint duly taken Ma'am!
England - West Midlands, United Kingdom
Joined: August 01, 2012
KitMaker: 960 posts
AeroScale: 391 posts
Posted: Saturday, March 01, 2014 - 04:04 PM UTC
Thank you Neil I really needed the deadline to motivate me this time. I don't have any new super kits in my collection; all are very basic.
My thanks go to our campaign organizer.
New York, United States
Joined: March 08, 2010
KitMaker: 3,662 posts
AeroScale: 174 posts
Posted: Sunday, March 02, 2014 - 12:54 AM UTC
Hey folks some great looking birds showed up here I real liked those bi-planes

I'm glad I spotted this tread an was able to take part, thanks for the ribbon and congratulations to all those that finished


Active Campaigns on the bench:
Operation Fall Gelb - Pz.Kpfw. IV Ausf. C
Engineering the Future - M-26 Recovery Vehicle
115 Campaigns completed

#372
United Kingdom
Joined: March 10, 2010
KitMaker: 2,568 posts
AeroScale: 1,619 posts
Posted: Sunday, March 02, 2014 - 08:07 AM UTC
Chris, Jessica - awesome work, especially with the rigging. That's one thing I've still to get my head around. Whenever I've tried it just ends up as either a messy disaster or the superglue fails to hold the thread. I may have to try on something bigger than 1/72 one day.
Brent - brilliant work on the Mossie. I would have struggled to guess that its the old Airfix kit if I hadn't seen your previous posts on the build.
I'm happy to report that my first session of decalling has gone well. The Pegasus decals performed beautifully only needing a little Microsol to help settle into the engraved aileron lines. The rudder decal proved to be a bit of a challenge as those on the Pegasus sheet were too narrow, bwing more suitable for a single-seat fighter. I found some about the right width on a Post-War RAF roundels sheet. The blue is a little darker, but I don't think it will be too noticeable. I still have the opposite side to apply. No reaction here with the Klear coat, so again it does leave me with a nagging suspicion that Humbrol's product and Klear don't want to play along. I plan on testing this at some point in the near future. The lesson I learned from this is to always use top quality decals and a decal setting product that I know works.
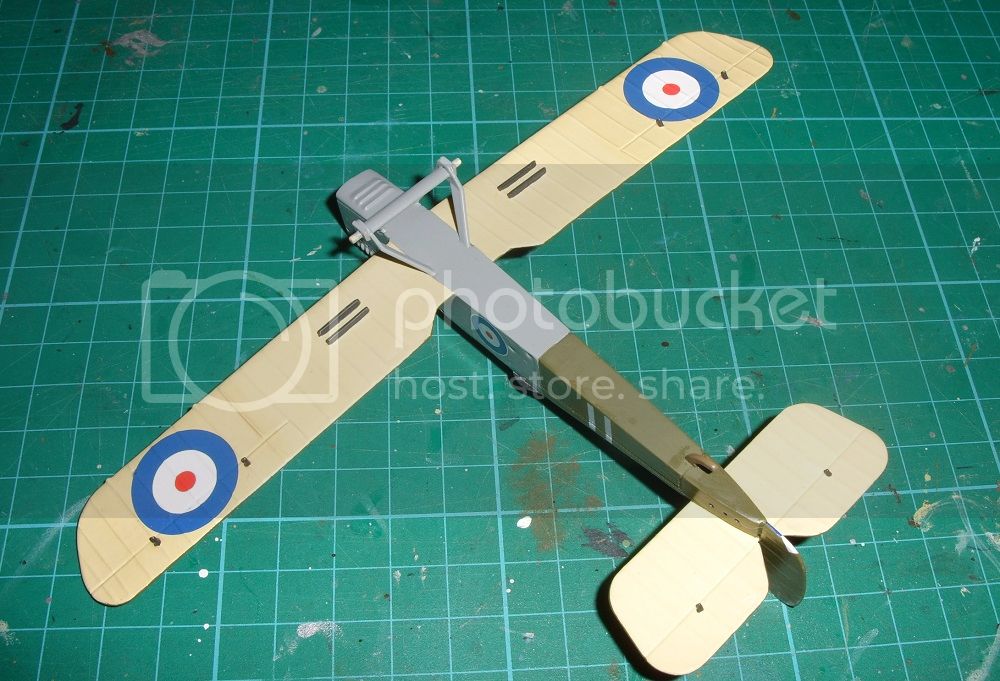
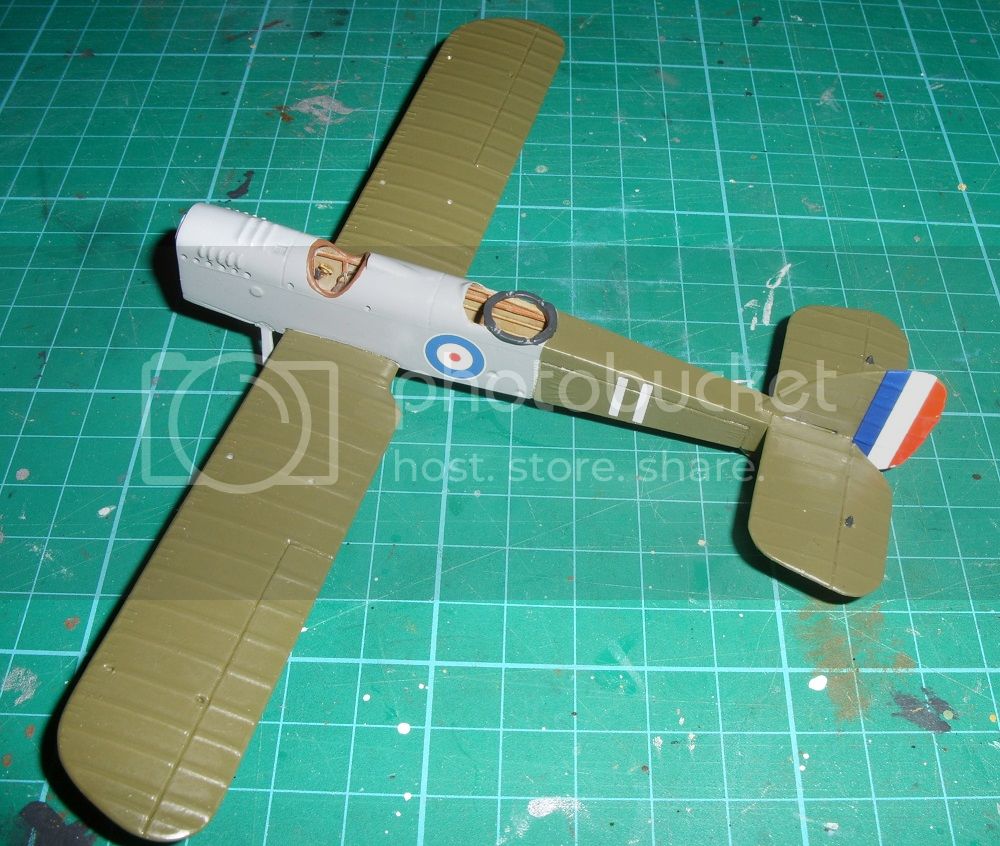
The upper wing has had its repaint, just needs another light coat of OD and then a coat of Klear. All going well I should be finished by the end of the week if not sooner.
Stephen.
On the bench: 1/72 Mosquito, Lightning F.6, DH.2,
AMT Vulcan Shuttle Surak.
Cyber-Hobby 1:35 Sherman Firefly IC - still stalled.
Merlin
 Senior Editor
#017
United Kingdom
Joined: June 11, 2003
KitMaker: 17,582 posts
AeroScale: 12,795 posts
Posted: Monday, March 03, 2014 - 09:34 AM UTC
Hi again
Woohoo! I've got a day off (finally) tomorrow, so I hope I can make a bit of progress in between attacking the rather worrying pile of outstanding reviews that's built up. A concerted effort this week should see the much-mangled Vampire just about home and dry...
All the best
Rowan

BEWARE OF THE FEW...
As I grow older, I regret to say that a detestable habit of thinking seems to be getting a hold of me. - H. Rider Haggard
Merlin
 Senior Editor
#017
United Kingdom
Joined: June 11, 2003
KitMaker: 17,582 posts
AeroScale: 12,795 posts
Posted: Tuesday, March 04, 2014 - 01:08 AM UTC
Quoted Text
Woohoo! I've got a day off (finally) tomorrow...
Hi again
So much for that - a problem at work means I've got to go in. So the "day" off turned into a couple of hours...

All the best
Rowan

BEWARE OF THE FEW...
As I grow older, I regret to say that a detestable habit of thinking seems to be getting a hold of me. - H. Rider Haggard
England - West Midlands, United Kingdom
Joined: August 01, 2012
KitMaker: 960 posts
AeroScale: 391 posts
Posted: Tuesday, March 04, 2014 - 05:26 AM UTC
Stephen, great work on the decals and paint. I like the WWI paint schemes.

#439
Washington, United States
Joined: November 05, 2005
KitMaker: 4,950 posts
AeroScale: 3,192 posts
Posted: Tuesday, March 04, 2014 - 05:50 AM UTC
Hanger Queens in Waiting:
Monogram 1/72 F8F-1
Corsair the Sky Pirate - 1/72 Ace A-7D
Century Series - Airfix 1/72 F-105G
Anti Shipping - Academy 1/72 PBJ-1D
Academy 1/72 F-84E

#259
Massachusetts, United States
Joined: October 23, 2011
KitMaker: 2,265 posts
AeroScale: 1,715 posts
Posted: Tuesday, March 04, 2014 - 07:06 AM UTC
Quoted Text
Quoted Text
Woohoo! I've got a day off (finally) tomorrow...
Hi again
So much for that - a problem at work means I've got to go in. So the "day" off turned into a couple of hours... 
All the best
Rowan 
Go on then, you love it.

I never refuse a call either...it's what we do.


#372
United Kingdom
Joined: March 10, 2010
KitMaker: 2,568 posts
AeroScale: 1,619 posts
Posted: Tuesday, March 04, 2014 - 10:22 AM UTC
Thanks Brent. I got the last decals on the wings tonight. The rudder needed a little touching up with paint before the serial numbers go on. Hoping to make a start on those tomorrow.
On the bench: 1/72 Mosquito, Lightning F.6, DH.2,
AMT Vulcan Shuttle Surak.
Cyber-Hobby 1:35 Sherman Firefly IC - still stalled.

#243
England - North East, United Kingdom
Joined: March 21, 2008
KitMaker: 996 posts
AeroScale: 915 posts
Posted: Tuesday, March 04, 2014 - 10:34 AM UTC
Thanks Jessie, good idea and good campaign. I note an unusually high percentage of civvie aircraft in the finishers. Nice to see.
Andrew
Pfalz DIIIa, Eduard 1/48 Uffz Max Hitschler Jasta 18 Late 1917
Merlin
 Senior Editor
#017
United Kingdom
Joined: June 11, 2003
KitMaker: 17,582 posts
AeroScale: 12,795 posts
Posted: Wednesday, March 05, 2014 - 09:56 PM UTC
Hi again
Sadly, I am going to have to declare my Vamp a back-burner project following an urgent request from Staff_Jim to get on with the ZM Shinden. On a scale of 1 to 10, his plea was an 11 - and I can't say no to the Boss. And he is right - samples must always take priority.
All the best
Rowan

BEWARE OF THE FEW...
As I grow older, I regret to say that a detestable habit of thinking seems to be getting a hold of me. - H. Rider Haggard

#372
United Kingdom
Joined: March 10, 2010
KitMaker: 2,568 posts
AeroScale: 1,619 posts
Posted: Monday, March 10, 2014 - 07:15 AM UTC
Rowan, I hope you get a chance to finish the Vampire. After all the work you put into it, it would be shame not to.
Quick update on my build.
The serial numbers on the rudder are now applied and drying out. These are from the Pegasus RFC/RNAS Serials sheet. Great decals to work with and very thin. I did find it tricky to get each individual digit lined up correctly and to really make things even more fun, the fore and aft digit have a second seperate decal over the top for the white outlines. Its times like this I wished I worked at a bigger scale!
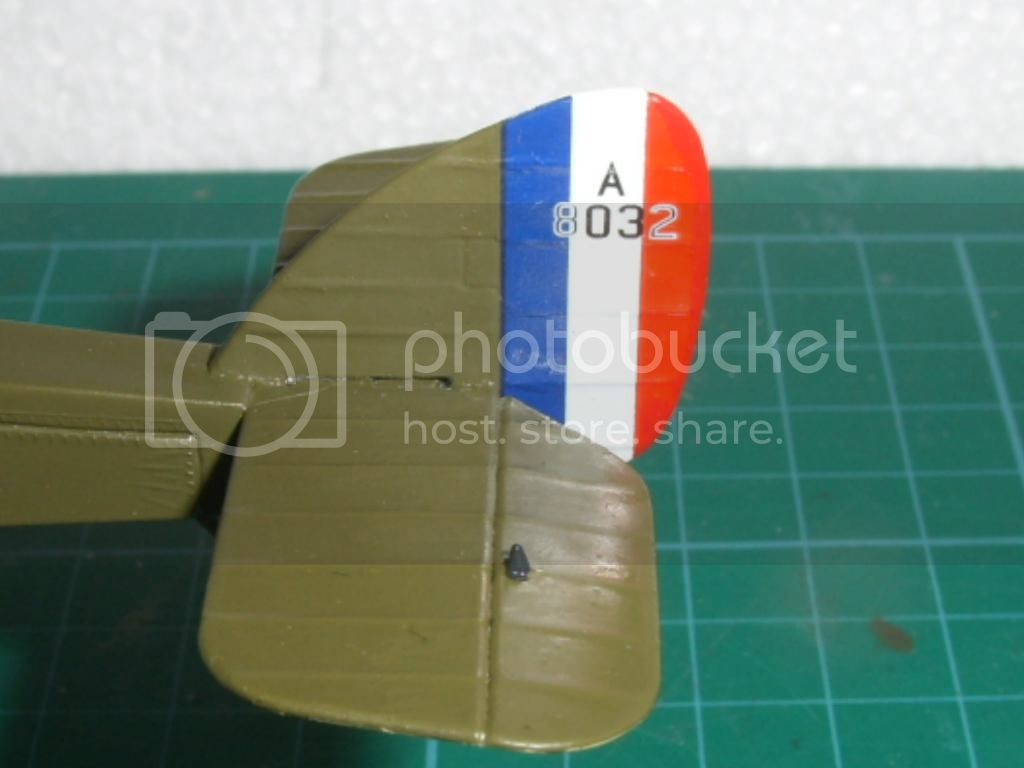
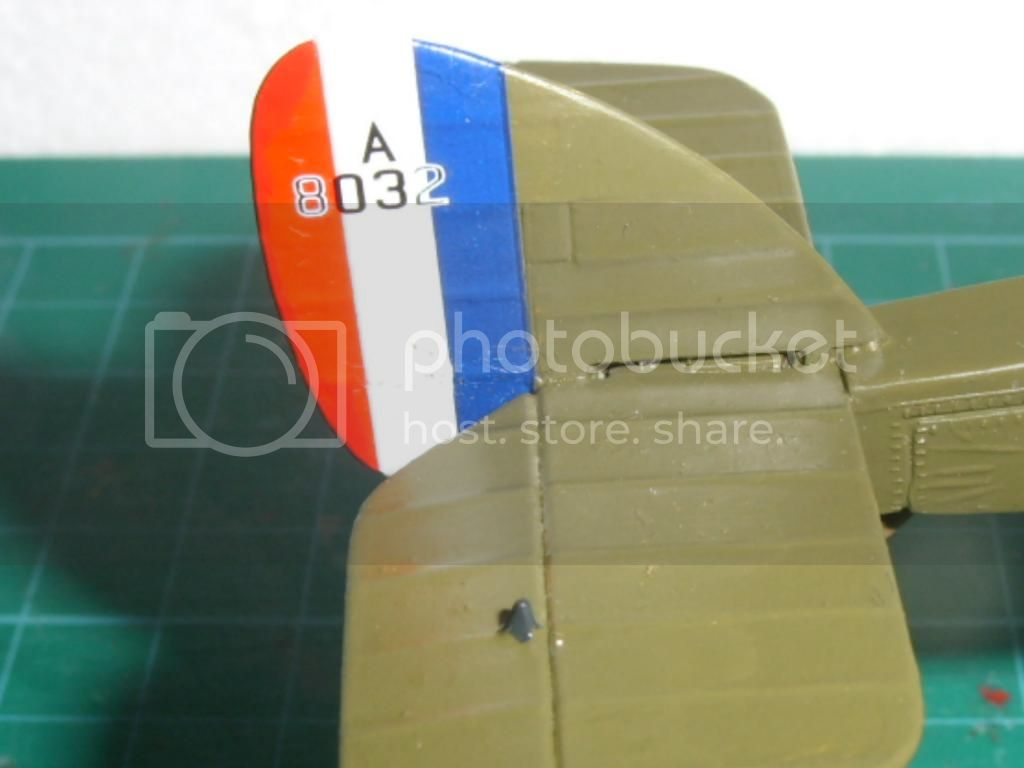
Tomorrow I can make a start on the matt coat and with luck its should be finished the next few days.
Stephen
On the bench: 1/72 Mosquito, Lightning F.6, DH.2,
AMT Vulcan Shuttle Surak.
Cyber-Hobby 1:35 Sherman Firefly IC - still stalled.
Merlin
 Senior Editor
#017
United Kingdom
Joined: June 11, 2003
KitMaker: 17,582 posts
AeroScale: 12,795 posts
Posted: Monday, March 10, 2014 - 08:50 AM UTC
Quoted Text
Rowan, I hope you get a chance to finish the Vampire. After all the work you put into it, it would be shame not to... Stephen
Hi Stephen
Don't worry - it's only shunted to one side while I focus on the Shinden. I'm determined to finish the little blighter.

Those serial decals have lined up perfectly. Nice job.

All the best
Rowan

BEWARE OF THE FEW...
As I grow older, I regret to say that a detestable habit of thinking seems to be getting a hold of me. - H. Rider Haggard

#259
Massachusetts, United States
Joined: October 23, 2011
KitMaker: 2,265 posts
AeroScale: 1,715 posts
Posted: Monday, March 10, 2014 - 09:10 AM UTC
Quoted Text
Rowan, I hope you get a chance to finish the Vampire. After all the work you put into it, it would be shame not to.
Quick update on my build.
The serial numbers on the rudder are now applied and drying out. These are from the Pegasus RFC/RNAS Serials sheet. Great decals to work with and very thin. I did find it tricky to get each individual digit lined up correctly and to really make things even more fun, the fore and aft digit have a second seperate decal over the top for the white outlines. Its times like this I wished I worked at a bigger scale!
Stephen
beautiful decal work there! hand lettering (or numbering) is indeed tremendously challenging!

England - West Midlands, United Kingdom
Joined: August 01, 2012
KitMaker: 960 posts
AeroScale: 391 posts
Posted: Monday, March 10, 2014 - 09:26 AM UTC
Stephen,
Beautiful Decal Work.

#372
United Kingdom
Joined: March 10, 2010
KitMaker: 2,568 posts
AeroScale: 1,619 posts
Posted: Monday, March 10, 2014 - 10:15 AM UTC
Thanks guys. They were a very tricky job and not something I'm going to to be quick to do again. Out of curiosity I just measured those serial numbers, each one is a little over 2mm in height!
On the bench: 1/72 Mosquito, Lightning F.6, DH.2,
AMT Vulcan Shuttle Surak.
Cyber-Hobby 1:35 Sherman Firefly IC - still stalled.

#372
United Kingdom
Joined: March 10, 2010
KitMaker: 2,568 posts
AeroScale: 1,619 posts
Posted: Sunday, March 16, 2014 - 11:13 AM UTC
Little more work this weekend. I've not forgotten!

I gave the model a coat of matt and some satin over the grey nose. When all that was dry I fitted on the fiddly bits that will be impossible to fit later, fuel tank, exhausts, Vickers gun and the pilots windscreen. I made that out of some clear plastic packaging material. The exhausts were first painted in a dark red-brown and then had a drybrush with some Mig pigments gun-metal powder. The guns were finished in the same way but had a base coat of Revell 09 Anthracite. I think it gives a pretty realistic look at small scales. I also gave the radiator a wash of black oil paint and when that had dried stuck on the prop. I'll attach that last of all along with the scarf mounted Lewis.
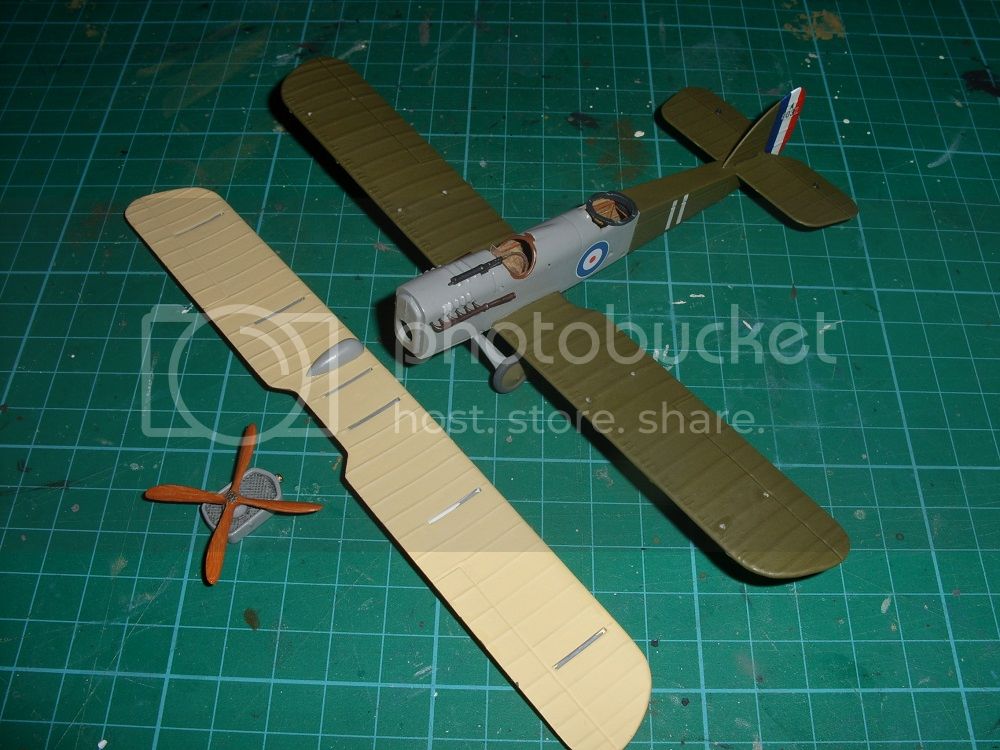
I'll leave those overnight to let the glue harden up and then do a little weathering with pastels and finally fit the upper wing and struts.
Stephen
On the bench: 1/72 Mosquito, Lightning F.6, DH.2,
AMT Vulcan Shuttle Surak.
Cyber-Hobby 1:35 Sherman Firefly IC - still stalled.

#372
United Kingdom
Joined: March 10, 2010
KitMaker: 2,568 posts
AeroScale: 1,619 posts
Posted: Monday, March 17, 2014 - 09:22 AM UTC
Nearly there.....

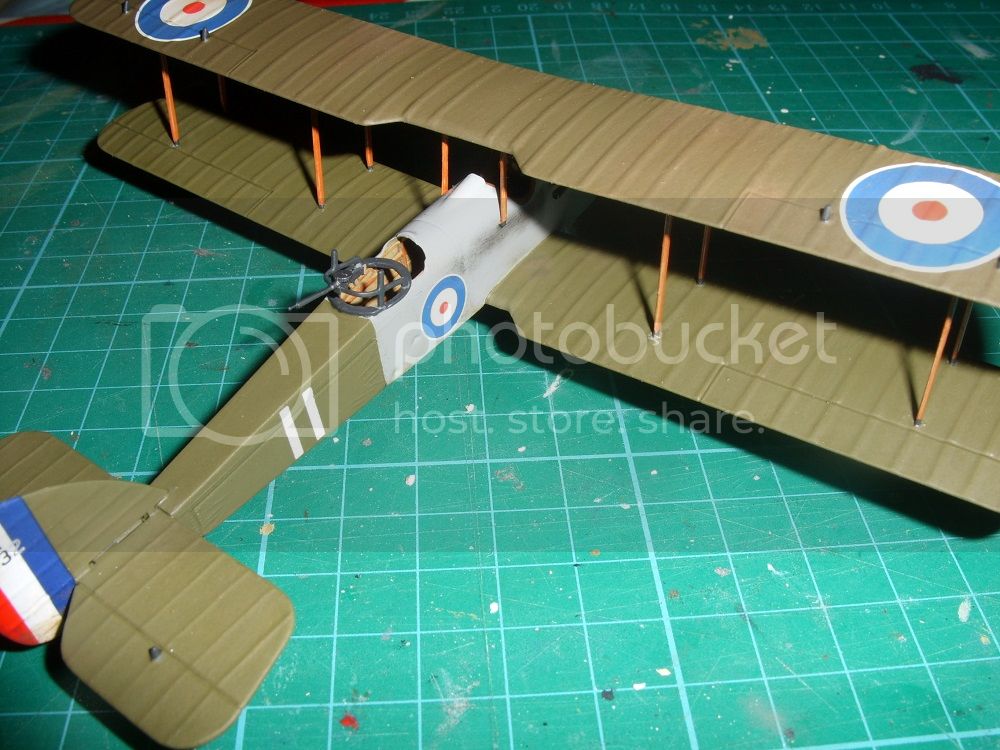
The upper wing and struts went on with no trouble. Just a little work to remove and touch up glue spots. I did a little weathering with some Tamiya weathering sets. I added some dirt to the underside of the wings, tail and rear fuselage.
It's also only now that I see that the upper wing is a different shade to the rest of the aircraft. When it came to repainting it I found that my old tin of olive drab had dried up so had to buy a new one. Despite being the same shade from the same manufacturer, its slightly browner than the old one. Not sure if that's due to the age of the paint or re-formulation of the new by Humbrol. Its too late to do anything about that now and I'll be damned if I'm going to repaint it. My story is that the upper wing was replaced in service and the rest is faded and worn. Its bound to have happened in real life.
Baring a natural disaster, she should be finally completed tomorrow.
Stephen
On the bench: 1/72 Mosquito, Lightning F.6, DH.2,
AMT Vulcan Shuttle Surak.
Cyber-Hobby 1:35 Sherman Firefly IC - still stalled.
British Columbia, Canada
Joined: September 03, 2009
KitMaker: 6,965 posts
AeroScale: 6,247 posts
Posted: Monday, March 17, 2014 - 10:16 AM UTC
Don't forget that the upper wing got more sun, too

Going to be brave and rig the beast?
When once you have tasted flight you will walk the Earth with your eyes turned skyward.
For there you have been, and there you will always long to return.
-Leonardo Da Vinci

#372
United Kingdom
Joined: March 10, 2010
KitMaker: 2,568 posts
AeroScale: 1,619 posts
Posted: Monday, March 17, 2014 - 11:43 AM UTC
Not this time round Jessie. I didn't prep for any rigging and it's given me enough trouble already. I intend to give it a go on the Stranraer and Heyford I have in my stash. Pretty sizeable models so they should be easier to work at than some fiddly little thing.
On the bench: 1/72 Mosquito, Lightning F.6, DH.2,
AMT Vulcan Shuttle Surak.
Cyber-Hobby 1:35 Sherman Firefly IC - still stalled.

#372
United Kingdom
Joined: March 10, 2010
KitMaker: 2,568 posts
AeroScale: 1,619 posts
Posted: Tuesday, March 18, 2014 - 10:48 AM UTC
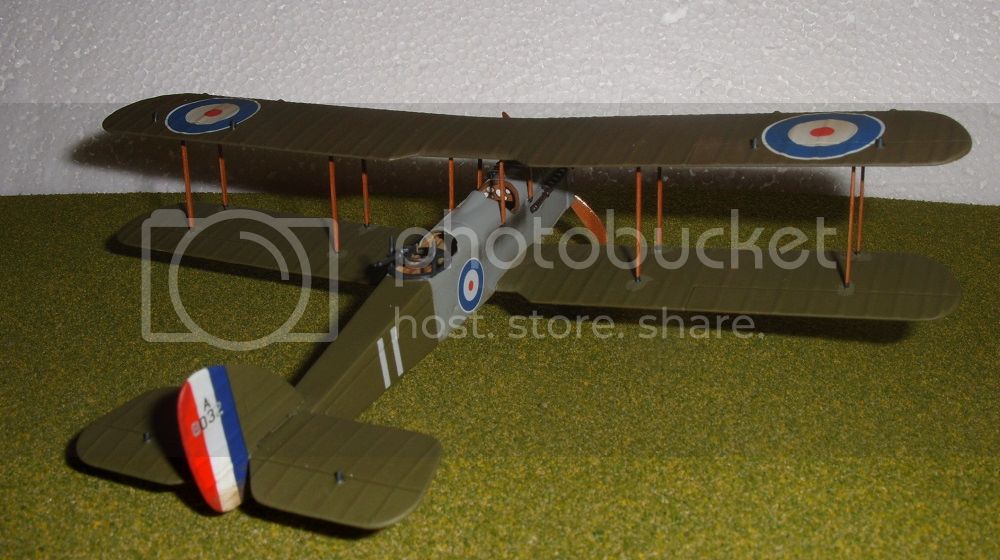
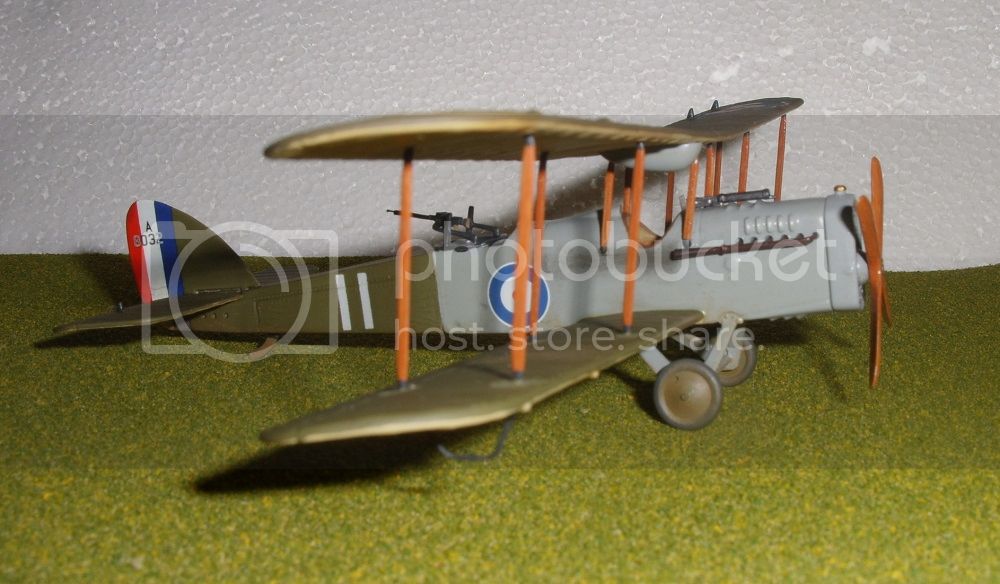
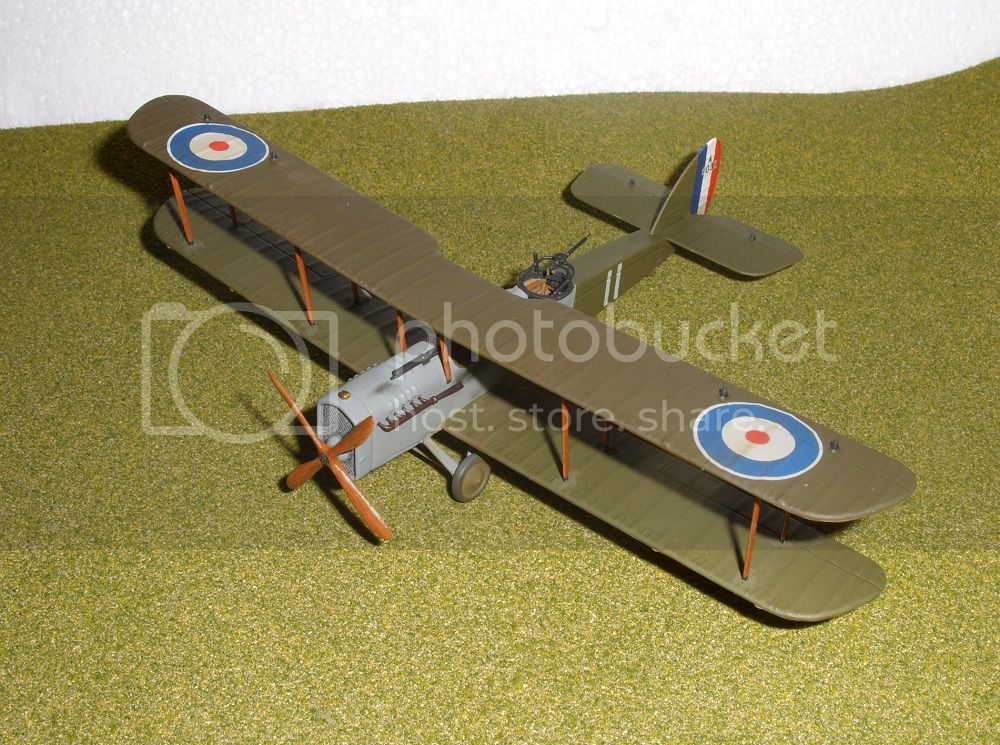
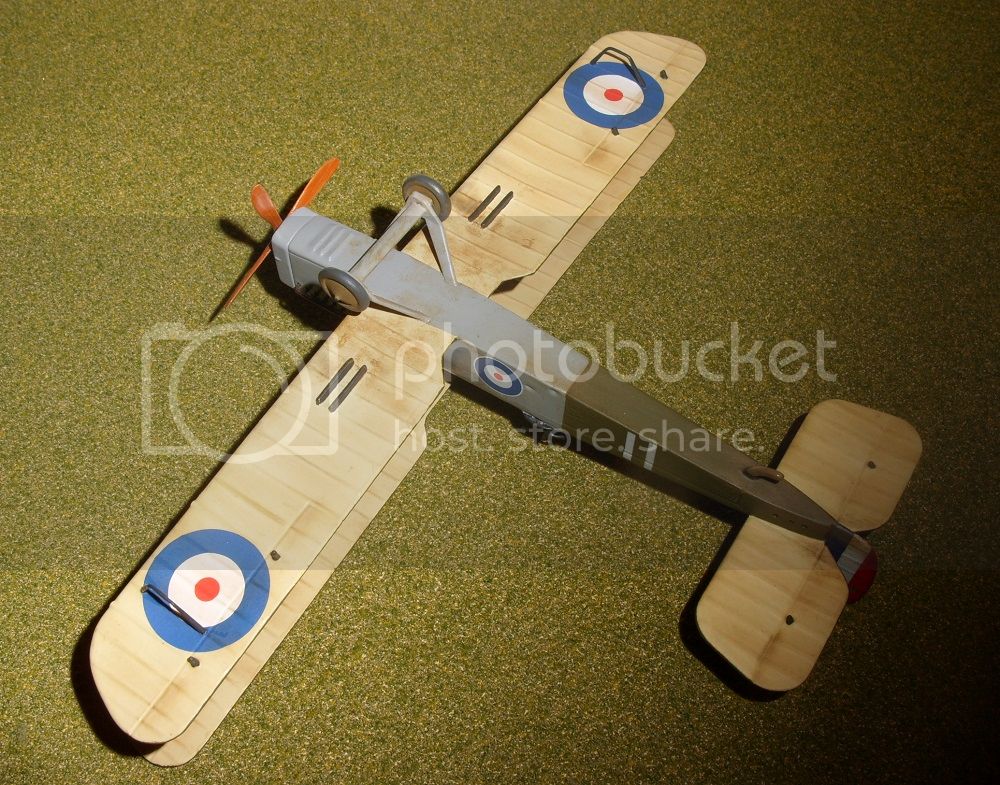
And finished. Finally.
Photography still isn't my strongest skill. I need to seriously give some thought to building a light box. I'll add the best couple to the campaign gallery.
So here it is the Airfix 1/72 Airco DH.4 finished in the markings of the aircraft piloted by Major Egbert Cadbury and gunner Major Robert Leckie of 212 Squadron RAF. On August 6th 1918, Cadbury and Leckie were scrambled along with 15 other aircraft to intercept a formation of four Zeppelins raiding targets along the Norfolk coast. Making a near head on attack at 16,000ft, Leckie fired two bursts from the Lewis gun into the nose of the lead Zeppelin L70. The L70 burst into flames and crashed into the North Sea with the loss of its commander Führer der Luftschiffe Peter Strasser and all 23 crewmen. The other Zeppelins were driven off. Cadbury and Leckie were both credited with the destruction of the L70 and awarded the DFC later in the month.
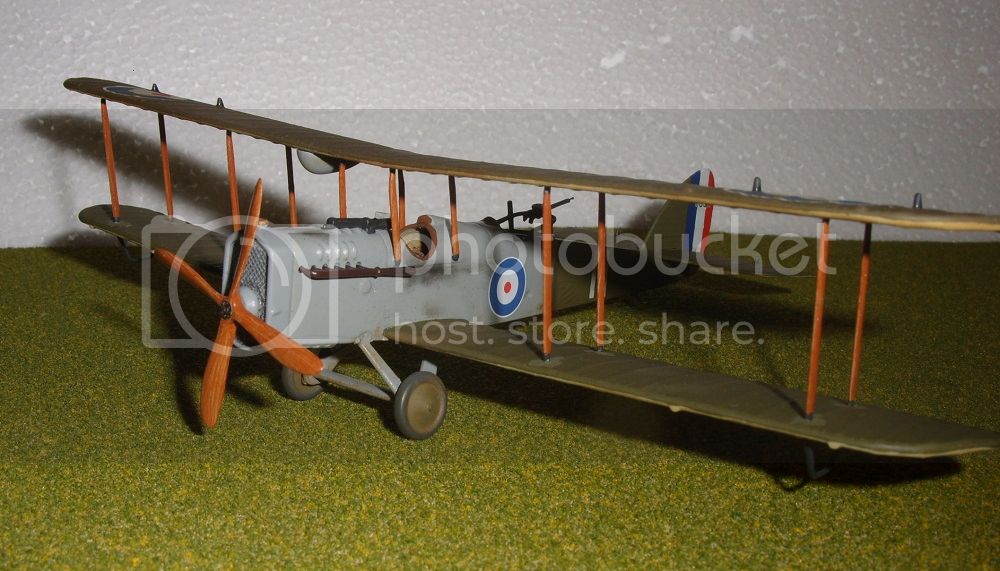
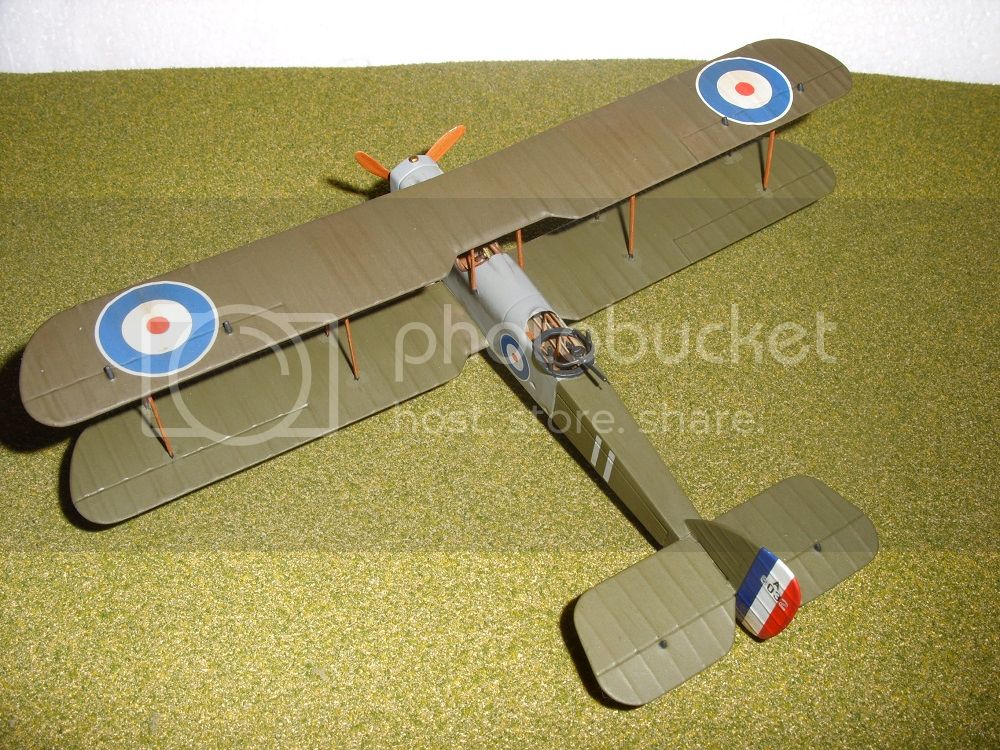
Its been an awesome campaign and I've enjoyed the different builds that everyone has done.
On the bench: 1/72 Mosquito, Lightning F.6, DH.2,
AMT Vulcan Shuttle Surak.
Cyber-Hobby 1:35 Sherman Firefly IC - still stalled.


