World War II
Discuss WWII and the era directly before and after the war from 1935-1949.
Hosted by Rowan Baylis
1/48 B-17F Build - 303rd BGs Luscious Lady
Joel_W
Staff MemberAssociate Editor
AUTOMODELER
_VISITCOMMUNITY
New York, United States
Joined: December 04, 2010
KitMaker: 11,666 posts
AeroScale: 7,410 posts
Posted: Monday, August 17, 2015 - 05:33 AM UTC

Quoted Text


Quoted Text


Brian,
That's some agenda you've got for the two of you. Sure hope that you get through all of it. Like you, I hate butt joints, but ended up having to live with it on the Buffalo. Joel


Well, I'm not saying we'll get through it all!

Probably the door openings and the wing spars, with some concept discussion about the crawl-space/tunnel. We will see. I think the wing spar solution will be simple, and actually somewhat elegant. He and I have discussed it. Something like what Monogram did with the B-29 kit.

Whatever we do will be documented.

I did not realize you butt joined the wings on the Buff! Did you pin anything from the wing edges to the fuselage sides? I would have thought that about four pins each top and bottom would add some strength, so that it isn't just the glue holding the wing on, even if the depth of the pins in the plastic wouldn't be that deep.


Brian,
Nope. Just a ton of glue, and I made sure that the surfaces were flush and smooth. The more I think about it, I should have pinned them, but being basically lazy, I just skipped it, and continued on with the build.
Joel
Redhand
#522
_VISITCOMMUNITY
New Jersey, United States
Joined: January 20, 2013
KitMaker: 1,460 posts
AeroScale: 1,443 posts
Posted: Monday, August 17, 2015 - 05:59 AM UTC

Quoted Text


Brian,
Nope. Just a ton of glue, and I made sure that the surfaces were flush and smooth. The more I think about it, I should have pinned them, but being basically lazy, I just skipped it, and continued on with the build.
Joel


Well, I'm not one to criticize others' techniques. Now that I have some glass cases to store these things, I say, "Once it's done, put it under glass and touch it as little as possible. That way it won't break!" What is remarkable to me is how much we lavish attention on work that is so easily broken when it's done.
Joel_W
Staff MemberAssociate Editor
AUTOMODELER
_VISITCOMMUNITY
New York, United States
Joined: December 04, 2010
KitMaker: 11,666 posts
AeroScale: 7,410 posts
Posted: Monday, August 17, 2015 - 06:18 AM UTC

Quoted Text


Quoted Text


Brian,
Nope. Just a ton of glue, and I made sure that the surfaces were flush and smooth. The more I think about it, I should have pinned them, but being basically lazy, I just skipped it, and continued on with the build.
Joel


Well, I'm not one to criticize others' techniques. Now that I have some glass cases to store these things, I say, "Once it's done, put it under glass and touch it as little as possible. That way it won't break!" What is remarkable to me is how much we lavish attention on work that is so easily broken when it's done.


Brian,
I have a display case, and once I'm done taking pictures, in it goes, and it's never moved nor touched again. Fortunately, dust hasn't found a way in more then 7 years, so once in, it's more like a tomb then a display case.

Many moons ago before we had a house, I just had a few shelves in our bedroom. Never ran out of display space as every time I cleaned my models, a few shall we say, bit the dust, and headed off to the landfill.

Joel
Redhand
#522
_VISITCOMMUNITY
New Jersey, United States
Joined: January 20, 2013
KitMaker: 1,460 posts
AeroScale: 1,443 posts
Posted: Saturday, August 22, 2015 - 11:37 PM UTC
WITH A "LITTLE" HELP FROM MY FRIEND!

My modeling friend from NC came to visit this past weekend, and boy was huge progress made on this build, thanks to his expertise. I mostly sat around and watched while we "talked plastic" and discussed various approaches to build problems.

Three things were tackled and resolved to near perfection.

First, he made casts of the Paragon set of B-17 doors, and cut out openings for them in the fuselage, This remarkable work can be seen below:


Next, after some discussion, we decided to cut out the tail control surfaces and decided to substitute ones from the Monogram kit, as seen below. He even cut out the trim tabs. This will allow the elevators to appear in down "locked" position, with a tiny upward tilt to the control tab. See cut out parts next to picture of the real thing (along with an extra cast of the doors.)


See also rudder in place, below, and obviously I still need to add the hinges.


I'm sure it's also clear that some clean-up of all these parts is necessary, but as a "first cut" at them I couldn't be happier.

Finally, we dealt with one of the biggest "structural" challenges the build provides with a full bomb bay added: how to secure the main wings?

We could go no deeper than the depth of the tabs inserted into the fuselage but flush with the inner sides of it. The ingenious solution was to increase the mating surface by adding a large, hollow, rectangular piece of Plastistruct bar stock


That was stacked on top of a smaller but longer piece that also doubled as a wing spar, both of which were secured by a large piece of Plastistruct "angle iron" to build strength and rigidity into the wing.


Finally, we added another piece of "angle iron" on the bottom of the wing that will adhere to the forward side of the "main spar" and provide "top-to bottom" strength to the wing interior.


I will post again soon about next steps.
Joel_W
Staff MemberAssociate Editor
AUTOMODELER
_VISITCOMMUNITY
New York, United States
Joined: December 04, 2010
KitMaker: 11,666 posts
AeroScale: 7,410 posts
Posted: Sunday, August 23, 2015 - 03:04 AM UTC
Brian,
I'm more then surprised at the number of modifications the two of you made over the weekend. Sure hope you took him out to dinner.

All three doors look great. You're showing them in the closed position. Is that just for now to check fit, and they'll be in the open position when all is said and done?

Those cutout flying surfaces really do add a lot of character to the build. I'm assuming that he just makes the cuts right across the hinges, then new hinges will be made up and glued into place. At least that's how I usually do it.

Sure wish I had your friend to help me with the F2A-3 wing butt joints. I'm sure that he would have come up with the same type of mount you now have.

Joel
Redhand
#522
_VISITCOMMUNITY
New Jersey, United States
Joined: January 20, 2013
KitMaker: 1,460 posts
AeroScale: 1,443 posts
Posted: Sunday, August 23, 2015 - 04:06 AM UTC

Quoted Text

Brian,

I'm more then surprised at the number of modifications the two of you made over the weekend. Sure hope you took him out to dinner.

All three doors look great. You're showing them in the closed position. Is that just for now to check fit, and they'll be in the open position when all is said and done?

Those cutout flying surfaces really do add a lot of character to the build. I'm assuming that he just makes the cuts right across the hinges, then new hinges will be made up and glued into place. At least that's how I usually do it.

Sure wish I had your friend to help me with the F2A-3 wing butt joints. I'm sure that he would have come up with the same type of mount you now have.

Joel


Dinner? Definitely!

The doors are going to be opened, all of them.

As to the number of mods I agree. We got a ton of stuff done.

I'll discuss them front to back, and the reasons.

The nose door was too alluring to pass up, as previously discussed. Since I have to return to the cockpit to reinstall the seats the open door also affords the opportunity to fix something that has troubled me since Karl pointed it out: the "basement doors" to the tunnel were removed in the ETO as part of the aircraft prep for combat.

I have already removed that subassembly and will go with the original TD resin parts for this, so the opening into the tunnel will allow a look up from the bottom through the open door, and visa versa. At the very least it will give the flashlight and penlight holders a sense of depth looking through the cockpit roof windows or up through the open door below.

The toughest part of this will be putting in some of the tunnel details,


but it's largely gonna be "fool the eye" due to a very restricted field of vision. I do have plenty of extra oxygen bottles, and know the layout from Karl's drawings. There's nothing here that can't be dealt with using styrene bits and pieces, I think.

The most tedious thing is going back into the cockpit. I'm really tired of it, even if each return has resulted in better detail. [I have no one to blame but myself, however]. I'm going to wait till it's re-done before posting any pics of that area (again).

There was no avoiding the wing spars. With a model this large, secure wing attachment points are essential. There is something else my friend suggested that I will add here when it comes time to join the wings.

The tail control surfaces got on the menu because of Karl's comment about the elevators being locked while the A/C is parked. It was a natural add on. Yes, he did saw through the hinges and added scratch-built ones. It's the most direct way.

I have to clean up the work area, then will jump back into it. This weekend's work has really cured some of the "battle fatigue" I've felt with the fuselage. It was especially great "trying the wings on for size!"


Redhand
#522
_VISITCOMMUNITY
New Jersey, United States
Joined: January 20, 2013
KitMaker: 1,460 posts
AeroScale: 1,443 posts
Posted: Friday, August 28, 2015 - 09:46 AM UTC
TUNNEL RAT

With renewed enthusiasm for the build after my friend's visit last weekend, I have started on the tunnel between the pilots' and nav/bomb compartment.

It appears to me that, like the bomb bay, this was finished in bare aluminum (with a "Touch of Gray" for an oldster like me?) so that is what I will be painting the compartment first.

Before that, however, I need to eliminate the unsightly gap in the ceiling of the tunnel seen forward in the below picture.


To accomplish this I will be using cut sheet styrene, properly positioned forward.


At the top of the photo is the ceiling/floor on the pilot's side, which we see is plywood. That will make for a nice contrast with the aluminum. Note also the control cables for the pilot's control column. That I plan to add, but all the electrical stuff, well, maybe just a fool-the-eye hint. Unlike the bomb bay, no reason to go overboard here due to limited visibility, but I'll do enough to satisfy myself.

I also absolutely plan to add the 5 oxygen bottles, which will also be visible.


That, folks, will be cool IMHO.

KPHB17FE
_VISITCOMMUNITY
Illinois, United States
Joined: January 12, 2015
KitMaker: 292 posts
AeroScale: 292 posts
Posted: Friday, August 28, 2015 - 05:41 PM UTC
Looking good Brian. In the interests of accuracy, there are seven oxygen bottles there. Two more don't show in that photo (may not even be in that restoration, can't say for certain).

Here is the view looking forward from the Bomb Bay:


Redhand
#522
_VISITCOMMUNITY
New Jersey, United States
Joined: January 20, 2013
KitMaker: 1,460 posts
AeroScale: 1,443 posts
Posted: Friday, August 28, 2015 - 05:58 PM UTC

Quoted Text

Looking good Brian. In the interests of accuracy, there are seven oxygen bottles there. Two more don't show in that photo (may not even be in that restoration, can't say for certain).


Thanks for the info. Five will do here, as the limited field of vision will make seeing even all of them nearly impossible.

Redhand
#522
_VISITCOMMUNITY
New Jersey, United States
Joined: January 20, 2013
KitMaker: 1,460 posts
AeroScale: 1,443 posts
Posted: Saturday, August 29, 2015 - 04:58 AM UTC
TUNNEL RAT 2

Masked


and sprayed


I am trying something innovative with the tunnel floor. We'll see how it works.
Redhand
#522
_VISITCOMMUNITY
New Jersey, United States
Joined: January 20, 2013
KitMaker: 1,460 posts
AeroScale: 1,443 posts
Posted: Saturday, September 05, 2015 - 05:05 AM UTC
TUNNEL RAT 3

My "innovative" idea for the tunnel floor turned out to be not-such-a-good-idea so I made small floor with non-skid that I will install at a later point.

I started with some coaming detail for the tunnel opening and then completed half the suite of electronic gear under the co-pilot seat:


I'm not thrilled with it but this is a low visibility, fool-the-eye area that looks more like this, with flash.


and will probably look closer to this in natural light:


There is a much dressing up still to do on the ceiling, with plywood and control cables, and those oxygen bottles. I should get a lot accomplished this holiday weekend. At least that's the plan.
Joel_W
Staff MemberAssociate Editor
AUTOMODELER
_VISITCOMMUNITY
New York, United States
Joined: December 04, 2010
KitMaker: 11,666 posts
AeroScale: 7,410 posts
Posted: Saturday, September 05, 2015 - 05:16 AM UTC
Brian,
Nicely done. It does fools one eye just enough.
Joel
Redhand
#522
_VISITCOMMUNITY
New Jersey, United States
Joined: January 20, 2013
KitMaker: 1,460 posts
AeroScale: 1,443 posts
Posted: Saturday, September 05, 2015 - 05:25 AM UTC

Quoted Text

Brian,
Nicely done. It does fools one eye just enough.
Joel


Thanks Joel, not thrilled with it but a black or umber wash, and darkness, will hide a multitude of sin.
Joel_W
Staff MemberAssociate Editor
AUTOMODELER
_VISITCOMMUNITY
New York, United States
Joined: December 04, 2010
KitMaker: 11,666 posts
AeroScale: 7,410 posts
Posted: Saturday, September 05, 2015 - 06:14 AM UTC

Quoted Text


Quoted Text

Brian,
Nicely done. It does fools one eye just enough.
Joel


Thanks Joel, not thrilled with it but a black or umber wash, and darkness, will hide a multitude of sin.


Brian,
Those dark washes are my best friend too.
Joel
berndm
_VISITCOMMUNITY
Niedersachsen, Germany
Joined: March 26, 2014
KitMaker: 844 posts
AeroScale: 630 posts
Posted: Saturday, September 05, 2015 - 09:49 AM UTC
Hello Brian, its good to see that your Fortress is still underway and you are still adding all these great details, looks very convincing.
Redhand
#522
_VISITCOMMUNITY
New Jersey, United States
Joined: January 20, 2013
KitMaker: 1,460 posts
AeroScale: 1,443 posts
Posted: Saturday, September 05, 2015 - 05:43 PM UTC

Quoted Text

Hello Brian, its good to see that your Fortress is still underway and you are still adding all these great details, looks very convincing.


Thanks for stopping by, and for the encouragement.
Joel_W
Staff MemberAssociate Editor
AUTOMODELER
_VISITCOMMUNITY
New York, United States
Joined: December 04, 2010
KitMaker: 11,666 posts
AeroScale: 7,410 posts
Posted: Saturday, September 05, 2015 - 08:08 PM UTC
Brian,
BTW, I've yet to build a medium or heavy bomber in 1/48 scale. I still have the Revell 1/48 scale PBY-5A that I'll just never build do to its size. I keep on posting it every so often for sale, but no one seems to want it at any price.

Anyway, I'm going to build at least one 1/72 bomber/recon aircraft per year. My 1st build will be the New Airfix B-17G. Hopefully, it will be almost pure box stock, and a most enjoyable build.
Joel
Redhand
#522
_VISITCOMMUNITY
New Jersey, United States
Joined: January 20, 2013
KitMaker: 1,460 posts
AeroScale: 1,443 posts
Posted: Saturday, September 05, 2015 - 08:25 PM UTC
Believe me, OOB sounds like a good option!
Redhand
#522
_VISITCOMMUNITY
New Jersey, United States
Joined: January 20, 2013
KitMaker: 1,460 posts
AeroScale: 1,443 posts
Posted: Saturday, September 05, 2015 - 08:46 PM UTC
TUNNEL RAT 4

Finished the last half of the electronics underneath the co-pilot's seat.

I don't pretend that the brass plates added to the faces of some of the equipment are accurate.


They were added solely to provide some 'color" and "eye candy" when the space is viewed in the natural light:


For me what's here is "close enough":


FWIW I understand that Aviation Artist Keith Ferris, who painted the famous mural "Fortresses Under Fire" at the Nat. Air & Space Museum in Wash. D.C. amused himself by painting all kinds of weird things into the picture, such as a Budweiser beer can. These are "inside jokes" completely invisible to the typical observer. I'm no Keith Ferris, but you get the idea.

KPHB17FE
_VISITCOMMUNITY
Illinois, United States
Joined: January 12, 2015
KitMaker: 292 posts
AeroScale: 292 posts
Posted: Sunday, September 06, 2015 - 01:28 AM UTC
Looking good Brian, busy enough to satisfy the eye! Your patience and scratch building skills are outstanding
Redhand
#522
_VISITCOMMUNITY
New Jersey, United States
Joined: January 20, 2013
KitMaker: 1,460 posts
AeroScale: 1,443 posts
Posted: Sunday, September 06, 2015 - 01:42 AM UTC

Quoted Text

Looking good Brian, busy enough to satisfy the eye! Your patience and scratch building skills are outstanding


Given your expertise on the interior, I am pleased you are "OK" with my "artistic license." I'll be doing the plywood ceilings this evening, with control cables.

Then the oxygen bottles, little bit of wiring, a couple of girders and "stuff" on the port floor, and finally upstairs to the cockpit for what (to preserve my sanity), will be THE LAST redo of that area.

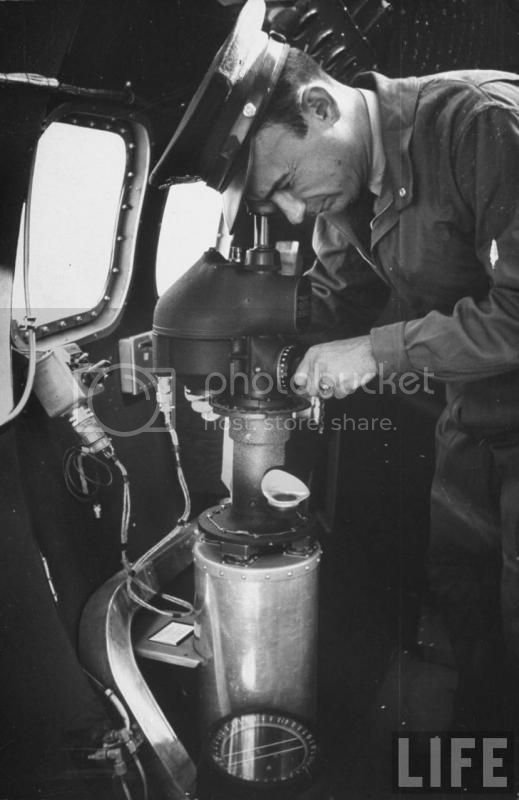
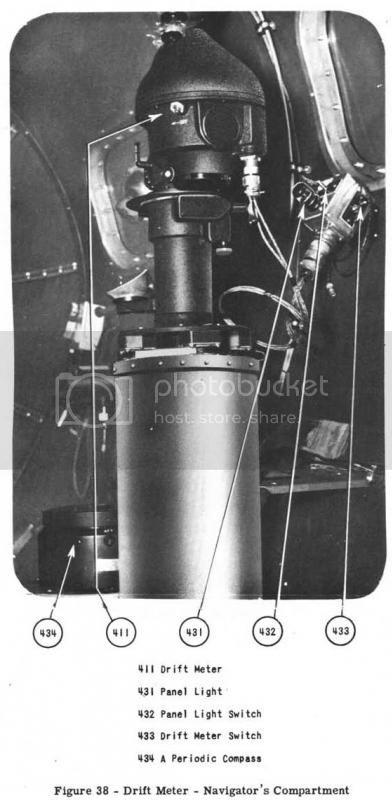
BTW could you send me or repost some pics of the drift meter in the nose? I want to do this while I'm still refurbishing the forward half of the A/C.

I have been thinking a lot lately about how long it would take me to do a G with the Eduard Brass sets and some of the TD sets, but closing up the tunnel and bomb bay, and with closed RR and waist positions. I think I could easily say 1/3 the time of this.
KPHB17FE
_VISITCOMMUNITY
Illinois, United States
Joined: January 12, 2015
KitMaker: 292 posts
AeroScale: 292 posts
Posted: Sunday, September 06, 2015 - 09:09 AM UTC
Brian, I really think you would find the TD "detail " sets are far more grief than they are worth. And accuracy wise they fall far short of any reasonable standard. But that is just me.

I am a big fan of "gizmology" and I love the results. The main thing is to make the viewer believe in what they are seeing and you have accomplished that in spades!

Here are a couple of photos of the drift meter installation for you:


Redhand
#522
_VISITCOMMUNITY
New Jersey, United States
Joined: January 20, 2013
KitMaker: 1,460 posts
AeroScale: 1,443 posts
Posted: Sunday, September 06, 2015 - 09:35 AM UTC

Quoted Text

Brian, I really think you would find the TD "detail " sets are far more grief than they are worth. And accuracy wise they fall far short of any reasonable standard. But that is just me.

I am a big fan of "gizmology" and I love the results. The main thing is to make the viewer believe in what they are seeing and you have accomplished that in spades!


Again I am grateful for the compliments. "Gizmology" can be quite a bit of fun.

The one TD set I would get for the G model is the cockpit again. Why? There are parts in it that are very useful. I like the orygen bottles, and the detail pieces that go up against the rear bulkhead. The hydraulic station isn't bad either. And the seats do provide a start on making taller, more accurate versions. But for a G kit I would stick mostly with Eduard Brass, since the interior isn't really all that bad.

Damn, those drift meters are large, and complex, but I think I can pull something together out of geometric shapes and the spares box, especially since it will only be seen through the nose glass. However I am going to have to pull out those two yellow oxygen bottles. (Yeah, I know they may not have been "right" for an F, but whatever).

Thanks for the pics and your continuing support!
Redhand
#522
_VISITCOMMUNITY
New Jersey, United States
Joined: January 20, 2013
KitMaker: 1,460 posts
AeroScale: 1,443 posts
Posted: Monday, September 07, 2015 - 09:07 PM UTC
TUNNEL RAT 5

After a lot of messing around and sweating, mixed with a few in the humid basement that is my workspace, I installed the forward (and only) parts due to visibility, of the tunnel control cables. They are far from perfect, but will get the job done for this area.


Here are two shots with the fuselage together, though the first shows an interim configuration.


In the below annotation of Karl's tunnel pic you will see some dressing up I'm doing of the vertical bulkhead in front of the control cable connection in the above pic. It will be nice because it can bee seen directly through the open door.


However, the oxygen bottles are next.
Redhand
#522
_VISITCOMMUNITY
New Jersey, United States
Joined: January 20, 2013
KitMaker: 1,460 posts
AeroScale: 1,443 posts
Posted: Tuesday, September 08, 2015 - 08:41 PM UTC
TUNNEL RAT 5.5

The OCD part of me had to fix the nearest control cable connection forward when I realized I had installed it backwards. Note also more restrained plate on one of the electronic black boxes against the stbd. bulkhead.


Though I'm still in the tunnel, I also did some prep work for the drift meter forward in the bomb/nav compartment. I think it will come out OK.