World War II: Great Britain
Aircraft of Great Britain in WWII.
Hosted by Rowan Baylis
Airfix 1/24 Scale Hawker Typhoon Build.
Joel_W
Staff MemberAssociate Editor
AUTOMODELER
_VISITCOMMUNITY
New York, United States
Joined: December 04, 2010
KitMaker: 11,666 posts
AeroScale: 7,410 posts
Posted: Tuesday, June 10, 2014 - 01:51 AM UTC

Quoted Text


Quoted Text

Mal,
Incoming orders are a good thing. Getting paid for the out going orders is even better.

Looking forward to your next update.

Joel


To get paid for outgoing orders I have to get them out. When I got back home after a week end at my daughters there was a call on the answer phone that will make getting commission orders out a bit more difficult because I will need to concentrate on something else for a while! It is something that I have been working towards for a few years now and it looks like it is set to happen I will try and get an update done for this but today and tomorrow I have some serious redesign work to do, and its not a design for masks I think that it is now the right time to get a proper web site up and running So that is going to take quite a bit of time!


Mal,
Go for it !! Sure sounds like a fantastic opportunity. Can you share it with us?
Joel
chukw1
_VISITCOMMUNITY
California, United States
Joined: November 28, 2007
KitMaker: 817 posts
AeroScale: 729 posts
Posted: Tuesday, June 10, 2014 - 01:57 AM UTC
Good on you, Mal!
Scrodes
_VISITCOMMUNITY
Ontario, Canada
Joined: July 22, 2012
KitMaker: 771 posts
AeroScale: 763 posts
Posted: Monday, June 16, 2014 - 02:09 PM UTC
Mal you already know I'll be contacting you to make me some markings for my Typhoon - and maybe the 1/24th scale Mosquito I'm building on here too, depending on my timeframe vs. turn around.

Also, I'm jealous that you have your Tiffie
Holdfast
Staff MemberPresident
IPMS-UK KITMAKER BRANCH
#056
_VISITCOMMUNITY
England - South West, United Kingdom
Joined: September 30, 2002
KitMaker: 8,581 posts
AeroScale: 4,913 posts
Posted: Monday, June 16, 2014 - 05:05 PM UTC
Hi Matt,
Of course I will be producing a promotional set for this kit at around a 35% discount. The set will include roundels, fin flash, camo, D-Day stripe helpers and yellow leading edge masks. The codes and serials will be done on commission separately and will be discounted too
Scrodes
_VISITCOMMUNITY
Ontario, Canada
Joined: July 22, 2012
KitMaker: 771 posts
AeroScale: 763 posts
Posted: Thursday, June 19, 2014 - 06:18 AM UTC

Quoted Text

Hi Matt,
Of course I will be producing a promotional set for this kit at around a 35% discount. The set will include roundels, fin flash, camo, D-Day stripe helpers and yellow leading edge masks. The codes and serials will be done on commission separately and will be discounted too


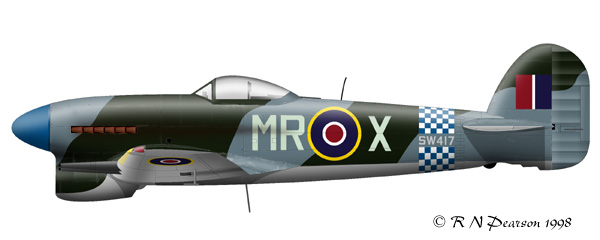
While I finish the Mossie and wait for my Typhoon, I'll let you stew over this - the specific markings I wish to paint my Tiffie in are the ones from the old Monogram kit. I just can't figure out how we could do the checkered tailband.


I'm in love with the blue spinner and this was one of the first models I ever built, I want to do it again to showcase how far I've come.
Joel_W
Staff MemberAssociate Editor
AUTOMODELER
_VISITCOMMUNITY
New York, United States
Joined: December 04, 2010
KitMaker: 11,666 posts
AeroScale: 7,410 posts
Posted: Thursday, June 19, 2014 - 07:42 AM UTC

Quoted Text


Quoted Text

Mal,
Incoming orders are a good thing. Getting paid for the out going orders is even better.

Looking forward to your next update.

Joel


To get paid for outgoing orders I have to get them out. When I got back home after a week end at my daughters there was a call on the answer phone that will make getting commission orders out a bit more difficult because I will need to concentrate on something else for a while! It is something that I have been working towards for a few years now and it looks like it is set to happen I will try and get an update done for this but today and tomorrow I have some serious redesign work to do, and its not a design for masks I think that it is now the right time to get a proper web site up and running So that is going to take quite a bit of time!


Mal,
Congratulations on whatever it is that you have to do the redesign for. Sure sounds like you've been working towards this goal for sometime.
Joel
Merlin
Staff MemberSenior Editor
AEROSCALE
#017
_VISITCOMMUNITY
United Kingdom
Joined: June 11, 2003
KitMaker: 17,582 posts
AeroScale: 12,795 posts
Posted: Thursday, June 19, 2014 - 07:49 AM UTC
Hi there

Eagle Editions are also quick off the mark with two new decal sets devoted to Airfix's big Tiffie:


https://aeroscale.kitmaker.net/news/17074

All the best

Rowan
Holdfast
Staff MemberPresident
IPMS-UK KITMAKER BRANCH
#056
_VISITCOMMUNITY
England - South West, United Kingdom
Joined: September 30, 2002
KitMaker: 8,581 posts
AeroScale: 4,913 posts
Posted: Thursday, June 19, 2014 - 05:18 PM UTC
Errrr, Rowan decals are not allowed in this build! All of those schemes can be available as masks
Merlin
Staff MemberSenior Editor
AEROSCALE
#017
_VISITCOMMUNITY
United Kingdom
Joined: June 11, 2003
KitMaker: 17,582 posts
AeroScale: 12,795 posts
Posted: Thursday, June 19, 2014 - 07:39 PM UTC
Hi Mal

No - I guess you won't be buying them! I muddled up the Tiffie build threads!

All the best

Rowan
Scrodes
_VISITCOMMUNITY
Ontario, Canada
Joined: July 22, 2012
KitMaker: 771 posts
AeroScale: 763 posts
Posted: Friday, June 20, 2014 - 01:32 AM UTC
Resin and photo-etch however.....
Joel_W
Staff MemberAssociate Editor
AUTOMODELER
_VISITCOMMUNITY
New York, United States
Joined: December 04, 2010
KitMaker: 11,666 posts
AeroScale: 7,410 posts
Posted: Friday, June 20, 2014 - 04:07 AM UTC
Mal,
Can you do that Blue/White checkerboard fuselage band? Looks really complicated.
Joel
DougN1
_VISITCOMMUNITY
Georgia, United States
Joined: August 08, 2011
KitMaker: 410 posts
AeroScale: 409 posts
Posted: Friday, June 20, 2014 - 06:01 AM UTC

Quoted Text

Mal,
Can you do that Blue/White checkerboard fuselage band? Looks really complicated.
Joel


Should be easy, you just need to paint a white band, cut out a bunch of squares the size of the checker and assemble them to make the pattern. Spray the blue and off you go.

I'm guessing the only thing Mal could do is make the squares for you. But you would still need to do the tedious assembly part.

Doug
Scrodes
_VISITCOMMUNITY
Ontario, Canada
Joined: July 22, 2012
KitMaker: 771 posts
AeroScale: 763 posts
Posted: Friday, June 20, 2014 - 09:28 AM UTC

Quoted Text


Quoted Text

Mal,
Can you do that Blue/White checkerboard fuselage band? Looks really complicated.
Joel


Should be easy, you just need to paint a white band, cut out a bunch of squares the size of the checker and assemble them to make the pattern. Spray the blue and off you go.

I'm guessing the only thing Mal could do is make the squares for you. But you would still need to do the tedious assembly part.

Doug


The tedious part would actually be the measuring - because it's a complex curve and you would want it to be a perfect checkerboard all the way around without having an obvious stop at the bottom of the fuse. I know people have built big beautiful doll and a lot of checker tail P-40s and such so it's not impossible.
Holdfast
Staff MemberPresident
IPMS-UK KITMAKER BRANCH
#056
_VISITCOMMUNITY
England - South West, United Kingdom
Joined: September 30, 2002
KitMaker: 8,581 posts
AeroScale: 4,913 posts
Posted: Friday, June 20, 2014 - 06:55 PM UTC

Quoted Text

Mal,
Can you do that Blue/White checkerboard fuselage band? Looks really complicated.
Joel


Quoted Text

Should be easy, you just need to paint a white band, cut out a bunch of squares the size of the checker and assemble them to make the pattern. Spray the blue and off you go.

I'm guessing the only thing Mal could do is make the squares for you. But you would still need to do the tedious assembly part.

Doug


I can probably do the checkers for the rear fuselage, but it isn't easy to get them right. It isn't quite as easy as just cutting a bunch of squares. Each "square" will need to be cut to reflect the compound curvature of the rear fuselage (it tapers as well as changing shape from top to bottom). I have struggled for a couple of years to get the checkers for the P-51 and P-47 done accurately.Basically every shape (as not one is a an actual square) has to fit exactly against the adjacent ones. The P-47 checkers are close and I am down to the row above the exhausts on the P-51. The slightest tweak though just throws everything out! I do have the decals for the big Tiffie, which include the checkers, but decals are a different animal compared to masks as they can be stretched and manipulated to fit (which means that they aren't fitting correctly)but paint masks need to fit exactly (as should decals).

However, the area to be painted isn't massive and I am fairly confident that I can do the checkers for the Tiffie. I will be doing the shark mouth so I need to do the checkers.


Quoted Text

The tedious part would actually be the measuring - because it's a complex curve and you would want it to be a perfect checkerboard all the way around without having an obvious stop at the bottom of the fuse. I know people have built big beautiful doll and a lot of checker tail P-40s and such so it's not impossible.
Matt


Once I know the size of the individual "square" it is then a matter of getting the angle of the taper correct in both axis. It is actually fairly easy to mask with thin strips of Tamiya tape, but you can only paint half the darker squares at one time. Squares and diamonds for tail surfaces though are easy peasy, as they are flat surfaces and therefore are not compound curves (apart from the very forward edge of the aerofoil and therefor the very last check in each row)

I did say earlier that I would post an update in a day or two; sorry but very good tings have been happening which I needed to respond to, that is apart from my Youngest daughters wedding coming up, so I have not got around to taking pictures. I have moved forward though and I have got most of the detail painting done on the cockpit parts, but I am still finding more to do I am off to the Armed forces day in Pool today where Martin of T7 models will be and yesterday he emailed me to say that the 1/32 Revell Spitfire MkII had arrived, so I will be picking up 2 of these I will try and take some picks of the Tiffie later today
Scrodes
_VISITCOMMUNITY
Ontario, Canada
Joined: July 22, 2012
KitMaker: 771 posts
AeroScale: 763 posts
Posted: Saturday, June 21, 2014 - 02:26 PM UTC
That's about what I figured - I even went as far as to try and find a Monogram Tiffie with those markings, but to no avail.

I thought the same thing you do - that it could be done with a masking tape lattice, painting the dark squares in two stages.

Edit - I figured it would be easy figuring out the size of the squares by comparing them to the serial number which is a standard size.
Holdfast
Staff MemberPresident
IPMS-UK KITMAKER BRANCH
#056
_VISITCOMMUNITY
England - South West, United Kingdom
Joined: September 30, 2002
KitMaker: 8,581 posts
AeroScale: 4,913 posts
Posted: Saturday, June 21, 2014 - 06:28 PM UTC

Quoted Text

Edit - I figured it would be easy figuring out the size of the squares by comparing them to the serial number which is a standard size.


Yes they are about 4" but like I said they are not square
Joel_W
Staff MemberAssociate Editor
AUTOMODELER
_VISITCOMMUNITY
New York, United States
Joined: December 04, 2010
KitMaker: 11,666 posts
AeroScale: 7,410 posts
Posted: Sunday, June 22, 2014 - 03:43 AM UTC

Quoted Text


Quoted Text

Edit - I figured it would be easy figuring out the size of the squares by comparing them to the serial number which is a standard size.


Yes they are about 4" but like I said they are not square


Mal,
They sure look square to these old worn out eyes. So then how would you figure out the correct size?
Joel
Scrodes
_VISITCOMMUNITY
Ontario, Canada
Joined: July 22, 2012
KitMaker: 771 posts
AeroScale: 763 posts
Posted: Sunday, June 22, 2014 - 05:12 AM UTC

Quoted Text


They sure look square to these old worn out eyes. So then how would you figure out the correct size?
Joel


It's a dark magic that our parents would prefer we not know.
Holdfast
Staff MemberPresident
IPMS-UK KITMAKER BRANCH
#056
_VISITCOMMUNITY
England - South West, United Kingdom
Joined: September 30, 2002
KitMaker: 8,581 posts
AeroScale: 4,913 posts
Posted: Sunday, June 22, 2014 - 07:11 PM UTC

Quoted Text

Mal,
They sure look square to these old worn out eyes. So then how would you figure out the correct size?
Joel


As the fuselage tapers then they can't be square, the front and rear sides will be parallel but the top and bottom ones will taper to varying amounts depending on their position on the fuselage. To work, each individual piece must fit precisely and they must fit exactly around the fuselage and the top and bottom lines need to be in the same plane as the centre line of the fuselage. These will be very much easier than the P-47 or P-51 cowling checkers. I'll try and remember to post pictures of how I achieve this

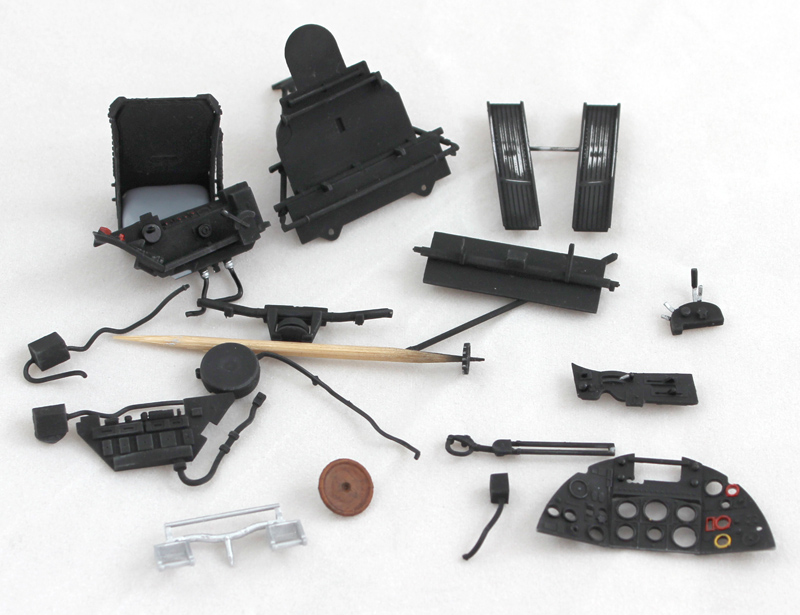
And now a small update:

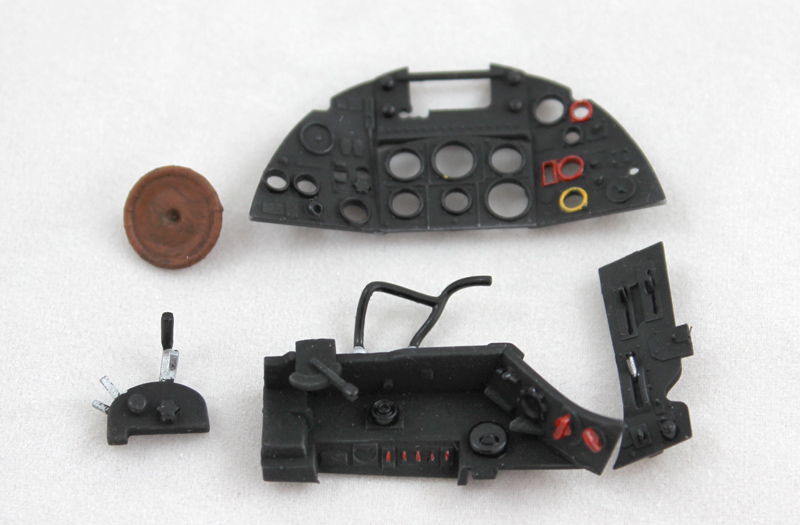
This doesn't look like much but I have quite a lot on my plate at the moment and what you see here has moved on a little and it won't be long before I can start adding these parts into the model.

I sprayed these parts with Tamiya matt black Which I won't do ever again as it took ages to clean my air brush! I then dry brushed using a dark grey. Black knobs and switches, and the instrument bezels were picked out using semi gloss black (this doesn't show up very well in my pictures). In reality this looks better than heavily dry brushed detail, especially silver! dry brushing. Well that is my opinion A couple of switches and bezels were picked out in red and one bezel in yellow. For the warning lights in the starboard console I painted them silver then Tamiya clear red. The cables from the console were painted gloss black and the connections silver; I have since painted the rest of the cables. The seat needs to be painted medium sea grey. The trim wheel was painted Humbrol leather then given a thinned streaked layer of burnt umber oil paint, to give it that brownish orangey streaky look.


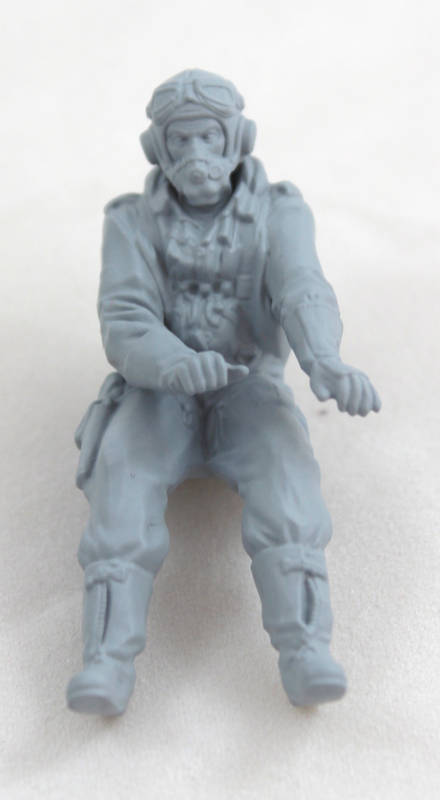
Steve Budd sent me the pilot figure from his kit as he didn't use him and I want to try and have my pilot figure with his goggles over his eyes, as he would if actually flying. I am using Steve's figure as it is cleaned up and primed, mine will donate the goggles over the eyes. This isn't that difficult, I did it for the pilot in my in flight Jet Shinden. The difficulty is going to be the angled lenses, which I might just have to ignore?


Joel_W
Staff MemberAssociate Editor
AUTOMODELER
_VISITCOMMUNITY
New York, United States
Joined: December 04, 2010
KitMaker: 11,666 posts
AeroScale: 7,410 posts
Posted: Sunday, June 22, 2014 - 11:11 PM UTC
Mal,
I'm assuming that you're referring to the Tamiya FX-1 Flat Black acrylic paint that gave you all sorts of issues trying to clean your airbrush. The only way that I've been able to effectively, quickly, and completely clean my AB after using Tamiya, or for that matter most Acrylic paints is to use plain old run of the mill, store bought, cheap Lacquer cleaner.

My exact method won't work for you because my AB of choice is the Paasche-H external mix gun, so I only have to deal with a short/small needle, cone, and cup, all of which fits neatly into a small jar that holds a few oz. of lacquer cleaner. Then I use a pipe cleaner with LC to complete the cleaning both inside and out of each part. Dry off with compressed air from the gun. Total time, less then 5 min max.

When I just want to change colors, I just clean the cup, open up the needle & Cone to max, and in a min they're dry of that color. Add a few drops of LC to the cup and shoot it through. Maybe 2-3 min top.

Another big advantage of an external mix to a internal mix Airbrush.

Joel
Scrodes
_VISITCOMMUNITY
Ontario, Canada
Joined: July 22, 2012
KitMaker: 771 posts
AeroScale: 763 posts
Posted: Monday, June 23, 2014 - 06:13 AM UTC
I'm actually surprised to hear that people have had a hard time painting xf-1, I've never had a problem with Tamiya paints. I have recently (within the past few years) discovered (heard from Spencer Pollard) that you can thin them with Tamiya's Lacquer Thinner. I hate spraying anything else now. They cut so nicely and they dry as fast as you can spray them. I wouldn't use any lacquer other than Tamiya's to thin for airbrushing because Tamiya Lacquer thinner is especially mild and designed for this purpose.


I agree with not drybrushing with silver or any other starkly different colour. What I prefer is Tamiya's magical XF-69 Nato Black instead of XF-1 as the base colour. It's a scale black right out of the bottle and then you can drybrush with a dark gray and wash with a black. Alternatively if I use a proper black for a base colour, I'll drybrush with Nato black.


Your progress looks good. I'm excited to watch this all come together. Now back to my Mosquito.
robot_
_VISITCOMMUNITY
United Kingdom
Joined: March 08, 2009
KitMaker: 719 posts
AeroScale: 691 posts
Posted: Monday, June 23, 2014 - 06:43 AM UTC
Mal, if you can't face the chequers, the Typhoon you're modelling flew during wartime operations without the fuselage band (post Jan '45, so no Sky band), but with the shark mouth. It got the blue spinner and chequered band post-war.
Gremlin56
Joined: October 30, 2005
KitMaker: 3,897 posts
AeroScale: 564 posts
Posted: Monday, June 23, 2014 - 07:02 AM UTC
Beautiful work on the cockpit Mal. The pilot figure is a quality quantum leap compared to the pilots provided in Airfix's first 1/24th offerings,(the 109E and their very first big Spitfire).
Merlin
Staff MemberSenior Editor
AEROSCALE
#017
_VISITCOMMUNITY
United Kingdom
Joined: June 11, 2003
KitMaker: 17,582 posts
AeroScale: 12,795 posts
Posted: Monday, June 23, 2014 - 07:18 AM UTC
Nice work Mal !

As Matt has noted, Tamiya paints spray really well with cellulose (lacquer) thinners - I wouldn't use anything else with them, as it also gives a bit more "bite" and durability. I actually don't bother with their own brand thinners (although it may well have added advantages) - any cellulose thinners has worked fine for me.

All the best

Rowan
Joel_W
Staff MemberAssociate Editor
AUTOMODELER
_VISITCOMMUNITY
New York, United States
Joined: December 04, 2010
KitMaker: 11,666 posts
AeroScale: 7,410 posts
Posted: Monday, June 23, 2014 - 08:51 AM UTC
Matt,
I believe Mal's issue was cleaning his gun, not shooting Tamiya FX-1. Like you, I read that Tamiya's yellow cap Lacquer Thinner does an outstanding job of thinning their acrylic paints. I've been using it for sometime. It's much to expensive to use for cleaning one's airbrush.

I still have more then enough X20-A for odd jobs that will literally last me a life time.

I also prefer Nato black for the scale effect. For tires I mix Nato Black with Dark Gray.

For dry brushing I've switched off from silver and Aluminum to med to light grays. I do use Silver for dry brushing flat Aluminum.

Joel