Thank you Rowan and Joel,
well, after having the Defiant and Bf 109G-4 done, I had rather preferred to start or pick up something in a diffewrent state of completion, to have a change to decalling the Bf 109G-5. BUT I have only 2 weekends left before our annual show in Berlin. So to have a chance to finish it the project has to be advanced. I have added a few decals yesterday and only about 6 stencils left so the end of decalling is near.
As for finishing old projects ... you know me, I put them back in teh stash but also take them on again. I have several that I would love to finish during my vacation in a few weeks but I also want to start one or another difficult project. Revell Ventura and Eduard F-4C are on top of my list at the moment ... and I have a bunch of Aftermarket for both of them.
I'd like to take the Su-7 to the finish line but I am waiting for Kenny Loops (aka Gator) masks at the moment (have not heard from him in over 2 moths .. hope everything is o.k.). And then there ist Il-2, Bf 110D Nichtfighter and Bf 110 E (which is pretty much done, but not "done!"), Turbo Porter, F-22, Mirage F.1, KAI T-50 ... just took a photo of my Ju 87B (Italeri) a few days ago
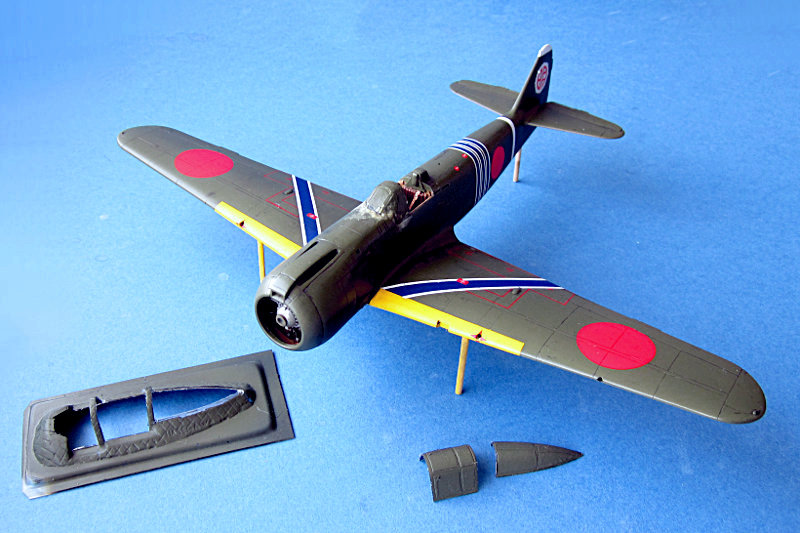
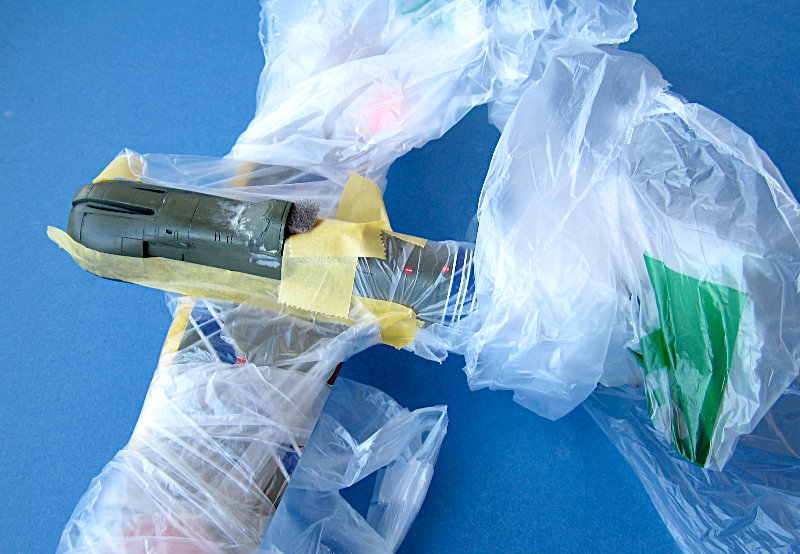
I do not even remember if I ever had a build log for this one. (I have no replacement canopy for the short shot kit part and masking the fuselage splinter is no fun).
all the best
Steffen
Hosted by Rowan Baylis
Kawasaki Ki 100-I Otsu - Hasegawa 1/48
Posted: Saturday, August 06, 2016 - 12:49 PM UTC
Posted: Saturday, August 06, 2016 - 05:52 PM UTC
Hi again
I have added the last decals this morning. After my usual wash procedure I have flat coated the model as the canopy. Then I cut out the vac parts. I am really not good at this, but luckily it went o.k. Still I had to fill sime minor gaps and steps with putty (Gunze) I smoothed the area with Levelling thinner.
now I have put it away to dry.
all the best
Steffen
Posted: Saturday, August 06, 2016 - 10:09 PM UTC
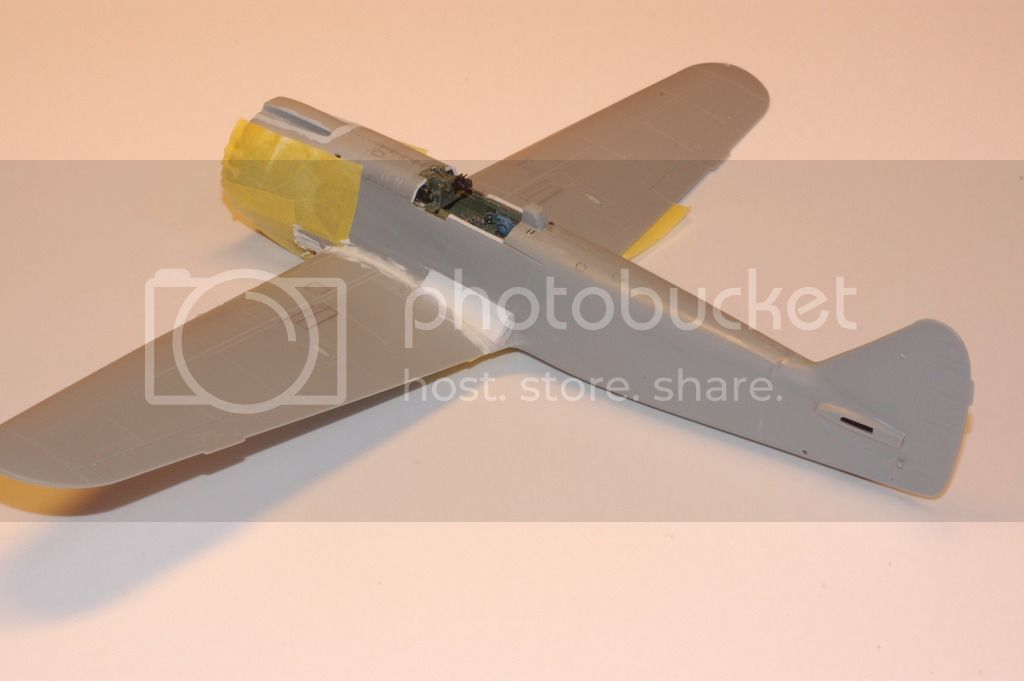
ready for repainting
all the best
Steffen
all the best
Steffen
Joel_W
Associate Editor
New York, United States
Joined: December 04, 2010
KitMaker: 11,666 posts
AeroScale: 7,410 posts
Joined: December 04, 2010
KitMaker: 11,666 posts
AeroScale: 7,410 posts
Posted: Sunday, August 07, 2016 - 10:07 PM UTC
Steffen,
The decaling continues to look outstanding.
I'm more then impressed with how you cut out your vacuum canopy sections. I still remember trying to get it right when I bought the Squadron replacements for the Hasegawa SBD-3 Dauntless.
Read through your difficult list. As you know I built the 1/48 Revell PV-1 Ventura as it's another weird personal favorite of mine. Yet, I think I'd vote for the RAF F-4C as I've built the Academy F-4B as well. It's a tremendous kit, and you would not only enjoy the build, but with the after market included in the Eduard version, just bring it to another level. I'm still waiting for the ZM F-4s to finally be released.
Joel
MS406C
Landes, France
Joined: May 22, 2008
KitMaker: 100 posts
AeroScale: 85 posts
Joined: May 22, 2008
KitMaker: 100 posts
AeroScale: 85 posts
Posted: Sunday, August 07, 2016 - 10:56 PM UTC
Hello Stefan. I just find your built right now and a little bit of research would have helped you to avoid some mistakes. First of all at the time of the built of the Ki-100 otsu, the directives of the JAAF were to simplify and harmonize things a little bit and so, all cockpit area , wheel wells, propellers, both side of landing gear covers and drop tanks were to be painted yellow-green #7(a close call to olive drab) so no light sand here. Then on your rear deck cockpit you have to drill the accesses to the fuel tank n°3 and to the water methanol tank.(picture on page 26 of Aero detail n°32)a point totally missed by Hasegawa. The last point is certainly the most difficult one: Hasegawa gives the wings of a Ki-61 to be glued to the body of the Ki-100, but with the new fuselage, the Karman was completely different and the shape was not the same than a Ki-61!Concerning the Kawasaki green you have used, it is a too light shade when compared to the #7 yellow-green, which is an olive drab. A second color was used on those planes too, some sources saying they were painted in charcoal grey, but more certainly a very dark shade of green, close to the Nakajima's one. Sorry to come so late to the rescue! Best regards, jean;
Posted: Monday, August 08, 2016 - 01:47 AM UTC
Cheers Jean,
many thanks for taking the time to respond in such detail! (one or another paragraph would have been nice though )
1. This whole camouflage and markings is based on the recollections of Maj. Hinoki so I do not worry too much about beeing 100% correct (no photos exist)
1a. I based my kit mainly on Lifelikes instructions but as you wrote I mistook the colour there for a green instead of OD (the darker type not so much faded as yours) I think with the flat coat on it looks o.k. though. Hinoki also remembered a number on the lower tail and gear doors but it is unclear which so theese will be missing on mine too.
2. inside colour: too true, but not changeable (it is explained on the 2nd Lifelike sheet, but I missed that)
3. I do not understand this:
...I applied the two decals from the Lifelike sheet, do you mean these?
4. what is the difference between the wings?
5. ... I'll keep the black for my Ki 84
all the best
Steffen
many thanks for taking the time to respond in such detail! (one or another paragraph would have been nice though )
1. This whole camouflage and markings is based on the recollections of Maj. Hinoki so I do not worry too much about beeing 100% correct (no photos exist)
1a. I based my kit mainly on Lifelikes instructions but as you wrote I mistook the colour there for a green instead of OD (the darker type not so much faded as yours) I think with the flat coat on it looks o.k. though. Hinoki also remembered a number on the lower tail and gear doors but it is unclear which so theese will be missing on mine too.
2. inside colour: too true, but not changeable (it is explained on the 2nd Lifelike sheet, but I missed that)
3. I do not understand this:
Quoted Text
Then on your rear deck cockpit you have to drill the accesses to the fuel tank n°3 and to the water methanol tank.(picture on page 26 of Aero detail n°32)a point totally missed by Hasegawa.
...I applied the two decals from the Lifelike sheet, do you mean these?
4. what is the difference between the wings?
5. ... I'll keep the black for my Ki 84
all the best
Steffen
Posted: Monday, August 08, 2016 - 01:53 AM UTC
Thank you Joel!
I am not very experienced with vacu and I am no fan of this meterial, but it is better than the on piece kit part. I used my trusty hypercut saw 0,1mm and a new scalpel blade, slowly scoring the cut lines several times.
Hmm, so the F-4C jumps up the schedule .. btw I have a sh..load of more aftermarket for this than just the kit. Luckily I also got the Academy kit decals for Robin Old's "Scat" (just the 4 or 5 I need) ... hope I ruin nothing.
thanks again
Steffen
MS406C
Landes, France
Joined: May 22, 2008
KitMaker: 100 posts
AeroScale: 85 posts
Joined: May 22, 2008
KitMaker: 100 posts
AeroScale: 85 posts
Posted: Monday, August 08, 2016 - 05:41 PM UTC
Hello Steffen; It means that right behind the headrest you will find the fill access to the tank n°3 and for the water methanol. Hasegawa has just forgot those! There is no difference with the wings but with the karman. because of the adaptation of a new engine the fuselage lines had to be changed and the karman is very much different on the Ki-100 than on a Ki-61. This is often overlooked by modelers. Have a good time Steffen.
Here are two pics of my WIp to explain my points:
Posted: Monday, August 08, 2016 - 10:59 PM UTC
Many thanks Jean! The pictures help a lot to understand!
I really appreciate your input !!!
.. even though I can't do much on my model and to be honest I also do not want to for this one. It is more or less a fun model although it took so long.
One day there will be a good 48 scale model of the Ki 100, the Ki 44 (which has a similar problem) and the Ki 43 ... of course these will have other fatal flaws
all the best
Steffen
MS406C
Landes, France
Joined: May 22, 2008
KitMaker: 100 posts
AeroScale: 85 posts
Joined: May 22, 2008
KitMaker: 100 posts
AeroScale: 85 posts
Posted: Tuesday, August 09, 2016 - 03:53 PM UTC
No problemo Steffen! But May I suggest next time to do some inquiries first! I will be delighted in helping, Have a great day!
Posted: Tuesday, August 09, 2016 - 08:14 PM UTC
Cheers Jean ... just check in earlier next time
I always have my mistakes at every kit and I have to live with that. Sometimes it is more obvious ... not to say glaring
BTW the lack of updates is due to my uncooperative compressor. Hope it is just the lack of oil...
all the best
Steffen
I always have my mistakes at every kit and I have to live with that. Sometimes it is more obvious ... not to say glaring
BTW the lack of updates is due to my uncooperative compressor. Hope it is just the lack of oil...
all the best
Steffen
Posted: Thursday, August 18, 2016 - 11:16 PM UTC
O.k. so here we go again.
Luckily the compressor issue was fixed with a bit of oil (was the first time I had to add some in 20+ years ... knock on wood)
I have checked the drawings in Maru Mechanic and I do not see the wing issue Jean mentioned .. it is probably just me so in case anyone wants to build this kit: check for yourself!
Lost a week due to the compressor but I proceeded a little since, so here is how it looks now:
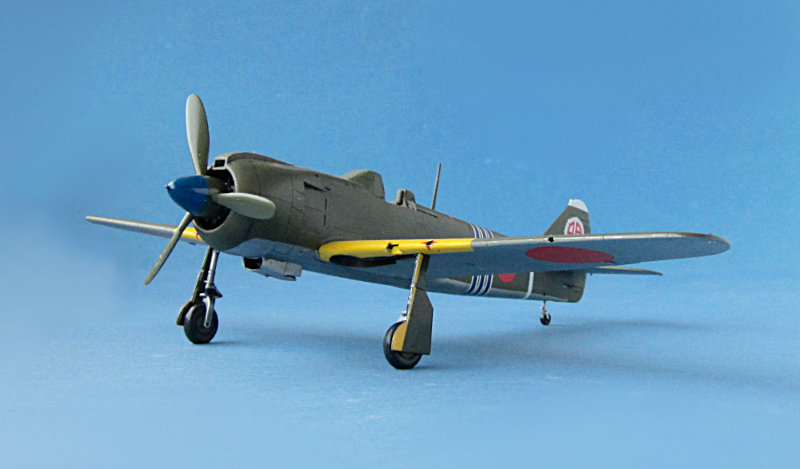
u/c bays painted top side color, undercarriage added, antenna mast added, prop painted and added .. new parts still need to be airbrushed flat
all the best
Steffen
Joel_W
Associate Editor
New York, United States
Joined: December 04, 2010
KitMaker: 11,666 posts
AeroScale: 7,410 posts
Joined: December 04, 2010
KitMaker: 11,666 posts
AeroScale: 7,410 posts
Posted: Friday, August 19, 2016 - 01:56 AM UTC
Steffen,
Glad to see that you've solved your compressor issues with just a little oil. Latest update pictures really do look quite nice. You're making excellent progress.
My only question/concern is the clear lenses for the leading edges of the wings. Mine never fit well enough to leave them for after painting as a final step.
Joel
Posted: Friday, August 19, 2016 - 11:55 AM UTC
Thank you Joel,
you are probably right about the clear part fit .. I will test this today. Still I think (and hope) this is only a minor thing.
all the best
Steffen
you are probably right about the clear part fit .. I will test this today. Still I think (and hope) this is only a minor thing.
all the best
Steffen
Posted: Friday, August 19, 2016 - 06:38 PM UTC
Fitting the clear part was no problem .. it had quite a bit of flash though, which was not nice on such a small part.
First I removed the paint and decal with a sharp scalpel, then used the motor tool with a round burr to make a circular indention a bit of filler for some gaps all painted silver in the end. A small black dot simulates the bulb (not so visible in the picture) and finally the clear part attached with Gators Glue.
all the best
Steffen
Posted: Saturday, August 20, 2016 - 07:42 PM UTC
Some more things done today,
As you might have seen in the previous post I have glued on the rear canopy (cyanacrylate) and slightly reworked the transition, I have added some small parts like the intake below the windscreen, and the pitot), some touch ups with paint and then some more flat XF-86, the inner gear doors were added though I am not sure these should really be dark on the outside. Finally the sliding part of the canopy was added. I have checked teh pictured available and these show no exhaust stains. Thus I just added some heat discolouration in a blackish brown.
all the best
Steffen
Joel_W
Associate Editor
New York, United States
Joined: December 04, 2010
KitMaker: 11,666 posts
AeroScale: 7,410 posts
Joined: December 04, 2010
KitMaker: 11,666 posts
AeroScale: 7,410 posts
Posted: Tuesday, August 23, 2016 - 12:28 AM UTC
Steffen,
Every post gets you closer the finish line, and your Ki-100 is really looking quite good.
Joel
Every post gets you closer the finish line, and your Ki-100 is really looking quite good.
Joel
Posted: Tuesday, August 23, 2016 - 08:19 PM UTC
Thank you Joel! Your engouragement is much appreciated!!
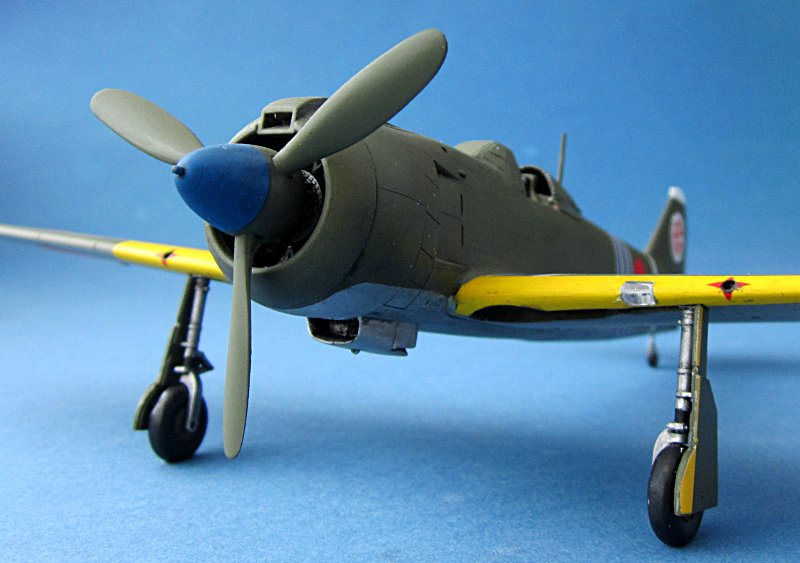
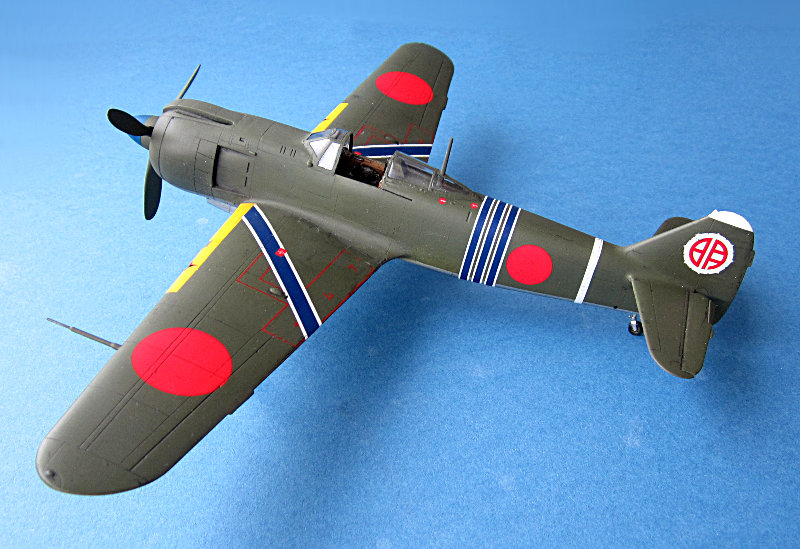
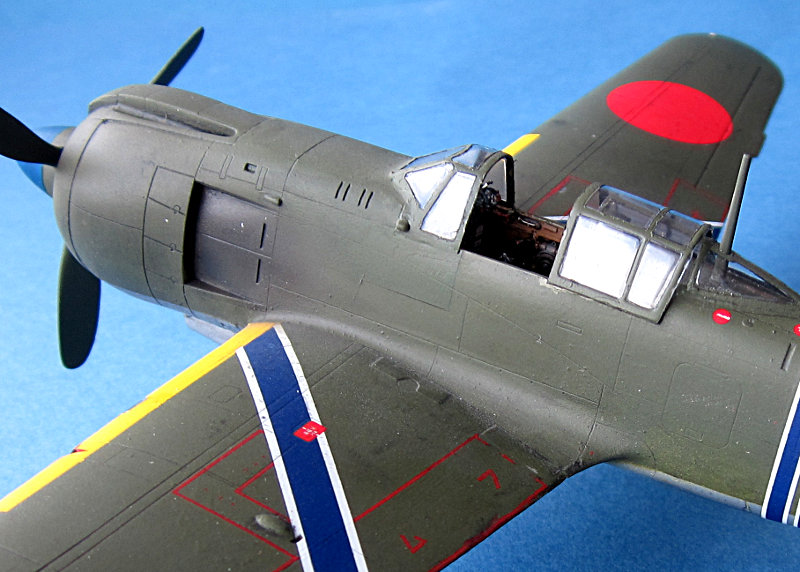
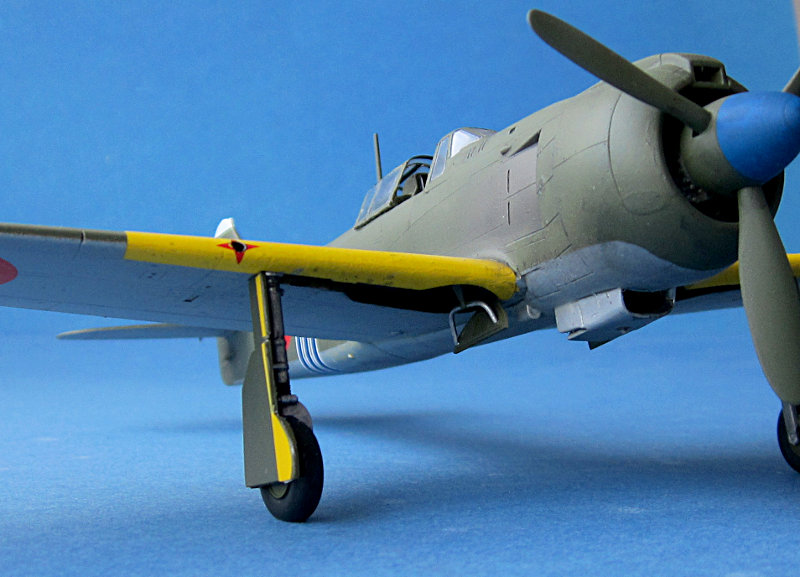
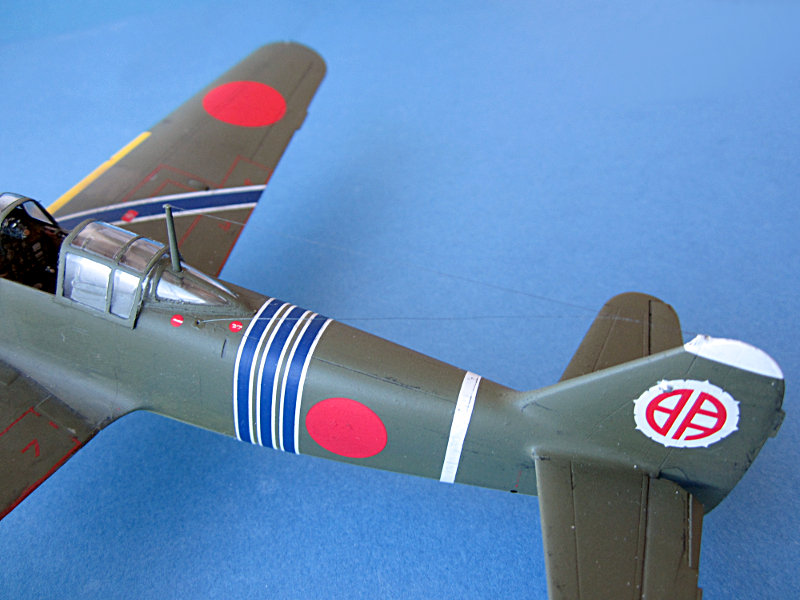
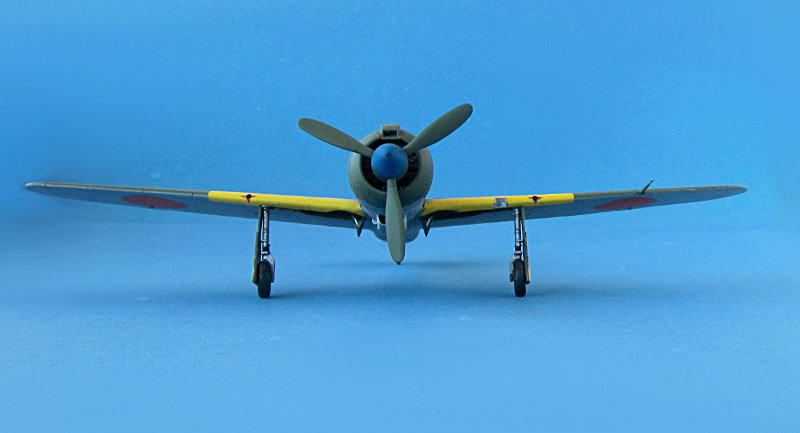
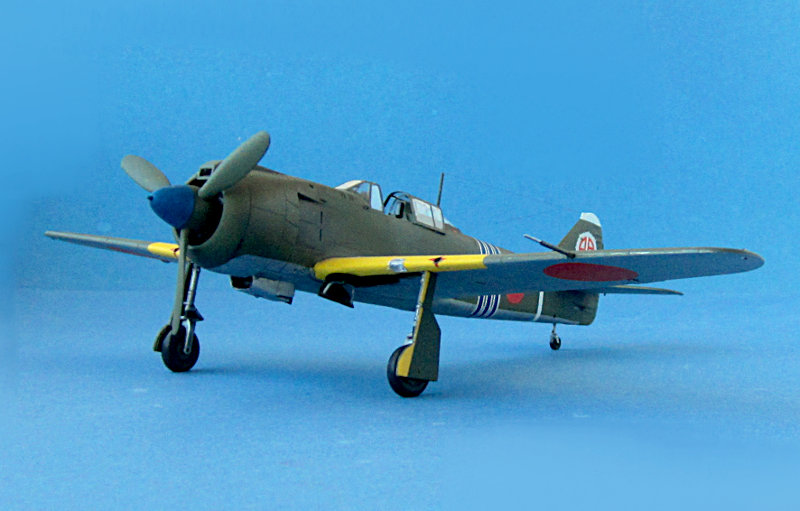
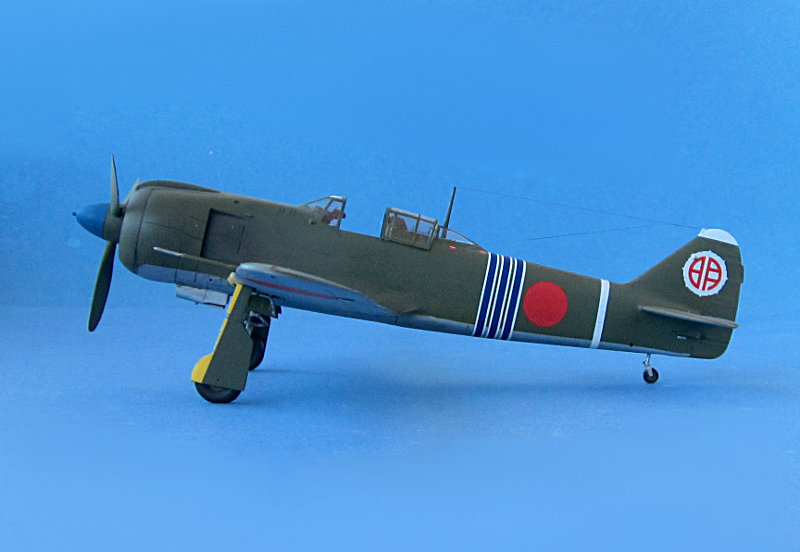
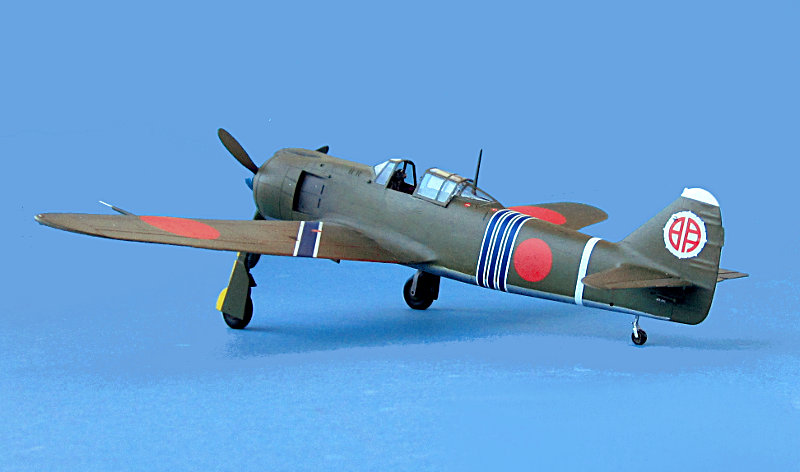
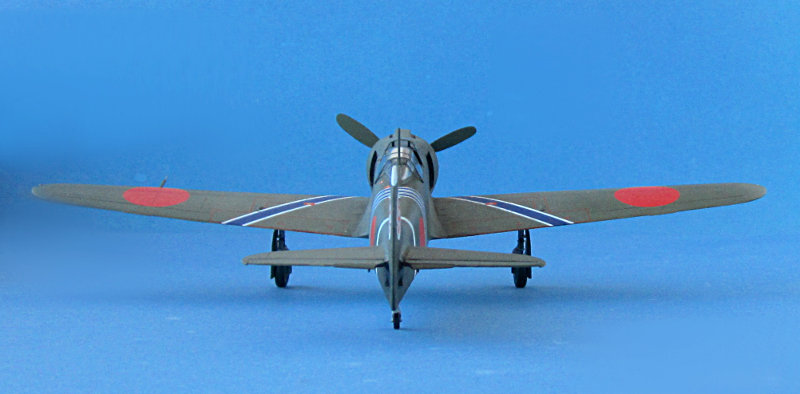
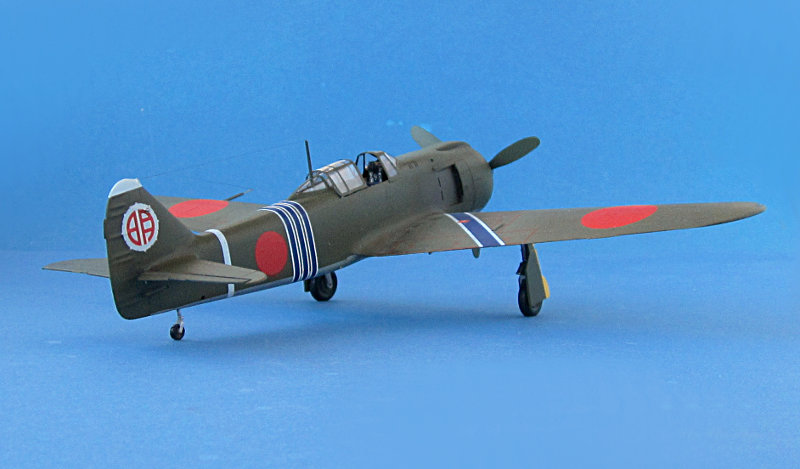
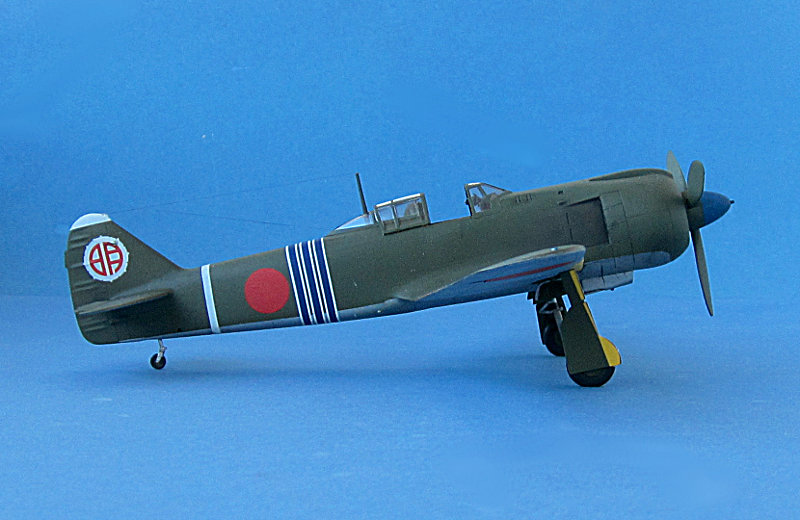
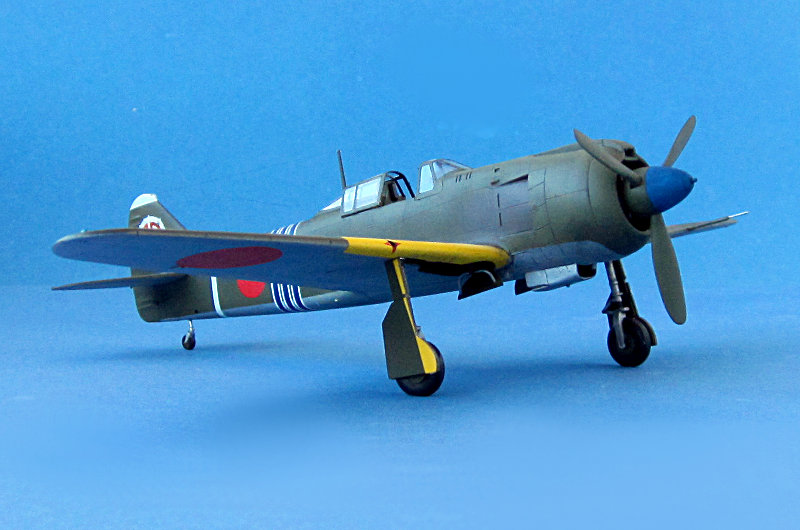
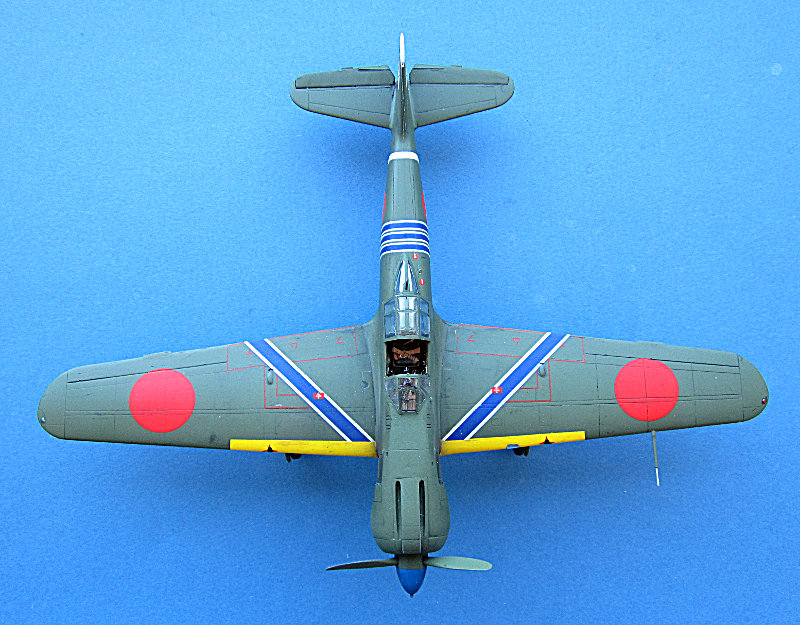
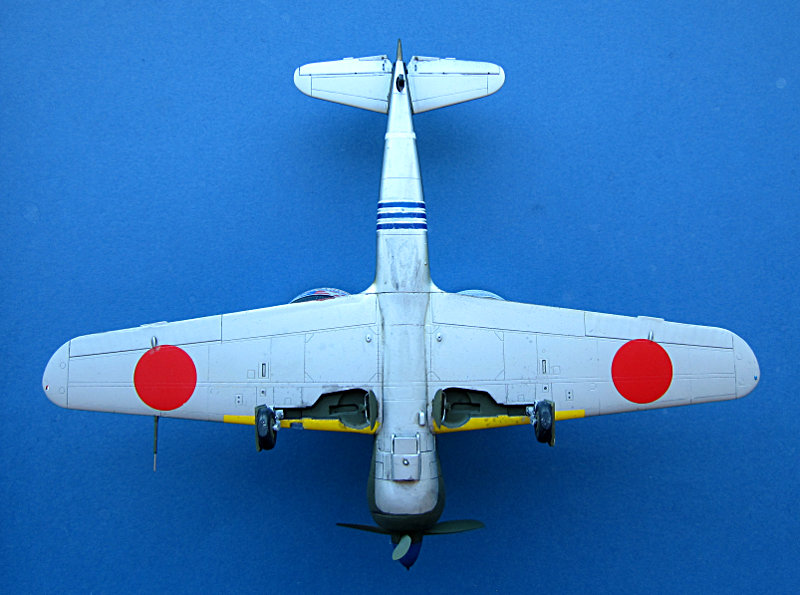
Seems interest is rather low at the moment. Well, nonetheless I have made some more progress: position lights are painted and I have added the antenna wires. The horizontal is UvdR rigging thread fine and the diagonal one is streched sprue.
Except I have forgotten something this thing is done.
10pix WA will follow later when I have trimmed the pictures.
all the best
Steffen
Posted: Tuesday, August 23, 2016 - 08:41 PM UTC
Steffen,
Wow, I'm late to the party.
You go, Man! I'll watch anyway.
Wow, I'm late to the party.
You go, Man! I'll watch anyway.
Posted: Tuesday, August 23, 2016 - 10:23 PM UTC
Cheers Fred,
yes you are pretty late, as I am done now (errors and omissions excepted)
Here are the ten pictures. Quality is not as good as I would have liked .. maybe time for a new camera.
all the best
Steffen
yes you are pretty late, as I am done now (errors and omissions excepted)
Here are the ten pictures. Quality is not as good as I would have liked .. maybe time for a new camera.
all the best
Steffen
BlackWidow
European Union
Joined: August 09, 2009
KitMaker: 1,732 posts
AeroScale: 1,336 posts
Joined: August 09, 2009
KitMaker: 1,732 posts
AeroScale: 1,336 posts
Posted: Wednesday, August 24, 2016 - 12:16 AM UTC
Steffen, your camera may have some issues, your Ki-100 surely hasn't. At least not to me and I'm pretty sure that Yohei Hinoki will have a smile on his face when he looks down on your model. Great result on this oldie and a good paint- and decal job!
Torsten
Torsten
Posted: Wednesday, August 24, 2016 - 12:50 AM UTC
Vielen Dank Torsten!
Wie schon oben geschrieben: die Bemalung ist zumindest unvollständig (Zahlen an Fahrwerksklappen und Leitwerk) und wahrscheinlich auch in einigen Punkten falsch ... aber es gibt leider kein Foto. Hat trotzdem Spaß gemacht und mir gefällt das Modell (insbesondere auch der grüne Farbton).
viele Grüße
Steffen
Joel_W
Associate Editor
New York, United States
Joined: December 04, 2010
KitMaker: 11,666 posts
AeroScale: 7,410 posts
Joined: December 04, 2010
KitMaker: 11,666 posts
AeroScale: 7,410 posts
Posted: Wednesday, August 24, 2016 - 02:08 AM UTC
Steffen,
Another one in the books. Overall I completely agree with Torsten that your build, paint, decaling, weathering all added up to a excellent build.
So what's next up on your most prolific workbench?
Joel
Another one in the books. Overall I completely agree with Torsten that your build, paint, decaling, weathering all added up to a excellent build.
So what's next up on your most prolific workbench?
Joel
Emeritus
Uusimaa, Finland
Joined: March 30, 2004
KitMaker: 2,845 posts
AeroScale: 1,564 posts
Joined: March 30, 2004
KitMaker: 2,845 posts
AeroScale: 1,564 posts
Posted: Wednesday, August 24, 2016 - 04:55 AM UTC
Another good one from you! I've always liked the no-nonsense lines of the Ki 100. Reminds of late-war German plane aesthetics, it's got that somewhat similar feel as the Fw 190. Probably tied to how to the Japanese realized the need for faster, more heavily armed and armored fighters.
Posted: Wednesday, August 24, 2016 - 04:50 PM UTC
Many thanks Joel and Eetu!!
@ Joel: not sure yet, I have 3 weeks vacation so I will probably find something. At the moment I am a bit itchy about the P-40Cs, I have everything for the Bronco and the Airfix is on the doorstep next week.
Plus one or another old project (Bf110D, Il-2) and I hope to start(F-4C, Ventura) or proceed (Pe-2) with a more complex project...
if only my hands would work as fast as my mind I might have a chance to complete my stash in my lifetime....
cheers
Steffen