

World War II
Discuss WWII and the era directly before and after the war from 1935-1949.
Discuss WWII and the era directly before and after the war from 1935-1949.
Hosted by Rowan Baylis
1/32 Czech FA2-3 Buffalo

jimmaas
Joined: January 11, 2007
KitMaker: 6 posts
AeroScale: 5 posts
KitMaker: 6 posts
AeroScale: 5 posts
Posted: Tuesday, May 19, 2015 - 04:37 AM UTC
I'd love to know the source for a Brewster at Malta (so Faith, Hope and Charity were joined by Desperation?). There were ex-Belgian Brewster Model 339B's in Egypt (one shot down by a Bf-109) and a couple on Crete. Serials were in the AS410-37/AX811-20 and BB450 range, though this also included the six abandoned on Martinique and never delivered. Some went to the UK where they were used briefly by 71 Eagle Squadron. Of note for modellers, the Belgian aircraft had a single camouflage pattern (unlike the British order which had 'A' and 'B' patterns) and the wing insignia were further inboard than their Model 339E counterparts.
Joel_W

Joined: December 04, 2010
KitMaker: 11,666 posts
AeroScale: 7,410 posts
Posted: Monday, May 25, 2015 - 03:04 AM UTC
Work has continued on the cockpit and fuselage sides. I've finally finished detailing both fuselage halves, as well as the various cockpit sub assemblies.
Mal and Rowan, after studying cockpit pictures that Jim Maas sent me, you're both right and the control stick was drawn backwards on the instructions, so I cut it off, and reversed it.
I dry brushed the Dark Dull Green with Model Master Aluminum Metalizer, which came out better then I thought. All that is left now is to add on a dark dirty wash.

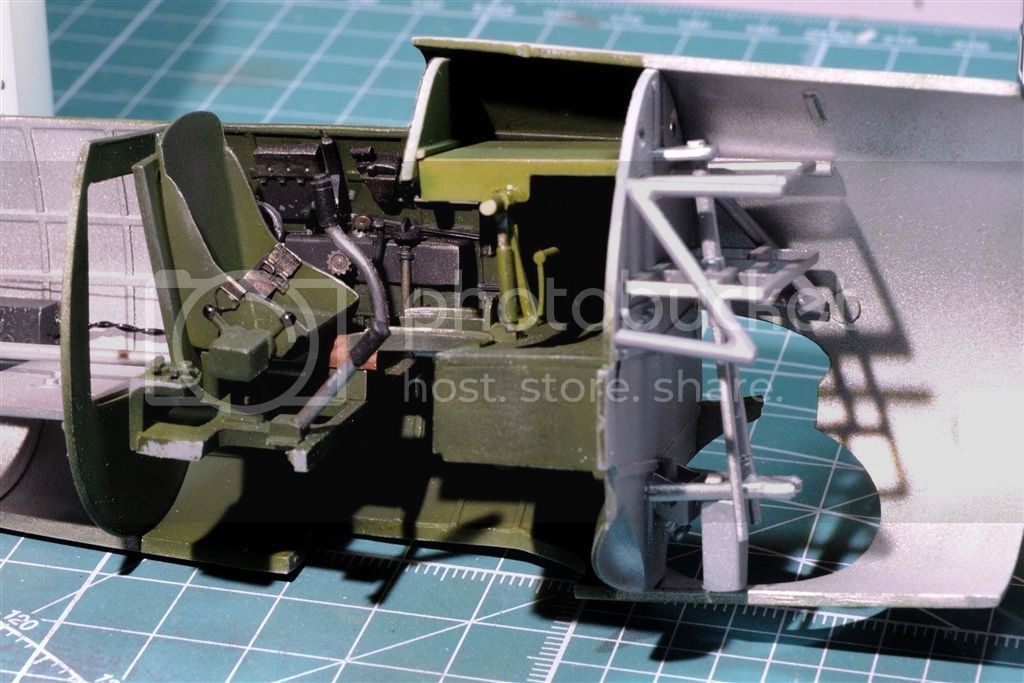
Before I can close up the fuselage halves, I have to install the MGs and ammo boxes, and the fire wall for the engine compartment.

If you look closely at the IP, you'll see that I added a home made place card to the center. It's the best that I could come up with, and once the fuselage is closed up, you'll hardly see it, let alone be able to read it.

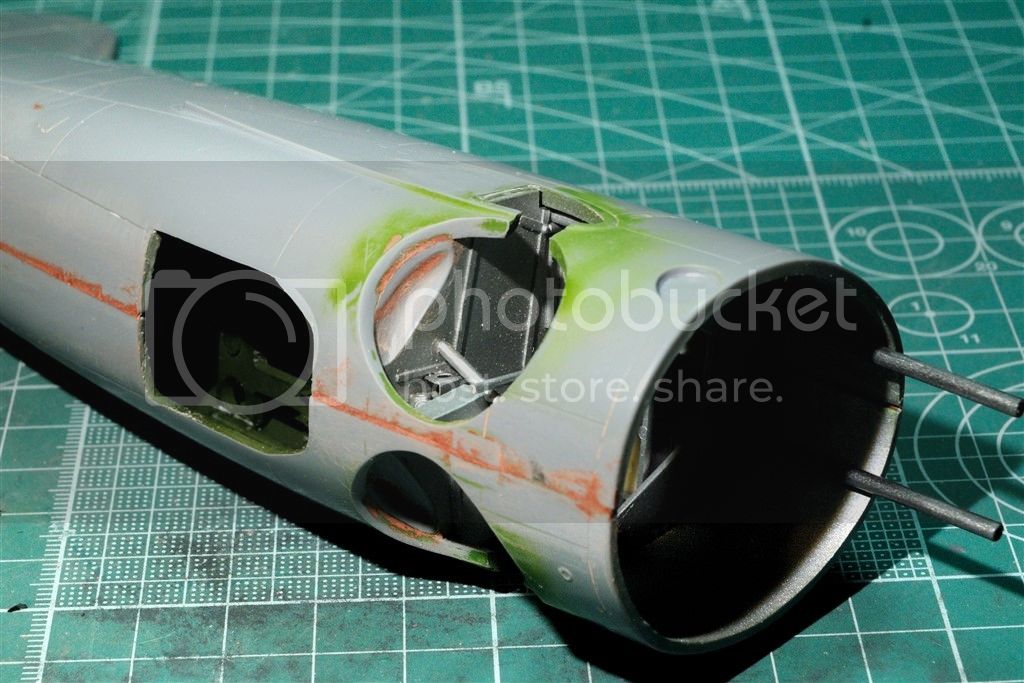
Here's a few pictures of the fuselage closed up to give you an idea of how the finished cockpit will look.


And here's a picture of the start of the gun/wheel well, engine compartment.

And now you're up to speed with my progress to date.
Joel
Mal and Rowan, after studying cockpit pictures that Jim Maas sent me, you're both right and the control stick was drawn backwards on the instructions, so I cut it off, and reversed it.
I dry brushed the Dark Dull Green with Model Master Aluminum Metalizer, which came out better then I thought. All that is left now is to add on a dark dirty wash.


Before I can close up the fuselage halves, I have to install the MGs and ammo boxes, and the fire wall for the engine compartment.

If you look closely at the IP, you'll see that I added a home made place card to the center. It's the best that I could come up with, and once the fuselage is closed up, you'll hardly see it, let alone be able to read it.

Here's a few pictures of the fuselage closed up to give you an idea of how the finished cockpit will look.


And here's a picture of the start of the gun/wheel well, engine compartment.

And now you're up to speed with my progress to date.
Joel


thegirl

Joined: January 19, 2008
KitMaker: 6,743 posts
AeroScale: 6,151 posts
Posted: Monday, May 25, 2015 - 05:53 AM UTC
Looking really good Joel !
Terri
Terri
Joel_W
Joined: December 04, 2010
KitMaker: 11,666 posts
AeroScale: 7,410 posts
Posted: Monday, May 25, 2015 - 06:11 AM UTC
Quoted Text
Looking really good Joel !
Terri
Terri,
Thanks so much for stopping by and liking what I've done to date.
Joel
Holdfast

#056

Joined: September 30, 2002
KitMaker: 8,581 posts
AeroScale: 4,913 posts

Posted: Monday, May 25, 2015 - 11:03 AM UTC
Hi Joel,
Looking good, I should be able to crack on with mine now that you have sorted out the interior colours
Assuming that the cowling front is the same, or similar, to the one in my kit have you got a solution for improving the intakes on the forward ring? I filled them, drilled and filed the filler to shape, and I think that they do look better I'll see about posting a pic.
Looking good, I should be able to crack on with mine now that you have sorted out the interior colours
Assuming that the cowling front is the same, or similar, to the one in my kit have you got a solution for improving the intakes on the forward ring? I filled them, drilled and filed the filler to shape, and I think that they do look better
I'll see about posting a pic.
Joel_W
Joined: December 04, 2010
KitMaker: 11,666 posts
AeroScale: 7,410 posts
Posted: Monday, May 25, 2015 - 06:36 PM UTC
Quoted Text
Hi Joel,
Looking good, I should be able to crack on with mine now that you have sorted out the interior colours
Assuming that the cowling front is the same, or similar, to the one in my kit have you got a solution for improving the intakes on the forward ring? I filled them, drilled and filed the filler to shape, and I think that they do look better
Mal,
I haven't really looked at those intakes other then if there is a molding seam to be dealt with at this point. So I just pulled out the cowling to look at it, and Jim Maas's book. There aren't any detail, up close and personal pics of it. But from what I can see the bottom intake has a more pronounced funnel shape then the top intake, and the kit has nothing other then a rounded opening.
I'm going to email Jim once again for his input.
Glad that I could help with the colors for the interior.
Joel
Joel_W
Joined: December 04, 2010
KitMaker: 11,666 posts
AeroScale: 7,410 posts
Posted: Tuesday, May 26, 2015 - 05:52 PM UTC
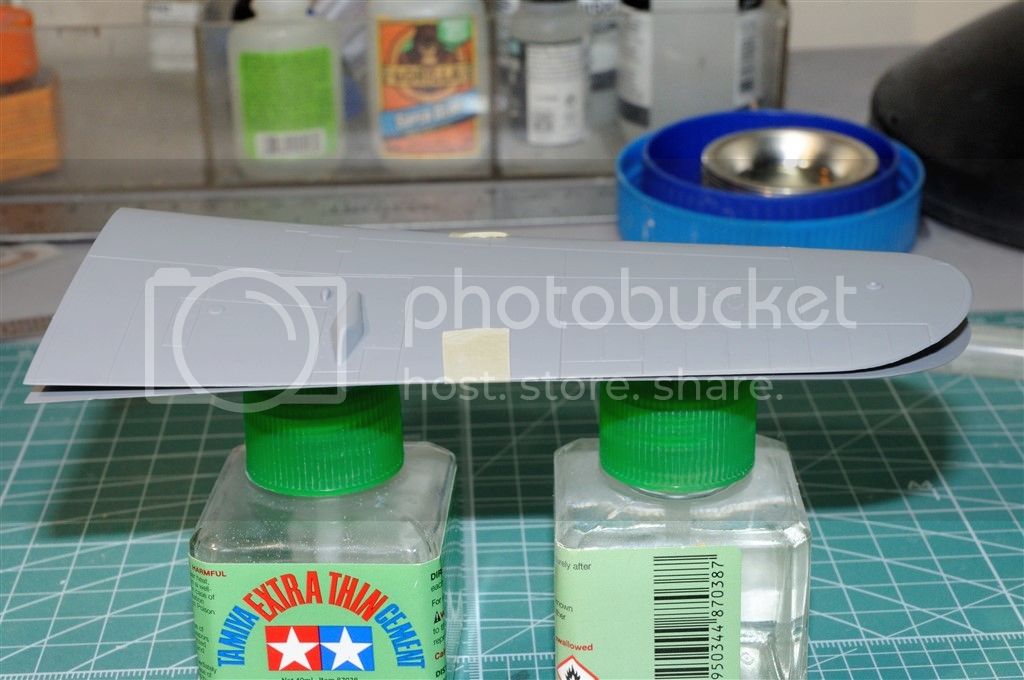
While waiting for the glued up fuselage halves to completely dry, I decided to start on the wings. They come molded as 4 pieces; two per wing, on one large sprue tree with plenty of attachment points, so they looked flat and square.
As I cut each off the sprue tree, it warped and twisted. Now I have 4 wing halves each looking contorted like they had some nervous disease. Needless to say I'm not a happy camper.
My 1st thought was to see if taping the each wing half to its mate would solve the problem. It did to some degree, but the wing tips are still badly warped, and there is some twisting in each wing half.
Later today, I'm going to try and cure their affliction by securely taping each wing half to the kitchen counter so that they lay completely flat. Then cover each of them with a rag that I'll continue to soak in boiling water several times. Then letting them cool down over a half hour or so before I remove the tape. Hopefully that will correct the issue.
Joel
Joel_W
Joined: December 04, 2010
KitMaker: 11,666 posts
AeroScale: 7,410 posts
Posted: Wednesday, May 27, 2015 - 01:12 AM UTC
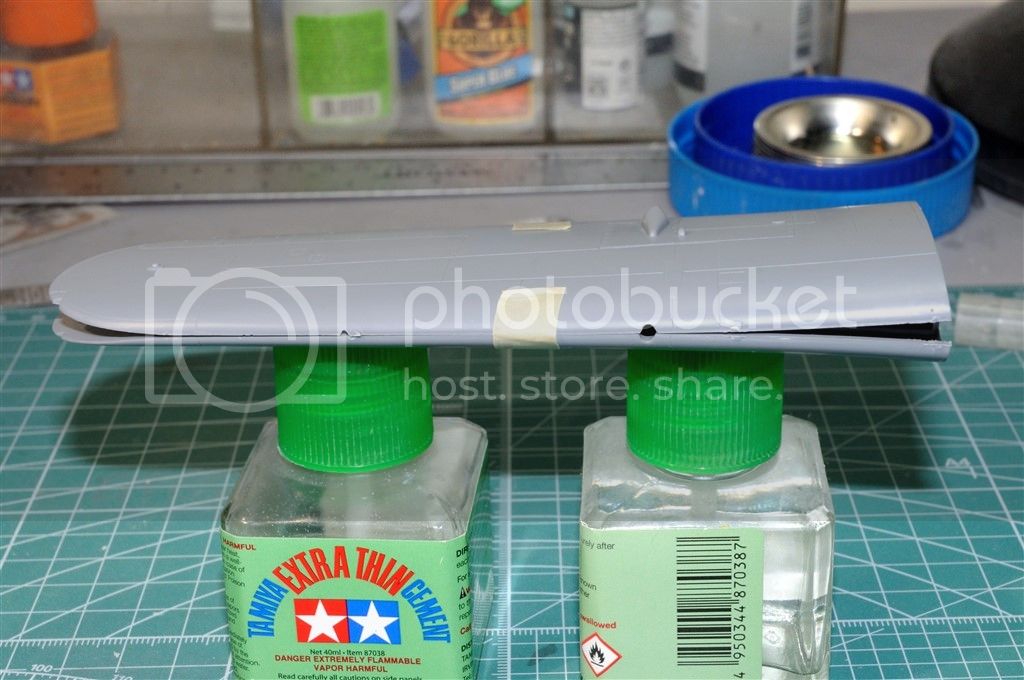
here's what the warp wings look like. Not a pretty sight.
Joel
Joel


Merlin
#017


Joined: June 11, 2003
KitMaker: 17,582 posts
AeroScale: 12,795 posts
Posted: Wednesday, May 27, 2015 - 01:20 AM UTC
Hi Joel
Welcome to the world of limited run kits!
To misquote Crocodile Dundee - "That's not a warped wing!"
Seriously, it's straight most of the length (certainly not always the case) - a clothes peg either end and you'll be sorted, (cobber).
All the best
Rowan
Welcome to the world of limited run kits!
To misquote Crocodile Dundee - "That's not a warped wing!"
Seriously, it's straight most of the length (certainly not always the case) - a clothes peg either end and you'll be sorted, (cobber).
All the best
Rowan

Joel_W
Joined: December 04, 2010
KitMaker: 11,666 posts
AeroScale: 7,410 posts
Posted: Wednesday, May 27, 2015 - 02:47 AM UTC
Quoted Text
Hi Joel
Welcome to the world of limited run kits!
To misquote Crocodile Dundee - "That's not a warped wing!"
Seriously, it's straight most of the length (certainly not always the case) - a clothes peg either end and you'll be sorted, (cobber).
All the best
Rowan
Rowan,
I could use Crocodile Dundee right about now. The warpage is actually a little worse and somewhat twisted, but the taping is keeping the centers together. There really isn't much of a straight section to play with.
I glued up the wheel wells and installed them, then using a ton of Extra Thin, I glued the wings together. I'm forcing them into shape with the exception of the wing tips with a lot of tape and spring clamps. Will let them dry for 24 hrs, then remove the clamps but leave the tape on for another 24 hrs.
If that doesn't work, then there is an excellent chance that my 1st venture into the dark world of limited run kits will be heading to my sparse "Shelf of Doom".
The only other Buffalo kit out there is the very old Tamiya 1/48 scale kit. It's a B-339 which is the export version of the F2A-2, not even a converted F2A-3, so I couldn't do the Midway version that I wanted to do with this project.
Joel

Redhand

#522
Joined: January 20, 2013
KitMaker: 1,460 posts
AeroScale: 1,443 posts
Posted: Wednesday, May 27, 2015 - 05:11 AM UTC
Quoted Text
The only other Buffalo kit out there is the very old Tamiya 1/48 scale kit. It's a B-339 which is the export version of the F2A-2, not even a converted F2A-3, so I couldn't do the Midway version that I wanted to do with this project.
Joel
Actually, no. Special Hobby makes a 1/48 F2A-3 both in Midway markings and as a Stateside trainer.
SH48032 Brewster F2A-3 Buffalo Battle of Midway
SH48098 F2A-3 Buffalo USN Trainer (w/resin & PE)
Roll Models may have it in stock. It's a little hard to find, but not out of production.

Joel_W
Joined: December 04, 2010
KitMaker: 11,666 posts
AeroScale: 7,410 posts
Posted: Wednesday, May 27, 2015 - 05:44 AM UTC
Brian,
Thanks for the information. I completely forgot about the special Hobbies kit. I believe it's a scaled down version of their 1/32 kit. Hopefully, I'll be able to pull off this minor miracle, and get the wings to the next stage.
Joel
Thanks for the information. I completely forgot about the special Hobbies kit. I believe it's a scaled down version of their 1/32 kit. Hopefully, I'll be able to pull off this minor miracle, and get the wings to the next stage.
Joel
thegirl
Joined: January 19, 2008
KitMaker: 6,743 posts
AeroScale: 6,151 posts
Posted: Wednesday, May 27, 2015 - 05:50 AM UTC
Yup , that is warpage .
If you have a stready metal ruler or some ruffly the same lay the part on the rule and use rubber bands to hold it on and flatten out the warp . Take a shoe box and on one end make a hole which a hair drier will fit and a smaller hole on the other end . Place the part in the box put the lid on and tape it down ( you don't have to use the whole roll )
or you can place a heavy book on top . Place hair drier in hole and turn it on . Let this run for 10 minutes and have a check to see how the progress is going .
Terri
Redhand
#522
Joined: January 20, 2013
KitMaker: 1,460 posts
AeroScale: 1,443 posts
Posted: Wednesday, May 27, 2015 - 07:46 AM UTC
Quoted Text
Brian,
Thanks for the information. I completely forgot about the special Hobbies kit. I believe it's a scaled down version of their 1/32 kit. Hopefully, I'll be able to pull off this minor miracle, and get the wings to the next stage.
Joel
I think you will. A pain but fixable.

FredrikA

Joined: January 09, 2008
KitMaker: 92 posts
AeroScale: 90 posts
Posted: Wednesday, May 27, 2015 - 01:49 PM UTC
Hi Joel!
I had missed this one, so after reading through the thread I'd like to say two things;
1. It's looking quite good! It'll be fun to follow this one.
2. I really like your presentation. It feels as if you've upped your game in that field. Nice pics and accompanying text.
Now, fix those wings!
/Fredrik

Emeritus

Joined: March 30, 2004
KitMaker: 2,845 posts
AeroScale: 1,564 posts

Posted: Wednesday, May 27, 2015 - 04:10 PM UTC
Quoted Text
Brian,
Thanks for the information. I completely forgot about the special Hobbies kit. I believe it's a scaled down version of their 1/32 kit. Hopefully, I'll be able to pull off this minor miracle, and get the wings to the next stage.
Joel
I think the 1:48 scale Classic Airframes/Special Hobby kits were released before the 1:32 ones. And while there are similarities in constructions, there's also some differences, the wings being the most prominent: One-piece lower wing vs. full fuselage and separate wings. In that area, the 1:32 kits resemble the 1:72 scale Special Hobby Brewsters (which to me look like having been strongly, uh, inspired by Hasegawa's Brewster kits).
Good luck with the wings! Hope you get them sorted out. It would be a shame to have to shelve such a nicely started build.


RYSZARD

Joined: August 21, 2010
KitMaker: 486 posts
AeroScale: 485 posts
Posted: Wednesday, May 27, 2015 - 07:06 PM UTC
Beautiful work. Long, long, ago, I built this model
https://aeroscale.kitmaker.net/forums/195386#1636757
https://aeroscale.kitmaker.net/forums/195386#1636757
Merlin
#017
Joined: June 11, 2003
KitMaker: 17,582 posts
AeroScale: 12,795 posts
Posted: Wednesday, May 27, 2015 - 10:19 PM UTC
Hi again Joel
Terri's suggestion should do the trick. Another thing I sometimes resort to in situations like this is to scribe the inside face quite deeply to allow the part to flex a bit.
All the best
Rowan
Terri's suggestion should do the trick. Another thing I sometimes resort to in situations like this is to scribe the inside face quite deeply to allow the part to flex a bit.
All the best
Rowan
Joel_W
Joined: December 04, 2010
KitMaker: 11,666 posts
AeroScale: 7,410 posts
Posted: Wednesday, May 27, 2015 - 10:24 PM UTC
Quoted Text
Beautiful work. Long, long, ago, I built this model
https://aeroscale.kitmaker.net/forums/195386#1636757
Ryszard,
Just an outstanding build. Your wings look a lot better then mine, guess the years that this kit sat in a whse before I finally purchased it, did effect the parts to some degree.
How did you handle the wing butt glue joint? It's a major concern of mine. And what type of glue did you use? I'm thinking that good old tube glue would be the best option for the strongest possible joint.
I sure hope that my finished Buffalo comes close to the level of your build.
Joel
Joel_W
Joined: December 04, 2010
KitMaker: 11,666 posts
AeroScale: 7,410 posts
Posted: Wednesday, May 27, 2015 - 11:43 PM UTC
Terri & Rowan,
Thanks for the suggestions but I've already glued the both wing halves with a ton of Extra Thin and enough masking tape to force the wings into proper shape.
I removed the spring clamps and tape this afternoon, and the warps/twists are 80-90% gone. I've still got that pesky 10-20% to try and deal with.
Jim Maas posted on ARC the section of the Blue Prints for the wing tips, and there is a up turn sweep on the lower side, but the entire top of the wings should be level. Unfortunately, I still have an up sweep of the wing tips on the top side as well, but not nearly as bad as it was.
The inner half of the wings were badly warped as you can see in those posted pictures. Since both halves are warped in the same orientation and that the halves were on the same sprue tree, I'm assuming that they were popped from the mold before the tree had the proper time to cure and cool down. Those warps are still present to some degree. My main concern is that the warp/twist will change the orientation of the landing gear struts, requiring some finessing of the tire surface and the axil hole.
It doesn't look like the warpage will be very noticeable at all as long as you're not looking head on at the F2A-3, and even then you might not see it unless you're really looking for it. But only time will tell.
A greater concern is that the wings are glued to the fuselage with nothing but a simple butt joint Certainly not the best of choices for two major joints that will eventually need to carry the entire weight of the model forever more. Added to that issue is that the joint surface of the wing is only half plastic, the other half is open into the wing.
My plan is to drill two holes on each side of the forward fuselage butt surface which should transverse the bottom of the center fuel tank, then into the wings. That should add a great deal of strength to the joint. Too bad I didn't think of this before I glued the fuselage halves together.
I'm going to ask Ryszard how he dealt with it on his build as it's stood the test of time.
Joel
Thanks for the suggestions but I've already glued the both wing halves with a ton of Extra Thin and enough masking tape to force the wings into proper shape.
I removed the spring clamps and tape this afternoon, and the warps/twists are 80-90% gone. I've still got that pesky 10-20% to try and deal with.
Jim Maas posted on ARC the section of the Blue Prints for the wing tips, and there is a up turn sweep on the lower side, but the entire top of the wings should be level. Unfortunately, I still have an up sweep of the wing tips on the top side as well, but not nearly as bad as it was.
The inner half of the wings were badly warped as you can see in those posted pictures. Since both halves are warped in the same orientation and that the halves were on the same sprue tree, I'm assuming that they were popped from the mold before the tree had the proper time to cure and cool down. Those warps are still present to some degree. My main concern is that the warp/twist will change the orientation of the landing gear struts, requiring some finessing of the tire surface and the axil hole.
It doesn't look like the warpage will be very noticeable at all as long as you're not looking head on at the F2A-3, and even then you might not see it unless you're really looking for it. But only time will tell.
A greater concern is that the wings are glued to the fuselage with nothing but a simple butt joint
Certainly not the best of choices for two major joints that will eventually need to carry the entire weight of the model forever more. Added to that issue is that the joint surface of the wing is only half plastic, the other half is open into the wing. My plan is to drill two holes on each side of the forward fuselage butt surface which should transverse the bottom of the center fuel tank, then into the wings. That should add a great deal of strength to the joint. Too bad I didn't think of this before I glued the fuselage halves together.
I'm going to ask Ryszard how he dealt with it on his build as it's stood the test of time.
Joel
Joel_W
Joined: December 04, 2010
KitMaker: 11,666 posts
AeroScale: 7,410 posts
Posted: Wednesday, May 27, 2015 - 11:52 PM UTC
Quoted Text
Quoted TextBrian,
Thanks for the information. I completely forgot about the special Hobbies kit. I believe it's a scaled down version of their 1/32 kit. Hopefully, I'll be able to pull off this minor miracle, and get the wings to the next stage.
Joel
I think the 1:48 scale Classic Airframes/Special Hobby kits were released before the 1:32 ones. And while there are similarities in constructions, there's also some differences, the wings being the most prominent: One-piece lower wing vs. full fuselage and separate wings. In that area, the 1:32 kits resemble the 1:72 scale Special Hobby Brewsters (which to me look like having been strongly, uh, inspired by Hasegawa's Brewster kits).
Good luck with the wings! Hope you get them sorted out. It would be a shame to have to shelve such a nicely started build.
Eetu
Excellent information on that kit. Too bad that they didn't copy the single lower wing with separate upper wings. The separate wings will be a real challenge all by themselves to get glued up in the proper orientation.
Joel
Joel_W
Joined: December 04, 2010
KitMaker: 11,666 posts
AeroScale: 7,410 posts
Posted: Wednesday, May 27, 2015 - 11:55 PM UTC
Quoted Text
Hi Joel!
I had missed this one, so after reading through the thread I'd like to say two things;
1. It's looking quite good! It'll be fun to follow this one.
2. I really like your presentation. It feels as if you've upped your game in that field. Nice pics and accompanying text.
Now, fix those wings!
/Fredrik
Fredrik,
Welcome to the party, and thanks for your support and positive feedback. I try to do my build presentations in both an informative and entertaining way. I'm really glade that you appreciate my efforts.
Joel
Joel_W
Joined: December 04, 2010
KitMaker: 11,666 posts
AeroScale: 7,410 posts
Posted: Monday, June 01, 2015 - 01:15 AM UTC
Work on the F2A-3 has slowed down some, but I'm still trying to put in a few hours 4 or 5 days per week. My last work post was about the horrendous wing warpage issue, and my concern that they were just to far gone to be brought back into an acceptable proportion.
Nothing really worked, so I glued the heck out the them with Extra Thin, then clamped and taped for all I was worth. The results were better then I thought.
The top of the wings are basically now straight. Well, almost so.
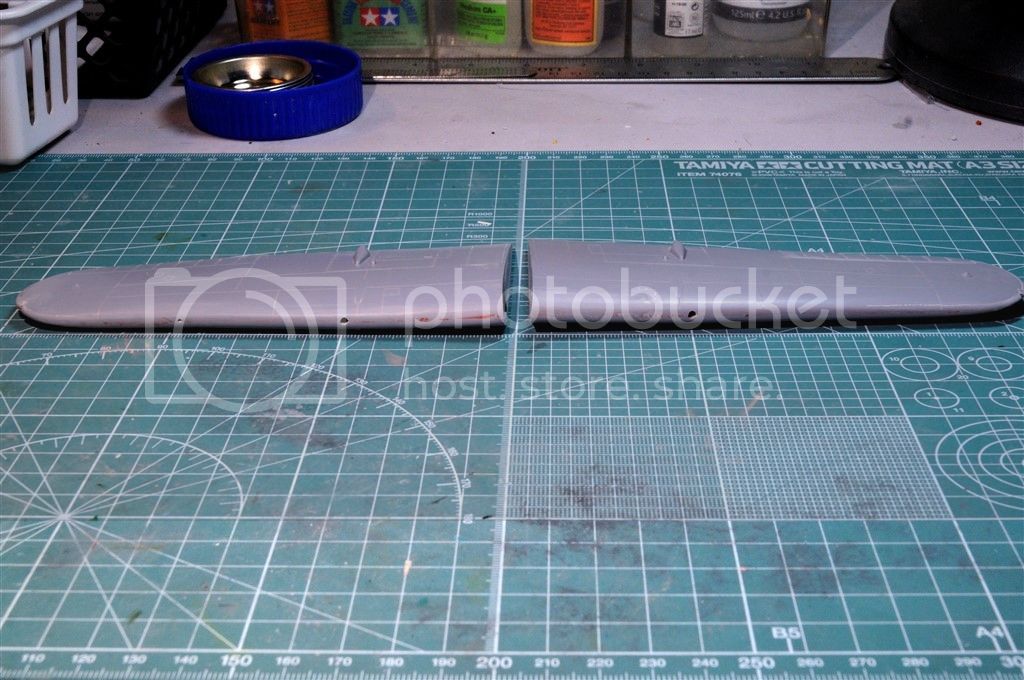
And so is the bottom side.
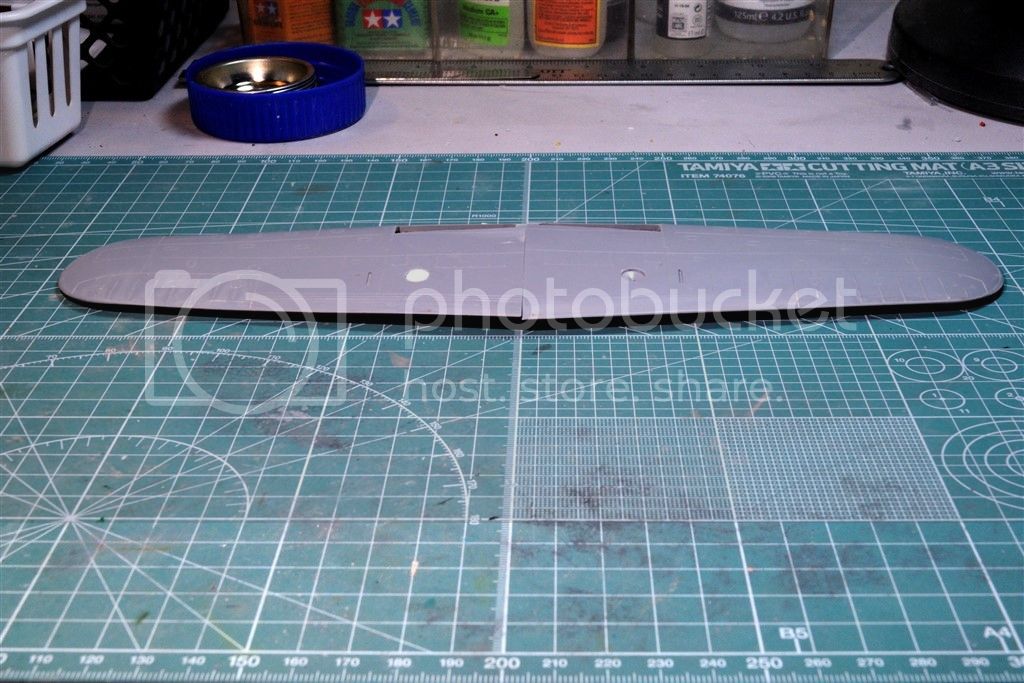
The white disk that you see in the bottom of one wing is a plug to close up one of the landing lights, as the F2A-3's only had one, while the Export version had one in each wing.
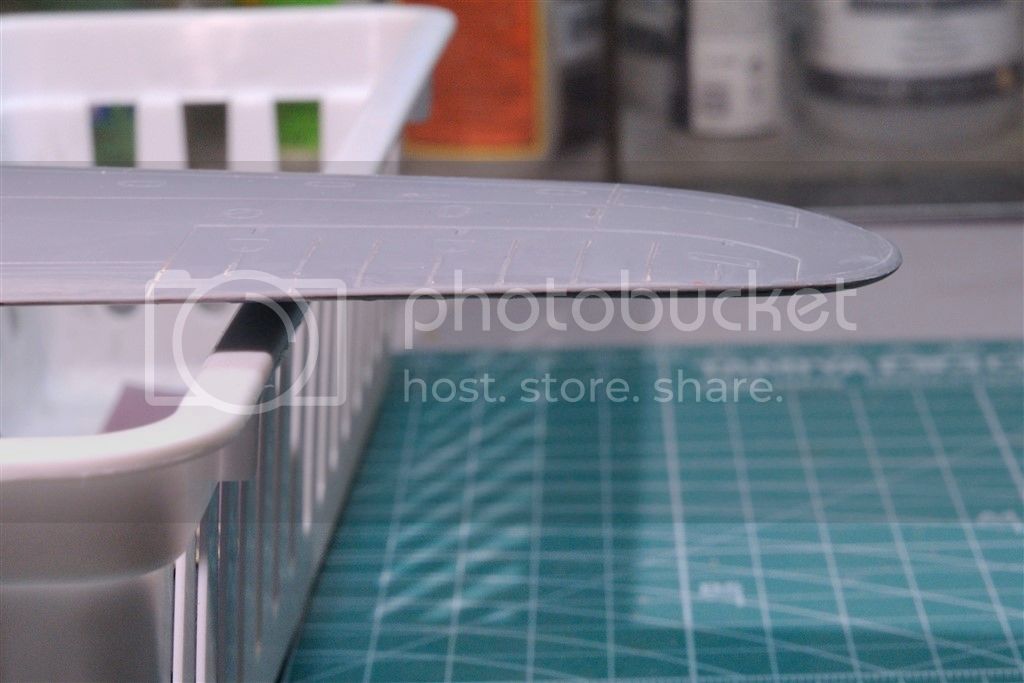
The wing tips were really out of wack with both the bottom and top of the wing tips turning up at the tip. After the massive gluing and clamping effort, the top of the wing is basically level right to the tip while the bottom turns up as it should.
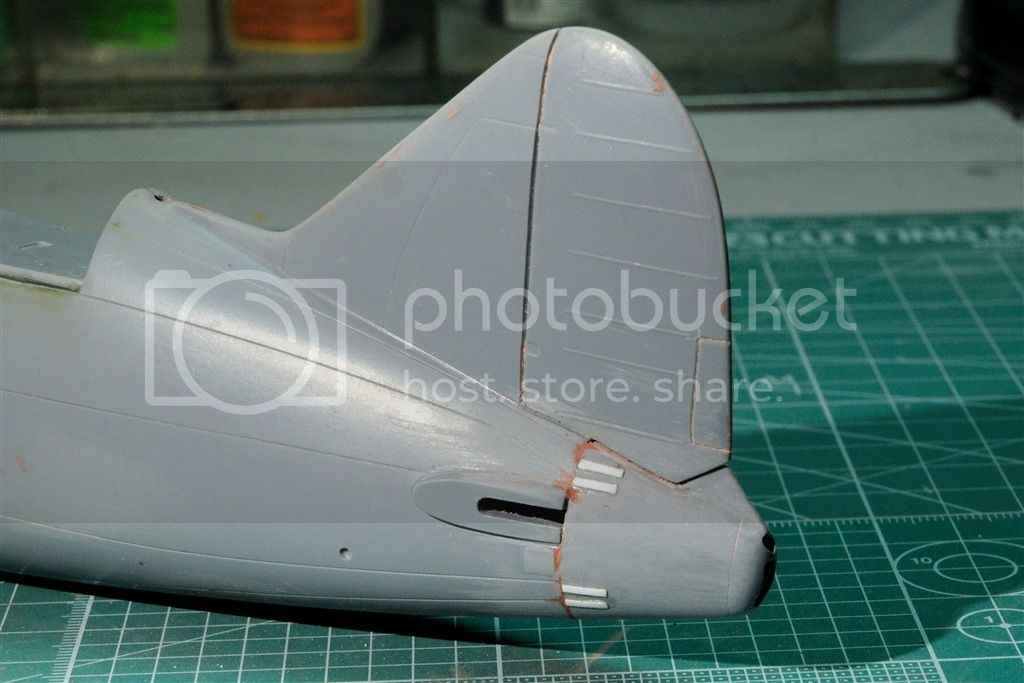
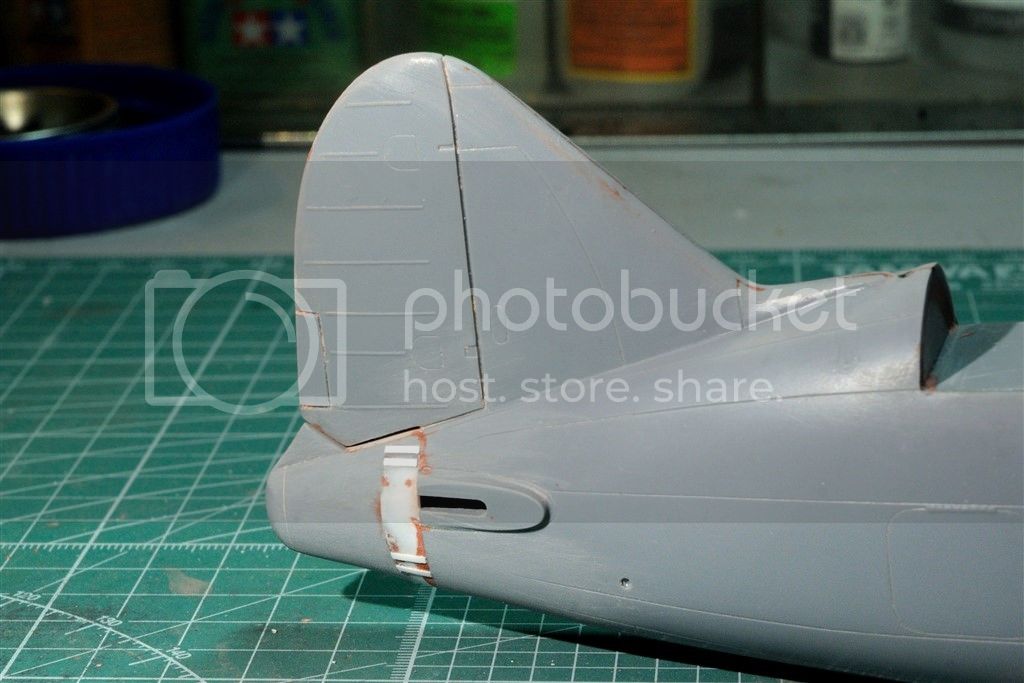
There is a difference in the fuselage tail cone as the USN version had an arrestor hook slides outof the rear opening, while the export model 339B was basically closed with a light in its place.

Unfortunately, the tail cone was slightly smaller in dia. then the fuselage. So I glued a piece of .0.40 sheet to one side, and a piece on the top as it was too short in the vertical plane as well.
Seems that I under estimated the size difference, so I had to do some putty work with Bondo. The final results look ok, but only priming will tell just how well.
Try as I might, I had some issues keeping the wheel wells perfectly inline with the fuselage openings once I closed up the fuselage halves. A little sanding and putty work brought them back to where they should be fine once primed and painted.
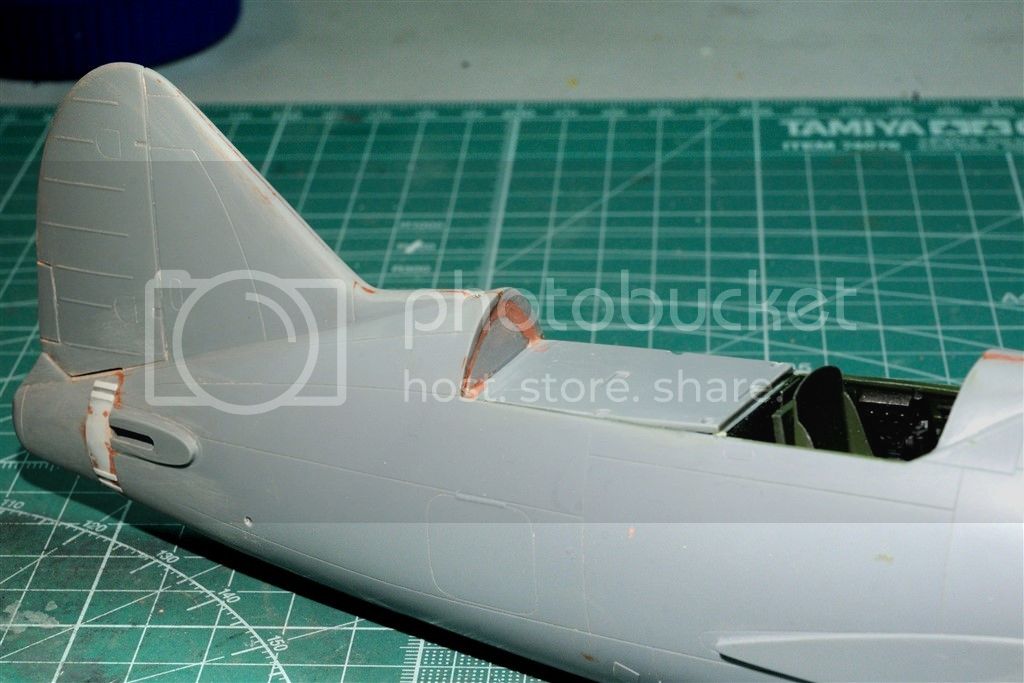
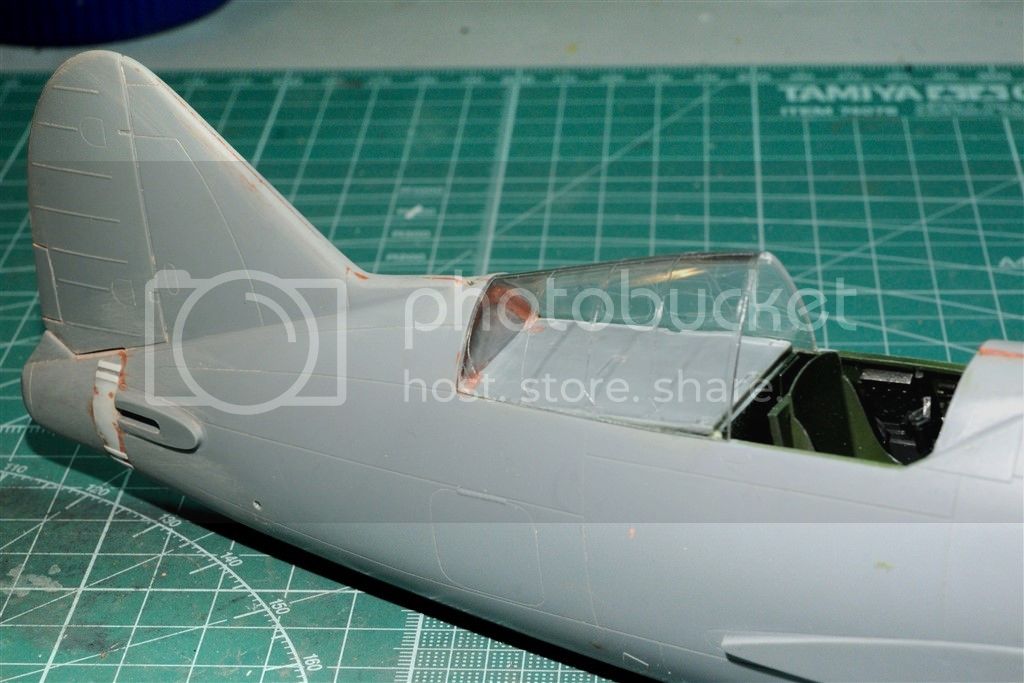
Next up was the rear cockpit shelf that supported the headrest and life raft container. Not only was it oversized but the rear bulkhead was too shallow. I had to use some putty to close the gap. There still is a little lip on one side but as you can see, once the canopy is glued into place, the rather large framing will completely cover up the seam.
And once again, you're up to speed on my build.
Joel
Nothing really worked, so I glued the heck out the them with Extra Thin, then clamped and taped for all I was worth. The results were better then I thought.
The top of the wings are basically now straight. Well, almost so.

And so is the bottom side.

The white disk that you see in the bottom of one wing is a plug to close up one of the landing lights, as the F2A-3's only had one, while the Export version had one in each wing.
The wing tips were really out of wack with both the bottom and top of the wing tips turning up at the tip. After the massive gluing and clamping effort, the top of the wing is basically level right to the tip while the bottom turns up as it should.

There is a difference in the fuselage tail cone as the USN version had an arrestor hook slides outof the rear opening, while the export model 339B was basically closed with a light in its place.

Unfortunately, the tail cone was slightly smaller in dia. then the fuselage. So I glued a piece of .0.40 sheet to one side, and a piece on the top as it was too short in the vertical plane as well.


Seems that I under estimated the size difference, so I had to do some putty work with Bondo. The final results look ok, but only priming will tell just how well.


Try as I might, I had some issues keeping the wheel wells perfectly inline with the fuselage openings once I closed up the fuselage halves. A little sanding and putty work brought them back to where they should be fine once primed and painted.

Next up was the rear cockpit shelf that supported the headrest and life raft container. Not only was it oversized but the rear bulkhead was too shallow. I had to use some putty to close the gap. There still is a little lip on one side but as you can see, once the canopy is glued into place, the rather large framing will completely cover up the seam.


And once again, you're up to speed on my build.
Joel
Merlin
#017
Joined: June 11, 2003
KitMaker: 17,582 posts
AeroScale: 12,795 posts
Posted: Monday, June 01, 2015 - 02:03 AM UTC
Hi Joel
Great work on the wings! You see, I wasn't far off with my flippant "Crocodile Dundee" remark.
I'm always fascinated by the brown Bondo filler I see so often in American builds - we don't have a direct equivalent over here in the UK (as far as I know).
All the best
Rowan
Great work on the wings!
You see, I wasn't far off with my flippant "Crocodile Dundee" remark. I'm always fascinated by the brown Bondo filler I see so often in American builds - we don't have a direct equivalent over here in the UK (as far as I know).
All the best
Rowan
Joel_W
Joined: December 04, 2010
KitMaker: 11,666 posts
AeroScale: 7,410 posts
Posted: Monday, June 01, 2015 - 02:46 AM UTC
Quoted Text
Hi Joel
Great work on the wings!
I'm always fascinated by the brown Bondo filler I see so often in American builds - we don't have a direct equivalent over here in the UK (as far as I know).
All the best
Rowan
Rowan,
Good call. I figured what the heck. It couldn't get any worse. Some times even I get lucky.
As for the Bondo, it's automotive body filler. I buy it at a local auto parts store. The exact product is Bondo Glazing and Spot Putty.
Joel
 |

WEB HOSTING BY


Copyright ©2021 AeroScale and Kitmaker Network, a subsidiary of Silver Star Enterprises
All Rights Reserved. Please read our Conditions of Use and Privacy Policy.
All Rights Reserved. Please read our Conditions of Use and Privacy Policy.