Joel_W
 Associate Editor
New York, United States
Joined: December 04, 2010
KitMaker: 11,666 posts
AeroScale: 7,410 posts
Posted: Tuesday, June 23, 2015 - 05:53 PM UTC
Quoted Text
Quoted Text
Torsten,
Glad you like my progress to date. As for those decals, gee let me guess. You've just happen to have in your stash the Special Hobbies 1/48 scale Buffalo. I'm certainly looking forward to you adding that to your miniature aircraft museum.
Joel
Joel, actually I have the Tamiya kit of the B-339 in my stash and after a first look over the parts I guess I will have to do some surgery to make a pretty finnish girl out of her. But surely not this year, my head is full of plans which want to be realized .... 
Torsten,
I've looked at the Tamiya kit as it's a F2A-2, and does have possibilities. It's biggest drawback for me is the fact that it has raised panel lines, and my rescribing skills are horrendous to put it mildly. I've never attempted more then a few major panel lines, and this would be a complete rescribe.
It's just less then 6 months to 2016, so your Buffalo project still could happen within a years time.
Joel
On my Workbench:
Monogram 1/24 scale 427 Shelby Cobra
Just Completed:
Beemax 1/24 scale BMW M3 E30 1992 Evolution II
Joel_W
Associate Editor New York, United States
Joined: December 04, 2010
KitMaker: 11,666 posts
AeroScale: 7,410 posts
Posted: Thursday, June 25, 2015 - 01:30 AM UTC
Next up was air brushing on the topside base color which is FS 35189, Medium Blue Gray. Naturally, Tamiya doesn't have a pre-mixed color, but it's easy enough to mix: XF-19 Medium Blue 3 parts to 1 part of XF-2 Flat White. I thinned this out 1:1 with Tamiya Yellow Cap Lacquer Thinner. Working small sections as a time using thin light passes, I was able to start to create a faded, bleached look using the Pre-shading to help vary the color intensity. Then I added a little more White and started to lighten up some top side panels even further.


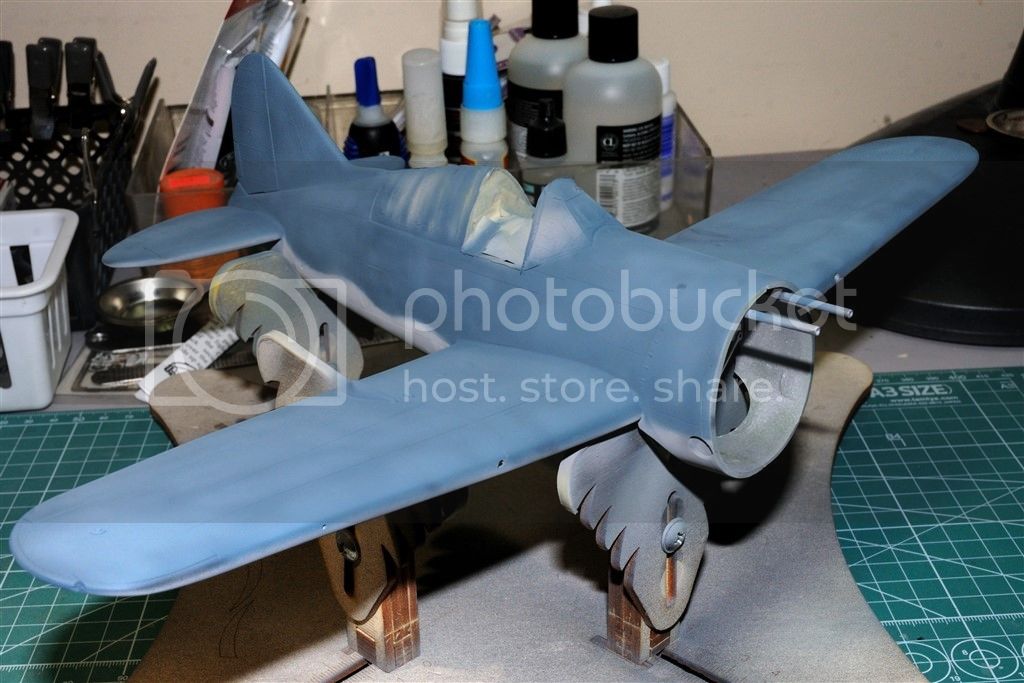
A little more bleaching needs to be done to all the flying surfaces over the ribs as they're fabric covered, then a coat of gloss, so I start to apply the decals, seal, and then continue with the weathering process.
Joel
On my Workbench:
Monogram 1/24 scale 427 Shelby Cobra
Just Completed:
Beemax 1/24 scale BMW M3 E30 1992 Evolution II
Alberta, Canada
Joined: January 19, 2008
KitMaker: 6,743 posts
AeroScale: 6,151 posts
Posted: Thursday, June 25, 2015 - 05:29 AM UTC
Nice airbrush work Joel

Terri
Holdfast
President 
#056
England - South West, United Kingdom
Joined: September 30, 2002
KitMaker: 8,581 posts
AeroScale: 4,913 posts
Posted: Thursday, June 25, 2015 - 11:54 AM UTC
A nicely masked canopy and a real nice paint job; this is looking really good Joel.
I would like to finish mine but I will only build one and I would really like to build the Finnish version, so I probably won't finish it and look for the correct version instead.
MAL the MASK
BULLDOG # 6 (President)
BEWARE OF THE FEW
Sappers: First in, last out. (UBIQUE)
It's not the same, better, but not the same.
California, United States
Joined: November 28, 2007
KitMaker: 817 posts
AeroScale: 729 posts
Posted: Thursday, June 25, 2015 - 07:48 PM UTC
Off to a good start, Joel- cheers!
[url]http://chukw.blogspot.com/[/url]
Joel_W
Associate Editor New York, United States
Joined: December 04, 2010
KitMaker: 11,666 posts
AeroScale: 7,410 posts
Posted: Thursday, June 25, 2015 - 08:14 PM UTC
Terri,
Thanks so much for your more then kind words. My air brushing techniques are more like AB101 then anything else. Nothing fancy or particularly hard to accomplish.
Joel
On my Workbench:
Monogram 1/24 scale 427 Shelby Cobra
Just Completed:
Beemax 1/24 scale BMW M3 E30 1992 Evolution II
Joel_W
Associate Editor New York, United States
Joined: December 04, 2010
KitMaker: 11,666 posts
AeroScale: 7,410 posts
Posted: Thursday, June 25, 2015 - 08:22 PM UTC
Quoted Text
A nicely masked canopy and a real nice paint job; this is looking really good Joel.
I would like to finish mine but I will only build one and I would really like to build the Finnish version, so I probably won't finish it and look for the correct version instead.
Mal,
Thank you for stopping by and liking my painting efforts.
From what I've read, the 239 was correct Finnish Buffalo version, which was a "denavalized" F2A-1. The Czech kit is a the F2A-3 version, so there are many differences between the two.
Joel
On my Workbench:
Monogram 1/24 scale 427 Shelby Cobra
Just Completed:
Beemax 1/24 scale BMW M3 E30 1992 Evolution II
Joel_W
Associate Editor New York, United States
Joined: December 04, 2010
KitMaker: 11,666 posts
AeroScale: 7,410 posts
Posted: Thursday, June 25, 2015 - 08:23 PM UTC
Quoted Text
Off to a good start, Joel- cheers!
Chuck,
Much appreciated that you stopped by, and liked what you saw.
Looking forward to following every step of the way on your new build blog.
Joel
On my Workbench:
Monogram 1/24 scale 427 Shelby Cobra
Just Completed:
Beemax 1/24 scale BMW M3 E30 1992 Evolution II
Joel_W
Associate Editor New York, United States
Joined: December 04, 2010
KitMaker: 11,666 posts
AeroScale: 7,410 posts
Posted: Saturday, June 27, 2015 - 08:22 PM UTC
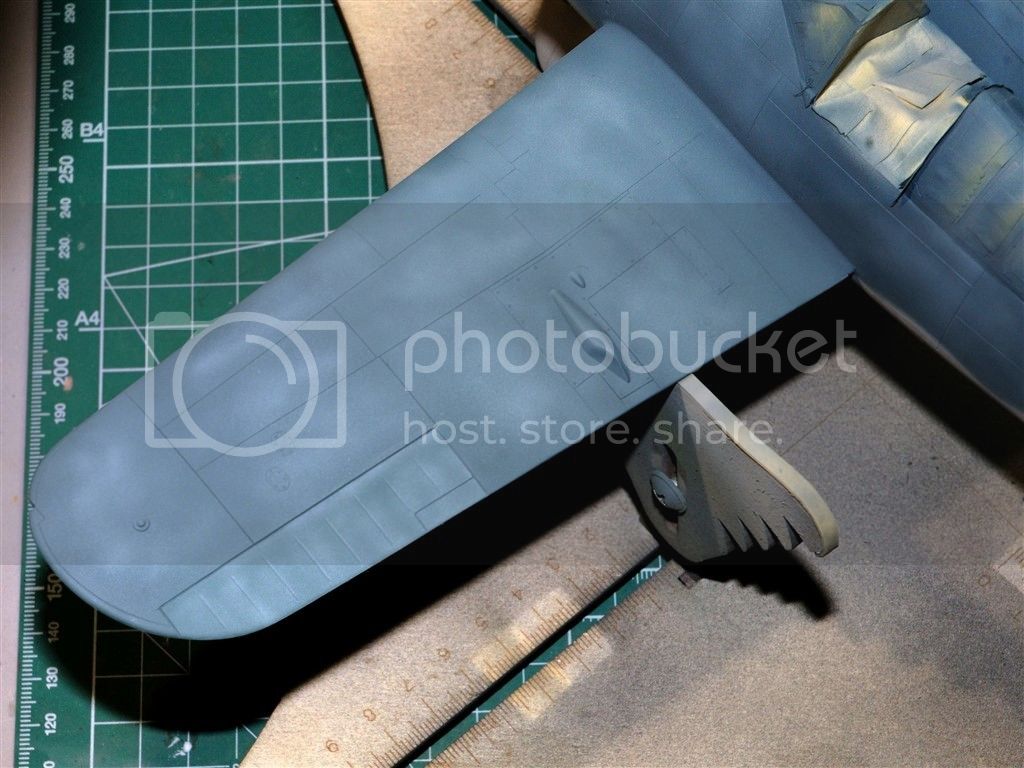
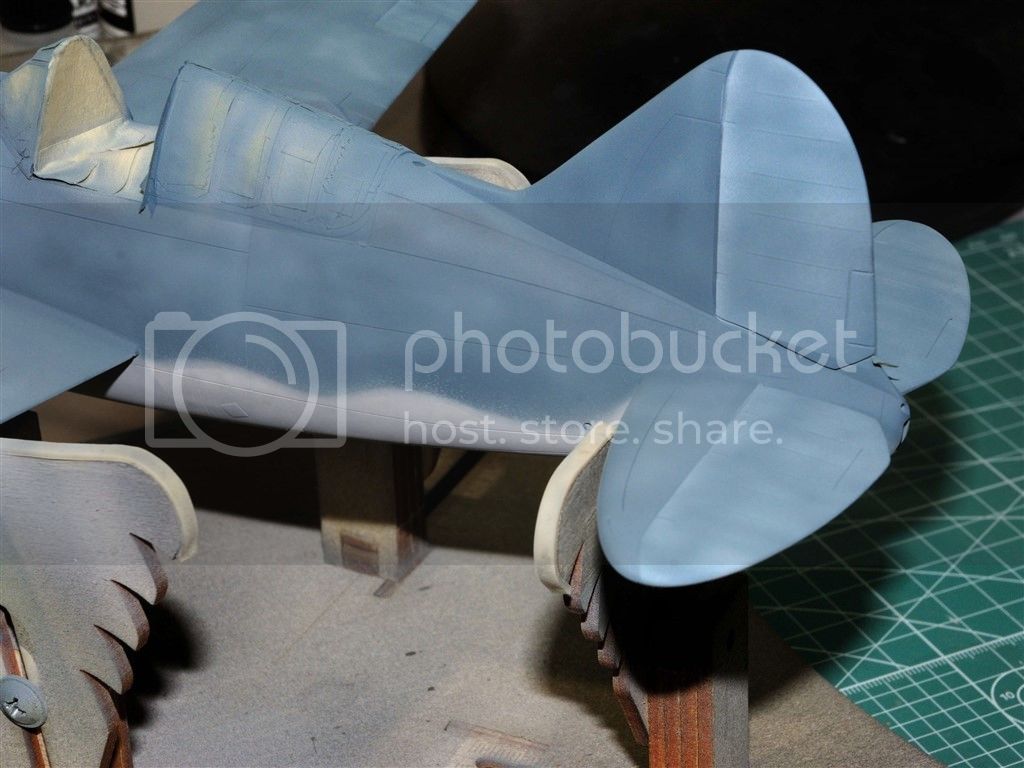
I've finished the basic paint fading, as you can now see that the fabric covered flying surfaces have been faded and bleached more then the Aluminum surfaces. So now it's time to seal with a few coats of Gloss for decaling, then seal again, so that I can start the weathering process.
Here's a few pictures to bring you up to speed.
Joel


On my Workbench:
Monogram 1/24 scale 427 Shelby Cobra
Just Completed:
Beemax 1/24 scale BMW M3 E30 1992 Evolution II
#522
New Jersey, United States
Joined: January 20, 2013
KitMaker: 1,460 posts
AeroScale: 1,443 posts
Posted: Saturday, June 27, 2015 - 09:58 PM UTC
I'm going to start having to learn how to do exteriors like this!
On my Workbench: 1/48 B-17F Luscious Lady (with H.G. Barnes and Karl Hauffe - Research) and with Contributions from the late Arthur T. Babiarz, Jr.
Two Special Hobby AF-2 Guardians, one AF-2W, and one AS-2S
Pennsylvania, United States
Joined: June 17, 2009
KitMaker: 566 posts
AeroScale: 507 posts
Posted: Saturday, June 27, 2015 - 10:24 PM UTC
Nice work on the paint, Your contrast looks pretty good. Ive tried this before but my efforts were way too subtle and wasnt visible when I was done with everything else.
"...Fat, drunk, and stupid is no way to go through life son"
Joel_W
Associate Editor New York, United States
Joined: December 04, 2010
KitMaker: 11,666 posts
AeroScale: 7,410 posts
Posted: Saturday, June 27, 2015 - 10:27 PM UTC
Quoted Text
I'm going to start having to learn how to do exteriors like this!
Brian,
You're much too kind. Your detailing skills is something I can only dream about.
Joel
On my Workbench:
Monogram 1/24 scale 427 Shelby Cobra
Just Completed:
Beemax 1/24 scale BMW M3 E30 1992 Evolution II
Joel_W
Associate Editor New York, United States
Joined: December 04, 2010
KitMaker: 11,666 posts
AeroScale: 7,410 posts
Posted: Saturday, June 27, 2015 - 10:29 PM UTC
Quoted Text
Nice work on the paint, Your contrast looks pretty good. Ive tried this before but my efforts were way too subtle and wasnt visible when I was done with everything else.
Mike,
Thank you. Believe me, it took a few years of screwing up before I started to see much in the way of positive results. It's really pretty easy. I just add white and or light Gray to the basic color, not too much or it doesn't look like faded paint, but rather a different color. It's much easier to add then to try and repaint.
Joel
On my Workbench:
Monogram 1/24 scale 427 Shelby Cobra
Just Completed:
Beemax 1/24 scale BMW M3 E30 1992 Evolution II
Ontario, Canada
Joined: July 22, 2012
KitMaker: 771 posts
AeroScale: 763 posts
Posted: Sunday, June 28, 2015 - 04:53 AM UTC
It's looking good Joel.
You're making a hell of a plane from a bear of a kiti - good on ya.
Matt Odom
I've been known to build a few things
Joel_W
Associate Editor New York, United States
Joined: December 04, 2010
KitMaker: 11,666 posts
AeroScale: 7,410 posts
Posted: Sunday, June 28, 2015 - 05:15 AM UTC
Quoted Text
It's looking good Joel.
You're making a hell of a plane from a bear of a kiti - good on ya.
Matt,
Thanks so much for stopping by and having a look at my build. Glad you appreciate my efforts to date.
As for it being a bear of a kit, at times that's an understatement, but so far I'm holding my own.
Joel
On my Workbench:
Monogram 1/24 scale 427 Shelby Cobra
Just Completed:
Beemax 1/24 scale BMW M3 E30 1992 Evolution II
Joel_W
Associate Editor New York, United States
Joined: December 04, 2010
KitMaker: 11,666 posts
AeroScale: 7,410 posts
Posted: Wednesday, July 01, 2015 - 12:11 AM UTC
Well, the mini decal session was more painful then I expected. The decals were made by Cartograf, so I assumed that they would behave as all the other Cartograf decals I've used, but that just wasn't going to be the case, as the decals were old since the Czech kit isn't exactly new.
My new standardized decaling procedure that I've used on the last two models is basically Paul's Budzik's method, and it's worked flawlessly for me.
This time the 1st decal didn't like the final application of Solvaset, so I didn't use it on the rest of the decals. The decals took 3-5 min to loosen up from the backing paper, then didn't want to slide around on the gloss surface wetted with warm water and Flow Enhancer. They tended to crack especially the letters, and one fuselage national insignia decal was ruined in the process. I was able to find a duplicate sized decal in my decal box, but the blue is completely different.
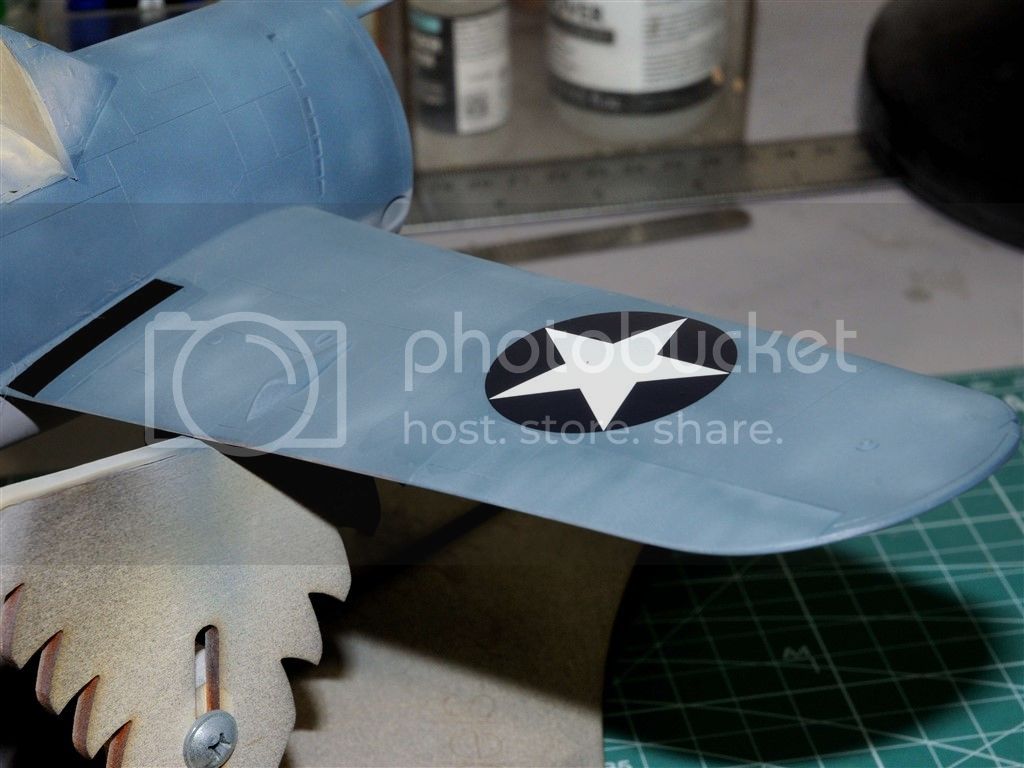
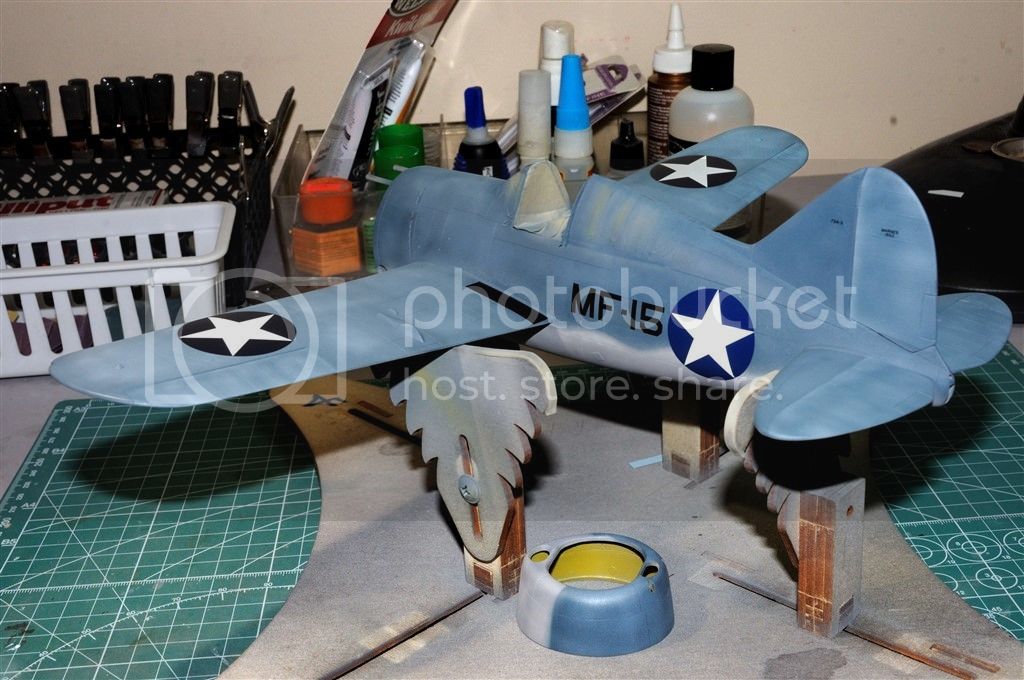
After re-glossing the decals, I'm ready to continue with the weathering process. But 1st I need to tone down the really dark blue and mid blue to resemble a more homogeneous and weathered look. I really just can't over spray the insignias with the same lightened Blue Gray as the white stars will take on a bluish tone. So I'm thinking of masking out all the insignias and then toning them down with a light gray over spray.
Joel
On my Workbench:
Monogram 1/24 scale 427 Shelby Cobra
Just Completed:
Beemax 1/24 scale BMW M3 E30 1992 Evolution II
Stockholm, Sweden
Joined: May 02, 2006
KitMaker: 1,953 posts
AeroScale: 1,902 posts
Posted: Wednesday, July 01, 2015 - 01:47 AM UTC
For as long as I've been building models, the decals have always been a major source for trouble! Masking off the stars should be fairly easy before toning down the blue I think.
Magnus
Press banner to the right to follow my trail to the new forums!
Joel_W
Associate Editor New York, United States
Joined: December 04, 2010
KitMaker: 11,666 posts
AeroScale: 7,410 posts
Posted: Wednesday, July 01, 2015 - 02:06 AM UTC
Quoted Text
For as long as I've been building models, the decals have always been a major source for trouble! Masking off the stars should be fairly easy before toning down the blue I think.
Magnus
Magnus,
I thought of that as well. But then I'd have to do stars instead of circles. And for me circles were daunting enough.
Joel
On my Workbench:
Monogram 1/24 scale 427 Shelby Cobra
Just Completed:
Beemax 1/24 scale BMW M3 E30 1992 Evolution II
#522
New Jersey, United States
Joined: January 20, 2013
KitMaker: 1,460 posts
AeroScale: 1,443 posts
Posted: Wednesday, July 01, 2015 - 05:57 AM UTC
Joel:
PLEASE don't tell me you're going to mask already applied decals. That sounds risky as hell to me. How can you possibly eliminate the danger of part of the decal lifting off with the tape?

On my Workbench: 1/48 B-17F Luscious Lady (with H.G. Barnes and Karl Hauffe - Research) and with Contributions from the late Arthur T. Babiarz, Jr.
Two Special Hobby AF-2 Guardians, one AF-2W, and one AS-2S
Holdfast
President #056
England - South West, United Kingdom
Joined: September 30, 2002
KitMaker: 8,581 posts
AeroScale: 4,913 posts
Posted: Wednesday, July 01, 2015 - 10:51 AM UTC
Of course I only have one thing to say, you should have gone to Miracle Masks

De-tack your masking tape before applying it over the decals!
MAL the MASK
BULLDOG # 6 (President)
BEWARE OF THE FEW
Sappers: First in, last out. (UBIQUE)
It's not the same, better, but not the same.
Joel_W
Associate Editor New York, United States
Joined: December 04, 2010
KitMaker: 11,666 posts
AeroScale: 7,410 posts
Posted: Wednesday, July 01, 2015 - 10:06 PM UTC
Mal,
Yeah, I know. But you don't have insignias this big.
Brian,
My plan is pretty simple, the masks will be made out of craft paper, so no tape will ever touch the decals even though they're sealed in a really good couple of coats of Glosscoat. I still remember the disaster I had on my hands with the A-6E when a piece of Tamiya tape touched the tail marking decals from Fightertown. It ripped it, so I had to get a replacement sheet. A very expensive lesson.
Joel
On my Workbench:
Monogram 1/24 scale 427 Shelby Cobra
Just Completed:
Beemax 1/24 scale BMW M3 E30 1992 Evolution II
#522
New Jersey, United States
Joined: January 20, 2013
KitMaker: 1,460 posts
AeroScale: 1,443 posts
Posted: Wednesday, July 01, 2015 - 10:31 PM UTC
Quoted Text
Brian,
My plan is pretty simple, the masks will be made out of craft paper, so no tape will ever touch the decals even though they're sealed in a really good couple of coats of Glosscoat. I still remember the disaster I had on my hands with the A-6E when a piece of Tamiya tape touched the tail marking decals from Fightertown. It ripped it, so I had to get a replacement sheet. A very expensive lesson.
Joel
OK, and you're doing this to tone down the color relative to the faded blue grey?
BTW, do I detect a different insignia blue tone on the fuselage relative to the wings? Was that the bad decal you were talking about?
On my Workbench: 1/48 B-17F Luscious Lady (with H.G. Barnes and Karl Hauffe - Research) and with Contributions from the late Arthur T. Babiarz, Jr.
Two Special Hobby AF-2 Guardians, one AF-2W, and one AS-2S
Joel_W
Associate Editor New York, United States
Joined: December 04, 2010
KitMaker: 11,666 posts
AeroScale: 7,410 posts
Posted: Wednesday, July 01, 2015 - 10:43 PM UTC
[quote]
Quoted Text
Brian,
My plan is pretty simple, the masks will be made out of craft paper, so no tape will ever touch the decals even though they're sealed in a really good couple of coats of Glosscoat. I still remember the disaster I had on my hands with the A-6E when a piece of Tamiya tape touched the tail marking decals from Fightertown. It ripped it, so I had to get a replacement sheet. A very expensive lesson.
Joel
OK, and you're doing this to tone down the color relative to the faded blue grey?
BTW, do I detect a different insignia blue tone on the fuselage relative to the wings? Was that the bad decal you were talking about?
Brian,
You most certainly do. That fuselage decal was decal was the one that ripped and wrinkled trying to get it into place. So I was lucky enough to find the proper dia. size replacement in my spare decals. The only issue was as you can plainly see, the variance of colors. I'm not even sure whose decal it is.
My thoughts to correct this as that blue is to light, and the Blue that Cartograf used is way to dark for a weather worn South Pacific F3A-3, was to fade and blend the decals using light gray rather then the Blue/Gray mixture I used for fading. This will also negate the issue of adding any blue to the white stars. The issue is that I don't want the surrounding surfaces to get an added dose of gray, at least not yet. So the masking is to let me fade the insignia decals without over spraying anything else.
Of course Murphy's laws comes into play once again. and I'm sure that it will raise it's nasty head creating even more of a challenge.
Joel
On my Workbench:
Monogram 1/24 scale 427 Shelby Cobra
Just Completed:
Beemax 1/24 scale BMW M3 E30 1992 Evolution II
Joel_W
Associate Editor New York, United States
Joined: December 04, 2010
KitMaker: 11,666 posts
AeroScale: 7,410 posts
Posted: Wednesday, July 01, 2015 - 11:11 PM UTC
Finally, a real lucky break

For some reason I decided to take one last look at what hides within my spare decal box. Not holding out much hope for a better color match and the right size decal, I actually found a single decal that is much closer to the Cartograf blue, and about the right size. If anything thing it's slightly to large, but I'm talking about a mil. in circ. at best. So I decided to bite the bullet, and apply the decal.

Damn if it didn't fit and meet my needs to color.
Now I can concentrate on just weathering the insignia rather then 1st trying to blend the colors. I'll still be masking, but need a lot less layers of light gray for the effect I'm looking for.
Joel
On my Workbench:
Monogram 1/24 scale 427 Shelby Cobra
Just Completed:
Beemax 1/24 scale BMW M3 E30 1992 Evolution II
#522
New Jersey, United States
Joined: January 20, 2013
KitMaker: 1,460 posts
AeroScale: 1,443 posts
Posted: Wednesday, July 01, 2015 - 11:12 PM UTC
What's the diameter? I have a ton of decals of this type. I would rather see you replace the blue than resort to this "desperate expedient." However, there are downsides to that with the insignia already on.
One issue I'm going to have with LL is the upper left star on the wing, which was almost certainly a dulled grey. See below:

I am considering cutting the white star out of the decal and then applying the decal over a light grey sprayed circle, when I get to this point [in the far distant future].
On my Workbench: 1/48 B-17F Luscious Lady (with H.G. Barnes and Karl Hauffe - Research) and with Contributions from the late Arthur T. Babiarz, Jr.
Two Special Hobby AF-2 Guardians, one AF-2W, and one AS-2S


