1/48 Academy B-25B Mitchell
Joel_W
 Associate Editor
New York, United States
Joined: December 04, 2010
KitMaker: 11,666 posts
AeroScale: 7,410 posts
Posted: Wednesday, March 23, 2016 - 02:22 AM UTC
Quoted Text
Looking good Joel. A bit frustrating about the decals, but from where I sit it is coming together beautifully! The fading on the upper surfaces looks spot-on.
Cheers, D
Damian,
Thanks. The decals were a major disappointment. There aren't really any AM sheets for the B-25Bs that I could find, and I really didn't want to buy a few sheets as this is a Aeroscale OOB build blog.
Uoel
On my Workbench:
Monogram 1/24 scale 427 Shelby Cobra
Just Completed:
Beemax 1/24 scale BMW M3 E30 1992 Evolution II
Gauteng, South Africa
Joined: July 03, 2015
KitMaker: 280 posts
AeroScale: 141 posts
Posted: Wednesday, March 23, 2016 - 10:45 AM UTC
Hi Joel,
Your B-25 is looking awesome!! A pity the issues with the decals but I'm sure you will get them sorted and all snuggled down.
Really looking forward to seeing her complete - I know it will set the benchmark for future B-25 builds.
Regards,
Kobus

#424
Queensland, Australia
Joined: April 23, 2015
KitMaker: 4,648 posts
AeroScale: 1,938 posts
Posted: Wednesday, March 23, 2016 - 10:54 AM UTC
It's really taking on a good look, Joel! Once those big radials are on, she'll be sweet!
"Artillery adds dignity, to what would otherwise be an ugly brawl."
Frederick The Great
Scotland, United Kingdom
Joined: May 11, 2015
KitMaker: 768 posts
AeroScale: 656 posts
Posted: Wednesday, March 23, 2016 - 06:37 PM UTC
I agree, and it's one of those milestone moments : suddenly looks just like a B25 now the two stabilisers are on there.

Pax & Pallets: Revell 1/48 Dakota
Terrible Teens : Revell 1/48 F15E Strike Eagle
Airfix IV : Airfix 1.72 Vulcan
United States
Joined: February 01, 2009
KitMaker: 1,233 posts
AeroScale: 663 posts
Posted: Wednesday, March 23, 2016 - 08:02 PM UTC
Looks great with the markings on, Joel. That "Ruptured Duck?"
Regards,
Ian
It is a fact that under equal conditions, large-scale battles and whole wars are won by troops which have a strong will for victory, clear goals before them, high moral standards, and devotion to the banner under which they go into battle.
-Georgy Zhukov
Joel_W
Associate Editor New York, United States
Joined: December 04, 2010
KitMaker: 11,666 posts
AeroScale: 7,410 posts
Posted: Wednesday, March 23, 2016 - 11:16 PM UTC
Quoted Text
Hi Joel,
Your B-25 is looking awesome!! A pity the issues with the decals but I'm sure you will get them sorted and all snuggled down.
Really looking forward to seeing her complete - I know it will set the benchmark for future B-25 builds.
Regards,
Kobus
Kobus,
Thanks for the vote of confidence, but the decals are what they are. They look alright, but just aren't up to my personal standards.
I'm not to sure that any of my builds are standard setters. Most are really nothing more then enhanced OOB display replicas.
Joel
On my Workbench:
Monogram 1/24 scale 427 Shelby Cobra
Just Completed:
Beemax 1/24 scale BMW M3 E30 1992 Evolution II
Joel_W
Associate Editor New York, United States
Joined: December 04, 2010
KitMaker: 11,666 posts
AeroScale: 7,410 posts
Posted: Wednesday, March 23, 2016 - 11:18 PM UTC
Quoted Text
It's really taking on a good look, Joel! Once those big radials are on, she'll be sweet!
Gary,
Thanks for taking the time away from your B-29 to checkout my lonely B-25B. About the only way those big twin radials will ever get installed is for me to actually start working on them. I haven't even removed a single part from the sprue trees as yet.
Joel
On my Workbench:
Monogram 1/24 scale 427 Shelby Cobra
Just Completed:
Beemax 1/24 scale BMW M3 E30 1992 Evolution II
Joel_W
Associate Editor New York, United States
Joined: December 04, 2010
KitMaker: 11,666 posts
AeroScale: 7,410 posts
Posted: Wednesday, March 23, 2016 - 11:26 PM UTC
Quoted Text
I agree, and it's one of those milestone moments : suddenly looks just like a B25 now the two stabilisers are on there.
Paul,
too bad that they're only dry fitted, but it sure does make a huge difference to my Mojo levels.
Joel
On my Workbench:
Monogram 1/24 scale 427 Shelby Cobra
Just Completed:
Beemax 1/24 scale BMW M3 E30 1992 Evolution II
Joel_W
Associate Editor New York, United States
Joined: December 04, 2010
KitMaker: 11,666 posts
AeroScale: 7,410 posts
Posted: Wednesday, March 23, 2016 - 11:26 PM UTC
Quoted Text
Looks great with the markings on, Joel. That "Ruptured Duck?"
Regards,
Ian
Ian,
Thanks for stopping by. Yeah, it's the Ruptured Duck. Just had to do that aircraft.
Joel
On my Workbench:
Monogram 1/24 scale 427 Shelby Cobra
Just Completed:
Beemax 1/24 scale BMW M3 E30 1992 Evolution II
Overijssel, Netherlands
Joined: September 13, 2003
KitMaker: 339 posts
AeroScale: 244 posts
Posted: Thursday, March 24, 2016 - 03:11 AM UTC
Nice job and shading Joel... I will follow tihs
gr TC
Joel_W
Associate Editor New York, United States
Joined: December 04, 2010
KitMaker: 11,666 posts
AeroScale: 7,410 posts
Posted: Thursday, March 24, 2016 - 03:42 AM UTC
Quoted Text
Nice job and shading Joel... I will follow tihs
gr TC
Lars,
Thanks so much for stopping by and liking my efforts to date.
I've been using a modified black base technique to accomplish the random color fading, but on this build I went with just a Gray primer, and two of the 3 Lifecolor ODs to achieve this effect. As I start to weather the Mitchell, the overall colors will become darker, which is the overall effect I'm after.
Joel
On my Workbench:
Monogram 1/24 scale 427 Shelby Cobra
Just Completed:
Beemax 1/24 scale BMW M3 E30 1992 Evolution II
Bayern, Germany
Joined: January 17, 2006
KitMaker: 673 posts
AeroScale: 492 posts
Posted: Thursday, March 24, 2016 - 01:28 PM UTC
Your fading effects are really well executed Joel. I like how you have broken up the monochrome paint job and given it some interesting and pleasing variations. Very, very nice!
I hear you concerning the decals, having gone through the exact issue with my Zero build. Have you tried the hot cloth compress technique that sometimes works on Tamiya decals? It might be worth a shot.
Joel_W
Associate Editor New York, United States
Joined: December 04, 2010
KitMaker: 11,666 posts
AeroScale: 7,410 posts
Posted: Thursday, March 24, 2016 - 10:34 PM UTC
Quoted Text
Your fading effects are really well executed Joel. I like how you have broken up the monochrome paint job and given it some interesting and pleasing variations. Very, very nice!
I hear you concerning the decals, having gone through the exact issue with my Zero build. Have you tried the hot cloth compress technique that sometimes works on Tamiya decals? It might be worth a shot.
Ernest,
Glad that you like my most efforts with paint color modulation. And yes, I did try the hot moist towel. Jus nothing really worked with those pesky Academy decals. I've already sealed them, and started the weathering process, so what it is, it is.
Joel
On my Workbench:
Monogram 1/24 scale 427 Shelby Cobra
Just Completed:
Beemax 1/24 scale BMW M3 E30 1992 Evolution II
Joel_W
Associate Editor New York, United States
Joined: December 04, 2010
KitMaker: 11,666 posts
AeroScale: 7,410 posts
Posted: Sunday, April 03, 2016 - 12:18 AM UTC
With work and some major family health issues, I haven't had much time to model, but I finally have completed enough work for a short update.
After the decals had dried, I applied two coats of Alcad II Lacquer Gloss #310 which is pre-thinned @ a flow rate of 20 psi. The next work session I hand brushed on 1 even coat of flory's Dark Acrylic Sludge wash, removed the excess when dry, then two more blotchy coats. When I was satisfied with the results, I sealed the washes with Alcad II Lacquer #314 Flat finish, and I do mean dead flat also at a flow rate of 20 psi.
For those of you who aren't familiar with the Alcad II clears, they're not Lacquer based, there Mineral spirit based. The confusion comes from the issue that Alcad II Lacquer is the company name. The Clears clearly state on the label that they're Mineral Spirit based. And one sniff will confirm that fact.
I wasn't very happy how the Ruptured Duck decal looked as I never could get it to lay down correctly, so I decided to weather it. However, I went a little too far. But there is really no turning back, so I'll have to live with the results.


Joel
On my Workbench:
Monogram 1/24 scale 427 Shelby Cobra
Just Completed:
Beemax 1/24 scale BMW M3 E30 1992 Evolution II
Stockholm, Sweden
Joined: May 02, 2006
KitMaker: 1,953 posts
AeroScale: 1,902 posts
Posted: Sunday, April 03, 2016 - 12:42 AM UTC
Well done Joel! This will be a stunner when it's finished!

Magnus
Press banner to the right to follow my trail to the new forums!
Joel_W
Associate Editor New York, United States
Joined: December 04, 2010
KitMaker: 11,666 posts
AeroScale: 7,410 posts
Posted: Sunday, April 03, 2016 - 01:05 AM UTC
Quoted Text
Well done Joel! This will be a stunner when it's finished!
Magnus
Magnus,
Welcome back my friend. You've been missed, of that I can assure you.
and thank you for that most kind comment.
Joel
On my Workbench:
Monogram 1/24 scale 427 Shelby Cobra
Just Completed:
Beemax 1/24 scale BMW M3 E30 1992 Evolution II
Joel_W
Associate Editor New York, United States
Joined: December 04, 2010
KitMaker: 11,666 posts
AeroScale: 7,410 posts
Posted: Sunday, April 03, 2016 - 01:47 AM UTC
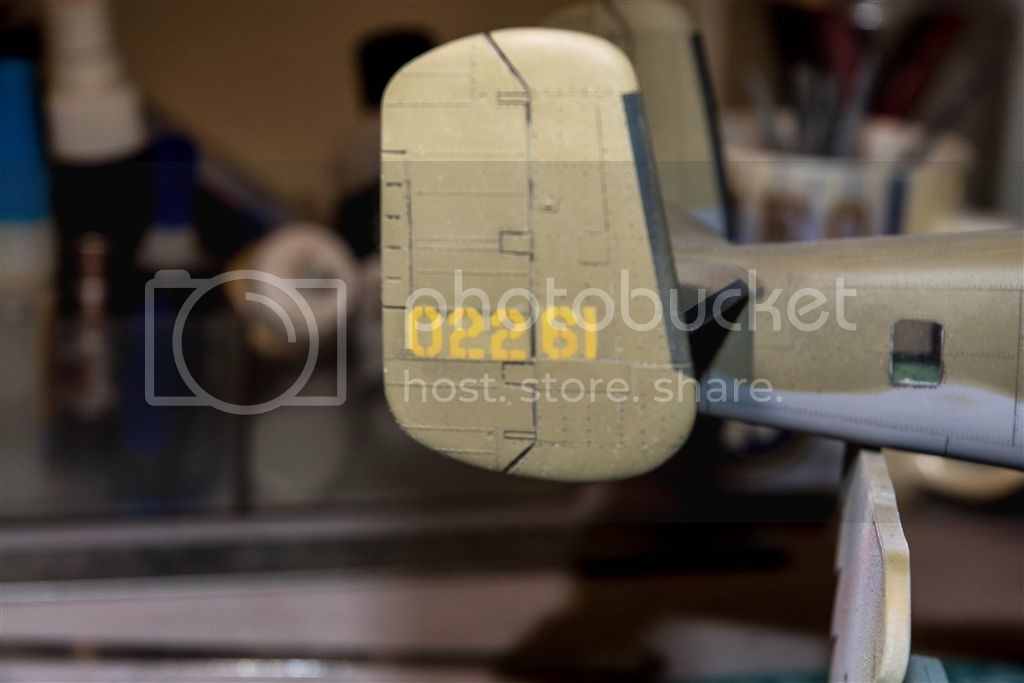
Ok guys, I've run into a major problem. I just can't live with those twin tail yellow Id markings. I was hoping that the sludge wash followed by a light dusting of OD would hide the clear film issues, but it just doesn't cut it. So now I have 3 issues:
1-How to remove the twin Vertical Stabs without damaging the Horizontal Stab?
2-Is there a way to remove the decal and paint on one side only, and not damage the de-icing boots?
3- And how do I replace those ID numbers? I checked my spare decal box and the only yellow ID decals I have (Cartgraf) aren't close number wise.
I really have no one to blame for this screw up but myself as I should have addressed the issue previously.
Joel
On my Workbench:
Monogram 1/24 scale 427 Shelby Cobra
Just Completed:
Beemax 1/24 scale BMW M3 E30 1992 Evolution II
Joel_W
Associate Editor New York, United States
Joined: December 04, 2010
KitMaker: 11,666 posts
AeroScale: 7,410 posts
Posted: Sunday, April 03, 2016 - 02:34 AM UTC
Decided to try one more Dark slug wash, then if it looks ok, I'll flat coat it again.
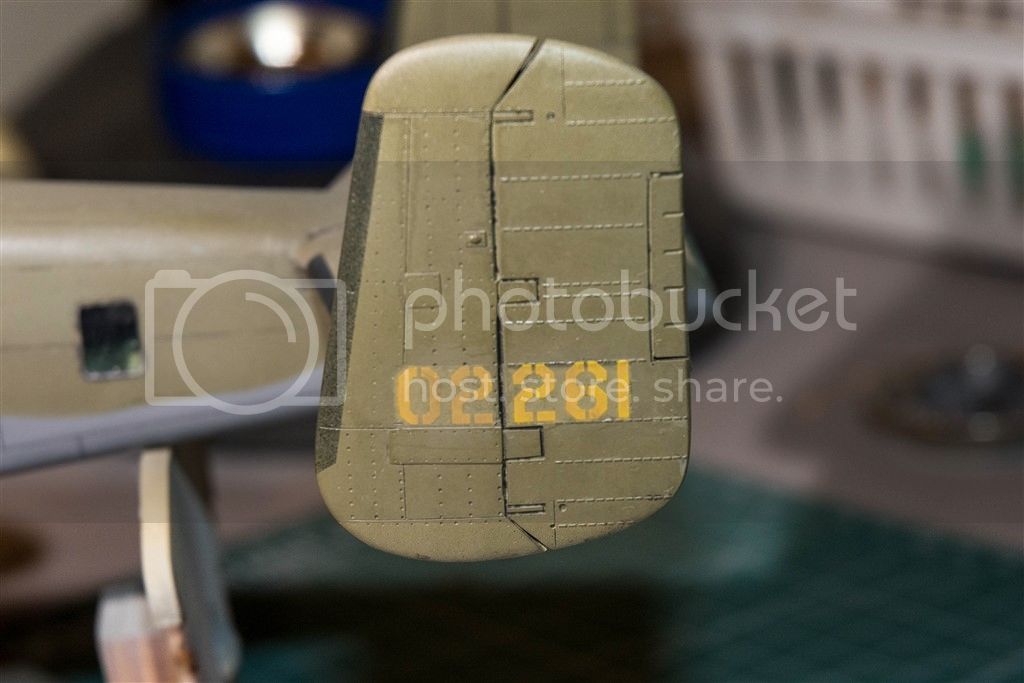
So what to you all think? I'm honestly thinking that in the overall context of the finished model, it will be more then passable.
Joel
On my Workbench:
Monogram 1/24 scale 427 Shelby Cobra
Just Completed:
Beemax 1/24 scale BMW M3 E30 1992 Evolution II
Illinois, United States
Joined: January 12, 2015
KitMaker: 292 posts
AeroScale: 292 posts
Posted: Sunday, April 03, 2016 - 02:36 AM UTC
Looks to me like it will be fine especially from normal viewing distances. I think we all tend to look too close at our projects we have put heart and soul into.
AussieReg
Associate Editor #007
Victoria, Australia
Joined: June 09, 2009
KitMaker: 8,156 posts
AeroScale: 3,756 posts
Posted: Sunday, April 03, 2016 - 02:37 AM UTC
Joel, I can see the reason for your dissatisfaction when viewed up close and I think that you are right to try to fix it if it is on your mind. The silvering really does draw your eye and take away from the rest of the build in those close shots. The decals should lift off if you place a sponge soaked in warm water over them, and hopefully this won't affect the paintwork if the sponge is place carefully just over the decal. I would try to source some stencil masks and paint the codes.
If you can't find any off the shelf then drop Mal (Holdfast) a line and see what he can do.
Cheers, D
ON the bench
Revell 1/24 '53 Corvette (building as '54)
Revell 1/24 BMW 507 Coupe and Cabrio
Italeri 1/48 Me262 B-1a/U1 Nightfighter
Monogram 1/24 '57 Chevy Nomad
Dragon 1/350 USS Frank Knox DD-742
Joel_W
Associate Editor New York, United States
Joined: December 04, 2010
KitMaker: 11,666 posts
AeroScale: 7,410 posts
Posted: Sunday, April 03, 2016 - 03:00 AM UTC
Damian,
I would agree as to your method, expect that the decals are sealed in one coat of Alcad Gloss and a few coats of Alcad flat. So it's going to take a lot more effort to remove them. I'll do another wash later tonight, then let it set for a day or so, and see how I feel about it. In the mean time, I'll start those two little mini kits called engines, as how they come straight from the box are just plain horrible.
Joel
On my Workbench:
Monogram 1/24 scale 427 Shelby Cobra
Just Completed:
Beemax 1/24 scale BMW M3 E30 1992 Evolution II
Joel_W
Associate Editor New York, United States
Joined: December 04, 2010
KitMaker: 11,666 posts
AeroScale: 7,410 posts
Posted: Sunday, April 03, 2016 - 03:01 AM UTC
Quoted Text
Looks to me like it will be fine especially from normal viewing distances. I think we all tend to look too close at our projects we have put heart and soul into.
Karl,
Thanks for stopping by, and offering your opinion. There is a lot of merit in what you said about bigger then life size and viewing distance.
I guess I'm just P.O. at my self for seeing it, and doing nothing about it when it was an easy fix.
Joel
On my Workbench:
Monogram 1/24 scale 427 Shelby Cobra
Just Completed:
Beemax 1/24 scale BMW M3 E30 1992 Evolution II
California, United States
Joined: September 06, 2013
KitMaker: 70 posts
AeroScale: 6 posts
Posted: Sunday, April 03, 2016 - 03:49 AM UTC
Joel,
I feel your pain. I was building Eduard's 1/72 FW 190 A-8 and sealed the decals with Alcad II flat before realizing that the number "10" on one side slipped out alignment. This was much more obvious than your tail codes. I found Microsol Set carefully applied allowed me to remove the decal without harming the paint underneath. In fact I could still see the gloss patch. I was unable to find a replacement for the "10" in my collection nor any in the available set online. Now I'm going to just to live with the missing decal. However I do have the original boxing of the B-25 that I'm going to build someday. If you could wait about a month, the kit is at another location I could send you the tail codes you need. Just let me know.
Russ
#522
New Jersey, United States
Joined: January 20, 2013
KitMaker: 1,460 posts
AeroScale: 1,443 posts
Posted: Sunday, April 03, 2016 - 04:34 AM UTC
Quoted Text
Ok guys, I've run into a major problem. I just can't live with those twin tail yellow Id markings. I was hoping that the sludge wash followed by a light dusting of OD would hide the clear film issues, but it just doesn't cut it. So now I have 3 issues:
1-How to remove the twin Vertical Stabs without damaging the Horizontal Stab?
2-Is there a way to remove the decal and paint on one side only, and not damage the de-icing boots?
3- And how do I replace those ID numbers? I checked my spare decal box and the only yellow ID decals I have (Cartgraf) aren't close number wise.
I really have no one to blame for this screw up but myself as I should have addressed the issue previously.
Joel
1. Try scotch tape over the decals putting it on and pulling it off numerous times. If that doesn't work try Micro-Sol to soften and remove it. I would stay away from Solvaset for this.
2. Don't put the tape on the deicer boots. I think you can try this with vertical stabs still in place on the model.
3. Techmod has yellow US numerals that should get the job done for you.
https://www.hannants.co.uk/product/TM48807 When I have issues like this with serial numbers, I cut them out inidvidually with a #11 blade and apply them one at a time.
Before trying any of the above, prick the decal film on the existing decals with a #11 blade in a number of places and wash with MicroSol. You may get the liquid underneath and solve your problems. Worth an attempt.
I should add that the above has worked for me sometimes even after putting "sealers" on.
On my Workbench: 1/48 B-17F Luscious Lady (with H.G. Barnes and Karl Hauffe - Research) and with Contributions from the late Arthur T. Babiarz, Jr.
Two Special Hobby AF-2 Guardians, one AF-2W, and one AS-2S
Joel_W
Associate Editor New York, United States
Joined: December 04, 2010
KitMaker: 11,666 posts
AeroScale: 7,410 posts
Posted: Sunday, April 03, 2016 - 05:25 AM UTC
Russ,
Thanks for the offer, but I'm going to solve the problem one way or the other.
Brian,
Twice I've accidently touched large sealed decals with Tamiya tape and off they came. So it might be the answer to removing them.
With a few more Sludge washes they might not look that bad, and as Karl said, I've got them center stage and greater then life size. Still, I keep on looking at them.
Lets see how they react to the tape method. If I can get them off, then I'll worry about replacements. I really don't want to use another set from the kit Unless I can successfully cut out each number perfectly.
Joel
On my Workbench:
Monogram 1/24 scale 427 Shelby Cobra
Just Completed:
Beemax 1/24 scale BMW M3 E30 1992 Evolution II


