Hey Joel,
I've accidentally removed sealed decals with 3M blue masking tape. I'd bet if you really needed to mask them to paint, they'd come right off.
Best of luck with whichever fix you take!
Gaz
World War II
Discuss WWII and the era directly before and after the war from 1935-1949.
Discuss WWII and the era directly before and after the war from 1935-1949.
Hosted by Rowan Baylis
1/48 Academy B-25B Mitchell
Posted: Sunday, April 03, 2016 - 06:16 AM UTC
Joel_W

Joined: December 04, 2010
KitMaker: 11,666 posts
AeroScale: 7,410 posts

Posted: Sunday, April 03, 2016 - 09:05 PM UTC
Quoted Text
Hey Joel,
I've accidentally removed sealed decals with 3M blue masking tape. I'd bet if you really needed to mask them to paint, they'd come right off.
Best of luck with whichever fix you take!
Gaz
Gary,
The 2nd sludge wash didn't really help that much either so it was removal time.
Of course touched decals sealed or not sealed will come right off when you don't want them to. But try as I might, they didn't budge with even regular packing tape.
I ended up sanding off the decals and paint right through the primer to the bare plastic with #320 grit. Then I started to polish and feather out the paint with 600, 4000, 6000, 8000, and finally 12,000. Now I'm about ready to prime with Tamiya lacquer primer thinned 2:3 with Yellow cap. Will let it cure for a few hours and then gently polish with 12000.
Joel
Posted: Monday, April 04, 2016 - 02:10 AM UTC
Joel,
Of course, the decals wouldn't budge. It's that way with foil too. On the plus side of masking and things easily lifted, I used Panzer Putty to mask over one of my foil spinners and it didn't lift the foil. The stuff is definitely showing advantages over tape and blutack.
Gaz
Of course, the decals wouldn't budge. It's that way with foil too. On the plus side of masking and things easily lifted, I used Panzer Putty to mask over one of my foil spinners and it didn't lift the foil. The stuff is definitely showing advantages over tape and blutack.
Gaz
Joel_W

Joined: December 04, 2010
KitMaker: 11,666 posts
AeroScale: 7,410 posts

Posted: Saturday, April 09, 2016 - 08:05 PM UTC
OK, the week of repairs to the vert Stabs ID numbers are over.
Here's what I started with. the issue was that the ID decal didn't settle and snug down, so you can clearly see it's a decal. There is also some flash and silvering even after a dose of weathering.

the decals were sanded off as was the paint down to the bare plastic. I polished and feathered each Vert. Stab with 600 grit through 12,000 Micro Mesh polishing pads. I then primed with Mig Ammo Acrylic gray primer. Then polished with 12,000 Micro Mesh pad.
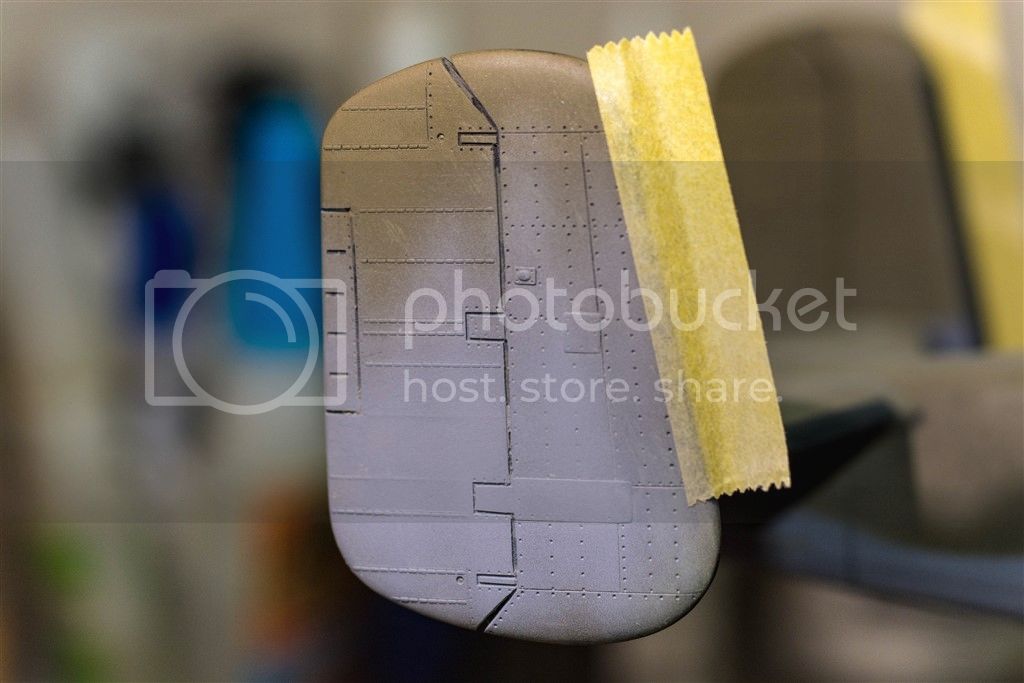
The next work session was just air brushing on LifeColor #43 O.D. and a little mottling effect with their weathered O.D.
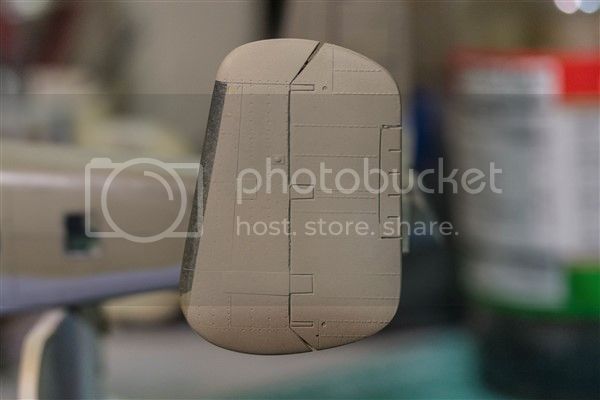
I really no longer like to cut out each individual letter/number as alignment is almost impossible for me with only eyesight in one eye these days. Such is life, and I've adjusted to it the best I can. But since I'm going with the kit decals again, I cut out and trimmed each number, then I applied them one at a time. But this time I went with Mr Mark Setter and Mr Mark Softer decal solutions that I borrowed from my brother till mine arrives from Hong Kong. These two products are very strong, and I will only use them when all else fails. Too much and they will eat right through the decals and paint.
After the decals had dried for two days, I applied a coat of Alcad 11 gloss, when dry, a flory dark sludge wash, then a couple of coats of Alcad 11 Flat.
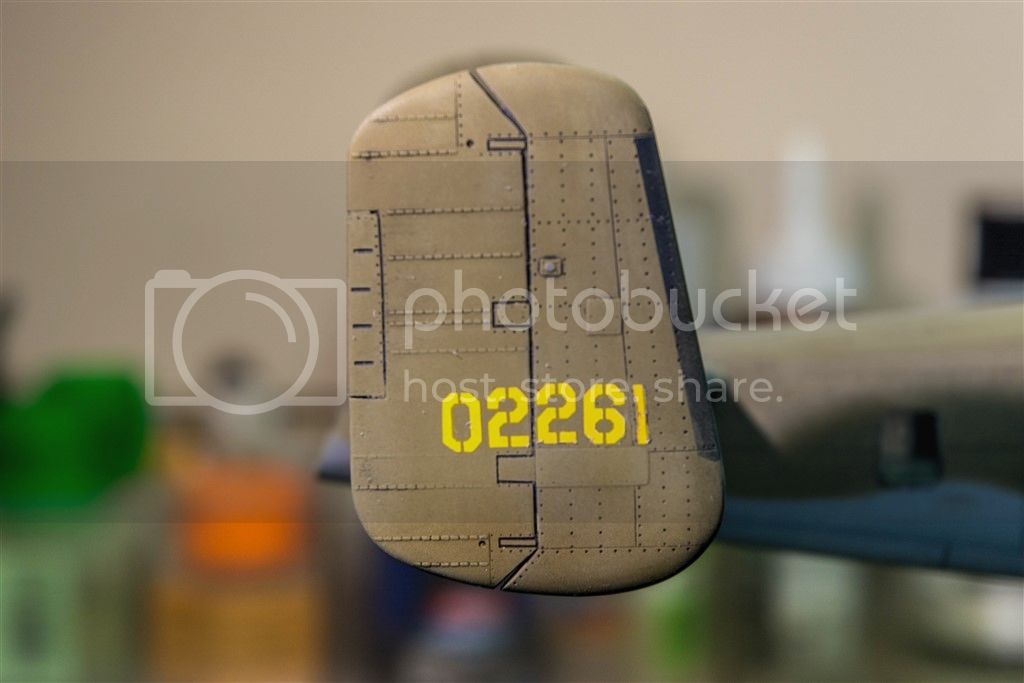
The finished results are exactly what I was looking for. Unfortunately the 0 & 1st 2 are a little crooked, but when viewed a foot or two away as a display model, you just don't notice it at all.
Now, back to detailing both engines.
Joel
Here's what I started with. the issue was that the ID decal didn't settle and snug down, so you can clearly see it's a decal. There is also some flash and silvering even after a dose of weathering.
the decals were sanded off as was the paint down to the bare plastic. I polished and feathered each Vert. Stab with 600 grit through 12,000 Micro Mesh polishing pads. I then primed with Mig Ammo Acrylic gray primer. Then polished with 12,000 Micro Mesh pad.
The next work session was just air brushing on LifeColor #43 O.D. and a little mottling effect with their weathered O.D.
I really no longer like to cut out each individual letter/number as alignment is almost impossible for me with only eyesight in one eye these days. Such is life, and I've adjusted to it the best I can. But since I'm going with the kit decals again, I cut out and trimmed each number, then I applied them one at a time. But this time I went with Mr Mark Setter and Mr Mark Softer decal solutions that I borrowed from my brother till mine arrives from Hong Kong. These two products are very strong, and I will only use them when all else fails. Too much and they will eat right through the decals and paint.
After the decals had dried for two days, I applied a coat of Alcad 11 gloss, when dry, a flory dark sludge wash, then a couple of coats of Alcad 11 Flat.
The finished results are exactly what I was looking for. Unfortunately the 0 & 1st 2 are a little crooked, but when viewed a foot or two away as a display model, you just don't notice it at all.
Now, back to detailing both engines.
Joel

goodn8

Joined: October 12, 2008
KitMaker: 709 posts
AeroScale: 651 posts

Posted: Saturday, April 09, 2016 - 09:04 PM UTC
Joel, so much work and efforts on such a partial issue... Respect!
You did yery well on this and as you said, no one will notice it if you dont know. Even the state as it was before had been good enough and I had gone with it. Only in the modellers eyes there is a remarkable spot because you know.
Anyway, well done Sir!
Thomas
You did yery well on this and as you said, no one will notice it if you dont know. Even the state as it was before had been good enough and I had gone with it. Only in the modellers eyes there is a remarkable spot because you know.
Anyway, well done Sir!

Thomas


SaxonTheShiba

Joined: February 01, 2009
KitMaker: 1,233 posts
AeroScale: 663 posts

Posted: Saturday, April 09, 2016 - 09:47 PM UTC
Joel, good save with the decals. Good shot of your wash on the plane as well. As we all can attest, this is one of those hobbies where you can be 99% done and that 1% left really screws you. Glad you were able to fix it and move on. Looking forward to the rest of "Ruptured Duck".!!!!
Cheers,
Ian


Cheers,
Ian


Szmann

Joined: September 02, 2014
KitMaker: 1,977 posts
AeroScale: 295 posts

Posted: Saturday, April 09, 2016 - 09:55 PM UTC
I'm glad you get thru in the decaling issue, Joel. Personally, I hate them and I use home made stencils (I have a plotter) or free hand painting if the machine cannot handle. As already stated, full respect for your effort.
Cheers!
Gabriel
Cheers!
Gabriel

Joel_W

Joined: December 04, 2010
KitMaker: 11,666 posts
AeroScale: 7,410 posts

Posted: Saturday, April 09, 2016 - 10:31 PM UTC
Ian, Thomas, & Gabriel,
Thanks for the more then kind words. I'm just glade I'm finally moving on. For a basically OOB build, it's setting a personal time record.
Joel
Thanks for the more then kind words. I'm just glade I'm finally moving on. For a basically OOB build, it's setting a personal time record.
Joel
SteveAndrews

Joined: August 16, 2010
KitMaker: 693 posts
AeroScale: 551 posts

Posted: Sunday, April 10, 2016 - 12:37 PM UTC
Hi Joel
I'm popping over for a look as I feel I owe it to you after all your support and interest in my Mirage build. Now I wish I'd be in from the beginning.
That's a work of art you are building. The paint job is wonderful, especially the fading which gives it a lovely look of an aircraft that has seen some sun and air. Not having followed from the beginning I took a look and thought 'I wonder how he did that'.
Your blog is treat too. I just read it from end to end.
Great work and a fun read.
All the best
Steve

greif8

Joined: January 17, 2006
KitMaker: 673 posts
AeroScale: 492 posts

Posted: Sunday, April 10, 2016 - 02:11 PM UTC
Much respect for going to great lengths to make those corrections Joel. They look great. You have more discipline than I do, as I would probably not have gone as deeply to the well as you have done.
Posted: Sunday, April 10, 2016 - 02:43 PM UTC
Joel,
Your fixed decals sunk in very well! They look painted on. I use Mark Softer regularly. Mark Setter rarely. Mark setter doesn't work well with acrylics, though Mark Softer doesn't seem to cause any problems.
Looking forward to seeing your bird done,
Gaz
Your fixed decals sunk in very well! They look painted on. I use Mark Softer regularly. Mark Setter rarely. Mark setter doesn't work well with acrylics, though Mark Softer doesn't seem to cause any problems.
Looking forward to seeing your bird done,
Gaz
Joel_W

Joined: December 04, 2010
KitMaker: 11,666 posts
AeroScale: 7,410 posts

Posted: Sunday, April 10, 2016 - 08:15 PM UTC
Quoted Text
Hi Joel
I'm popping over for a look as I feel I owe it to you after all your support and interest in my Mirage build. Now I wish I'd be in from the beginning.
That's a work of art you are building. The paint job is wonderful, especially the fading which gives it a lovely look of an aircraft that has seen some sun and air. Not having followed from the beginning I took a look and thought 'I wonder how he did that'.
Your blog is treat too. I just read it from end to end.
Great work and a fun read.
All the best
Steve
Steve,
Thanks for taking the time away from your Mirage IIIc build and stopping buy. A positive comment or two from a builder of your caliber is always more then welcome, and much appreciated.
Joel
Joel_W

Joined: December 04, 2010
KitMaker: 11,666 posts
AeroScale: 7,410 posts

Posted: Sunday, April 10, 2016 - 08:21 PM UTC
Quoted Text
Much respect for going to great lengths to make those corrections Joel. They look great. You have more discipline than I do, as I would probably not have gone as deeply to the well as you have done.
Ernest,
I wouldn't classify the correction as great, since the correction also has an issue, but over all they're a far cry from my 1st attempt, and well worth the extended effort.
Joel
Joel_W

Joined: December 04, 2010
KitMaker: 11,666 posts
AeroScale: 7,410 posts

Posted: Sunday, April 10, 2016 - 08:53 PM UTC
Quoted Text
Joel,
Your fixed decals sunk in very well! They look painted on. I use Mark Softer regularly. Mark Setter rarely. Mark setter doesn't work well with acrylics, though Mark Softer doesn't seem to cause any problems.
Looking forward to seeing your bird done,
Gaz
Gary,
That's interesting that you don't use a setting agent, or at least Mr. Mark's but use their Softer. Why would either decal solution not work well with acrylics since the paint is sealed in a clear gloss? Are you referring to the type of clear gloss that you use? I use either Alcad II gloss which is mineral spirit based, or Pledge for small decal applications that I hand brush.
Joel
Posted: Monday, April 11, 2016 - 01:15 AM UTC
Hi Joel
Great save on the fin decal the result is about as "painted on" as you can get. You seem to be jinxed on twin-fins (remember the Ventura)!
All the best
Rowan
Great save on the fin decal the result is about as "painted on" as you can get.
 You seem to be jinxed on twin-fins (remember the Ventura)!
All the best
Rowan

Posted: Monday, April 11, 2016 - 03:47 AM UTC
Joel,
Mark Setter leaves a mark in Future which is one of my primary clear coats. I also use Testors gloss and matte clears.
I've just found in my own personal experience that using it hasn't improved silvering or adherence. My best weapon against silvering has been ensuring an absolutely smooth place to place the decal. Details notwithstanding, of course. I have taken the practice of adding a couple layers of clear in the decal area then sanding and buffing to a high sheen. With that practice, I find a couple applications of mark softer, if needed, enables the decal to sink into any detail.
Again, everything I've said is to be taken as 'so far'.
Best wishes,
Gaz
Joel_W

Joined: December 04, 2010
KitMaker: 11,666 posts
AeroScale: 7,410 posts

Posted: Monday, April 11, 2016 - 09:21 PM UTC
Quoted Text
Hi Joel
Great save on the fin decal the result is about as "painted on" as you can get.You seem to be jinxed on twin-fins (remember the Ventura)!

All the best
Rowan
Rowan,
My sincerest thanks for stopping by. Yeah the actual decaling is about as perfect as one can get, and these are with those thick, non-yielding Academy decals. I've spend a little time staring at those Vert. Stabs since my post, and in real life the numbers line up pretty well, so I've moved on to the landing gear and the engines.
I've completely forgotten about my screw up on the PV-1 Vert. stab on one side. If nothing else, I'm getting pretty good at saves.
Joel
Joel_W

Joined: December 04, 2010
KitMaker: 11,666 posts
AeroScale: 7,410 posts

Posted: Monday, April 11, 2016 - 09:25 PM UTC
Quoted Text
Joel,
Mark Setter leaves a mark in Future which is one of my primary clear coats. I also use Testors gloss and matte clears.
I've just found in my own personal experience that using it hasn't improved silvering or adherence. My best weapon against silvering has been ensuring an absolutely smooth place to place the decal. Details notwithstanding, of course. I have taken the practice of adding a couple layers of clear in the decal area then sanding and buffing to a high sheen. With that practice, I find a couple applications of mark softer, if needed, enables the decal to sink into any detail.
Again, everything I've said is to be taken as 'so far'.
Best wishes,
Gaz
Gary,
I certainly agree about the smoother the surface, the better the decals will lay down. The issue I had with the Academy decals is that they just wouldn't settle into the nooks and crannies, and I could still see the decal clear film. The Mr. Mark system is much stronger then even Solvaset, and did the trick for me.
I rarely use Pledge unless I just have a small area to deal with. My go to clears these days are the Alcads IIs, and I still love the Testors Dullcoat and Glosscoats. I just may end up going back to them even though they're lacquer based. But honestly, the Alcad's smell just as bad.
Joel
Twentecable

Joined: September 13, 2003
KitMaker: 339 posts
AeroScale: 244 posts

Posted: Tuesday, April 12, 2016 - 01:28 AM UTC
Ow Joel,
so much effort on those decals. I recently use Revell Softener, it really works good on sinking decals into cavices.
Also another little point. you could try to use a pin wash on some elements to just let them pop out a little more..
gr TC
so much effort on those decals. I recently use Revell Softener, it really works good on sinking decals into cavices.
Also another little point. you could try to use a pin wash on some elements to just let them pop out a little more..
gr TC
Joel_W

Joined: December 04, 2010
KitMaker: 11,666 posts
AeroScale: 7,410 posts

Posted: Tuesday, April 12, 2016 - 01:42 AM UTC
Quoted Text
Ow Joel,
so much effort on those decals. I recently use Revell Softener, it really works good on sinking decals into cavices.
Also another little point. you could try to use a pin wash on some elements to just let them pop out a little more..
gr TC
Lars,
Thanks for the tip, but No one Really carries Revell products that I deal with on my side of the pond.
What elements are you referring to? Every rivet and panel line and separation of flying surfaces have a dark wash showing. Did I miss something?
Joel
Posted: Tuesday, April 12, 2016 - 01:58 AM UTC
Hi Joel
Thanks for the heads-up on the Alclad clear coats. I've not tried them yet, but their white filler/primer is excellent. It's heady stuff - you definitely need good ventilation when spraying it (and I wear a mask too).
All the best
Rwoan
Thanks for the heads-up on the Alclad clear coats. I've not tried them yet, but their white filler/primer is excellent. It's heady stuff - you definitely need good ventilation when spraying it (and I wear a mask too).
All the best
Rwoan

Twentecable

Joined: September 13, 2003
KitMaker: 339 posts
AeroScale: 244 posts

Posted: Tuesday, April 12, 2016 - 02:29 AM UTC
Hi Joel,
sorry my bad ... I didn't didnt take a good look on you last pic. It is all there!
gr TC
sorry my bad ... I didn't didnt take a good look on you last pic. It is all there!
gr TC
Joel_W

Joined: December 04, 2010
KitMaker: 11,666 posts
AeroScale: 7,410 posts

Posted: Tuesday, April 12, 2016 - 08:45 PM UTC
Quoted Text
Hi Joel
Thanks for the heads-up on the Alclad clear coats. I've not tried them yet, but their white filler/primer is excellent. It's heady stuff - you definitely need good ventilation when spraying it (and I wear a mask too).
All the best
Rwoan
Rowan,
I've tried over the last year two new clears: Alcad II, and Windsor & Newton. Honestly, there are pluses and minuses to both of them.
I originally decided to switch from my long time friends: Testors Glosscoat and Dullcoat because of the lacquer smell. The Winsor & Newton is acrylic based and has no smell. It thins wonderfully with Tamiya X20-A. Gloss is really glossy, and Matt is flat enough. the issue is that it's made for sealing oil paints, so the drying/curing time has lasted for more then a week or two. Much to much trouble for me to deal with. So I rarely use it for anything other then when I need to brush on a Matt coat, as I still use Pledge for hand brushing Gloss for small jobs.
the Alcad II clears are fantastic, are pre-thinned which is a good thing and a bad thing. The good is that you just pour and shoot at their recommended settings. they dry to the touch in a min or two, and fully cure over night. The bad is that you're spending a lot of hard earned money for something that's half Mineral Spirit or turps. I much rather would prefer to cut it myself, as it would last twice as long.
For now I'll stick to the Alcad II's but I can easily see myself going back to the Testors clearcoats.
I also use Testors Metalizer Clearcoat for sealing NMF's. My eyesight is horrid these days, but I can't see any difference from pre sealed to post sealed.
Joel
Joel_W

Joined: December 04, 2010
KitMaker: 11,666 posts
AeroScale: 7,410 posts

Posted: Tuesday, April 12, 2016 - 08:48 PM UTC
Quoted Text
Hi Joel,
sorry my bad ... I didn't didnt take a good look on you last pic. It is all there!
gr TC
Lars,
that's a relief, I thought that I'd screwed up or something.
Joel
Joel_W

Joined: December 04, 2010
KitMaker: 11,666 posts
AeroScale: 7,410 posts

Posted: Saturday, April 16, 2016 - 03:08 AM UTC
Work continues on the two big radials, but little by little I've been squeezing in the front landing gear as the ignition wiring is not only tedious, but lately a major cause of eye strain.
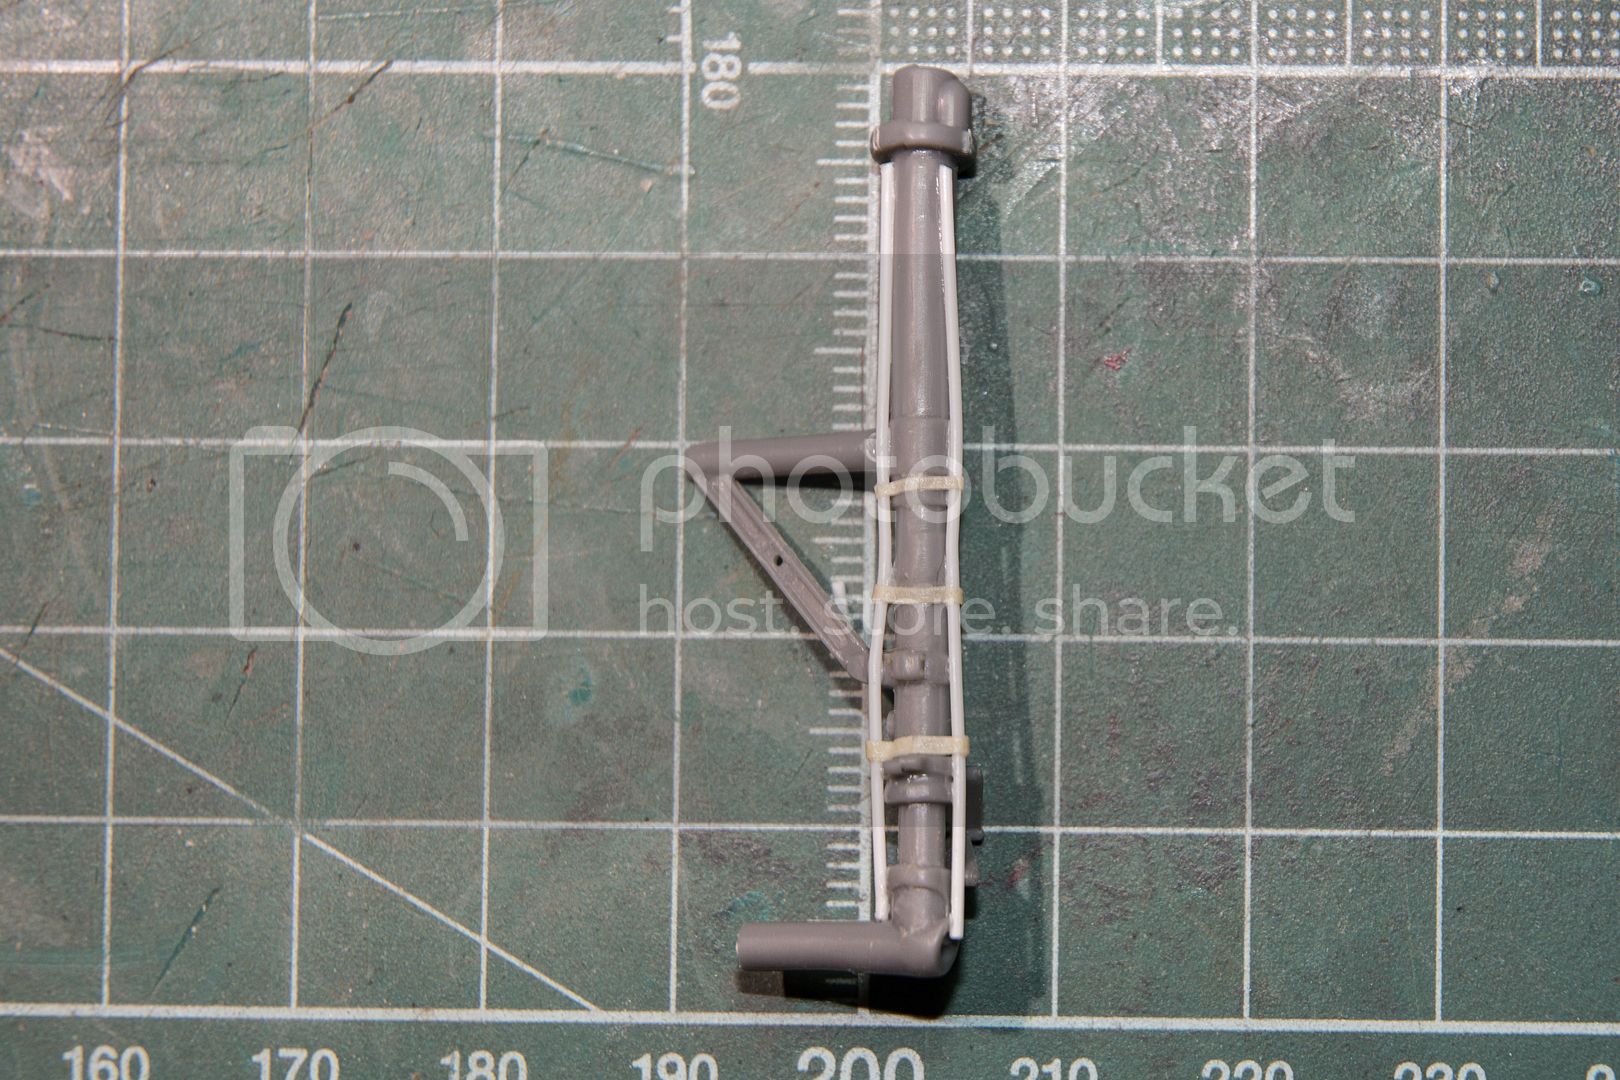
Both main struts received some light sanding and filing to remove as much of the molding lines as I could get to.
I then added the duel hydraulic lines that run down opposite sides of the struts. 3 aluminum clamps were fashioned out of masking tape.
I then primed with Tamiya Gray lacquer primer thinned 2 to 3 with their Yellow cap Lacquer Thinner. I laid down a tack coat, then two wet coats. Came out as smooth as silk. I painted the Oleos with Model Master Chrome Metalizer.
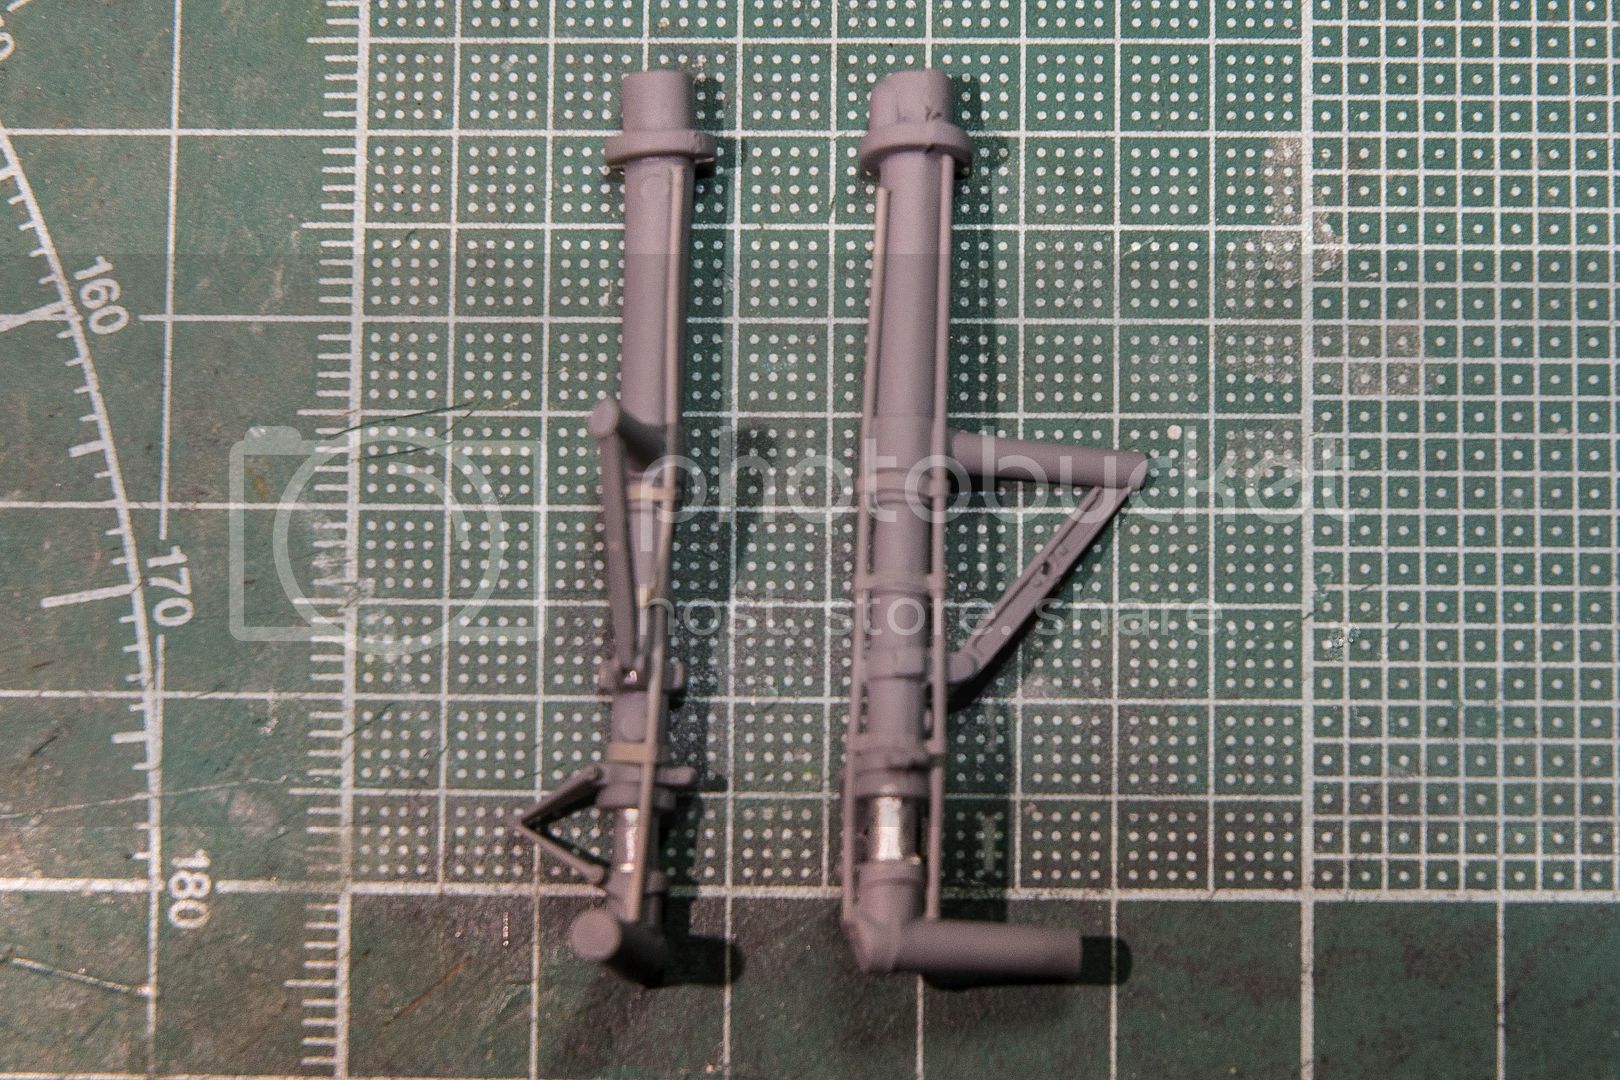
When dry, I masked the oleos with Tamiya tape and airbrushed on Alcad II White Aluminum #106 I also painted the wheels with Alcad II Aluminum #101. Then the tires with Tamiya FX-69 Nato Black thinned 2:3 with Tamiya X20-A. the Nato Black is in reality a Gray Black, and really looks like rubber.


For those that noticed, the Alcad II only goes up just past the cross brace. From there up it will be hidden inside the wheel wells. And since my Mitchell with be attached to a base, there really isn't much reason to paint or detail what can't be seen.
And now it's back to wiring those engines. Unfortunately, I'm still on the 1st one.
Joel
Both main struts received some light sanding and filing to remove as much of the molding lines as I could get to.
I then added the duel hydraulic lines that run down opposite sides of the struts. 3 aluminum clamps were fashioned out of masking tape.
I then primed with Tamiya Gray lacquer primer thinned 2 to 3 with their Yellow cap Lacquer Thinner. I laid down a tack coat, then two wet coats. Came out as smooth as silk. I painted the Oleos with Model Master Chrome Metalizer.
When dry, I masked the oleos with Tamiya tape and airbrushed on Alcad II White Aluminum #106 I also painted the wheels with Alcad II Aluminum #101. Then the tires with Tamiya FX-69 Nato Black thinned 2:3 with Tamiya X20-A. the Nato Black is in reality a Gray Black, and really looks like rubber.
For those that noticed, the Alcad II only goes up just past the cross brace. From there up it will be hidden inside the wheel wells. And since my Mitchell with be attached to a base, there really isn't much reason to paint or detail what can't be seen.
And now it's back to wiring those engines. Unfortunately, I'm still on the 1st one.
Joel
 |


