

Paint job looks great Joel. I am yet to try LifeColour paints but I picked up the RAAF set a while back to use on my 1/32 Special Hobby P-39. On your feedback I will get some branded thinner to go with it as well before I cut loose on it.
I like the tone of the OD here, as you stated it looks to be a bit further into the brown than the green of the Tamiya version.
Cheers, D
World War II
Discuss WWII and the era directly before and after the war from 1935-1949.
Discuss WWII and the era directly before and after the war from 1935-1949.
Hosted by Rowan Baylis
1/48 Academy B-25B Mitchell

AussieReg

#007

Joined: June 09, 2009
KitMaker: 8,156 posts
AeroScale: 3,756 posts
Posted: Saturday, March 12, 2016 - 07:34 PM UTC

Joel_W

Joined: December 04, 2010
KitMaker: 11,666 posts
AeroScale: 7,410 posts
Posted: Sunday, March 13, 2016 - 01:53 AM UTC
Quoted Text
Hi Joel,
I'm glad that you understand photography. It's something that never drew my attention enough to study. My wife has a couple nice cameras wheras I just use my phone.
I have noticed, over the years, how many OD aircraft have that brownish look, but I haven't put an OD scheme on an aircraft since 1979. So I'm gonna pay a lot of attention to what you do here.
Heck, your painting techniques have helped me immensely over the past year. So I always get a lot from your blogs.
Gary
I've been interested in photography since I was a teenager. Back then it was so simple. not so today. The cameras are mini computers that can do amazing things.
None of my painting techniques are ground breaking by any stretch of the imagination. I'm just thrilled some of it was helpful to you.
Joel

Joel_W
Joined: December 04, 2010
KitMaker: 11,666 posts
AeroScale: 7,410 posts
Posted: Sunday, March 13, 2016 - 01:57 AM UTC
Quoted Text
Joel:
I also will have many questions to ask when I get to painting the B-17.
Brian,
I've seen you paint work, and it's 1st class. Any questions, just fire away, and I'll try my best to answer them.
Joel
Joel_W
Joined: December 04, 2010
KitMaker: 11,666 posts
AeroScale: 7,410 posts
Posted: Sunday, March 13, 2016 - 02:03 AM UTC
Quoted Text
The B25 is looking great Joel. I use much the same ratio as you do when I spray LifeColor paints, going with 3:1 thinner to paint; and I always use their thinner. I spray it at between 10-15 psi to both ensure it goes down wet and to reduce drying on the tip, though I still get that and keep a Q-tip handy for clean ups. I don't use silly type stuff much for the reason you stated, but I did not know clean up was as easy as washing it off with water and will have to give that technique another look.
Do you use foam board as a background for your photos? They look so much better than my "in progress" shots. Of course you also use a much better camera than mine; I have a Sony Cybershot DSC-H7 and can get good pictures when I carefully setup my lighting and use a light tent. As you can see by the photos in my Zero build though, shots taken at the bench or airbrush cabin are not nearly as good.
Ernest,
I actually my ratio is paint to thinner where I use more LC paint which is a 1st for me.
As far as a setup for my work grab pics, all I do is clean off my workbench so that there is nothing between the back of the model and the wall. I use a two light setup each with a 5500k rating (Daylight), and I've been using the Nikon pop up flash for fill light at 1/6 power rating. But with the new camera it's much more intense then on the old Nikon. I guess that the light and the clear plastic in front of it have both aged somewhat.
Joel
Joel_W
Joined: December 04, 2010
KitMaker: 11,666 posts
AeroScale: 7,410 posts
Posted: Sunday, March 13, 2016 - 02:06 AM UTC
Quoted Text
Paint job looks great Joel. I am yet to try LifeColour paints but I picked up the RAAF set a while back to use on my 1/32 Special Hobby P-39. On your feedback I will get some branded thinner to go with it as well before I cut loose on it.
I like the tone of the OD here, as you stated it looks to be a bit further into the brown than the green of the Tamiya version.
Cheers, D
Damion,
This is the 1st time that I've ever used anything buy Tamiya's X20-A or their Yellow cap Lacquer thinner. After doing more then a few Google searchers, the vast number of modelers said that they got better results using the LifeColor thinner, so I bit the bullet and bought it. I only use it for thinning the paint. I use plan old 91% ISO alcohol, followed by Iwata cleaner to clean my air brushes.
Joel

greif8

Joined: January 17, 2006
KitMaker: 673 posts
AeroScale: 492 posts

Posted: Sunday, March 13, 2016 - 06:01 PM UTC
Hi Joel, I have found that I can airbrush LifeColor paints better thinned more than I normally thin; for example I go 50/50 with Tamiya paints. I think the pigments in LifeColor paints are a bit bigger then Tamiya's, and I need to thin it more to get good effect. I spray either Tamiya of LifeColor nearly exclusively, with the exception of metal colors which I use Alclad II for.
Reference taking photos, it would take a lot of work to clear the bench for photos, so I guess I will keep using white or blue paper for backgrounds. I do think though that I will try out using my light setup to make the lighting look better on the "in progress" though. By the way, I have finished staining and weathering the carrier deck.
Ernest
Joel_W
Joined: December 04, 2010
KitMaker: 11,666 posts
AeroScale: 7,410 posts
Posted: Sunday, March 13, 2016 - 07:40 PM UTC
Quoted Text
Hi Joel, I have found that I can airbrush LifeColor paints better thinned more than I normally thin; for example I go 50/50 with Tamiya paints. I think the pigments in LifeColor paints are a bit bigger then Tamiya's, and I need to thin it more to get good effect. I spray either Tamiya of LifeColor nearly exclusively, with the exception of metal colors which I use Alclad II for.
Reference taking photos, it would take a lot of work to clear the bench for photos, so I guess I will keep using white or blue paper for backgrounds. I do think though that I will try out using my light setup to make the lighting look better on the "in progress" though. By the way, I have finished staining and weathering the carrier deck.
Ernest
Ernest,
Glad to hear that the carrier deck is moving along. It's one of my options for displaying the Mitchell. I opted not to add any weight since the nose is glass, and I felt that just to much would be needed in the engine nacelles to keep it form being a tail sitter. So I'm planning on using 3 pegs glued into the wheels, and the wheels pegged into a base. Just not to sure what type of base I'm going to be using.
One of my friends from Sweden also shoots LifeColor at at 1:1 ratio, yet I found that it took so many coats to cover that I eventually decided on 3 or 4:1 paint to thinner, which worked well for me. I'm a novice with LC paints, so I'll keep on decreasing the ratio to maybe 2:1 and see how it preforms for me.
Joel
Joel_W
Joined: December 04, 2010
KitMaker: 11,666 posts
AeroScale: 7,410 posts
Posted: Monday, March 14, 2016 - 01:59 AM UTC
It's hard to believe, but I've actually got another update. 1st it was weeks between updates as I struggled with putty, sanding, priming, and doing it over again. Now the work stages seem to be flowing somewhat smoother, and certainly faster.
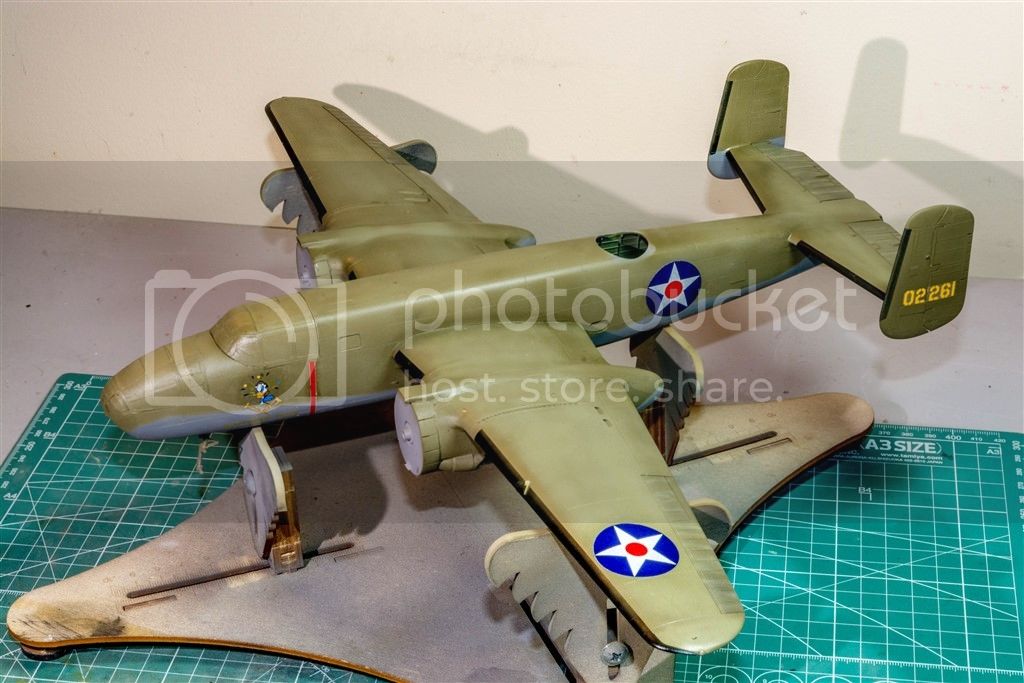
I air brushed on a weathered shade of O.D. in a wide blotchy pattern to represent moderate fading from the salt air and water, as well as whatever bleaching took place during their training on land. Then a few days later it took me more then 2 hours to mask out the de-icing boots. At 1st I was going to use a very dark gray, but after a google search, the boots were indeed a black rubber.
Look closely and you can see the lighter OD blotchy pattern.


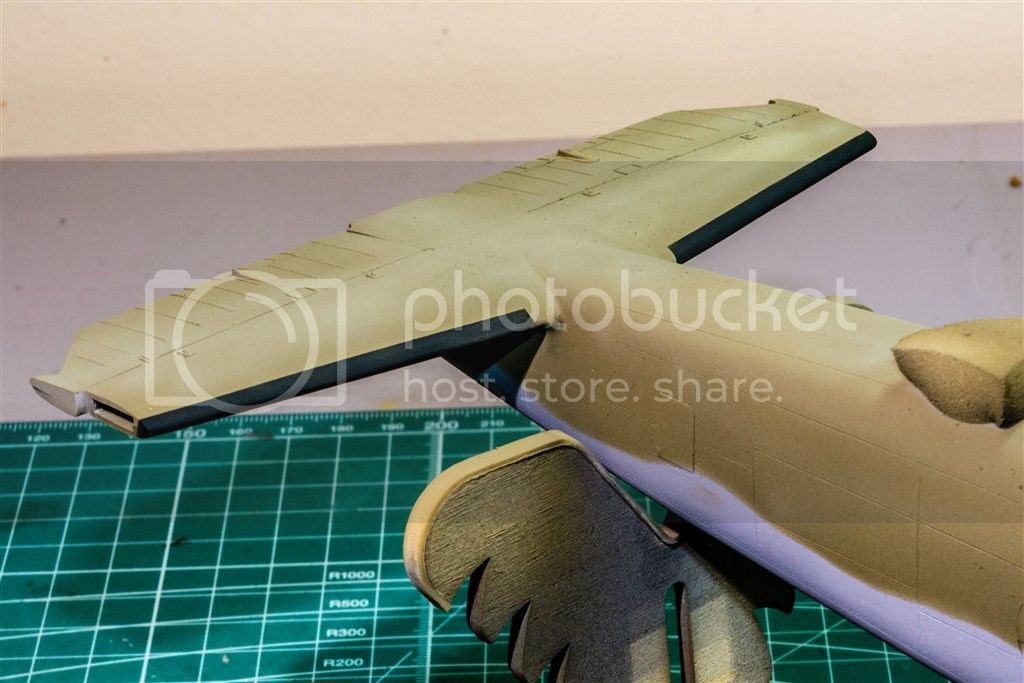
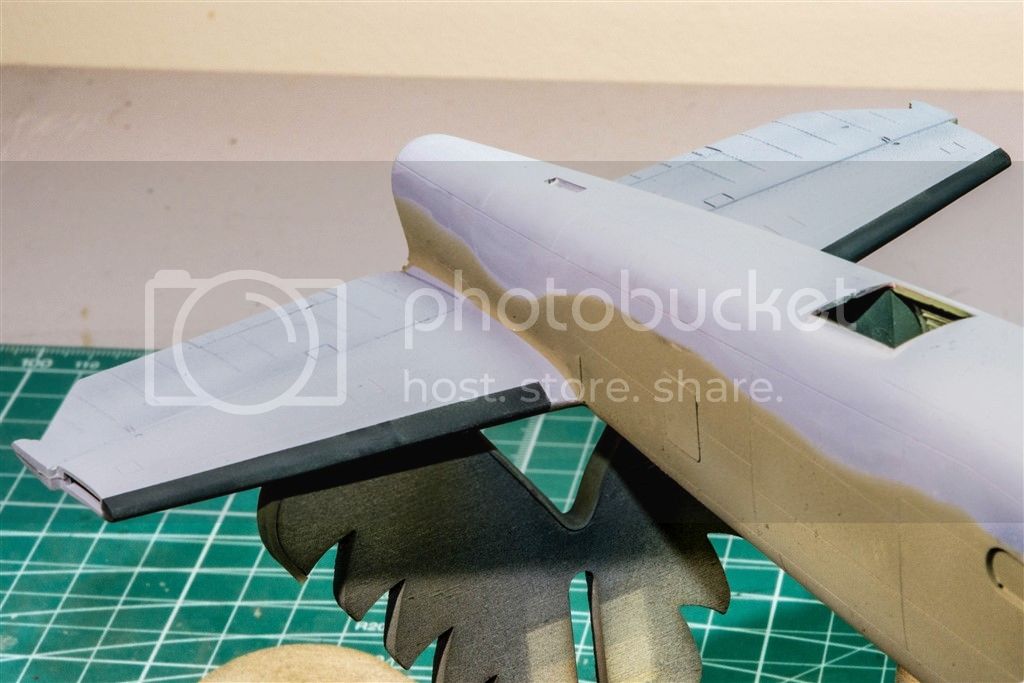
One thing to note, the rivet detail hasn't been weathered as yet. that's the shadow effect from the photo lights. I sure hope when I weather them, it looks that good.
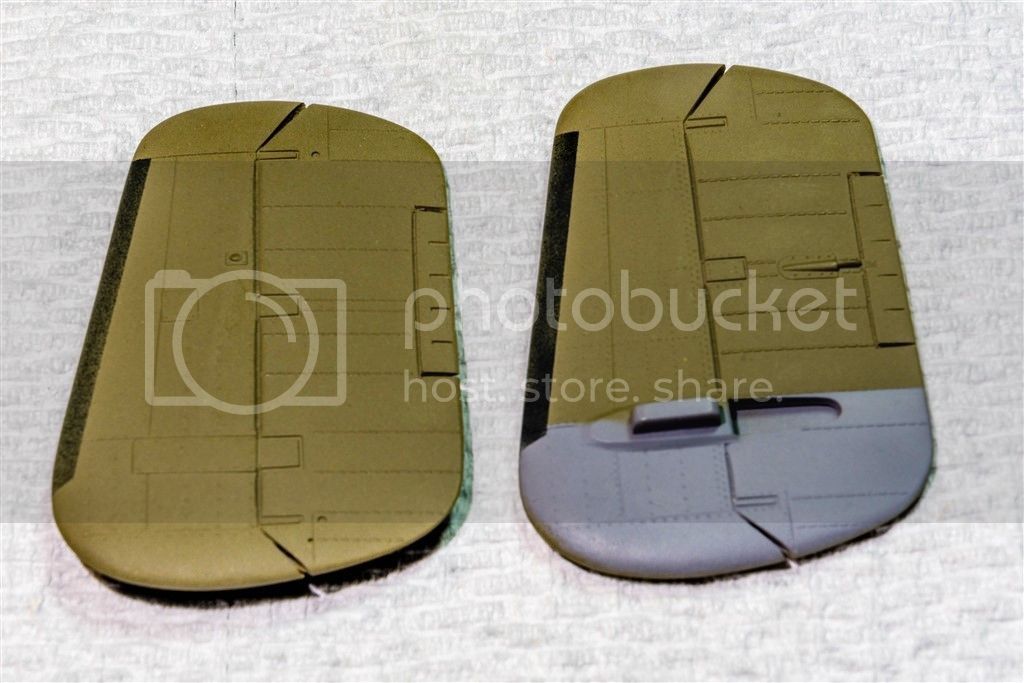
Joel
I air brushed on a weathered shade of O.D. in a wide blotchy pattern to represent moderate fading from the salt air and water, as well as whatever bleaching took place during their training on land. Then a few days later it took me more then 2 hours to mask out the de-icing boots. At 1st I was going to use a very dark gray, but after a google search, the boots were indeed a black rubber.
Look closely and you can see the lighter OD blotchy pattern.


One thing to note, the rivet detail hasn't been weathered as yet. that's the shadow effect from the photo lights. I sure hope when I weather them, it looks that good.

Joel

Kilo_Uniform

Joined: July 03, 2015
KitMaker: 280 posts
AeroScale: 141 posts
Posted: Tuesday, March 15, 2016 - 06:20 PM UTC
Hi Joel,
Congratulations in getting some colour on. I really like the faded 'sun-bleached' look.
Regards,
Kobus
Congratulations in getting some colour on. I really like the faded 'sun-bleached' look.
Regards,
Kobus

Redhand

#522
Joined: January 20, 2013
KitMaker: 1,460 posts
AeroScale: 1,443 posts
Posted: Tuesday, March 15, 2016 - 06:40 PM UTC
Impressive. Gotta love those vertical stabs!

Joel_W
Joined: December 04, 2010
KitMaker: 11,666 posts
AeroScale: 7,410 posts
Posted: Tuesday, March 15, 2016 - 08:04 PM UTC
Quoted Text
Hi Joel,
Congratulations in getting some colour on. I really like the faded 'sun-bleached' look.
Regards,
Kobus
Kobus,
Thanks. It sure took a lot longer to get some paint on then I originally thought it would. The bleaching effect hopefully will end up a few shades darker after a wash of a Burnt Sienna. That's the look I was originally aiming for.
Joel
Joel_W
Joined: December 04, 2010
KitMaker: 11,666 posts
AeroScale: 7,410 posts
Posted: Tuesday, March 15, 2016 - 08:11 PM UTC
Quoted Text
Impressive. Gotta love those vertical stabs!
Brian,
Thanks for taking some time away from the Luscious Lady to stop by. Yeah, twin Stabs really do look rather cool. Just might do a 1/72 scale B-24 on of these days.
I do want to eventually do a few B-17s, but in 1/72 scale as space is a major concern.
Joel
Redhand
#522
Joined: January 20, 2013
KitMaker: 1,460 posts
AeroScale: 1,443 posts
Posted: Tuesday, March 15, 2016 - 09:12 PM UTC
Work on the 17 is continuing, slowly, but continuing. As I said earlier, I will definitely be talking with you about OD and neutral gray when I get to the painting point of my build. Up to this point in my modeling career I've never pre-shaded, post-shaded, or done anything other than minimal weathering on the exterior surfaces. So this will be something new for me here too.

GazzaS

#424
Joined: April 23, 2015
KitMaker: 4,648 posts
AeroScale: 1,938 posts

Posted: Wednesday, March 16, 2016 - 02:56 AM UTC
Hi Joel,
She is really starting to look great! I really like the result of your painting technique.
It interested me to note that your Mitchell had de-icing boots wheras I found many pictures of B-29's that didn't. After some searching I found that they were removed by the crews once they got In-theater.
Gary
AussieReg
#007
Joined: June 09, 2009
KitMaker: 8,156 posts
AeroScale: 3,756 posts
Posted: Wednesday, March 16, 2016 - 04:54 AM UTC
I'm with Gazza, this is coming together beautifully. The weathering steps are giving a really nice depth to the overall paint job. The twin stabilisers look great as well, such a distinctive feature.
Cheers, D
Cheers, D

BlackWidow

Joined: August 09, 2009
KitMaker: 1,732 posts
AeroScale: 1,336 posts
Posted: Thursday, March 17, 2016 - 12:06 AM UTC
Quoted Text
It's hard to believe, but I've actually got another update. 1st it was weeks between updates as I struggled with putty, sanding, priming, and doing it over again. Now the work stages seem to be flowing somewhat smoother, and certainly faster....
Joel
It's the same with me, Joel. Sometimes it seems to need ages to get the cockpit done (of which you usually don't see much in the end), but after the fuselage is sanded and assembled with the wings and the first paint is thrown on it, it's done within a week or so. Happens to my new Spit right now. Last weekend everything seemed to last forever and now it's nearly done ....
Your Mitchell comes out really well. That de-icers are eye catching, they give the build a certain touch. I have never build a B-25 until now.
Torsten


Joel_W
Joined: December 04, 2010
KitMaker: 11,666 posts
AeroScale: 7,410 posts
Posted: Thursday, March 17, 2016 - 01:59 AM UTC
Quoted Text
Hi Joel,
She is really starting to look great! I really like the result of your painting technique.
It interested me to note that your Mitchell had de-icing boots wheras I found many pictures of B-29's that didn't. After some searching I found that they were removed by the crews once they got In-theater.
Gary
Gary,
I was somewhat surprised to see that the B-25Bs on the Doolittle raid still had de-icing boots on all the leading edges considering that they removed anything that they could to save weight. And since they were on a basically one way mission flying low in the warm tropical air, those boots certainly weren't needed. Yet they were left on.

Joel
Joel_W
Joined: December 04, 2010
KitMaker: 11,666 posts
AeroScale: 7,410 posts
Posted: Thursday, March 17, 2016 - 02:03 AM UTC
Quoted Text
I'm with Gazza, this is coming together beautifully. The weathering steps are giving a really nice depth to the overall paint job. The twin stabilisers look great as well, such a distinctive feature.
Cheers, D
Damian,
Thanks for the positive feedback. I'm hoping that the weathering planned with not be too much for these aircraft. Although, I was somewhat surprised to see just how quickly they did show signs of fading from the weather.
Joel
Joel_W
Joined: December 04, 2010
KitMaker: 11,666 posts
AeroScale: 7,410 posts
Posted: Thursday, March 17, 2016 - 02:05 AM UTC
Quoted Text
Quoted TextIt's hard to believe, but I've actually got another update. 1st it was weeks between updates as I struggled with putty, sanding, priming, and doing it over again. Now the work stages seem to be flowing somewhat smoother, and certainly faster....
Joel
It's the same with me, Joel. Sometimes it seems to need ages to get the cockpit done (of which you usually don't see much in the end), but after the fuselage is sanded and assembled with the wings and the first paint is thrown on it, it's done within a week or so. Happens to my new Spit right now. Last weekend everything seemed to last forever and now it's nearly done ....
Your Mitchell comes out really well. That de-icers are eye catching, they give the build a certain touch. I have never build a B-25 until now.
Torsten
Torsten,
Ain't that the truth. Although it will be way more then a week or two till it's across the finish line and on the display shelf.
Joel

Szmann

Joined: September 02, 2014
KitMaker: 1,977 posts
AeroScale: 295 posts
Posted: Thursday, March 17, 2016 - 02:18 AM UTC
You're doing a great painting / weathering job, Joel. I have the same thing in mind with my B17G build. Actually, I have distilled two OD tones, and I intend to use "bleaching" as well.
Cheers
Gabriel
Cheers
Gabriel
Joel_W
Joined: December 04, 2010
KitMaker: 11,666 posts
AeroScale: 7,410 posts
Posted: Thursday, March 17, 2016 - 02:47 AM UTC
Quoted Text
You're doing a great painting / weathering job, Joel. I have the same thing in mind with my B17G build. Actually, I have distilled two OD tones, and I intend to use "bleaching" as well.
Cheers
Gabriel
Gabriel,
Thanks for the positive feedback. I'm certainly lookin forward to seeing your B17G in it's camo paint scheme.
Joel
Joel_W
Joined: December 04, 2010
KitMaker: 11,666 posts
AeroScale: 7,410 posts
Posted: Wednesday, March 23, 2016 - 01:35 AM UTC
Work continues at a slower pace then my usual snail's pace. I've reached the point of decaling. I wasn't sure what base I would be using for the filter and washes, so I went with an Acrylic clear gloss varnish by Winsor & Newton. I thin it 1:1 with Tamiya X20-A, and a final coat thinned at 2:3.
Once dry, I used the kit decals, and was I ever disappointed. The Academy version of the Accurate Miniature decals done by Cartograf are well in register, and the colors appear to be dead on. The major issue I had with them is that neither the Microscale system nor Walther's Solvaset seamed to have any effect on them. I'm going to order Mr. Set and Mr. Sol which seem to work well with Chinese decals when I next need to use kit decals produced in China.
For the most part the decals settled down ok, but rarely fully in the recessed panel lines.
Once the decals dried, I decided that I would be using dark Acrylic filter, and washes, so I sealed the decals with Alcad's Mineral Spirit based Gloss Kleer Kote #310.

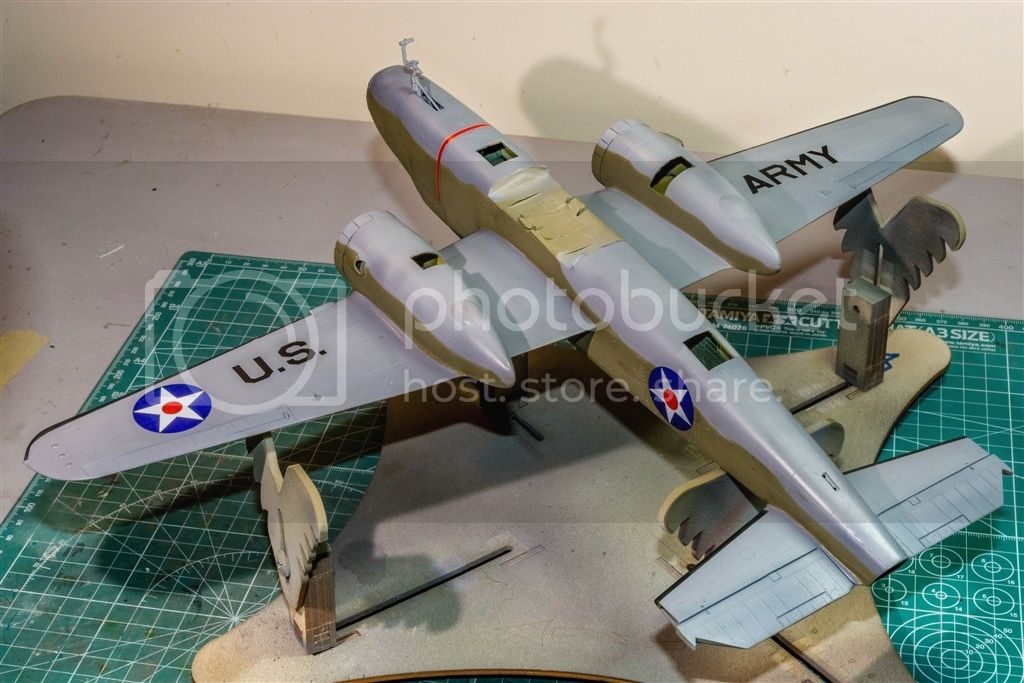
Then I decided to dry fit the twin vertical Stabs. What a difference in the overall appearance of the Mitchell.
Joel
Once dry, I used the kit decals, and was I ever disappointed. The Academy version of the Accurate Miniature decals done by Cartograf are well in register, and the colors appear to be dead on. The major issue I had with them is that neither the Microscale system nor Walther's Solvaset seamed to have any effect on them. I'm going to order Mr. Set and Mr. Sol which seem to work well with Chinese decals when I next need to use kit decals produced in China.
For the most part the decals settled down ok, but rarely fully in the recessed panel lines.
Once the decals dried, I decided that I would be using dark Acrylic filter, and washes, so I sealed the decals with Alcad's Mineral Spirit based Gloss Kleer Kote #310.


Then I decided to dry fit the twin vertical Stabs. What a difference in the overall appearance of the Mitchell.


Joel
AussieReg
#007
Joined: June 09, 2009
KitMaker: 8,156 posts
AeroScale: 3,756 posts
Posted: Wednesday, March 23, 2016 - 01:51 AM UTC
Looking good Joel. A bit frustrating about the decals, but from where I sit it is coming together beautifully! The fading on the upper surfaces looks spot-on.
Cheers, D
Cheers, D
Redhand
#522
Joined: January 20, 2013
KitMaker: 1,460 posts
AeroScale: 1,443 posts
Posted: Wednesday, March 23, 2016 - 01:53 AM UTC
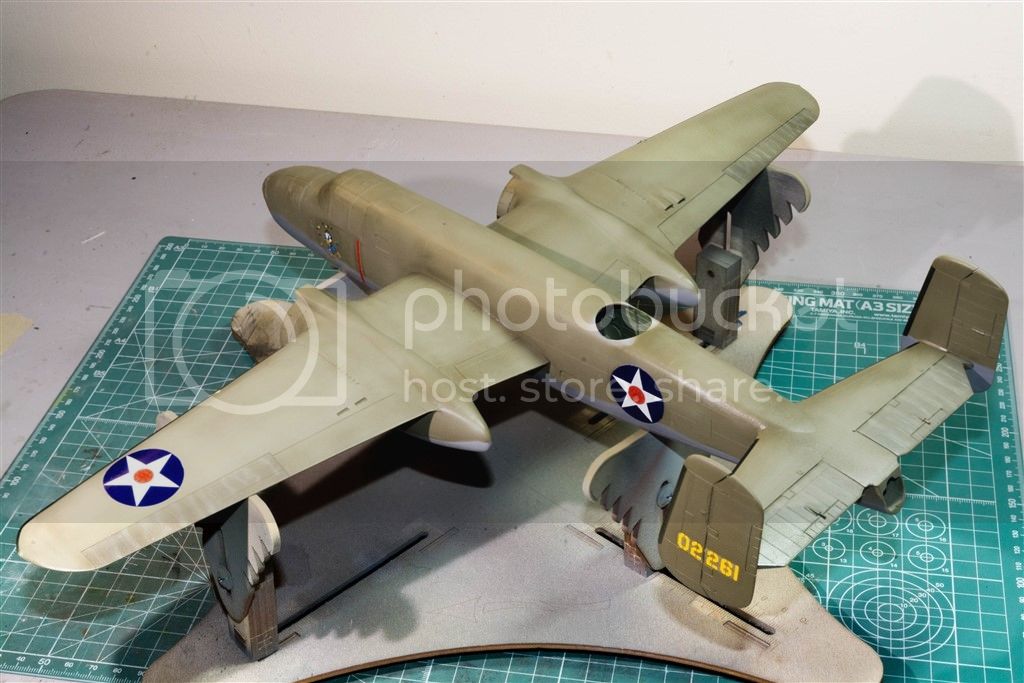
What's with the national insignia on the wings? Is it me or is the position of the stars not strictly fore and aft?
Joel_W
Joined: December 04, 2010
KitMaker: 11,666 posts
AeroScale: 7,410 posts
Posted: Wednesday, March 23, 2016 - 02:20 AM UTC
Quoted Text
What's with the national insignia on the wings? Is it me or is the position of the stars not strictly fore and aft?
Brian,
The instructions and the few pictures and line drawings I have show that the national insignias on the wings are 90 degrees square to the fuselage not parallel to the leading edge. I know it looks a little weird but that's the way I should be.
Joel
 |

WEB HOSTING BY


Copyright ©2021 AeroScale and Kitmaker Network, a subsidiary of Silver Star Enterprises
All Rights Reserved. Please read our Conditions of Use and Privacy Policy.
All Rights Reserved. Please read our Conditions of Use and Privacy Policy.