

Air Campaigns
Want to start or join a group build? This is where to start.
Want to start or join a group build? This is where to start.
Hosted by Frederick Boucher, Michael Satin
OFFICIAL: The Sign of the Four Campaign
Removed by original poster on 07/30/16 - 18:37:32 (GMT).
Removed by original poster on 07/30/16 - 18:38:24 (GMT).
Removed by original poster on 07/30/16 - 18:39:17 (GMT).

Tobar

Joined: October 17, 2002
KitMaker: 192 posts
AeroScale: 70 posts
Posted: Friday, July 29, 2016 - 11:43 PM UTC
Hello "Sign of 4" campaign!!
I am just getting around to uploading my post and some assembly pics... I've chosen the F4F-4 Wildcat from Tamiya as my subject only because the assembly is easy with not too many parts.. I am looking forward to the final paint scheme.... I want to try a completely different technique then what I am use too. I will be painting my Wildcat the 3-tone scheme but will try a weathering technique I've seen on YouTube... to 'age' the paint. It's like a 'Frosting' technique where a mix of 10x1 ratio, (thinner to white paint), is applied to 'age' the base color then a second covering of a lighter base coat at the same ratio (10x1 of thinner to base color) is used to blend the base coat with the 'frost' coat.... thus making an aged effect....I've never done this and never tried it... ... So it will be a learning experience...
....hear is a pictorial update...


I am just getting around to uploading my post and some assembly pics... I've chosen the F4F-4 Wildcat from Tamiya as my subject only because the assembly is easy with not too many parts.. I am looking forward to the final paint scheme.... I want to try a completely different technique then what I am use too. I will be painting my Wildcat the 3-tone scheme but will try a weathering technique I've seen on YouTube... to 'age' the paint. It's like a 'Frosting' technique where a mix of 10x1 ratio, (thinner to white paint), is applied to 'age' the base color then a second covering of a lighter base coat at the same ratio (10x1 of thinner to base color) is used to blend the base coat with the 'frost' coat.... thus making an aged effect....I've never done this and never tried it...
... So it will be a learning experience... ....hear is a pictorial update...

phantom_phanatic309

#372

Joined: March 10, 2010
KitMaker: 2,568 posts
AeroScale: 1,619 posts

Posted: Saturday, July 30, 2016 - 08:45 PM UTC
Welcome aboard Thomas. Always good to see a Wildcat being built.
Should be an interesting finish, not a technique I've come across before.
The oil paint dried a lot quicker than I expected. I think the hot weather we've been having has really helped. I glossed everything with Johnsons Klear and made a start on the detail painting. The details are now starting to come alive.


bomber14
Joined: February 02, 2015
KitMaker: 330 posts
AeroScale: 286 posts
Posted: Sunday, July 31, 2016 - 04:45 AM UTC
a short update on my corsair build. i am a little farther along then the photo shows. i found some clear rigid tube to pose the plane in flight and chose the paint i will use. the pilot figure (not shown) is finished too, man i stink at painting figures. the pilot supplied in the hasegawa kit was wrong for the korean war era with a WWII fabric headgear. so instead of trying to find a pilot with a helmet i cut the head off of a standing figure that came with monograms saber jet and swapped them. also if you look at the photo you will see the motor wrapped in high density foam. this is what will hold the motor in place instead of gluing or mounting it somehow in the fuselage. i had to pirate an engine from the monogram p-61 black widow (i cast a resin replacement of it first) because i don't know what happened to the one that came with the kit, can't find it. apparently i removed it for something years ago.
i have another problem now. i really like the death rattler rattlesnake version that came with the decals but the white parts of the decals had yellowed so i put them in the rear window of my car to let the summer sun bleach them white again. it worked but it also damaged the pigment in the decals. they wrinkled and cracked like little crows feet marks like you would see on a sun damaged car. the carrier seems to be ok based on a test i did with some of the decals but even walthers decal solvent wont smooth them out.
so far i can't find any replacement sheets on the internet but the only sites i know of to check are squadron and spruebrothers. anyone know of any other sites that have a good selection of decals? i think i can salvage the rattlesnakes. i need the national insignias and the marine markings, squadron markings which are WS on the rudder/MARINES on the wings and the vmf323 and 96845 on the sides.
thanks-joe

AussieReg

#007

Joined: June 09, 2009
KitMaker: 8,156 posts
AeroScale: 3,756 posts
Posted: Tuesday, August 02, 2016 - 07:09 PM UTC
A small progress report from me on the PB4 Y-2 Privateer.
I deviated from the instructions slightly and added the fuselage front pieces to each half, some filling and sanding required here to bring things into line.


I have installed the engines into the cowls and fitted them to the nacelles. no fit issues here.

The top half of the starboard wing is slightly narrower than the bottom half, so I have glued in a fine strip of evergreen and will shape this once it is set.

Onwards and upwards, some great builds going on here folks!
Cheers, D


GazzaS
#424
Joined: April 23, 2015
KitMaker: 4,648 posts
AeroScale: 1,938 posts

Posted: Wednesday, August 03, 2016 - 02:30 AM UTC
Damian,
Nice work on the wing fix. Now I have an idea what to do when presented with the problem. There is some hefty fabric detail for scale there. Engines look good, too.
Gaz
Nice work on the wing fix. Now I have an idea what to do when presented with the problem. There is some hefty fabric detail for scale there. Engines look good, too.
Gaz
AussieReg
#007
Joined: June 09, 2009
KitMaker: 8,156 posts
AeroScale: 3,756 posts
Posted: Wednesday, August 03, 2016 - 02:35 AM UTC
Thanks Gaz. I will be knocking the fabric back a bit on all of the flying surfaces, as you said it is just a little bit out of proportion to the scale!!
Cheers, D
Cheers, D
Tobar
Joined: October 17, 2002
KitMaker: 192 posts
AeroScale: 70 posts
Posted: Wednesday, August 03, 2016 - 06:43 AM UTC

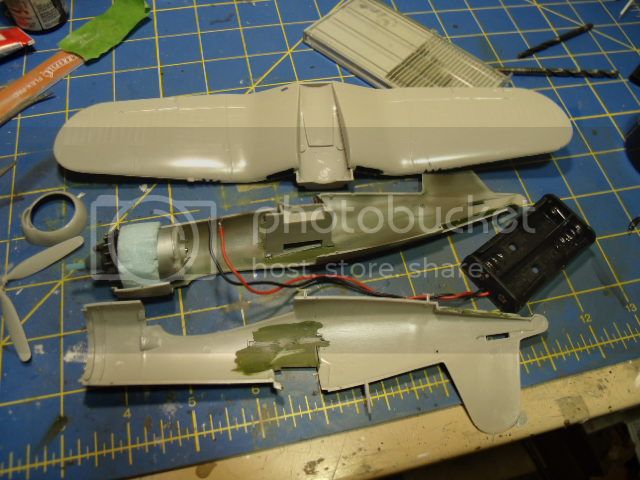
Here is a quick update as to where I am in this build...
Other then the lower wing and side fuselage halves, I assembled 3 assemblies so far: Engine, Cockpit, Landing Gear.
All three have received their base paint and a gloss coat to accept the enamel dark wash next. I am still anticipating the process of 'Frosting' the final paint scheme overall. If it doesn't work the way I want it too, you'll still see how it comes out.......
GazzaS
#424
Joined: April 23, 2015
KitMaker: 4,648 posts
AeroScale: 1,938 posts
Posted: Wednesday, August 03, 2016 - 08:18 AM UTC
In the past I never gave paint time to cure. Dry-to-the-touch was good enough for me. Now, I'm trying to see if even more patience can improve the finish.
RLM65 applied. RLM 65 came in various shades, some almost seafoam green while others were closer to azure.

Cheers!
RLM65 applied. RLM 65 came in various shades, some almost seafoam green while others were closer to azure.
Cheers!
bomber14
Joined: February 02, 2015
KitMaker: 330 posts
AeroScale: 286 posts
Posted: Wednesday, August 03, 2016 - 04:55 PM UTC
all nice work on the builds so far guys.
gary, that is interesting. i often thought some of the kit and decal makers got the colors wrong since i had seen directions calling for rlm 65 or 76 for the sides and underside but then the art work and the color diagrams so a more sky color. are there other codes to the rlm, like rlm65-a for example?
joe
GazzaS
#424
Joined: April 23, 2015
KitMaker: 4,648 posts
AeroScale: 1,938 posts
Posted: Wednesday, August 03, 2016 - 11:12 PM UTC
Joe,
As far as I know there aren't any subcodes. It's just a matter of what the supplier churned out with a certain batch. Just like when you paint a room in your house, you always buy extra because if you run back to the hardware store for more paint, it's possible to get a different batch from the same supplier and notice a difference when the new paint is laid down.
There is no "exact" Color. Best we can do is approximate enough to be happy.
Best wishes,
Gaz
SGTJKJ
#041

Joined: July 20, 2006
KitMaker: 10,069 posts
AeroScale: 3,788 posts

Posted: Wednesday, August 03, 2016 - 11:28 PM UTC
Quoted Text
There is no "exact" Color. Best we can do is approximate enough to be happy.
Best wishes,
Gaz
Gaz, I am with you on this one.
I have seen how much colors can be different in the army in peacetime. Imagine how it will be in wartime with several different factories producing and applying paint.

AussieReg
#007
Joined: June 09, 2009
KitMaker: 8,156 posts
AeroScale: 3,756 posts
Posted: Thursday, August 04, 2016 - 02:43 AM UTC
Quoted Text
I have seen how much colors can be different in the army in peacetime. Imagine how it will be in wartime with several different factories producing and applying paint.
And with leftovers from 2 or 3 different batches being mixed together to finish off a job. I think we overthink this issue to the point of distraction sometimes, but doing the research is fun.
Cheers, D
phantom_phanatic309
#372
Joined: March 10, 2010
KitMaker: 2,568 posts
AeroScale: 1,619 posts
Posted: Thursday, August 04, 2016 - 03:08 AM UTC
And I'm working from a grainy copy of a 100 year old photo so I'm making a lot of educated guesses in my final finish!
Stoker

Joined: February 07, 2015
KitMaker: 58 posts
AeroScale: 19 posts
Posted: Thursday, August 04, 2016 - 05:19 AM UTC
Hi Everybody 
Just a quick update, my Canuck is together and the painting process has begun. Put a coat of gloss black on tonight, hopefully get the painting done by the end of the weekend.

Just a quick update, my Canuck is together and the painting process has begun. Put a coat of gloss black on tonight, hopefully get the painting done by the end of the weekend.
GazzaS
#424
Joined: April 23, 2015
KitMaker: 4,648 posts
AeroScale: 1,938 posts
Posted: Thursday, August 04, 2016 - 10:38 AM UTC
Hi Ron,
Looks nice. So much engine there!
Gaz
Looks nice. So much engine there!
Gaz
GazzaS
#424
Joined: April 23, 2015
KitMaker: 4,648 posts
AeroScale: 1,938 posts
Posted: Friday, August 05, 2016 - 11:28 AM UTC
Painting camouflage. I used Panzer Putty to get the soft-edged splinter like that of the Duxford 109.

Not entirely happy with some of the unattached parts. Somebody masked a couple of them backwards!
Gaz
Not entirely happy with some of the unattached parts. Somebody masked a couple of them backwards!
Gaz
MichaelSatin

Joined: January 19, 2008
KitMaker: 3,909 posts
AeroScale: 2,904 posts
Posted: Saturday, August 06, 2016 - 03:44 AM UTC
Nice work going on here!
Here's where I am at the end of today's session on the 1/32 Tamiya F4U-1A:
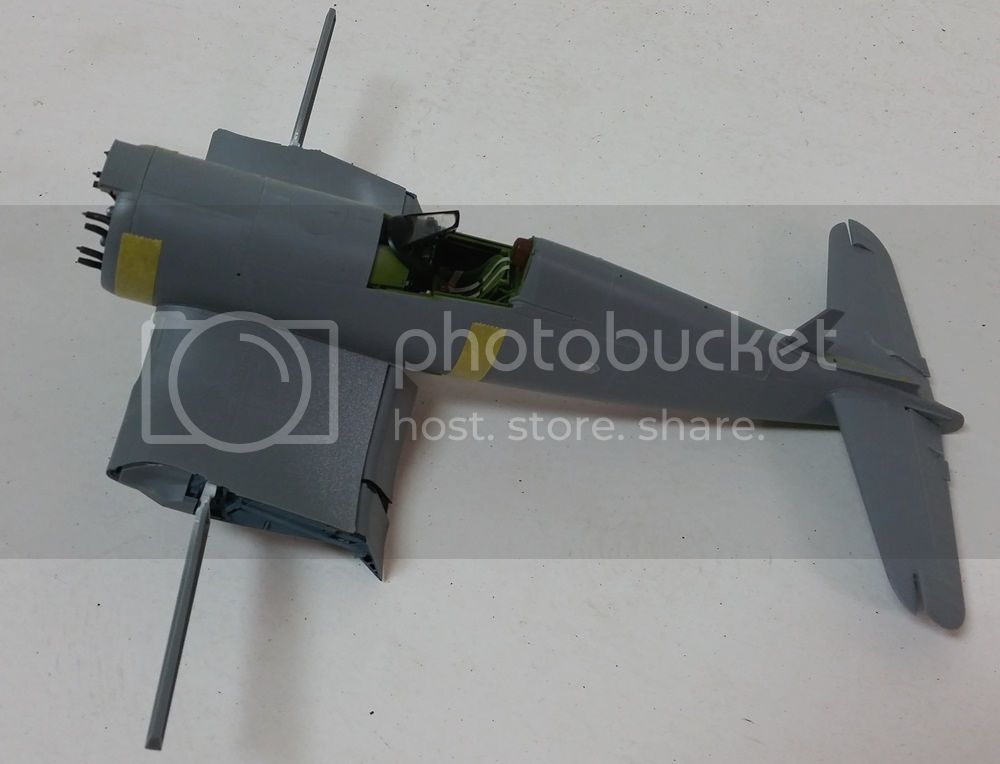
That central wing section has more to it that you think! And I know flaps aren't normally down, but I like the way they look. So there.

The cockpit with the armored glass installed. Typical excellent Tamiya details and fit so far!
On to the outer wings tomorrow (hopefully).
Michael
AussieReg
#007
Joined: June 09, 2009
KitMaker: 8,156 posts
AeroScale: 3,756 posts
Posted: Saturday, August 06, 2016 - 03:11 PM UTC
Quoted Text
Nice work going on here!
That central wing section has more to it that you think! And I know flaps aren't normally down, but I like the way they look. So there.
I like that Mike, soften us up with a quick compliment and then slap us with some attitude. Love it !
You are right though, there is a bunch of very nice work going on.
Cheers, D


SaxonTheShiba
Joined: February 01, 2009
KitMaker: 1,233 posts
AeroScale: 663 posts

Posted: Saturday, August 06, 2016 - 07:08 PM UTC
Michael, the Corsair looks great. BTW, I posted a response to your tape question in your thread.
Best wishes,
Ian
Best wishes,
Ian
SaxonTheShiba
Joined: February 01, 2009
KitMaker: 1,233 posts
AeroScale: 663 posts
Posted: Saturday, August 06, 2016 - 07:23 PM UTC
Here's an update on my F-4D from Bergstrom AFB. Decals are on. The main markings were from the Hi-Decal F-4D sheet and the stencils came from the Afterburner Osan AFB F-4E sheet. I also used some stencils from the Revell of Germany sheet. Now it's time for the sub-assemblies.
Best wishes,
Ian


Best wishes,
Ian


GazzaS
#424
Joined: April 23, 2015
KitMaker: 4,648 posts
AeroScale: 1,938 posts
Posted: Sunday, August 07, 2016 - 02:29 AM UTC
Michael,
Your Corsair's cockpit looks truly inspiring!
Ian,
Loving the look of your Phantom!
Gaz
Your Corsair's cockpit looks truly inspiring!
Ian,
Loving the look of your Phantom!
Gaz
BoiseBlade

#523
Joined: February 28, 2014
KitMaker: 342 posts
AeroScale: 250 posts

Posted: Sunday, August 07, 2016 - 03:03 AM UTC
Ok, I have started my Lamborghini Countach 5000 Quattrovalvole
Here is the front spare area and the engine so far.
I added some plumbing for the AC, Brakes and cables for Battery. I also added tie downs and straps for spare.
also added hood latch on black wall.


For the engine I added some plumbing and dip stick and of course Spark wires. I also scratch a few parts that we not provided. I will be adding more into the Engine compartment as well.


Here is the front spare area and the engine so far.
I added some plumbing for the AC, Brakes and cables for Battery. I also added tie downs and straps for spare.
also added hood latch on black wall.
For the engine I added some plumbing and dip stick and of course Spark wires. I also scratch a few parts that we not provided. I will be adding more into the Engine compartment as well.
 |

WEB HOSTING BY


Copyright ©2021 AeroScale and Kitmaker Network, a subsidiary of Silver Star Enterprises
All Rights Reserved. Please read our Conditions of Use and Privacy Policy.
All Rights Reserved. Please read our Conditions of Use and Privacy Policy.