Air Campaigns
Want to start or join a group build? This is where to start.
OFFICIAL: The Sign of the Four Campaign
MichaelSatin
Staff MemberCampaigns Administrator
AEROSCALE
_VISITCOMMUNITY
Colorado, United States
Joined: January 19, 2008
KitMaker: 3,909 posts
AeroScale: 2,904 posts
Posted: Wednesday, July 06, 2016 - 05:12 AM UTC

Quoted Text

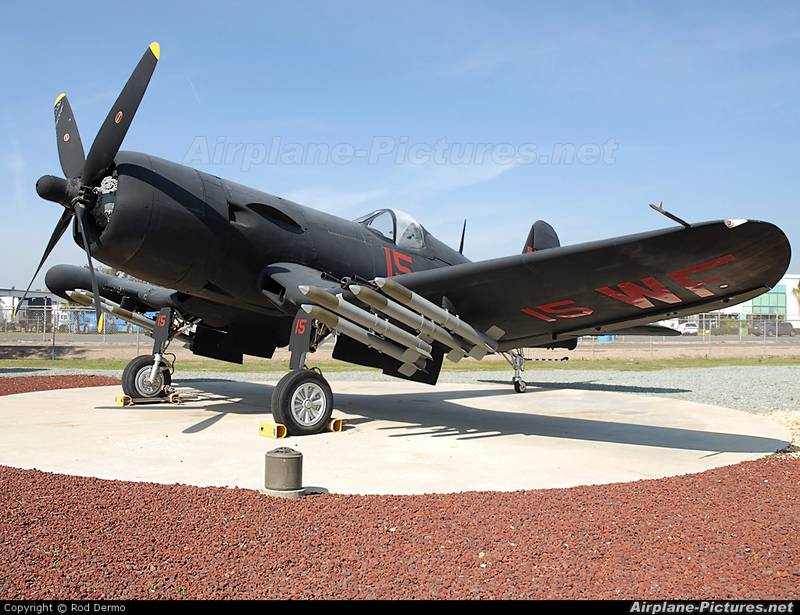
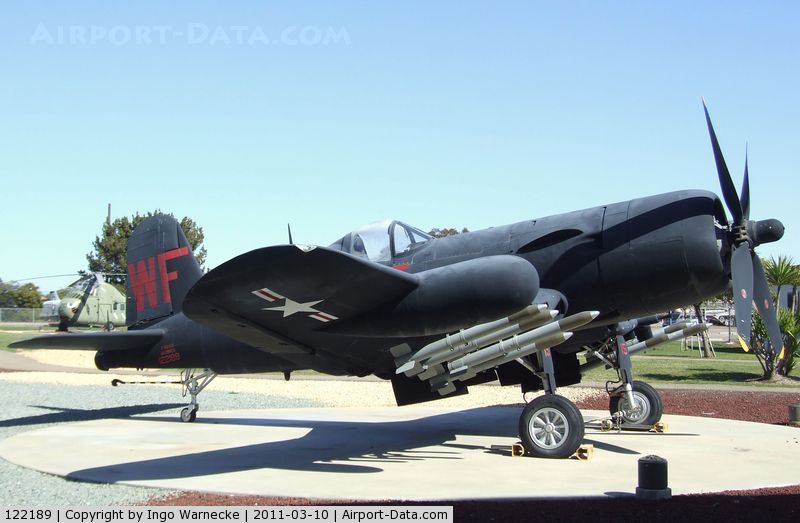
i am in need of a little help.i am planning on adding rockets from my spares box to my korean war era corsair. i know the front half should be olive drab color but what color paint should be the rest of the body of the rocket? i've seen directions call out white,silver,grey to name a few. i can not seem to find a good color photo of one.
anyone know?

thanks, joe


I would bet bare metal (silver) but I'm no expert.

Michael
duckdawgs
_VISITCOMMUNITY
California, United States
Joined: August 01, 2010
KitMaker: 143 posts
AeroScale: 55 posts
Posted: Wednesday, July 06, 2016 - 05:15 AM UTC
Joe, I don't think you can go wrong with either of those colors, I've seen pictures of them painted with either of those three colors you mentioned. I've even seen a picture of a yellow/orange training rocket... My project can start up again, I finally received the contour gauge I ordered, now I can finally start on the internal bulkheads, and ribbing. Hopefully I can have some pictures up soon... happy modeling everybody
duckdawgs
_VISITCOMMUNITY
California, United States
Joined: August 01, 2010
KitMaker: 143 posts
AeroScale: 55 posts
Posted: Wednesday, July 06, 2016 - 05:30 AM UTC
Joe, here's a blurry pic I found on the internet. It looks like its grey with silver fins.
bomber14
_VISITCOMMUNITY
New Jersey, United States
Joined: February 02, 2015
KitMaker: 330 posts
AeroScale: 286 posts
Posted: Wednesday, July 06, 2016 - 06:07 PM UTC
great photo roland, thanks.i will go with a silver or a light grey, maybe both.
also can i ask you where you got your contour gauge? the one i got from micro mark is plastic junk.

joe.
duckdawgs
_VISITCOMMUNITY
California, United States
Joined: August 01, 2010
KitMaker: 143 posts
AeroScale: 55 posts
Posted: Wednesday, July 06, 2016 - 07:46 PM UTC
Hey Joe, I got the contour gauge from a vendor on Ebay for $10.00 free shipping. But it took over two weeks to arrive even though the vendor was in the same state as me. Would have been better off buying it thru Grainger, they have a retail store close buy and I would have had it same day...
BoiseBlade
#523
_VISITCOMMUNITY
Idaho, United States
Joined: February 28, 2014
KitMaker: 342 posts
AeroScale: 250 posts
Posted: Wednesday, July 06, 2016 - 09:30 PM UTC
Joe,

Here are some images of HVARs as used in Korea.
On Navy AC they seem to be usually Grey / Steal Grey Body, Green Nose and silver metal tip and fins.
The one real clean picture is a mockup.
Hope this helps.

bomber14
_VISITCOMMUNITY
New Jersey, United States
Joined: February 02, 2015
KitMaker: 330 posts
AeroScale: 286 posts
Posted: Wednesday, July 06, 2016 - 09:59 PM UTC

Quoted Text

Hey Joe, I got the contour gauge from a vendor on Ebay for $10.00 free shipping. But it took over two weeks to arrive even though the vendor was in the same state as me. Would have been better off buying it thru Grainger, they have a retail store close buy and I would have had it same day...


thanks roland. i will try to get one through grainger.

jeff- thanks for the pictures. met grey or white should be ok. i notice the rockets are not side by side but split in twos. is that to keep the canon ejector shoots clear? also the one photo it looks like the second from the left is sticking out more than the others. wonder why.

joe
BoiseBlade
#523
_VISITCOMMUNITY
Idaho, United States
Joined: February 28, 2014
KitMaker: 342 posts
AeroScale: 250 posts
Posted: Thursday, July 07, 2016 - 01:28 AM UTC
You're welcome Joe

The top right picture of the image I sent actually has light grey rockets. In the original large image it is definitely noticeable they are a grey shade.

Also depending on what scale size the rockets are you are using they would be either HVAR 5" or ATAR 6.5" rockets. The new ATARs Anti Tank Aircraft Rockets were developed to combat the Soviet/Chinese built armor which the HVAR could not really penetrate.
They were both the same color body's just that the ATAR had a Hollow-charge warhead so nose was different..

As for why they were staggered, the Initial testing showed the rockets caused damage to the flaps during firing.(Not good )
So the inner two pylons were staggered to remedy this.

This was normal on all F4U-4B and F4U-5's. Both only saw Naval service in Korea since the Navy only put them in squadron service starting ion 1946.

BTW, There are some very good images of the F4U-5N Night fighter at Miramar with rockets staggered.
BoiseBlade
#523
_VISITCOMMUNITY
Idaho, United States
Joined: February 28, 2014
KitMaker: 342 posts
AeroScale: 250 posts
Posted: Thursday, July 07, 2016 - 03:21 AM UTC
BTW The Inner most rocket on each wing is slightly dropped then the outside 2 and the second one inside is much more forward.

The Corsairs in the image is carrying ATARs.
BoiseBlade
#523
_VISITCOMMUNITY
Idaho, United States
Joined: February 28, 2014
KitMaker: 342 posts
AeroScale: 250 posts
Posted: Thursday, July 07, 2016 - 03:35 AM UTC
Here are some images of the Miramar F4U


SHAKY962
_VISITCOMMUNITY
Buenos Aires, Argentina
Joined: May 21, 2012
KitMaker: 765 posts
AeroScale: 316 posts
Posted: Thursday, July 07, 2016 - 05:43 AM UTC
I am in with this

Nito74
_VISITCOMMUNITY
Lisboa, Portugal
Joined: March 04, 2008
KitMaker: 5,386 posts
AeroScale: 635 posts
Posted: Thursday, July 07, 2016 - 05:46 PM UTC
Hi fellas

I'm in too.
Still haven't picked a build, maybe a Phantom.

Hi Jose nice too see you, how's everything ?

bomber14
_VISITCOMMUNITY
New Jersey, United States
Joined: February 02, 2015
KitMaker: 330 posts
AeroScale: 286 posts
Posted: Friday, July 08, 2016 - 12:03 AM UTC
thanks again jeff. i notice the top right photo is an f4u-4 not a 4-b. it has 3 50 cal guns not canon. the rockets on it are even across as opposed to the canon equipped 4-b's.
the f4u-4 is the one i am making. i assume the rockets should be even across with the 50 cals and not with canon equipped versions.

joE
Bigrip74
_VISITCOMMUNITY
Texas, United States
Joined: February 22, 2008
KitMaker: 5,026 posts
AeroScale: 2,811 posts
Posted: Friday, July 08, 2016 - 10:40 PM UTC
@ Roland, nice tool there. I have been looking for one for ages.
@ Jose, I did not know that you built 1/72.
@ Mark, really nice job on your halftrack.
@ Daniel, the amtracks are coming along nicely.
@ Michael, I just picked up that F4u kit and following your build will help with tips on mine.
@ Joe, where are you going to place the switch for the motor? I remember the Linderg models we TRIED to install the motor that came with the kit, but never successfully. Can’t wait to see yours.
@ Damian, I’ve tried making putty using the same method, but it either came out too hard or too stringy. What is your formula?


I have a little progress (albeit not much) I taped the canopy and tried to cut out the frame (not so good )
The canopy still looks suspect (the shape)
GazzaS
#424
_VISITCOMMUNITY
Queensland, Australia
Joined: April 23, 2015
KitMaker: 4,648 posts
AeroScale: 1,938 posts
Posted: Saturday, July 09, 2016 - 06:57 AM UTC
Hi Everyone!
Time to jump in on this one:

Oops! Where'd that come from? Anyway...that's my 6-week-old grand daughter. A new, ongoing WIP.

Ah, here's the campaign related one.

Like most of my stash, this Tamiya 109 came in second-hand. I'll most likely do it in the Helmut Wick scheme.

See ya soon,

Gaz
Bigrip74
_VISITCOMMUNITY
Texas, United States
Joined: February 22, 2008
KitMaker: 5,026 posts
AeroScale: 2,811 posts
Posted: Saturday, July 09, 2016 - 08:51 AM UTC
Gary, congratulations on the grand daughter. Cute picture and it reminds me of many moons ago for mine.

Bob
BoiseBlade
#523
_VISITCOMMUNITY
Idaho, United States
Joined: February 28, 2014
KitMaker: 342 posts
AeroScale: 250 posts
Posted: Saturday, July 09, 2016 - 01:28 PM UTC
Joe,

Since you are doing a WWII bird then make sure to use only scale 5 inch rockets.

Gary,

Congratulations! What number is this? or is this your first?
I actually had my first grandchild last December and they just visited again for the Forth of July. She's growing fast.
GazzaS
#424
_VISITCOMMUNITY
Queensland, Australia
Joined: April 23, 2015
KitMaker: 4,648 posts
AeroScale: 1,938 posts
Posted: Saturday, July 09, 2016 - 02:24 PM UTC
Bob, Jeff,
Thank you very much! She's my first grandchild. I've already told everyone that she'll be modelling with me often...lol

Cheers,

Gaz
phantom_phanatic309
#372
_VISITCOMMUNITY
United Kingdom
Joined: March 10, 2010
KitMaker: 2,568 posts
AeroScale: 1,619 posts
Posted: Sunday, July 10, 2016 - 01:27 AM UTC
Congratulations Gary, I'm sure she'll helping with a kit in the near future.

After fixing a leaky shower and other jobs around the house, which has really slowed me down over the last week, I've managed to get some colour onto the Mercedes D.IVa engine for the Rumpler.
I used the kit colour call outs using a mix of Vallejo, Tamiya and Revell acrylics. Only thing I changed was the colour of the intake manifold. The instructions say white for my chosen aircraft, the all-over lozenge version. WNW provide a lovely clear photo of this aircraft and while the manifold is definitely a a light colour, as opposed to the usual black or lagged, the contrast between it and the pale blue struts next to it is too similar. If it were white, I would expect it to look white next to the grey struts. I decided instead to go with a light grey. If I can get a good photo, I'll post it to show what I mean.
The resin spark plugs really do make the whole thing pop. Taurus models provide 15 plugs, which proved to be beneficial after I crushed the first one between a pair of tweezers when attaching it.


Really enjoying the build so far.
GazzaS
#424
_VISITCOMMUNITY
Queensland, Australia
Joined: April 23, 2015
KitMaker: 4,648 posts
AeroScale: 1,938 posts
Posted: Sunday, July 10, 2016 - 01:34 AM UTC
Stephen,
Those plugs are a great addition! I'm only new to WWI aircraft, but I think I'll be making some extra efforts to make those exposed engines more detailed.

Cheers,

Gaz
Bigrip74
_VISITCOMMUNITY
Texas, United States
Joined: February 22, 2008
KitMaker: 5,026 posts
AeroScale: 2,811 posts
Posted: Sunday, July 10, 2016 - 02:55 AM UTC
Stephen, are the Wing Nut Wing kits really as good as all the write ups say? I have yet to see one up close.

Bob
phantom_phanatic309
#372
_VISITCOMMUNITY
United Kingdom
Joined: March 10, 2010
KitMaker: 2,568 posts
AeroScale: 1,619 posts
Posted: Sunday, July 10, 2016 - 03:04 AM UTC
Thanks Gaz,
Taurus do quite a good range of resin spark plugs. I'm no expert on what should be used with what (the instructions on these merely state 'For German inline engines') but they should have what you need. They're also VERY cheap if you shop around. For a such a small price they really do add that little extra.
This is the first WNW kit I've built and it is just fantastic so far. WW1 was not my thing until good kits started appearing over the last few years. I think every modeler should treat themselves to at least one WNW or two.

Ste
phantom_phanatic309
#372
_VISITCOMMUNITY
United Kingdom
Joined: March 10, 2010
KitMaker: 2,568 posts
AeroScale: 1,619 posts
Posted: Sunday, July 10, 2016 - 03:39 AM UTC

Quoted Text

Stephen, are the Wing Nut Wing kits really as good as all the write ups say? I have yet to see one up close.

Bob


Hi Bob,
So far I'm very impressed with this kit. Detail is fantastic and it has lots of optional extras. The fit so far has been great, as good as the latest Tamiya releases. The decals look to be good and this kit even has all the lozenge decals printed to the shape of the wings and fuselage. No cutting the strips yourself here!
Not long after getting this I also ordered their Sopwith Snipe, Pup and Pfalz D.IIIa kits. And they look just as good as the Rumpler. I would say go for one. The Pfalz in particular is very nice.

Ste
Bigrip74
_VISITCOMMUNITY
Texas, United States
Joined: February 22, 2008
KitMaker: 5,026 posts
AeroScale: 2,811 posts
Posted: Sunday, July 10, 2016 - 04:17 AM UTC
Stephen, are the instructions good enough for a beginner to be able to install the rigging?

Bob
phantom_phanatic309
#372
_VISITCOMMUNITY
United Kingdom
Joined: March 10, 2010
KitMaker: 2,568 posts
AeroScale: 1,619 posts
Posted: Sunday, July 10, 2016 - 04:33 AM UTC

Quoted Text

Stephen, are the instructions good enough for a beginner to be able to install the rigging?

Bob


To be honest I don't think they are as clear as they should be compared with the rest of the booklet. Those for the Snipe and Pup are hard to follow. Especially the internal rigging and control wires. On the plus side, the locations for the external bracing and control wires are moulded into the parts and just need a little drilling. A trawl for references will be your only option, but given the high price we really shouldn't have to. Only criticism I have.