

Air Campaigns
Want to start or join a group build? This is where to start.
Want to start or join a group build? This is where to start.
Hosted by Frederick Boucher, Michael Satin
OFFICIAL: Those Radial Fighters Campaign

ColinEdm

Joined: October 15, 2013
KitMaker: 1,355 posts
AeroScale: 107 posts
Posted: Saturday, March 07, 2020 - 09:51 AM UTC
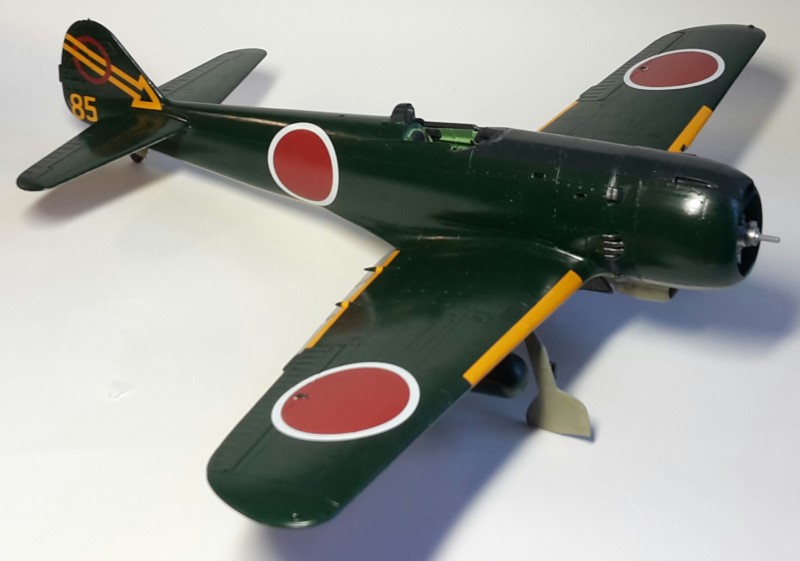
Chipping away at my well worn veteran of the Rabaul garrison...

PasiAhopelto

Joined: October 01, 2016
KitMaker: 514 posts
AeroScale: 239 posts
Posted: Friday, March 13, 2020 - 05:36 PM UTC
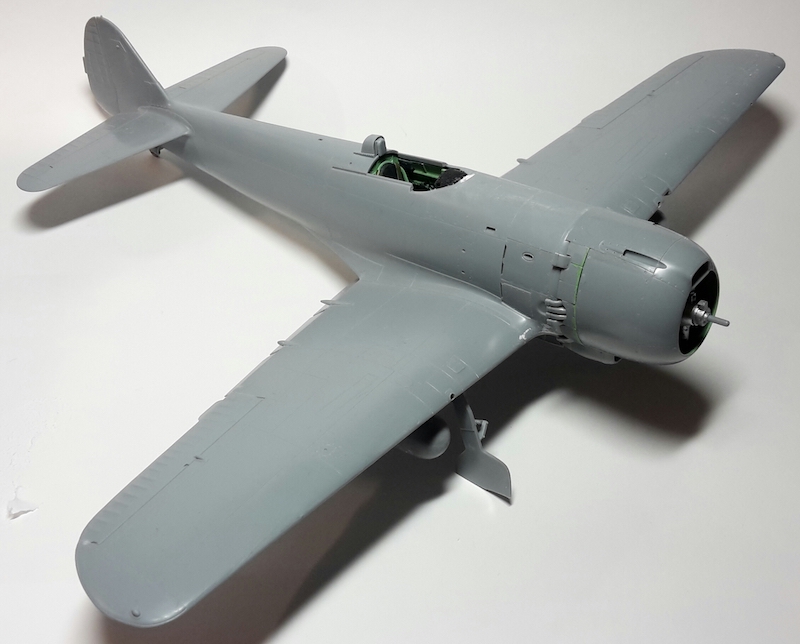
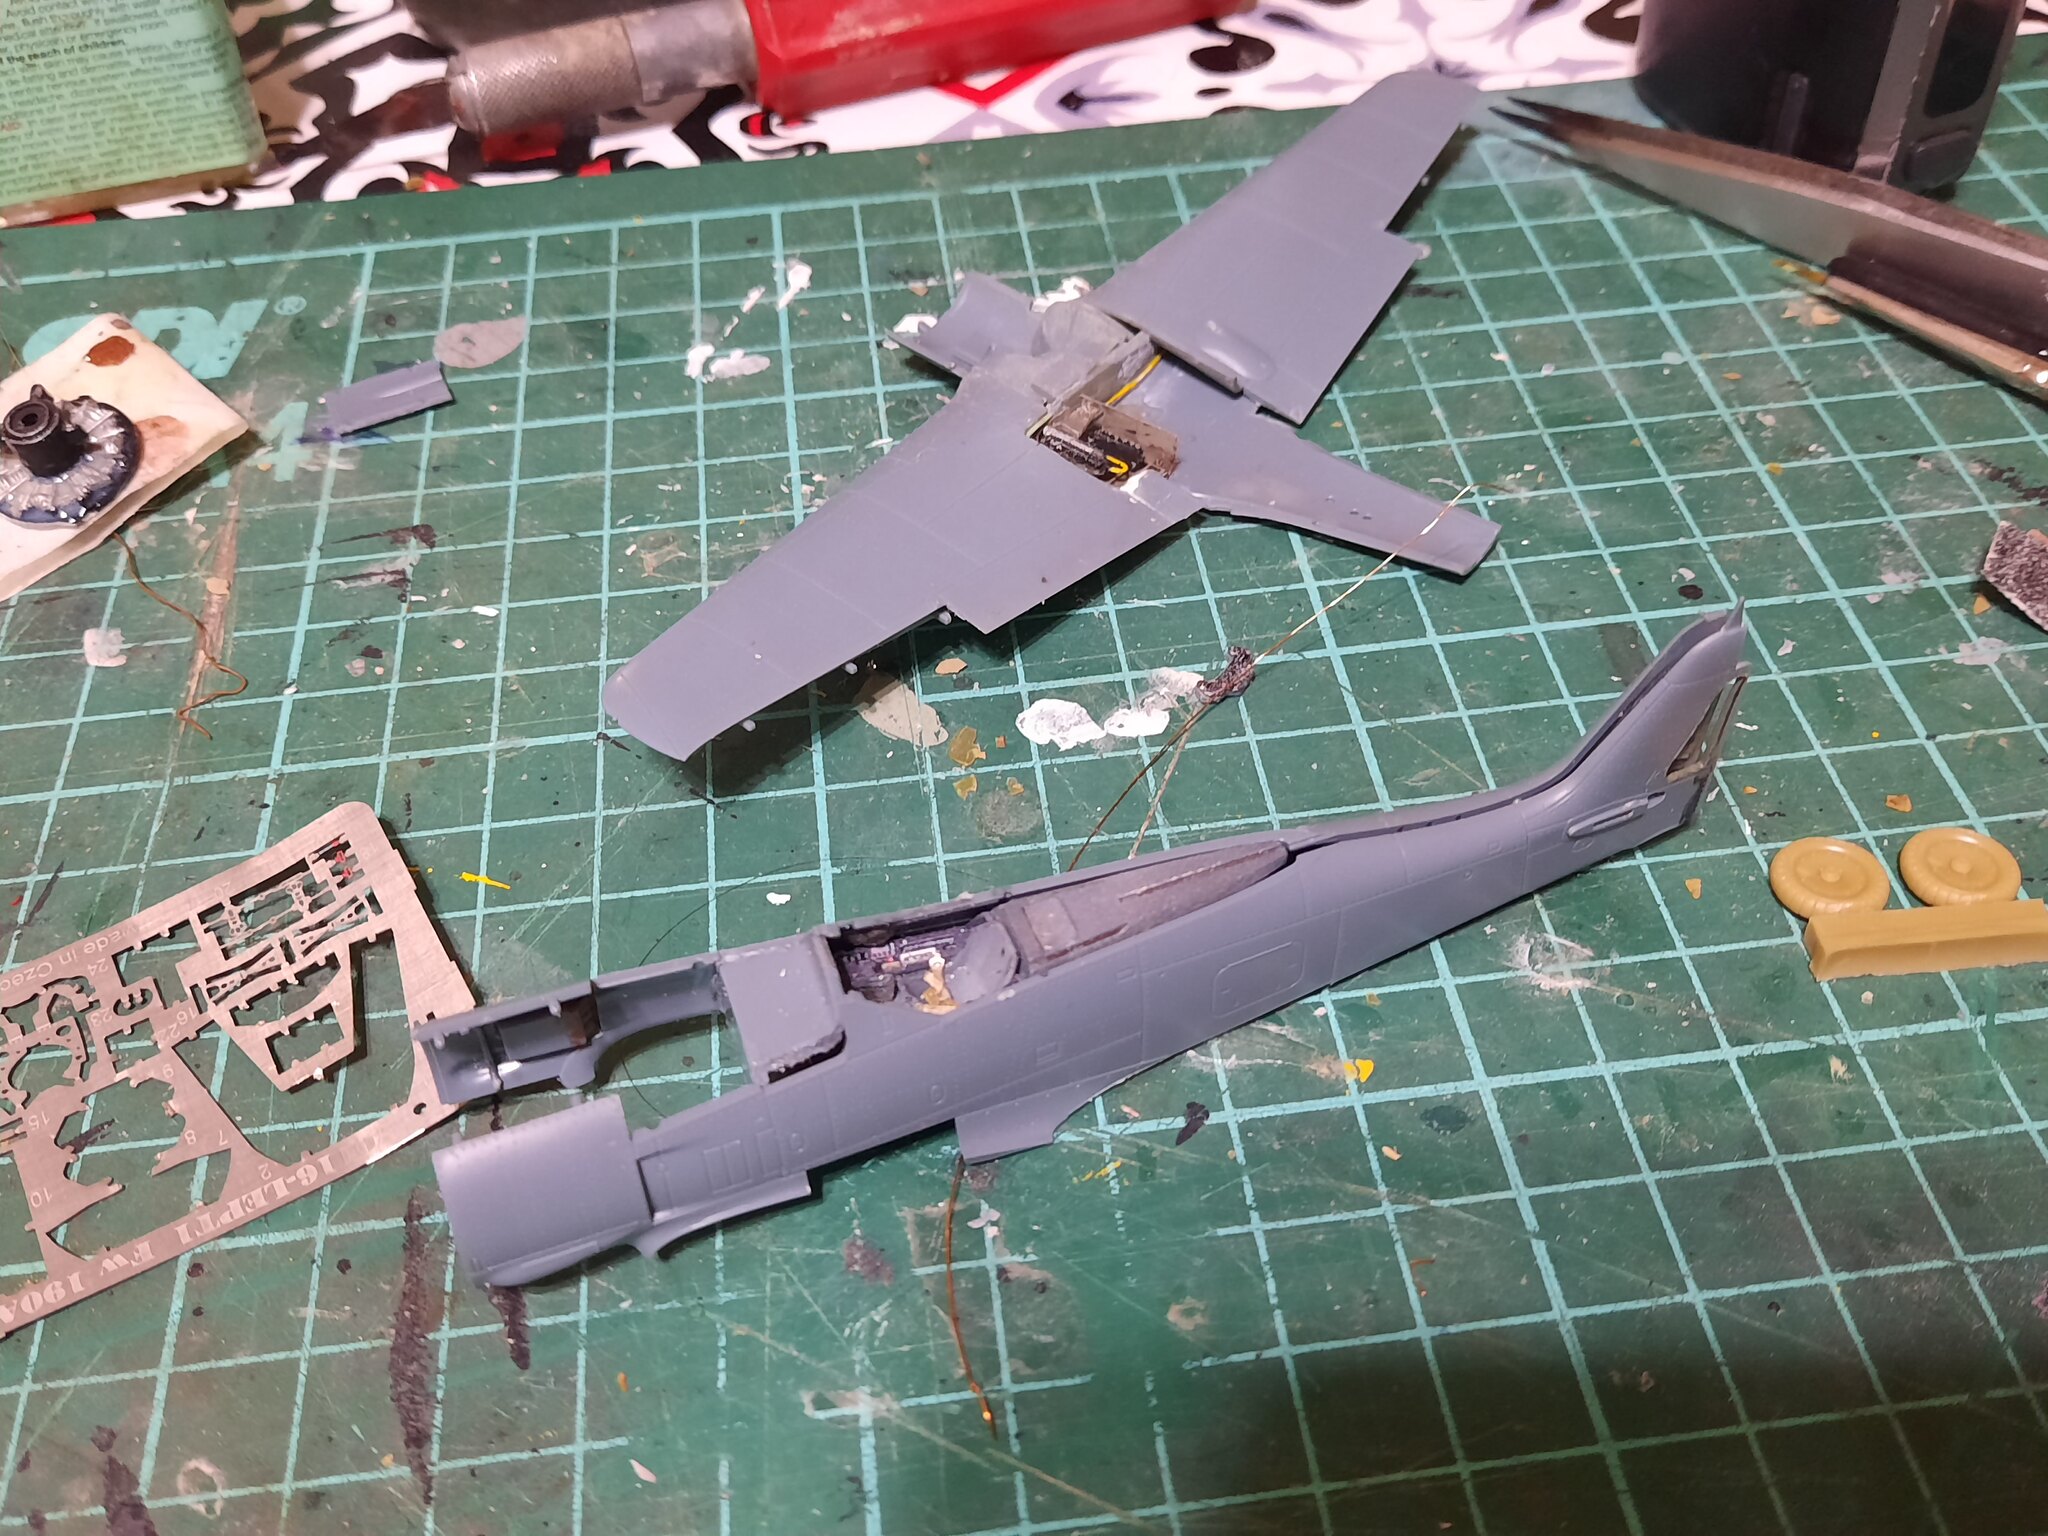
Assembly pretty much done:
SGTJKJ

#041

Joined: July 20, 2006
KitMaker: 10,069 posts
AeroScale: 3,788 posts

Posted: Sunday, March 29, 2020 - 07:29 AM UTC
Finally I got around to spray camouflage on the Hellcat. I need to fix some touch ups and start the weathering and chipping.
More to follow
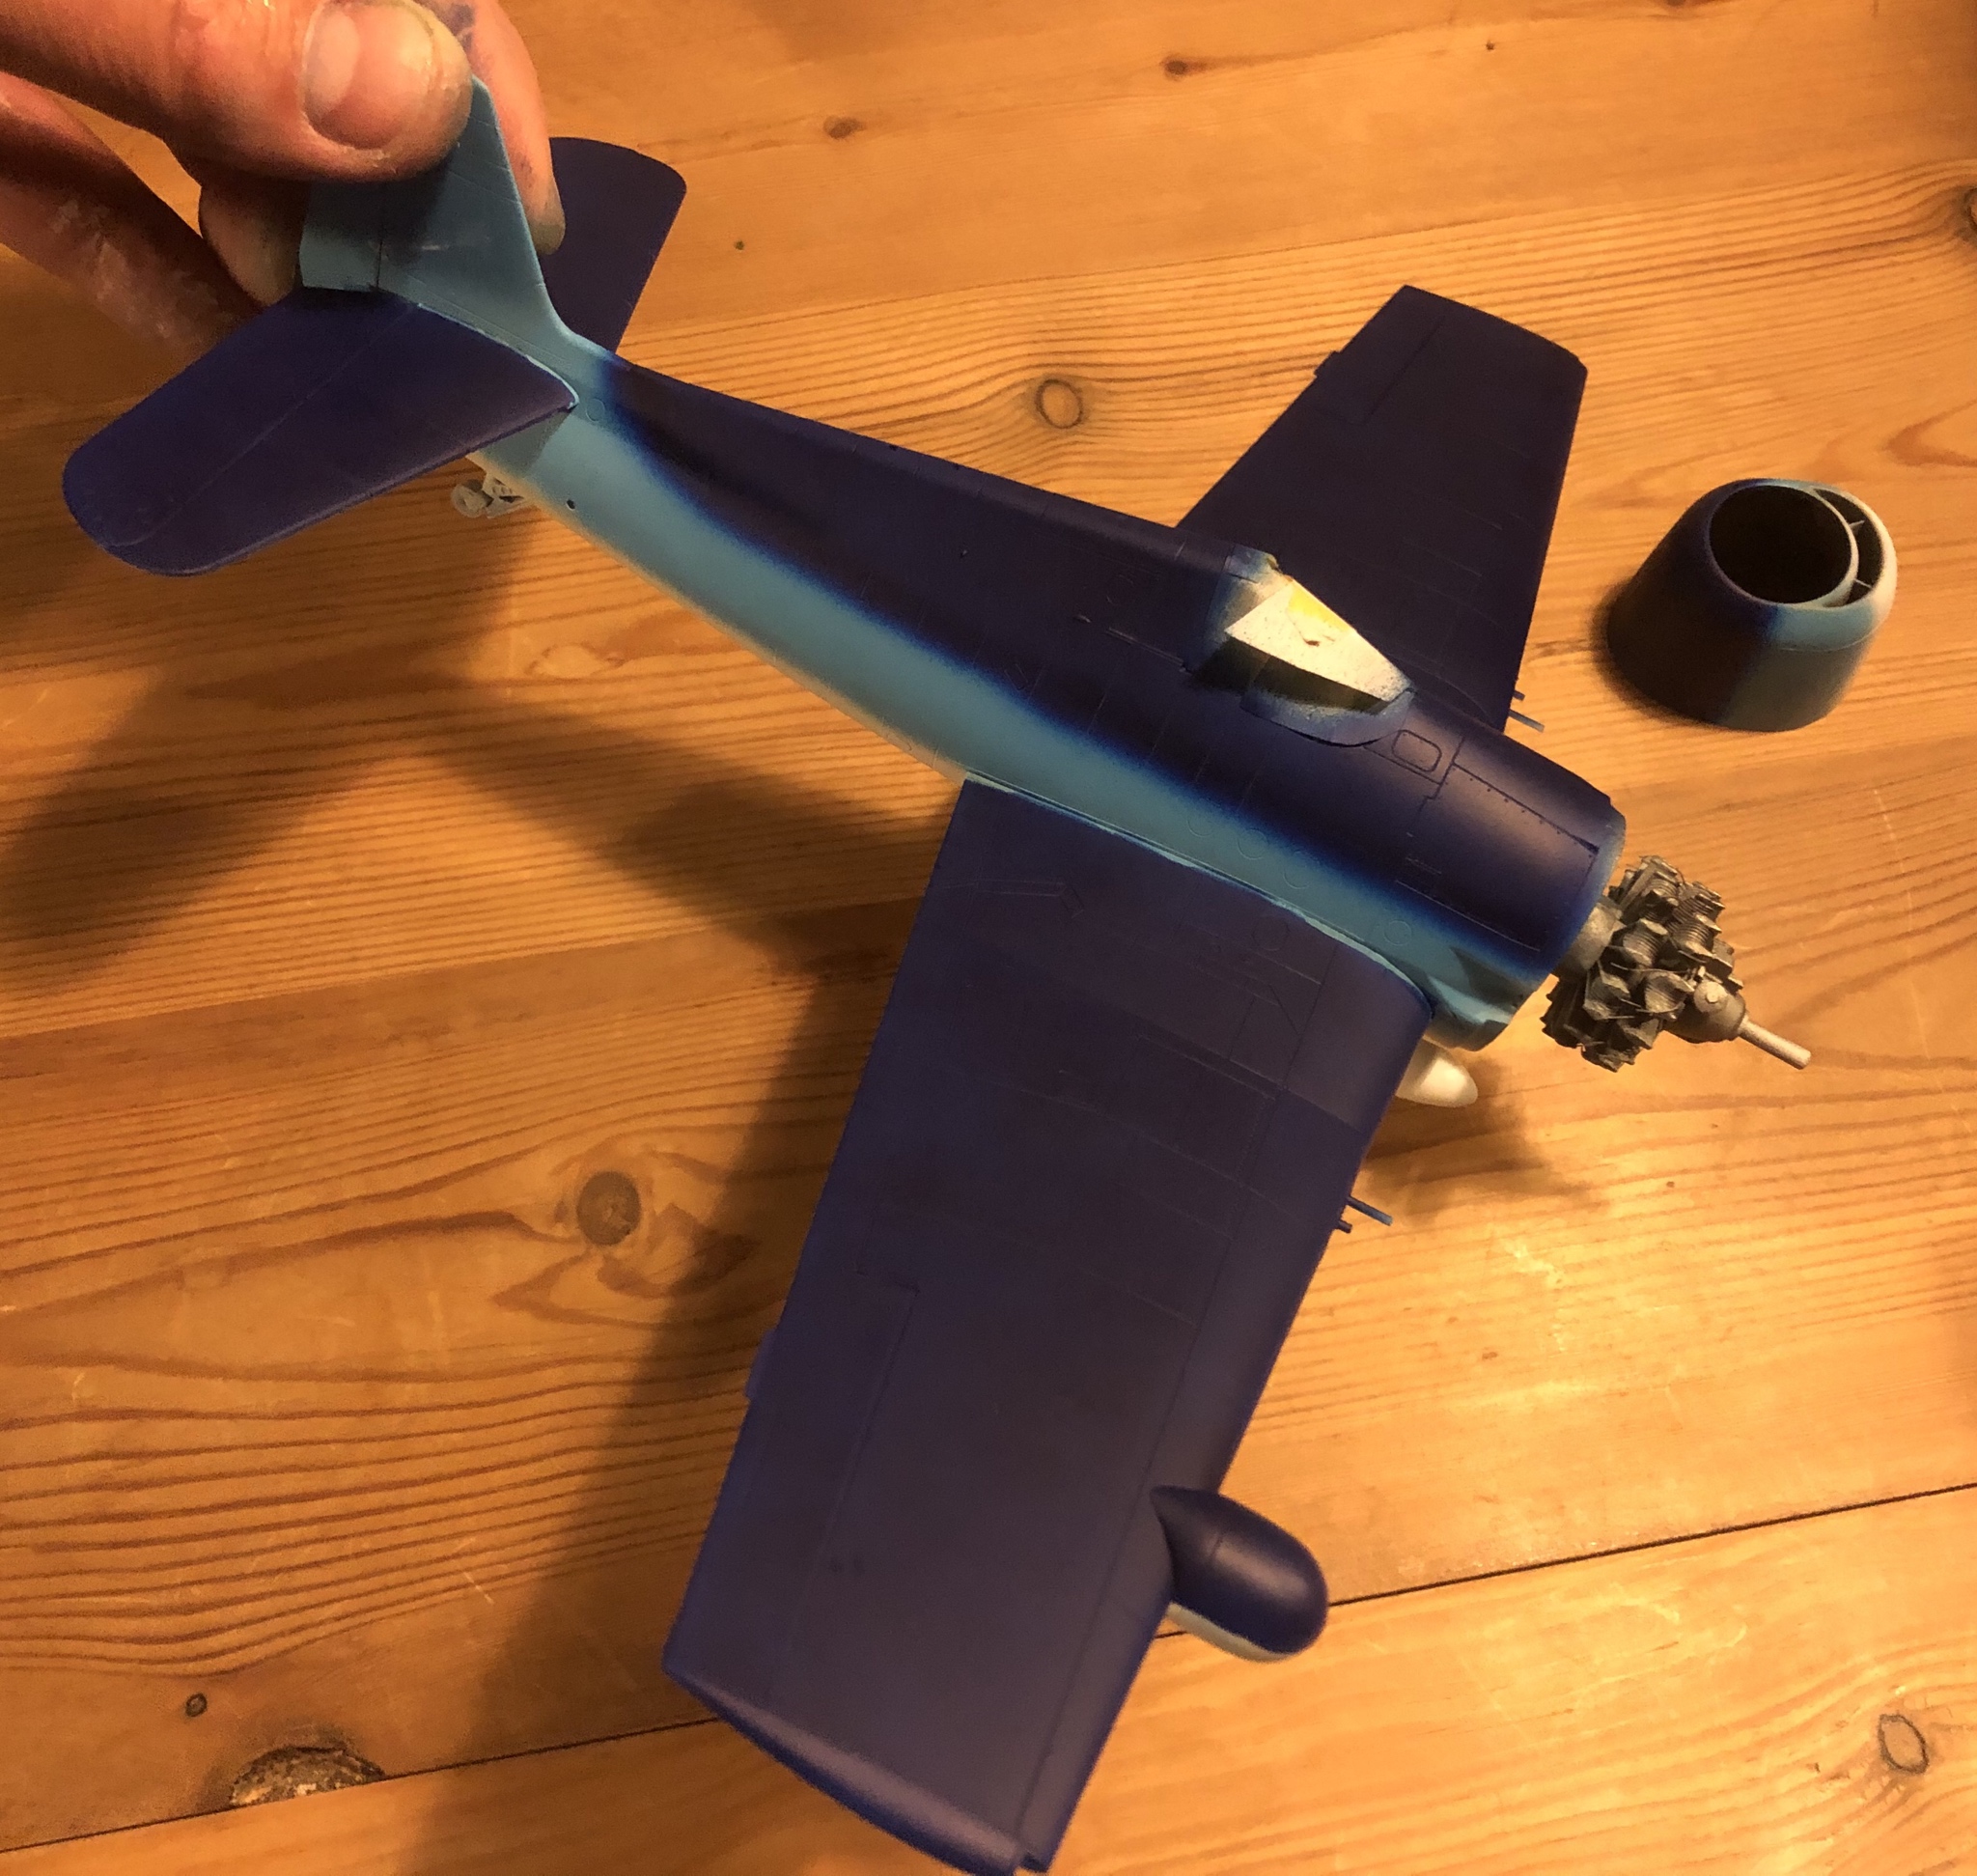
More to follow


SHAKY962

Joined: May 21, 2012
KitMaker: 765 posts
AeroScale: 316 posts

Posted: Sunday, March 29, 2020 - 12:25 PM UTC
Finally, after many twists and turns with the country's economy that affected us all, and for the benefit of the quarantine that they have imposed on us, here is the model I chose for this GB
 20200329_211727 by Shaky962, en Flickr
SGTJKJ
#041
Joined: July 20, 2006
KitMaker: 10,069 posts
AeroScale: 3,788 posts
Posted: Friday, April 03, 2020 - 01:40 AM UTC
Welcome onboard, Jose
Some more progress of my Hellcat. Chipping done. My first try at using chipping fluid on an aircraft. I think I might have overdone it.
Maybe it will look ok when toned down a bit with other weathering.
More to follow.
Some more progress of my Hellcat. Chipping done. My first try at using chipping fluid on an aircraft. I think I might have overdone it.
Maybe it will look ok when toned down a bit with other weathering.
More to follow.

b17-peter

#392

Joined: January 09, 2013
KitMaker: 696 posts
AeroScale: 608 posts

Posted: Friday, April 03, 2020 - 09:22 AM UTC
Great builds on the way, mates!
I made some progress on mine during the last days...painting is going on.

I made some progress on mine during the last days...painting is going on.
b17-peter
#392
Joined: January 09, 2013
KitMaker: 696 posts
AeroScale: 608 posts
Posted: Tuesday, April 07, 2020 - 06:54 AM UTC
Nearly complete and waiting for the decals.....

b17-peter
#392
Joined: January 09, 2013
KitMaker: 696 posts
AeroScale: 608 posts
Posted: Wednesday, April 08, 2020 - 03:34 AM UTC
Done!
SHAKY962
Joined: May 21, 2012
KitMaker: 765 posts
AeroScale: 316 posts
Posted: Wednesday, April 08, 2020 - 08:29 AM UTC
Excelent Peter!!!!!
Well done
Well done

Lakota
#123

Joined: November 17, 2008
KitMaker: 1,202 posts
AeroScale: 292 posts
Posted: Friday, April 10, 2020 - 05:16 AM UTC
Howdy Y'all 
Peter-Congratulations on your build.
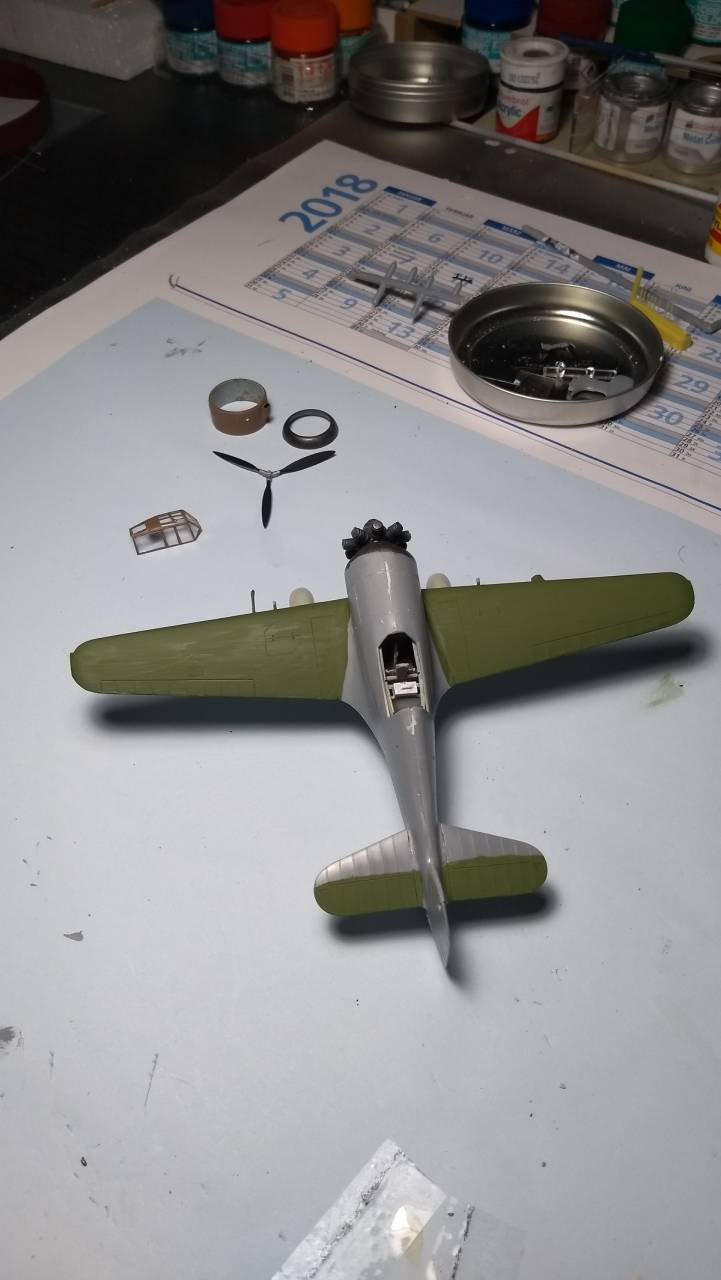
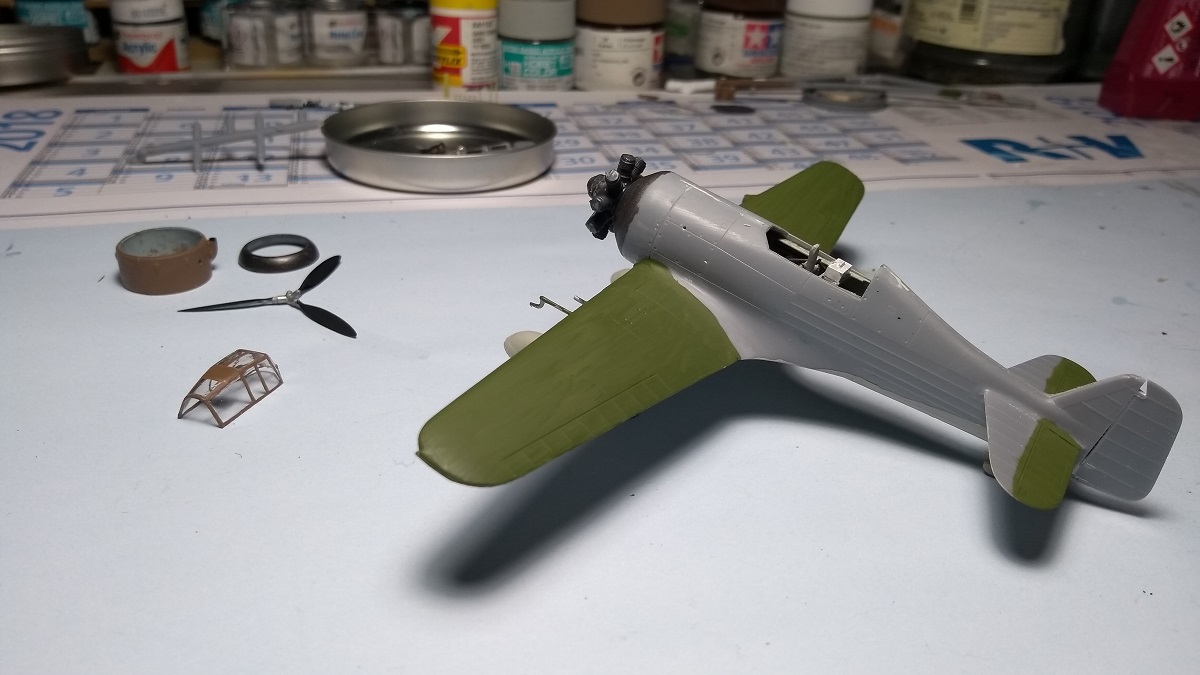
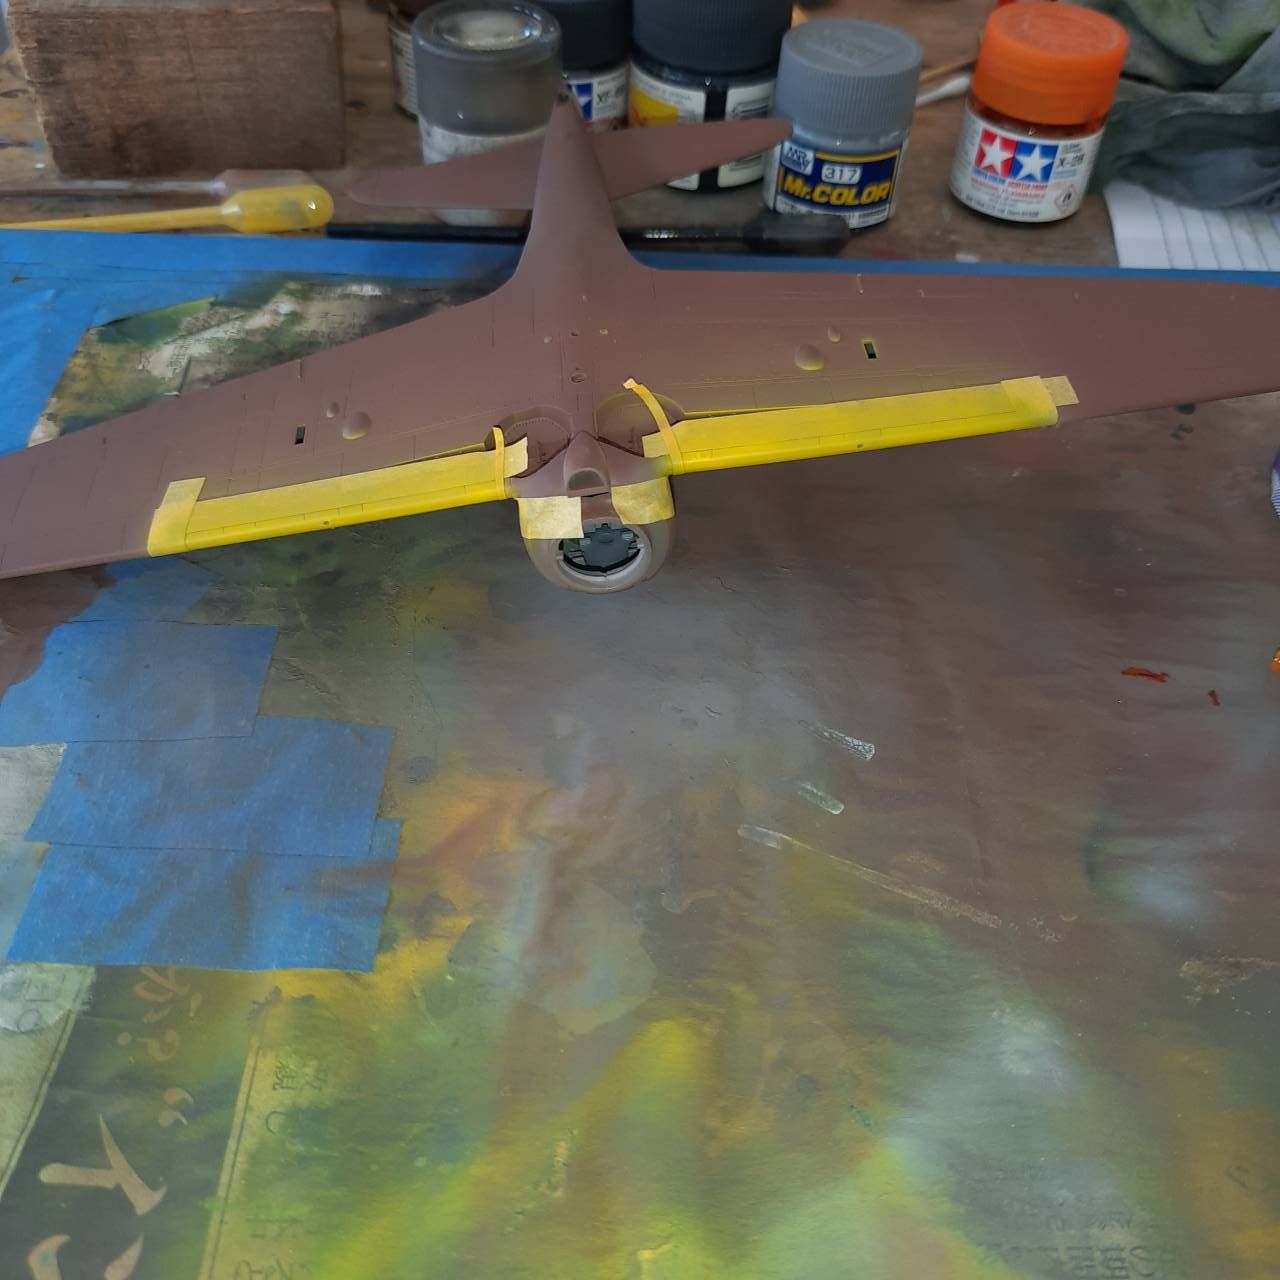
A little progress on my Ki-84. I'm using rattle cans but getting some overspray. I was trying some poster tack putty, the pieces can be seen at the bottom of the box.

Take care and stay safe,
Don "Lakota"
Peter-Congratulations on your build.
A little progress on my Ki-84. I'm using rattle cans but getting some overspray. I was trying some poster tack putty, the pieces can be seen at the bottom of the box.
Take care and stay safe,
Don "Lakota"

Sleepwalker71

Joined: August 30, 2012
KitMaker: 265 posts
AeroScale: 72 posts

Posted: Saturday, April 11, 2020 - 03:41 AM UTC
I hope this is similar to Nakajima Sakae 21 radial engine. I've added 28 ignition cables.
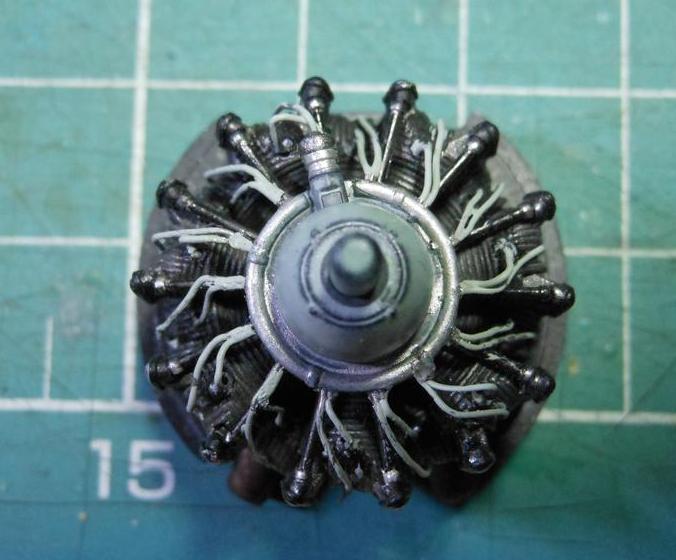
Not much visible with engine cowling installed:
Not much visible with engine cowling installed:

Buckeye198
Joined: May 02, 2010
KitMaker: 596 posts
AeroScale: 197 posts

Posted: Sunday, April 12, 2020 - 10:53 AM UTC
Some excellent progress on all fronts, folks! And Don, I can now attest that the Mig putty is outstanding! I'm using it on another build and I think it will now be my go-to for masking sharp edges.
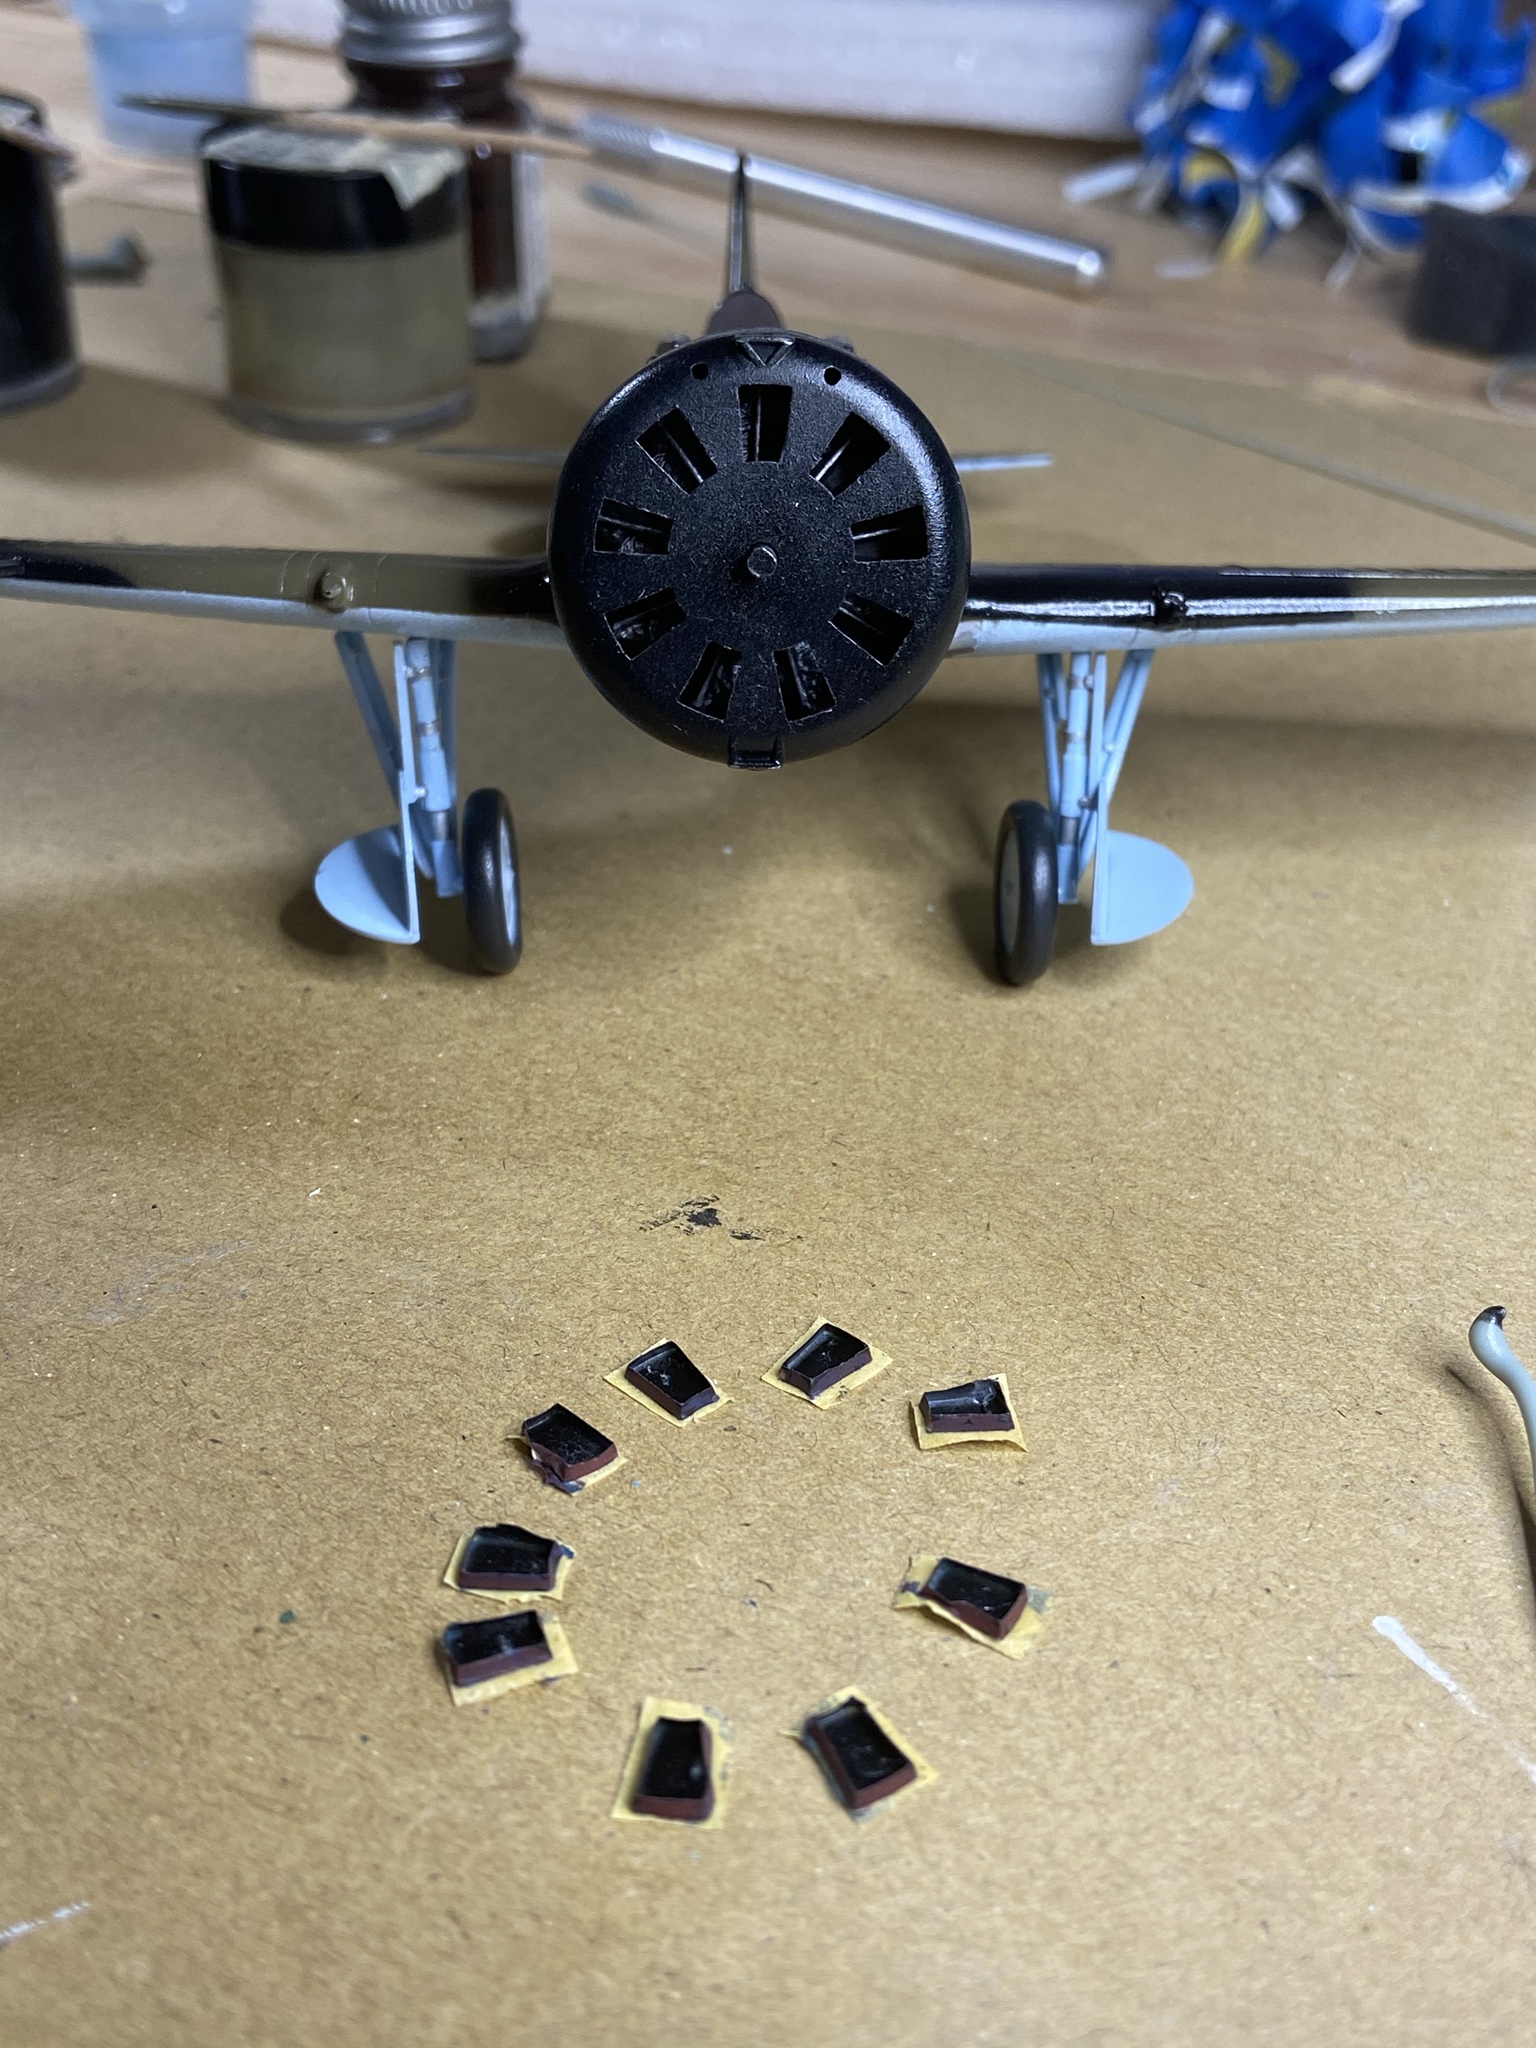
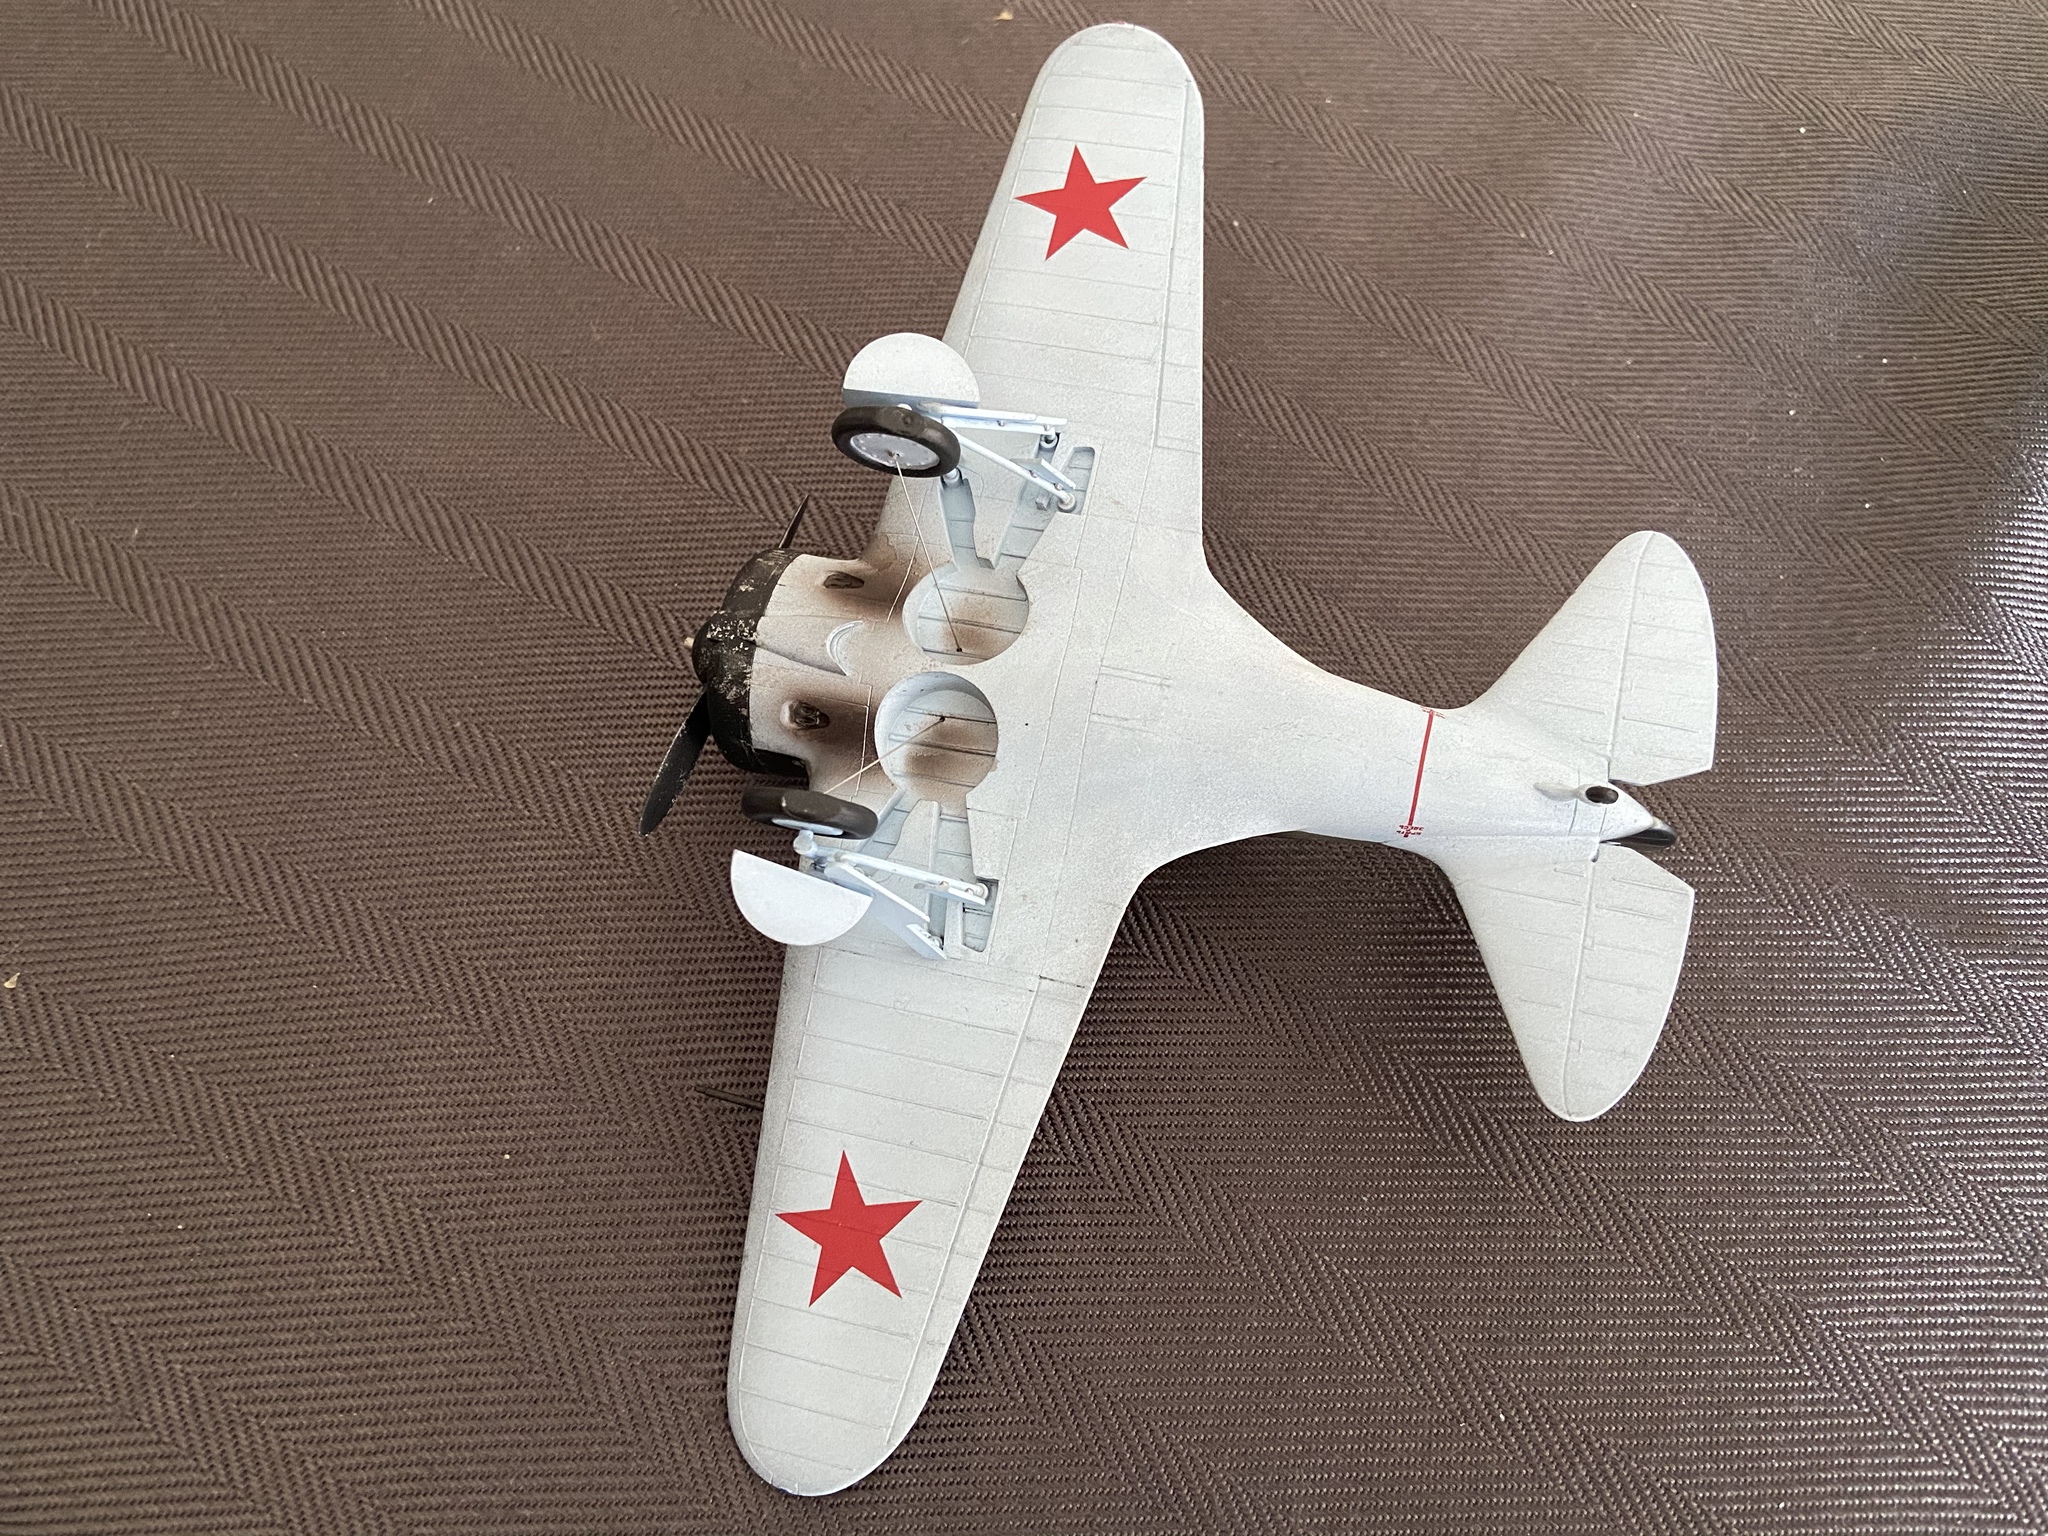
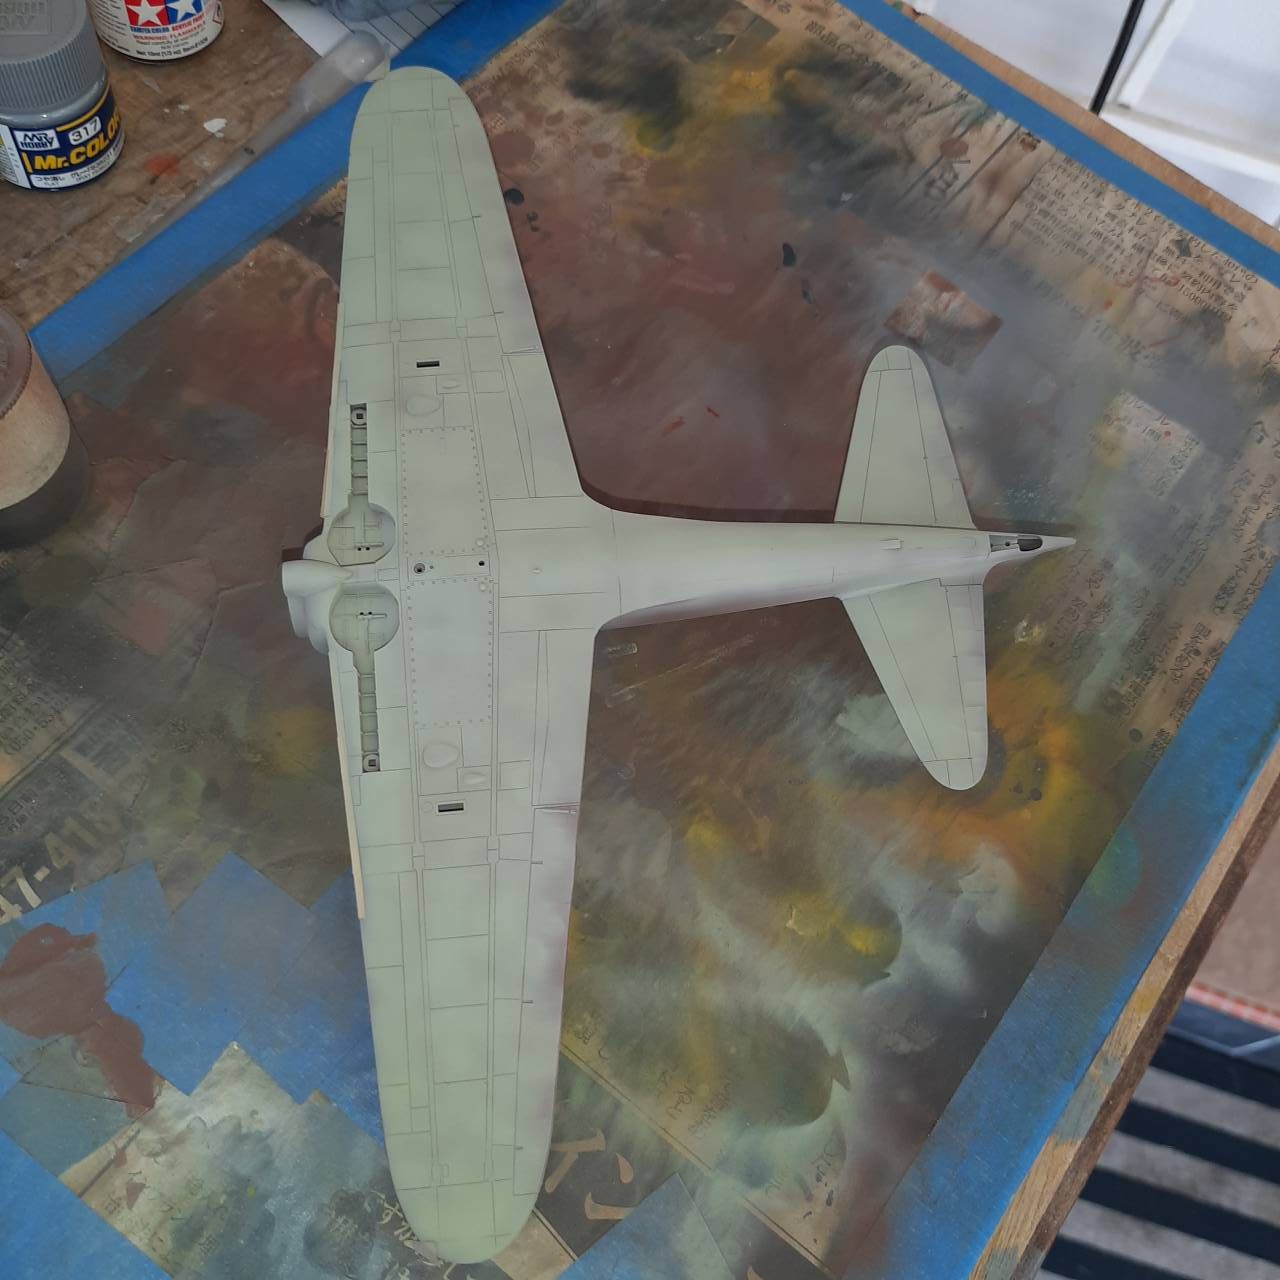
As I said before, I've actually been done with this build for a while now. My last in-progress shot is of the engine cowling masking, which worked perfectly! I painted the insides and installed the engine, then laid a masking tape piece nearly flush with each opening on the interior side. I used Micro-Mask as the final barrier between the cowling and the tape, then closed it all up and painted the model. When it was done, I poked each piece of [tape+MicroMask] loose and then used tweezers to pull them through the openings. Here's the end result:
If I wasn't verbose enough, here's the story of this build
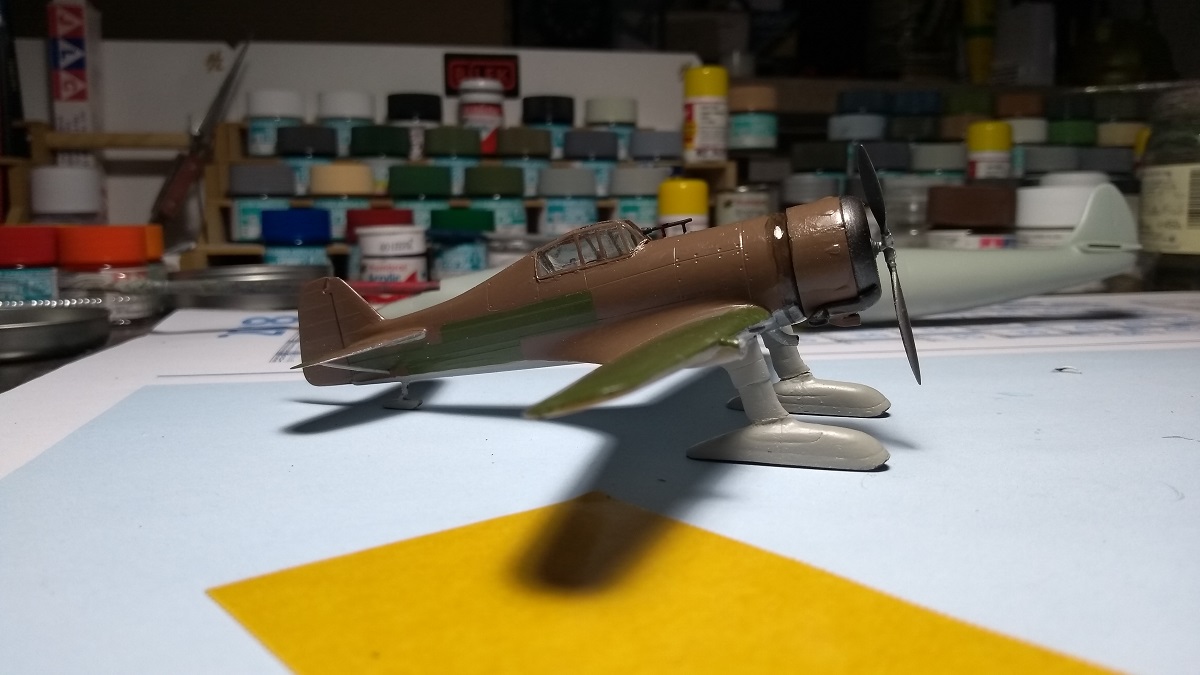
I bought this kit right after I took the last board exam for medical school, and it's rife with symbolism:
-The plane's number is the score I received on that exam (decals from my spares)
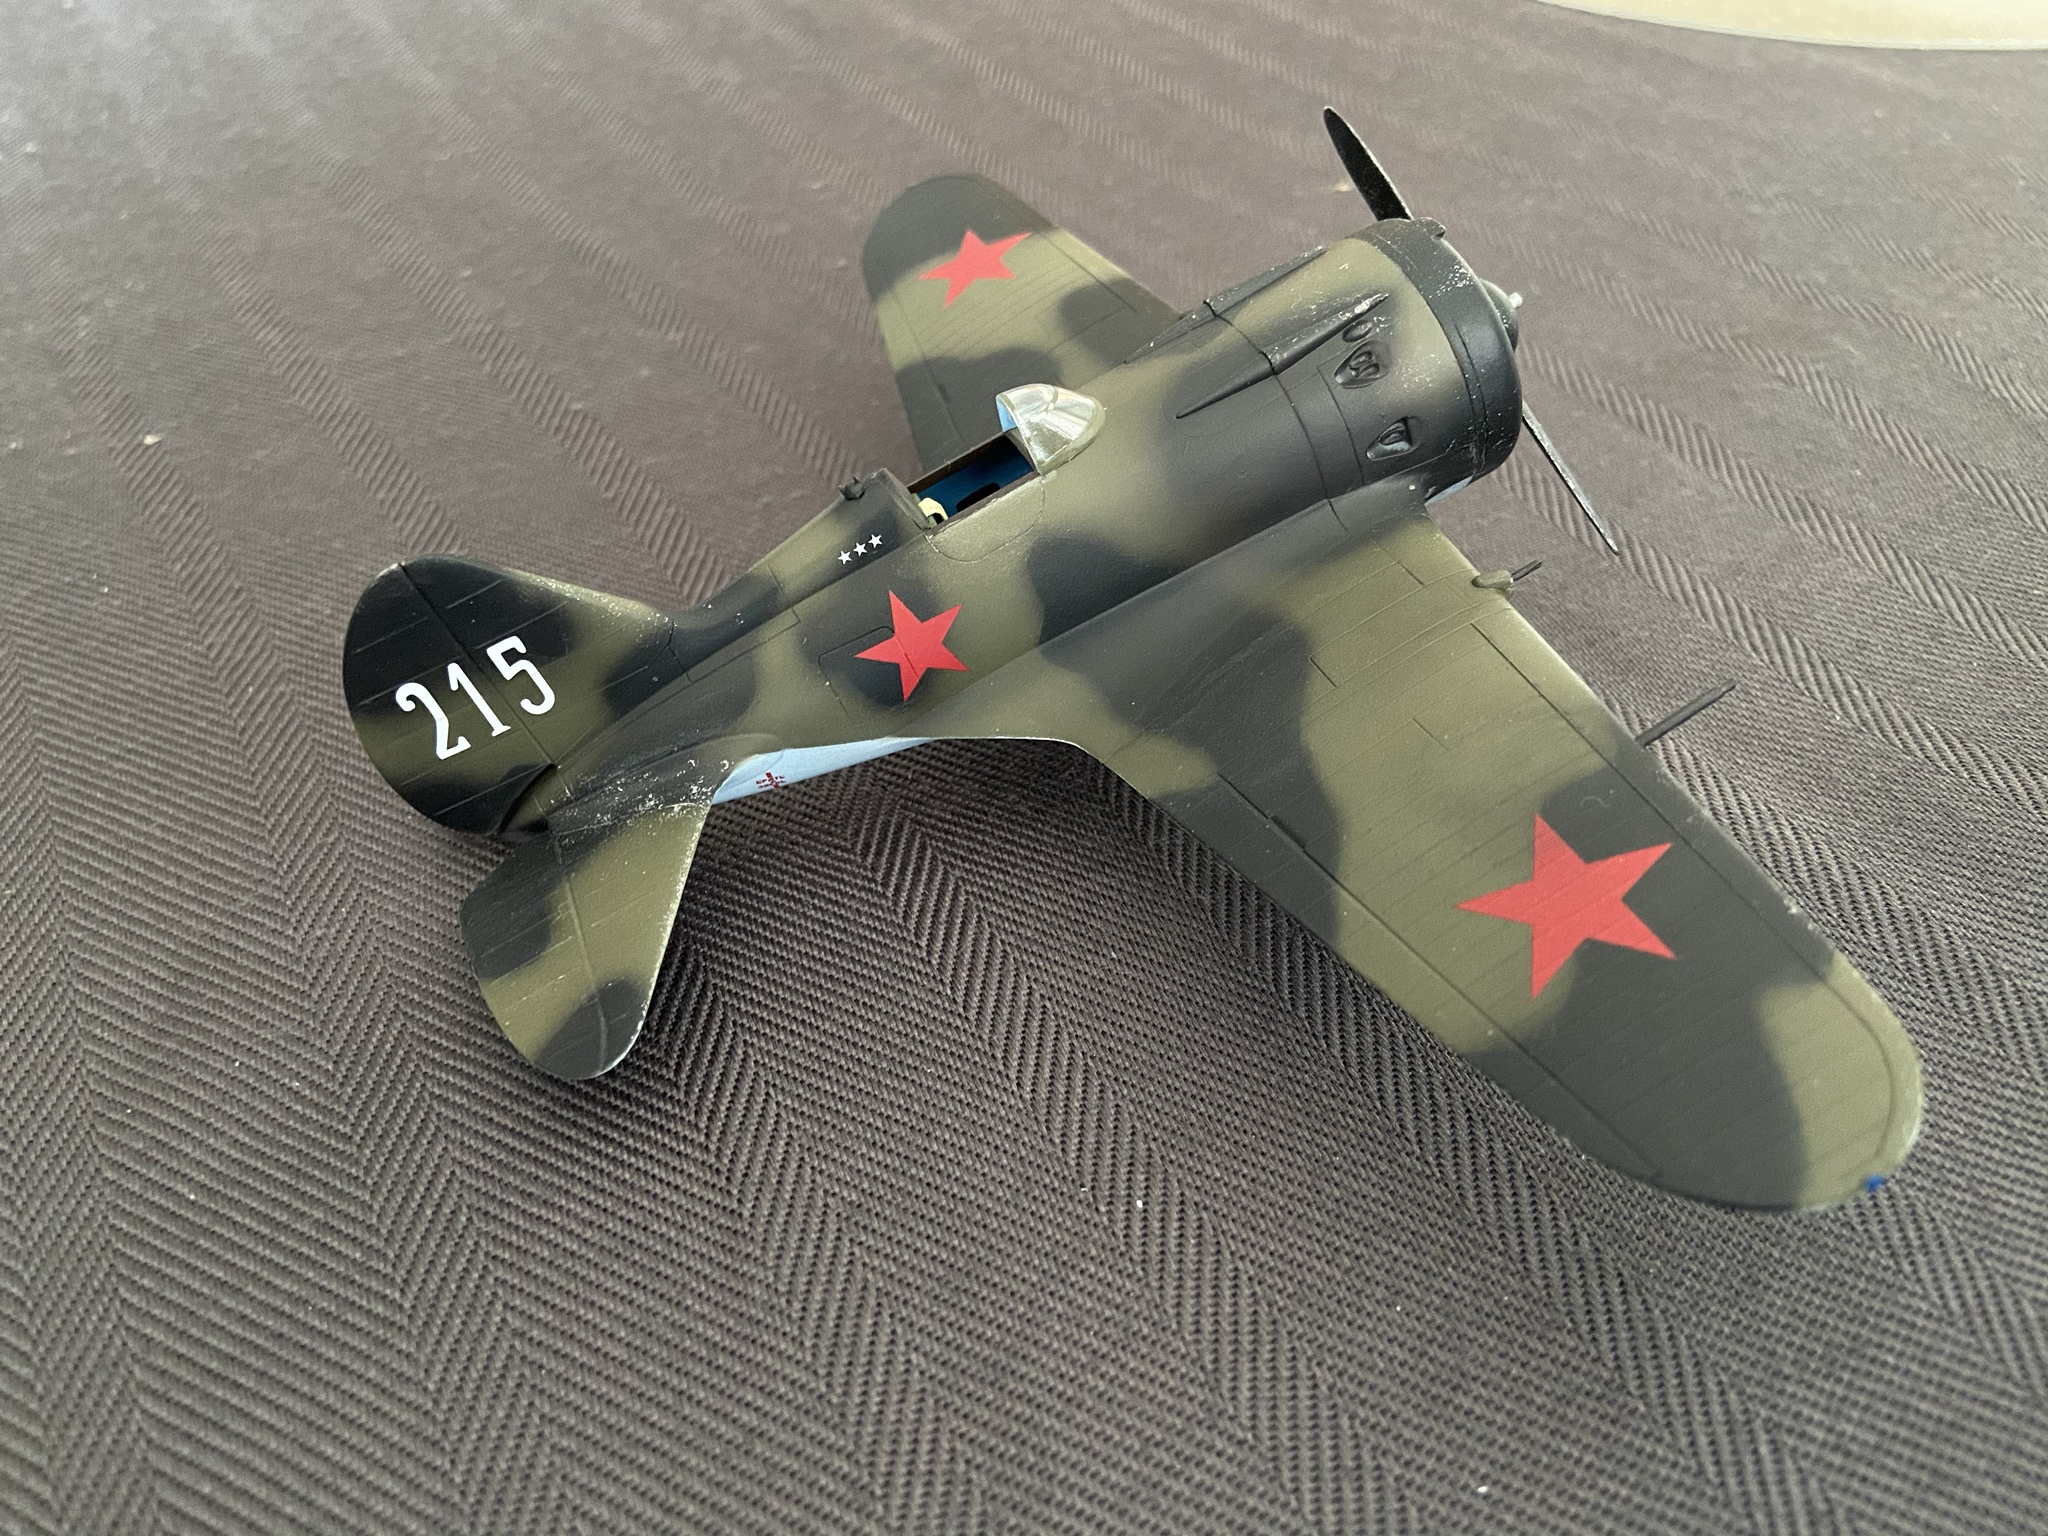
-The word translates to "victory!" and besides being a fun exercise in Russian calligraphy, this symbolizes my victory on that exam
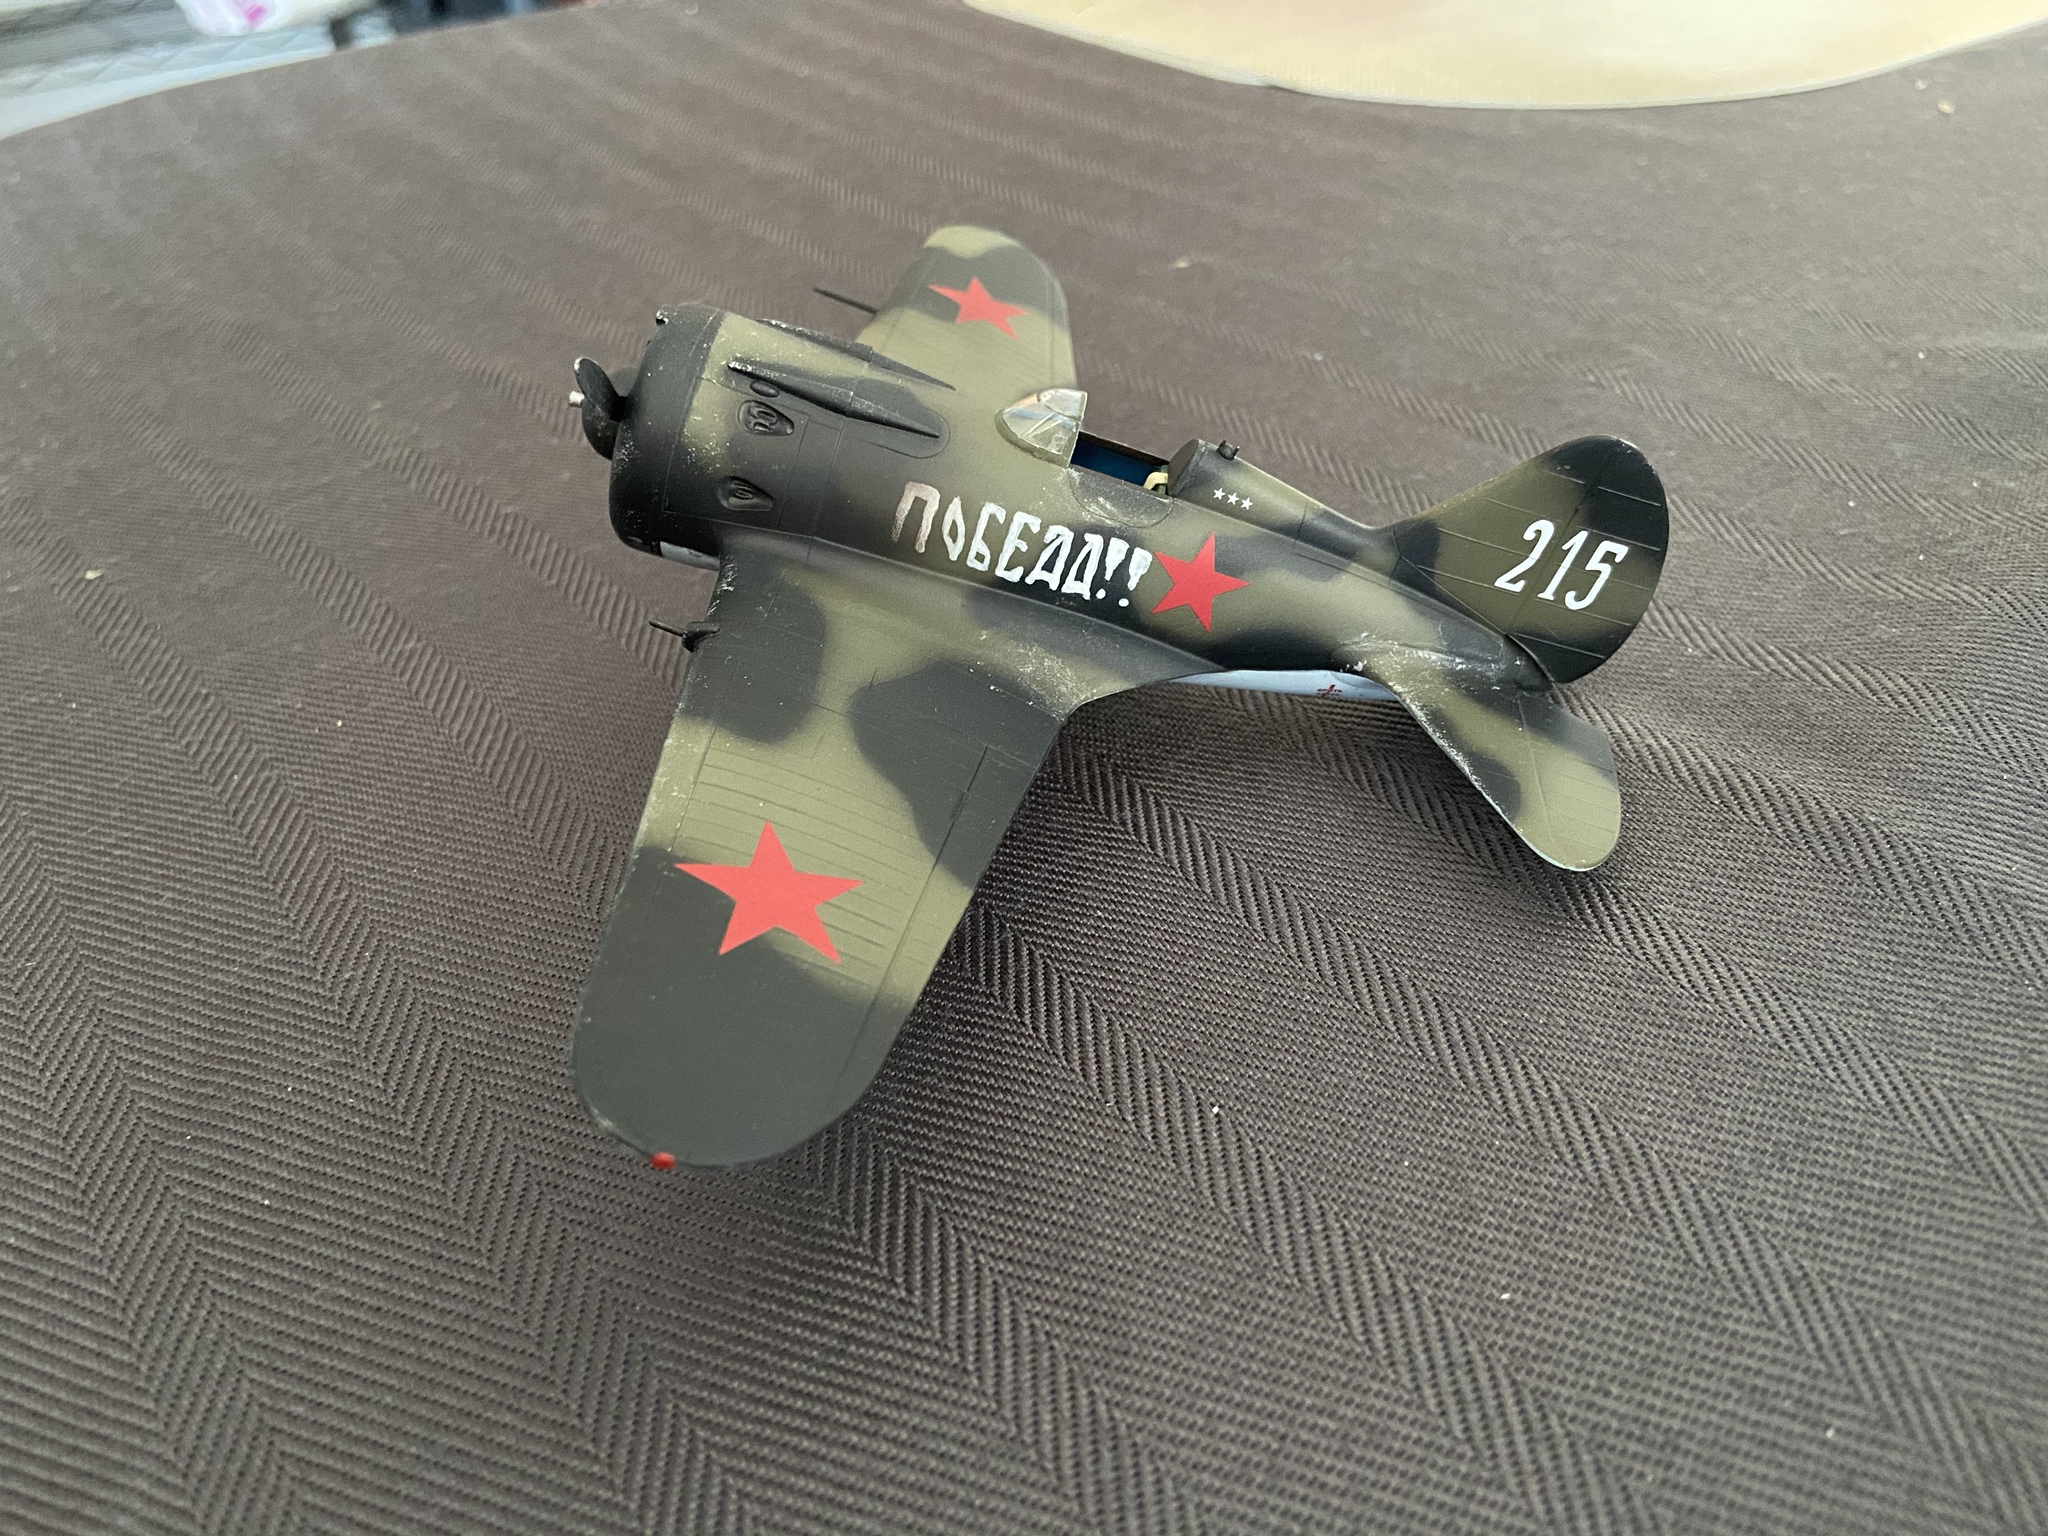
-The three victory marks symbolize the three board exams I took and passed during med school (decals from my spares)

-The I-16 was a plane that was great in its day but was quickly outclassed even when WWII began, yet it continued flying and performing admirably given its limitations. Much like how I performed compared to the other students at my med school
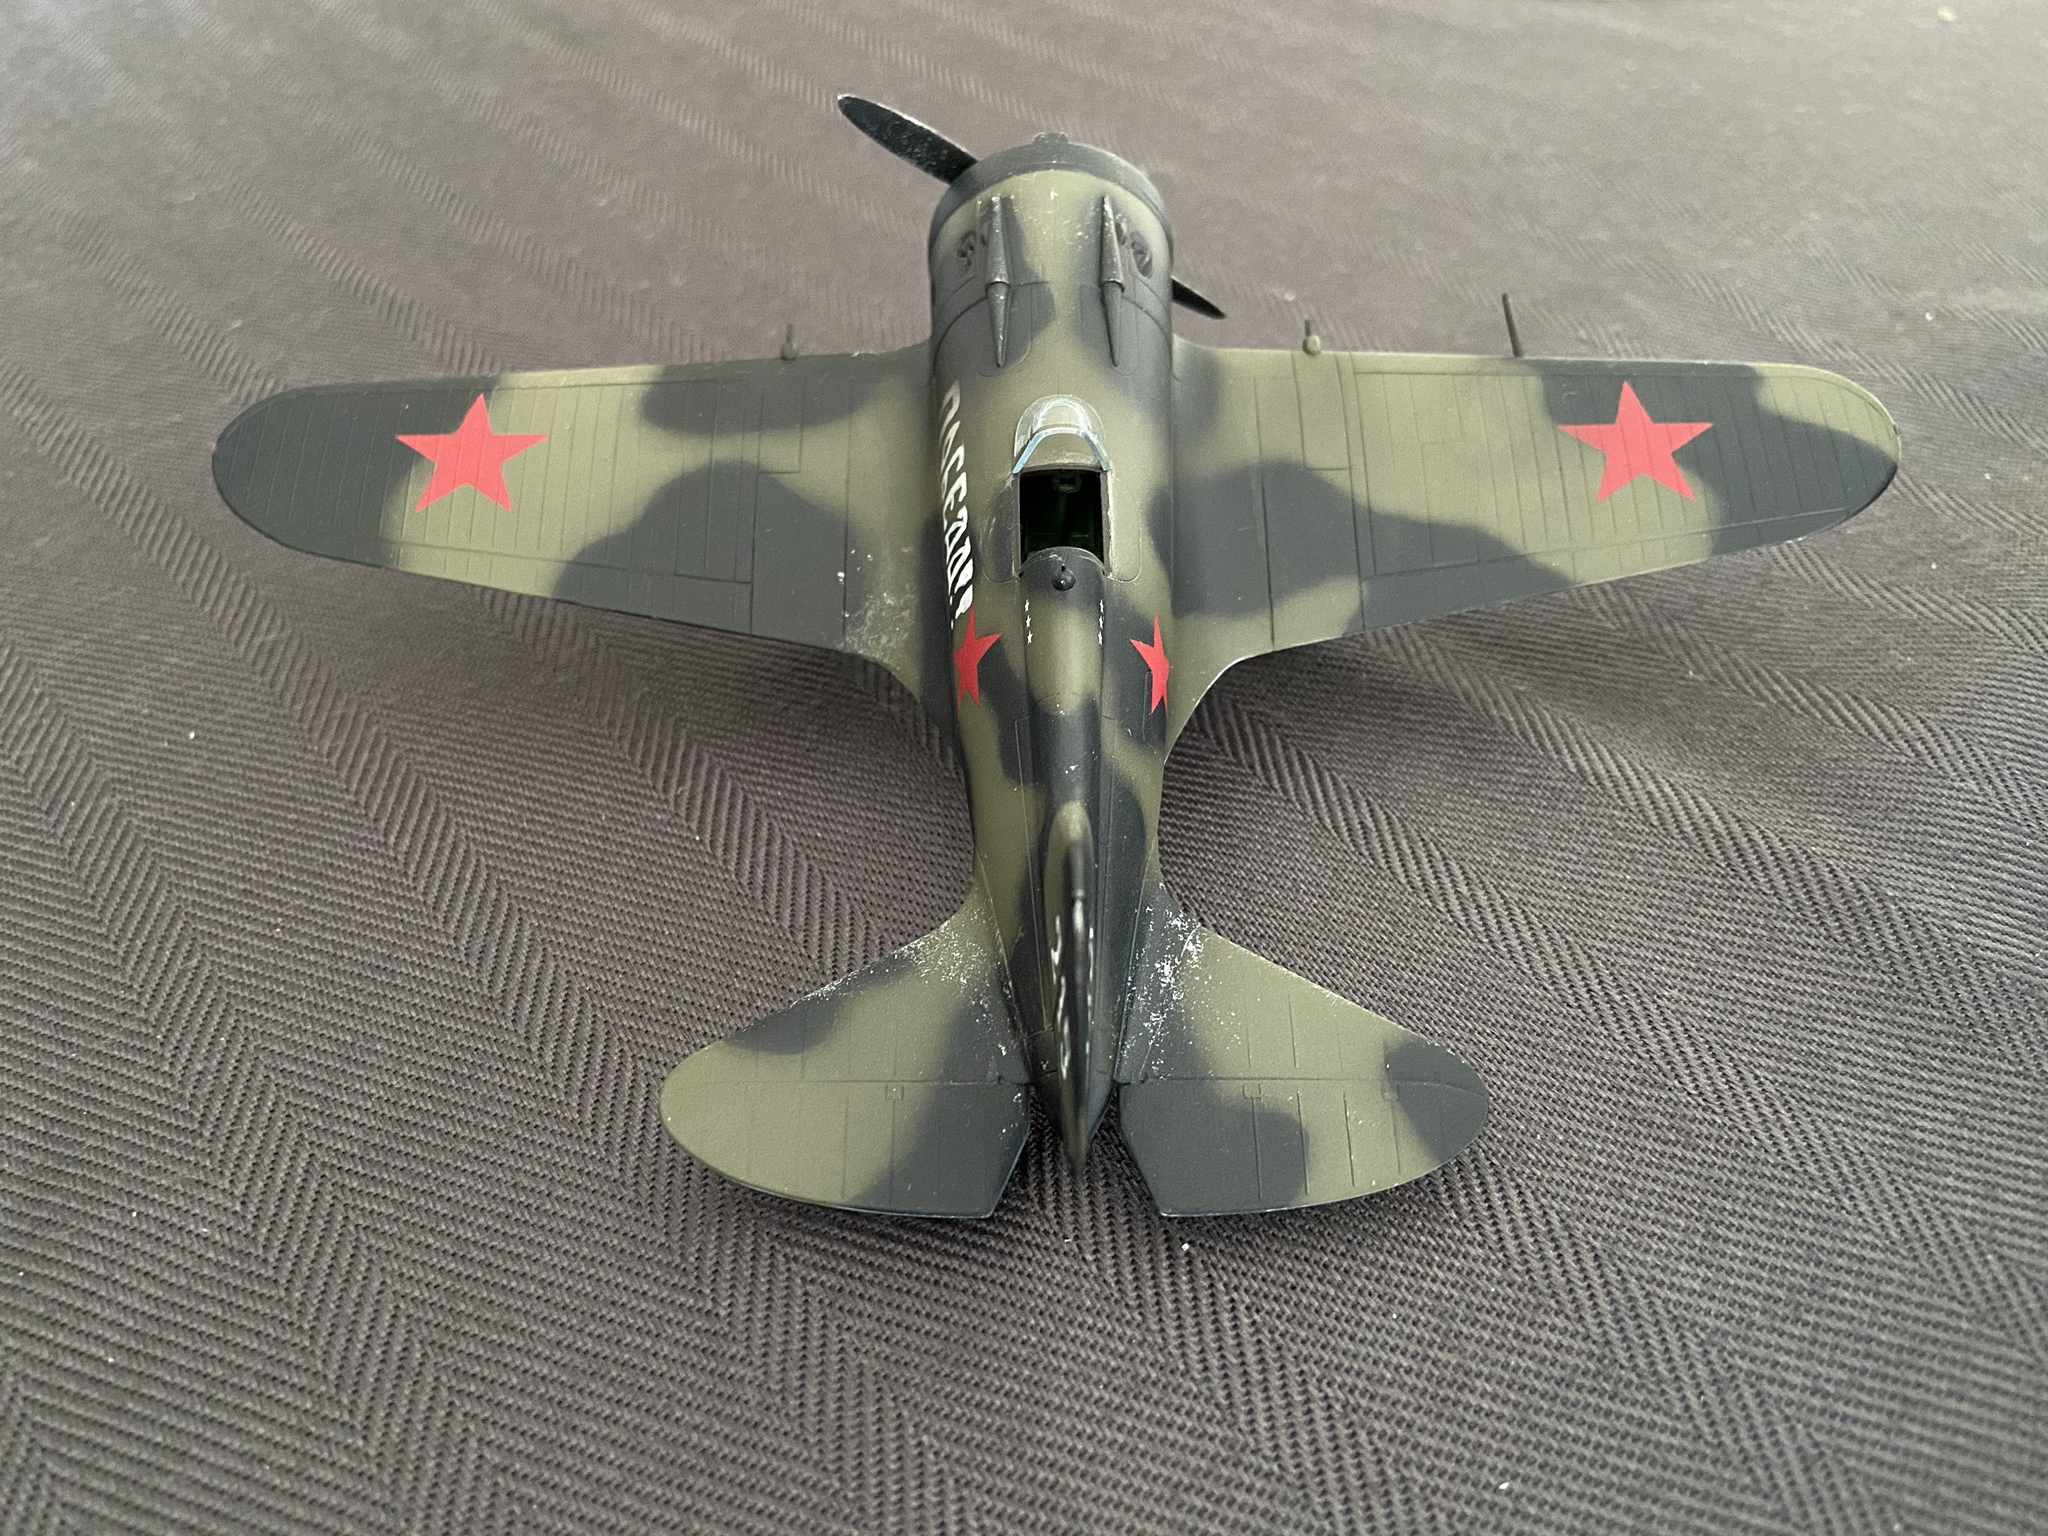
The major theme of this whole build is "my way" -- not striving for 100% realism or accuracy, nor for even my cleanest build. I just wanted a build that would get the job done one way or another with the lowest amount of stress possible...much like my attitude during med school

And by the way, I'm glad to share that I matched to my top choice for residency!!
As I said before, I've actually been done with this build for a while now. My last in-progress shot is of the engine cowling masking, which worked perfectly! I painted the insides and installed the engine, then laid a masking tape piece nearly flush with each opening on the interior side. I used Micro-Mask as the final barrier between the cowling and the tape, then closed it all up and painted the model. When it was done, I poked each piece of [tape+MicroMask] loose and then used tweezers to pull them through the openings. Here's the end result:
If I wasn't verbose enough, here's the story of this build
I bought this kit right after I took the last board exam for medical school, and it's rife with symbolism:
-The plane's number is the score I received on that exam (decals from my spares)
-The word translates to "victory!" and besides being a fun exercise in Russian calligraphy, this symbolizes my victory on that exam
-The three victory marks symbolize the three board exams I took and passed during med school (decals from my spares)
-The I-16 was a plane that was great in its day but was quickly outclassed even when WWII began, yet it continued flying and performing admirably given its limitations. Much like how I performed compared to the other students at my med school
The major theme of this whole build is "my way" -- not striving for 100% realism or accuracy, nor for even my cleanest build. I just wanted a build that would get the job done one way or another with the lowest amount of stress possible...much like my attitude during med school
And by the way, I'm glad to share that I matched to my top choice for residency!!
Lakota
#123
Joined: November 17, 2008
KitMaker: 1,202 posts
AeroScale: 292 posts
Posted: Sunday, April 12, 2020 - 11:28 AM UTC
Robby,
I'll need to try the Mig masking putty. Congrats on your boards and getting the residency of your choice. Way to go!
Oh yeah, that's a nice model you completed. I like the way you personalized it.
Take care and stay safe,
Don "Lakota"
I'll need to try the Mig masking putty. Congrats on your boards and getting the residency of your choice. Way to go!
Oh yeah, that's a nice model you completed. I like the way you personalized it.
Take care and stay safe,
Don "Lakota"
PasiAhopelto
Joined: October 01, 2016
KitMaker: 514 posts
AeroScale: 239 posts
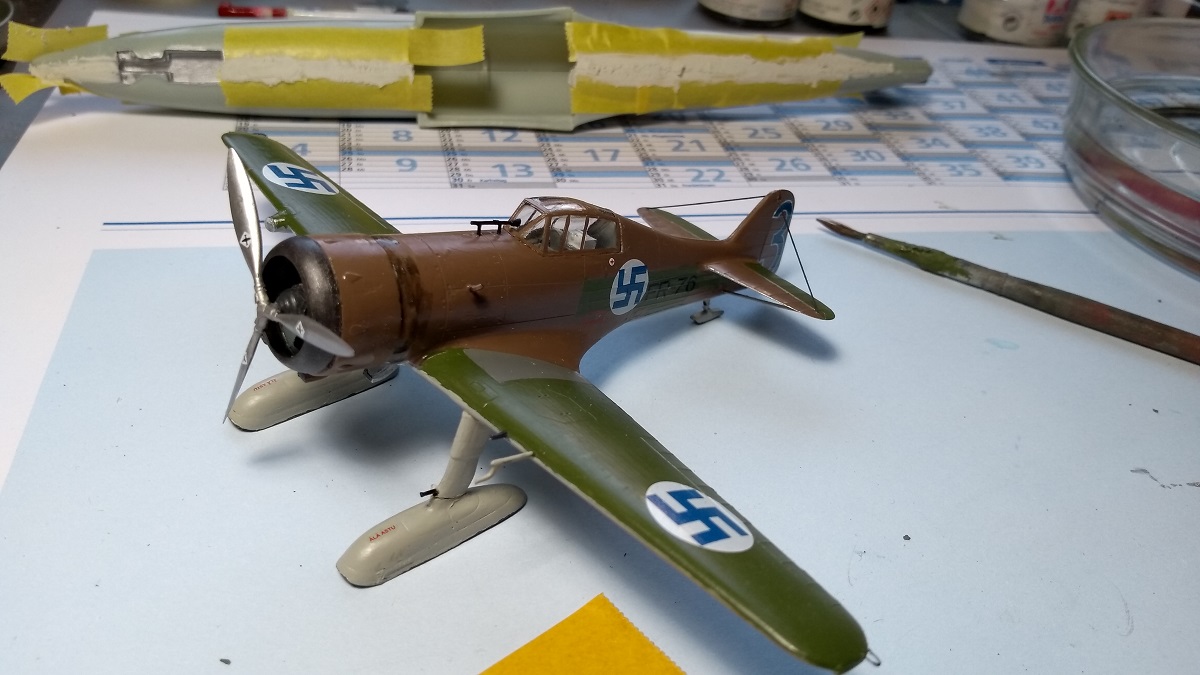
Posted: Monday, April 13, 2020 - 04:33 AM UTC
Good looking builds above.
I'll need to touch up paint and decals (not all in place yet) before weathering, but I think I'll finish this in time.
I'll need to touch up paint and decals (not all in place yet) before weathering, but I think I'll finish this in time.
b17-peter
#392
Joined: January 09, 2013
KitMaker: 696 posts
AeroScale: 608 posts
Posted: Monday, April 13, 2020 - 04:47 AM UTC
Looks great already, Pasi! 

RhinoSpit

Joined: September 22, 2016
KitMaker: 224 posts
AeroScale: 191 posts
Posted: Monday, April 13, 2020 - 09:35 AM UTC
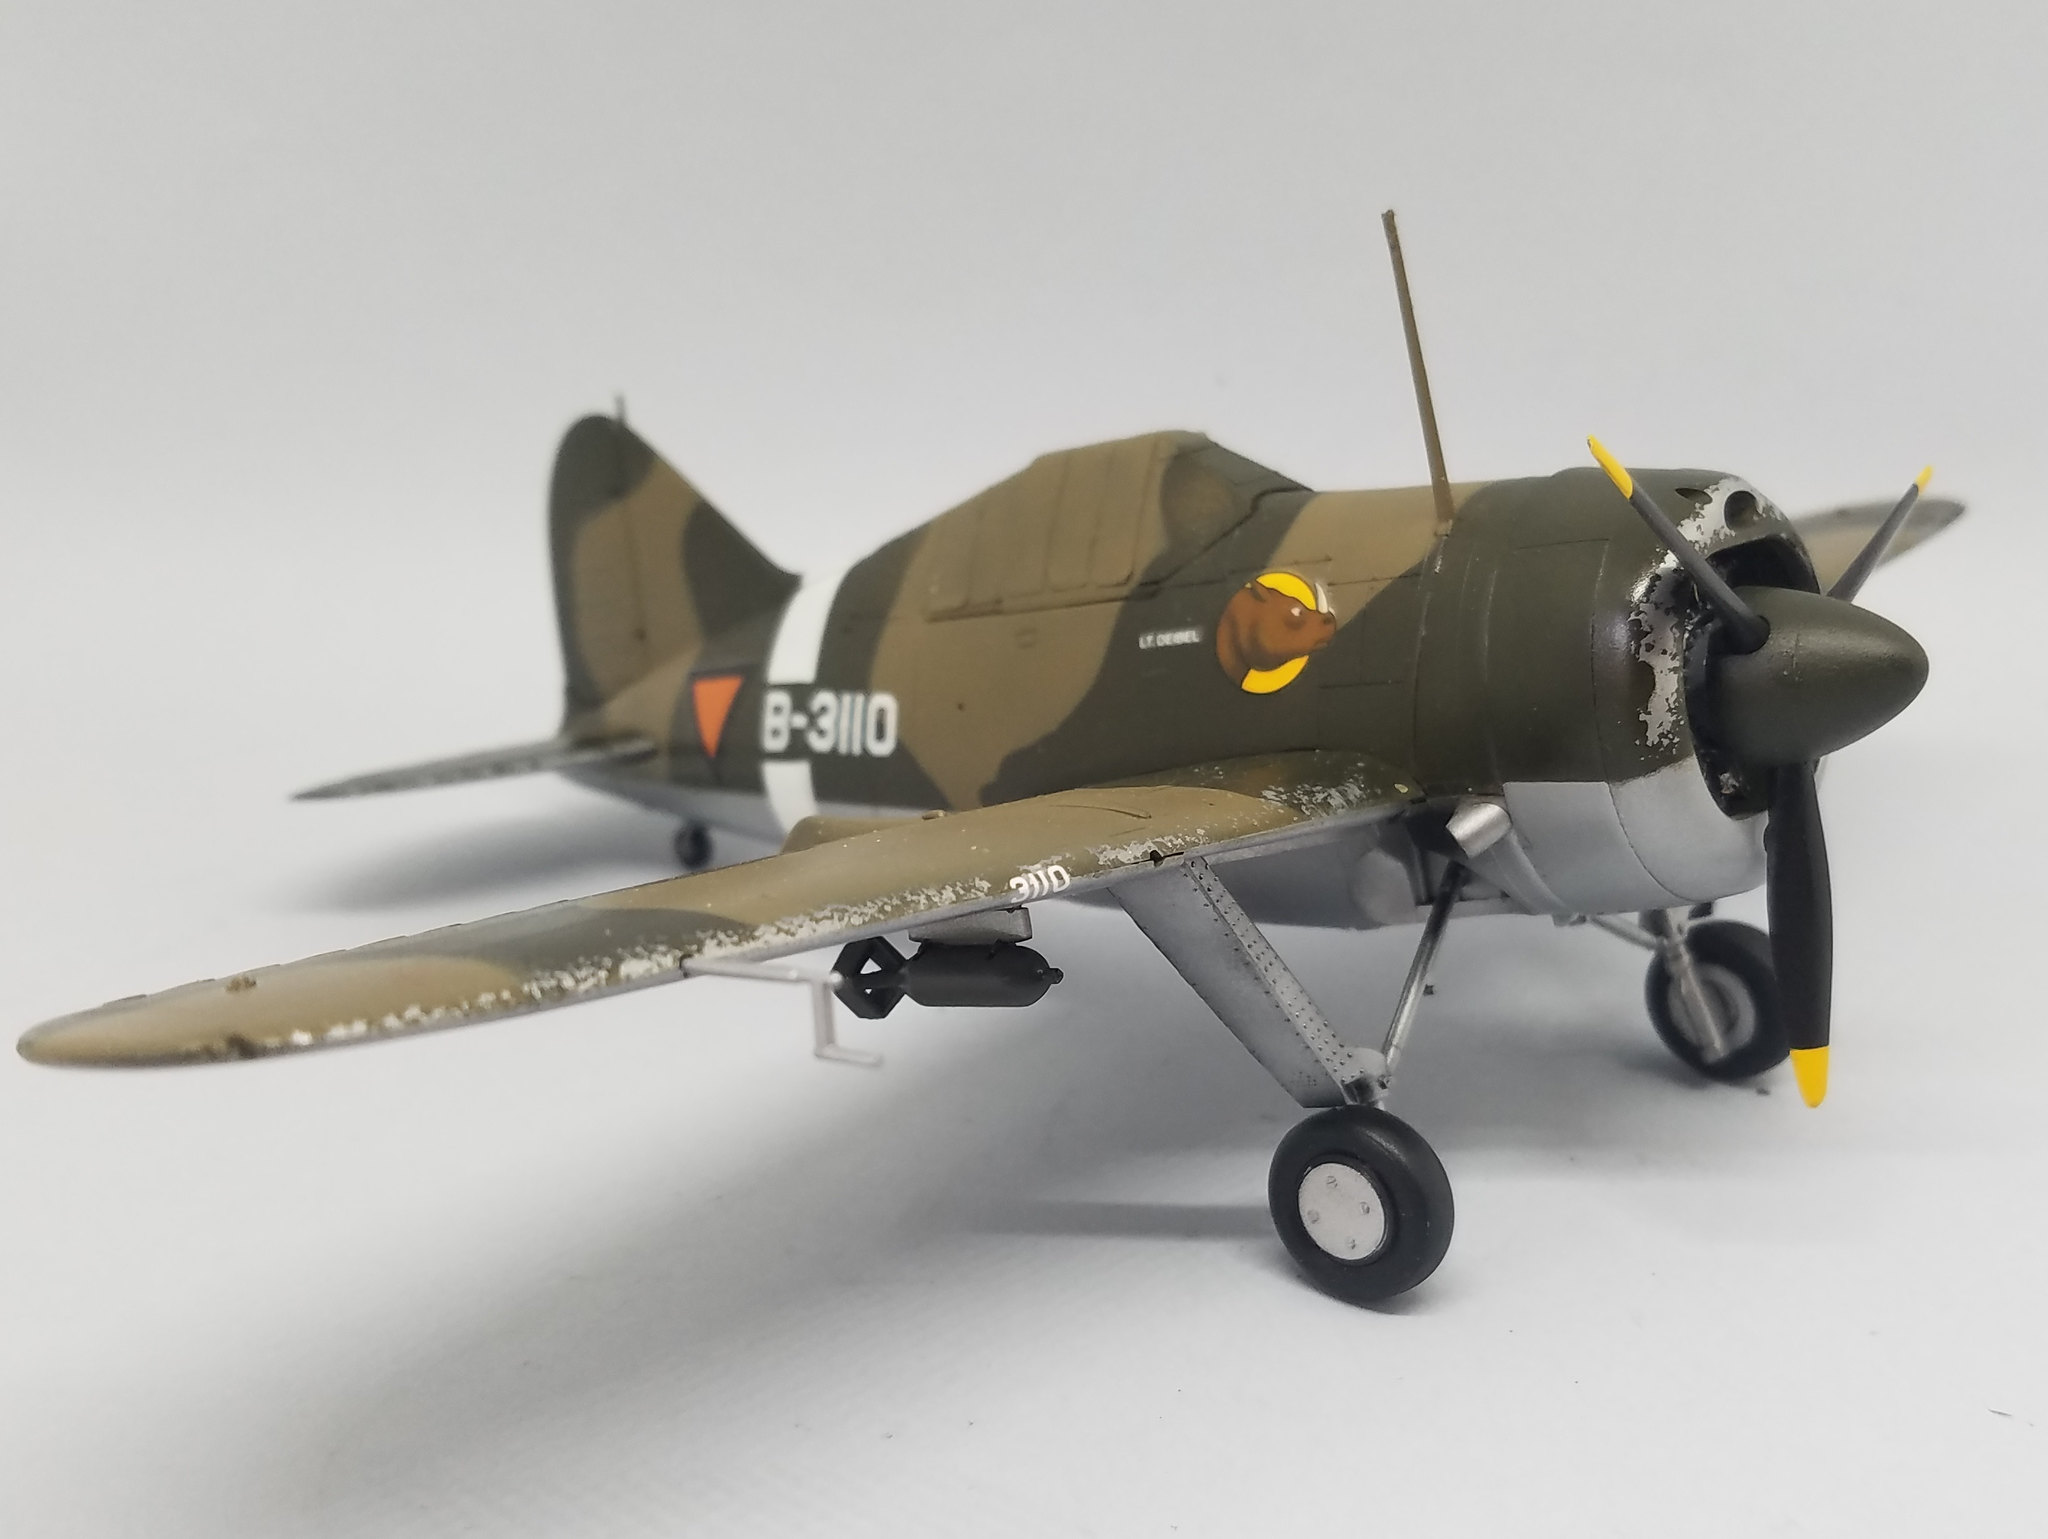
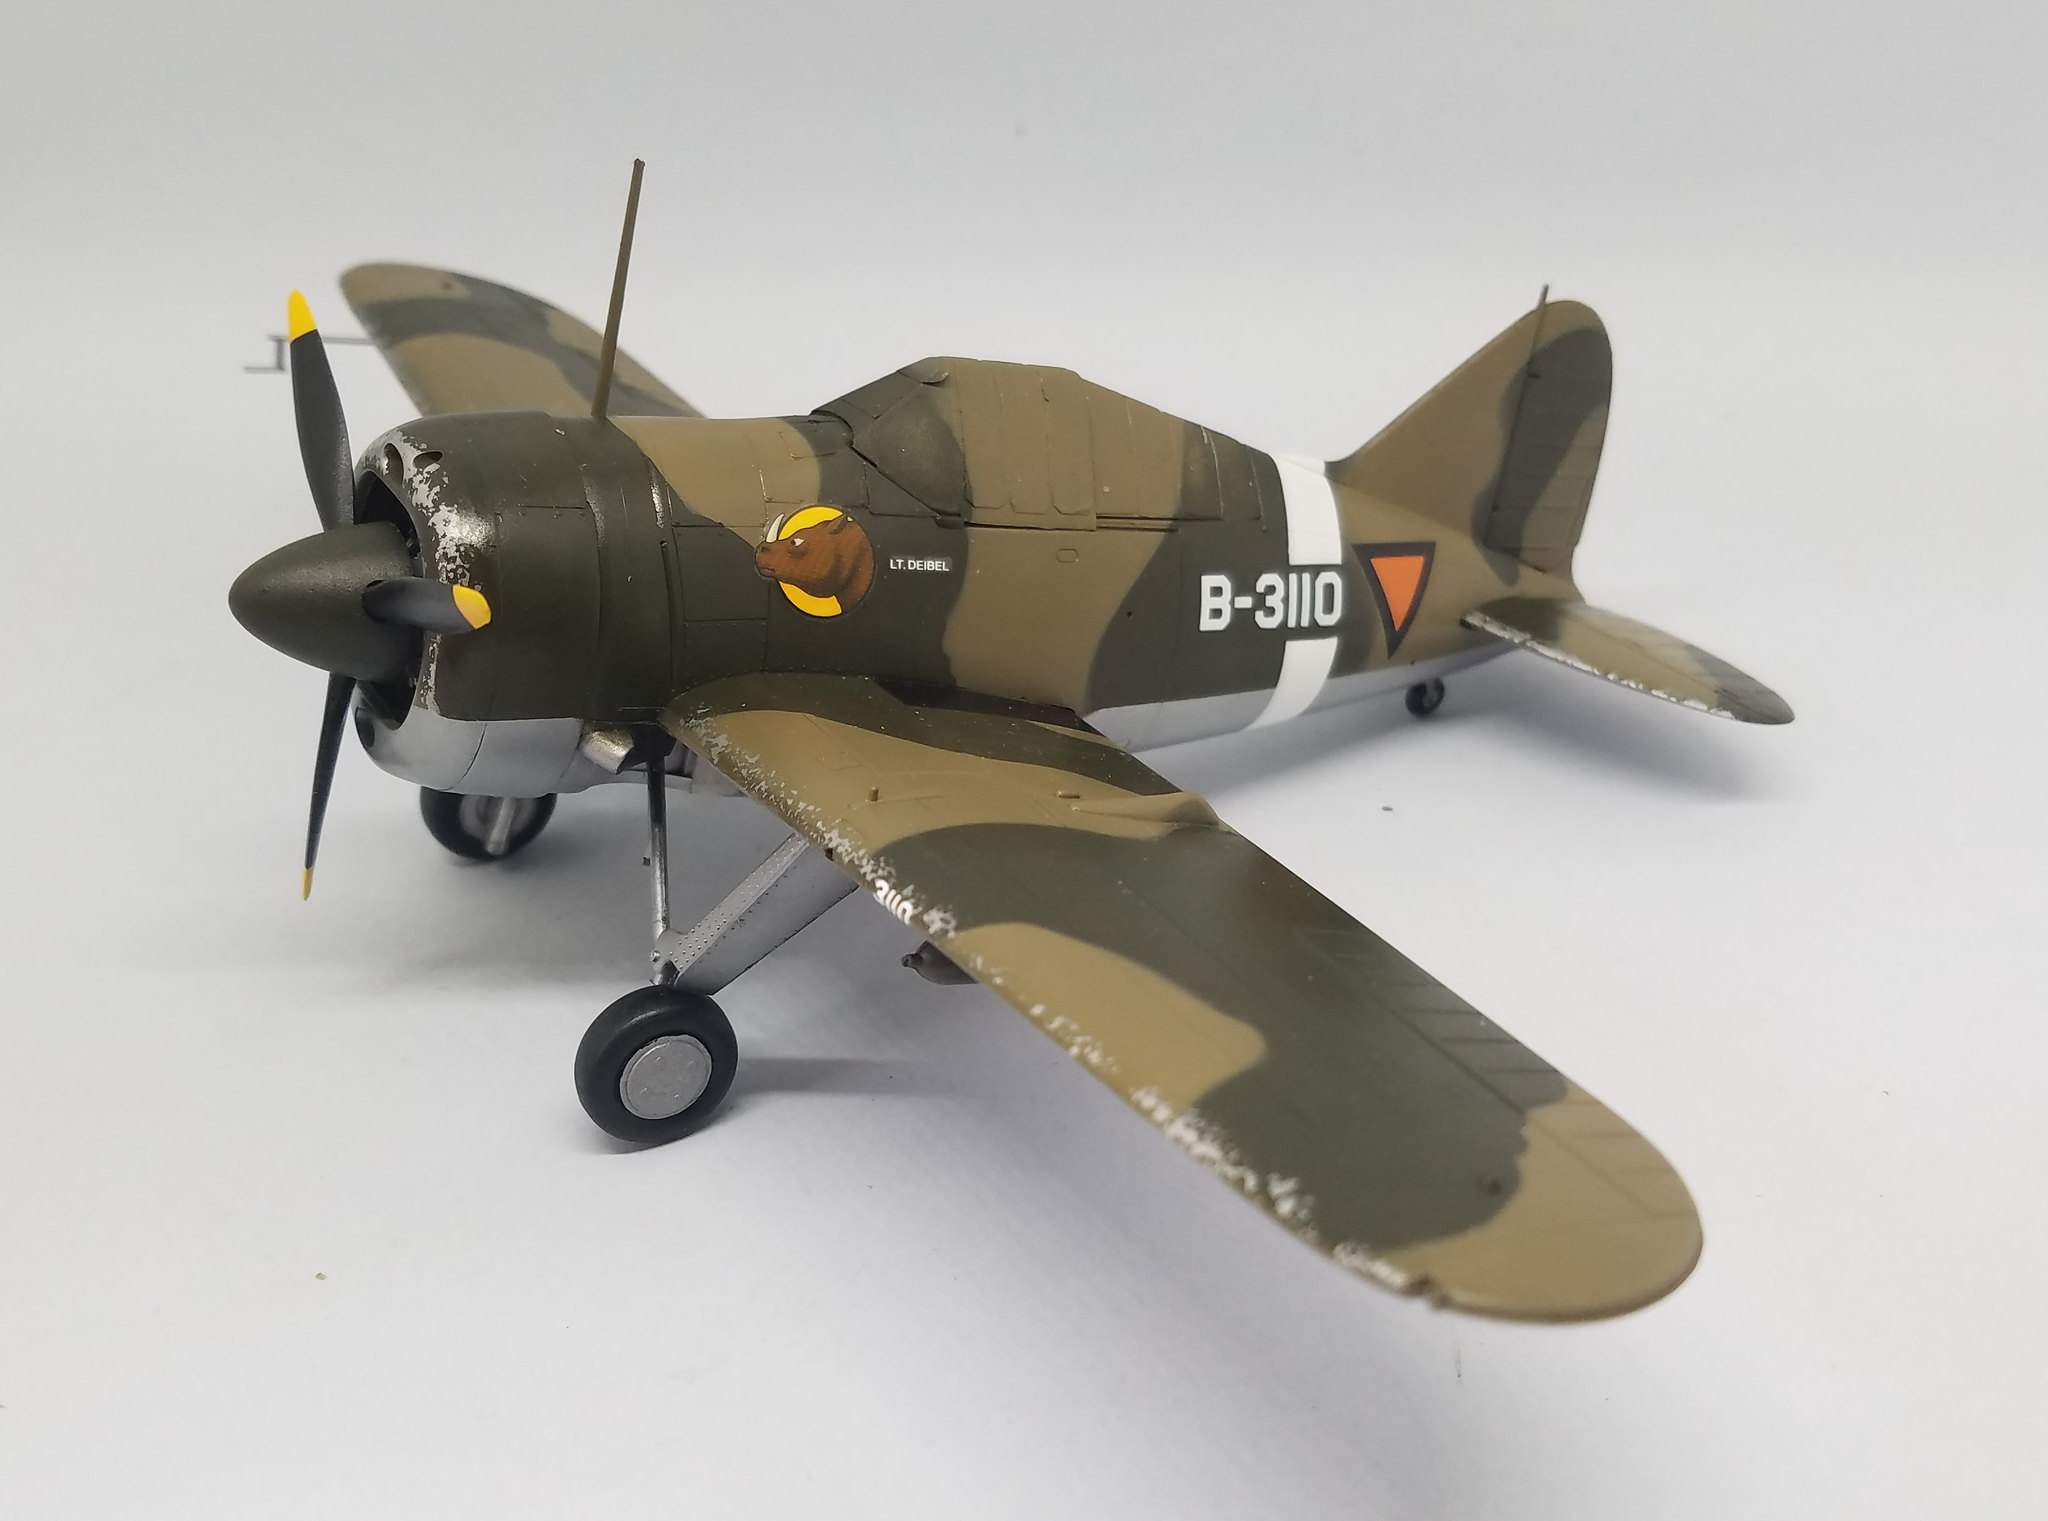
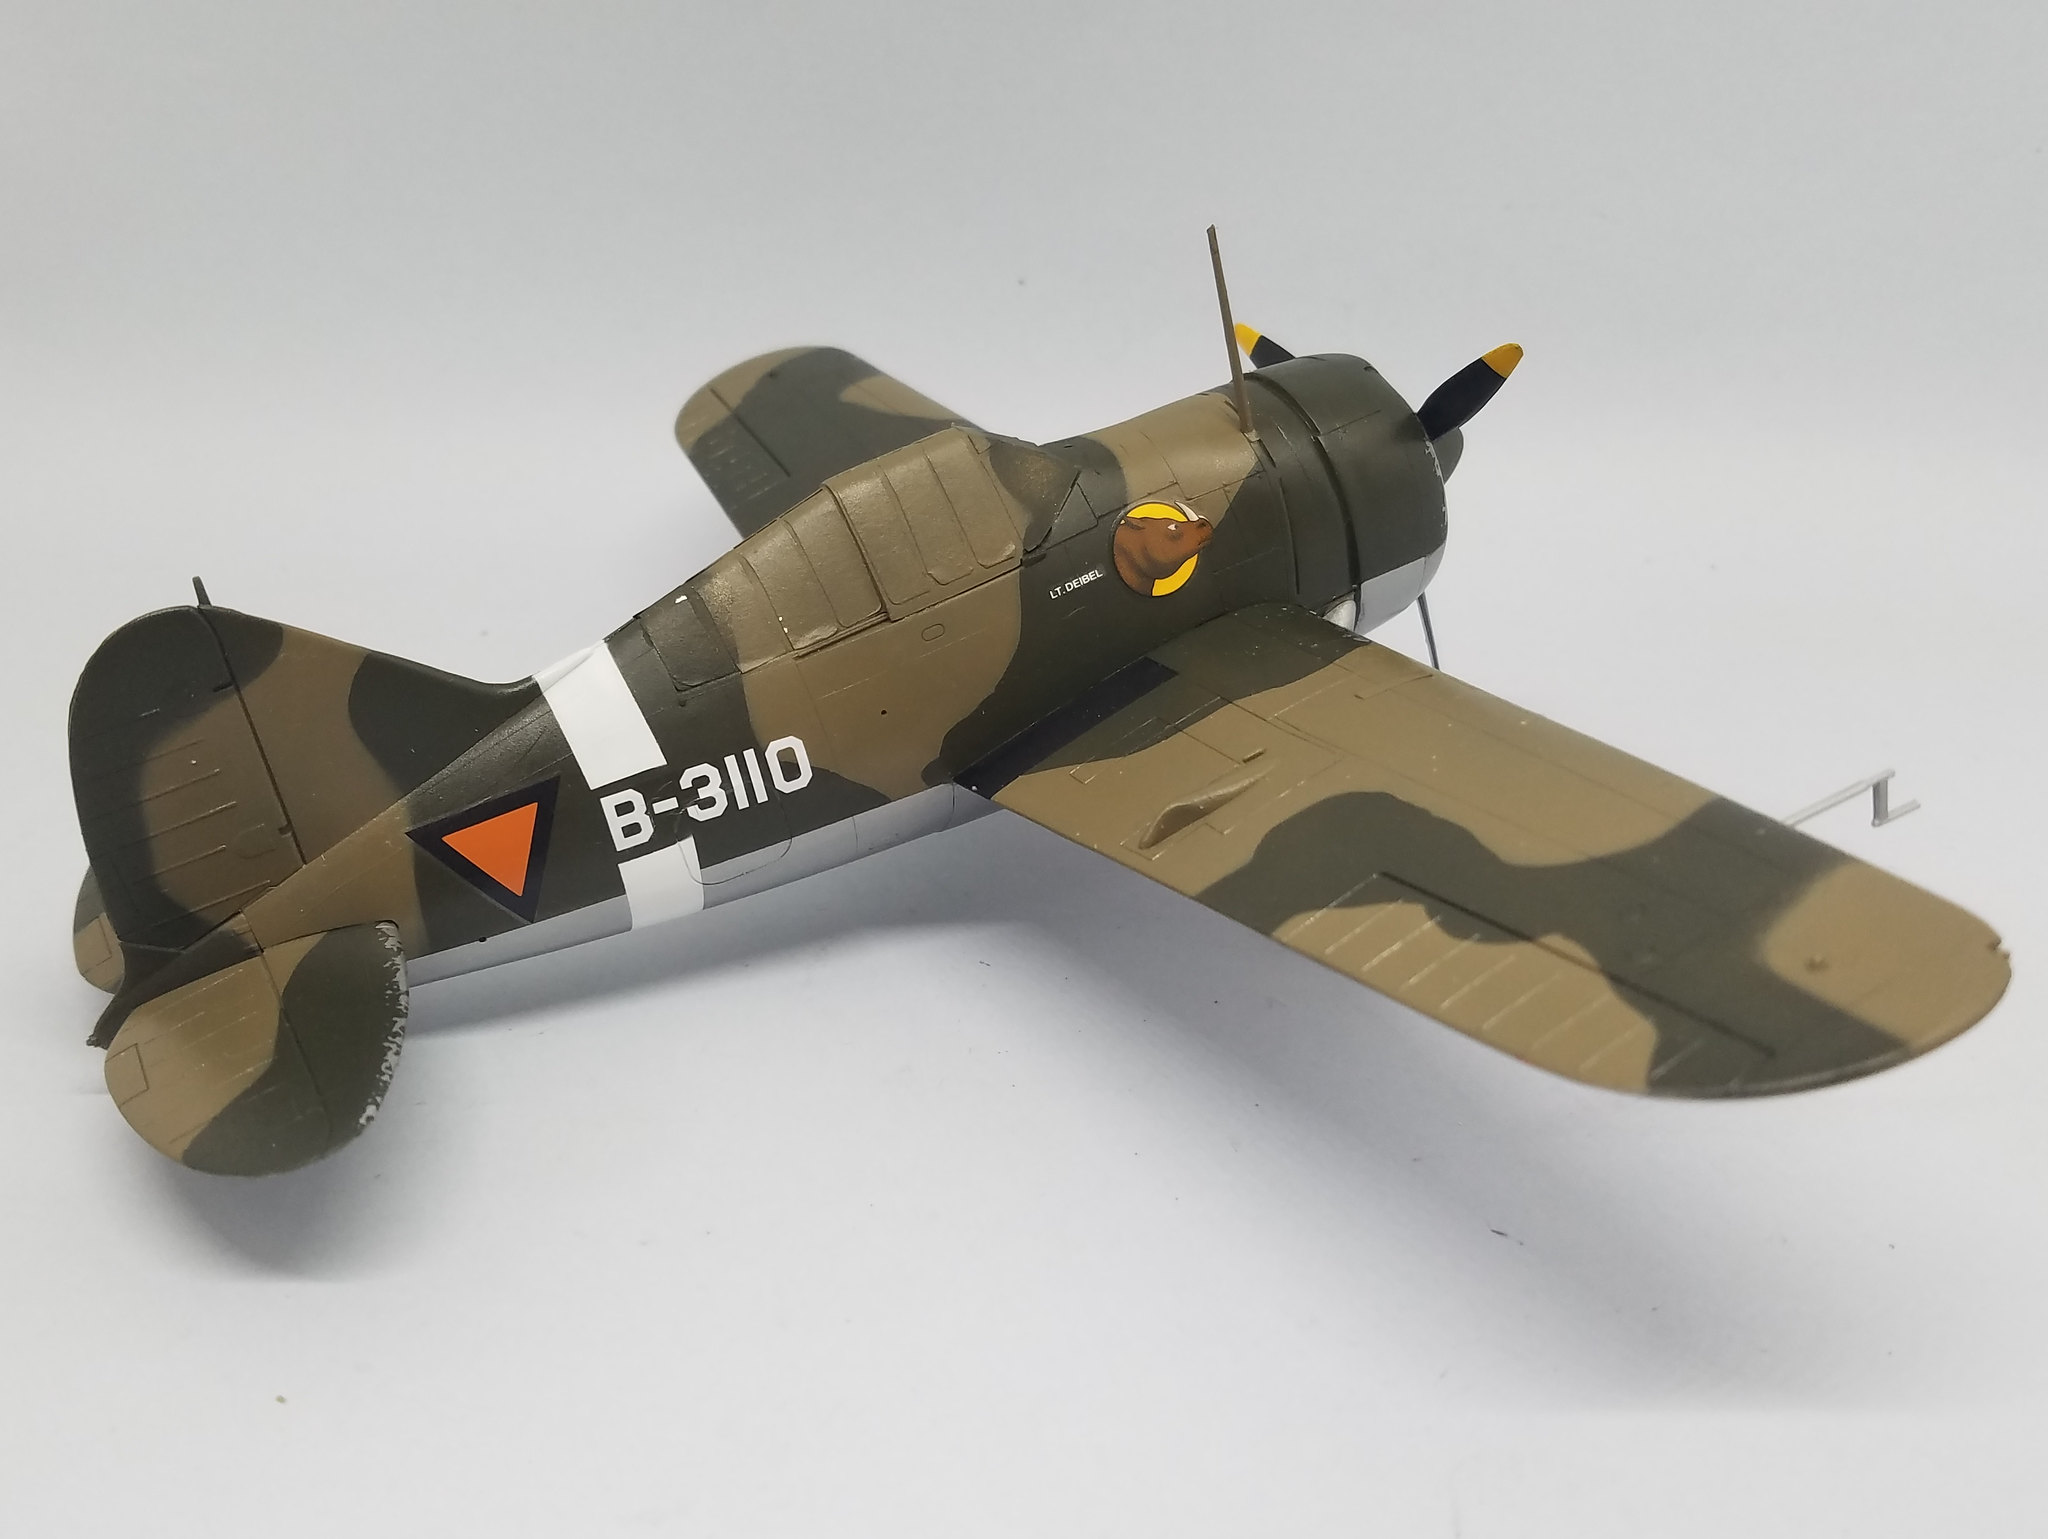
I hope you're doing well. With the containment i've plenty of time and no excuse to finish my models. So my Brewster buffalo is near the finish line. 3 days earlier i've brushed a coat of Future and yesterday i've decaled it and here the result:
MichaelSatin

Joined: January 19, 2008
KitMaker: 3,909 posts
AeroScale: 2,904 posts
Posted: Monday, April 13, 2020 - 12:30 PM UTC
Good Lord, how does the driver see where he's going?
Michael
Michael
Sleepwalker71
Joined: August 30, 2012
KitMaker: 265 posts
AeroScale: 72 posts
Posted: Monday, April 13, 2020 - 02:03 PM UTC
Quoted Text
Good Lord, how does the driver see where he's going?
Michael
Special plane for IFR (Instrument Flight Rules) training.

AussieReg
#007

Joined: June 09, 2009
KitMaker: 8,156 posts
AeroScale: 3,756 posts
Posted: Monday, April 13, 2020 - 02:36 PM UTC
Quoted Text
Good Lord, how does the driver see where he's going?
Michael
"Use the force, Luke!"


SGTJKJ
#041
Joined: July 20, 2006
KitMaker: 10,069 posts
AeroScale: 3,788 posts
Posted: Saturday, April 18, 2020 - 04:08 AM UTC
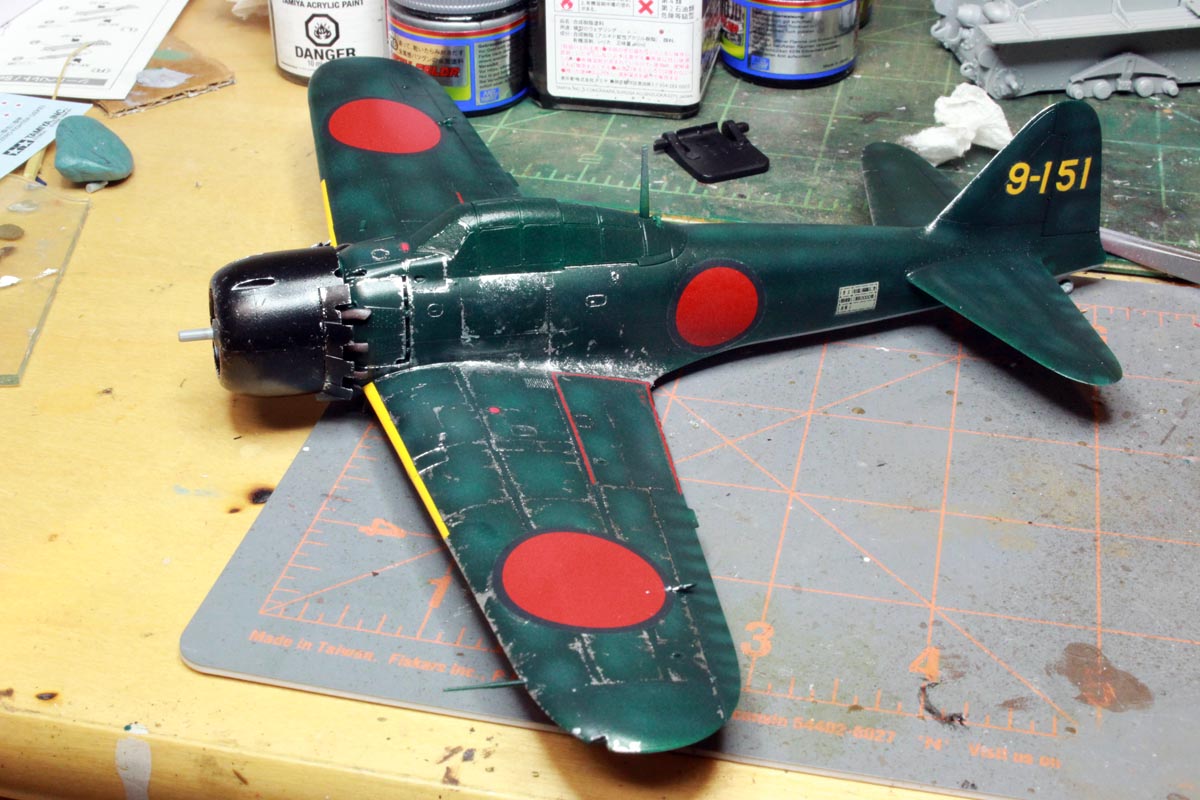
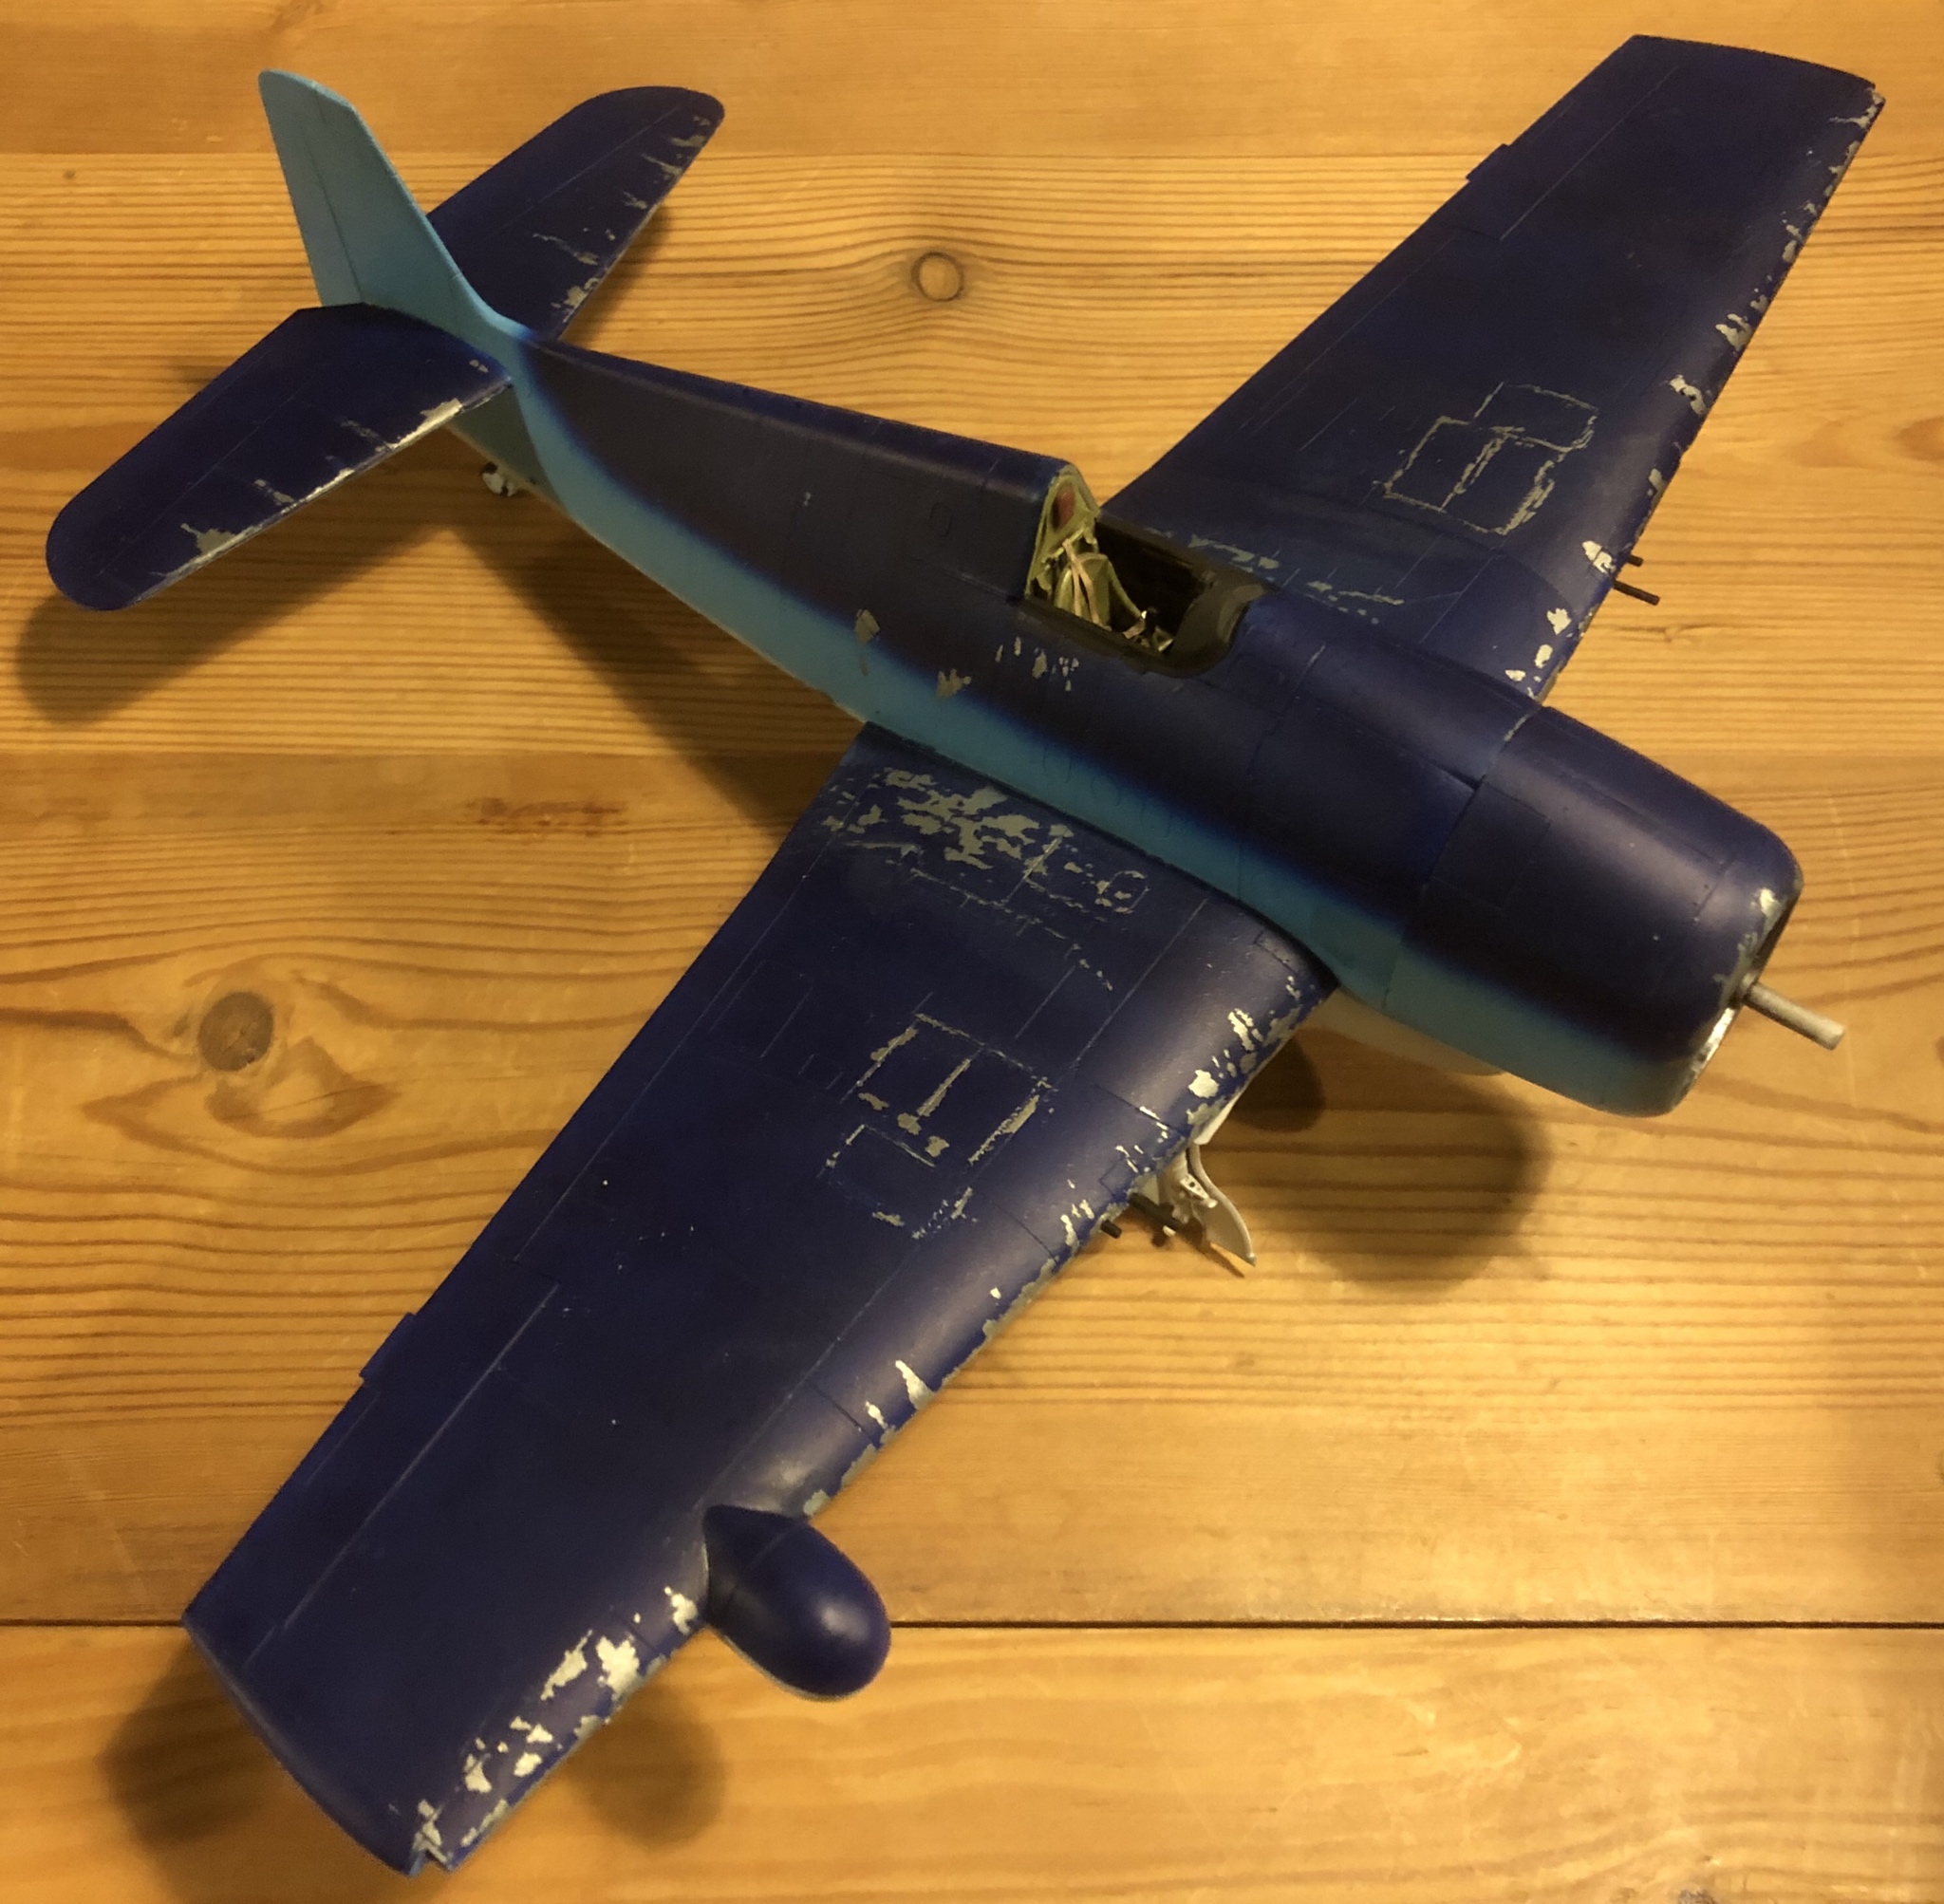
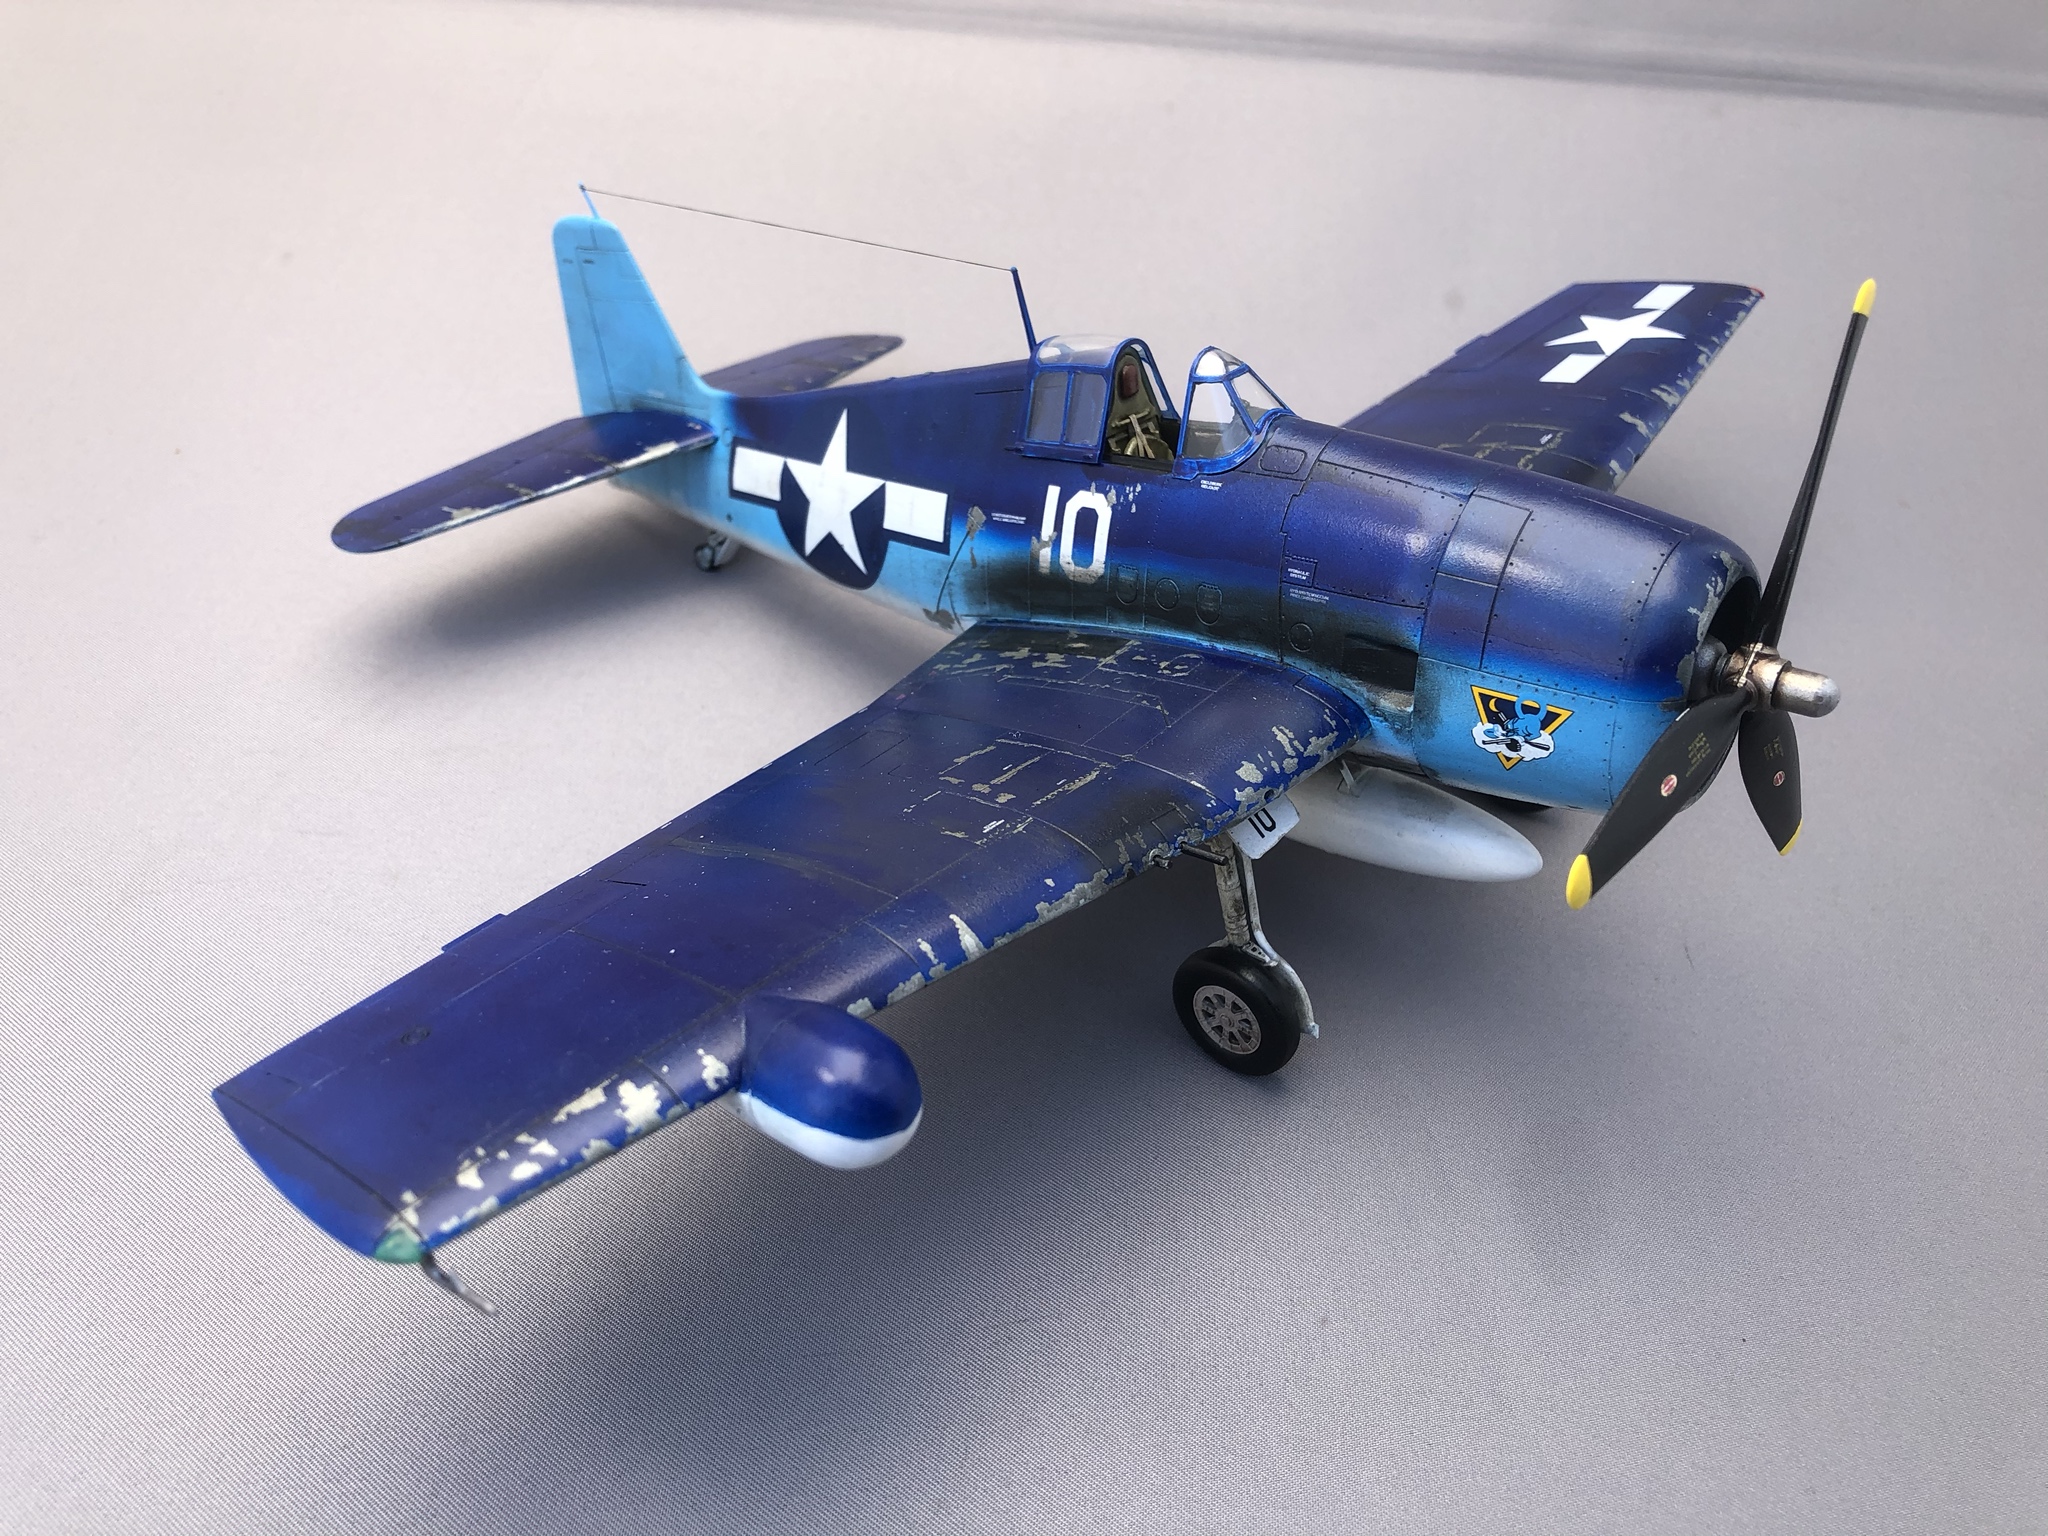
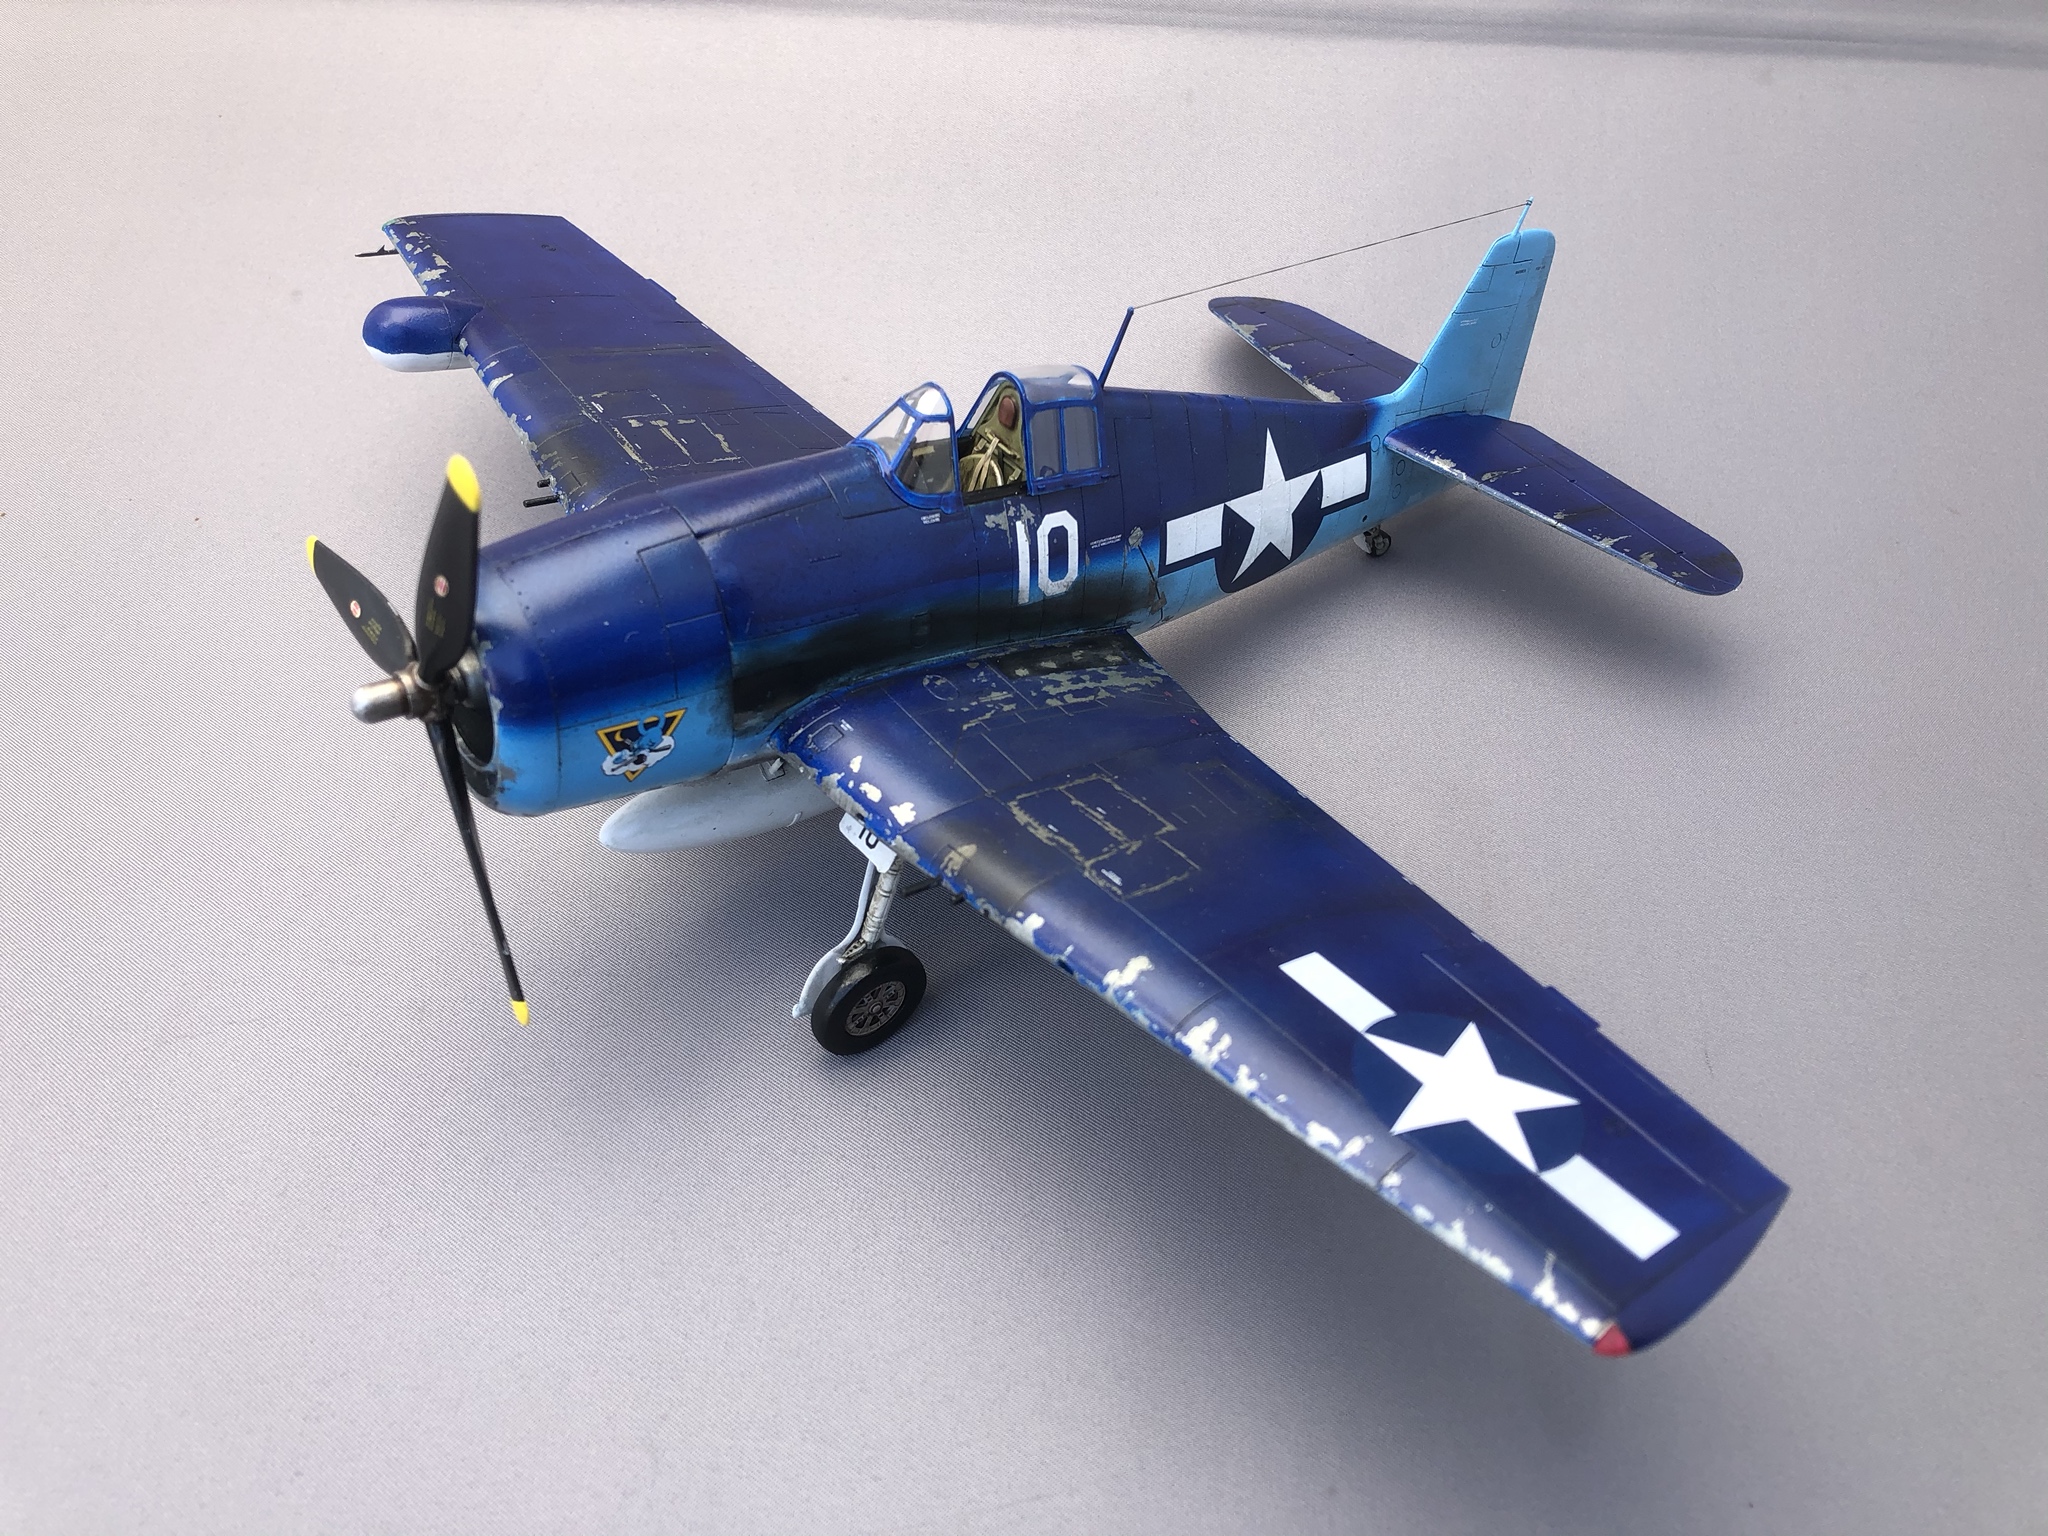
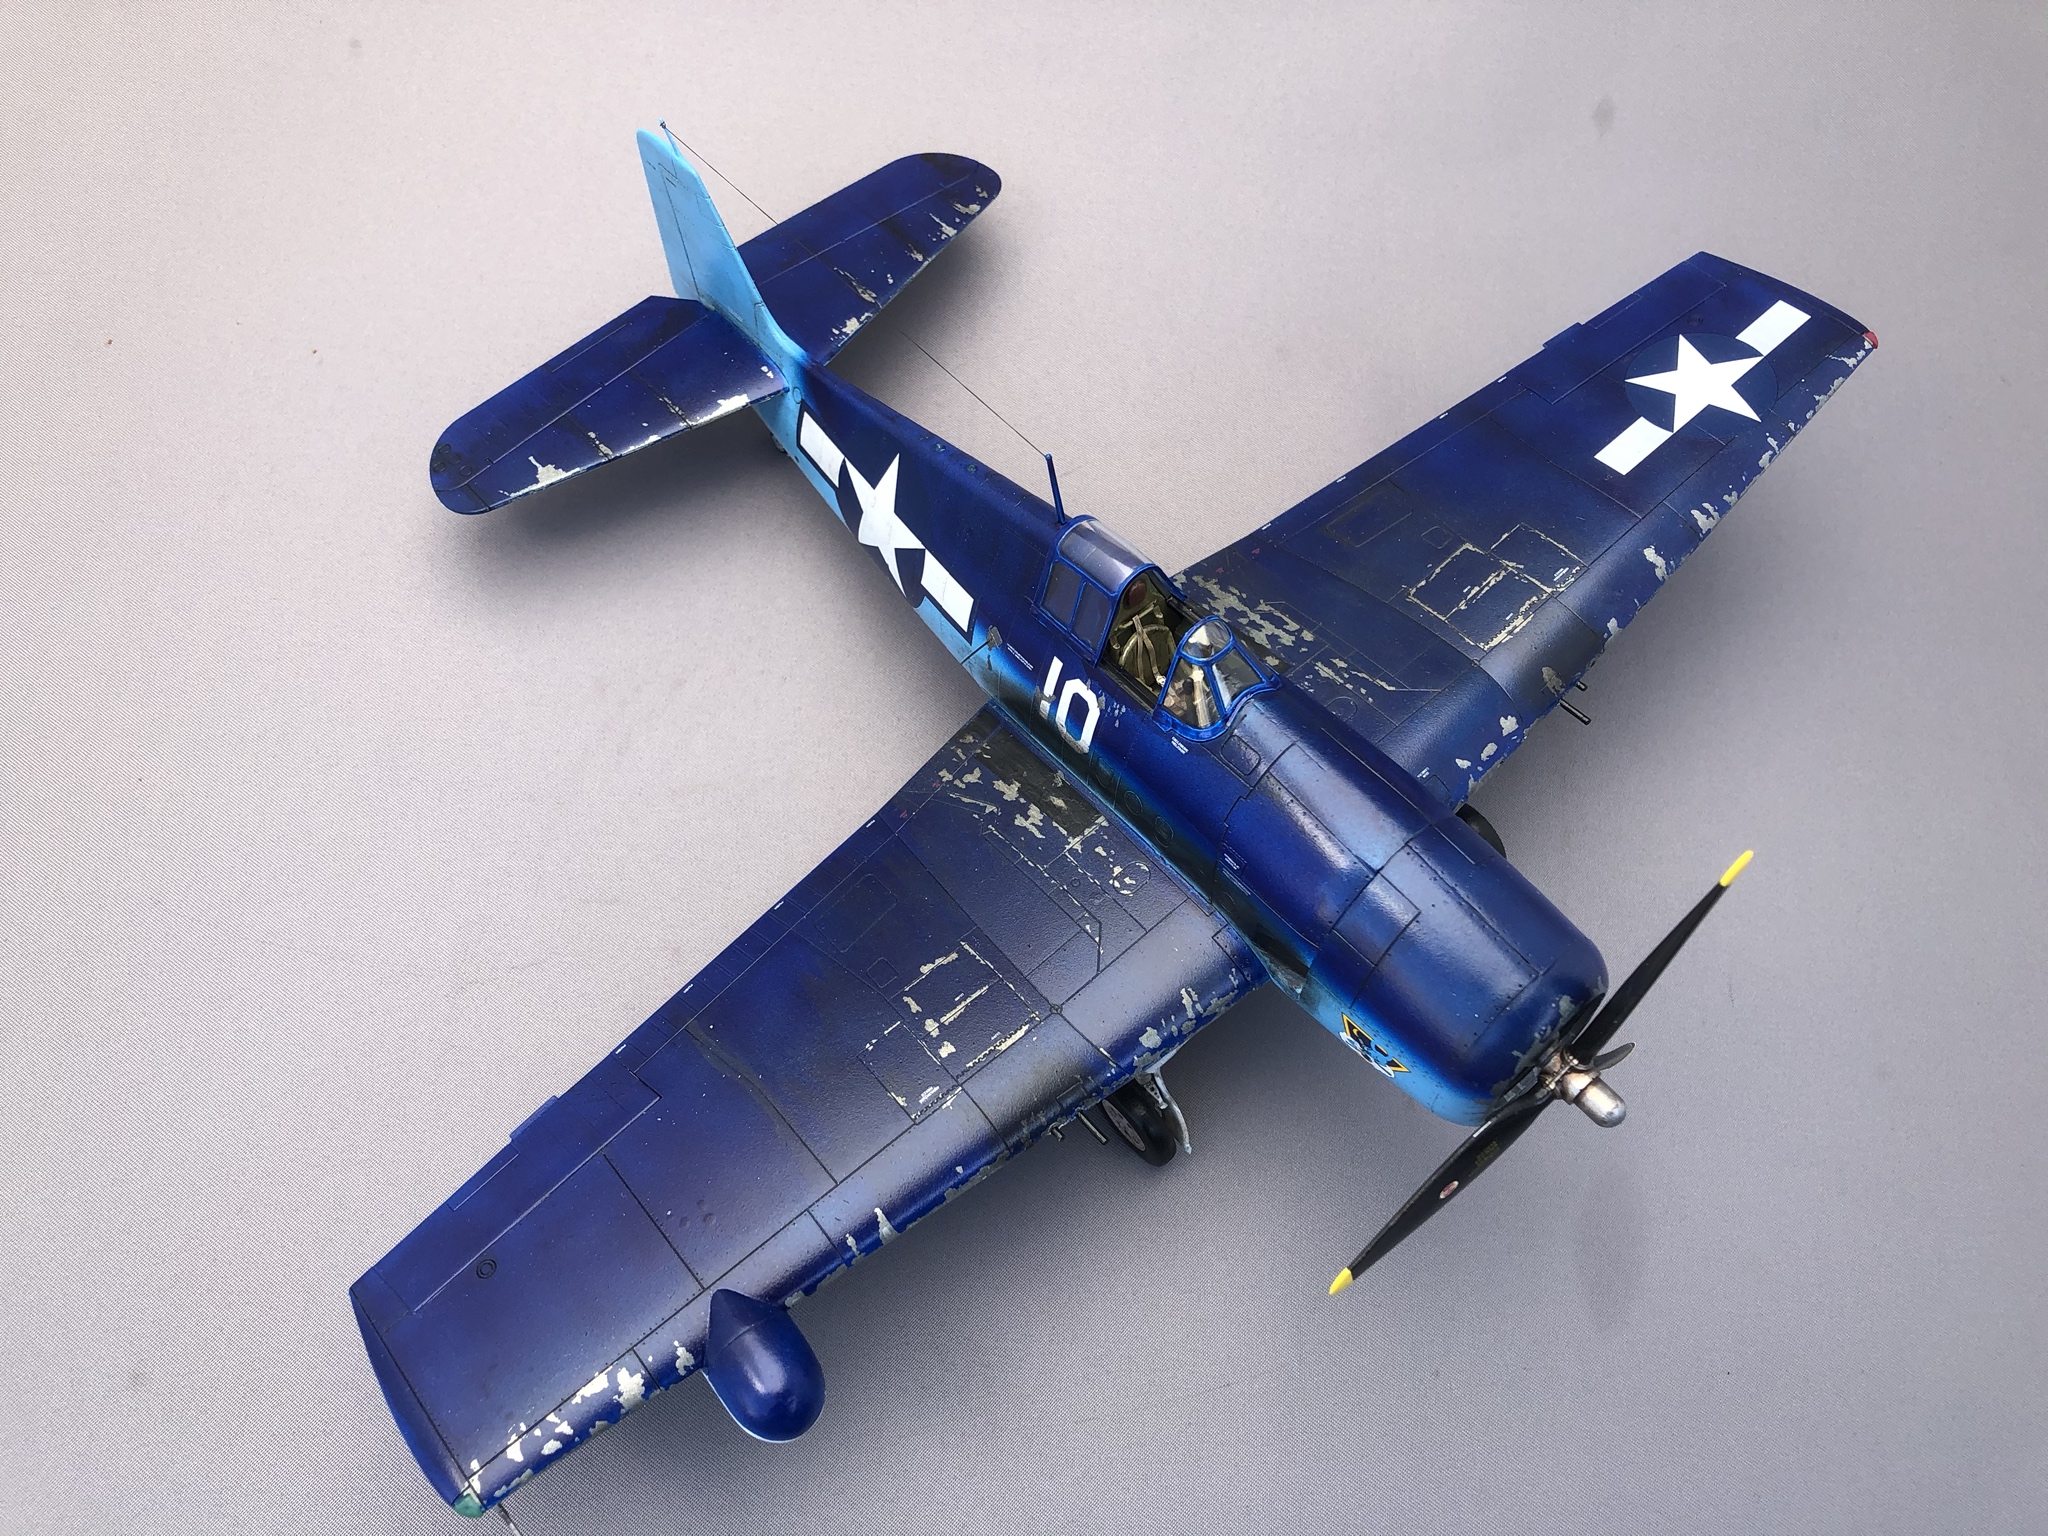
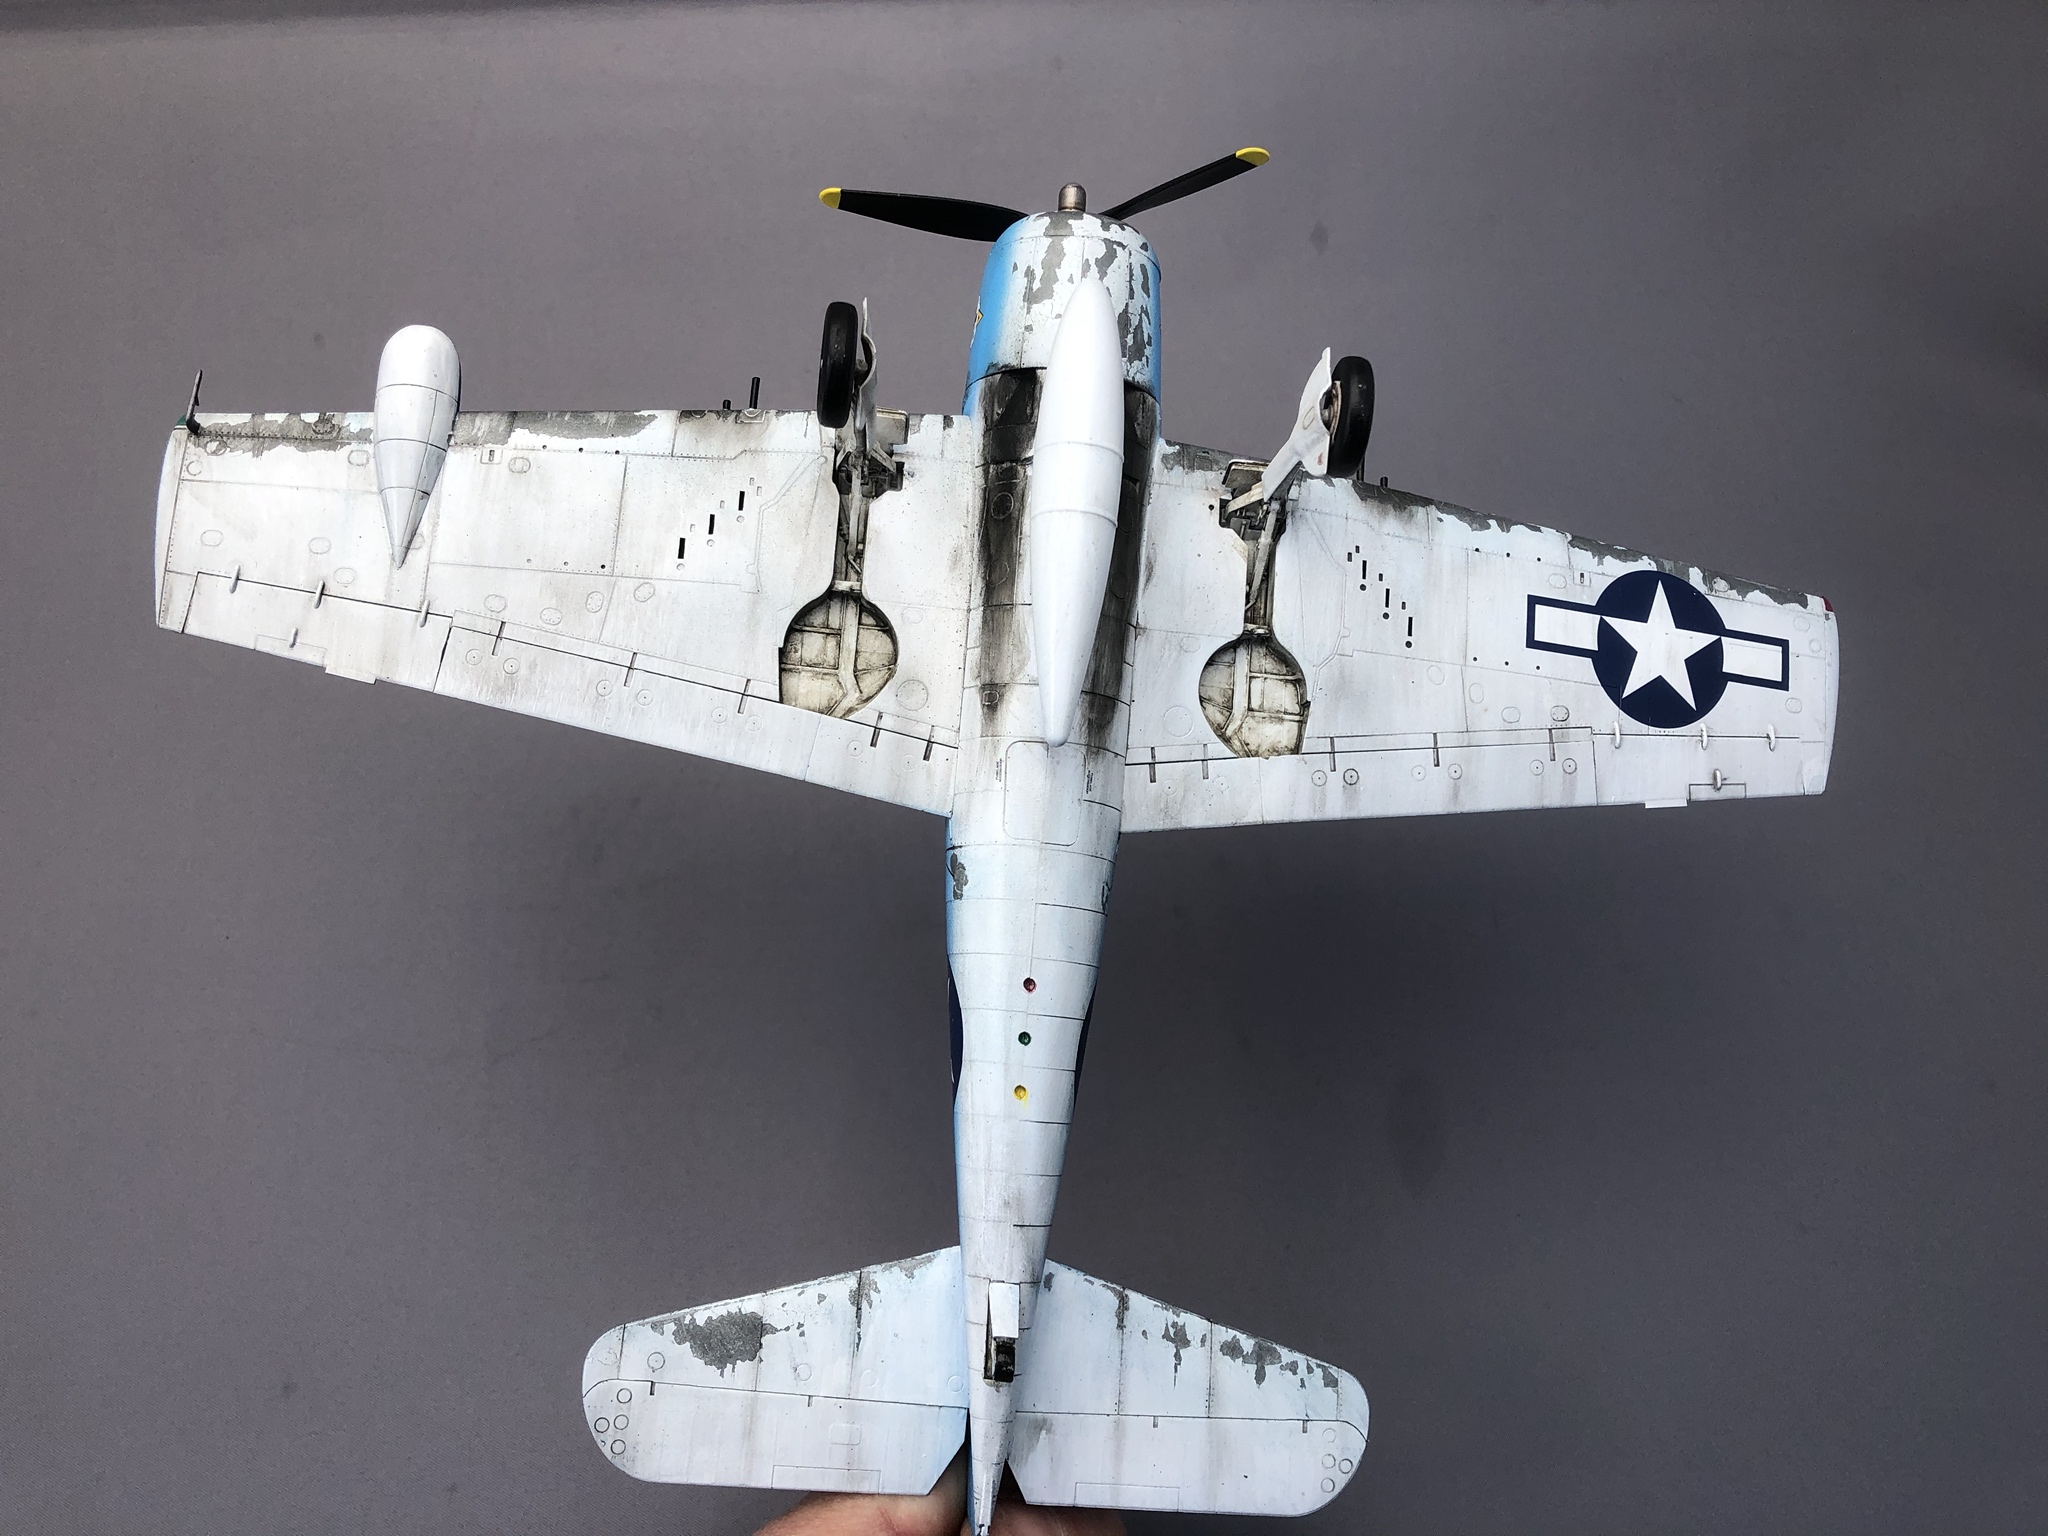
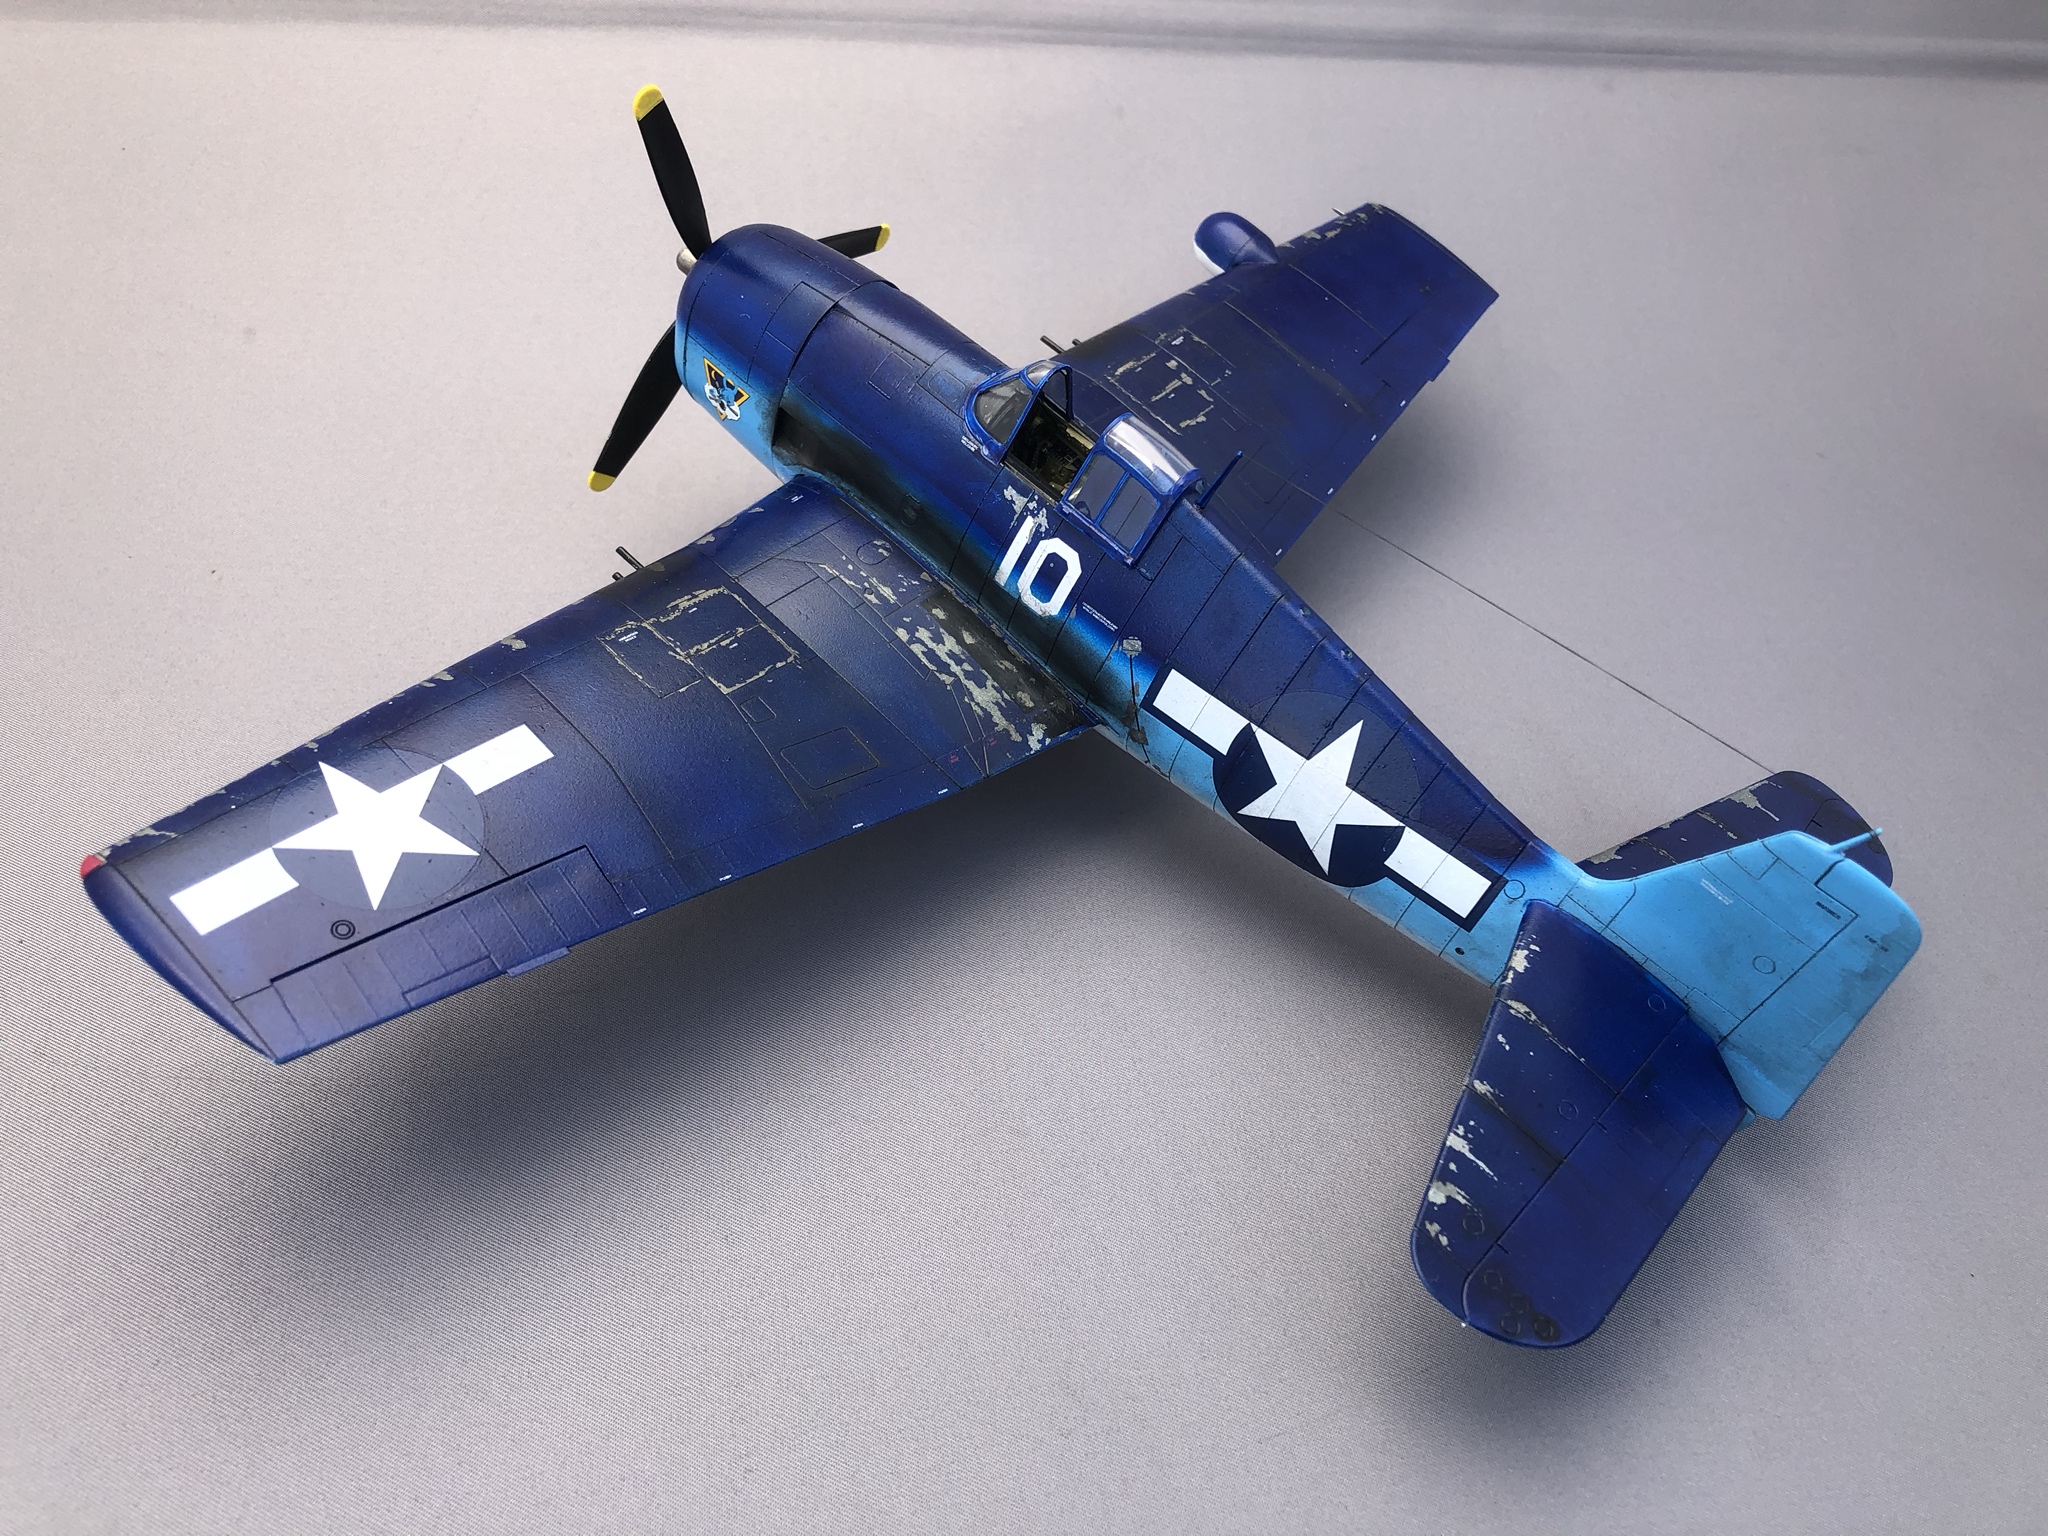
I have finished my 1/48 Eduard Hellcat. A very nice kit!
Overall I am pretty satisfied with the result. Chipping and weathering could have been better, but learned something new. The next one will be better.
Overall a pleasant and cool build and satisfied with the final bird. It looks ready to take on some enemy fighters.
Overall I am pretty satisfied with the result. Chipping and weathering could have been better, but learned something new. The next one will be better.
Overall a pleasant and cool build and satisfied with the final bird. It looks ready to take on some enemy fighters.
SHAKY962
Joined: May 21, 2012
KitMaker: 765 posts
AeroScale: 316 posts
Posted: Thursday, April 23, 2020 - 02:06 PM UTC
Hi,
I like the Buffalo and the Hellcat. Nice work!!!
A little advance in my FW190
 20200423_202936 by Shaky962, en Flickr
I like the Buffalo and the Hellcat. Nice work!!!
A little advance in my FW190
20200423_202936 by Shaky962, en Flickr
john41492
#442

Joined: July 20, 2015
KitMaker: 363 posts
AeroScale: 335 posts
Posted: Friday, April 24, 2020 - 07:29 PM UTC
Howdy folks!
Lots of good things coming together here!
I've been building up a storm, and realized that I haven't made any updates lately. So here goes!
I really like the Hasegawa Zero series, they build into great representations with little to no fuss. I did take some liberty in not really following the instructions. The engineering of the kit allows one to close the fuselage and not worry about the cockpit right off. Which is what I did, then I attached the upper wings to the fuselage, making for seamless joins. Then the cockpit can be added through the bottom, and then the lower wing. I did not use any filler on this build, a rarity for me!
finished the cockpit and added some Eduard IJN seatbelts, also completed the engine. One thing that I really don't like about Zero's is the vast greenhouse glass, for me it takes between 8 - 10 hours of my time. Therefore, I invested in the Eduard mask set for this (and all other Hasegawa Zero's in the stash, and there's a squadron of them!).
Then it was off to painting. First I painted the cockpit decking and the engine cowling using Tamiya Sea Blue XF-17 (as with all of my airbrush paints it was diluted 1:4 with Mr. Leveler thinner), this is a very good representation of the bluish-black used. I then installed the canopy and painted it also Sea Blue, the interior color of the canopy frames.
Then, Instead of doing my normal black basing, I opted to paint the plane Tamiya Red-Brown XF-64, as the base.
After the base, I started on the yellow IFF bands that the IJN adopted at the start of 1943. It's a pretty straight forward process to get "that" orange yellow color. First a coat of Tamiya Yellow XF-3, followed by an overcoat of Tamiya Clear Orange X-26. These were then covered with some Tamiya tape and painting went on to the next color Tamiya Gray Green (IJN) XF-76.
Bottom done, I really like the color, and not to get into the debate of the early Zero colors, it's my go to color for these early war Zero's.
Upper main coat on!
I then painted the fabric areas using J.N. Grey Tamiya XF-12. Pretty convincing I think!
And with that, it was time to get it shinny for the decals. Normally I do a Future with 70% IPA mixed in. This time I used Tamiya Clear X-22. I also chose to use the kit decals, and the fits began.
They were old, and the "No Walk" red decals shattered. So I stole some from a newer kit, but the red was not the same. Oh well.
Still a great out of the box building kit! I recommend it anyone wanting a nice Zero on your shelf.
Final pics will be uploaded as soon as I take the pretty pictures.
Lakota
#123
Joined: November 17, 2008
KitMaker: 1,202 posts
AeroScale: 292 posts
Posted: Saturday, April 25, 2020 - 12:07 AM UTC
John,
Nice work on the Zero. The cowl is straight XF-17, not mixed with black? That's a great idea. I'm going to have to bookmark this page, I think you got the colors down perfect. I never thought of using red brown as a base coat for a gray color scheme. Thanks for sharing your technique.
Take care and stay safe,
Don "Lakota"
b17-peter
#392
Joined: January 09, 2013
KitMaker: 696 posts
AeroScale: 608 posts
Posted: Saturday, April 25, 2020 - 12:23 AM UTC
@Jesper - my congrats to your Hellcat!
@John - Zero looks very convincing yet!
Cheers
Peter
@John - Zero looks very convincing yet!
Cheers
Peter
Lakota
#123
Joined: November 17, 2008
KitMaker: 1,202 posts
AeroScale: 292 posts
Posted: Sunday, April 26, 2020 - 03:42 AM UTC
Howdy Y'all
I tried putting the decals on this morning without much luck.
The white band around the fuselage broke into 3 pieces and my attempt to use it failed. I'm thinking of masking around it and painting it. The yellow leading edge also failed so I'll need to mask the area and paint it. I'm a very slow builder so this is a major setback for me. I'll think I'll take a break from this kit and continue it in the Hangar Queen campaign. Good work on everyone's else's build. It's been enjoyable watching the progress.
Take care and stay safe,
Don "Lakota"
 |

WEB HOSTING BY


Copyright ©2021 AeroScale and Kitmaker Network, a subsidiary of Silver Star Enterprises
All Rights Reserved. Please read our Conditions of Use and Privacy Policy.
All Rights Reserved. Please read our Conditions of Use and Privacy Policy.