G'day Nigel,
The decals I listed are all 48 scale and for the Razorback, some are of the red outline Star and Bar, with some as a Yellow outline around the Blue circle of the Star.
Everyone has some form of artwork on the cowl.
I'll scan the sideviews of all sheets and post the pix in the next day or so.
Rob.
Hosted by Rowan Baylis
Thunderbolts

29Foxtrot

Joined: September 19, 2003
KitMaker: 708 posts
AeroScale: 674 posts

Posted: Friday, September 22, 2006 - 06:10 PM UTC

Siderius

Joined: September 20, 2005
KitMaker: 1,747 posts
AeroScale: 1,673 posts

Posted: Saturday, September 23, 2006 - 07:04 AM UTC
Wad_ware

Joined: September 09, 2002
KitMaker: 537 posts
AeroScale: 437 posts

Posted: Saturday, September 23, 2006 - 07:35 AM UTC
Real nice looking Thunderbolt Russell. Be sure to add a few pics of it to our Thunderbolt Photo Album. Here is the link to it.
https://aeroscale.kitmaker.net/forums/84236&page=1
I am thrilled now that I have been able to get back to my Georgia Peach II. The decals are looking really good so far. I don't want to take any pics quite yet but I will before long.
I was able to mask off and alclad over the areas of the invasion stripes where the star and circle overlap.
I came up with a good way of doing it that worked well for me anyway. I scanned off the decal sheet and printed them out. I cut out the decal I needed for that area leaving a fair amount of paper all around and then very carefully cut out the decal itsself with a really good blade and small sharp scissors. Being regular printer paper I then just wet the paper down a little bit and laid it right on the model where the decal goes. I did tape off just a little bit of the close areas to be safe for any overspray.
The paper mask worked great. Paint the area, lift off the mask and remove any taping and I was back in business.
One little side effect that might be helpfull to someone later on...
Earlier in this thread I mentioned that my polished aluminum alclad doesn't have quite the mirror shine to it that it really should because of my previous sanding. I had all ready put the future on my P-47 in anticipation of my decals. So when I painted over the area for the star decals, the alclad in that spot has a really nice shine to it because of the future making an extra smooth surface. In most cases one probably would not need to put future underneath the alclad ...but, it can be done and looks like it can help out in the finish of the alclad in the right situation.
Wayne

29Foxtrot

Joined: September 19, 2003
KitMaker: 708 posts
AeroScale: 674 posts

Posted: Saturday, September 23, 2006 - 02:16 PM UTC
Nice little Academy subject you finished, a friend of mine intends to build the BMF checkertail Thunderbolt as 88 from an option of one of the kit sheets he has.
I mentioned earlier about some spare decal sheets from the old AeroMaster range that I have for the P 47's Razorback's of the 4th F.G.
Here are the pix of the 4 sheets and NOTE: that subjects from 2 of these sheets are missing and are remarked under the pic.

Gentle subject VF-T missing from this sheet


Godfrey subject VF-P missing from this sheet


Hope these help a little. If these aircraft subjects are of use to anyone who is interested in this subject, just PM me and we'll go from there.
I mentioned earlier about some spare decal sheets from the old AeroMaster range that I have for the P 47's Razorback's of the 4th F.G.
Here are the pix of the 4 sheets and NOTE: that subjects from 2 of these sheets are missing and are remarked under the pic.

Gentle subject VF-T missing from this sheet


Godfrey subject VF-P missing from this sheet


Hope these help a little. If these aircraft subjects are of use to anyone who is interested in this subject, just PM me and we'll go from there.
Posted: Tuesday, September 26, 2006 - 09:52 PM UTC
Number 3 finished and in the photo thread.
Academy 1/72 P-47 D, built OOB, but i threw away those hopeless Academy decals and got some nice A.M ones instead :-) . In the markings of Lt Col. Francis Gabreski, 61 FS. 56 FG, Boxted, Anglia, June 1944.
Here is a pic of all three.
Can anyone spot the cock-up

 .
.
Andy

Academy 1/72 P-47 D, built OOB, but i threw away those hopeless Academy decals and got some nice A.M ones instead :-) . In the markings of Lt Col. Francis Gabreski, 61 FS. 56 FG, Boxted, Anglia, June 1944.
Here is a pic of all three.
Can anyone spot the cock-up


 .
.Andy

Posted: Wednesday, September 27, 2006 - 04:20 PM UTC
Nice one (or three!) Andy!
A group build of your own!,,nice idea.
How about a 1:48 to go with them?
I dont think I would have spotted the deliberate mistake if you hadnt told me so I'll say nowt :-)
Nige
A group build of your own!,,nice idea.
How about a 1:48 to go with them?

I dont think I would have spotted the deliberate mistake if you hadnt told me so I'll say nowt :-)
Nige

newtothegame

Joined: October 05, 2003
KitMaker: 588 posts
AeroScale: 468 posts

Posted: Wednesday, September 27, 2006 - 07:13 PM UTC
Looks really, really nice Andy. You are a building machine!
Leon
Leon

VonCuda

Joined: November 28, 2005
KitMaker: 2,216 posts
AeroScale: 1,080 posts

Posted: Thursday, September 28, 2006 - 08:50 AM UTC
Hey Andy 
Did you by chance put the star on the wrong wing on the middle airplane?
Great trio by the way. You and Nigel blow me away with your tiny little 1/72 scale builds.

Did you by chance put the star on the wrong wing on the middle airplane?
Great trio by the way. You and Nigel blow me away with your tiny little 1/72 scale builds.

Posted: Thursday, September 28, 2006 - 12:08 PM UTC
Quoted Text
Hey Andy
Did you by chance put the star on the wrong wing on the middle airplane?
Great trio by the way. You and Nigel blow me away with your tiny little 1/72 scale builds.
Yep, that's what happens when you look at the instructions the wrong way up :-) . I didn't notice it until i had all 3 together in a row :-) . i will now try the masking tape trick, some masking tape over a decal always rips it up (well it always works when i don't want it too
 ).
).Quoted Text
How about a 1:48 to go with them?
Definitely will do one after a couple of other projects i have planned.
Thanks for the comments, i might build a 4th 1/72 one yet as i have a spare decal set for a black P-47
 .
.Andy


Wad_ware

Joined: September 09, 2002
KitMaker: 537 posts
AeroScale: 437 posts

Posted: Friday, September 29, 2006 - 06:01 AM UTC
Hey Andy - Great job on the third Thunderbolt. That makes a really nice looking collection. Keep 'em coming :-) :-) With your speed you should have about 40 of these done by Christmas :-) :-) :-) :-)
Wayne
Wayne

Wad_ware

Joined: September 09, 2002
KitMaker: 537 posts
AeroScale: 437 posts

Posted: Sunday, October 01, 2006 - 03:14 AM UTC
Hi all
I got all the decals on my Thunderbolt and everything is starting to look pretty good. Here are a couple quick pics. I am still not getting along too well with my digital camera and these aren't the best of pics but it shows where I am at. I have to let the decals/solvent set up for a bit and then I am ready for the future coat to tie in the decals.
I am going to use an oil wash for some rust ..etc.. I am going to have to decide how much I want that to show. The wash reacts different if you put it on a gloss finish or if you put it on a flat finish. On a flat finish the wash spreads out more and looks a lot more obvious than on the gloss. I am thinking it would be better on the gloss finish. I want the wash noticable but I don"t think I want it overbearing. Plus that way I can always add more here an there if I want a stronger effect with the wash.
Posted: Sunday, October 01, 2006 - 04:39 PM UTC
Oh Boy Oh Boy!
That is looking SO good Wayne,,cant wait to see it all finished
Nige
That is looking SO good Wayne,,cant wait to see it all finished

Nige

newtothegame

Joined: October 05, 2003
KitMaker: 588 posts
AeroScale: 468 posts

Posted: Sunday, October 01, 2006 - 07:20 PM UTC
Wow Wayne, That looks great! I especially like the blue; it really grabs the attention. Can't wait to see it complete.
Leon
Leon

Lucky13

Joined: June 01, 2006
KitMaker: 1,707 posts
AeroScale: 1,119 posts

Posted: Sunday, October 01, 2006 - 07:44 PM UTC
WOW!! What a good looking bird.....eeerrrmmm, do you know if she has a sister??
Posted: Monday, October 02, 2006 - 03:30 AM UTC
Hi Gang,
ADDED: here is the newly sprayed version: Shiney T-Bolt
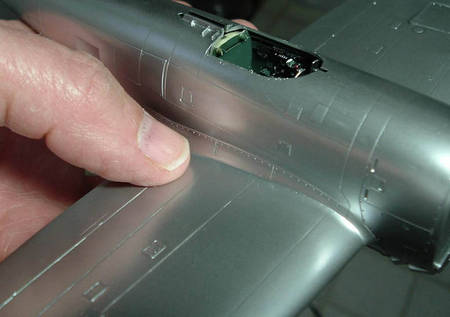
My T-bolt took its NMF and something is wrong. Note how it has rough places--but they are not rough, they are smooth to the touch! Also, note that the paint looks different over the areas of plastic that have the molding flow marks (circled in red). The bottom pix is the plane primed with gloss--see how the outlines on the ammo access doors show up, and still do under the silver?

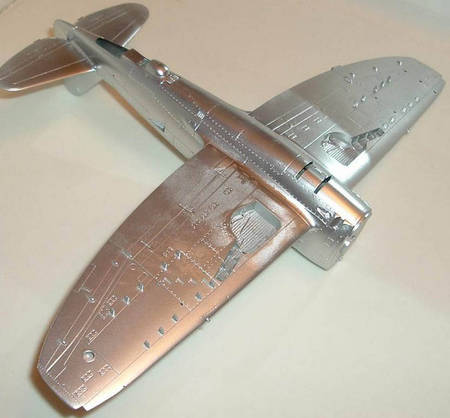

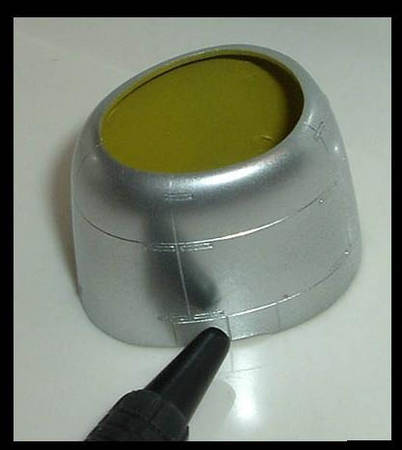

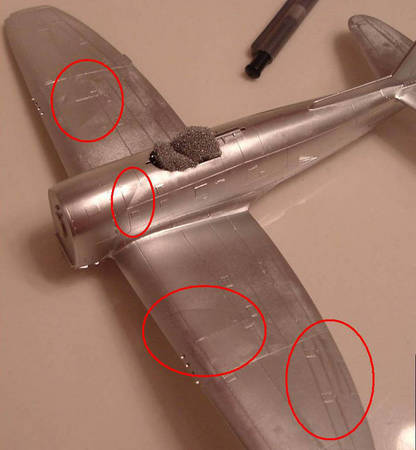

This is odd. I have never experienced this before with this paint (Floquil Bright Silver) and I will place these pix under the painting forum asPlastic Blemishes...
P.S., I just covered the entire beast with gloss black lacquer, the [b]Model Master Custom Lacquer system for cars.
ADDED: here is the newly sprayed version: Shiney T-Bolt
My T-bolt took its NMF and something is wrong. Note how it has rough places--but they are not rough, they are smooth to the touch!
 Also, note that the paint looks different over the areas of plastic that have the molding flow marks (circled in red). The bottom pix is the plane primed with gloss--see how the outlines on the ammo access doors show up, and still do under the silver?


This is odd. I have never experienced this before with this paint (Floquil Bright Silver) and I will place these pix under the painting forum asPlastic Blemishes...
P.S., I just covered the entire beast with gloss black lacquer, the [b]Model Master Custom Lacquer system for cars.

Wad_ware

Joined: September 09, 2002
KitMaker: 537 posts
AeroScale: 437 posts

Posted: Monday, October 02, 2006 - 05:47 AM UTC
 Thanks guys I am really happy with the way this is turning out
Quoted Text
That looks great! I especially like the blue; it really grabs the attention.
I agree Leon. That is one of the main reasons I picked the paint scheme because I liked the blue. It just caught my eye,
 along with the nudie girl on the side of the plane
  It is a simple scheme really but it really looks good all put together with the invasion stripes and NMF finish.
Quoted Text
WOW!! What a good looking bird.....eeerrrmmm, do you know if she has a sister??
:-) :-) She just might... Another part of the decal set I got has another scheme called 'Squirt' which is a razorback P-47 that I just might, definitely, sort-of-have-to, probably, do some time in the future. It has a nice looking nudie on the side of this one too. It would be a really nice looking set of sisters. ... I'll leave out the 'jug' puns on this one ... but boy I have a few of them running through my mind right at the moment :-) :-) :-)
Boy Fred, that is really odd about your metal finish there. I honestly have no clue as to why or can't give you any help on that one
 I am sure there is someone here that can probably give you a good explanation for why that happened. It would be a good thing to know to hopefully avoid later on with another build.
Thanks again all.
Link to Photo Album
https://aeroscale.kitmaker.net/forums/84236&page=1

29Foxtrot

Joined: September 19, 2003
KitMaker: 708 posts
AeroScale: 674 posts

Posted: Tuesday, October 03, 2006 - 05:50 PM UTC
Wayne,
Nice scheme and finish on your bird, can understand about the 'Bimbo's' on any future subject - [I help a friend with building some of his kits, as all his subjects have to have Bimbo's on them].
Fred,
That's a shame about the BMF on your subject, without stripping the paint back to plastic, [maybe it would look diferent with a few decals and some weathering], I've had a similar problem with a BMF finish I helped a friend apply to one of his birds, with a little weathering the "problem" resolved into a realistic type of battle damage.
I'll get back to my P 47's subjects [and start on a couple more, the new Tamiya P 47m as 'Pengie' in the wierd blue over BMF with the red bits], when I clear some of the contract builds that are under way, from the workshop.
Posted: Thursday, October 05, 2006 - 08:45 PM UTC
Floquil Vs Alcad
This is Floquil Bright Silver compared to Alcad Aluminum. Both are applied at the same psi (12-15) over Model Master Custom Lacquer Gloss Black.
Please post comments about the diiference between paints here: Shiney T-Bolt and comments about building P-47s in this thread. Sorry about complcating things
Floquil




Alcad:


This is Floquil Bright Silver compared to Alcad Aluminum. Both are applied at the same psi (12-15) over Model Master Custom Lacquer Gloss Black.
Please post comments about the diiference between paints here: Shiney T-Bolt and comments about building P-47s in this thread. Sorry about complcating things
Floquil
Alcad:

Posted: Monday, October 16, 2006 - 10:10 AM UTC

Wad_ware

Joined: September 09, 2002
KitMaker: 537 posts
AeroScale: 437 posts

Posted: Tuesday, October 17, 2006 - 05:26 AM UTC
Fred your thunderbolt is coming along nicely. It looks like your metal finish came out really well and I really like the yellow in the scheme.
Usually with nose art there is a lot of times scantily clad bodies just painted on the side of the plane. I see you have taken that one step further by having the scantily clad model actually posing on the plane
:-) :-) very original :-) :-)
By the picture that looks like some pretty good figure painting on the little guy.
Nice work so far and can't wait to see more.
Wayne

Posted: Tuesday, October 17, 2006 - 05:38 AM UTC
Quoted Text
Usually with nose art there is a lot of times scantily clad bodies just painted on the side of the plane. I see you have taken that one step further by having the scantily clad model actually posing on the plane
:-) :-) very original :-) :-)
By the picture that looks like some pretty good figure painting on the little guy.
Thanks Wayne

So far I am happy with my finish. Floquil has never let me down. I am doing a little experimenting, though. I am 1/2 putting the decals on directly over the smooth NMF--no gloss coat. Alcad is on the underside and I did use Future on it. I might even put a little Future under one or two places on the Floquil just for comparison.
The nose art isn't really a figure, it is my Trompez l’ oeil painting!
 I 'figured' (pardon the pun) he would show off the shine of the NMF. It is Monograms venerable ARVN soldier from their RAG boat and/or Junk. He looks like a GI on a hot Pacific island. I appreciate the compliment on its painting. That is my wash technique again.
More pix ASAP!

29Foxtrot

Joined: September 19, 2003
KitMaker: 708 posts
AeroScale: 674 posts

Posted: Tuesday, October 17, 2006 - 09:13 PM UTC
Fred,
Excellent progress on the jug so far, is this a PTO bird ?
As I have a ProModeller {yet to start} that is a BMF/Blue finish.
Excellent progress on the jug so far, is this a PTO bird ?
As I have a ProModeller {yet to start} that is a BMF/Blue finish.
Posted: Tuesday, October 31, 2006 - 06:07 PM UTC
Hi all.
How goes it with the P47's?
Im getting along slowly with my Duel build and a Razorback is next on the list so I'll finally be able to take an active part in this. I cant see me getting started for a few weeks,but if the "strafing and tank busting" Campaign gets approval I think I'll hang on and build my Jug for that.
I want to see some pics guys!
Nige
How goes it with the P47's?
Im getting along slowly with my Duel build and a Razorback is next on the list so I'll finally be able to take an active part in this. I cant see me getting started for a few weeks,but if the "strafing and tank busting" Campaign gets approval I think I'll hang on and build my Jug for that.
I want to see some pics guys!

Nige

Posted: Monday, January 08, 2007 - 05:52 AM UTC
Hi Guys,
My long-languishing Jug is finished, with just minutes to go before the (extended ) end of the Duel! campaign
More pix ASAP!
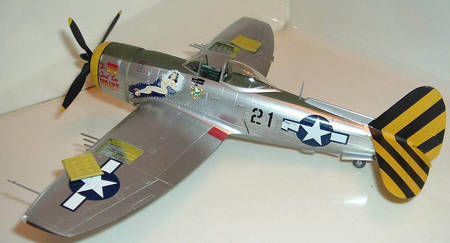
My long-languishing Jug is finished, with just minutes to go before the (extended
 ) end of the Duel! campaign
More pix ASAP!

Wad_ware

Joined: September 09, 2002
KitMaker: 537 posts
AeroScale: 437 posts

Posted: Monday, January 08, 2007 - 09:34 AM UTC
Great job and a fine build with the P-47 Fred 


I can't wait to see more pics of it and be sure to enter this one into the model of the quarter contest.
I finally, after a very long modeling break, got my Georgia Peach done. I am hoping here shortly to get some pics posted for it. Once I get some I'll get it entered into the MOQ also.
It has been a while since I've updated this thread or been able to pay too much attention to things. Is there anone out there still working on some P-47s?
Good modeling everyone,
Wayne

 |


