Hi Guys
I have made a small bit of progress, I have applied the green and grey camo to my lynx, here are some pics:
Nick
Air Campaigns
Want to start or join a group build? This is where to start.
Hosted by Frederick Boucher, Michael Satin
"The Guardian Angel" Helicopter Campaign '07
harrier1
England - West Midlands, United Kingdom
Joined: June 09, 2005
KitMaker: 613 posts
AeroScale: 46 posts
Joined: June 09, 2005
KitMaker: 613 posts
AeroScale: 46 posts
Posted: Friday, August 03, 2007 - 09:21 PM UTC
harrier1
England - West Midlands, United Kingdom
Joined: June 09, 2005
KitMaker: 613 posts
AeroScale: 46 posts
Joined: June 09, 2005
KitMaker: 613 posts
AeroScale: 46 posts
Posted: Monday, August 20, 2007 - 11:25 PM UTC
Hi everyone
Well its been a while but I have made a bit more progress with my Lynx. I have added decals and glazing and started on the main rotors ( I am awaiting a replacement rotor blade from Accurate Armour hence only three blades) I have weathered the tail rotors aswell. I am not sure yet whether i will add the TOW launchers or just the frames as they are extremely complicated!! All that needs to be done really is attach teh IRCM's, TOW launchers and rotor decals and then it is done except for an minor weathering!. Anyway here are some pics:
Nick
harrier1
England - West Midlands, United Kingdom
Joined: June 09, 2005
KitMaker: 613 posts
AeroScale: 46 posts
Joined: June 09, 2005
KitMaker: 613 posts
AeroScale: 46 posts
Posted: Wednesday, August 29, 2007 - 07:07 AM UTC
Hi Guys
Well, I've finally finished my Lynx. I will post pics in the finished thread. See you there. Nick
wizard179
New South Wales, Australia
Joined: January 27, 2006
KitMaker: 251 posts
AeroScale: 179 posts
Joined: January 27, 2006
KitMaker: 251 posts
AeroScale: 179 posts
Posted: Tuesday, September 25, 2007 - 10:46 PM UTC
Time to put this thread back on the map...
Now that I have finished my entry in the Tomcat campaign, I can start in earnest on my helo.
Slight change of plan on the kit, though. I will be doing the Hobbyboss 1/72 CH-46E/F. I bought the kit when I had the flu a couple of months ago to do as a quick OOB, minimal effort build whilst recuperating... I couldn't live with the lack of interior detail and decided to do some scratchbuiliding.
I was kinda hoping that the thread would have had a few more posts so that mine would be on a different page to Intruderbass's lovely scratchbuilt interior but... oh well
Cheers
Wiz
drabslab
European Union
Joined: September 28, 2004
KitMaker: 2,186 posts
AeroScale: 1,587 posts
Joined: September 28, 2004
KitMaker: 2,186 posts
AeroScale: 1,587 posts
Posted: Friday, September 28, 2007 - 02:58 AM UTC
hai,
don't worry, you are not the only one still building for this campaign.
I am still working on a seaking on 1/48.
Still two months to go. It must be possible to finalise something but i seem to be too much occupied with work lately.
don't worry, you are not the only one still building for this campaign.
I am still working on a seaking on 1/48.
Still two months to go. It must be possible to finalise something but i seem to be too much occupied with work lately.
grubbyfingers
Victoria, Australia
Joined: September 07, 2007
KitMaker: 404 posts
AeroScale: 339 posts
Joined: September 07, 2007
KitMaker: 404 posts
AeroScale: 339 posts
Posted: Tuesday, October 02, 2007 - 04:24 PM UTC
Hi Guys,
I'd like to join in on the build if that's okay. I'm a newby at forums so please excuse any lack of etiquette.
I've got the Panda UH-1H that I'm about to build as a local (Aus) NSCA 212. It'll be quite a similar build to Hermon's, even a similar colour scheme.
I have a 15th Nov deadline for a comp here so I'll be done before the forum theme finishes.
Let me know your thoughts.
Graeme.
mother
New York, United States
Joined: January 29, 2004
KitMaker: 3,836 posts
AeroScale: 1,036 posts
Joined: January 29, 2004
KitMaker: 3,836 posts
AeroScale: 1,036 posts
Posted: Tuesday, October 02, 2007 - 05:11 PM UTC
Hello Graeme,
First welcome to Armorama/AeroScale . It'll be our pleasure having you joining in with us. Looking forward to you progress photos and finished entry.
Joe
First welcome to Armorama/AeroScale . It'll be our pleasure having you joining in with us. Looking forward to you progress photos and finished entry.
Joe
drabslab
European Union
Joined: September 28, 2004
KitMaker: 2,186 posts
AeroScale: 1,587 posts
Joined: September 28, 2004
KitMaker: 2,186 posts
AeroScale: 1,587 posts
Posted: Wednesday, October 03, 2007 - 09:31 AM UTC
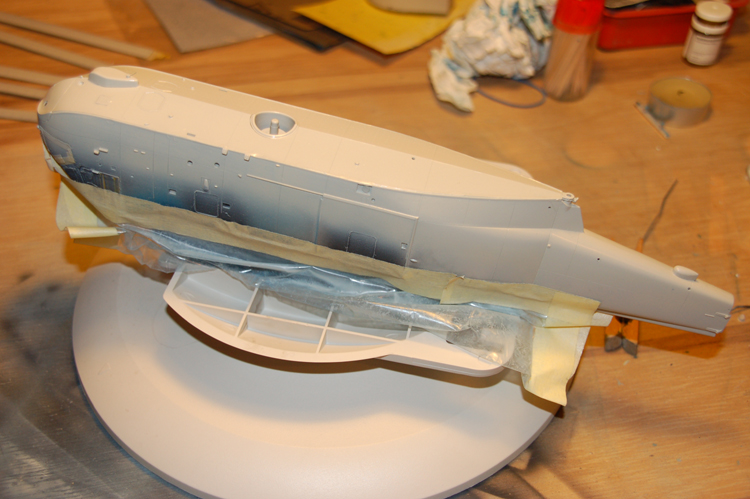
Just to show that i am really doing some work
Phantom2
Östergötland, Sweden
Joined: April 18, 2006
KitMaker: 708 posts
AeroScale: 678 posts
Joined: April 18, 2006
KitMaker: 708 posts
AeroScale: 678 posts
Posted: Tuesday, October 09, 2007 - 09:01 AM UTC
Hi all!
I´m still in on this campaign!
My Kiowa have made some progress;
Seatbelts from a Eduard set, made for the Cayuse;
I know (now) the interior is supposed to be all black, but as I already had It painted in the grey color, I´ll let It stay that way!
Then It was time to get the fuselage halves together, we can call It a "forced reluctant wedding"!
Now I´m fiddling around with the rotorhead!
More pics soon!
Cheers!
Stefan E
drabslab
European Union
Joined: September 28, 2004
KitMaker: 2,186 posts
AeroScale: 1,587 posts
Joined: September 28, 2004
KitMaker: 2,186 posts
AeroScale: 1,587 posts
Posted: Tuesday, October 09, 2007 - 07:54 PM UTC
Hai Stefan,
that interior looks good, also in grey.
I am also still working in this campaign But it looks like we are the only ones left.
Keep up the good work
that interior looks good, also in grey.
I am also still working in this campaign But it looks like we are the only ones left.
Keep up the good work
wizard179
New South Wales, Australia
Joined: January 27, 2006
KitMaker: 251 posts
AeroScale: 179 posts
Joined: January 27, 2006
KitMaker: 251 posts
AeroScale: 179 posts
Posted: Tuesday, October 09, 2007 - 09:13 PM UTC
Hi drabslab and Phantom2
I'm still in
I've been having some logistics problems with making curved framing for the scratchbuilt troop seats. I literally just got it sorted so will hopefully be able to complete the interior in the next couple of days and close her up. After that it's just masking and painting.
Nice work on your models. Can't wait to see the finished products!
Cheers
Wiz
mother
New York, United States
Joined: January 29, 2004
KitMaker: 3,836 posts
AeroScale: 1,036 posts
Joined: January 29, 2004
KitMaker: 3,836 posts
AeroScale: 1,036 posts
Posted: Saturday, October 13, 2007 - 03:56 PM UTC
Hello campaigner's
I'm just putting out a call to see where we are at. I need to know how many are left that need to finish and do you still need more time. The LZ is only a month and a half away, I could extend it a month for those who need it, just PM me that you do need more time.
Joe
I'm just putting out a call to see where we are at. I need to know how many are left that need to finish and do you still need more time. The LZ is only a month and a half away, I could extend it a month for those who need it, just PM me that you do need more time.
Joe
wizard179
New South Wales, Australia
Joined: January 27, 2006
KitMaker: 251 posts
AeroScale: 179 posts
Joined: January 27, 2006
KitMaker: 251 posts
AeroScale: 179 posts
Posted: Monday, October 15, 2007 - 12:53 AM UTC
Hi Mother
I don't believe I will need an extension this time around. Thanks for the offer.
Cheers
Wiz
I don't believe I will need an extension this time around. Thanks for the offer.
Cheers
Wiz
grubbyfingers
Victoria, Australia
Joined: September 07, 2007
KitMaker: 404 posts
AeroScale: 339 posts
Joined: September 07, 2007
KitMaker: 404 posts
AeroScale: 339 posts
Posted: Monday, October 15, 2007 - 05:59 PM UTC
I'm good to go, thanks.
Ready for a lightning build? I start tonight! Watch this space...
Graeme.
Ready for a lightning build? I start tonight! Watch this space...
Graeme.
Posted: Monday, October 15, 2007 - 07:26 PM UTC
I'm still here, just stalled due to the appallingness of the kit i chose for the campaign. Airfix Sea King - it's Cr@p, but i will persevere, just don't expect miracles.
It's gonna be very yellow, and about 3/4 squadron green.
Andy
It's gonna be very yellow, and about 3/4 squadron green.
Andy
drabslab
European Union
Joined: September 28, 2004
KitMaker: 2,186 posts
AeroScale: 1,587 posts
Joined: September 28, 2004
KitMaker: 2,186 posts
AeroScale: 1,587 posts
Posted: Tuesday, October 16, 2007 - 01:37 AM UTC
thanks for the offer.
But that would only result in me beign even later. the deadline was knwon from the start and I will "reach the objective in time".
at least, that's what i hope
But that would only result in me beign even later. the deadline was knwon from the start and I will "reach the objective in time".
at least, that's what i hope
grubbyfingers
Victoria, Australia
Joined: September 07, 2007
KitMaker: 404 posts
AeroScale: 339 posts
Joined: September 07, 2007
KitMaker: 404 posts
AeroScale: 339 posts
Posted: Wednesday, October 17, 2007 - 12:17 PM UTC
OK, here we go.
I told you I was starting!
The kit I am building is the now-extinct Panda UH-1N, although it will more than likely appear as an Academy release with the photo-etch and people and guns like the UH-1D has.
This is the box...Thrilled?
And these are the sprues. Notice taht it is a mix if UH-1D/H and UH-1N parts?
And hopefully it will look a bit like this when I am done...
This a Bell 212 operated by a now-defunct rescue organisation back in the 1980s called National Safety Council of Australia (NSCA). They had a huge fleet of choppers and fixed-wing aircraft, boats, trucks and so-on. They were internationally recognised as world leaders in search and rescue work and facilities and were run on almost para-military lines with strict discipline and training regimes. unfortunately they went under in the late 80s and we don't see the bright yellow birds wockering around any more.
The Panda UH-1N kit is a mixed bag, it scales out quite well, but the nose shape looks wrong (I'm not going to fix it!) and the surface detail is real 60's Revell meets 80s Matchbox. But, it's the only game in town.
We start with the interior. My bird haswooden sheeting on the floor so I sanded the detail off the kit floor and prepared some plastic card to represent the timber...
It also has a couple of storage boxes in the back of the cabin...
See you soon!
Graeme.
I told you I was starting!
The kit I am building is the now-extinct Panda UH-1N, although it will more than likely appear as an Academy release with the photo-etch and people and guns like the UH-1D has.
This is the box...Thrilled?
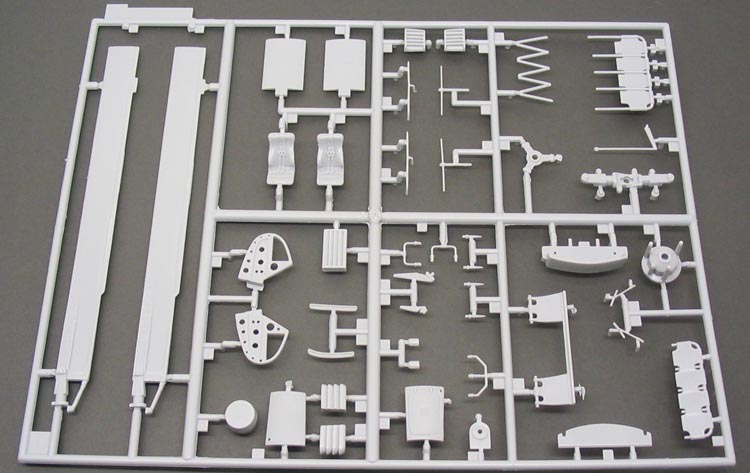
And these are the sprues. Notice taht it is a mix if UH-1D/H and UH-1N parts?
And hopefully it will look a bit like this when I am done...
This a Bell 212 operated by a now-defunct rescue organisation back in the 1980s called National Safety Council of Australia (NSCA). They had a huge fleet of choppers and fixed-wing aircraft, boats, trucks and so-on. They were internationally recognised as world leaders in search and rescue work and facilities and were run on almost para-military lines with strict discipline and training regimes. unfortunately they went under in the late 80s and we don't see the bright yellow birds wockering around any more.
The Panda UH-1N kit is a mixed bag, it scales out quite well, but the nose shape looks wrong (I'm not going to fix it!) and the surface detail is real 60's Revell meets 80s Matchbox. But, it's the only game in town.
We start with the interior. My bird haswooden sheeting on the floor so I sanded the detail off the kit floor and prepared some plastic card to represent the timber...
It also has a couple of storage boxes in the back of the cabin...
See you soon!
Graeme.
grubbyfingers
Victoria, Australia
Joined: September 07, 2007
KitMaker: 404 posts
AeroScale: 339 posts
Joined: September 07, 2007
KitMaker: 404 posts
AeroScale: 339 posts
Posted: Sunday, October 21, 2007 - 01:52 PM UTC
Next step was to get a hoist going. I raided the spares box and assembled some winch-looking bits into a hoist:
And then nail them together into something resembling a hoist:
Next thing to do was get rid of the overscale rivets:
The kit tailplanes are square on the inside edges, which would make them sit perpendicular to the skin of the tailboom, rather than perp to the centreline. Trimming a wedge off the inside edge fixed this. I took off the rivets too:
The bird I am modelling had the tailcone removed, so this area needs to be removed:
The Panda tailpipes are less than convincing, so I trimmed them off and formed some new ones out of strip folded around a form of brass tubes and heated:
This also meant drilling out the rear of the engine nacelle tomake it bit more realistic:
The inside if the nacelle needed some blanking off to prevent that see-through look we all hate:
Next step is paint up the interior.
See you soon!
Graeme.
mother
New York, United States
Joined: January 29, 2004
KitMaker: 3,836 posts
AeroScale: 1,036 posts
Joined: January 29, 2004
KitMaker: 3,836 posts
AeroScale: 1,036 posts
Posted: Sunday, October 21, 2007 - 03:57 PM UTC
Graeme,
Intense and impressive! Looks like a great project. What references are you using. Keep us posted.
Joe
Intense and impressive! Looks like a great project. What references are you using. Keep us posted.
Joe
grubbyfingers
Victoria, Australia
Joined: September 07, 2007
KitMaker: 404 posts
AeroScale: 339 posts
Joined: September 07, 2007
KitMaker: 404 posts
AeroScale: 339 posts
Posted: Sunday, October 21, 2007 - 04:37 PM UTC
Hi Joe,
I don't know about "impressive", my work is not exactly "Finescale Modeler" standard, but thanks.
References for this build are the everpresent Squadron/Signal Wayne Mutza and Lou Drendel "Huey in Action" and "Huey", some web photos and a few pics from a historian friend. Along with those go Christopher Chant's "Bell UH-1 Super Profile".
Graeme.
Posted: Sunday, October 21, 2007 - 05:01 PM UTC
Quoted Text
I don't know about "impressive"
Hi Graeme!
Ok, let's say "very informative" for the moment. I like those building reports with some interesting scratchbuilding techniques to learn...
I'm sure it will be an impressive model when finished...
Jean-Luc
grubbyfingers
Victoria, Australia
Joined: September 07, 2007
KitMaker: 404 posts
AeroScale: 339 posts
Joined: September 07, 2007
KitMaker: 404 posts
AeroScale: 339 posts
Posted: Monday, October 22, 2007 - 05:31 PM UTC
Here we go with the interior. I'm not much good at instrument panels so I'm leaving them as supplied. In this case, that means a decal on a new piece of plastic card, you'll see that later.
Here you can see the timber in place on the floor, the boxes in the back and everything painted up. The kit seats themselves are quite nicely moulded with belts and buckles that painted up well. The rolled tarp behind the seats is from the AFV Club Fitters Track M113.
In the process of dry-fitting the interior, I discovered that the fuselage halves have only two locating pins! Some scraps of styrene sheet fixed that. I'll have to work out a sanity-saving way of masking off the interior when the exterior paint goes on. A strip of styrene with holes drilled gives some semblance of the internal structure between the front and rear doors, too.
Next, finish off the interior with a bit more wear and tear and get it stuck between the fuselage halves.
See you soon!
Graeme.
Posted: Tuesday, October 23, 2007 - 03:29 AM UTC
Interesting to follow the progress onall those cool choppers. Great interior, Greame. You improved the kit to the point of "very informative"
Looking forward to see more on all the builds in this tread.
grubbyfingers
Victoria, Australia
Joined: September 07, 2007
KitMaker: 404 posts
AeroScale: 339 posts
Joined: September 07, 2007
KitMaker: 404 posts
AeroScale: 339 posts
Posted: Tuesday, October 23, 2007 - 11:21 PM UTC
Here we go, finishing off the interior and getting ready to put the fuselage together.
From previously building the Pnada UH-1D, I know this Huey will be a tail-sitter, so I glued some sinkers and washers under the floorboards and in the centre console. You can see here the kit decal instrument panel. On the main door, the windows needed enlarging. I did this with a file. I'll need to cut some new windows out of sheet. The runner along the bottom of the door (I don't know what this is) was sanded down from some square strip and glued and clamped around the curve of the door. Rivet detail was removed too, as well as the "functional" door runner thingy. Trouble with that system is that, apart from being a bit clunky and gimmicky, it stops the doors from opening fully. These will just be glued solid in place.
Now to a tricky job: How to mask the interior? I didn't want to mask it once the fuselage was together, so I'm trying masking it first, trapping the masked unit between the fuselage halves and then pulling the tape out after the painting is done. Let's see how it works. You can see the cockpit windows taped off from the inside and the tape blanking off the main cabin. I'll mask the front of the cockpit later.
Now to make it look like a helicopter....
Graeme.
grubbyfingers
Victoria, Australia
Joined: September 07, 2007
KitMaker: 404 posts
AeroScale: 339 posts
Joined: September 07, 2007
KitMaker: 404 posts
AeroScale: 339 posts
Posted: Thursday, October 25, 2007 - 12:01 AM UTC
Here's the fuselage all clamped up and glued. I'll leave this for two days to set hard before I put on the roof. It took a fair bit of pressure to get the halves lined up and together and I'd hate for it to spring apart!
I'll get stuck into the doors and rotors in the mean time.
Hey, I picked up the Revell 1:32 ADAC chopper set today. I got an MBB BO105, an Aerospatiale EC135 and a Kawasaki / MBB BK 117 in one box for $70AUD. The NSCA ran a Bo 105, so that will probably be made to match this 212. The local Wales Rescue chopper is a BK 117 so there's another possible. Don't know about the EC 135 yet, I'll see what's on the civil register.
See you soon.
Graeme.
I'll get stuck into the doors and rotors in the mean time.
Hey, I picked up the Revell 1:32 ADAC chopper set today. I got an MBB BO105, an Aerospatiale EC135 and a Kawasaki / MBB BK 117 in one box for $70AUD. The NSCA ran a Bo 105, so that will probably be made to match this 212. The local Wales Rescue chopper is a BK 117 so there's another possible. Don't know about the EC 135 yet, I'll see what's on the civil register.
See you soon.
Graeme.