Air Campaigns
Want to start or join a group build? This is where to start.
I Feel the Need for Speed
mj
_VISITCOMMUNITY
Illinois, United States
Joined: March 16, 2002
KitMaker: 1,331 posts
AeroScale: 325 posts
Posted: Saturday, January 17, 2009 - 07:08 AM UTC
Okay - that blur you saw streak past the finish line was ME ! As reported, some painting mistakes are there to see, but the SkyRay is complete. I only hope I can gain some proficiency with my new Paasche VL in time for the "two-seater" campaign, which is about to begin.

I'm not much of a reviewer, but this 1/72 Tamiya kit of the SkyRay was just about the perfect kit as far as I'm concerned. Every piece fit like a glove - absolutely no filler needed on this kit, and sometimes, no glue either, the pieces fit so fine. I highly recommend this kit to all who have interest. I didn't do it justice, but the great modelers here in Aeroscale would be able to make this bird a real show-stopper.


Cheers, fellow speed freaks -
Mike

CaptainA
_VISITCOMMUNITY
Indiana, United States
Joined: May 14, 2007
KitMaker: 3,117 posts
AeroScale: 2,270 posts
Posted: Saturday, January 17, 2009 - 09:00 AM UTC
Mike is officially a speed-demon. Congrats on a fine build.
SGTJKJ
#041
_VISITCOMMUNITY
Kobenhavn, Denmark
Joined: July 20, 2006
KitMaker: 10,069 posts
AeroScale: 3,788 posts
Posted: Monday, January 19, 2009 - 03:19 AM UTC
Very nice build, Speed Demon Mike The SkyRay is a unique looking aircraft with that think delta wing.

Stefan, that is going to be one big Blackbird! The engines are the size of a fist!
LongKnife
_VISITCOMMUNITY
Jönköping, Sweden
Joined: April 25, 2006
KitMaker: 831 posts
AeroScale: 688 posts
Posted: Monday, January 19, 2009 - 04:44 AM UTC
Mike: Neat Skyray. These colourful navy birds should shine, so I like the fact that it's clean.

I'm a prop-man myself, and used to swedish deltas flying overhead in my youth, but the Skyray holds it's own compared to everything SAAB turned out, at least concetning coolness. Given Bill Gates monetary situation - I'd buy one, get one lesson, break the barrier and bale out!

Tony
VonCuda
_VISITCOMMUNITY
North Carolina, United States
Joined: November 28, 2005
KitMaker: 2,216 posts
AeroScale: 1,080 posts
Posted: Monday, January 19, 2009 - 07:33 AM UTC

Quoted Text

Okay - that blur you saw streak past the finish line was ME !


I've been waiting to see her wearing paint Mike, and she looks great! Seeing you build that SkyRay has made me rethink my carrier campaign entry. Think the Tomcat may have to sit on the shelf while I break out that ole SkyRay of mine.
Great job and congrats!

Andrew, the Hun is looking super sexy. Yours is another project I've been watching. Keep up the great work.

Hermon
amegan
#243
_VISITCOMMUNITY
England - North East, United Kingdom
Joined: March 21, 2008
KitMaker: 996 posts
AeroScale: 915 posts
Posted: Tuesday, January 20, 2009 - 11:18 AM UTC
Thanks for the kind words Hermon, I am learning a lot about airbrushing and trying to get the best finish I can.

Photos don't show up the fnish using flash so here are a couple using available light
HeyLoad
_VISITCOMMUNITY
Illinois, United States
Joined: December 06, 2005
KitMaker: 64 posts
AeroScale: 33 posts
Posted: Tuesday, January 20, 2009 - 12:16 PM UTC
Hello All.

Just a quick update on the Hasegawa 1/48 F/A-18F. All the major subassemblies are ready for paint. No major problems so far, just a little tricky around the intakes and fuselage join.

Tom

SGTJKJ
#041
_VISITCOMMUNITY
Kobenhavn, Denmark
Joined: July 20, 2006
KitMaker: 10,069 posts
AeroScale: 3,788 posts
Posted: Tuesday, January 20, 2009 - 09:20 PM UTC
Nice looking F/A-18F so far, Tom. This is going to be a real beast in 1/48. Will you give it any additional loads or just AAMs and drop tanks?

Nice progress on the NMF, Andrew.

I am trying out the NMF as well on my build for this campaign. You can follow my build blog of the 1/48 SU-7BKL HERE I am also in the NMF process.
HeyLoad
_VISITCOMMUNITY
Illinois, United States
Joined: December 06, 2005
KitMaker: 64 posts
AeroScale: 33 posts
Posted: Wednesday, January 21, 2009 - 12:39 PM UTC
Jesper, thanks. Beautiful work there on the aftermarket detail of the SU-7!

Just going with the kit-provided AIM-120 AMRAAM, AIM-9X Sidewinder, and drop tanks.

Tom
amegan
#243
_VISITCOMMUNITY
England - North East, United Kingdom
Joined: March 21, 2008
KitMaker: 996 posts
AeroScale: 915 posts
Posted: Thursday, January 22, 2009 - 08:47 AM UTC
Mean looking beast Jesper, seeing that has provoked a few thoughts, I used Alclad but I do have so Tamiya Aluminium here. Smoke looks good
jaypee
_VISITCOMMUNITY
Scotland, United Kingdom
Joined: February 07, 2008
KitMaker: 1,699 posts
AeroScale: 1,384 posts
Posted: Thursday, January 22, 2009 - 11:03 AM UTC
Made a little progress on the macchi MC72. These old kits take far longer to make decent.
And the moulds on this are older than me!

Have got some more refs of the cockpit and scratched some believable interior.

A seat and ribbing out of plastic sheet. Punched some holes in sheet with a sharpened brass
tube for an instrument panel. Stick and controls from brass rod. Opened up the intake on
top of the engine.

The fit of the legs to the floats was impossible so I gave up and sheared them off where they meet the floats,
and added brass pins to provide some flex but strength in the joint. The problem is that they will be being pinned
into filler. I don't know how secure that will be. I may have to rethink this again at some point in the future.

And there is still nothing worth showing yet! Will get some wood colour on the cockpit and then we should see
a little more progress. With only 20 parts, once I get everything to fit it should be OK. It is frustrating but overcoming these
problems are improving my building.

Rowan I feel your pain

Update. Filler is far too brittle. Will mix up some goop with sprue and glue and paste that into the large cutout where
the end of the leg would have gone. Messy play! glue fumes! brilliant!
SGTJKJ
#041
_VISITCOMMUNITY
Kobenhavn, Denmark
Joined: July 20, 2006
KitMaker: 10,069 posts
AeroScale: 3,788 posts
Posted: Thursday, January 22, 2009 - 08:56 PM UTC
Thanks for the comments on my SU-7, guys. I appreciate it.

Andrew, regarding the aluminium finish. I am certainly no expert on the subject. However, I do think there are many modellers that like to finish their aircraft in a very bright silvery aluminium colour.
I like to go for a little more weathered finish. The aluminium aircraft I have seen over the years are almost all of them in semi gloss or dull aluminium colour, so this is what I am going for, although a new or well maintained and polished aircraft might be more bright in the "shine" of the aluminium colour.

I hoep to finish my SU-7BKL over the weekend. more to follow in my build tread.
amegan
#243
_VISITCOMMUNITY
England - North East, United Kingdom
Joined: March 21, 2008
KitMaker: 996 posts
AeroScale: 915 posts
Posted: Saturday, January 24, 2009 - 07:36 PM UTC
Jesper, having the option of a shine would be an acheivement. No seriously, I am pretty sure that I first attempted to spray too heavily and lost the gloss. After a second attempt the aircraft is good enough for a used finish but nothing like as bright as a friend's Isaac Fury cowling (5/8 scale Hawker Fury, yeah, you sit in it to fly it) which is real NMF. I think I need to see more NMF aircraft to know what is possible. Meantime, I have a finsh I can work with. Alclad sprays nicely at V low pressure but it is sometimes difficult to know whether you have put anything on at all, if you're doing it right
FalkeEins
_VISITCOMMUNITY
England - South East, United Kingdom
Joined: March 07, 2005
KitMaker: 868 posts
AeroScale: 690 posts
Posted: Saturday, January 24, 2009 - 11:19 PM UTC


neat Jesper !

not so neat ....some progress on the Huma 209....going for a small kit is not necessarily a good idea. Here's a pic - you can't actually see how I've managed to ruin the canopy...yes I know liquid poly is not a good idea and, yes, I normally use PVA - but, well, it wouldn't sit properly..

Merlin
Staff MemberSenior Editor
AEROSCALE
#017
_VISITCOMMUNITY
United Kingdom
Joined: June 11, 2003
KitMaker: 17,582 posts
AeroScale: 12,795 posts
Posted: Sunday, January 25, 2009 - 12:14 AM UTC
Hi there

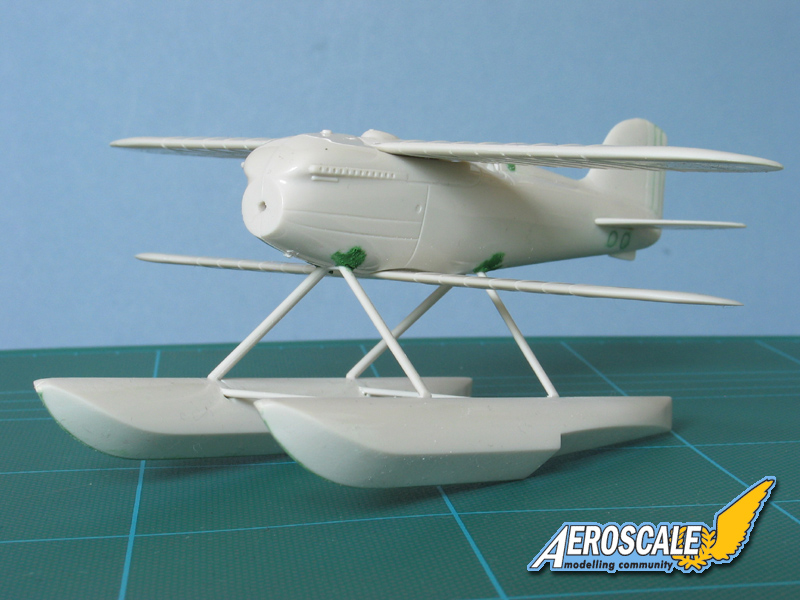
Just to show I haven't completely forgotten this one, here's my little Curtiss Racer rough-assembled. As you can see, there's lots to do(!) - but I'm quite encouraged that everything's fitting together reasonably well...


The joints for the floats' struts are very poor, so I've deepened them and added a lot of filler, and both the upper and lower wing roots will need plenty of work - the upper wing lacks the aerodynamic fairing of the original, so I'll add that with Miliput.

Next stage is to cobble together some sort of cockpit. I've been doing tests on how to represent the wing surface radiators and I think I've got a technique ready - more on that to follow.

All the best

Rowan
SGTJKJ
#041
_VISITCOMMUNITY
Kobenhavn, Denmark
Joined: July 20, 2006
KitMaker: 10,069 posts
AeroScale: 3,788 posts
Posted: Sunday, January 25, 2009 - 07:13 PM UTC
Thanks for all the comments. My SU-7BKL is now finished. It took a lot of time and effort but I am happy with the result. A nice and entertaining build.
You can see more details HERE in my build blog

Comments welcome

jaypee
_VISITCOMMUNITY
Scotland, United Kingdom
Joined: February 07, 2008
KitMaker: 1,699 posts
AeroScale: 1,384 posts
Posted: Sunday, January 25, 2009 - 09:50 PM UTC
An example of the filling needed for the floats, and some shots of the cockpit. I couldn't get enough light
through the tiny cockpit opening but you may be able to see a hint of rudder pedals and the throttle box
on the port side. Yes that is a light blub next to my fingers! Photos clickable for larger sizes.
mc 72 floatsMC 72 cockpitMC 72 cockpit

Nice work jesper. And that Curtis is a handsome beast rowan. Quite right to fill in those panel lines Neil. All the racers in this build are going to have to have pristine finishes.
LongKnife
_VISITCOMMUNITY
Jönköping, Sweden
Joined: April 25, 2006
KitMaker: 831 posts
AeroScale: 688 posts
Posted: Sunday, January 25, 2009 - 10:18 PM UTC
Oh yeah Jesper. That looks mean and efficient.

Nice piece of work!
Tony
SGTJKJ
#041
_VISITCOMMUNITY
Kobenhavn, Denmark
Joined: July 20, 2006
KitMaker: 10,069 posts
AeroScale: 3,788 posts
Posted: Monday, January 26, 2009 - 06:58 PM UTC
Thanks for the comments, guys. I appreciate it
jaypee
_VISITCOMMUNITY
Scotland, United Kingdom
Joined: February 07, 2008
KitMaker: 1,699 posts
AeroScale: 1,384 posts
Posted: Monday, January 26, 2009 - 08:45 PM UTC
After a pleasant evening with the sanding stick, I have the fuselage ready.
Wings and tailplane attached and puttied ready for more sanding.

However I noticed when test fitting everything that the contra rotating props are both pitched
the same way! A point someone else had mentioned on another forum. Damn!

So what to do? I can't just turn the rear prop round as the moulding at the base of the
prop is all wrong and looks worse than just the two props facing the same way.
Now I've mentioned it I'll have to do something about it.

I think this is the best part of modeling coming up with solutions to problems.
At the minute I only have problems but no solution yet.
First I should work out which prop is the wrong un.

Update: It is the front prop that is wrong. Chopped the props off and turned them
round. They are now a little short but I'll offset them from the rear ones or sand the
rear ones to the same length whichever looks better.

Primed and waiting to dry to sand out any rough bits. I want a nice shiny finish on this.
I'm reading automodeller for tips on a good gloss. I wonder if halfords have a suitable
red. Probably FIAT would have a good match.
amegan
#243
_VISITCOMMUNITY
England - North East, United Kingdom
Joined: March 21, 2008
KitMaker: 996 posts
AeroScale: 915 posts
Posted: Wednesday, January 28, 2009 - 08:44 AM UTC
Very nice Jesper, I doubt if the USAF ever let them get that weathered, the Hun will be much less weathered. Decals on last night but no pics as I am away from home sampling the delights of Scotland. Decals were a little thick and inflexible even using Microsol but not too bad. It won't look as good as yours Jesper but......... JP, I like the subject but you seem to have a big job on your hands. I damaged the Hun Windscreen the same way, nothing more I can do to correct it now. Recently I have used Humbrol Clearfix to attach canopies and haven't damaged one since I started. I tried using PlasWeld this time and damaged the canopy, DOH!
One of the features of this build seems to be the number of old kits with low parts counts, and how difficult they are, well I like them and know the pain, I built an Airfix DH88 a couple of years ago, great plane, lousy kit, still is a great looking model on the desk, just don't look too close
jaypee
_VISITCOMMUNITY
Scotland, United Kingdom
Joined: February 07, 2008
KitMaker: 1,699 posts
AeroScale: 1,384 posts
Posted: Wednesday, January 28, 2009 - 09:51 PM UTC
Does that mean a number of decent modern representations of schnieder cup planes would big good sellers? Seems strange that some of the most famous planes in avaition history aren't covered by any major manufacturer. They must've been sellers in the 60s so why not now?

Still sanding away. Got rid of all the seam lines. Pretty pleased looks like a one piece now. There is nothing more beautiful than a piece of smooth primed plastic.

Scribed a bunch of lines and off to the craft shop today to find some copper foil for the radiators. Tried silver foil and PVA on them last night and it looks quite neat. Very little masking required just spray the whole thing red then stick on the radiators. Only fear is that the copper will oxidise so I will cover some in future and leave it outside overnight with untreated stuff and see it saves it. I want it to be shiny shiny shiny.

Next up is pinning the legs to the floats and trail fitting the float assembly.
Looks like I'll need to cut the legs at the radiators to get a nice faired in joint at the floats and the fuselage
like this.


LinkinPark
_VISITCOMMUNITY
North Carolina, United States
Joined: December 13, 2008
KitMaker: 63 posts
AeroScale: 11 posts
Posted: Saturday, January 31, 2009 - 12:32 PM UTC
Hi guys
I just picked up some Tamiya gloss yellow paint today so my Bell should be ready for take off pretty soon. Is there a gallery space yet for our finished pictures? I don't want to miss it and not get my ribbon.

Hunter
jaypee
_VISITCOMMUNITY
Scotland, United Kingdom
Joined: February 07, 2008
KitMaker: 1,699 posts
AeroScale: 1,384 posts
Posted: Sunday, February 01, 2009 - 09:28 AM UTC
Pictures clickabe for larger sizes. Apologies for the darkness of the photos.
Smer 1/50 MC.72Smer 1/50 MC.72

The local craft shop didn't have copper foil so the search for that continues. Still have to cut the legs and fair in the fuselage half but you get the idea.
Nito74
_VISITCOMMUNITY
Lisboa, Portugal
Joined: March 04, 2008
KitMaker: 5,386 posts
AeroScale: 635 posts
Posted: Sunday, February 01, 2009 - 02:27 PM UTC
Just started my 1/72 Su-11 from A-model. Will update some pics during the week.