Air Campaigns
Want to start or join a group build? This is where to start.
FW 190 Campaign. It will really be cool!
thegirl
_VISITCOMMUNITY
Alberta, Canada
Joined: January 19, 2008
KitMaker: 6,743 posts
AeroScale: 6,151 posts
Posted: Tuesday, May 05, 2009 - 06:09 AM UTC
Nicely done Matthew , that red is an eye catcher and I really like it ! After all modeling is to be fun Good eyes there Steffen , I totally missed that one on the leading edge and will go back and fill it , I also drop it while appling the decals and the wing root on the left wing broke so have to fix that now .

I have start the deed of applying the decals . First time using AM decals and find them to be on the thick side and needed a few coats of super sol to aid in them settling down . Still have about a hunred more to go , there is a lot of small ones to put on .................here is what I have done so far .


LongKnife
_VISITCOMMUNITY
Jönköping, Sweden
Joined: April 25, 2006
KitMaker: 831 posts
AeroScale: 688 posts
Posted: Tuesday, May 05, 2009 - 06:29 AM UTC
@Matthew. Real or not, the red nose is a looker. If I'd met that one in a Mk V, I'd made a 180 and taken off. Nice finish Matthew.

@Taylor. Dora #11 is coming along nice. I just love crates with replaced panels and mixed camo. Gear wells are looking busy too, fuzzy pic aside.

@Terri. The fiddly bits looks great. I just hope the cowling will fit well. Nice mottling too. It's there, but not quite, so to speak. Nice.

Tony
thegirl
_VISITCOMMUNITY
Alberta, Canada
Joined: January 19, 2008
KitMaker: 6,743 posts
AeroScale: 6,151 posts
Posted: Tuesday, May 05, 2009 - 07:13 AM UTC
Thanks Tony ! but all the cowl panels will be open to show off the engine and guns .
Tomcat31
#042
_VISITCOMMUNITY
England - North East, United Kingdom
Joined: November 18, 2006
KitMaker: 2,828 posts
AeroScale: 1,720 posts
Posted: Tuesday, May 05, 2009 - 08:32 AM UTC
Well as you all seem to like the red. Here my progress so far.

I've been pottering away at this Tamiya kit in between other projects but at the weekend I finally got round to painting and decalling so here it is (some people may want to avert their eyes)


I'm sorry but I couldn't resist the scheme when I saw it as one of the options in my Eduard kit. But fear not I will do the Eduard kit in some proper markings when I eventually get round to building it
Yeti123
_VISITCOMMUNITY
Michigan, United States
Joined: February 11, 2008
KitMaker: 311 posts
AeroScale: 278 posts
Posted: Tuesday, May 05, 2009 - 03:43 PM UTC
Matt: That really turned out great. If I had a 190, It would have a red nose.
Speaking of red, Alllens is definitely that. That red finish is better than any car model I have ever built

Tony: I thought the picture being fuzzy was just the beer, looks like i need some camera skill development


Taylor
Red4
_VISITCOMMUNITY
California, United States
Joined: April 01, 2002
KitMaker: 4,287 posts
AeroScale: 1,164 posts
Posted: Tuesday, May 05, 2009 - 03:46 PM UTC
Allen, two words for you..."Love-it!" "Q"
Red4
_VISITCOMMUNITY
California, United States
Joined: April 01, 2002
KitMaker: 4,287 posts
AeroScale: 1,164 posts
Posted: Tuesday, May 05, 2009 - 07:10 PM UTC
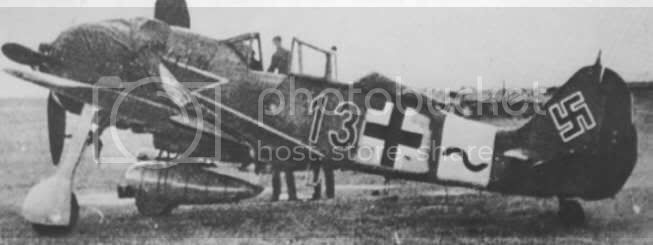
I know my build was questionable, but check this pic out....

Even in b/w you can clearly see the makrings (minus fuselage number) are the same. Color is anyones guess. Just thought it was interesting. Makes me go Hmmm. I just happened across this in another thread here and thought I would share. "Q"
alpha_tango
_VISITCOMMUNITY
Germany
Joined: September 07, 2005
KitMaker: 5,609 posts
AeroScale: 5,231 posts
Posted: Tuesday, May 05, 2009 - 07:56 PM UTC

Quoted Text

I know my build was questionable, but check this pic out....

Even in b/w you can clearly see the makrings (minus fuselage number) are the same. Color is anyones guess. Just thought it was interesting. Makes me go Hmmm. I just happened across this in another thread here and thought I would share. "Q"


So you should have made the cross wave and swastika also red ... just following your explanation.

I recommend to read Jochen Prien's book on IV./JG 3 and you will find their cowlings were black and definitely not red. Also the whole cowling is in one colour and has not the white trim (or as in your model yellow) ... maybe Neil as well known Sturmjäger expert can add some info here (unfortunately I do not have a link to his Kaczmarek/ Sturmjäger web site)

here is a profile from him. I had to alter it to post it on my site and of course I have Neil's permission ... though I am not sure if he is o.k. with this post (I do think so):


again not aimed against your nice model, just some info !

all the best

Steffen

Yeti123
_VISITCOMMUNITY
Michigan, United States
Joined: February 11, 2008
KitMaker: 311 posts
AeroScale: 278 posts
Posted: Wednesday, May 06, 2009 - 02:41 PM UTC
Getting much Closer. The exhaust stain is next


Taylor
Tomcat31
#042
_VISITCOMMUNITY
England - North East, United Kingdom
Joined: November 18, 2006
KitMaker: 2,828 posts
AeroScale: 1,720 posts
Posted: Wednesday, May 06, 2009 - 10:19 PM UTC

Quoted Text

Speaking of red, Alllens is definitely that. That red finish is better than any car model I have ever built

Thanks Taylor, would it make it really you really sick if I said this has been brush painted as well? If you look closely you can still see some brush marks.
SGTJKJ
#041
_VISITCOMMUNITY
Kobenhavn, Denmark
Joined: July 20, 2006
KitMaker: 10,069 posts
AeroScale: 3,788 posts
Posted: Thursday, May 07, 2009 - 01:09 AM UTC
Looks great, Taylor. Nice work on the camouflage.

Looking forward to see more
Red4
_VISITCOMMUNITY
California, United States
Joined: April 01, 2002
KitMaker: 4,287 posts
AeroScale: 1,164 posts
Posted: Thursday, May 07, 2009 - 08:32 AM UTC
Nice work Allen and Taylor. Looking forward to seeing more. Just picked another colorful 190 today; DML's A5 in Herman Grafs markings. Should prove to be another eye catcher once complete. "Q"
Yeti123
_VISITCOMMUNITY
Michigan, United States
Joined: February 11, 2008
KitMaker: 311 posts
AeroScale: 278 posts
Posted: Thursday, May 07, 2009 - 03:20 PM UTC
Allen:
What brush marks? That is one superb brush job then.

Jesper and Q: Thank you for the comments. Q, no need to tell you to watch out for the cowl fit. I have the same kit in with different markings

Taylor
Emeritus
_VISITCOMMUNITY
Uusimaa, Finland
Joined: March 30, 2004
KitMaker: 2,845 posts
AeroScale: 1,564 posts
Posted: Sunday, May 10, 2009 - 09:40 AM UTC
This is almost a small miracle, I've managed to (more or less) complete something, even if it's just a small subassembly.

I probably add some slight chipping and scuffing later on, and perhaps spray a more satin coat on it, but it's basically done. On the backs of the prop blades are red stencil markings. The spinner spiral is taken from the Revell kit-supplied decal sheet, as I succeeded in messing up not one, but two spirals on the EagleCal sheet. This may not be exactly the same pattern as on Artner's plane, but it's close enough, and what's best, it actually fit the spinner.

I'm pretty close to completion with the cockpit as well. The only thing that's missing is the shoulder harness, which is naturally attached after closing the fuselage halves.


I must say I was positively surprised at how the kit-supplied instrument panel turned out. Perhaps even better than some PE items I've built.

The 'pit of the my Dora is also at pretty much the same point, but that'll have to wait until next time as I'm still in the middle of glazing the instruments gauges with Future.

Until next time.
Over and out.
Yeti123
_VISITCOMMUNITY
Michigan, United States
Joined: February 11, 2008
KitMaker: 311 posts
AeroScale: 278 posts
Posted: Sunday, May 10, 2009 - 02:28 PM UTC
Eetu:
Very nice looking cockpit

Taylor
Emeritus
_VISITCOMMUNITY
Uusimaa, Finland
Joined: March 30, 2004
KitMaker: 2,845 posts
AeroScale: 1,564 posts
Posted: Monday, May 11, 2009 - 04:25 AM UTC
Thanks.

Here's the cockpit of the Academy Dora.


Although I was originally thinking about trying to keep down the amount of aftermarket items with this kit, I'm slipping again. On my last visit to the LHS, I just couldn't resist this Aires control surfaces set.

But hey, the surface details on the control surfaces in the kit are a bit iffy.

But one thing's for sure, I won't be touching the inaccurate A-series style wheel wells. Scratch-building all the gizmos to convincingly fill up the void left by cutting off the middle of the wells isn't that much of a tempting idea.
Now don't tell me if there's a aftermarket correction set for this!
thegirl
_VISITCOMMUNITY
Alberta, Canada
Joined: January 19, 2008
KitMaker: 6,743 posts
AeroScale: 6,151 posts
Posted: Monday, May 11, 2009 - 07:27 AM UTC
Eetu , fantastic job so far . The instrument panel is super !


I have some progress done on my build . Slowly getting her done , one part at a time .
Still have to srcatch new cowl panels , new gun barrels for the wings , canopy and few more washes then the dull coat followed with pastels . This is where I'm at .....................


LongKnife
_VISITCOMMUNITY
Jönköping, Sweden
Joined: April 25, 2006
KitMaker: 831 posts
AeroScale: 688 posts
Posted: Monday, May 11, 2009 - 08:14 AM UTC
I guess you should move to Jönköping Eetu. It's safe here. We don't have a LHS

And Terri, where you're at is the hard place. Sooo close, but a bit left. Keep it up! It's going to be great.

Tony
thegirl
_VISITCOMMUNITY
Alberta, Canada
Joined: January 19, 2008
KitMaker: 6,743 posts
AeroScale: 6,151 posts
Posted: Monday, May 11, 2009 - 05:51 PM UTC
Thanks Tony !
Emeritus
_VISITCOMMUNITY
Uusimaa, Finland
Joined: March 30, 2004
KitMaker: 2,845 posts
AeroScale: 1,564 posts
Posted: Monday, May 11, 2009 - 08:42 PM UTC
Thanks for the compliments, much appreciated.

Now what did I stick my fingers in this time... Yep, another not-so-funny chore:

As I had already cut off the rudder for the resin replacement, I sort of had to go forth with the rest of them, and the ailerons turned out tricky.
Simple as cut-off-styrene - glue-in-resin? Not quite, I'm afraid. All that styrene cutting would have been best to do with the wing halves still separate. Now it was an excercise in patience and eye-hand coordination. First I needed to remove the styrene aileron. Somewhat simple, although the wing edges weren't at the same level. That was followed by some tedious carving, trimming and shaving.
Then it was time for... you guessed it, more trimming! Now with the resin part. I had to file the back edge of the aileron to compensate for the lack of the rounded groove in the wing (which could have been done, had the halves been separate) and cut a notch to mount it.
When I was done with that and the resin part fit was ok, I noticed there was a unsightly gap in the underside. Solution: styrene strip and superglue.

Now it looks sort of okay when dryfitted.


I'll still have to do some more slight trimming and sanding (the aileron still extends a bit beyond the trailing edge), re-building the outer edge a bit with superglue, but the major work is done.

Yes! I'm done! ...Halfway through. One side done, one more to go.

Moral of the story: Some preplanning isn't necessarily a bad thing to do.
SGTJKJ
#041
_VISITCOMMUNITY
Kobenhavn, Denmark
Joined: July 20, 2006
KitMaker: 10,069 posts
AeroScale: 3,788 posts
Posted: Monday, May 11, 2009 - 11:20 PM UTC
Looks good, Eetu. A very nice cockpit. It will be interesting to see what the extra control surfaces do to the finished kit.

Looking forward to see more as your work progresses
cinzano
_VISITCOMMUNITY
Indiana, United States
Joined: January 13, 2009
KitMaker: 419 posts
AeroScale: 378 posts
Posted: Tuesday, May 12, 2009 - 10:09 AM UTC
Really nice progress there Terri.

I think you nailed it with that burnt aluminum for the cylinder heads. Much better scale effect than some bright silver. When the canopy goes on that whole build is really going to 'pop'.

Cheers,
Fred
CaptainA
_VISITCOMMUNITY
Indiana, United States
Joined: May 14, 2007
KitMaker: 3,117 posts
AeroScale: 2,270 posts
Posted: Tuesday, May 12, 2009 - 10:11 AM UTC
Eetu, I can feel your pain. But it is starting to look as it should.

Terri, Nice. Are you going to have somebody take a picture of you sitting on top of this one?

I think this has to be one of the best campaigns I have seen. The number and quality of the builds is outstanding.
Emeritus
_VISITCOMMUNITY
Uusimaa, Finland
Joined: March 30, 2004
KitMaker: 2,845 posts
AeroScale: 1,564 posts
Posted: Tuesday, May 12, 2009 - 09:45 PM UTC
As I anticipated, the other fitting the other aileron went smoother as I had an idea what to do about it. I'll post pics when I get them both finished and attached.

Back on the Revell A8, fuselage halves are together and it's slowly starting to look airframish.

Because of the resin "shelf" behind the cockpit (I decided to use the PE part for the Dora, as they're much easier to use this way round), both superglue and styrene cement had to be used. I used CA first, gluing the fuselage together by the shelf alone. When that was set, I applied liquid styrene cement to the rest of the seam using a small brush.

Fit was very good on the upside, the seam should be fine with just a bit of sanding. However, the underside wasn't so good. Oh yes, I managed to break off the tail wheel as well. Fortunately it snapped off cleanly, making repair easy.

Obvious signs of a well-used mould. Well, at least there isn't many panel lines going across there. Nothing a bit of milliput can't fix.

That's it for this time. Stay tuned.
thegirl
_VISITCOMMUNITY
Alberta, Canada
Joined: January 19, 2008
KitMaker: 6,743 posts
AeroScale: 6,151 posts
Posted: Wednesday, May 13, 2009 - 06:00 AM UTC
Thanks Fred and Carl ! Might not be a stringbagger but it has been an enjoyable build so far which I almost have it finished now . Just have to finishing paint the new cowls and the canopy with a few small bit's . Weathering has been done on her but not point of posting pic's until she is finished .

No Carl I will not be standing on top of it when I take a picture of her . Knowing my luck I will trip or something and well ..............just something i can't talk about .

Besides Steffen said just don't screw it up !!!!