Air Campaigns
Want to start or join a group build? This is where to start.
Camel -VS-Fokker DR.1 Campaign
thegirl
_VISITCOMMUNITY
Alberta, Canada
Joined: January 19, 2008
KitMaker: 6,743 posts
AeroScale: 6,151 posts
Posted: Sunday, October 25, 2009 - 12:39 PM UTC
The blue is perfect I think Gary !

The tail's stand out better and having them enlarged made the difference .

Let's go with this one if that's alright with the rest of you folks ?
TuomasH
_VISITCOMMUNITY
Turku ja Pori, Finland
Joined: September 10, 2008
KitMaker: 470 posts
AeroScale: 279 posts
Posted: Sunday, October 25, 2009 - 09:03 PM UTC
Looks great now!
thegirl
_VISITCOMMUNITY
Alberta, Canada
Joined: January 19, 2008
KitMaker: 6,743 posts
AeroScale: 6,151 posts
Posted: Monday, October 26, 2009 - 01:10 AM UTC
You just snook that one in there Gary !

The black is ok , but for some reason it just doest seem to fit . It makes the tails look small again . I like the other one the best .

I think we will go with that one , no one seems to really disagree with it . You did a fine job on the design and I would like to thank Tuomas and yourself for the aid and feed back in getting this going ! And all others for their input
Kornbeef
_VISITCOMMUNITY
England - South East, United Kingdom
Joined: November 06, 2005
KitMaker: 1,667 posts
AeroScale: 1,551 posts
Posted: Monday, October 26, 2009 - 05:29 AM UTC
I love it...there again I should

thegirl
_VISITCOMMUNITY
Alberta, Canada
Joined: January 19, 2008
KitMaker: 6,743 posts
AeroScale: 6,151 posts
Posted: Wednesday, November 04, 2009 - 01:30 PM UTC
How is everones build coming along ?
robot_
_VISITCOMMUNITY
United Kingdom
Joined: March 08, 2009
KitMaker: 719 posts
AeroScale: 691 posts
Posted: Wednesday, November 11, 2009 - 02:09 AM UTC
I have a question (my build hasn't made much progress- just cleaning up the parts and dry-fitting): I am opening up the inspection panels in the wings of my Roden 1/72 Camel (the part pe set has the covers included), but what should you seen under the clear panel? I guess there would be the wing spar, and a couple of cables and a pulley? This is probably way too small for this scale- just a bit of linen coloured paint and wood for the back wall of the opening?
Kornbeef
_VISITCOMMUNITY
England - South East, United Kingdom
Joined: November 06, 2005
KitMaker: 1,667 posts
AeroScale: 1,551 posts
Posted: Wednesday, November 11, 2009 - 02:56 AM UTC
Mines coming along slowly Terri..I hope to have the fuselage together within a week once I get the column detailed and the ammo holders in

thegirl
_VISITCOMMUNITY
Alberta, Canada
Joined: January 19, 2008
KitMaker: 6,743 posts
AeroScale: 6,151 posts
Posted: Wednesday, November 11, 2009 - 02:57 AM UTC
Hi Ben !

There will be a small pully and the cable for the control surfaces . The two outer ones . The one which is kinda towards the middle would just be a cable . If you have the windsock datafile on page 18 and 19 there is a excellent cut away . So yes wood would be inside and the pully cable pick out in black and sliver .
thegirl
_VISITCOMMUNITY
Alberta, Canada
Joined: January 19, 2008
KitMaker: 6,743 posts
AeroScale: 6,151 posts
Posted: Friday, November 13, 2009 - 02:10 PM UTC
Looking forward on the pic's Keith !

It's always a joy seeing your work !
SGTJKJ
#041
_VISITCOMMUNITY
Kobenhavn, Denmark
Joined: July 20, 2006
KitMaker: 10,069 posts
AeroScale: 3,788 posts
Posted: Monday, November 16, 2009 - 11:59 PM UTC
Well, I will join this campaign and take to the skies. It will be my first try at the WWI fighters. So far the rigging has kept me away from the WWI fighters, but the Fokker Dr. I. does not have that much rigging.

I have Eduard's Fokker Dr. I dual combo in my stash and I will make one of the planes for this campaign. There are so many attractive schmes included in the pack, so it is good that there are two kits to make color scheme decisions easier.

I think I will go for the very colourful yellow and red machine. Work has actually already started. More pictures will follow shortly.

BTW: Great ribbon, Gary!


Kornbeef
_VISITCOMMUNITY
England - South East, United Kingdom
Joined: November 06, 2005
KitMaker: 1,667 posts
AeroScale: 1,551 posts
Posted: Tuesday, November 17, 2009 - 05:58 AM UTC
Jesper, thats a nice bright colourscheme, she should look stunning.

Terri.........here--------> Proof at last that I have at least done something...LOL


More piccies in the Early Aviation forum

Keith
SGTJKJ
#041
_VISITCOMMUNITY
Kobenhavn, Denmark
Joined: July 20, 2006
KitMaker: 10,069 posts
AeroScale: 3,788 posts
Posted: Tuesday, November 17, 2009 - 11:24 PM UTC
Wow! excellent decals, Keith! Very impressive.

I am continuing work on my Fokker. The main cockpit is together, but painting is not completed yet. Next is the triple wings. Another first for me.

More to follow.....


thegirl
_VISITCOMMUNITY
Alberta, Canada
Joined: January 19, 2008
KitMaker: 6,743 posts
AeroScale: 6,151 posts
Posted: Wednesday, November 18, 2009 - 12:54 AM UTC
Welcome back Keith , awesome jog so far !

Jesper , great kit choice and start on the project ! And glad to see you sign up for this one
SGTJKJ
#041
_VISITCOMMUNITY
Kobenhavn, Denmark
Joined: July 20, 2006
KitMaker: 10,069 posts
AeroScale: 3,788 posts
Posted: Friday, November 20, 2009 - 12:10 AM UTC
Glad to be here

It is interesting to build one of the early warplanes from the infancy of air warfare. Building the P-47 Jug at the same time it is striking how much airwarfare developed in 25 years! Especially in terms of size

Work has progressed, so an update is upcoming during the weekend.
SGTJKJ
#041
_VISITCOMMUNITY
Kobenhavn, Denmark
Joined: July 20, 2006
KitMaker: 10,069 posts
AeroScale: 3,788 posts
Posted: Saturday, November 21, 2009 - 03:23 AM UTC
Hey guys and girls

I am now getting closer to start putting some paint on my Fokker.

I need some help this being my first WWI plane. The instructions does not show the colours on the top of the engine and around the machine guns. I could imagine this being nutaral metal/steel due to the heat but I am not sure.

Is the area marked with red in the picture below painted the same colour as the fuselage or is it in natural metal?

Any good tricks for making the streaked/doped camouflage on the sides of the Fokker Dr. I?


Kalt
_VISITCOMMUNITY
Mendoza, Argentina
Joined: June 14, 2006
KitMaker: 222 posts
AeroScale: 219 posts
Posted: Saturday, November 21, 2009 - 04:49 AM UTC
Hello Jesper,

The cowling, upper decking, axle wing and in some cases the landing gear and wing struts were painted Fokker olive green.
Check this thread about a 1/32 Roden Fokker Dr.1 I built last year:

https://aeroscale.kitmaker.net/forums/118042&page=3

This is my technique for the Fokker streaked finish:

First I painted the upper surfaces with ANA616 Sand de Model Master that represents the linen. Later, I masked and painted stripes with a highly thinned green to aid to better replicate the lack of uniformity of the finish. As far as possible I tried to follow the pattern of light and dark zones I saw in the pictures of the original plane. Then, I diluted Gunze Sangyo's acrylic dark green (H330) with ethyl alcohol and fulfilled the streaking with a flat brush of 1 cm of width and stiff bristles starting the strokes from the leading edge.
The first paints were enamel and the third one acrylic. I did this for a couple of reasons: First, enamel paints are more resistant than acrylic ones to repeating stokes without producing “cracking” on the base paint or the mix of the two paints. This was the reason because I thinned the acrylic paint with ethyl alcohol and not the much stronger isopropil alcohol as I usually do. The second reason was the possibility to remove, in case of a mistake, the acrylic green paint with a bit of cotton dipped in alcohol without affecting the base paint. Thankfully it was not necessary . Finally, I applied a couple of coats of gloss varnish to get an homogeneous finish.


I hope this will be helpful for your build.
thegirl
_VISITCOMMUNITY
Alberta, Canada
Joined: January 19, 2008
KitMaker: 6,743 posts
AeroScale: 6,151 posts
Posted: Saturday, November 21, 2009 - 05:13 AM UTC
Howdy Jesper ! Kalt bet me to it , both typing at the same time , my fingers are just a little slower then his . But I answered any way !

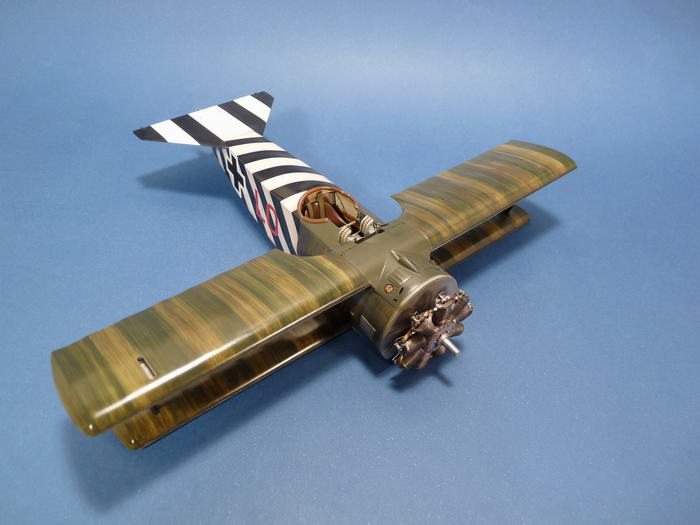
For your first question the gun decking should be painted in a dark olive green . Same with the top of the axle wing ( no streaking ) . This was stander finish from the factory . Keep in mind though that there would be different varitions ot what the supplies would have been so in some case's the colour would be on the light side as well . But still a olive green .

For the streaking , well you got me there . I only made a few try's of this . You can get decals for this . Gun Sight Graphic's does them in 48 scale and can be found on E-bay . Stephen has a thread on this subject as well Streaking Camo 101 .

Start with a base coat of CDL . Or a linen shade of your liking . When this is dried seal it with a few coats of lacquer either gloss or dull . You could use future as well . Once this is all said and dry you can now do the streaking . Using oil paints like testors .

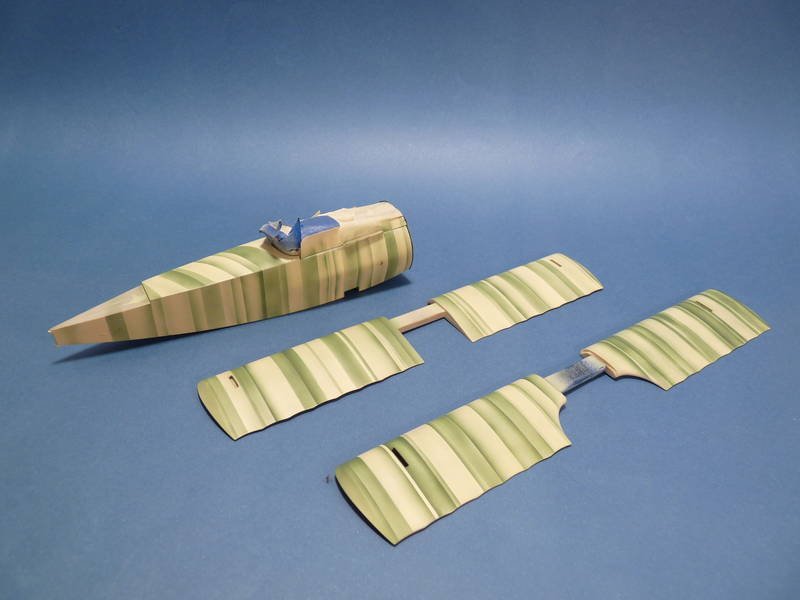
Load up a flat brush , not to much paint though . Your not looking for a full cover . And at a 45 degree angle with the spaceing of two ribs start working your way in one way . Keep going until the brush runs dry and start over again . This for for the tops of the wings and the trutle deck . You might have to go back and add more to areas which a weak in colour but don't over do it . Let this dry fully and seal it with future . A lttile tip to , keep the brush moist when doing this . The paint will dry on the brush if you don't and will make a mess out of it .

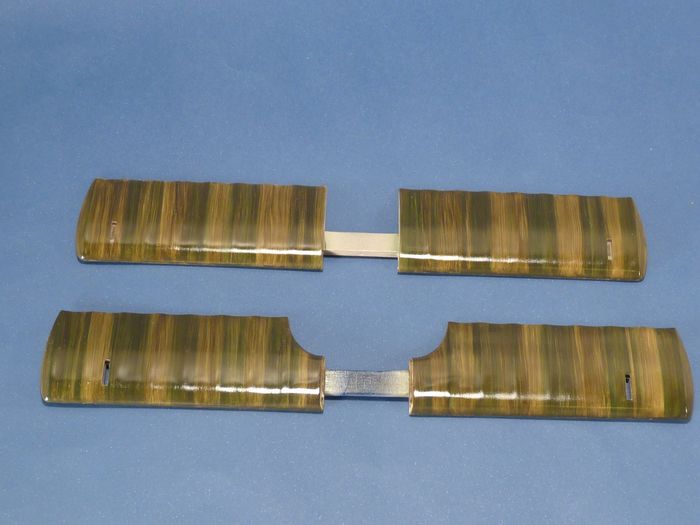
When i did my i went over key areas with a little raw sierra to break it up . This was by a wisking montion back and forth .

You should end up with something like this ........


and the fially the end results .............


For the sides of the fuselage the same method is used but straight up and down . Starting from the top making your way down .
This was my thrid try at doing this type of camo so you may want to try it out on a srcap wing or card to get the feel of it . It does come down to mostly practicing the method and everyone will have there own opinions of what the colours should or will be . In the pic's posted I used acrylics , no oils and I'm very pleased with the out come .

Stpehen also has a review build log on this kit and is most worth having a peek at how he does his . It help me a lot with this method .

Hope this helps you out in some way !
Your build so far is looking very nice Jesper , what do you think of the kit so far ?
Mobious
_VISITCOMMUNITY
Indiana, United States
Joined: May 18, 2008
KitMaker: 210 posts
AeroScale: 80 posts
Posted: Saturday, November 21, 2009 - 05:56 AM UTC
Teri, just wanted to say there are some wonderful looking aircraft being built. The pair of Camels are cool, really like the No 10 Naval Squadron, and the Egyptian markings are very interesting. The paint streaking on LO is gorgeous. Very nice work all. Should be getting started on my builds soon, especially after seeing the inspiring work here...thanks everyone.
SGTJKJ
#041
_VISITCOMMUNITY
Kobenhavn, Denmark
Joined: July 20, 2006
KitMaker: 10,069 posts
AeroScale: 3,788 posts
Posted: Sunday, November 22, 2009 - 08:37 AM UTC
Terri and Claudio, thanks very much for your detailed guides. Definitely a help for me. I will try to have a go for it and update you along the way.

Thanks again to both of you.

More to follow....
SGTJKJ
#041
_VISITCOMMUNITY
Kobenhavn, Denmark
Joined: July 20, 2006
KitMaker: 10,069 posts
AeroScale: 3,788 posts
Posted: Tuesday, November 24, 2009 - 04:00 PM UTC
I have now had my first try at the streaked camouflage. It looks as expected, but I think I might go for a darker green or a dark wash to bring out the streaking more. Any comments and suggestions are welcome

The streaking effect did not come out so well in the pictures, so I have played around with the lighting to show the effect a little better.

Work is continuing during the weekend, so more updates will follow then


Kornbeef
_VISITCOMMUNITY
England - South East, United Kingdom
Joined: November 06, 2005
KitMaker: 1,667 posts
AeroScale: 1,551 posts
Posted: Wednesday, November 25, 2009 - 09:22 PM UTC
Yes I think you are right Jesper, it needs some darker streaking to emphasise the camo nore.

On Mine I have some paint on

I've base coated the camo areas in Humbrol 103 now I have to let it dry and follow the examples set here by Claudio and Terri...if it turns out as good I'll be chuffed

jaypee
_VISITCOMMUNITY
Scotland, United Kingdom
Joined: February 07, 2008
KitMaker: 1,699 posts
AeroScale: 1,384 posts
Posted: Wednesday, November 25, 2009 - 09:54 PM UTC
I've just signed up as I reckon I could complete a little fokker in time for christmas.
Eduard's 1/72 Flyboys boxing. Are the fictional markings OK Terri?
If not I can always try a simple scheme.
thegirl
_VISITCOMMUNITY
Alberta, Canada
Joined: January 19, 2008
KitMaker: 6,743 posts
AeroScale: 6,151 posts
Posted: Thursday, November 26, 2009 - 01:44 AM UTC
Hi Jesper !
Not bad for your first try at doing the streaking . Keith is right it needs some darker colour to break it up more .

Hello Jaypee !
Sure you can do the fictional markings I see nothing wrong with that . oh yeah ! , glad to have you on as well

SGTJKJ
#041
_VISITCOMMUNITY
Kobenhavn, Denmark
Joined: July 20, 2006
KitMaker: 10,069 posts
AeroScale: 3,788 posts
Posted: Saturday, November 28, 2009 - 01:46 AM UTC
Thanks for the comments. I have now tried with a darker green. I am pretty satisfied with the result although my references for the streaked camouflage is sparse.

More to follow....

Kornbeef
_VISITCOMMUNITY
England - South East, United Kingdom
Joined: November 06, 2005
KitMaker: 1,667 posts
AeroScale: 1,551 posts
Posted: Saturday, November 28, 2009 - 05:46 AM UTC
Coming along nicely Jesper.

JayPee glad to see you joining us fokkers, though I have a profi 1/48th and the ...Academy 1/32 Camels I cant see me doing either in the timescale.

Anyway...Terri heres some progress shots....more in the early aviation forum if anyone wants a peek


I still have dials, fasteners etc to add but construction is getting to the easy *if things line up* stage,

Streaking is done with oils, far the best method I've tried apart from the dreadful time waiting for it to dry,

Keith