

Chuck,
First class build and documentation, as always!
Michael
World War II
Discuss WWII and the era directly before and after the war from 1935-1949.
Discuss WWII and the era directly before and after the war from 1935-1949.
Hosted by Rowan Baylis
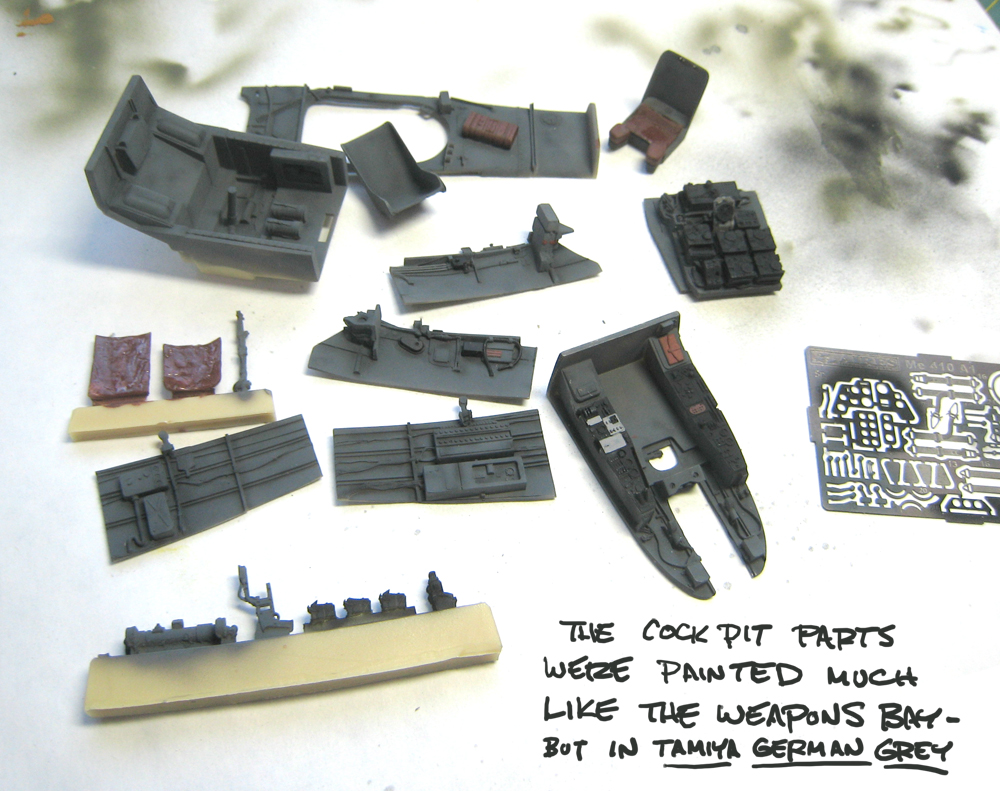
Me 410- Promodeler plus kitchen sink

paxtonm

Joined: February 06, 2007
KitMaker: 89 posts
AeroScale: 20 posts
Posted: Monday, April 20, 2009 - 07:25 AM UTC

robot_

Joined: March 08, 2009
KitMaker: 719 posts
AeroScale: 691 posts
Posted: Monday, April 20, 2009 - 07:30 AM UTC
Chuck: probably the best thread on this forum!
Keep it up!
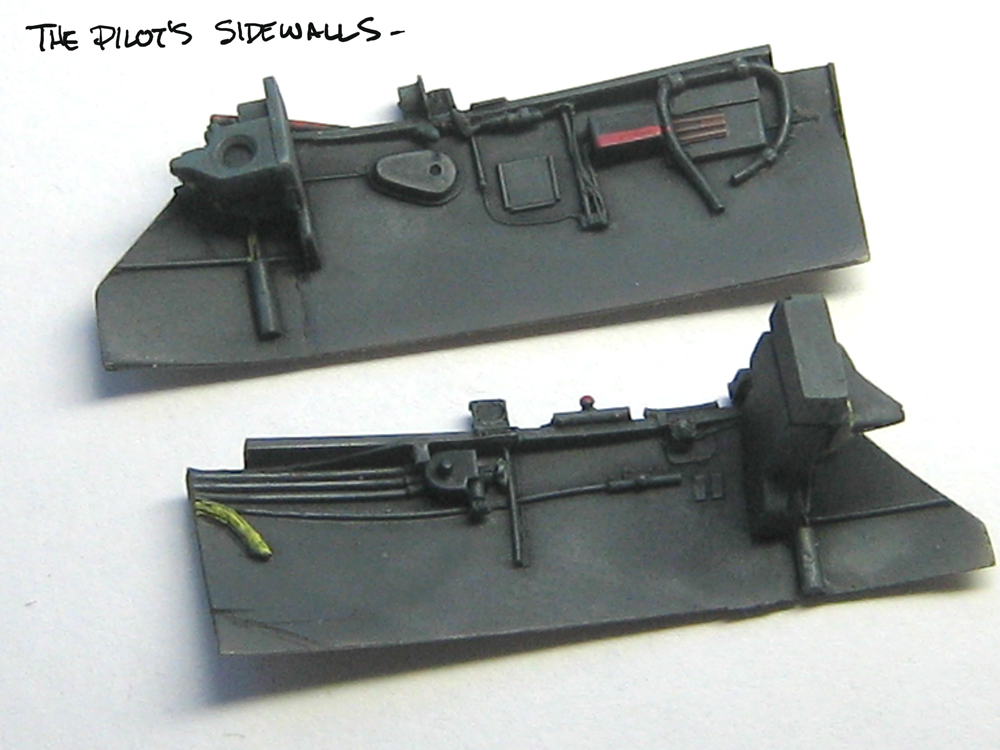
I'm very interested in the depiction of the Robot, if it is supposed to be a Robot. The only two forms of Robot gun camera used by the Luftwaffe in WWII, as far as I know, were the very rare Robot 375 (it took 375 frame on 10 metres of film, from one wind of a giant spring- which fed the usual smaller spring on top of the camera), and the much more common Robot II tall wind knob spring (50 frames per wind, a complete 35mm film) that was fitted with a solenoid release, and fitted to the wings of FW-190's.
http://www.robot-camera.de/ROBOT_Kameras/Robot_II/Robot_II_Luftwaffe/robot_ii_luftwaffe.html
Keep it up!
I'm very interested in the depiction of the Robot, if it is supposed to be a Robot. The only two forms of Robot gun camera used by the Luftwaffe in WWII, as far as I know, were the very rare Robot 375 (it took 375 frame on 10 metres of film, from one wind of a giant spring- which fed the usual smaller spring on top of the camera), and the much more common Robot II tall wind knob spring (50 frames per wind, a complete 35mm film) that was fitted with a solenoid release, and fitted to the wings of FW-190's.
http://www.robot-camera.de/ROBOT_Kameras/Robot_II/Robot_II_Luftwaffe/robot_ii_luftwaffe.html

beepboop

Joined: May 23, 2004
KitMaker: 144 posts
AeroScale: 7 posts

Posted: Monday, April 20, 2009 - 09:34 AM UTC
These posts are amazing, Chuck! You should consider finding out if you can get your Helldiver comic/guide/build-log (and, in due course, Me 410) professionally published - they are a hell of a lot more informative (and fun) than most modelling guides. At the very least you should think of compiling them into a .pdf for distribution to a wider audience. This really is something else - modelling skill of the highest order and the best presentation I've ever seen. Always a pleasure to check back to see if the next instalment is up yet!

Merlin

#017

Joined: June 11, 2003
KitMaker: 17,582 posts
AeroScale: 12,795 posts

Posted: Monday, April 20, 2009 - 09:47 AM UTC
Hi Chuck
You still have me beat on how to compile these epics into Features, but we really should do one day! Fantastic stuff and I'm always here...
All the best
Rowan
You still have me beat on how to compile these epics into Features, but we really should do one day! Fantastic stuff and I'm always here...
All the best
Rowan


hellvetier

Joined: April 17, 2008
KitMaker: 264 posts
AeroScale: 88 posts

Posted: Monday, April 20, 2009 - 12:06 PM UTC
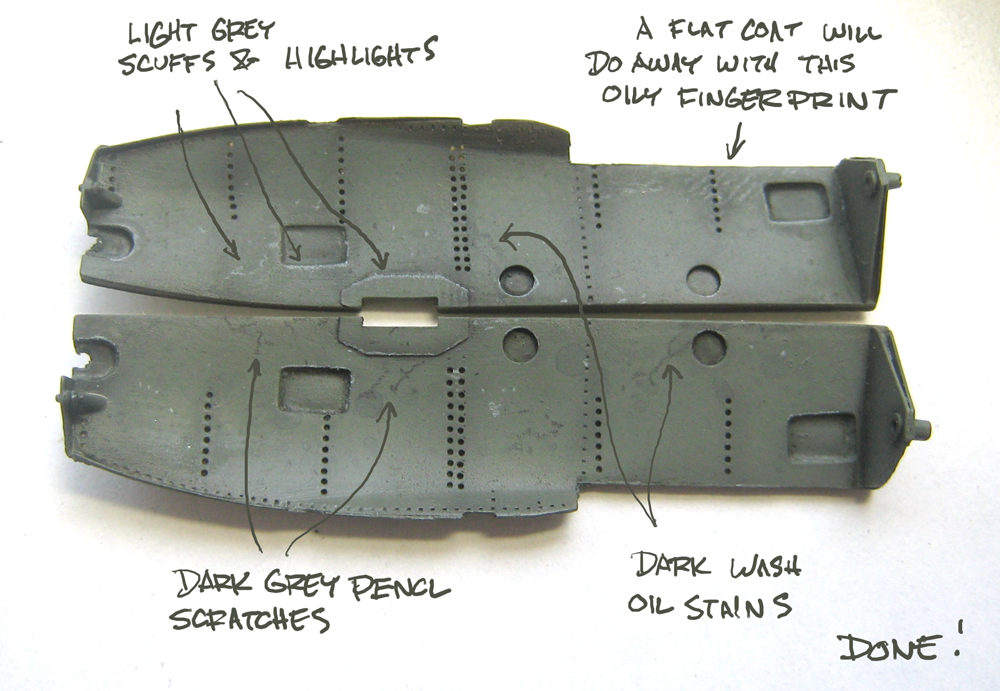
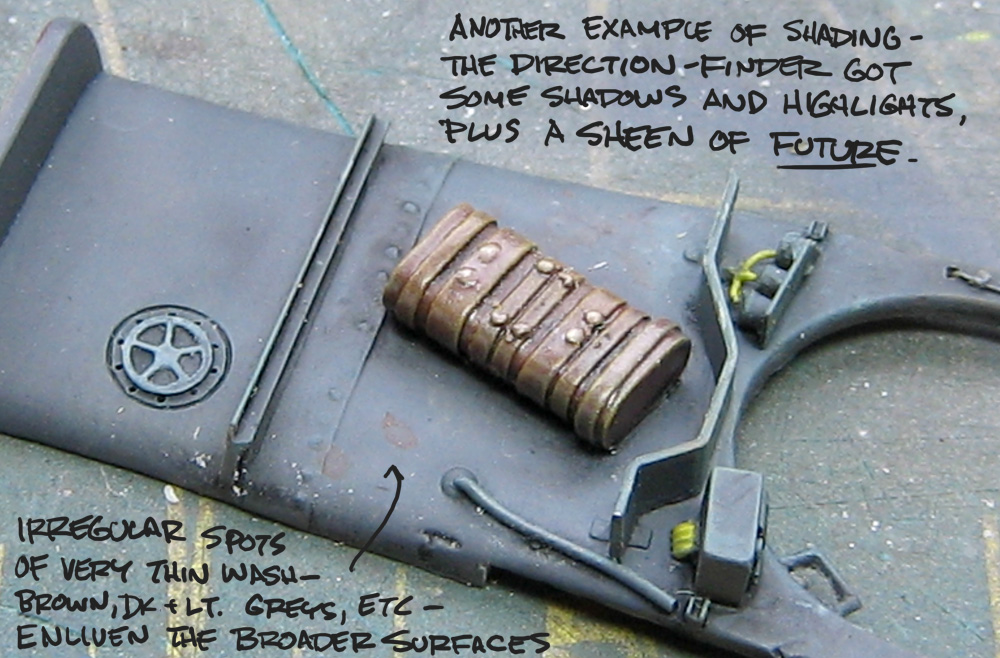
Entertaining and beautiful work as always  You paint technique is very interesting to follow, especially the post-shading.
Looking forward to the next update
You paint technique is very interesting to follow, especially the post-shading. Looking forward to the next update
chukw1
Joined: November 28, 2007
KitMaker: 817 posts
AeroScale: 729 posts
Posted: Tuesday, April 21, 2009 - 03:36 AM UTC
Thanks, everybody!
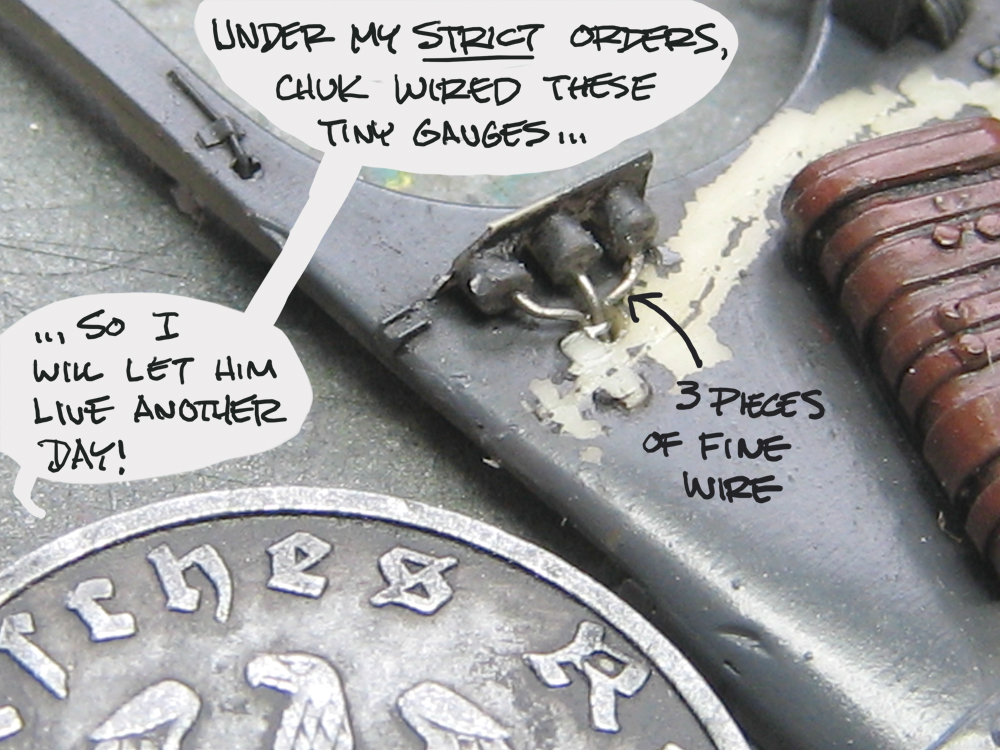
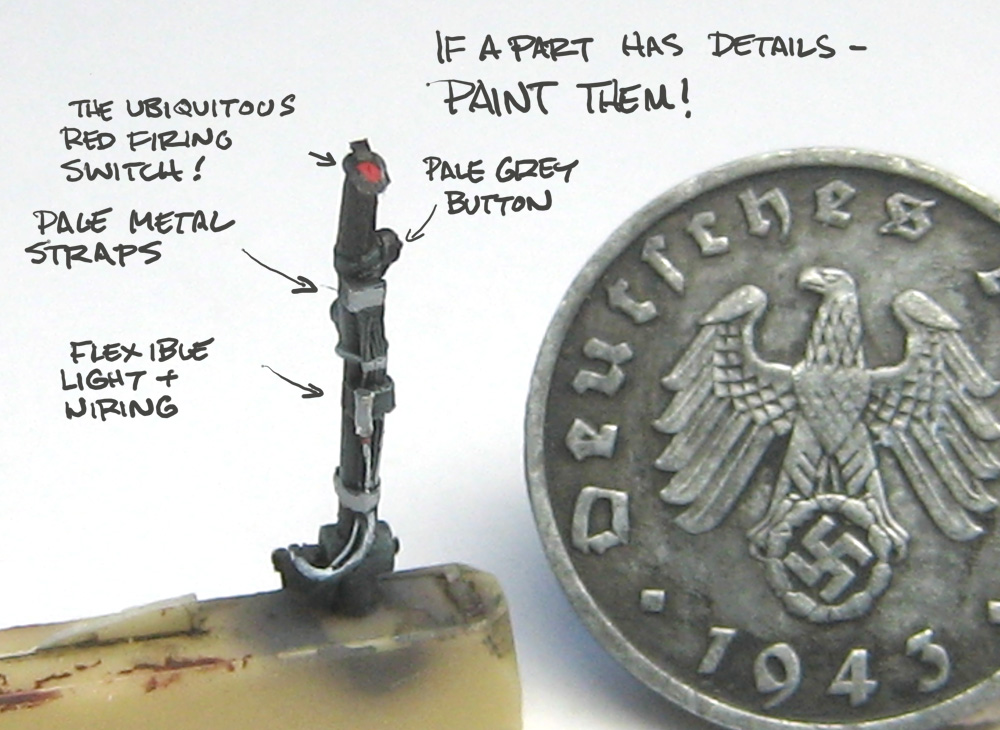
Ben- you caught me! I had meant to put a question mark there, because I can't identify that beautiful little widget! It's down with the guns, it's pointed out a window- it must be a gun camera, right? Any ideas on what it might be? Thanks for keeping me honest!
Ben- you caught me! I had meant to put a question mark there, because I can't identify that beautiful little widget! It's down with the guns, it's pointed out a window- it must be a gun camera, right? Any ideas on what it might be?
Thanks for keeping me honest!
robot_
Joined: March 08, 2009
KitMaker: 719 posts
AeroScale: 691 posts
Posted: Tuesday, April 21, 2009 - 05:08 AM UTC
Chuck- after doing some Googling, I have not found any photos of other gun cameras used by the Luftwaffe, but I would have thought it was a 16mm cine camera. The types that are mentioned as being found in ME 109's, FW 190's and others are: BSK 16, EK 16 and ESK 2000B.
I think they only used the Robot when size was important- they are tiny cameras, and are still small with the release solenoid attached- it could be fitted in the leading edge of the wing and be wired up to a gun very easily. Later Robots (some of the Royal models) can take a continuous series of frames, but the gun cameras would have just taken one frame every time the trigger was depressed, I think.
I think they only used the Robot when size was important- they are tiny cameras, and are still small with the release solenoid attached- it could be fitted in the leading edge of the wing and be wired up to a gun very easily. Later Robots (some of the Royal models) can take a continuous series of frames, but the gun cameras would have just taken one frame every time the trigger was depressed, I think.
chukw1
Joined: November 28, 2007
KitMaker: 817 posts
AeroScale: 729 posts
Posted: Sunday, April 26, 2009 - 04:17 PM UTC
Thanks, Ben- maybe we'll never know!
Well, more WWII fun for everybody- take it away, Fritzi!


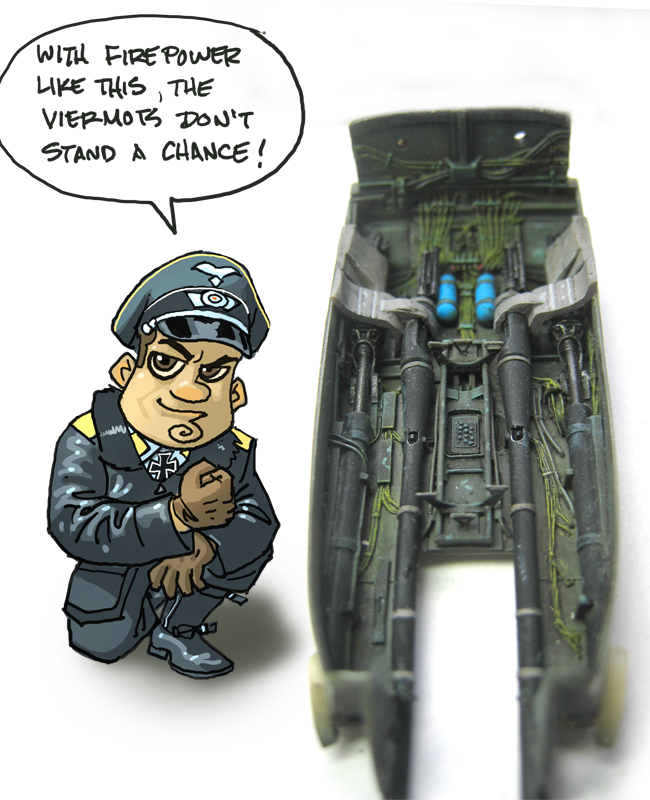


Well, more WWII fun for everybody- take it away, Fritzi!

f1matt

Joined: August 13, 2006
KitMaker: 1,021 posts
AeroScale: 184 posts

Posted: Sunday, April 26, 2009 - 06:58 PM UTC
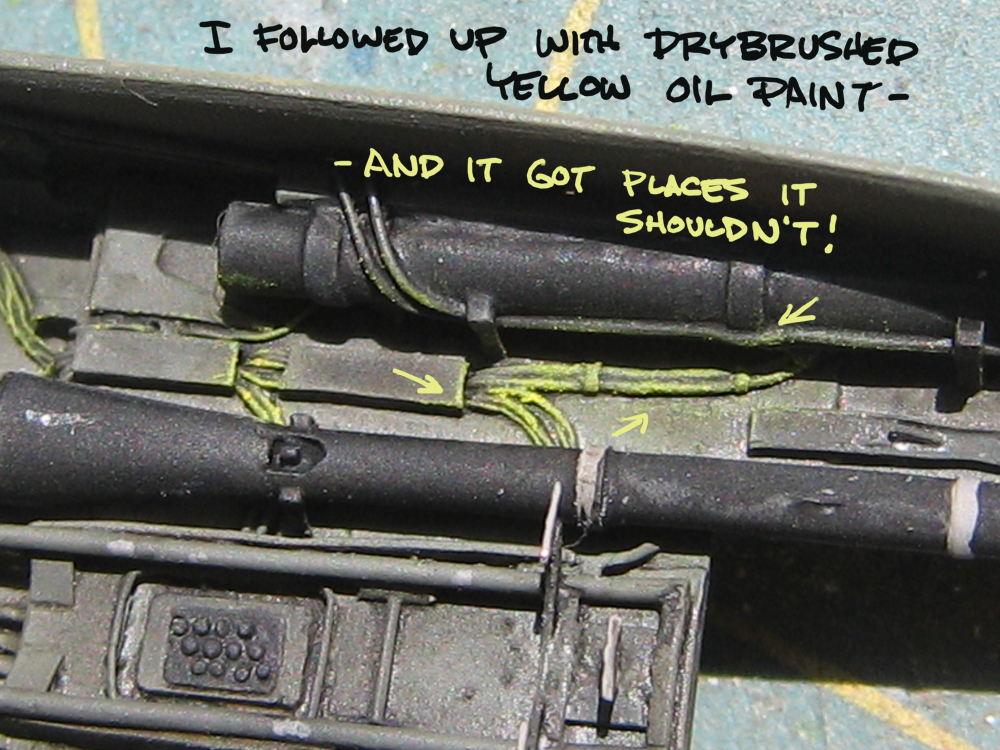
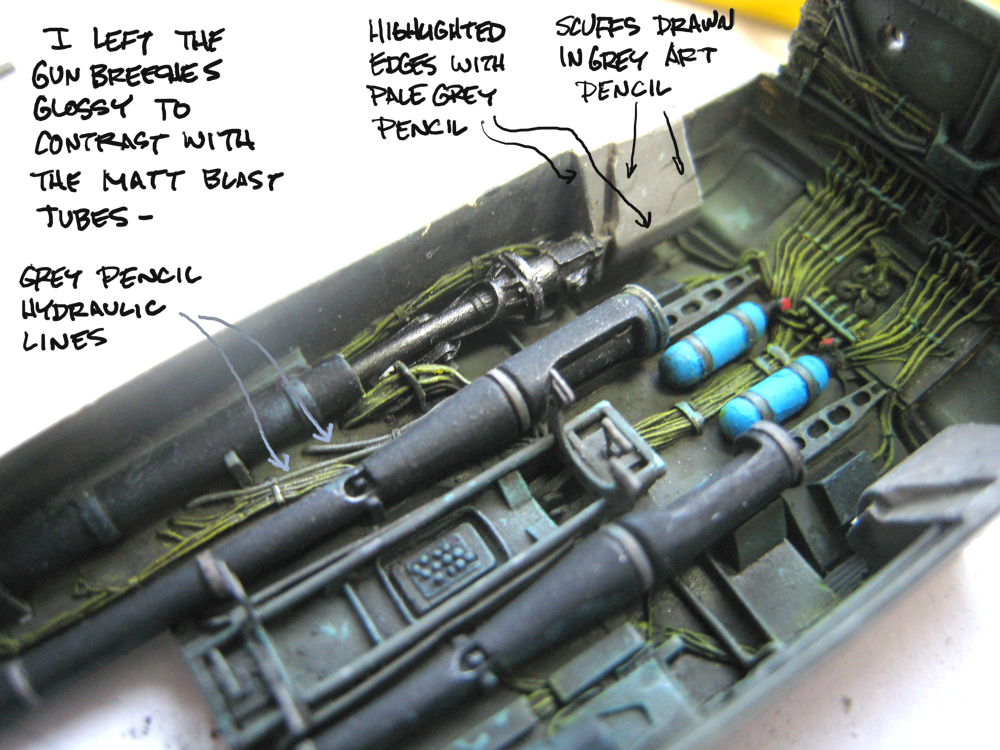
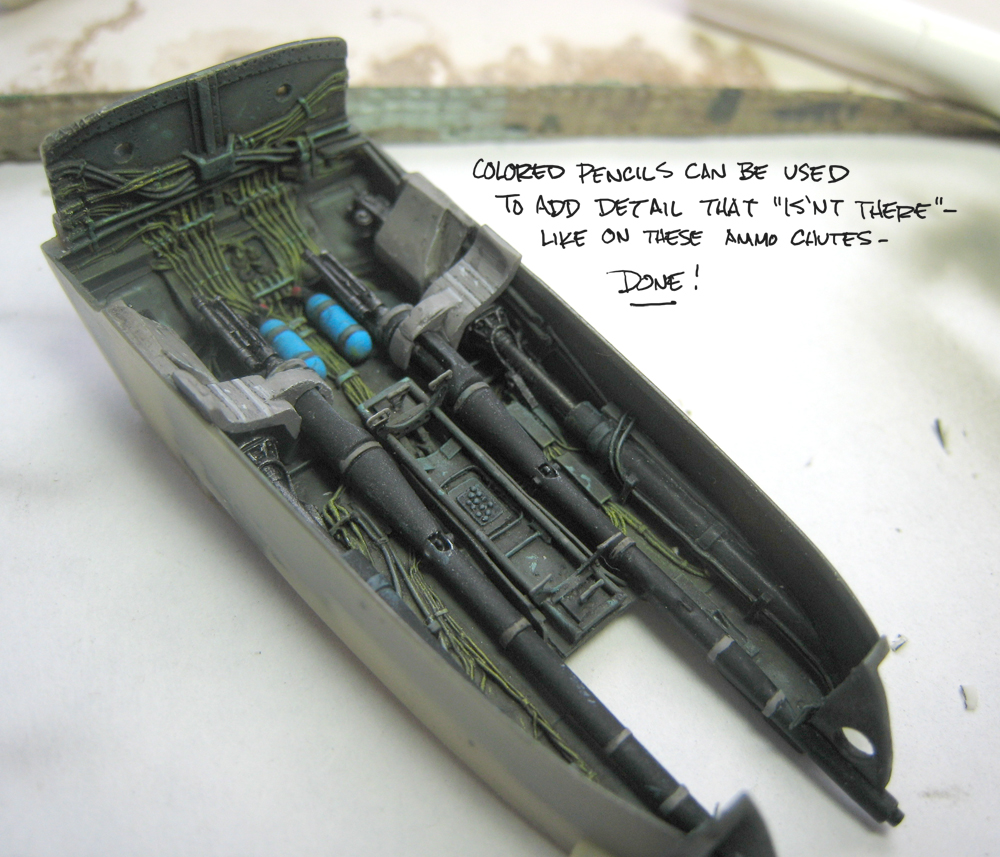
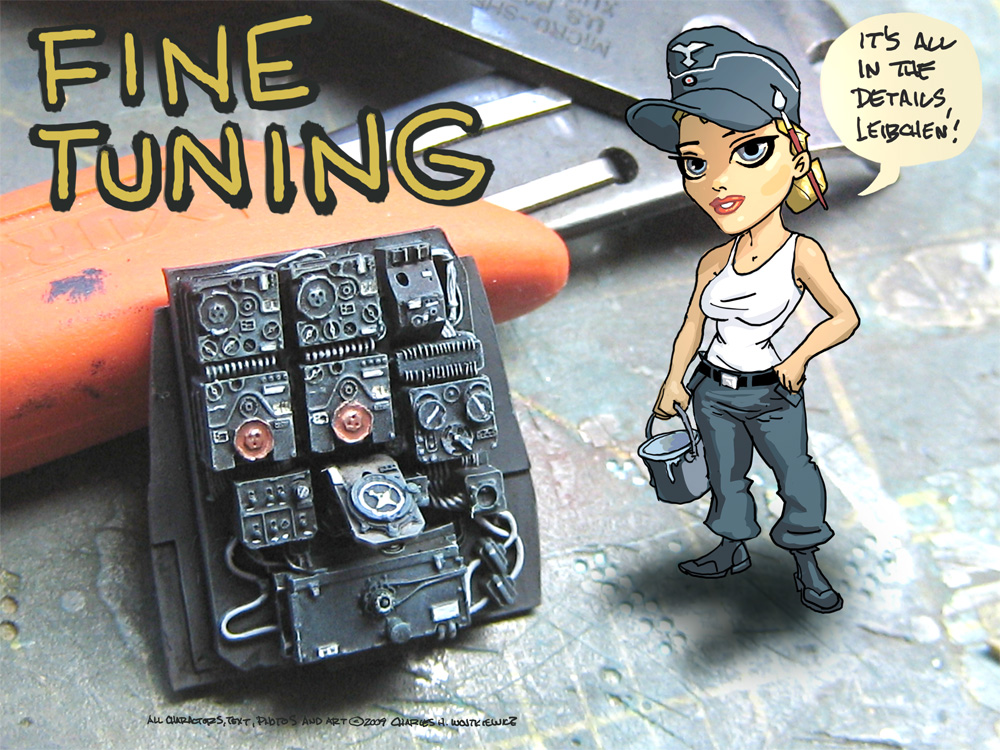
And Chuk plows ahead! More good stuff. I never thought of using a coloured pencil like that before.
Matt
Matt
ViperAtl
Joined: August 22, 2005
KitMaker: 331 posts
AeroScale: 135 posts
Posted: Monday, April 27, 2009 - 04:12 AM UTC
I started to use color pencils about 2 years ago for armor models to make scratches and such but never have thought to used them for adding details. Learned something new.
chukw1
Joined: November 28, 2007
KitMaker: 817 posts
AeroScale: 729 posts
Posted: Sunday, May 03, 2009 - 03:38 PM UTC
Thank you, gents!
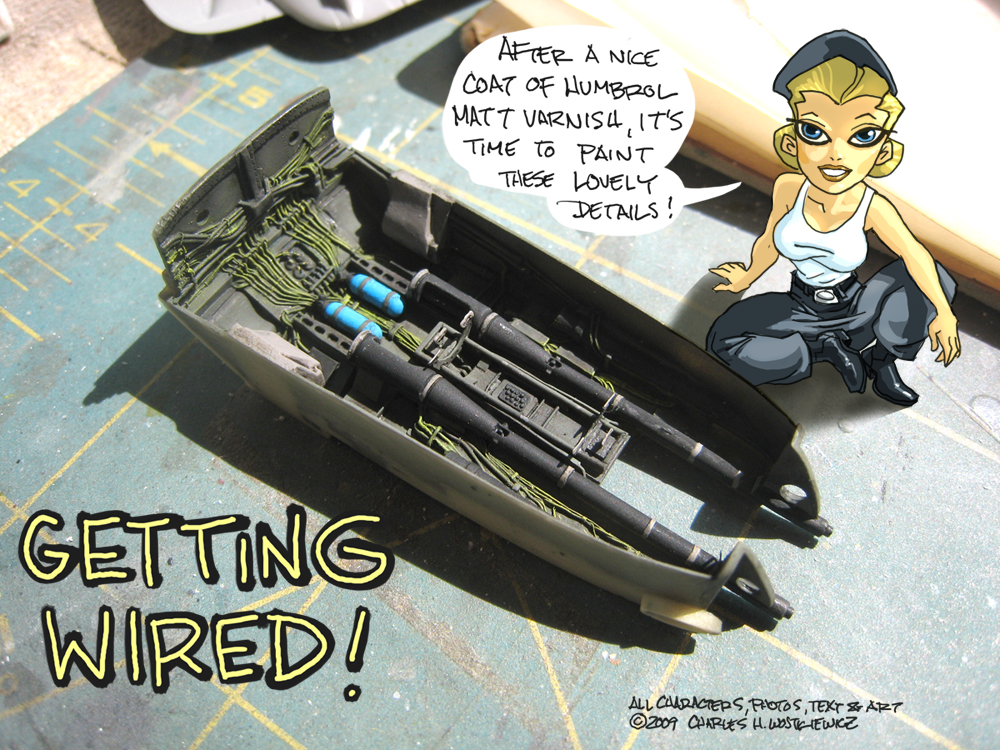
Not much modeling time this weekend- but lots of pics, starting with our 100th in this series. Take it away, Fritzi!

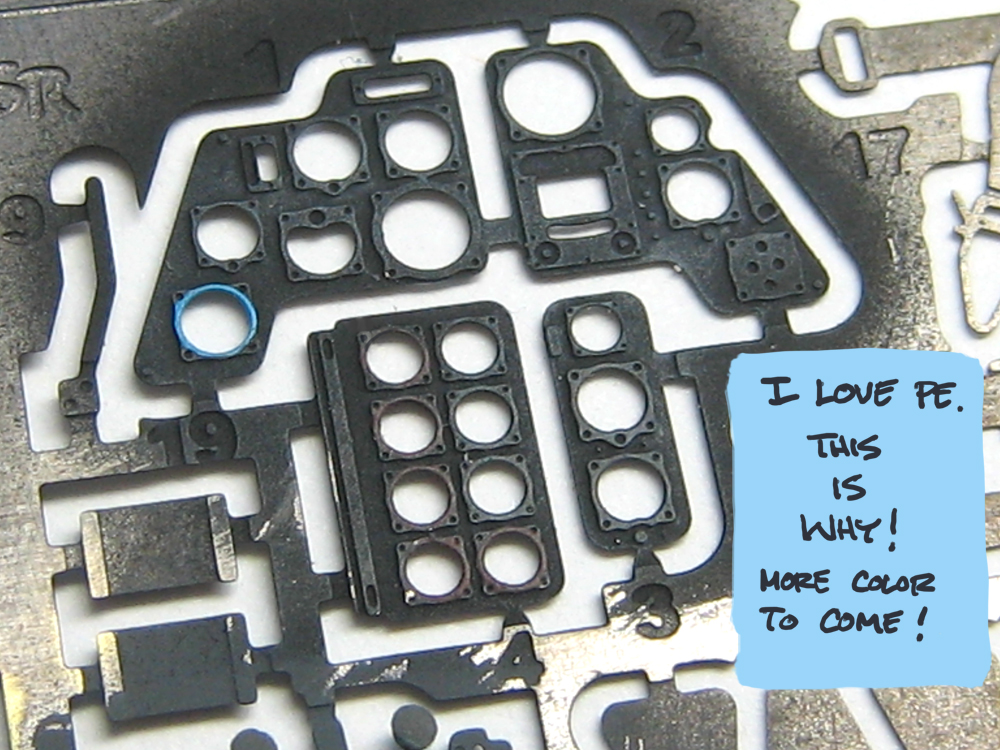
Not much modeling time this weekend- but lots of pics, starting with our 100th in this series. Take it away, Fritzi!
f1matt
Joined: August 13, 2006
KitMaker: 1,021 posts
AeroScale: 184 posts
Posted: Sunday, May 03, 2009 - 06:40 PM UTC
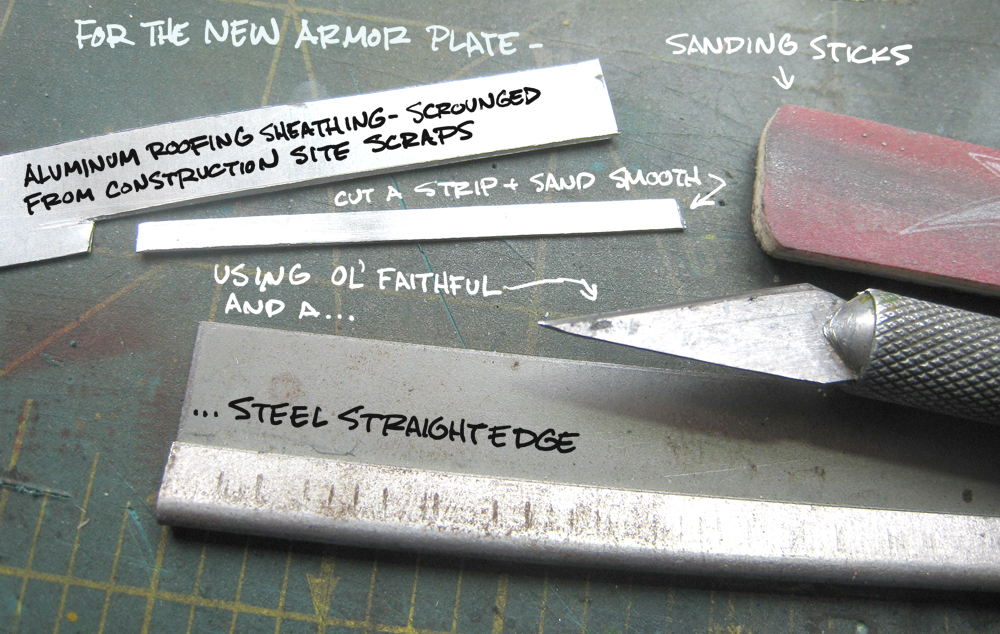
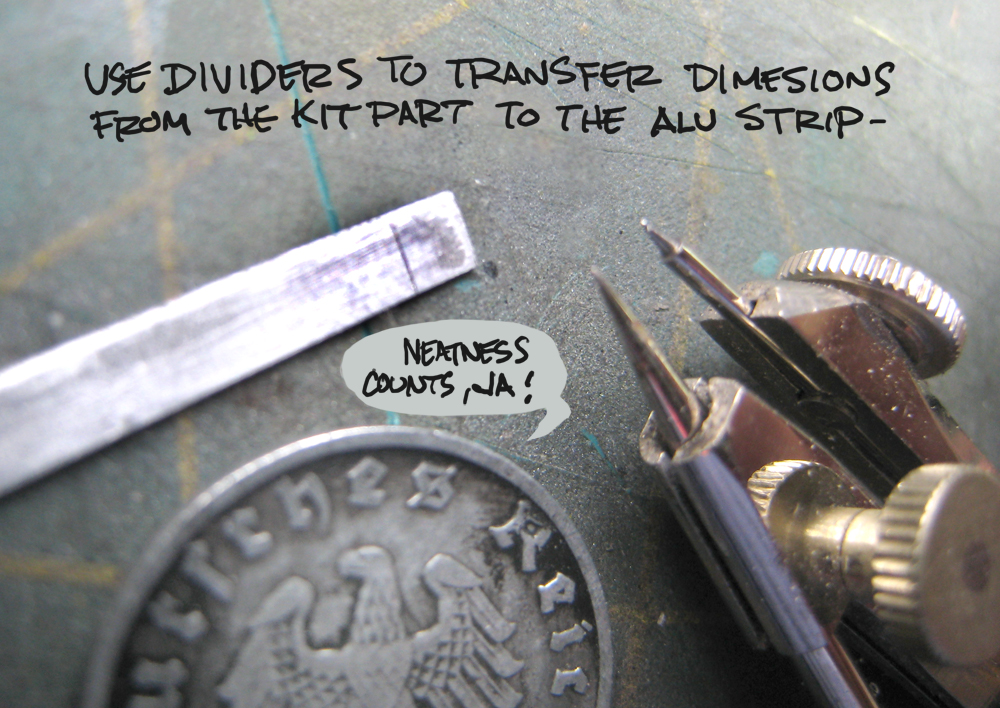
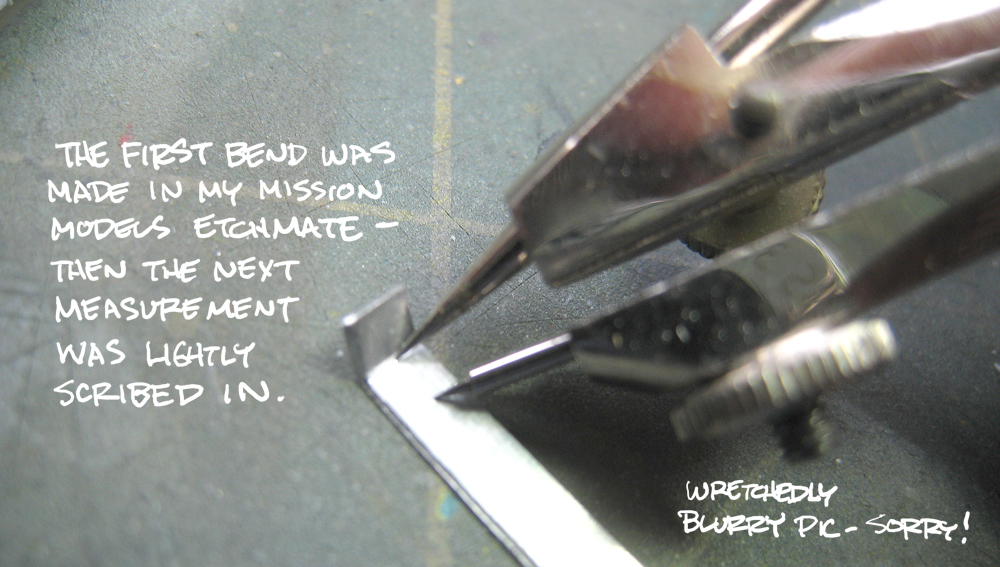
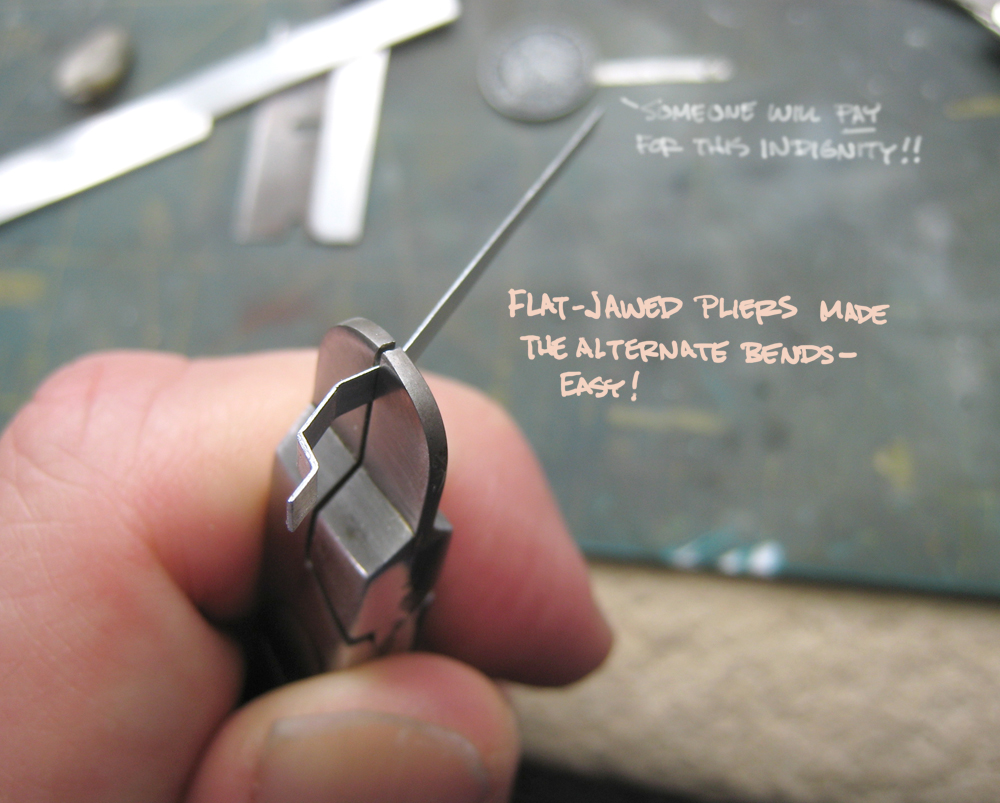
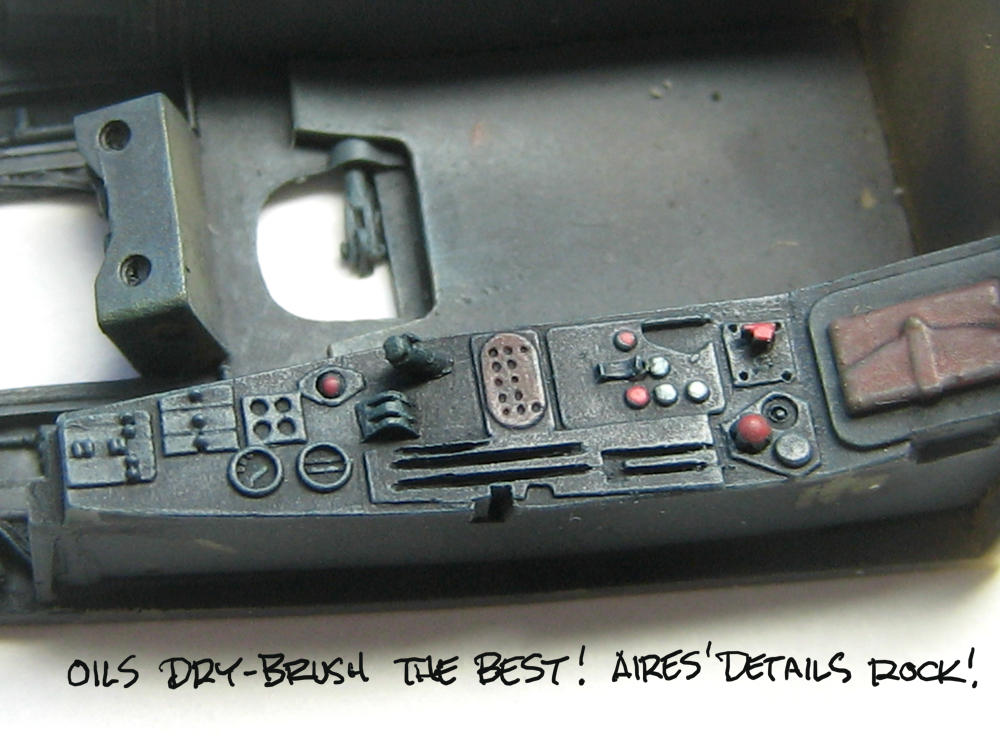
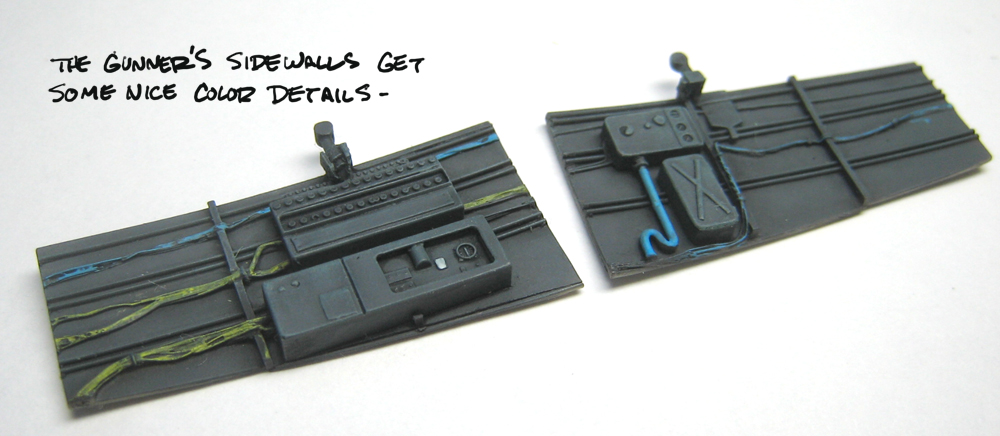
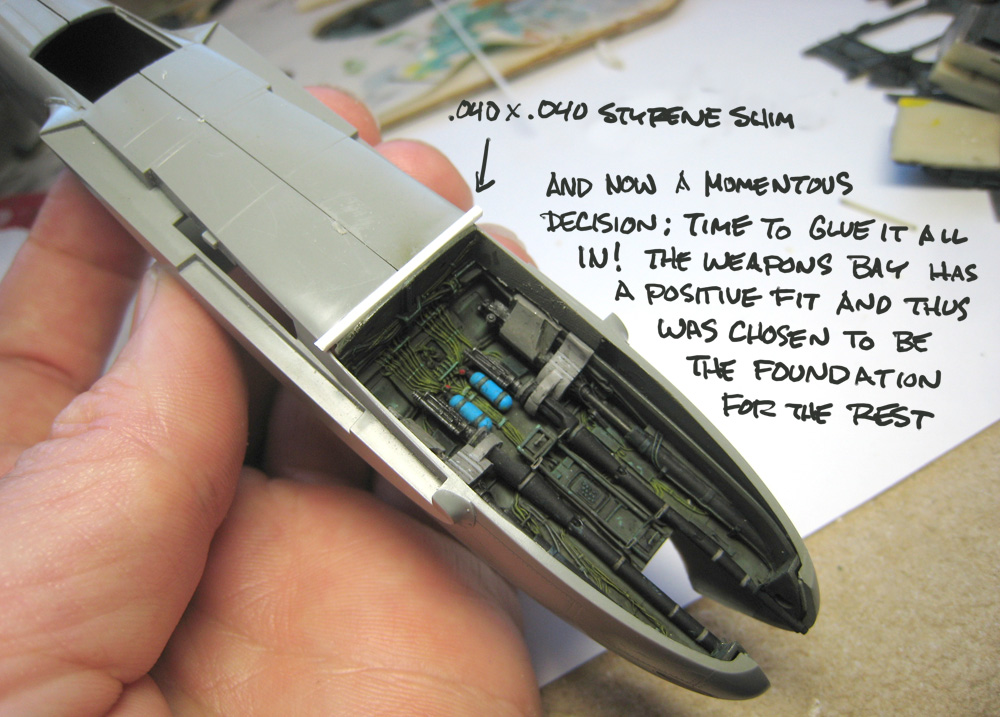
Good job replacing the armour plate. And I love the little details that get picked out in blue and yellow. Adds a little bit of life to the whole thing.
Matt
Matt
TuomasH

Joined: September 10, 2008
KitMaker: 470 posts
AeroScale: 279 posts
Posted: Sunday, May 03, 2009 - 07:33 PM UTC
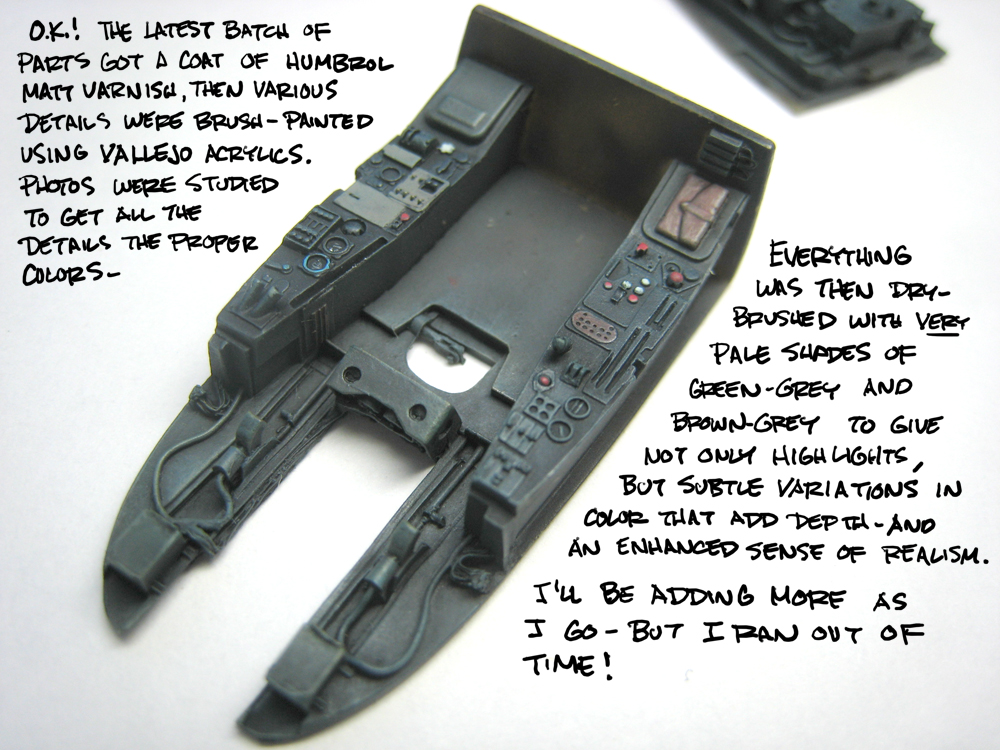
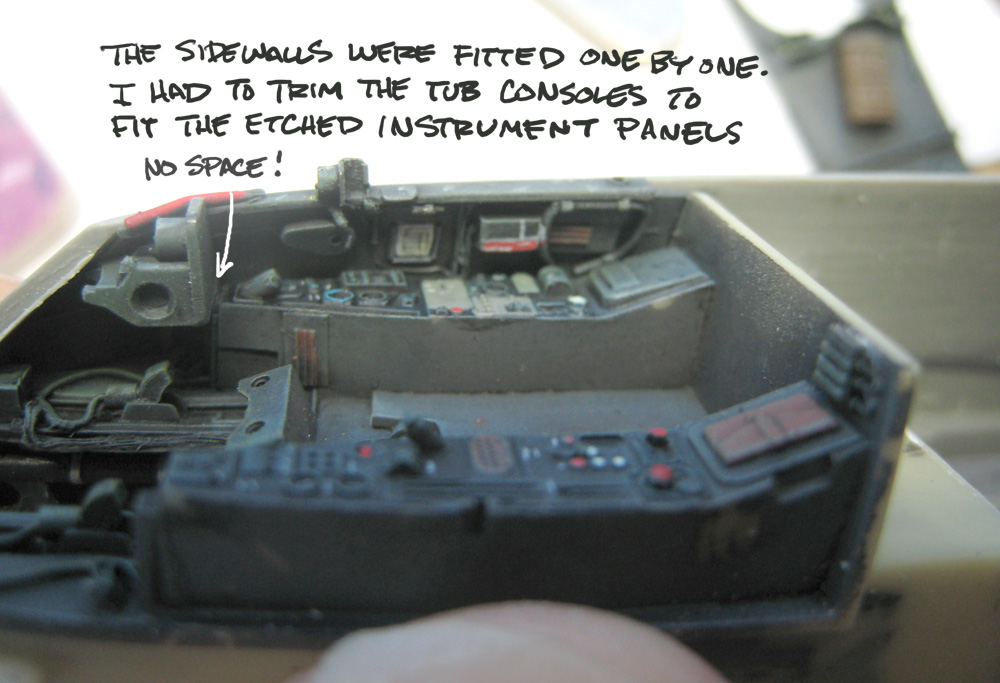
Very nice looking cockpit Chuck!

thegirl
Joined: January 19, 2008
KitMaker: 6,743 posts
AeroScale: 6,151 posts
Posted: Sunday, May 03, 2009 - 08:05 PM UTC
Looking very sweet Chuck ! Nice job on the different hues for the weathering sure adds a lot depth to the areas . Can't wait for the next installment ..............these commercial breaks are way to long !!! 

jhoog59
Joined: November 13, 2005
KitMaker: 189 posts
AeroScale: 129 posts

Posted: Tuesday, May 05, 2009 - 08:46 AM UTC
Your posts never dissapoint. Waiting anxiously for the next one. 

Blueheeler

Joined: March 18, 2008
KitMaker: 347 posts
AeroScale: 223 posts

Posted: Tuesday, May 05, 2009 - 10:55 PM UTC
As always Chuck; brilliant! Always learning something from you each post it seems

Yeti123
Joined: February 11, 2008
KitMaker: 311 posts
AeroScale: 278 posts
Posted: Tuesday, May 05, 2009 - 11:45 PM UTC
Chuck:
I really enjoy these posts. The detail work is beautiful and I learn something new each time. Thanks
Taylor
I really enjoy these posts. The detail work is beautiful and I learn something new each time. Thanks
Taylor

chukw1
Joined: November 28, 2007
KitMaker: 817 posts
AeroScale: 729 posts
Posted: Sunday, May 10, 2009 - 03:52 PM UTC
My sincere thanks to you, my friends! You're a great bunch indeed- 
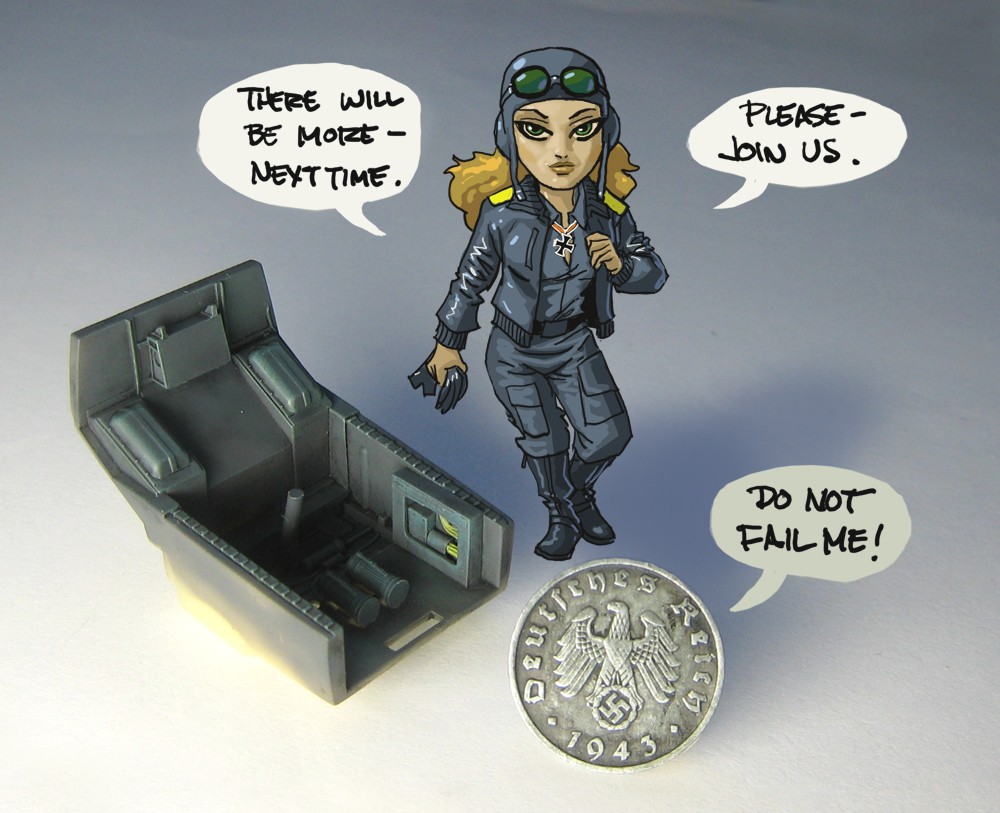
Running late? Me? Of course! That's why I have assistants- take it away, Fritzi!


Running late? Me? Of course! That's why I have assistants- take it away, Fritzi!

LongKnife

Joined: April 25, 2006
KitMaker: 831 posts
AeroScale: 688 posts
Posted: Sunday, May 10, 2009 - 08:52 PM UTC
Thanks for the "details that aren't there" Chuck. I haven't thought about them, but you really have to get close to see them for what they are/aren't. Neat as always.
However, I wonder what Hptm Hannah has in the pitcher. Is it RLM 21, perhaps? Or maybe a stuck cotton bud?
Tony
However, I wonder what Hptm Hannah has in the pitcher. Is it RLM 21, perhaps? Or maybe a stuck cotton bud?
Tonyjhoog59
Joined: November 13, 2005
KitMaker: 189 posts
AeroScale: 129 posts
Posted: Monday, May 11, 2009 - 11:49 AM UTC
Excellent update Chuck. I really liked the details that arent ther part Im going to try that on my P-40.
Jim
Jim
chukw1
Joined: November 28, 2007
KitMaker: 817 posts
AeroScale: 729 posts
Posted: Sunday, May 17, 2009 - 03:25 PM UTC
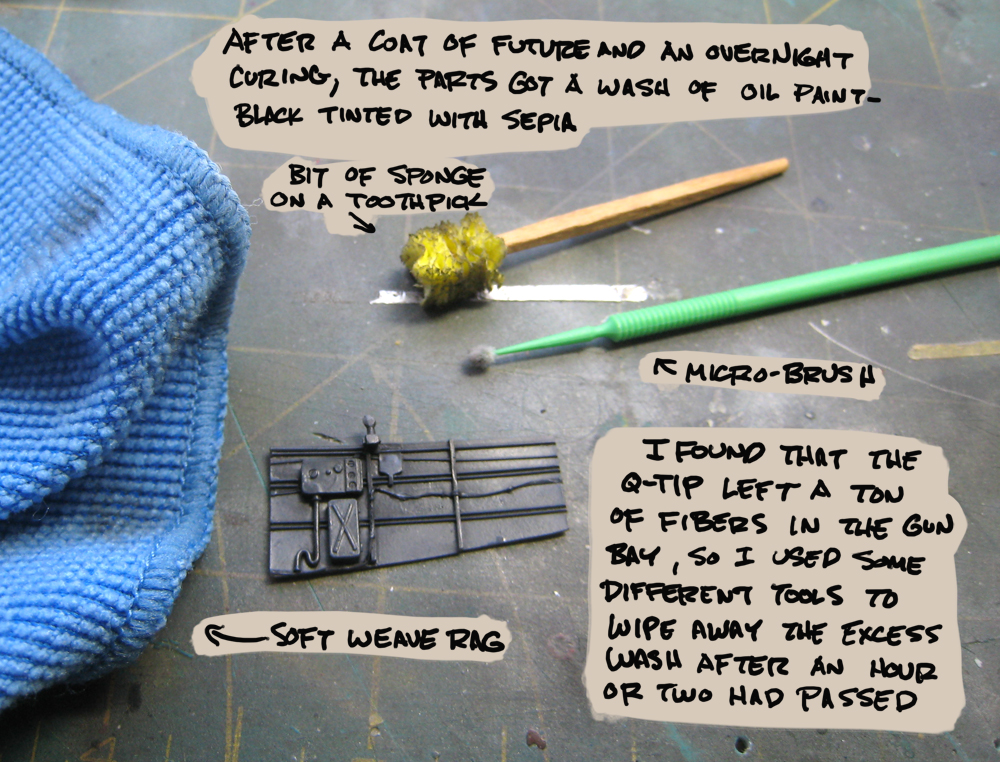
Thanks, Tony and Jim! That's a nice lager in that stein- I tasted it for her to make sure it wasn't spoiled. ;D
I've had a busy but enjoyable weekend- even got in a little modeling time! Take a look:


I've had a busy but enjoyable weekend- even got in a little modeling time! Take a look:

russamotto
Joined: December 14, 2007
KitMaker: 3,389 posts
AeroScale: 375 posts

Posted: Sunday, May 17, 2009 - 04:08 PM UTC
Amazing. This is better than anything on tv.
thegirl
Joined: January 19, 2008
KitMaker: 6,743 posts
AeroScale: 6,151 posts
Posted: Sunday, May 17, 2009 - 05:01 PM UTC
This will be a good time to get more beer !
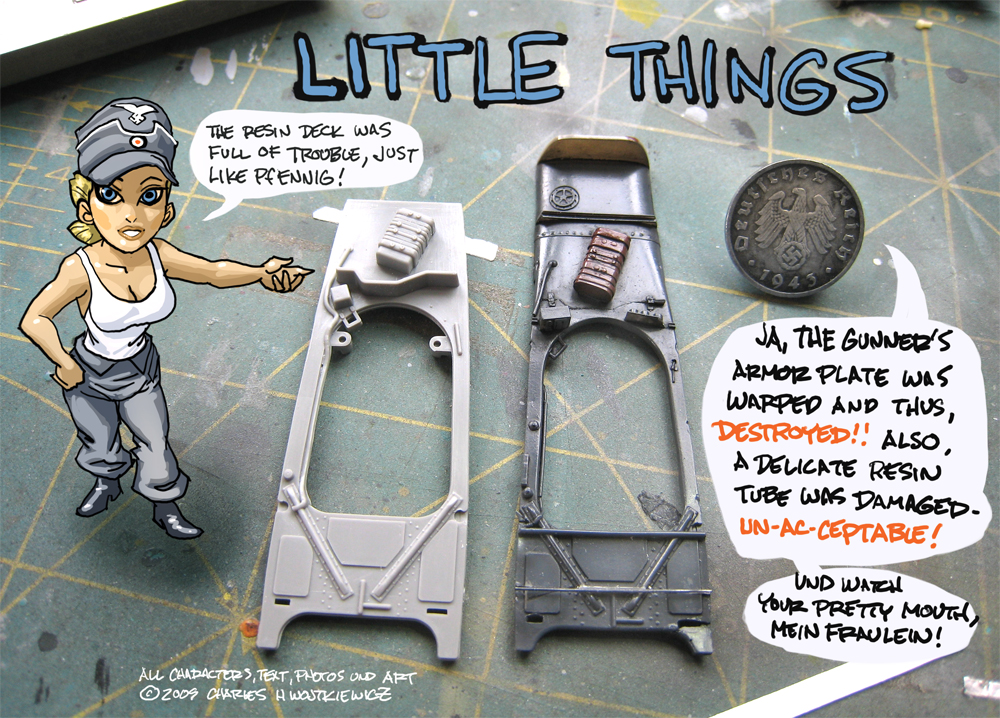
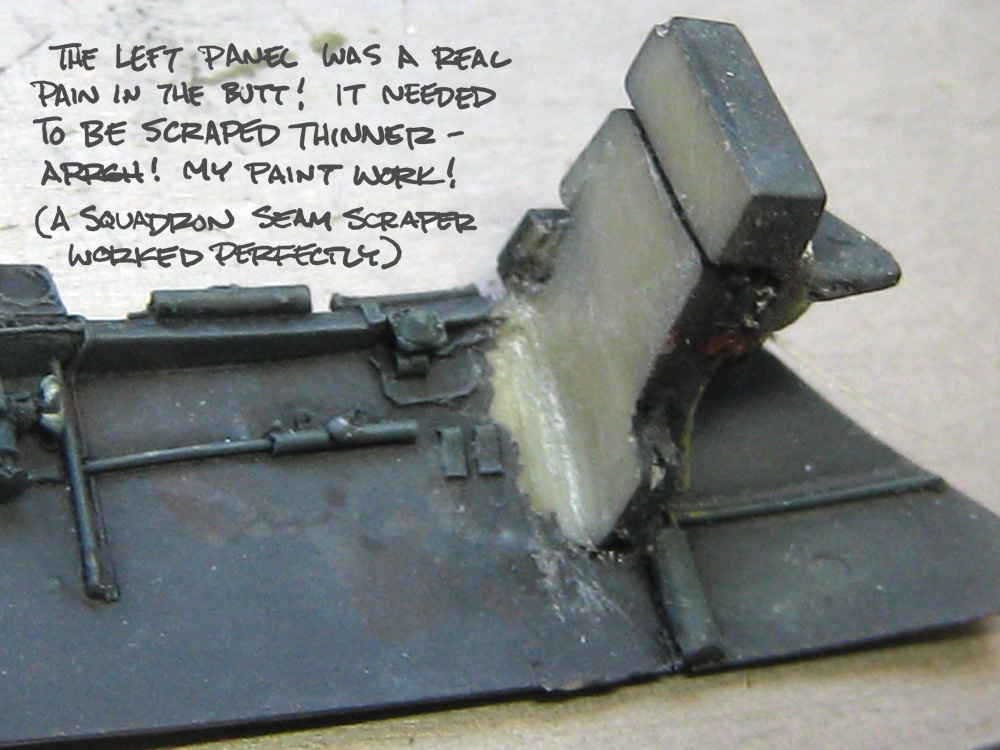
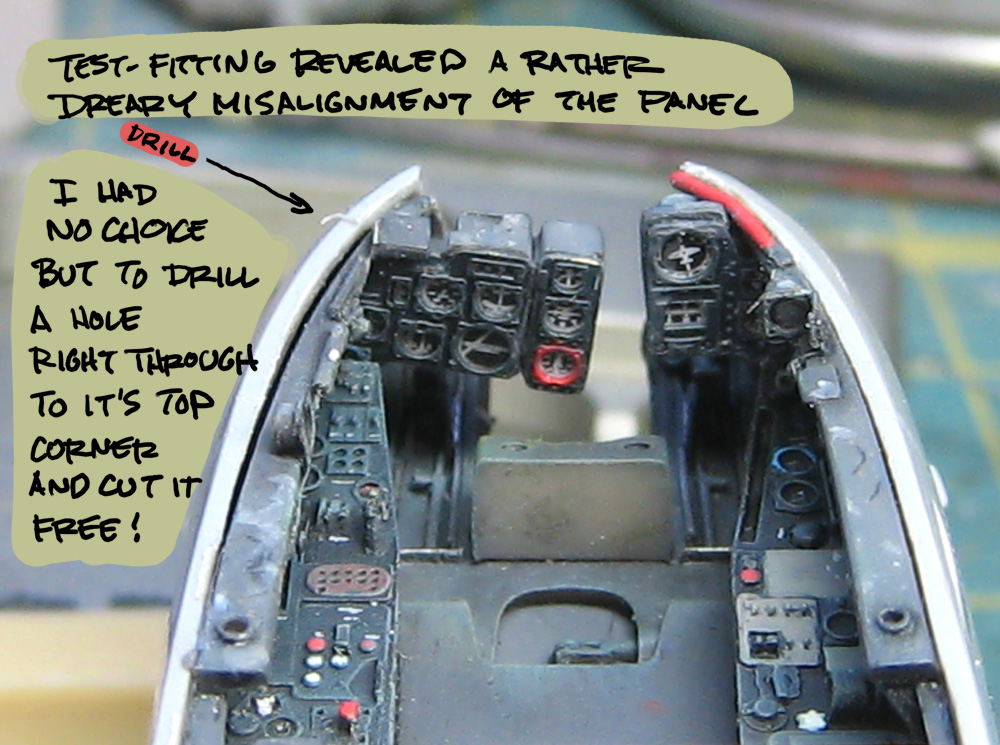
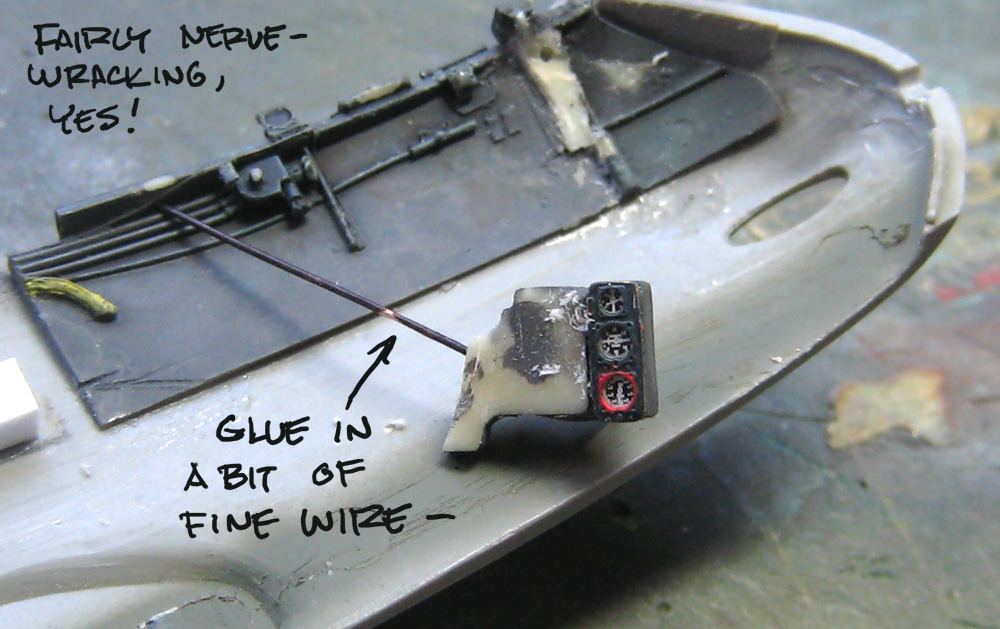
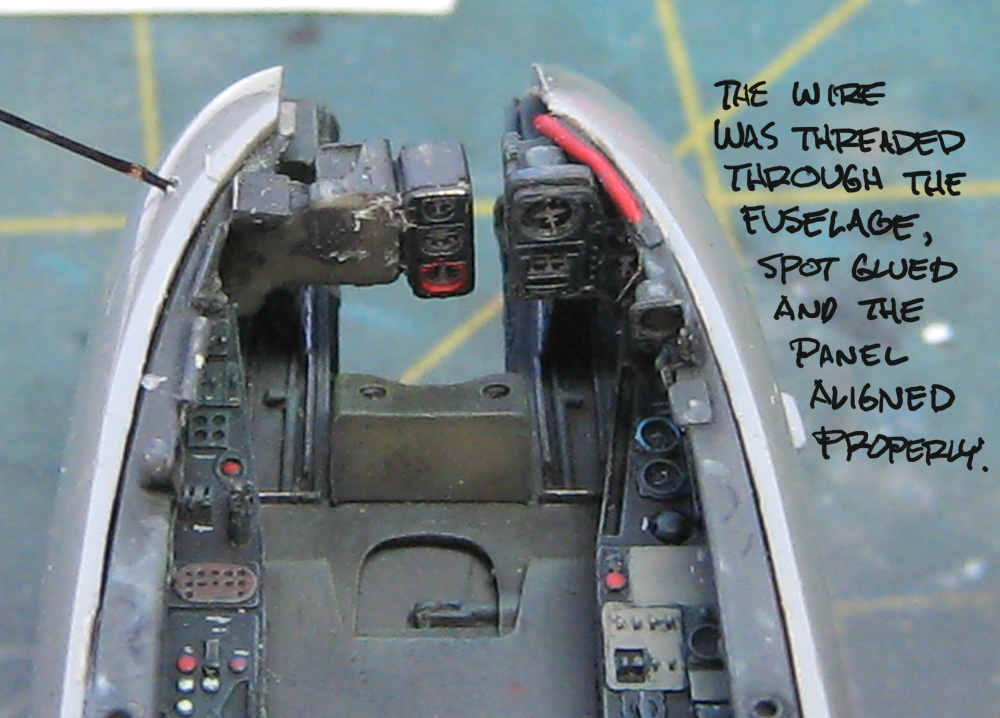
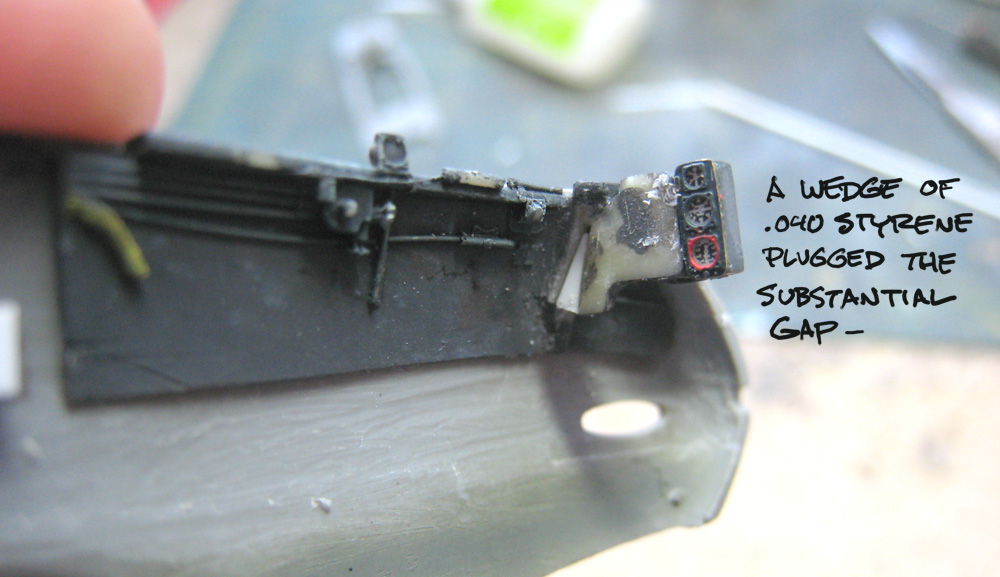
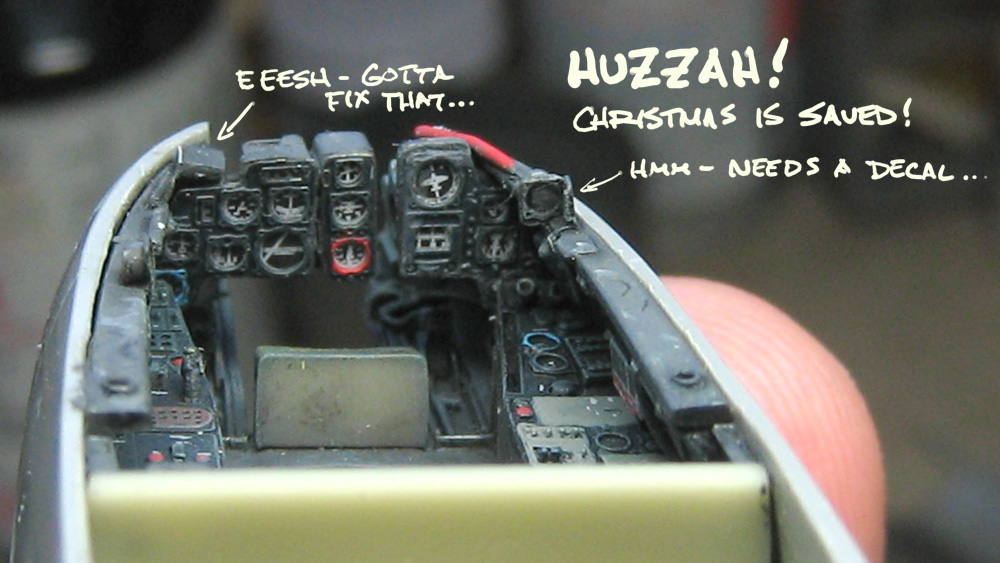
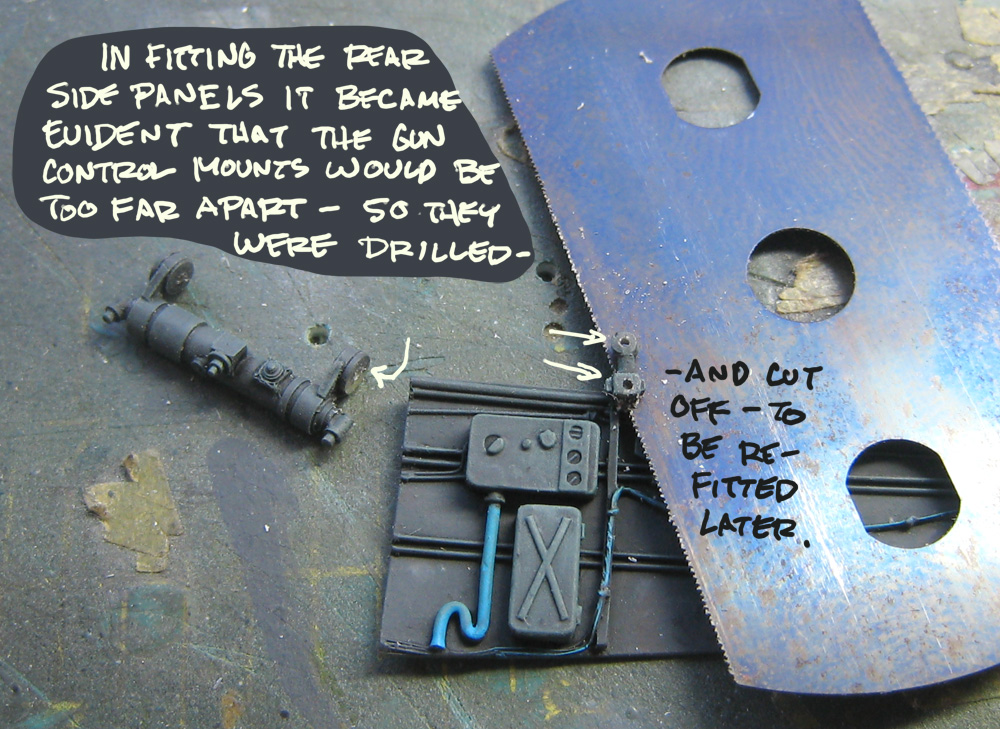
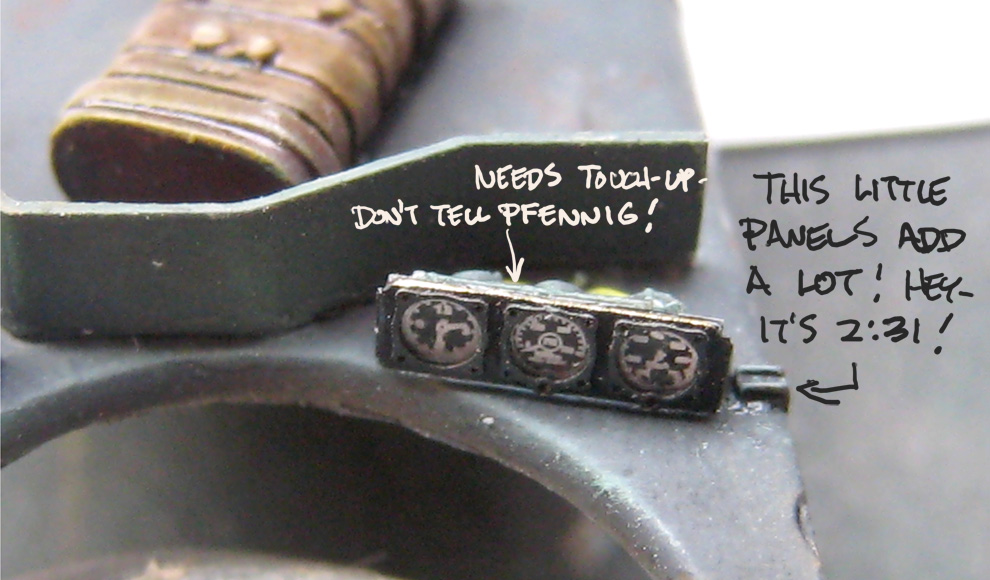
I hear you on the seat belts , I like the added realism but still can't get them to bend the way I want to and this is even after running under a candle flame !!! Looking might fine Chuck , great save on the instrument panel . Bummer that a hole had to be drill into the fuselage side . Looking forward to the next segment !
Cheers

old-dragon
Joined: August 30, 2005
KitMaker: 3,289 posts
AeroScale: 289 posts
Posted: Sunday, May 17, 2009 - 05:29 PM UTC
The plain is nice and all, but I like Pfennig! 
jhoog59
Joined: November 13, 2005
KitMaker: 189 posts
AeroScale: 129 posts
Posted: Monday, May 18, 2009 - 01:06 AM UTC
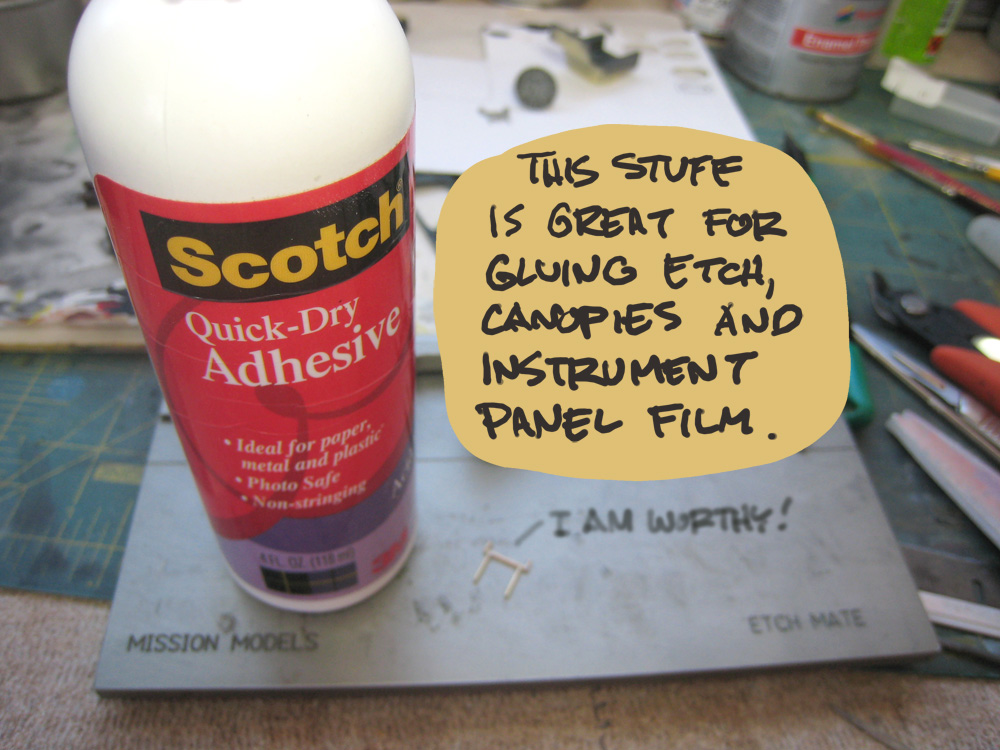
Scotch quik dry adhesive.
Yet another tip that I will have to look into. Thanks Chuck.
Yet another tip that I will have to look into. Thanks Chuck.
 |

WEB HOSTING BY


Copyright ©2021 AeroScale and Kitmaker Network, a subsidiary of Silver Star Enterprises
All Rights Reserved. Please read our Conditions of Use and Privacy Policy.
All Rights Reserved. Please read our Conditions of Use and Privacy Policy.