Air Campaigns
Want to start or join a group build? This is where to start.
Official Sea Plane Campaign Thread
AussieReg
Staff MemberAssociate Editor
AUTOMODELER
#007
_VISITCOMMUNITY
Victoria, Australia
Joined: June 09, 2009
KitMaker: 8,156 posts
AeroScale: 3,756 posts
Posted: Friday, February 12, 2010 - 02:14 AM UTC

Quoted Text

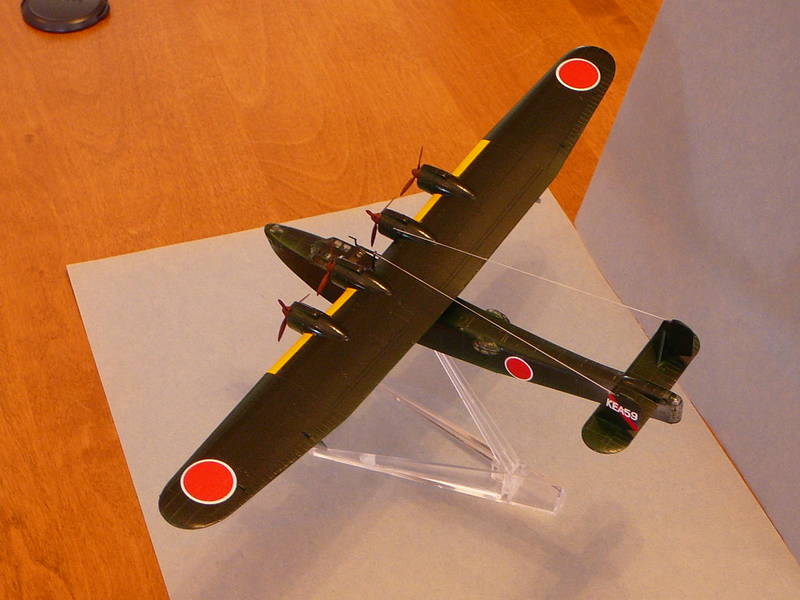
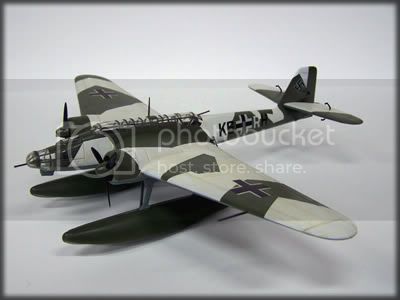
The white part of the cross decal on the port wing is quite see through. Sorry to point this out after you started weathering. Should be easy enough to mask and spray though. I wouldn't even bother with the other side. Just spray a white with a hint of the green colour so it looks like the cross on the opposite wing.

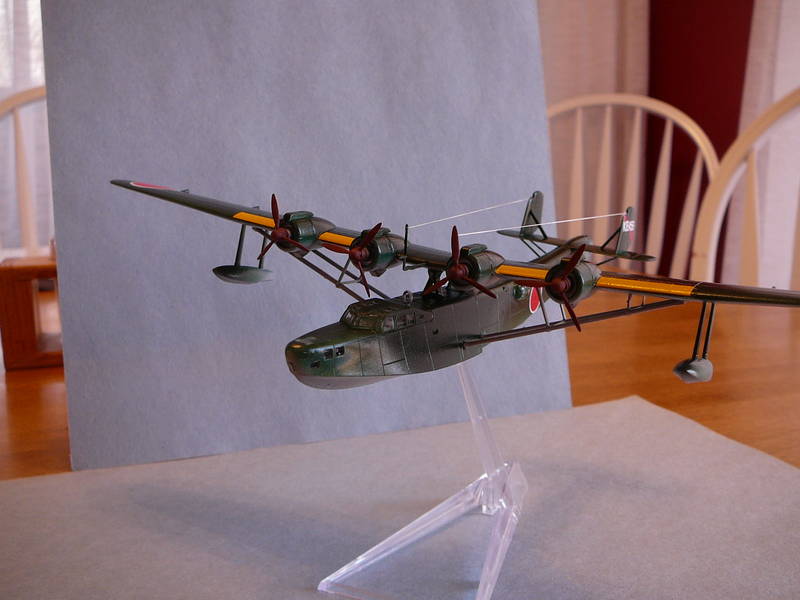
I think it does look great though, really nice clean construction. You never see these getting built either, just stashed.


Thanks Jaypee, funny what you miss when you are just too close to these little critters. I'll have a go at "thickening" the white a bit. I buy'em to build'em. My stash sits at about 30 kits and they will all be built, no intention of letting boxes gather dust !!

@Rob, great choice there. Maybe a Lake Boga dio coming up ??

Cheers, D
JimMrr
_VISITCOMMUNITY
Ontario, Canada
Joined: January 03, 2007
KitMaker: 1,505 posts
AeroScale: 595 posts
Posted: Friday, February 12, 2010 - 03:51 AM UTC
Damian, my suggestion is to even out the wash, and dont worry too much if you think its a bit heavy. use 2 more colours to weather the airframe to break things up a bit, and you can always tie them all together with an oversprayed mistcoat...I find a good mistcoat ties up a paintjob or weathering job nicely...just mask your glazings..not pane by pane, but a general masking..just my humble opinion..
AussieReg
Staff MemberAssociate Editor
AUTOMODELER
#007
_VISITCOMMUNITY
Victoria, Australia
Joined: June 09, 2009
KitMaker: 8,156 posts
AeroScale: 3,756 posts
Posted: Friday, February 12, 2010 - 12:45 PM UTC
Thanks Jim, I was thinking maybe a thin wash of Blue/Grey next, then a seal coat. What colour do you suggest for the mist coat?

Cheers, D
JimMrr
_VISITCOMMUNITY
Ontario, Canada
Joined: January 03, 2007
KitMaker: 1,505 posts
AeroScale: 595 posts
Posted: Wednesday, February 17, 2010 - 10:00 AM UTC
Sorry it took so long for me to reply ... life has been a bit mean lately ..
Choose a neutral colour like light grey and mist it on ....careful not to overdo it..
you may not even notice the first couple coats ...its a gradual thing...then add streaks here and there following the airflow...I usually try to go for 5 different tones on a model if I can( thats tones, not colours)5 seems to be the magic number for painting...for me anyways.
Have a look at Robs post of the Catelina pics ..the first pic in particular I see at least 4 tones right off the top...HTH
29Foxtrot
_VISITCOMMUNITY
Victoria, Australia
Joined: September 19, 2003
KitMaker: 708 posts
AeroScale: 674 posts
Posted: Wednesday, February 17, 2010 - 04:01 PM UTC
Damian,

Another way is to use artist pastels, instead of a wash. Jim made reference to the Catalina OX-D which is the first pic of the wartime pix I posted.
Several years ago I built the PBY 5 Catalina for the RAAF replicating the weathered condition of the photo to the model subject which I did this in 3 ways.

Firstly: Overall Silver finish on the model.
Secondly: Fuselage painted in 'Night Black' from the Xtracolor range, canvas tailplane surfaces painted, in Humbrol 'Matt Black'.
Thirdly: Ocean Blue/Dark Sea Gray, both FADED by adding 10% of Flat White to either mix of the upper main wing surface.

Given a gloss coat to adhere the decals, followed by a Dull Coat, when dry the fuselage was lightly rubbed with an emery board, exposing the 'BMF' as chipped paint, the main upper wing was done in the same fashion then rubbed down with pastels and sealed, smaller parts where then added, (DF Loop and Fuel Drains) and the wing adhered to the fuselage.


Note: This model subject, has the fishtail exhausts and was built for the RAAF and is at RAAF Base Williams, (Not the RAAF Museum).

Hope this helps a little.
AussieReg
Staff MemberAssociate Editor
AUTOMODELER
#007
_VISITCOMMUNITY
Victoria, Australia
Joined: June 09, 2009
KitMaker: 8,156 posts
AeroScale: 3,756 posts
Posted: Wednesday, February 17, 2010 - 08:23 PM UTC
Thanks so much Jim and Rob (stunning Cat too !!). I will be using your advice to finish my build off soon for this campaign, but just at the moment I am packing up to move house next weekend (joy of joys). It will be 2 weeks or so until I get back to the bench

Cheers, D
SGTJKJ
#041
_VISITCOMMUNITY
Kobenhavn, Denmark
Joined: July 20, 2006
KitMaker: 10,069 posts
AeroScale: 3,788 posts
Posted: Thursday, February 18, 2010 - 07:35 AM UTC
Stunning job on the cat, Rob. Great entry in the campaign. I love the weathering.
grayghost666
#021
Joined: August 02, 2007
KitMaker: 2,458 posts
AeroScale: 197 posts
Posted: Thursday, February 18, 2010 - 01:34 PM UTC
Hello Rob,
Great looking "Cat". Thanks for the update and photos. Please make sure you get a photo in the gallery for your ribbon.
Cheers,
Bruce
Keeperofsouls2099
_VISITCOMMUNITY
Florida, United States
Joined: January 14, 2009
KitMaker: 2,798 posts
AeroScale: 2,443 posts
Posted: Thursday, February 18, 2010 - 03:42 PM UTC
Good job on the cat looks really good!


Build On,
Justin
discordian
_VISITCOMMUNITY
New Jersey, United States
Joined: May 28, 2009
KitMaker: 239 posts
AeroScale: 95 posts
Posted: Thursday, March 04, 2010 - 05:21 AM UTC
I put three photos of my Arado Ar 95 in the gallery.
And so I conclude my very first campaign.
grayghost666
#021
Joined: August 02, 2007
KitMaker: 2,458 posts
AeroScale: 197 posts
Posted: Thursday, March 04, 2010 - 10:00 AM UTC

Quoted Text

I put three photos of my Arado Ar 95 in the gallery.
And so I conclude my very first campaign.


Hello Scott,
Congrats on your build and your first completed campaign. I am honored to awarded you your first ribbon at the end of the campaign.
Thanks for joining the campaign,
Cheers,
Bruce
grayghost666
#021
Joined: August 02, 2007
KitMaker: 2,458 posts
AeroScale: 197 posts
Posted: Thursday, March 04, 2010 - 10:10 AM UTC
Hello All,
Does anyone know what happen to the ribbon that was (I think?) on the campaign page.
If it vanished, Can anyone here make me a new one, Please.
Cheers,
Bruce
HARV
#012
_VISITCOMMUNITY
Wyoming, United States
Joined: November 07, 2003
KitMaker: 3,098 posts
AeroScale: 79 posts
Posted: Sunday, March 07, 2010 - 06:41 AM UTC
Hi Bruce.

PM inbound.

HARV
29Foxtrot
_VISITCOMMUNITY
Victoria, Australia
Joined: September 19, 2003
KitMaker: 708 posts
AeroScale: 674 posts
Posted: Tuesday, March 09, 2010 - 04:21 PM UTC
Hi All,

Having decided to build an RAAF 'NOCTURNAL Cat' from the kit, for this campaign and having started on a few minor details (in between other projects), after opening the box I found that a lot of the smaller parts as well as all the wing section parts are worpt or twisted to some degree.
With a little persistence I had painted the cockpit and rear gunner's sidewalls area in the semi gloss black, along with most of the floor plates and other parts of the cockpit, but 'scratched' the floor area with a silver pencil and smugged the pencil marks with a Q tip.
The instrument panel is highlighted using a white Graphite pencil and sealed using an artists pencil and charcoal sealer.


The next sub assemblies are the main undercarriage legs.

Note: Bruce the pix I posted previously of the PBY 5 Catalina, were posted as a guide to assist in a weathering technique as the model was built back in 2003 as part of a contract I have with the RAAF in building models significant to their history.
Sorry if I did not mention that in the original post when i put the pix up.
ludwig113
_VISITCOMMUNITY
England - South East, United Kingdom
Joined: February 05, 2008
KitMaker: 1,381 posts
AeroScale: 1,110 posts
Posted: Monday, March 15, 2010 - 07:15 AM UTC
ok, i'm getting there !.......slowly but i'm getting there.
floats are on,a little bit of touch up , rigging and i'm done.....................so about another 2 months......

mj
_VISITCOMMUNITY
Illinois, United States
Joined: March 16, 2002
KitMaker: 1,331 posts
AeroScale: 325 posts
Posted: Tuesday, March 23, 2010 - 05:43 AM UTC
Well, my Zero Floatplane didn't take a whole lot of time, but my second entry seemed to linger - why is it life always seems to get in the way of modeling?

Anyway, I finally finished my OOB 1/144 scale Trumpeter Kawanishi Type 97 Mavis H6K5/23 Flying Boat. It was a nice build. although the plastic was a bit "softer" than I like to work with. The fit was great, no problems, and the decals looked good and sat down nicely. It doesn't come with a dolly, but with a stand instead, so - that is how she is displayed. It wasn't one of my better builds, in my opinion - just couldn't seem to get into the build, if you know what I mean. But, it's acceptable by my standards, and more importantly - it's in the case! Here are a couple of shots - sorry about the photo quality:


So, two entries for me in this Campaign, and a really fun one it was. Thanks for the chance to participate.

Cheers,
Mike

SGTJKJ
#041
_VISITCOMMUNITY
Kobenhavn, Denmark
Joined: July 20, 2006
KitMaker: 10,069 posts
AeroScale: 3,788 posts
Posted: Wednesday, March 31, 2010 - 02:46 AM UTC
Very nice second entry, Mike. It looks beautiful.

Thanks for sharing
JimMrr
_VISITCOMMUNITY
Ontario, Canada
Joined: January 03, 2007
KitMaker: 1,505 posts
AeroScale: 595 posts
Posted: Monday, April 05, 2010 - 01:52 PM UTC
I love the MAvis ....nice job on her Mike!
Aurora-7
#360
_VISITCOMMUNITY
Connecticut, United States
Joined: June 18, 2003
KitMaker: 1,020 posts
AeroScale: 125 posts
Posted: Friday, April 16, 2010 - 05:24 AM UTC
Beautiful Mavis. I have an unfinished 1/72 Hasegawa that I back-burnered after I started making mods to it.

I was going to do a Pete, then a Glenn but now to combine with another forum build (and keep my builds better managed) I'm going to do an Airfix 1/72 Sunderland. I want to get the PE set for the mid section and detail the bomb racks.

Should make a nice companion piece for my in progress 1/72 flower corvette and yet to be done 1/72 Type VIIC U-Boat.
Keeperofsouls2099
_VISITCOMMUNITY
Florida, United States
Joined: January 14, 2009
KitMaker: 2,798 posts
AeroScale: 2,443 posts
Posted: Friday, April 16, 2010 - 01:06 PM UTC
looks good on the display stand Mj congrats.


Build On,
Justin
AussieReg
Staff MemberAssociate Editor
AUTOMODELER
#007
_VISITCOMMUNITY
Victoria, Australia
Joined: June 09, 2009
KitMaker: 8,156 posts
AeroScale: 3,756 posts
Posted: Saturday, April 17, 2010 - 01:59 PM UTC
Hi all, I'm calling this build done ! I would like to do some more weathering and maybe have a try at my first water base dio down the track sometime, but for now it's on the display shelf.


One of the club guys took a few pics for me, so if you're interested here's a link

Damian's He115

Cheers guys, and thanks for a really good Campaign Bruce
KrisMax
_VISITCOMMUNITY
Queensland, Australia
Joined: January 23, 2010
KitMaker: 156 posts
AeroScale: 139 posts
Posted: Sunday, April 18, 2010 - 12:31 AM UTC
Damian,

What a great model! The paint finish is excellent. Well done. What was the build like (sorry I haven't been following this campaign ) and is the kit easy to come by? I might keep this one in mind for a future build myself.

Simon
AussieReg
Staff MemberAssociate Editor
AUTOMODELER
#007
_VISITCOMMUNITY
Victoria, Australia
Joined: June 09, 2009
KitMaker: 8,156 posts
AeroScale: 3,756 posts
Posted: Sunday, April 18, 2010 - 12:52 AM UTC
Thanks Simon. It's and old (and I mean OLD) Matchbox 3-colour kit that I stumbled across a while back. It went together quite well, but one of the wings was badly squashed in, from poor storage I think rather than during manufacture. There is absolutey no interior detail, which I didn't do anything about as this was an exercise in paint methods for me.

Most of the progress pics are on pages 9-13 of the thread.

Glad you like it, I had a lot of fun with it and am happy with the result.

Cheers, D
Keeperofsouls2099
_VISITCOMMUNITY
Florida, United States
Joined: January 14, 2009
KitMaker: 2,798 posts
AeroScale: 2,443 posts
Posted: Sunday, April 18, 2010 - 10:55 AM UTC
it came out really well congrats D.


Build On,
Justin
SGTJKJ
#041
_VISITCOMMUNITY
Kobenhavn, Denmark
Joined: July 20, 2006
KitMaker: 10,069 posts
AeroScale: 3,788 posts
Posted: Monday, April 19, 2010 - 01:33 AM UTC
Really nice He 115, Damian. I still have my doubts on the historical accuracy of the camouflage, but it came out very nice. You made a great result out an old kit.

Thanks for sharing