

Air Campaigns
Want to start or join a group build? This is where to start.
Want to start or join a group build? This is where to start.
Hosted by Frederick Boucher, Michael Satin
Official Sea Plane Campaign Thread

Tigerbait

Joined: September 28, 2005
KitMaker: 347 posts
AeroScale: 179 posts
Posted: Monday, November 02, 2009 - 09:44 AM UTC
@ Damian ... How are you going to handle the raised panel lines?


VonCuda
Joined: November 28, 2005
KitMaker: 2,216 posts
AeroScale: 1,080 posts
Posted: Monday, November 02, 2009 - 10:09 AM UTC
Ok, here is my kit. I don't actually get the local paper so I had to wait until I got to work today and steal the bosses copy. I know, it isn't mandentory but I wanted to do it anyway.

Hermon
Hermon


JimMrr

Joined: January 03, 2007
KitMaker: 1,505 posts
AeroScale: 595 posts
Posted: Monday, November 02, 2009 - 10:40 AM UTC
The paper is absolutely not mandatory sir,just a fun addition......it gives people in other parts of the world a chance to see whats up in your backyard......but not mandatory at all..

VonCuda
Joined: November 28, 2005
KitMaker: 2,216 posts
AeroScale: 1,080 posts
Posted: Monday, November 02, 2009 - 10:46 AM UTC
Hey Jim, that's why I said "I know it isn't mandentory, but I wanted to do it anyway." 
Hell, I can't even spell mandatory correctly.
Hermon
Hell, I can't even spell mandatory correctly.
Hermon
JimMrr
Joined: January 03, 2007
KitMaker: 1,505 posts
AeroScale: 595 posts
Posted: Monday, November 02, 2009 - 10:50 AM UTC
I must be losing my mind ..I could have sworn you asked if it was mandatory or not 
Mabe I need a big bottle of Scotch ...
Theres a hysteria here in Ontario about this H1N1 flu ...mabe im sick ..lol
Mabe I need a big bottle of Scotch ...
Theres a hysteria here in Ontario about this H1N1 flu ...mabe im sick ..lol
VonCuda
Joined: November 28, 2005
KitMaker: 2,216 posts
AeroScale: 1,080 posts
Posted: Monday, November 02, 2009 - 10:56 AM UTC
Quoted Text
Mabe I need a big bottle of Scotch ...
With all the Scotch being passed around here I'd like to offer my services as the sober back-up campaign leader. I only drink iced tea. Just kidding Jim and Bruce.

Now, if ya'll will excuse me I have a Goose to get started on.

Hermon
JimMrr
Joined: January 03, 2007
KitMaker: 1,505 posts
AeroScale: 595 posts
Posted: Monday, November 02, 2009 - 11:12 AM UTC
Its ironic the headline on your newspaper was about an "interpreter gap"..lol....boy do I feel silly..
Im really interested in seeing your build on the Goose,Hermon. Its a great kit and a great plane ..
Im really interested in seeing your build on the Goose,Hermon. Its a great kit and a great plane ..
VonCuda
Joined: November 28, 2005
KitMaker: 2,216 posts
AeroScale: 1,080 posts
Posted: Monday, November 02, 2009 - 12:15 PM UTC
Here is a shot of the cabin interior. Not much there. I'll try and find some reference pic's and maybe add some detail.

And a shot of where the pilots do their job. I think I can liven it up with some paint and a few knobs and switches made from sprue.

Lucky for me this kit comes with some much needed interior eye candy. This will help out alot.

Well, time to get started!
Hermon
And a shot of where the pilots do their job. I think I can liven it up with some paint and a few knobs and switches made from sprue.
Lucky for me this kit comes with some much needed interior eye candy. This will help out alot.
Well, time to get started!
Hermon

old-dragon
Joined: August 30, 2005
KitMaker: 3,289 posts
AeroScale: 289 posts

Posted: Monday, November 02, 2009 - 04:27 PM UTC
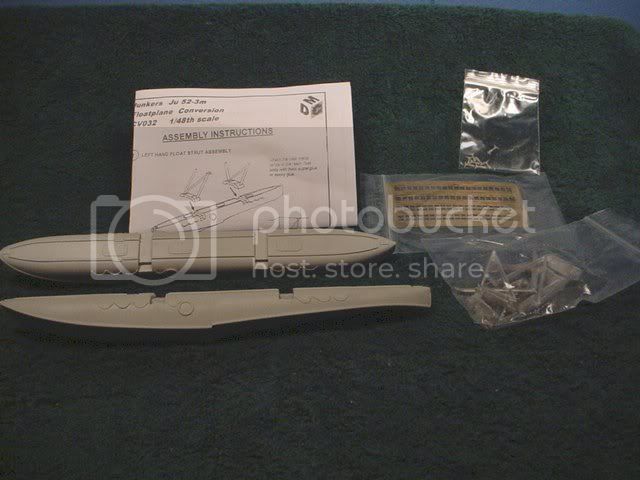
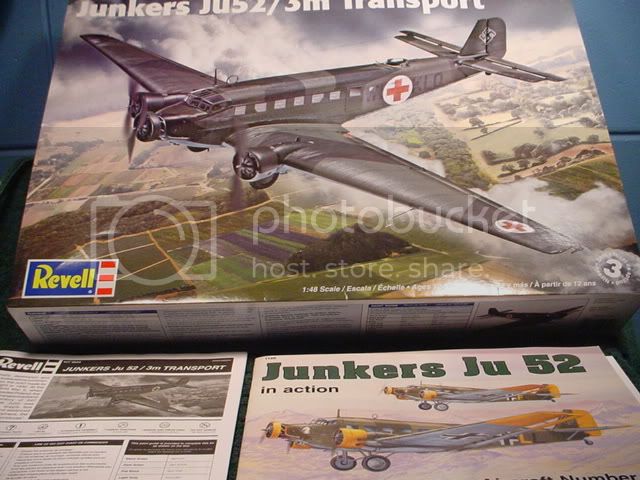
Shoot, off to a bad start since I just remembered about this build! OK folks, here's my build of a 1/48 scale Ju52 float plane. The revell kit and resin floats for your viewing enjoyment...and my work ahead. I forgot I never got the correct decals for this plane...good thing I have time!

Keeperofsouls2099
Joined: January 14, 2009
KitMaker: 2,798 posts
AeroScale: 2,443 posts
Posted: Monday, November 02, 2009 - 04:38 PM UTC
its going to be interesting to see how that one turns out dragon. theres alot of great
builds going cant wait to start.almost done with my F4U-1 IM COMING........
Build on,
Justin
builds going cant wait to start.almost done with my F4U-1 IM COMING........
Build on,
Justin


Merlin

#017


Joined: June 11, 2003
KitMaker: 17,582 posts
AeroScale: 12,795 posts

Posted: Monday, November 02, 2009 - 08:00 PM UTC
Quoted Text
OK folks, here's my build of a 1/48 scale Ju52 float plane. The revell kit and resin floats for your viewing enjoyment...and my work ahead. I forgot I never got the correct decals for this plane...good thing I have time!
Hi Bob
That's going to be a HUGE model! I'm really looking forward to seeing how your build turns out.
I probably won't make a start on my Widgeon for a while yet - certainly until I get a couple of other builds safely out of the way (otherwise, I know what'll happen - I'll get distracted, lose interest, and won't finish any of them!
)All the best
Rowan


JimMrr
Joined: January 03, 2007
KitMaker: 1,505 posts
AeroScale: 595 posts
Posted: Monday, November 02, 2009 - 11:33 PM UTC
wow ...very cool Bob!
I have finished most of the structural improvements in the cockpit area..now im moving on to the insturmentations and whatnot..Ill post a pic before I paint it up..
I have finished most of the structural improvements in the cockpit area..now im moving on to the insturmentations and whatnot..Ill post a pic before I paint it up..

litespeed

Joined: October 15, 2009
KitMaker: 1,976 posts
AeroScale: 1,789 posts
Posted: Tuesday, November 03, 2009 - 10:48 AM UTC

Sorry about the lack of newspaper, hope the circular from the local supermarket will do. The box and transfers are very mildewy. Ive started with the cockpit, gluing some copper wire to represent the frame work. Not sure about the interior colours as there are so many variations. This looks a great kit despite the age and multicoloured plastic. Looks like the sweet selection at the local cinema!
Anyway I am underway.
tim

JimMrr
Joined: January 03, 2007
KitMaker: 1,505 posts
AeroScale: 595 posts
Posted: Tuesday, November 03, 2009 - 10:54 AM UTC
Thats really neat the way youve done the internal structure Tim. I love seeing old"moldy" kits tweaked up with bits and bobs like youve done there ...cool
old-dragon
Joined: August 30, 2005
KitMaker: 3,289 posts
AeroScale: 289 posts
Posted: Tuesday, November 03, 2009 - 12:45 PM UTC
Quoted Text
Quoted TextOK folks, here's my build of a 1/48 scale Ju52 float plane. The revell kit and resin floats for your viewing enjoyment...and my work ahead. I forgot I never got the correct decals for this plane...good thing I have time!
Hi Bob
That's going to be a HUGE model! I'm really looking forward to seeing how your build turns out.
I probably won't make a start on my Widgeon for a while yet - certainly until I get a couple of other builds safely out of the way (otherwise, I know what'll happen - I'll get distracted, lose interest, and won't finish any of them!
All the best
Rowan
I have 6 1/18 scale birds hangin from the ceiling already...this one will fit in just fine.
VonCuda
Joined: November 28, 2005
KitMaker: 2,216 posts
AeroScale: 1,080 posts
Posted: Tuesday, November 03, 2009 - 12:53 PM UTC
Little update on the Goose. OK, don't laugh. I'm not the best scratch builder in the world but it's better than nothing. 1st pic is fuselage interior so far. I used some 1/4 round to simulate ribbing and sanded off the ejector pin marks. The cockpit is all resin so I won't bother there. 2nd pic I drilled out the instrument panel gauges. I'll back them with white plasticard and put a drop of Future in each hole. Should be OK.


That's all for now. Tonight is Biggest Loser night and viewing is mandantory in my house.
Hey Bob, I swear man.......you have the coolest stuff in your stash. We're gonna have to do some trading some time.
Hermon
That's all for now. Tonight is Biggest Loser night and viewing is mandantory in my house.
Hey Bob, I swear man.......you have the coolest stuff in your stash. We're gonna have to do some trading some time.
Hermon
JimMrr
Joined: January 03, 2007
KitMaker: 1,505 posts
AeroScale: 595 posts
Posted: Wednesday, November 04, 2009 - 04:44 AM UTC
Here is my update:cockpit dressings....


The kits steering column was salvageable ..I kept the wheels and the main column..but I tweaked it a bit
Im still working on the steering mechanisms..I must be slow because it makes no sense to me how the plans show the co-pilots foot pedals to be up so high, and blocking the walkway to boot..hmmnnn..
Keeperofsouls2099
Joined: January 14, 2009
KitMaker: 2,798 posts
AeroScale: 2,443 posts
Posted: Wednesday, November 04, 2009 - 05:51 AM UTC
Good work jim.I finished my F4U so im going to take a break and then start my PBY
Lots of interesting builds going on.
Now I just need to figure out where im going to put mine when its done
Build on,
Justin
Lots of interesting builds going on.
Now I just need to figure out where im going to put mine when its done
Build on,
Justin
JimMrr
Joined: January 03, 2007
KitMaker: 1,505 posts
AeroScale: 595 posts
Posted: Wednesday, November 04, 2009 - 06:09 AM UTC
hey justin....just adopt it out to a LHS ....they are usually happy to have local modellers work in their display cases ..especially if it is of a kit that is still for sale ...it helps them sell stuff!

Emeritus

Joined: March 30, 2004
KitMaker: 2,845 posts
AeroScale: 1,564 posts
Posted: Wednesday, November 04, 2009 - 07:42 AM UTC
Oh, I hadn't actually enlisted and I was just about to start making my first WIP post of my entry. Well, that's taken care of, I'm officially in now.
So on to the entry of mine then. Yes yes, I admit I have a whole bunch of projects underway, in various stages of completion. Just thinking that a nice & simple Japanese mainstream kit built and finished (well, almost...) straight from the box might be just what's needed to me going again and tackling those other projects.
As I probably mentioned in the postman thread, here's what I'm going to build: Fine Molds' 1:48 scale Curtiss R3C-0 seaplane racer, from the Hayao Miyazaki film Porco Rosso.
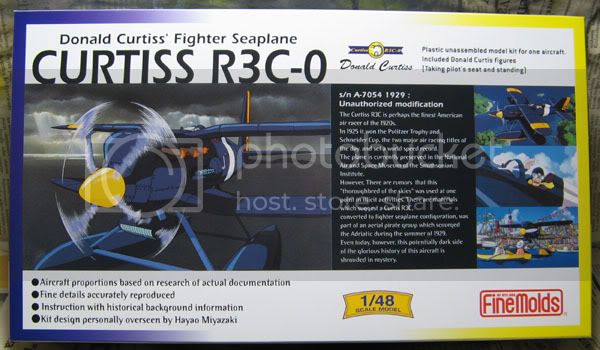
Piloted by the errol flynn'esque character Donald Curtiss, the aircraft in the film differed from from the real-life R3C with the addition of two machine guns in the fuselage and the lack of rigging wires.
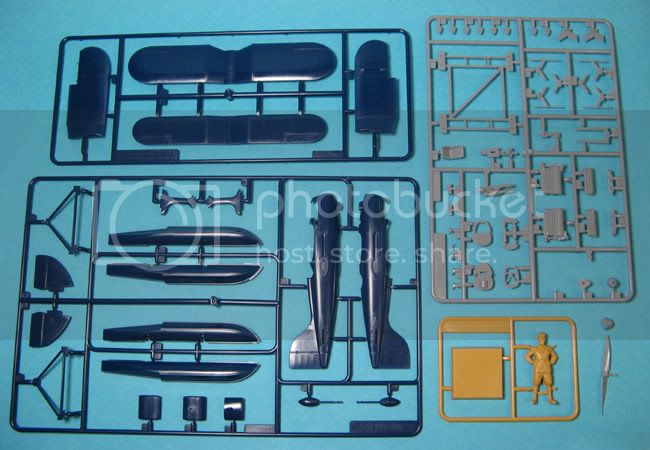
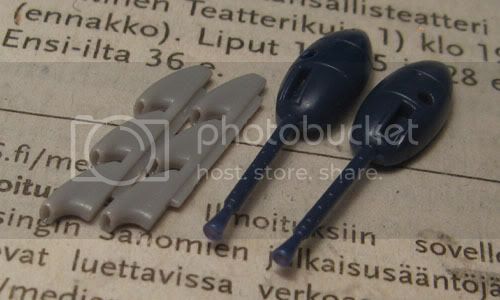
Moulded in (unnecessarily, if you ask me) three colours of styrene in addition to the usual clear for the single-piece canopy, the kit is a typical mainstream kit from Japan. Very clean moulding, nice and crisp details, somewhat hard styrene used though. The kit features a full engine, a beaching dolly, as well as two figures, one in 1:48 scale to be placed in the kit, and a larger one, probably about 1:35.
Decals follow the trend of most Japanese manufacturers: good printing and alignment, but the decal film seems a bit thick, at least on the sheet.

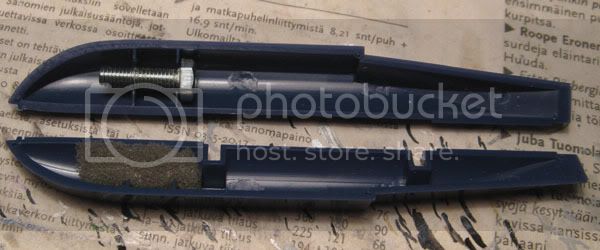
Packaged in the same bag with the decal sheet is the single small clear sprue containing windscreen, grommets for holding the propeller in place, and two hefty screws to be trapped inside the float halves to prevent tail sitting.

After the usual washing of sprues, I kicked off the build by assembling the upper wing, engine, floats, and did some of the few improvements I had in mind.
Not much to say of the first two, everything fitting as advertised.
The aforementioned screws didn't fit inside the float halves as tightly as I would have liked. While the float halves were perfectly adequately designed to hold the screw in the front, I'd rather not have models that rattle while handled, so I tried supergluing the screws in place. With not much gluing surface for them, that attempt failed, so I simply used small pieces of superlon foam rubber to snugly hold the screws in place.
The rear face of the under-chin radiator was blank, so I superglued some copper wire mesh there.
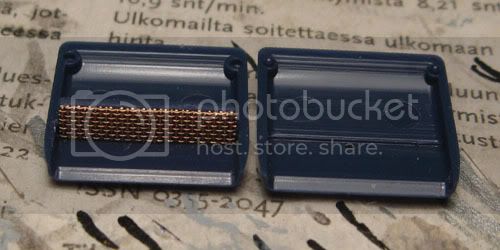
While I was at it, I also drilled out the machine gun barrels and exhaust pipes.
Ps. Steffen, you up for that duel? The glove has been thrown!
So on to the entry of mine then. Yes yes, I admit I have a whole bunch of projects underway, in various stages of completion. Just thinking that a nice & simple Japanese mainstream kit built and finished (well, almost...) straight from the box might be just what's needed to me going again and tackling those other projects.
As I probably mentioned in the postman thread, here's what I'm going to build: Fine Molds' 1:48 scale Curtiss R3C-0 seaplane racer, from the Hayao Miyazaki film Porco Rosso.
Piloted by the errol flynn'esque character Donald Curtiss, the aircraft in the film differed from from the real-life R3C with the addition of two machine guns in the fuselage and the lack of rigging wires.
Moulded in (unnecessarily, if you ask me) three colours of styrene in addition to the usual clear for the single-piece canopy, the kit is a typical mainstream kit from Japan. Very clean moulding, nice and crisp details, somewhat hard styrene used though. The kit features a full engine, a beaching dolly, as well as two figures, one in 1:48 scale to be placed in the kit, and a larger one, probably about 1:35.
Decals follow the trend of most Japanese manufacturers: good printing and alignment, but the decal film seems a bit thick, at least on the sheet.
Packaged in the same bag with the decal sheet is the single small clear sprue containing windscreen, grommets for holding the propeller in place, and two hefty screws to be trapped inside the float halves to prevent tail sitting.
After the usual washing of sprues, I kicked off the build by assembling the upper wing, engine, floats, and did some of the few improvements I had in mind.
Not much to say of the first two, everything fitting as advertised.
The aforementioned screws didn't fit inside the float halves as tightly as I would have liked. While the float halves were perfectly adequately designed to hold the screw in the front, I'd rather not have models that rattle while handled, so I tried supergluing the screws in place. With not much gluing surface for them, that attempt failed, so I simply used small pieces of superlon foam rubber to snugly hold the screws in place.
The rear face of the under-chin radiator was blank, so I superglued some copper wire mesh there.
While I was at it, I also drilled out the machine gun barrels and exhaust pipes.
Ps. Steffen, you up for that duel? The glove has been thrown!

AussieReg
#007

Joined: June 09, 2009
KitMaker: 8,156 posts
AeroScale: 3,756 posts
Posted: Wednesday, November 04, 2009 - 08:21 AM UTC
Wow, some great work going on here already !! I have a couple on the bench to finish off for other campaigns before I get cracking on this one otherwise I might end up with a P-47 floatplane or a 3-engine Fiat G-50, there are just so many bits floating around on there at the moment.
I am really enjoying this campaign already and I haven't cut a single piece off the sprue yet !!
Cheers, D
I am really enjoying this campaign already and I haven't cut a single piece off the sprue yet !!
Cheers, D

JimMrr
Joined: January 03, 2007
KitMaker: 1,505 posts
AeroScale: 595 posts
Posted: Wednesday, November 04, 2009 - 10:24 AM UTC
There is alot of inertia and positive energy flowing here for sure!
Some really neat stuff being built guys!
heres my panel done ...I like the compass


The control yoke and footpedals....the green rod for the footpedals is stretched sprue..the rest is evergreen stock..

Some really neat stuff being built guys!
heres my panel done ...I like the compass
The control yoke and footpedals....the green rod for the footpedals is stretched sprue..the rest is evergreen stock..
Keeperofsouls2099
Joined: January 14, 2009
KitMaker: 2,798 posts
AeroScale: 2,443 posts
Posted: Wednesday, November 04, 2009 - 12:46 PM UTC
Nice work jim.started PBY with the seats will post pics soon.
Build on,
Justin
Build on,
Justin

jaypee

Joined: February 07, 2008
KitMaker: 1,699 posts
AeroScale: 1,384 posts

Posted: Wednesday, November 04, 2009 - 10:57 PM UTC
Wow Jim you really are in the zone just now.
My Pegasus engines arrived from aeroclub. Pretty nicely moulded but they are the whole cowling.
I could use them and perhaps I'm better too. But I feel I owe it to the previous builder to use as much
as their stuff as I can. A bit more work for me but is more what I want to do with this kit.
Here is what aeroclub provide. Front cowl, rear cowl and hedgehog exhaust in white metal. Middle cowling and engine in one piece of resin. Quite nice but a fair bit of sanding and filling to get a nice cowl.
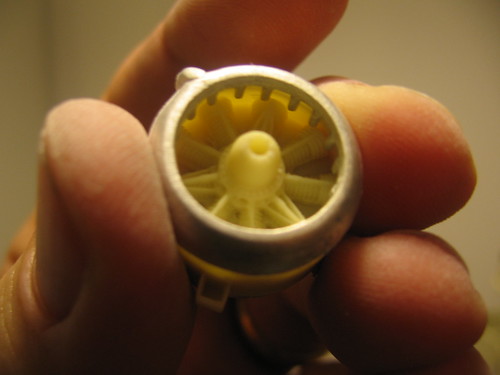
And here is what I did to one of the engines. Ouch!
That's a RB productions saw. It is magic!
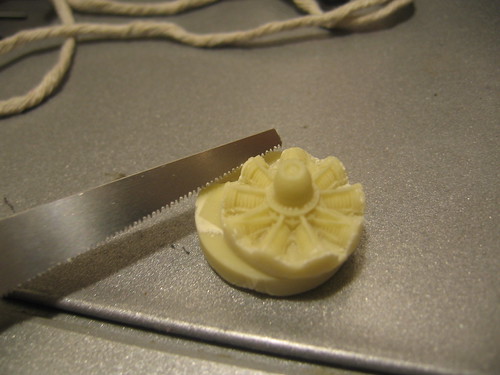
And here is it installed into the custom made cowling.
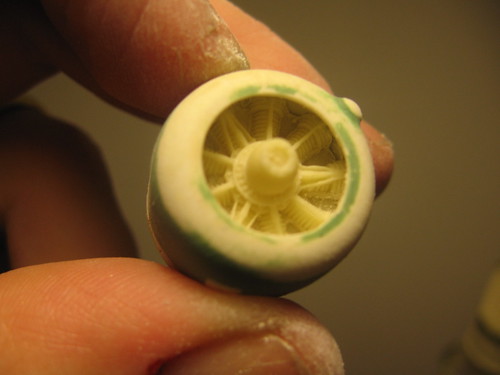
Only 3 more to go. I'll spare you all the pics
My Pegasus engines arrived from aeroclub. Pretty nicely moulded but they are the whole cowling.
I could use them and perhaps I'm better too. But I feel I owe it to the previous builder to use as much
as their stuff as I can. A bit more work for me but is more what I want to do with this kit.
Here is what aeroclub provide. Front cowl, rear cowl and hedgehog exhaust in white metal. Middle cowling and engine in one piece of resin. Quite nice but a fair bit of sanding and filling to get a nice cowl.
And here is what I did to one of the engines. Ouch!
That's a RB productions saw. It is magic!
And here is it installed into the custom made cowling.
Only 3 more to go. I'll spare you all the pics


alpha_tango

Joined: September 07, 2005
KitMaker: 5,609 posts
AeroScale: 5,231 posts
Posted: Wednesday, November 04, 2009 - 11:23 PM UTC
Quoted Text
Ps. Steffen, you up for that duel? The glove has been thrown!
I think I stay out of this.
all the best
Steffen

 |

WEB HOSTING BY


Copyright ©2021 AeroScale and Kitmaker Network, a subsidiary of Silver Star Enterprises
All Rights Reserved. Please read our Conditions of Use and Privacy Policy.
All Rights Reserved. Please read our Conditions of Use and Privacy Policy.