OFFICAL: Camm-paign, Sir Sydney Camm Campaign

#041
Kobenhavn, Denmark
Joined: July 20, 2006
KitMaker: 10,069 posts
AeroScale: 3,788 posts
Posted: Monday, August 15, 2011 - 10:19 AM UTC
Thanks for the comment, Damian. What Matchbox kits lack in details, they make up for in nostalgia

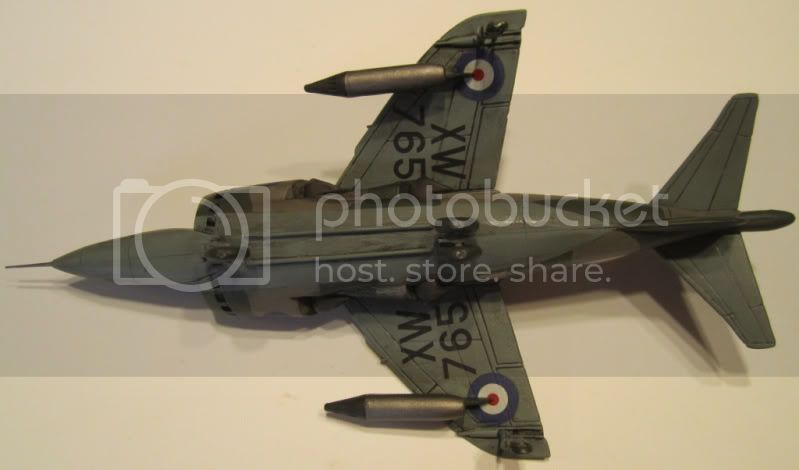
I have made a little more progress on the harrier. I decided to do the standard camouflage and not do the winter white wash. However, I might still change my mind.
More to follow


Campaign'oholic - 252+ campaigns completed

#305
Christchurch, New Zealand
Joined: February 01, 2006
KitMaker: 1,673 posts
AeroScale: 1,517 posts
Posted: Monday, August 15, 2011 - 10:49 AM UTC
@Jesper: Nice work on that camo job is it hand painted or sprayed? Because I think it's hand painted and you've done a damn fine job of it! Go on winterise it you know you WANT to!
@Tomcat: The email has arrived and I've printed the instructions on my printer in A3 (I have an understanding wife who let me get a printer that scans and prints in A3) They're nicely clear and blemish free and will do very nicely thanks! Does Camo want the decals from my kit? Since I'll be doing it as a Swiss Hunter I've no need of them? Or would anybody else have a use for them? I've been shown such generosity and I'd like to pass it forward if I can.
@Sebastian: I'm all set to build, however I'll need to get the updated ejected shell catchers with the Flare/Chaff dispensers. Does anyone know if there are resin upgrades/replacements for them?
British Columbia, Canada
Joined: September 03, 2009
KitMaker: 6,965 posts
AeroScale: 6,247 posts
Posted: Monday, August 15, 2011 - 02:02 PM UTC
Quoted Text
I have made a little more progress on the harrier. I decided to do the standard camouflage and not do the winter white wash. However, I might still change my mind.
So do a litle vignette of a couple Erks applying the whitewash with one side of it washed and the other not done yet. That way you can turn it around and see whichever scheme you feel like

When once you have tasted flight you will walk the Earth with your eyes turned skyward.
For there you have been, and there you will always long to return.
-Leonardo Da Vinci
AussieReg
 Associate Editor
#007
Victoria, Australia
Joined: June 09, 2009
KitMaker: 8,156 posts
AeroScale: 3,756 posts
Posted: Monday, August 15, 2011 - 11:16 PM UTC
ON the bench
Revell 1/24 '53 Corvette (building as '54)
Revell 1/24 BMW 507 Coupe and Cabrio
Italeri 1/48 Me262 B-1a/U1 Nightfighter
Monogram 1/24 '57 Chevy Nomad
Dragon 1/350 USS Frank Knox DD-742

#305
Christchurch, New Zealand
Joined: February 01, 2006
KitMaker: 1,673 posts
AeroScale: 1,517 posts
Posted: Tuesday, August 16, 2011 - 12:44 AM UTC
@Aussie: Awesome just awesome! The Aussie Furies always look good in that royal blue! Nice job fella!

#042
England - North East, United Kingdom
Joined: November 18, 2006
KitMaker: 2,828 posts
AeroScale: 1,720 posts
Posted: Tuesday, August 16, 2011 - 03:55 AM UTC
Quoted Text
@Tomcat: The email has arrived and I've printed the instructions on my printer in A3 (I have an understanding wife who let me get a printer that scans and prints in A3) They're nicely clear and blemish free and will do very nicely thanks! Does Camo want the decals from my kit? Since I'll be doing it as a Swiss Hunter I've no need of them? Or would anybody else have a use for them? I've been shown such generosity and I'd like to pass it forward if I can.
Glad you received them OK. Sam says thank you for the offer but she's planning on doing Miss Demeanor or one of the concepts for that scheme. I've sent you an email with regards to the shell catchers. In the mean time have you thought of using any etch? Flightpath do some huge sets for the 32nd Hunter
Link to Flightpath Modellers Creed: This is my toolbox. There are many like it, but this one is mine. My toolbox is my best friend. It is my life. I must master it as I must master my life. My toolbox, without me, is useless. Without my toolbox, I am useless.

#305
Christchurch, New Zealand
Joined: February 01, 2006
KitMaker: 1,673 posts
AeroScale: 1,517 posts
Posted: Tuesday, August 16, 2011 - 05:43 PM UTC
@Tomcat: Surprisisngly enough I've picked up a resin cockpit and I've been toying with the idea of an exterior set of etch but it depends on how much my A.M.S. flares up.


#041
Kobenhavn, Denmark
Joined: July 20, 2006
KitMaker: 10,069 posts
AeroScale: 3,788 posts
Posted: Wednesday, August 17, 2011 - 10:03 AM UTC
Beautiful Fury, Damian!
Thanks for the comments, Jessie and Chris. The camouflage is hand painted. On these small models I often find it more fun to hand paint them than to mask and spray.
It gets one lightly thinned coat of each colour followed by an even thinner coat. That often leaves out any streaks and gives a nice consistent tone to each colour.
Yesterday I added the decals and when they were dry I wanted to add a wash to take advantage of those trench like engraved lines. It ended up as a big disaster.
The decals sucked in the colour of the wash - probably due to their age and very small cracks/holes in the top varnish on the decals. Some of them just ended up being dark brown squares.

The decal in the picture is the best looking of the decals......
Luckily the kit comes with a choice of UK decals as well. So if I can get the old US decals off, I can just reapply UK decals. I did not succeed yesterday, but I left the kit to soak all day in water so hope the US decals will lift.
Otherwise this build is going in the trash pile

More to follow


Campaign'oholic - 252+ campaigns completed
British Columbia, Canada
Joined: September 03, 2009
KitMaker: 6,965 posts
AeroScale: 6,247 posts
Posted: Wednesday, August 17, 2011 - 11:06 AM UTC
Try Micro Sol or vinegar to help soak the decals off. You may need to resort to sanding and repainting to get everything off.
When once you have tasted flight you will walk the Earth with your eyes turned skyward.
For there you have been, and there you will always long to return.
-Leonardo Da Vinci

#041
Kobenhavn, Denmark
Joined: July 20, 2006
KitMaker: 10,069 posts
AeroScale: 3,788 posts
Posted: Thursday, August 18, 2011 - 06:20 AM UTC
Thanks for the tip, Jessie.
When I came home the water had lifted the decals so much I could scrub them of. I will need to retouch the camouflage again and start the weathering all over, but it is better than scrapping the kit altogether.
More to follow


Campaign'oholic - 252+ campaigns completed
Scotland, United Kingdom
Joined: February 07, 2008
KitMaker: 1,699 posts
AeroScale: 1,384 posts
Posted: Friday, August 19, 2011 - 03:33 AM UTC
hey hey looks like the yanks are selling us harriers back. I like the stars/bars area left. Could do this as a decommissioned civvy one.
I got out of my torpor by spraying the roundels using mals masks. easy as pie. The great unpeeling this evening will be photographed and posted here.
I'm hoping the crisp clean roundels will inspire me to getting this Fury done. The smell of iso propyl and windex has my juices flowing again though. Maybe it is just the fumes tho

Ontario, Canada
Joined: November 14, 2009
KitMaker: 270 posts
AeroScale: 264 posts
Posted: Friday, August 19, 2011 - 10:22 AM UTC
Haven't been modelling much this summer, but I finally sat back down a couple weeks ago and made some progress on the Academy Tempest mkV. Just got some pictures as I'd been digicam-less for a couple weeks due to a hardware failure (props to Sony for a quick repair).
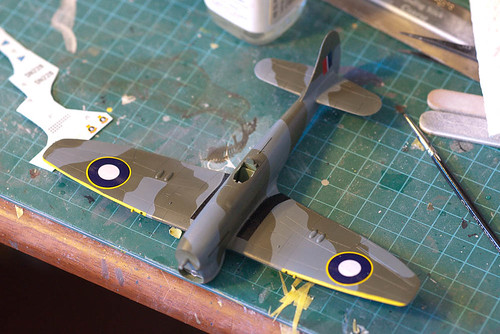 Academy Tempest Mk V 1/72
 by
mawz_models, on Flickr
 Academy Tempest Mk V 1/72
 by
mawz_models, on Flickr
It should be done in a day or two.
The Special Hobby Tempest mkII on the other had is not going to be completed anytime soon. I need a proper dremel to get the wheel bays to fit and I've only got a cheapo cordless unit with a dying battery.
Scotland, United Kingdom
Joined: February 07, 2008
KitMaker: 1,699 posts
AeroScale: 1,384 posts
Posted: Friday, August 19, 2011 - 07:33 PM UTC
Excellent tiffie!
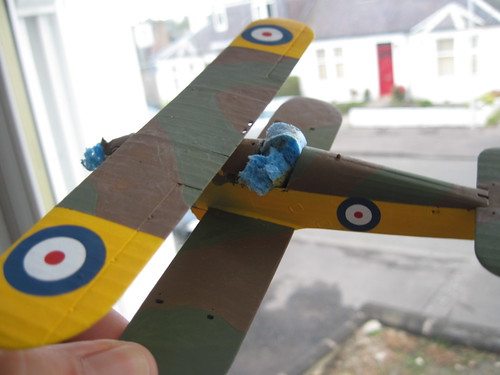
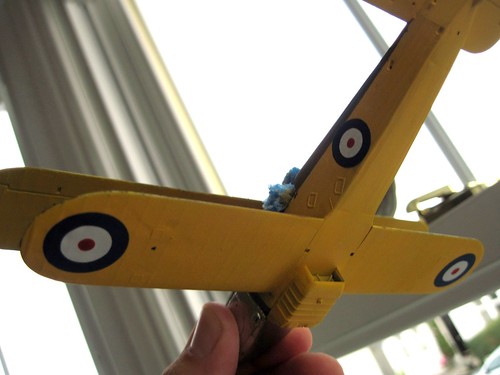
The roundels turned out beautifully. Now, on with the show. Got a couple of quiet hours later today to work on this.

#305
Christchurch, New Zealand
Joined: February 01, 2006
KitMaker: 1,673 posts
AeroScale: 1,517 posts
Posted: Friday, August 19, 2011 - 09:08 PM UTC
Nice work JP coming along very nicely! Going to rig it as well?? LOL or am I just swearing at you now? I've only rigged one aircraft so far and that was the Hobbycraft Camel..... turned out really well though for a first attempt. But I've got so many WW2 biplanes to build I need the practice! Can't wait to see it finished!
@Adam: Nice work on the tempest fella! Who's aircraft are you doing? I did Evans aircraft EDM I think that's one of the options isn't it? I did it this time in 1/48 though!
England - North East, United Kingdom
Joined: October 20, 2005
KitMaker: 1,045 posts
AeroScale: 622 posts
Posted: Saturday, August 20, 2011 - 01:46 AM UTC
Angel by day, Devil by night

#305
Christchurch, New Zealand
Joined: February 01, 2006
KitMaker: 1,673 posts
AeroScale: 1,517 posts
Posted: Saturday, August 20, 2011 - 03:07 AM UTC
Nicely done Sam ..... looks sufficiently war weary and well used. I know what you mean about those wing folds I did mine folded and had the devils own job to get them to sit right and I also had a decaling mishap with the wing coming adrift from all that handling! Ah well lesson learned decal first then finish putting it together!
Ontario, Canada
Joined: November 14, 2009
KitMaker: 270 posts
AeroScale: 264 posts
Posted: Saturday, August 20, 2011 - 04:21 AM UTC
@Chris: I'm also doing EDM, although a later version thereof with the coat of arms on the tail. The other box option is for Closterman, but I've got something of an aversion to him so WCmdr Mackie it is.
Ran into a little snag though, it seems I've misplaced the undercarriage legs. Thankfully these are cheap kits, I'll just buy another for replacements and build that one up in flight at some point.

#305
Christchurch, New Zealand
Joined: February 01, 2006
KitMaker: 1,673 posts
AeroScale: 1,517 posts
Posted: Saturday, August 20, 2011 - 10:52 AM UTC
Funny you should say that Adam I do too, I can't say why but I just don't like building his aircraft. Perhaps it's because I've seen it ad nauseam since I was a kid. LOL besides I must admit to liking building anything that has to do with New Zealanders and the air war in WW2!

#041
Kobenhavn, Denmark
Joined: July 20, 2006
KitMaker: 10,069 posts
AeroScale: 3,788 posts
Posted: Saturday, August 20, 2011 - 12:33 PM UTC
Campaign'oholic - 252+ campaigns completed
AussieReg
 Associate Editor
#007
Victoria, Australia
Joined: June 09, 2009
KitMaker: 8,156 posts
AeroScale: 3,756 posts
Posted: Saturday, August 20, 2011 - 12:50 PM UTC
Beautiful job Jesper, well done on the recovery from the decal disaster !
Cheers, D
ON the bench
Revell 1/24 '53 Corvette (building as '54)
Revell 1/24 BMW 507 Coupe and Cabrio
Italeri 1/48 Me262 B-1a/U1 Nightfighter
Monogram 1/24 '57 Chevy Nomad
Dragon 1/350 USS Frank Knox DD-742

#041
Kobenhavn, Denmark
Joined: July 20, 2006
KitMaker: 10,069 posts
AeroScale: 3,788 posts
Posted: Sunday, August 21, 2011 - 03:33 PM UTC
Thanks for the comment, Damian. I am satisfied with the end result - especially considering I actually had placed it in the garbage can at some point, but changed my mind and gave it another try.
Many cool builds in this campaign. Looking forward to see the gallery when the campaign ends.

Campaign'oholic - 252+ campaigns completed
Ontario, Canada
Joined: November 14, 2009
KitMaker: 270 posts
AeroScale: 264 posts
Posted: Sunday, August 21, 2011 - 04:00 PM UTC
And almost done:
 Academy Tempest Mk V 1/72
 by
mawz_models, on Flickr
Just waiting for the gasbags & prop spinner to dry, then I'll pop those on, dullcote and add the canopy
Ontario, Canada
Joined: November 14, 2009
KitMaker: 270 posts
AeroScale: 264 posts
Posted: Monday, August 22, 2011 - 03:30 PM UTC

#305
Christchurch, New Zealand
Joined: February 01, 2006
KitMaker: 1,673 posts
AeroScale: 1,517 posts
Posted: Monday, August 22, 2011 - 07:21 PM UTC
And Very nicely done it is too Adam! Nice job I built this kit a couple of years ago and was amazed at how well it fit, how much detail there was in it and just how GOOD the price was!

#042
England - North East, United Kingdom
Joined: November 18, 2006
KitMaker: 2,828 posts
AeroScale: 1,720 posts
Posted: Monday, August 22, 2011 - 11:49 PM UTC
Nicely done Adam, any chance we could have photo on a plain background so we can use it for the photo feature that'll be done when the campaign finishes?
Modellers Creed: This is my toolbox. There are many like it, but this one is mine. My toolbox is my best friend. It is my life. I must master it as I must master my life. My toolbox, without me, is useless. Without my toolbox, I am useless.


 The decal in the picture is the best looking of the decals......


