World War II
Discuss WWII and the era directly before and after the war from 1935-1949.
Hosted by Rowan Baylis
What lately left my assembly line
BlackWidow
_VISITCOMMUNITY
European Union
Joined: August 09, 2009
KitMaker: 1,732 posts
AeroScale: 1,336 posts
Posted: Friday, June 17, 2016 - 02:33 AM UTC
Another small build for last weeks expo in Mannheim is nothing with wings but important to keep the wings flying. It's the Albion AM 463 3-Point Fueller from Airfix, of course again in quarterscale ....


.... at the outbreak of WW 2 the Royal Air Force utilised one main truck for its refuelling needs, the Albion AM 463. This vehicle was chosen after a number of trials in the early 1930's, as the Air Ministry searched for a truck whose chassis would be able to perform a number of roles. The AM 463 was therefore used not only as a tanker, but also for a variety of roles including that of ambulance. By the outbreak of war over 400 wére in use with the RAF both in Europe and the Far and Middle East. Many went to France with the RAF in 1940 and suffered a similar fate to the vehicles of the British Army, being abandoned on the run back to Dunkirk. Those that remained gave sterling service during the Battle of Brítain, helping to quickly refuel fighters in between sorties, their three refuelling hoses drastically cutting down the time needed. Phased out for more modern designs just after the Battle, the Albion was however a crucial part of the RAF's inventory during the frist two years of the war .... (text taken from Airfix construction plan)


.... there's not much to say about this kit. Most parts fit well together, except for the tank itself, which consists of 3 parts. There are 2 ugly seams on both sides which have to be filled and carefully sanded. Sanding took me an evening. The rest goes together easily. Surprisingly this cute little truck has the same amount of parts as the Defiant - 113 ....


.... I took an easy painting on this kit and used Olive Grey 66 from Revell which comes close to the recommended Light Olive 86 from Humbrol. That paint is not easy to get over here. And on the other hand I don't use enamel paints anymore. There are only a handfull of decals which are applied within an hour or so. Final coating was again made with Flat Varnish from Marabu.
Though I found no useful informations about the Albion in the internet I found this nice photo of an Albion feeding a thirsty Defiant in 1940 ....


.... and this is how both new kits looked at the expo last weekend. I still need to paint some figures to bring some life into the scene. Not sure if I can make it before my summer holidays next month. And on the other hand I work again on a Transportpanzer Fuchs in 1/35 which I laid aside already 2 times to finish other kits before. So the Fuchs (Fox) has to be finished now before my next expo in August.

Happy modelling!
Torsten
GazzaS
#424
_VISITCOMMUNITY
Queensland, Australia
Joined: April 23, 2015
KitMaker: 4,648 posts
AeroScale: 1,938 posts
Posted: Friday, June 17, 2016 - 03:25 AM UTC
Torsten,
Very nice addition to your Defiant!

Gaz
AussieReg
Staff MemberAssociate Editor
AUTOMODELER
#007
_VISITCOMMUNITY
Victoria, Australia
Joined: June 09, 2009
KitMaker: 8,156 posts
AeroScale: 3,756 posts
Posted: Friday, June 17, 2016 - 05:11 AM UTC
It is always great to see the new additions to your collection Torsten, and the back stories are a real bonus. Great work on the Defiant and the Albion, they are both very nicely finished and will provide the basis for a good little scene (similar to my current project).

Cheers, D
BlackWidow
_VISITCOMMUNITY
European Union
Joined: August 09, 2009
KitMaker: 1,732 posts
AeroScale: 1,336 posts
Posted: Friday, June 17, 2016 - 11:00 PM UTC
Thanks for your comments guys!

Damian, you know my roll outs are not made within 5 minutes. Usually it takes me about an hour to write one of these postings. I always try to find some informations about the aircraft and the pilot. Also, I try to give some informations about the kit, the pros and cons. Of course it's only subjective; from my point of view.

And I didn't expect, that this thread is already 5 years old and still going on ....

Torsten
BlackWidow
_VISITCOMMUNITY
European Union
Joined: August 09, 2009
KitMaker: 1,732 posts
AeroScale: 1,336 posts
Posted: Saturday, October 22, 2016 - 02:53 AM UTC
It has been a bit quiet in this thread over the last few months but that doesn't mean I have not been active building models. I just had a bit less time than usual. But today I can present you the first half of my dual combo which I've built for the 56th Fighter Group Campaign. It's the P-47 M Thunderbolt from Tamiya in 1/48 ....


.... the P-47 M was the fastest version of the Thunderbolt. That speed was achieved by using the Pratt & Whitney R-2800-14W engine and the CH-5 turbo charger. At full power this engine could provide 2800 hp, giving the P-47 M a top speed of around 750 km/h at 9700 meters which was an improvement of 80 km/h over the P-47 D. It was said that the "M" could reach 4500 meters (15000 feet) in 5 minutes and 6100 meters (20000 feet) in under 6 minutes. The P-47 M entered service with the 56th FG in Boxted in early 1945 which was the solitary unit of the USAAF to use this version during the war. The "M" suffered from a series of problems, the new engine was particularly problematic. It also had a shorter range than the P-47 D. However the massive increase of speed allowed the P-47 M to shoot down a few of the Messerschmitt Me 262 of the Luftwaffe, whose pilots must have been surprised to find an apparently familiar enemy aircraft almost keeping pace with them ....


... I have build "Miss June", an early P-47 M without dorsal fin of the 63rd FS, flown by Lt. Eugene Andermatt. This aircraft carried nose art on both sides of the cowling. Not many details are known about the aircraft and its pilot ....


.... as I've build an early "M", I have used the Tamiya kit of the "D", as there are no significant differences to see in the model. It's pretty easy to build the huge fighter out of this great kit. The biggest problem was to find the right colour of the lighter blue. After some discussion in my build blog I decided to use Azure Blue 71108 from Vallejo, the same colour you find on my latest Spitfire. The darker blue is Insignia Blue 71091, also from Vallejo. For the underside I took Silver 90 from Revell and the red cowling ring is Carmine Red 36, again Revell. The blue on the side rudder should be a bit darker, Revell's Light Blue 50 is not totally correct here. For the cockpit I used Interior Green 71010 (Vallejo), the other interior was painted with Reed Green 362 (Revell). Final coating was again made with Matt Varnish from Marabu. The stencils and national insignias are taken from the kit, the special decals for "Miss June" come from AeroMaster's sheet "The Wolf Pack Pt. VI" (No. 48-715). As usual this kit is build oob and not weathered. That does the dust on my "shelf of pride" ....


I thank you for walking around the latest member of my aviation museum and hope you enjoyed it. It has already been to an expo recently.

Happy modelling!
Torsten

PS: I'm surprised that I havn't written too much nonsense here while I listen to my favourite latvian rock band in the past hour. These guys don't make me sit motionless on my chair ....
julionav
_VISITCOMMUNITY
Florida, United States
Joined: September 01, 2016
KitMaker: 75 posts
AeroScale: 69 posts
Posted: Sunday, October 23, 2016 - 12:21 AM UTC
Wonderful post. I enjoyed immensely viewing your work.

Now that has to be a lot of fun: a Latvian rock band!! Now that's something you don't see everyday, lol!

I would love to see your painting set up.
AussieReg
Staff MemberAssociate Editor
AUTOMODELER
#007
_VISITCOMMUNITY
Victoria, Australia
Joined: June 09, 2009
KitMaker: 8,156 posts
AeroScale: 3,756 posts
Posted: Sunday, October 23, 2016 - 01:29 AM UTC
Beautiful build Torsten, soon to be joined by its "older brother" no doubt!

Cheers, D
GazzaS
#424
_VISITCOMMUNITY
Queensland, Australia
Joined: April 23, 2015
KitMaker: 4,648 posts
AeroScale: 1,938 posts
Posted: Sunday, October 23, 2016 - 07:01 AM UTC
Torsten,
You do make em' pretty!

Nice work,

Gaz
simonn
_VISITCOMMUNITY
Australia
Joined: October 15, 2016
KitMaker: 62 posts
AeroScale: 36 posts
Posted: Sunday, October 23, 2016 - 09:59 AM UTC
The P47 looks great Torsten. An uncommon paint scheme that looks good in your finishing style.
And that's the first Albion I have seen built. I have the kit in the stash so your remarks on the build is much appreciated.
Looking forward to your next 'production.'
Thanks

Simon
Joel_W
Staff MemberAssociate Editor
AUTOMODELER
_VISITCOMMUNITY
New York, United States
Joined: December 04, 2010
KitMaker: 11,666 posts
AeroScale: 7,410 posts
Posted: Sunday, October 23, 2016 - 07:45 PM UTC
Torsten my old friend,

yet again, another outstanding build of an Iconic aircraft that isn't modeled very often. Your camo paint scheme really makes this Jug standout. Decaling is dead on, without a hint of flash, especially using Tamiya kit decals, which of late seem to be of a higher quality.

While I'm a member of the operational weathering fraternity, I've long been a fan of your museum quality finishes, and appreciate that modeling style. I should, as my brother builds his 1/32 scale aircraft to those high standards as well.

Looking forward to seeing your Razorback museum post shortly.

Joel
BlackWidow
_VISITCOMMUNITY
European Union
Joined: August 09, 2009
KitMaker: 1,732 posts
AeroScale: 1,336 posts
Posted: Sunday, October 23, 2016 - 11:49 PM UTC
Thanks very much for all your nice feedback! Really appreciated.

Damian, yesterday afternoon I took photos of "Ole Cock" and they will approach in this thread shortly. I just have to prepare them "ready for take off" ....

Julio, thanks for stepping in! I'm glad you like what you see. There's more to come, I already work on new sins ....

Gary, I really like your words "make 'em pretty". Thanks for that!

Simon, that Albion is really a great kit from Airfix. Long awaited to join my tanker fleet. I have already build an Isuzu and an Opel Blitz. The GMC is in stash, I only miss a GAZ or ZIL. It won't give you any hassle, except for the fuel tank itself. But with some filler and patience while sanding you'll solve that issue.

Joel, thanks especially for your kind comment! I've heared quite often about the problems with the thickness and resistance of Tamiya decals. To say the truth, I had only once problems with them and that was on my Leopard 1A4 tank. But those decals were old and brittle. I just read how Rowan spoiled his Spitfire with using a softener that seems to be no friend of Tamiya decals. I only use the softener from Revell and that works fine for me, no matter what decal brand I use, also aftermarket decals. I'm sure there is also a big difference in what company prints the decals. For a long time sure the best come from Cartograph.

Torsten
BlackWidow
_VISITCOMMUNITY
European Union
Joined: August 09, 2009
KitMaker: 1,732 posts
AeroScale: 1,336 posts
Posted: Thursday, October 27, 2016 - 12:07 AM UTC
Today I can show you the other half of my 56th FG campaign dual build. It's the P-47 D Thunderbolt Razorback, also from Tamiya and of course again in 1/48, finished a few days after the Bubbletop ....


.... the Thunderbolt was one of the most famous aircrafts during WW 2 and the heaviest and biggest single engined fighter to have served in the USAAF ever. In its family tree we find the Seversky P-35 and the P-43 Lancer. It was developed by famous aircraft designer Alexander Kartvelli. The maiden flight of the prototype was in May 1941 and the first production aircrafts (P-47 B) came off the line in March 1942. The first group to be equipped with it was the 56. FG in June. A total of 12602 P-47 D were built plus another 354 by Curtiss-Wright under the designation P-47 G. After the war P-47 D and N remained in service with Air National Guards until 1955. Beside the USAAF other operators of the Thunderbolt during the war were the air forces of Brazil, France, Great Britain, Mexico and the Soviet Union ....


.... I've built HV-Mbar "Ole Cock" from the 61st FS, flown by Lt. Donovan F. Smith early in 1944. If I understand it correctly this aircraft was lost on the 8. March 1944 with Boleslaw "Mike" Gladych at the controls, when he ran out of fuel and had to bail out ....


.... this build is as easy as the Bubbletop from the earlier posting. No major issues, just a bit of sanding the seams away, that's all. Sometimes it feels like an easy assembly kit; just click it together. Finding the right colours here was much easier than on the "M". For the upperside I used Olive Drab 71043 from Vallejo, which has become my favourite paint for OD in the meantime. The underside is painted with Medium Grey 43 from Revell. For the white stripes I used White 301 from Revell. The side rudder was covered with Tamiya Tape 6 mm, the elevators with 10 mm. The cowling ring was covered with Parafilm. The interior is painted in the same way as the "M". Final coating again with Clear Matt Varnish from Marabu. Stencils and national insignias were again taken from the kit sheet. No problems with them at all. The special decals for "Ole Cock" I took from that amazing book "56th Fighter Group Part 1", co-written by our Nigel Julian. I found the decals a bit sticky and learned to leave them a little longer than the usual 15 seconds in warm water to loose some of the glue so they are better movable on the surface. Everything went smooth until I came to the nose art. When I took the decal of the paper it suddenly folded over in several places. Panic! For about an hour I did emergeny rescue and breathing life into the decal again using buckets of water. No, I was not swearing, I just spoke loud and clear I couldn't save everything, so of the 9 black stripes in front of the cock's chest I had to cut off 3. They were irreparable. And the whole decal should be a bit further up the cowling but this is the best result I could achieve. In the end I'm really satisfied how the bird turned out with this unusual though not perfectly applied nose art ....


.... finally the obligatory family photo. Welcome to the club! The 2 silver birds are the Academy "D" and "N", built in 2008 also as a dual build. No Hasegawa Jugs here, but they are in my stash. So there are more to come, also from the 56. FG. I have more than enough P-47 decals ....
Thanks again for walking around this bird. Hope you've enjoyed it too.

Happy modelling!
Torsten
Joel_W
Staff MemberAssociate Editor
AUTOMODELER
_VISITCOMMUNITY
New York, United States
Joined: December 04, 2010
KitMaker: 11,666 posts
AeroScale: 7,410 posts
Posted: Thursday, October 27, 2016 - 01:48 AM UTC
Torsten,
Your Razorback is the equal to your Bubble top build in every way. Just a great family portrait.

And I must say that I really enjoyed your build blog. Thanks for sharing your builds with us.

Joel
BlackWidow
_VISITCOMMUNITY
European Union
Joined: August 09, 2009
KitMaker: 1,732 posts
AeroScale: 1,336 posts
Posted: Friday, October 28, 2016 - 03:23 PM UTC
Thanks Joel!
It was also a pleasure for me to join this campaign (I planned a Thunderbolt this year anyway) and to show you all how I build my model kits.

When I looked at all the nose arts of the P-47 I've build so far, I thought it would be a nice idea to show them here a bit closer. Hope you enjoy it ....

P-47 D "Ole Cock" (Tamiya)


P-47 M "Miss June" (Tamiya), left cowling side


P-47 M "Miss June" (Tamiya), right cowling side


P-47 D "Hawkeye" (Tamiya)


P-47 N "Expected Goose" (Academy)


P-47 D "Rabbit" (Academy), left cowling side


P-47 D "Rabbit" (Academy), right cowling side


Happy modelling!
Torsten
simonn
_VISITCOMMUNITY
Australia
Joined: October 15, 2016
KitMaker: 62 posts
AeroScale: 36 posts
Posted: Friday, October 28, 2016 - 04:03 PM UTC
An envious collection of jugs. Torsten. Thanks for sharing.

Simon
BlackWidow
_VISITCOMMUNITY
European Union
Joined: August 09, 2009
KitMaker: 1,732 posts
AeroScale: 1,336 posts
Posted: Saturday, October 29, 2016 - 04:08 PM UTC
Thanks Simon!

As I said, I still have a few P-47 kits in my stash (mainly Tamiya), but none planned to be build in 2017. But don't worry, I won't get bored. I have sooo many other kits planned for next year. Probably more than I can build ....

Torsten
Joel_W
Staff MemberAssociate Editor
AUTOMODELER
_VISITCOMMUNITY
New York, United States
Joined: December 04, 2010
KitMaker: 11,666 posts
AeroScale: 7,410 posts
Posted: Sunday, October 30, 2016 - 11:26 PM UTC
Torsten,
I for one am looking forward to your new completed builds as they're shown at the end of your assembly line.
Joel
Antilles
_VISITCOMMUNITY
Nordrhein-Westfalen, Germany
Joined: March 22, 2015
KitMaker: 671 posts
AeroScale: 614 posts
Posted: Monday, October 31, 2016 - 02:58 PM UTC
Torsten,
this is really a lucky bunch of jugs. Nicely done and presented. My favourite is the M-version. You very much for sharing!

Oliver
BlackWidow
_VISITCOMMUNITY
European Union
Joined: August 09, 2009
KitMaker: 1,732 posts
AeroScale: 1,336 posts
Posted: Wednesday, November 02, 2016 - 07:52 PM UTC
Thanks Joel and Oliver!

If I had to pick a favourite T'bolt I would go for the Razorback. At least it's the real P-47, isn't it? And as I said before, there are more to come to my collection, but none planned in the near future. But I'm already working on the next kits.

Torsten
BlackWidow
_VISITCOMMUNITY
European Union
Joined: August 09, 2009
KitMaker: 1,732 posts
AeroScale: 1,336 posts
Posted: Tuesday, November 22, 2016 - 01:19 AM UTC
While Gary goes new ways in modelling his superb quarterscale B-29, I have build an aircraft which the Superfortresses encountered quite often in the last year of WW2. Today I want to show you my new Kawasaki Ki-61 "Hien" from Hasegawa in 1/48 ....


.... the Ki-61 was developed by Kawasaki's famous designer Takeo Doi, who was also responsable for the Ki-45 "Toryu". It was the only mass produced Japanese fighter using a liquid cooled inline engine. It was introduced to the IJAAF in 1942 and first shots in anger were fired in April 1942 when 2 prototypes attacked the B-25's of the Doolittle Raid over Tokyo. But they were ineffective as they had only training ammo aboard. First unit to be equipped with the "Hien" was the 68. Sentai, which had tough fights over New Guinea against the allied air forces. The Ki-61 was powered by a Kawasaki Ha-40 engine with 1175 hp, which was a licensed build german Daimler Benz DB 601 A. But it never was as reliable as the german original, especially the cooling system was prone. Nevertheless about 2600 Ki-61 were produced. It had a maximum speed of nearly 600 km/h at 5000 meters and a service ceiling of 12000 meters. The climb rate was 714 meters per minute or 7 minutes for 5000 meters. The range was 600 km without and 1800 km with external tanks. The usual armament were four 12,7 mm machine guns (2 in the wings and 2 in the fuselage) but that depended on the version and the use of operation. Today there are still 3 fuselages left in museums around the world in more or less good/bad conditions ....


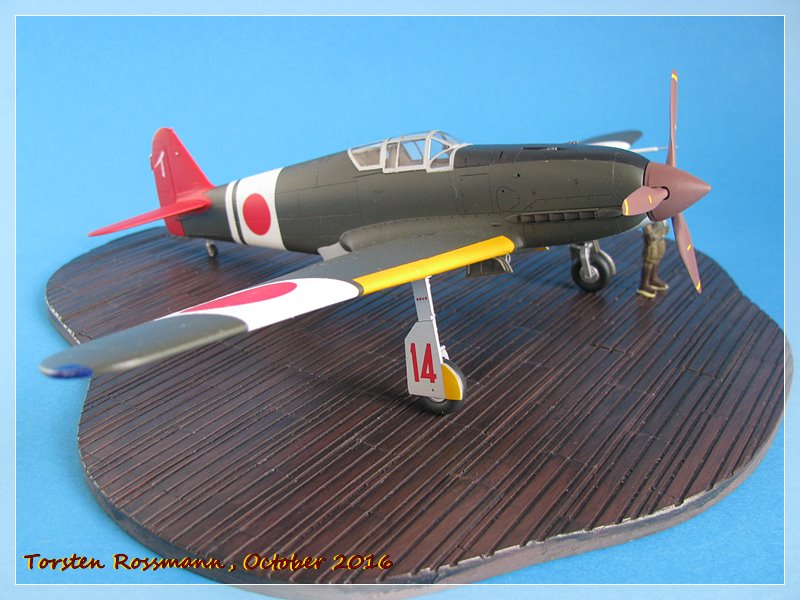
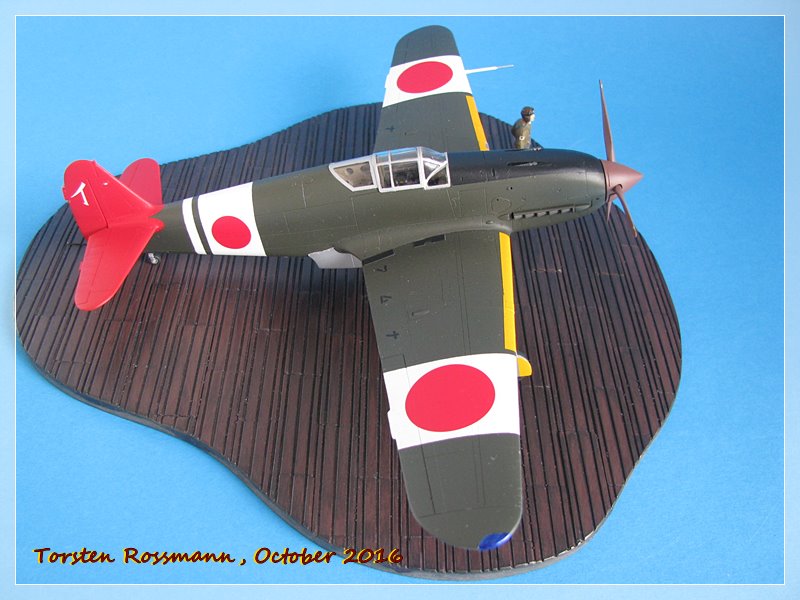
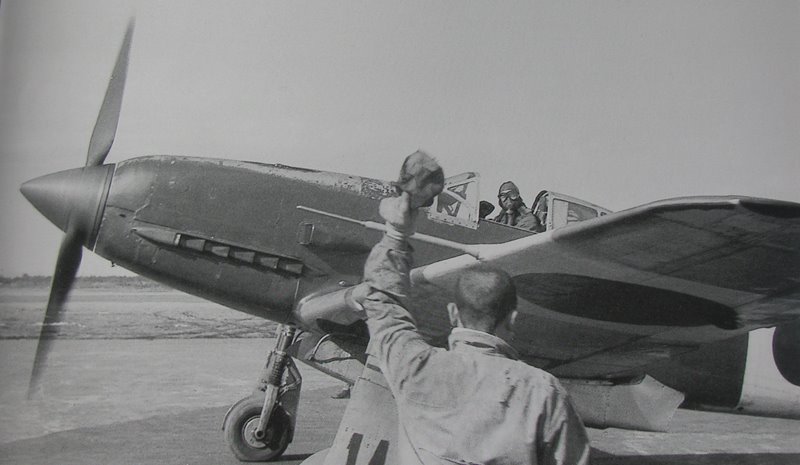
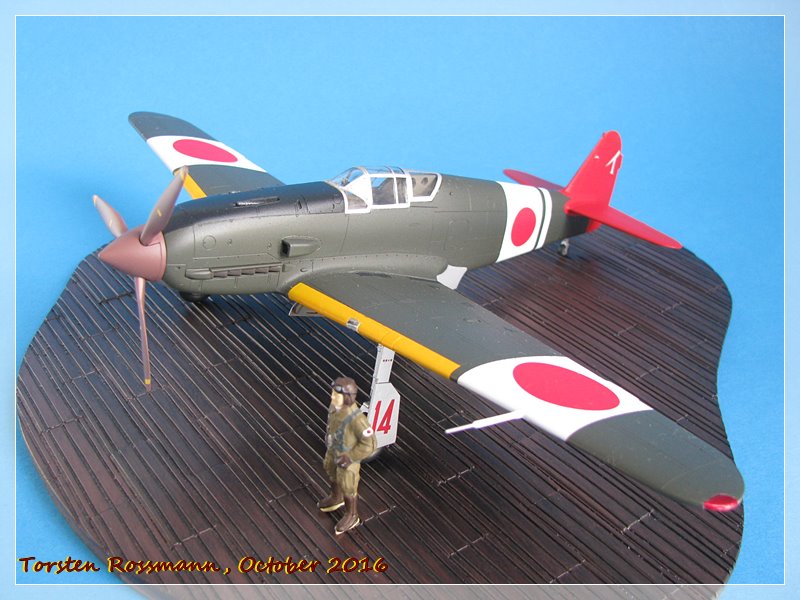
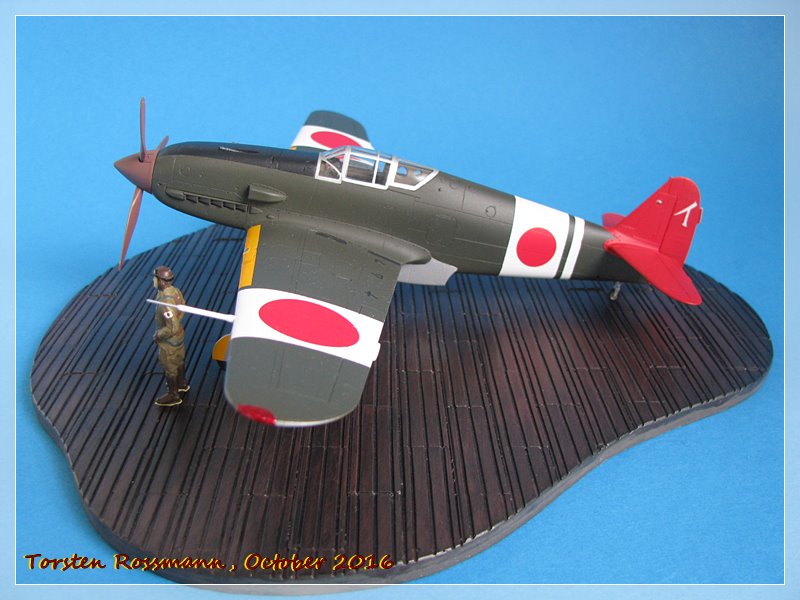
.... I have build aircraft "14" of the very famous 244. Sentai, based at Chofu Airfield in February 1945 during the defense of the japanese mainland. It was flown by the remarkable Gunso (Sergeant) Masao Itagaki, who belonged to the Shinten Sekutai, an air-to-air ramming unit within the 244. Sentai. Itagaki was one of the rare double-Bukosho recipents. The Bukosho was the highest military medal of Japan during WW2, comparable with the Victoria Cross or the Medal Of Honor. On the 3. December 1944 Itagaki rammed the B-29 "Long Distance T-49" of the 498th BG and bailed out of his damaged fighter without a scratch. He won his first Bukosho for this attack. On the 27. January 1945 he rammed another B-29 and escaped again by parachute unhurt to get his second Bukosho for this action. From March to May 1945 he flew Kamikaze escort missions to Okinawa. Luck stayed at his side and he survived the war as one of only 2 known double Bukosho recipents. At the end of the war Itagaki was only 19 years old .... Unfortunatly his post-war life is unknown to me. I found this amazing shot of him sitting in his "14" ready to take off in Osprey's "Ki-61 Aces" ....


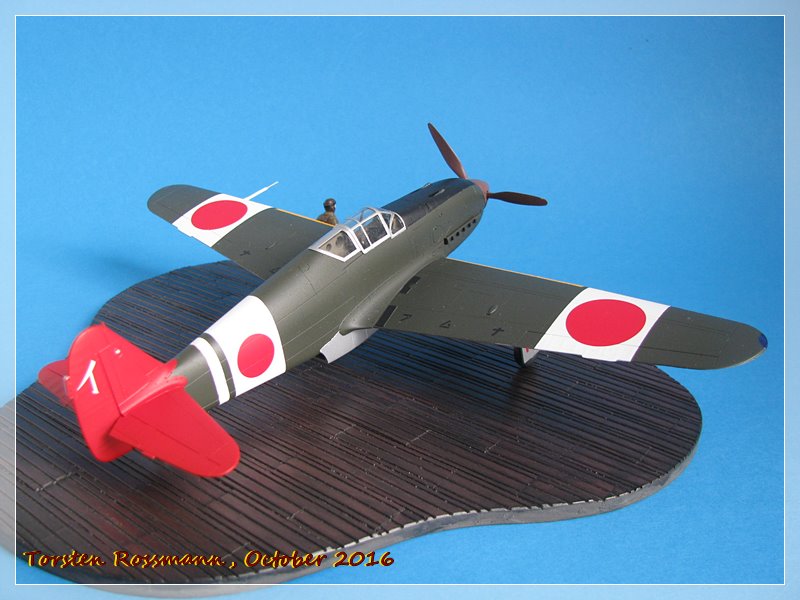
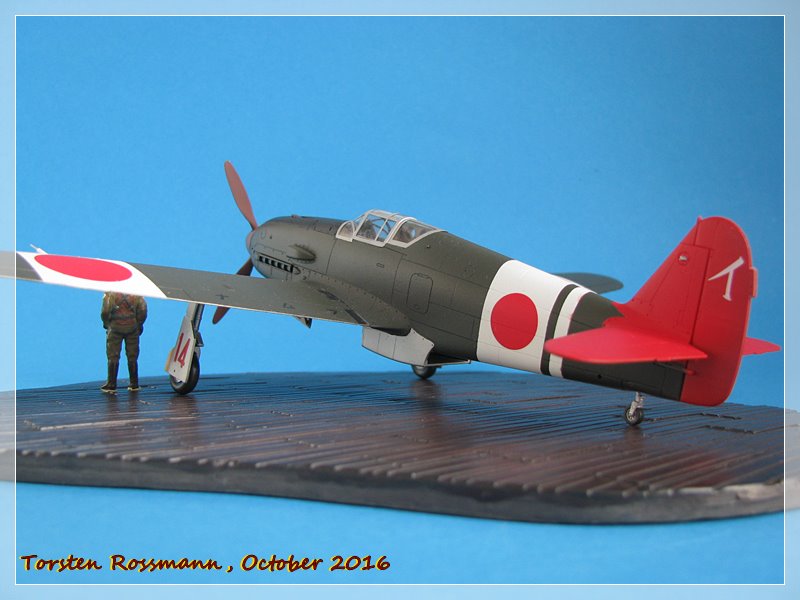
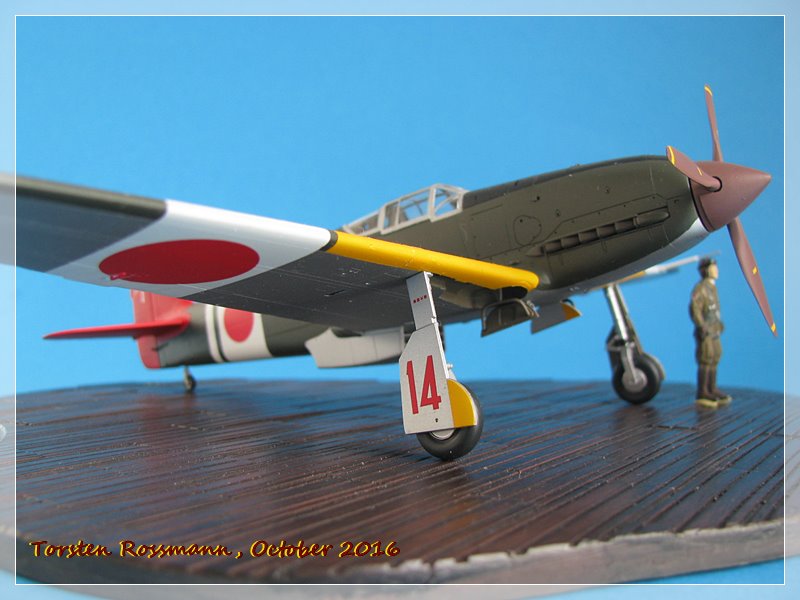
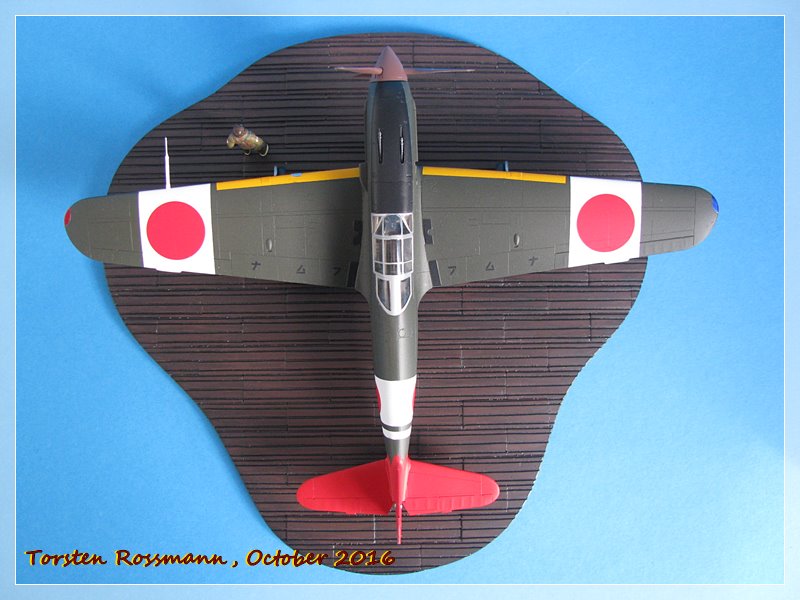
.... Hasegawa came out with this limited edition in 2010 and after recently reading the story of the pilot I knew instantly which version of the 3 choices I want to build. The kit is from the 1990's and has some issues. So there is some filler needed on both wing roots, furthermore a lot of sanding has to be done. I read that pilots often removed the wing guns to be lighter and more manouvrable in the heights of the B-29's. Some even had only one machine gun in the fuselage. I have looked at the 2 photos I have of "14" and decided to close the gun openings in the wings with putty. Not sure if this is correct but it might have been so. After painting this area I was not satisfied with how it looked and decided to cover the openings "Spitfire-like" with a piece of Tamiya Tape painted yellow. Maybe the groundcrews in those days have also used Tamiya Tape 
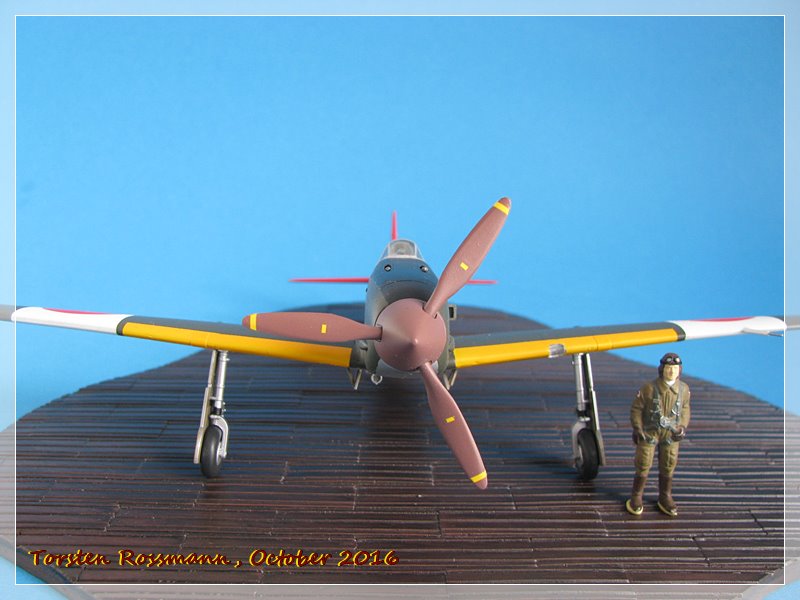
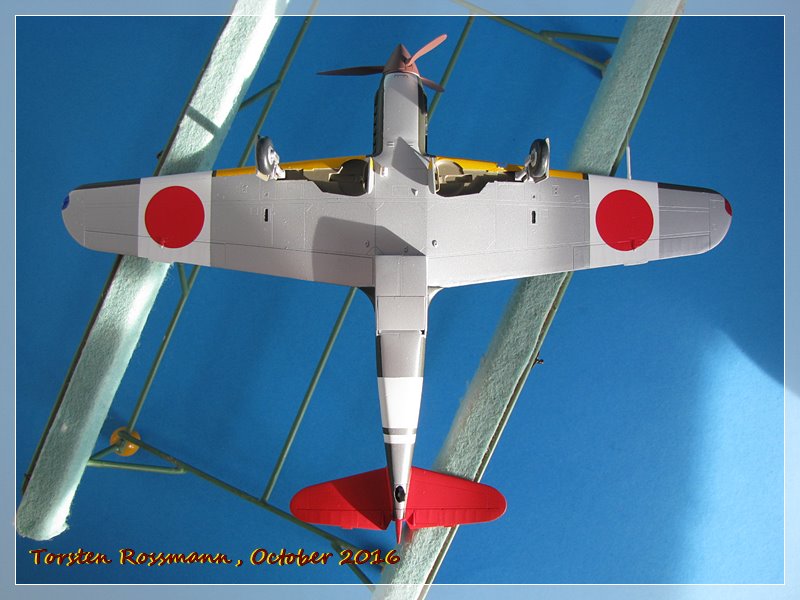
The paints on this bird all come from Revell. I recently read that the late war brownish-green of the japanese fighters would come close to RAL 6014 Gelboliv. Which is a bit funny as that's the paint on German Bundeswehr vehicles until the late 1970's. So I have used Yellow Olive 42, White 301, Black 302 and Red 36 for the upper side, Silver 90 for the underside, Yellow 310 for the leading edges of the wings, Red-Brown 83 for the propeller and Brown 87 for the interior. Final coating was again made with Clear Flat Varnish from Marabu.This bird gave me quite a tough masking job, especially those curves on the red tail were difficult. Parafilm didn't work well enough here, so I used small pieces of Kip Tape which surprisingly did a good job here. Masking the canopy was done with Eduard EX055. All decals are taken from the kit. The japanese character on the rudder means "I" and stands here of course for Itagaki. As ususal this model is build oob and not weathered ....


.... again I say "domo arigato" for watching and hope you've enjoyed this little walk around with me. There are only very few videos on Youtube about the Ki-61, but I found a short war time japanese propaganda film of the 244. Sentai you might like to see.

Happy modelling!
Torsten
AussieReg
Staff MemberAssociate Editor
AUTOMODELER
#007
_VISITCOMMUNITY
Victoria, Australia
Joined: June 09, 2009
KitMaker: 8,156 posts
AeroScale: 3,756 posts
Posted: Tuesday, November 22, 2016 - 01:49 AM UTC
Yet another fascinating back-story and a beautiful build. Such an elegant aircraft. When I look at the nose of this in the close-up image it actually looks like the designer has taken a drawing of a spitfire and turned it upside down. The underside of the nose is quite flat and the top curves down sharply to the spinner, and the stacks are at the bottom.

Cheers, D
Joel_W
Staff MemberAssociate Editor
AUTOMODELER
_VISITCOMMUNITY
New York, United States
Joined: December 04, 2010
KitMaker: 11,666 posts
AeroScale: 7,410 posts
Posted: Tuesday, November 22, 2016 - 09:49 PM UTC
Torsten,
Another beautifully built addition to your growing miniature museum. Your painting is as usual up to your usual high standards as every single demarcation line is razor sharp without a singe issue.

You certainly have brought this oldish 1990 Hasegawa model up to current standards. Well done. And thanks for the mini history lesson that I always find so fascinating.

Joel
BlackWidow
_VISITCOMMUNITY
European Union
Joined: August 09, 2009
KitMaker: 1,732 posts
AeroScale: 1,336 posts
Posted: Tuesday, December 06, 2016 - 12:34 AM UTC
Don't worry guys, I'm still alive. I just had a complete breakdown of my internet and telephone for 2 weeks, because my provider had major problems to activate my new faster connections. So no internet and no telephone, only mobile ....

Damian, the Spitfire is the wrong aircraft. The design of the Ki-61 is copied a lot from the Heinkel He 100. In fact, the Doolittle Raiders first thought they were attacked by a Me 109 or an italian C 202 "Folgore". All 3 aircraft were powered by the same engine, built by Daimler Benz, Kawasaki and Alfa Romeo. That's why they are also sometimes called "sisters by heart".

And thanks to both of you for your compliments about the story I wrote down. Glad you like it. This young fellow surely had an extraordinary wartime career.

Happy modelling!
Torsten
Joel_W
Staff MemberAssociate Editor
AUTOMODELER
_VISITCOMMUNITY
New York, United States
Joined: December 04, 2010
KitMaker: 11,666 posts
AeroScale: 7,410 posts
Posted: Tuesday, December 06, 2016 - 04:58 AM UTC
Torsten,
Glad to hear that you sill alive and modeling. Don't know how you managed to live without the internet for 2 weeks.
Joel
BigZimmo
_VISITCOMMUNITY
Baden-Württemberg, Germany
Joined: December 06, 2016
KitMaker: 132 posts
AeroScale: 117 posts
Posted: Tuesday, December 06, 2016 - 01:10 PM UTC
Hi Torsten!!

Superb Ki and an interesting background story.....another Cracker from your workbench, mate!!

Cheers....
Stefan