

Some fantastic, and speedy, work being done in this campaign. It makes me wonder how these kits ended up as Hangar Queens in the first place!
I'm hoping to show some progress on my F-16 soon.
Keep up the good work everyone!
Keith
Air Campaigns
Want to start or join a group build? This is where to start.
Want to start or join a group build? This is where to start.
Hosted by Frederick Boucher, Michael Satin
OFFICIAL: Hangar Queen 2 Campaign

woltersk

Joined: May 27, 2003
KitMaker: 1,026 posts
AeroScale: 215 posts
Posted: Sunday, March 04, 2012 - 02:50 PM UTC


Jessie_C


Joined: September 03, 2009
KitMaker: 6,965 posts
AeroScale: 6,247 posts

Posted: Tuesday, March 06, 2012 - 06:53 AM UTC
Quoted Text
It makes me wonder
Probably because I have the attention span of a mayfl...Ooooh! Shiny!

windysean
Joined: September 11, 2009
KitMaker: 1,917 posts
AeroScale: 563 posts
Posted: Tuesday, March 06, 2012 - 07:21 AM UTC
Michal, I meant to mention earlier how excellent your paint variation turned out. And the peeling mask looks like actual weathering-- too bad the prototype photo didn't look like that. I would have believed it. I'm curious about what look like brass tubes in the tire bottoms-- will this be attached to a base later?
Keith and Jessica, yes, I think there's a tendency with modelers to only do what excites them and not model when the interest fades. (WHAT? JUST A HOBBY?) Whatever the reason, it's nice to see all these builds come out in this campaign!! At least, that's what I think happens.
Cheers!
-Sean H.
Keith and Jessica, yes, I think there's a tendency with modelers to only do what excites them and not model when the interest fades. (WHAT? JUST A HOBBY?)
Whatever the reason, it's nice to see all these builds come out in this campaign!! At least, that's what I think happens.Cheers!
-Sean H.

md72

#439
Joined: November 05, 2005
KitMaker: 4,950 posts
AeroScale: 3,192 posts

Posted: Tuesday, March 06, 2012 - 08:36 AM UTC
Well there is also the problem with the perfect being the enemy of the good. I'm deliquent on my entry for the Corsair build. Sunday, I painted Future on it. Monday I noticed some runs in the Future, so I tried washing and buffing them out. CRAACCKK!  The canopy has a crack 2/3 of the way across the top. If I knew what I was doing, I might just round file it. Now I guess I'll set it aside, concentrate on some other builds and get back to it eventually.
The canopy has a crack 2/3 of the way across the top. If I knew what I was doing, I might just round file it. Now I guess I'll set it aside, concentrate on some other builds and get back to it eventually. 
Mecenas
Joined: December 23, 2007
KitMaker: 1,596 posts
AeroScale: 1,275 posts
KitMaker: 1,596 posts
AeroScale: 1,275 posts

Posted: Tuesday, March 06, 2012 - 08:20 PM UTC
Quoted Text
Michal, I meant to mention earlier how excellent your paint variation turned out. And the peeling mask looks like actual weathering-- too bad the prototype photo didn't look like that. I would have believed it. I'm curious about what look like brass tubes in the tire bottoms-- will this be attached to a base later?
Hi Sean,
I'm on the "decision edge" right now whether to leave it as it is and go forward or take another mask and repaint it. I really want to get rid of this model from the workbench as soon as possible.
The tubes in the wheels is attachement to base, you're right.
windysean
Joined: September 11, 2009
KitMaker: 1,917 posts
AeroScale: 563 posts
Posted: Wednesday, March 07, 2012 - 02:02 AM UTC
Michal,
Any chance you could touch it up with a fine brush? Do you still have that color or was it an odd mix? Could you mask and then touch up by brush?
I hate when a project goes unloved and clogs up the workbench, but we've all been there! It's especially sad when a hangar queen returns to the back of the hangar.
thanks for posting! We'll see how this turns out.
-Sean

29Foxtrot

Joined: September 19, 2003
KitMaker: 708 posts
AeroScale: 674 posts

Posted: Wednesday, March 07, 2012 - 01:13 PM UTC
Keith,
In some cases as to how these kits end up as Hanger Queens is simply not enough time to complete them, due to some issue or as in my case, either way too many consignment or contract builds and / or being involved in other projects within the hobby such as teaching various techniques in construction, gap filling and basic airbrushing, or giving practical demonstrations to groups.
Two of mine included here were from previous campaigns that I didn't complete. Or with supporting a family member who has a life threatening illness.


Snorri23
Joined: March 25, 2010
KitMaker: 514 posts
AeroScale: 244 posts
Posted: Wednesday, March 07, 2012 - 04:39 PM UTC
I think I will finish the Do 24 I have stored under my desk. If anyone can find a decent colour scheme rather than RLM 65,72,73 I would be quite gracious of them.
29Foxtrot
Joined: September 19, 2003
KitMaker: 708 posts
AeroScale: 674 posts
Posted: Wednesday, March 07, 2012 - 05:30 PM UTC
Trevor,
The Dutch East indies had the Do 24 in a Light Grey upper surface / Bare Metal lower surface scheme with their tri colour insignia on the lower wings and fuselage.
The RAAF took them over for a while after the fall of Java.
Using a variety of camo schemes, such as Dark Sea Grey / Slate Grey over Black, or as the attached pic which is RAAF Dark Earth / Foliage Green over RAAF Sky Blue.

Hope this helps a little.
The Dutch East indies had the Do 24 in a Light Grey upper surface / Bare Metal lower surface scheme with their tri colour insignia on the lower wings and fuselage.
The RAAF took them over for a while after the fall of Java.
Using a variety of camo schemes, such as Dark Sea Grey / Slate Grey over Black, or as the attached pic which is RAAF Dark Earth / Foliage Green over RAAF Sky Blue.
Hope this helps a little.
windysean
Joined: September 11, 2009
KitMaker: 1,917 posts
AeroScale: 563 posts
Posted: Thursday, March 08, 2012 - 02:11 AM UTC
Snorri and Foxtrot,
I have nothing to add except that the Do24 is an attractive plane and another nice, odd, aircraft for this campaign.
Good choice! Can't wait to see it started again.
-Sean
I have nothing to add except that the Do24 is an attractive plane and another nice, odd, aircraft for this campaign.
Good choice! Can't wait to see it started again.
-Sean
29Foxtrot
Joined: September 19, 2003
KitMaker: 708 posts
AeroScale: 674 posts
Posted: Thursday, March 08, 2012 - 04:57 AM UTC
Sean and Trevor,
I forgot too add that I have the 48 scale Fonderie Miniature kit of the Do24 as a cosignment build. The owner wants it finished in the German ASR scheme.
I forgot too add that I have the 48 scale Fonderie Miniature kit of the Do24 as a cosignment build. The owner wants it finished in the German ASR scheme.
Jessie_C
Joined: September 03, 2009
KitMaker: 6,965 posts
AeroScale: 6,247 posts
Posted: Friday, March 09, 2012 - 07:39 AM UTC
My big Russian has primer now, and it reveals a horror story of filling and sanding still needing to be done.
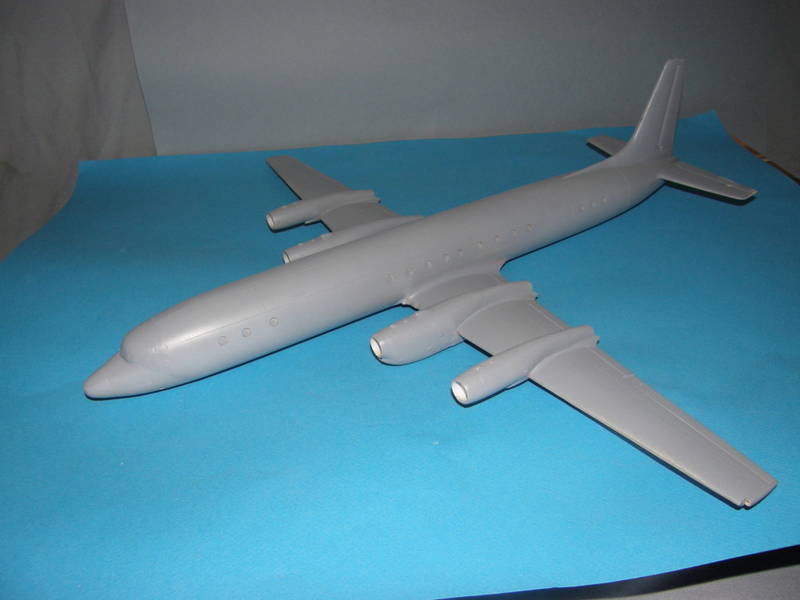
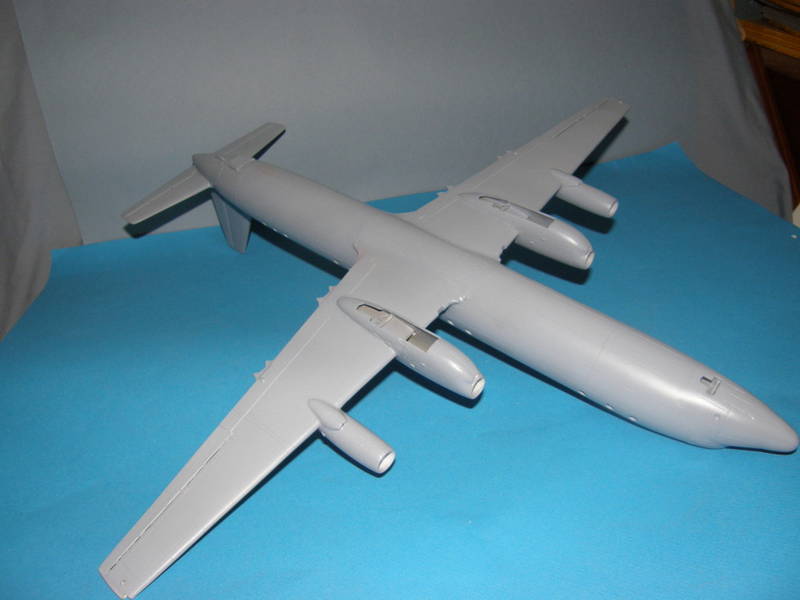

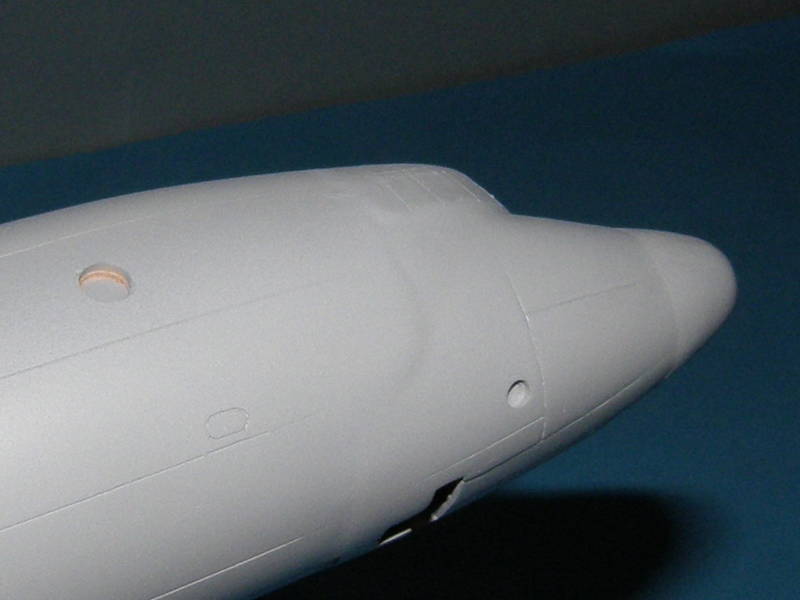
Putty, sand, prime, repeat. And repeat.
Putty, sand, prime, repeat. And repeat.
windysean
Joined: September 11, 2009
KitMaker: 1,917 posts
AeroScale: 563 posts
Posted: Friday, March 09, 2012 - 08:03 AM UTC
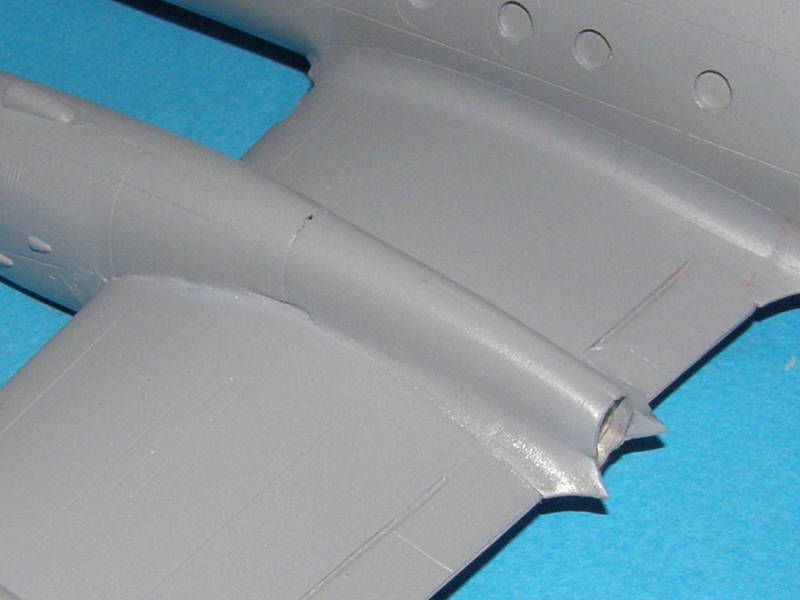
Yow! How can I unsee the horrors I just saw? Those engine fairings will require a floor sander or worse. Was there a terrible accident that caused that?
Keep us posted. We're counting on you.
-Sean H.
Those engine fairings will require a floor sander or worse. Was there a terrible accident that caused that?Keep us posted. We're counting on you.
-Sean H.
Jessie_C
Joined: September 03, 2009
KitMaker: 6,965 posts
AeroScale: 6,247 posts
Posted: Friday, March 09, 2012 - 08:19 AM UTC
No, that's just the result of gluing A-model injected plastic to A-model fibreglas. You have to use superglue of course, and I think this time it shrunk while it was curing, causing the plastic to snap in several places. This one's going to sit on a shelf way up high where the multiple offences against the modelling gods will not be so apparent.
windysean
Joined: September 11, 2009
KitMaker: 1,917 posts
AeroScale: 563 posts
Posted: Monday, March 12, 2012 - 01:09 AM UTC
A bump to get this thread back to the top of the page here...
For anyone just reading this for the first time (and a reminder to others), seeing the pandemonium in other campaigns with builds not finishing, HERE'S YOUR CHANCE!
This is a very welcoming campaign. Any unfinished aircraft-- even if you haven't actually cleared it off your workspace-- is good for this campaign. Check the rules, but the keys are a starting photo (at whatever stage of build it currently sits), an in-progress photo (or 2 or 3) on this thread, and a final photo (or 2 or 3) in the gallery when you've completed your beauty!
Excellent work all around, but always looking for more.
-Sean.
For anyone just reading this for the first time (and a reminder to others), seeing the pandemonium in other campaigns with builds not finishing, HERE'S YOUR CHANCE!
This is a very welcoming campaign.
Any unfinished aircraft-- even if you haven't actually cleared it off your workspace-- is good for this campaign. Check the rules, but the keys are a starting photo (at whatever stage of build it currently sits), an in-progress photo (or 2 or 3) on this thread, and a final photo (or 2 or 3) in the gallery when you've completed your beauty!Excellent work all around, but always looking for more.
-Sean.
29Foxtrot
Joined: September 19, 2003
KitMaker: 708 posts
AeroScale: 674 posts
Posted: Wednesday, March 14, 2012 - 02:40 PM UTC
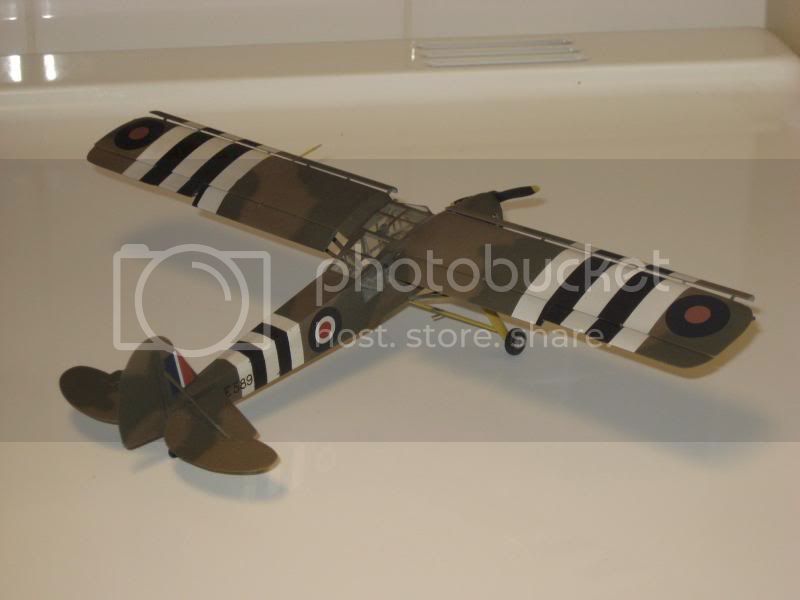
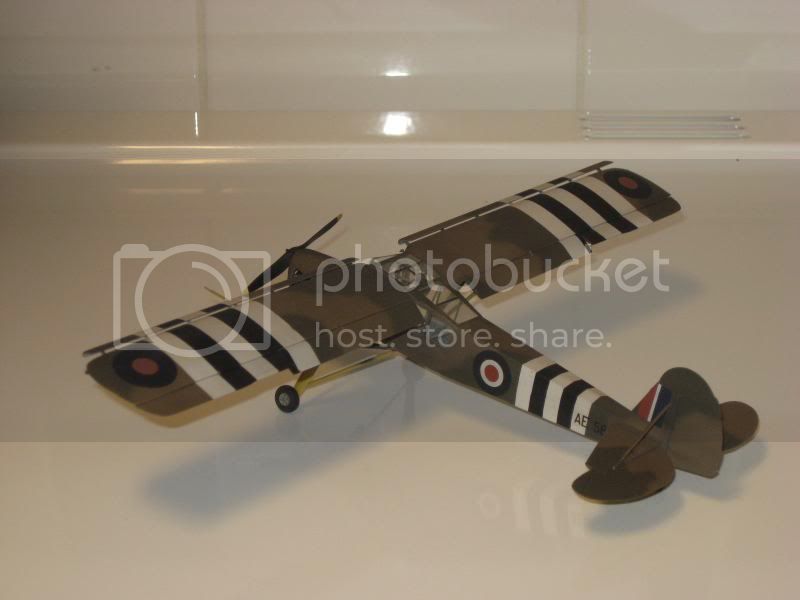
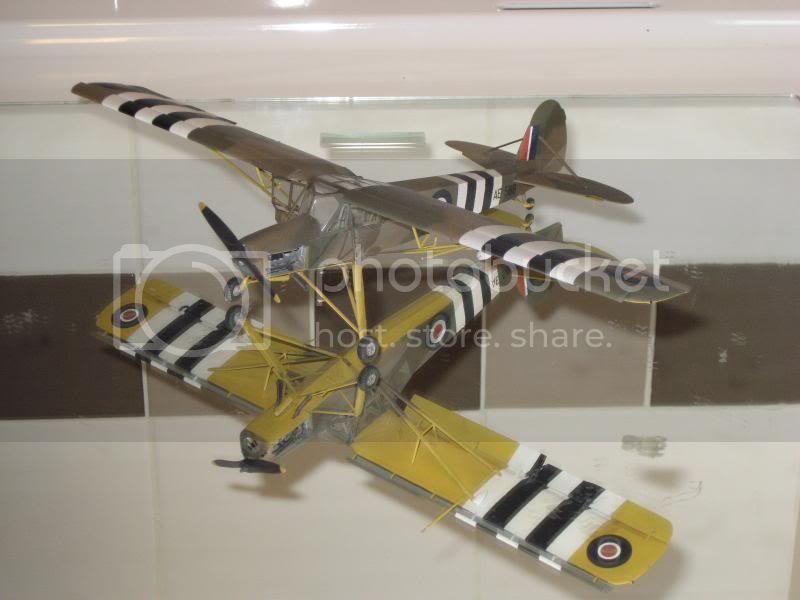
Done a little more to the Tamiya Fieseler Fi 156, hope to get back to it before the weekend. The serial Number of AE 589 is fictional, even though the RAF applied AE prefixes to any captured aircraft


Note: The white paper is a stop so that over spray will not fill the interior when the final dullcoat is applied.
I believe an after market decal sheet has been done of this particular captured subject for the Hasegawa 32 scale kit as well as a USAAC subject.
Note: The white paper is a stop so that over spray will not fill the interior when the final dullcoat is applied.
I believe an after market decal sheet has been done of this particular captured subject for the Hasegawa 32 scale kit as well as a USAAC subject.
windysean
Joined: September 11, 2009
KitMaker: 1,917 posts
AeroScale: 563 posts
Posted: Wednesday, March 14, 2012 - 03:58 PM UTC
Ah, Rob. My best customer. I didn't even remember you doing a Stork in this campaign, but again, that's some fine work! I know if I were to fly such a distinct aircraft for the wrong side, I'd be repainting those invasion stripes big and bright before every flight!
Cheers!
Sean.
I didn't even remember you doing a Stork in this campaign, but again, that's some fine work! I know if I were to fly such a distinct aircraft for the wrong side, I'd be repainting those invasion stripes big and bright before every flight!Cheers!
Sean.
29Foxtrot
Joined: September 19, 2003
KitMaker: 708 posts
AeroScale: 674 posts
Posted: Wednesday, March 14, 2012 - 04:52 PM UTC
G'day Sean,
Thanks for the kind words on the Storch.
Yep I listed several birds which included the Storch and left out 3 on purpose, as I may get back too either of them later in the year.
They are all 48 scale;
Kinteck Danish F16
Tamiya F16c/n
Hobby Boss F 111 {RAAF}
Thanks for the kind words on the Storch.
Yep I listed several birds which included the Storch and left out 3 on purpose, as I may get back too either of them later in the year.
They are all 48 scale;
Kinteck Danish F16
Tamiya F16c/n
Hobby Boss F 111 {RAAF}

TaiidanTomcat
Joined: January 04, 2009
KitMaker: 45 posts
AeroScale: 31 posts
Posted: Sunday, March 18, 2012 - 12:35 PM UTC
Thats an excellent finish! Flawless stripes as well
29Foxtrot
Joined: September 19, 2003
KitMaker: 708 posts
AeroScale: 674 posts
Posted: Wednesday, March 21, 2012 - 12:10 AM UTC
Benjamin,
Thanks for the comment.
The 'Under New Ownership' Fi 156c Storch I elected to build this bird with the wing flaps in the down position along with open leading edge flaps, the RAF Temperate Land Scheme {upper surfaces} is enamels from Xtra Color, along with the RAF Trainer Yellow under surfaces, to tone down the camo a little a little coat of Tamiya Acrylic smoke followed by a little coat of dark grey/smoke wash, followed by 2 coat of Alclad II Flat Finish.


So now I can call this build finished.
Thanks for the comment.
The 'Under New Ownership' Fi 156c Storch I elected to build this bird with the wing flaps in the down position along with open leading edge flaps, the RAF Temperate Land Scheme {upper surfaces} is enamels from Xtra Color, along with the RAF Trainer Yellow under surfaces, to tone down the camo a little a little coat of Tamiya Acrylic smoke followed by a little coat of dark grey/smoke wash, followed by 2 coat of Alclad II Flat Finish.
So now I can call this build finished.
windysean
Joined: September 11, 2009
KitMaker: 1,917 posts
AeroScale: 563 posts
Posted: Wednesday, March 21, 2012 - 01:35 AM UTC
Nice one, Rob. Now you're the first two entrants to complete the campaign (assuming you post the Storch into the gallery also).
I'm inspired to actually (re)start my hangar queen soon.
Cheers!
-Sean.
I'm inspired to actually (re)start my hangar queen soon.
Cheers!
-Sean.
29Foxtrot
Joined: September 19, 2003
KitMaker: 708 posts
AeroScale: 674 posts
Posted: Wednesday, March 21, 2012 - 02:17 AM UTC
Sean,
Thanks for the comment and yep pix are in the gallery
Thanks for the comment and yep pix are in the gallery
windysean
Joined: September 11, 2009
KitMaker: 1,917 posts
AeroScale: 563 posts
Posted: Wednesday, March 21, 2012 - 03:45 AM UTC
Yep, there they are! Well done again.
-Sean.
-Sean.
TaiidanTomcat
Joined: January 04, 2009
KitMaker: 45 posts
AeroScale: 31 posts
Posted: Friday, March 23, 2012 - 02:21 PM UTC
Nice work Rob! 
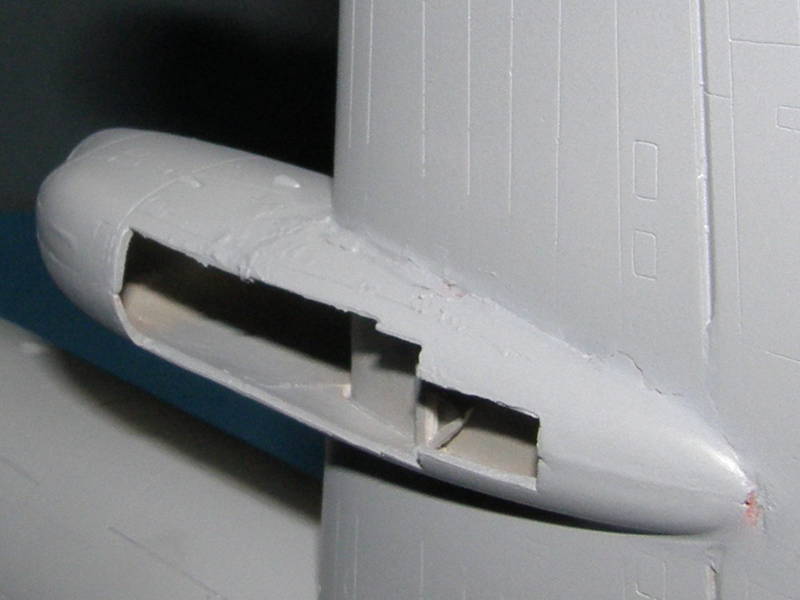
I got this in 1995, started work on it in 2004. I have changed my mind on what it is and what it will be literally a half dozen times. It has no cockpit, I lost so many parts I have had to resin cast a new nose and various other parts have been robbed to make it work even a little my hope is it will one day be a 3 foot model! It is by far the worst hanger queen I have.
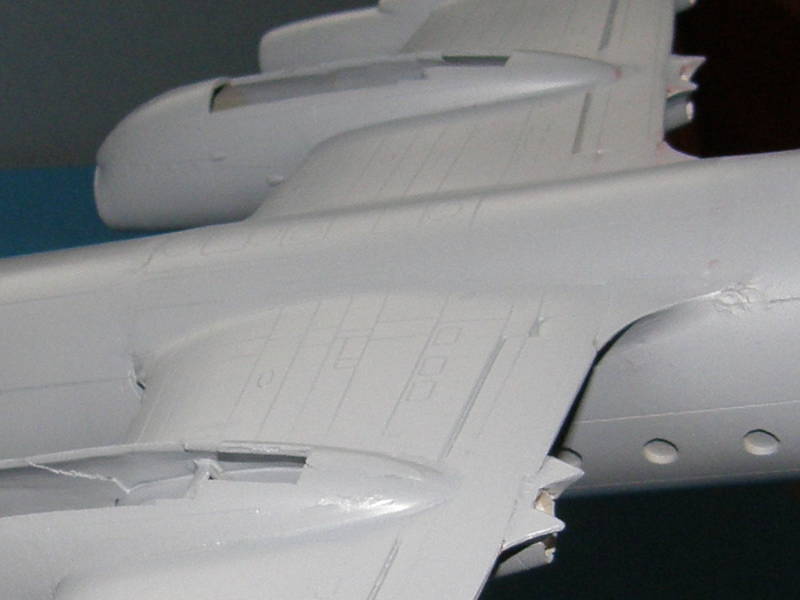
This is how it looked in June 2011 when I was going for an F-35 look:

Then I changed my mind again and broke out the razor saw to make it a Russian MiG-23 like design. This is where I officially start this build for this campaign:
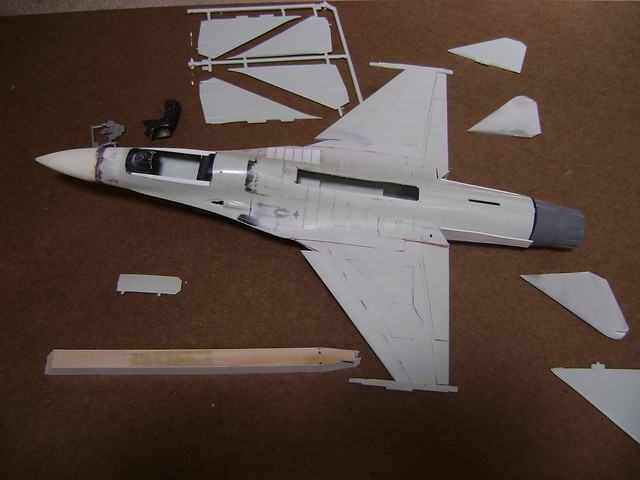

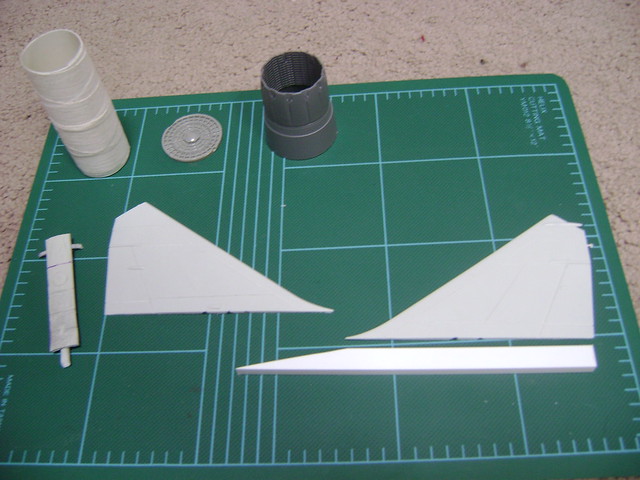
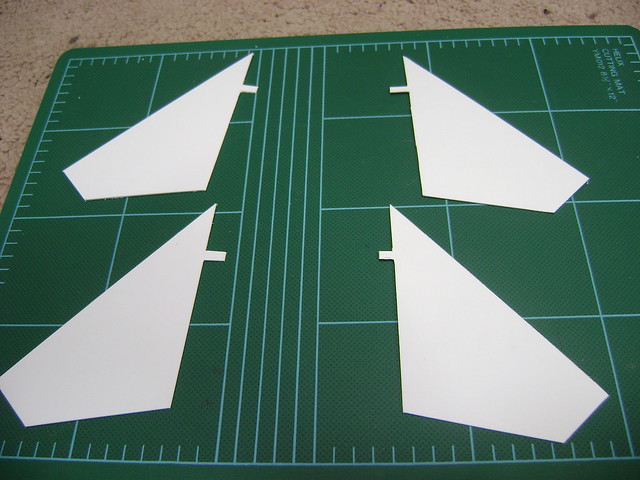
Scratchbuilt Horizontal stabs made from tracing the trumpy Flogger's Stabs
I got this in 1995, started work on it in 2004. I have changed my mind on what it is and what it will be literally a half dozen times. It has no cockpit, I lost so many parts I have had to resin cast a new nose and various other parts have been robbed to make it work even a little my hope is it will one day be a 3 foot model! It is by far the worst hanger queen I have.
This is how it looked in June 2011 when I was going for an F-35 look:
Then I changed my mind again and broke out the razor saw to make it a Russian MiG-23 like design. This is where I officially start this build for this campaign:
Scratchbuilt Horizontal stabs made from tracing the trumpy Flogger's Stabs
windysean
Joined: September 11, 2009
KitMaker: 1,917 posts
AeroScale: 563 posts
Posted: Friday, March 23, 2012 - 02:46 PM UTC
TaiidanTomcat, that is the best hangar queen story that I've heard yet! Glad to have that 3' beauty onboard.
Don't mind changing your plan a few more times before 2012 is over!
-Sean.
Don't mind changing your plan a few more times before 2012 is over!
-Sean.
 |

WEB HOSTING BY


Copyright ©2021 AeroScale and Kitmaker Network, a subsidiary of Silver Star Enterprises
All Rights Reserved. Please read our Conditions of Use and Privacy Policy.
All Rights Reserved. Please read our Conditions of Use and Privacy Policy.