


Air Campaigns
Want to start or join a group build? This is where to start.
Want to start or join a group build? This is where to start.
Hosted by Frederick Boucher, Michael Satin
OFFICIAL: Hangar Queen 2 Campaign

Snorri23

Joined: March 25, 2010
KitMaker: 514 posts
AeroScale: 244 posts
Posted: Friday, May 04, 2012 - 03:08 AM UTC
On the Do24 I have noticed that there are support wires going from upper wing strut to lower. I only have crude photos showing that they exist. Other than that the exact location is unknown to me. Anyone able to clarify the locals for me? Thanks in advance. AS for the progress I have the cream paint on the upper wing and RLM 65 on the wing as well and hull. Still figuring out how to mask the red crosses so that I may be able to paint them.

woltersk

Joined: May 27, 2003
KitMaker: 1,026 posts
AeroScale: 215 posts
Posted: Monday, May 07, 2012 - 03:21 PM UTC
Not so much of an update as me playing around. I did some filling and sanding then dry fit some of the major components.

Can't wait to get to the point where I can actually attach the wings and vertical tail.
Keith
Can't wait to get to the point where I can actually attach the wings and vertical tail.
Keith


Jessie_C

Joined: September 03, 2009
KitMaker: 6,965 posts
AeroScale: 6,247 posts

Posted: Monday, May 07, 2012 - 04:26 PM UTC
Quoted Text
On the Do24 I have noticed that there are support wires going from upper wing strut to lower. I only have crude photos showing that they exist. Other than that the exact location is unknown to me. Anyone able to clarify the locals for me? Thanks in advance. AS for the progress I have the cream paint on the upper wing and RLM 65 on the wing as well and hull. Still figuring out how to mask the red crosses so that I may be able to paint them.
This picture shows the only rigging is a pair of wires in an X between the outer wing struts.

Are those the ones you're looking at?
Here's a more modern airframe.

Here's a link to a really large version of that second picture.

md72

#439
Joined: November 05, 2005
KitMaker: 4,950 posts
AeroScale: 3,192 posts

Posted: Wednesday, May 16, 2012 - 05:19 PM UTC
Getting closer:
Paint and decals in place. Time to start the fiddly bits, but, the tires went missing????


My plan is to build it with the wings folded up and secured in place by some rods. Try to make use use of the kit as designed.
Paint and decals in place. Time to start the fiddly bits, but, the tires went missing????
My plan is to build it with the wings folded up and secured in place by some rods. Try to make use use of the kit as designed.


windysean
Joined: September 11, 2009
KitMaker: 1,917 posts
AeroScale: 563 posts
Posted: Thursday, May 17, 2012 - 01:58 AM UTC
Coming along nicely, everyone!
Thanks, Jessica, for finding those pics for Trevor.
Keith, probably hard not to play around with such a big 1/32 aircraft taking up the entire workroom, I bet!
md, have those wheels rolled away somewhere?
Carry on.
-Sean
Thanks, Jessica, for finding those pics for Trevor.
Keith, probably hard not to play around with such a big 1/32 aircraft taking up the entire workroom, I bet!
md, have those wheels rolled away somewhere?
Carry on.
-Sean
md72
#439
Joined: November 05, 2005
KitMaker: 4,950 posts
AeroScale: 3,192 posts
Posted: Thursday, May 17, 2012 - 03:10 AM UTC
Yeah, I recall that they had toothpicks sruck into the hubs. Probably movitated themselves into the cement floor monster...... 
md72
#439
Joined: November 05, 2005
KitMaker: 4,950 posts
AeroScale: 3,192 posts
Posted: Saturday, May 26, 2012 - 05:13 PM UTC
Found the wheels. They'd been safely packed away with other loose parts.
Anyhow, I got it together. I'm calling this one done.


Anyhow, I got it together. I'm calling this one done.

MLD
Joined: July 21, 2002
KitMaker: 3,569 posts
AeroScale: 419 posts
Posted: Wednesday, May 30, 2012 - 07:41 AM UTC
Whew.. made it!
The Grosventor House DH 88 in 1/72 from Airfix, thanks to George Oh for the decals.
I did switch things up and do the nearly ootb one as Grosventor House instead of as Black Magic as planned.
I do hear the Airfix is re-re-releasing the kit this year with "The Green 'un" markings, so I'll do the third later I suppose.
To quote the dog, this kit is RUFF!
bad seams, thick canopy, mold shift, seam lines and the like..
almost as much putty here as plastic.
The canopy was so bad that, after trying to mask the red lines, I ended up cheaping out and using the black border line around the decals as canopy framing, held down with a coat of Future
here's an old in-progress pic

and the finished pics.


The 1934 on the tail is to help me remember the order for the kits in the timeline hanging from my classroom ceiling. I'm getting old and the memory aint what it used to be..

I'll shoot a pic of it in the timeline of powered flight hanging from the classroom ceiling tomorrow.
next up, something a little less painful. Trumpeter Su27 UB perhaps?
Mike
The Grosventor House DH 88 in 1/72 from Airfix, thanks to George Oh for the decals.
I did switch things up and do the nearly ootb one as Grosventor House instead of as Black Magic as planned.
I do hear the Airfix is re-re-releasing the kit this year with "The Green 'un" markings, so I'll do the third later I suppose.
To quote the dog, this kit is RUFF!
bad seams, thick canopy, mold shift, seam lines and the like..
almost as much putty here as plastic.
The canopy was so bad that, after trying to mask the red lines, I ended up cheaping out and using the black border line around the decals as canopy framing, held down with a coat of Future
here's an old in-progress pic
and the finished pics.
The 1934 on the tail is to help me remember the order for the kits in the timeline hanging from my classroom ceiling. I'm getting old and the memory aint what it used to be..
I'll shoot a pic of it in the timeline of powered flight hanging from the classroom ceiling tomorrow.
next up, something a little less painful. Trumpeter Su27 UB perhaps?
Mike
Jessie_C
Joined: September 03, 2009
KitMaker: 6,965 posts
AeroScale: 6,247 posts
Posted: Thursday, May 31, 2012 - 02:00 PM UTC
Hello, Bartender. I'd like a white Russian please.
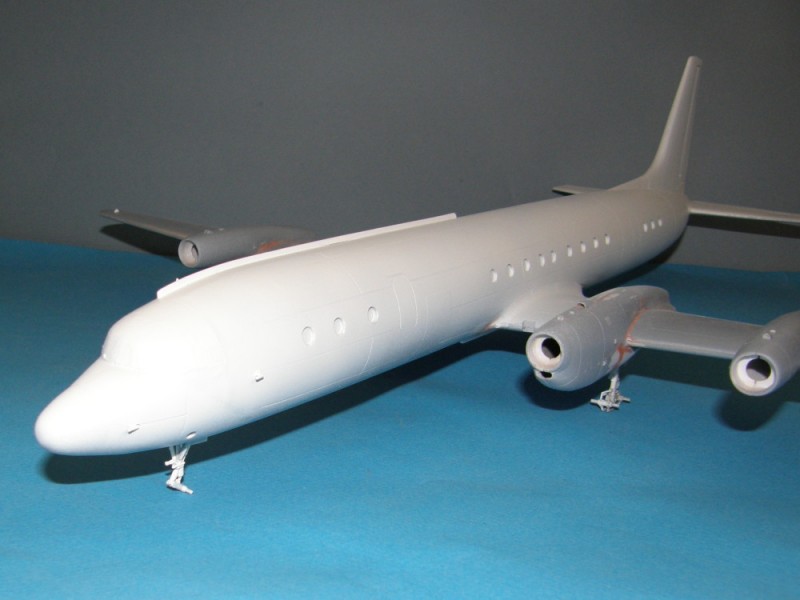
There are a few more things to glue together. AModel in their infinite wisdom decided that all the wheels should be in halves. The main wheel hubs are separate, which makes painting easier. I have the props done (each of them made up of 8 parts in a similar manner to those in Roden's An-12) but they still need a lot of filling and sanding before I can glue them in place. Each window and light lens is a separate clear part, and they all have to be glued to the fibreglas. I'm going to see about using clear gloss paint to stick them in place instead of superglue so I don't fog them up irretrievably.
There are a few more things to glue together. AModel in their infinite wisdom decided that all the wheels should be in halves. The main wheel hubs are separate, which makes painting easier. I have the props done (each of them made up of 8 parts in a similar manner to those in Roden's An-12) but they still need a lot of filling and sanding before I can glue them in place. Each window and light lens is a separate clear part, and they all have to be glued to the fibreglas. I'm going to see about using clear gloss paint to stick them in place instead of superglue so I don't fog them up irretrievably.
woltersk
Joined: May 27, 2003
KitMaker: 1,026 posts
AeroScale: 215 posts
Posted: Monday, June 11, 2012 - 03:03 PM UTC
My first time using the 'stretched spruce hole filling method', and I must say, it works well.
Glued them in:

Cut them with a utility razor to get it as flush as possible (kids, do not attempt this without adult supervision):

Voila! Just needs some light sanding:

Why am I filling in four hard points, you ask? One, to build this Block 15 as a pure, slicked down, interceptor which I worked on at Moidy AFB in the late '80s. And two, because this cheap knock off kit didn't come with all the missile pylons!
Keith
Glued them in:
Cut them with a utility razor to get it as flush as possible (kids, do not attempt this without adult supervision):
Voila! Just needs some light sanding:
Why am I filling in four hard points, you ask? One, to build this Block 15 as a pure, slicked down, interceptor which I worked on at Moidy AFB in the late '80s. And two, because this cheap knock off kit didn't come with all the missile pylons!
Keith
windysean
Joined: September 11, 2009
KitMaker: 1,917 posts
AeroScale: 563 posts
Posted: Tuesday, June 12, 2012 - 01:30 AM UTC
Whoa! Hold on!  I really should have checked my own campaign once in a while. I've been a busy, good employee lately and hadn't noticed the updates here.
Excellent builds, Mark and Mike!
Mark, glad your detectives found those lost wheels (reminds me of the Kenny Rogers spoof from back in the day, "You picked a fine time to leave me loose wheel") She turned out really well.
Mike, that gloss red is spectacular!
Jessie, you get a rimshot for the "White Russian" joke. It's obvious how much you really enjoy the hobby, never doing the easy kits. You sure do fine work though!
Keith, excellent work filling those holes. The technique seems to have worked, because in your final image, the holes are well-hidden.
Thanks, everyone! Look for me to join with my build in July or so.
-Sean H.
I really should have checked my own campaign once in a while. I've been a busy, good employee lately and hadn't noticed the updates here.Excellent builds, Mark and Mike!
Mark, glad your detectives found those lost wheels (reminds me of the Kenny Rogers spoof from back in the day, "You picked a fine time to leave me loose wheel") She turned out really well.
Mike, that gloss red is spectacular!
Jessie, you get a rimshot for the "White Russian" joke. It's obvious how much you really enjoy the hobby, never doing the easy kits.
You sure do fine work though!Keith, excellent work filling those holes. The technique seems to have worked, because in your final image, the holes are well-hidden.
Thanks, everyone! Look for me to join with my build in July or so.
-Sean H.

29Foxtrot

Joined: September 19, 2003
KitMaker: 708 posts
AeroScale: 674 posts

Posted: Tuesday, June 12, 2012 - 03:29 AM UTC
Hi All,
Been busy with way too many consignment builds and a recent Model Expo entry, but now I can get back to finishing those listed builds for this campaign, the Beaufighter is getting almost done as well as the 'Black Cat'.
More to follow later.
Been busy with way too many consignment builds and a recent Model Expo entry, but now I can get back to finishing those listed builds for this campaign, the Beaufighter is getting almost done as well as the 'Black Cat'.
More to follow later.

windysean
Joined: September 11, 2009
KitMaker: 1,917 posts
AeroScale: 563 posts
Posted: Wednesday, June 13, 2012 - 09:40 AM UTC
MLD, that timeline must look cool! Please don't forget to post a final photo to the campaign gallery, here !
thanks,
Sean.
thanks,
Sean.

Middle_Franconian

Joined: January 02, 2011
KitMaker: 279 posts
AeroScale: 239 posts

Posted: Friday, June 15, 2012 - 08:51 AM UTC
Hello all,
I´m in with my Revell (ex Hasegawa) 1:48 F-4M FGR 2.
I started end of 2010 and then packed it away. Noe its time for finishing!
It is a really nice kit. I even cannot really say why it became a Hangar Queen...
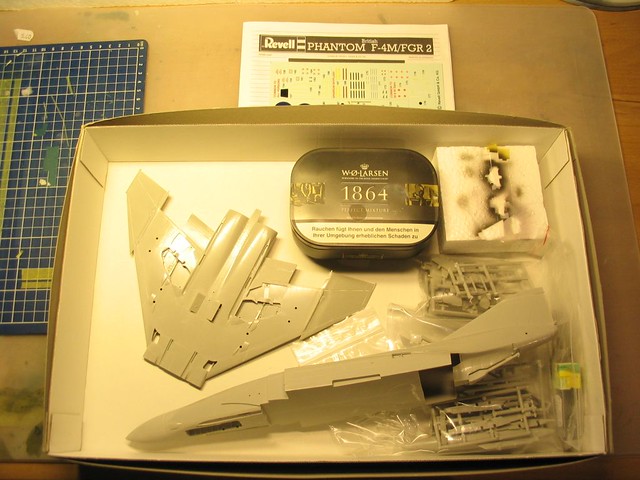
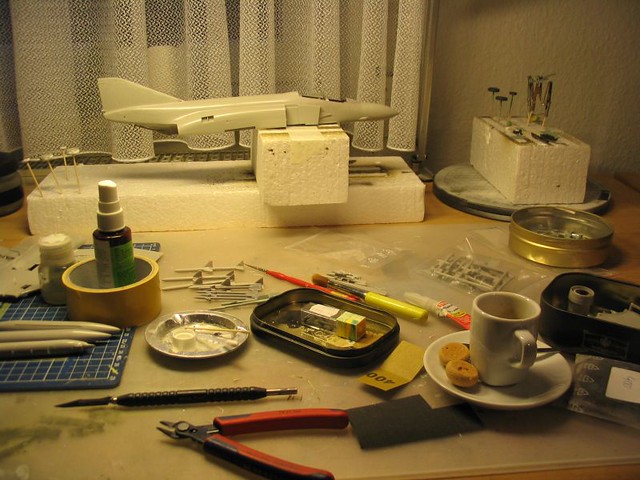
More pictures will follow!
Regards,
Sebastian
I´m in with my Revell (ex Hasegawa) 1:48 F-4M FGR 2.
I started end of 2010 and then packed it away. Noe its time for finishing!
It is a really nice kit. I even cannot really say why it became a Hangar Queen...
More pictures will follow!
Regards,
Sebastian
Jessie_C
Joined: September 03, 2009
KitMaker: 6,965 posts
AeroScale: 6,247 posts
Posted: Tuesday, June 19, 2012 - 09:36 AM UTC
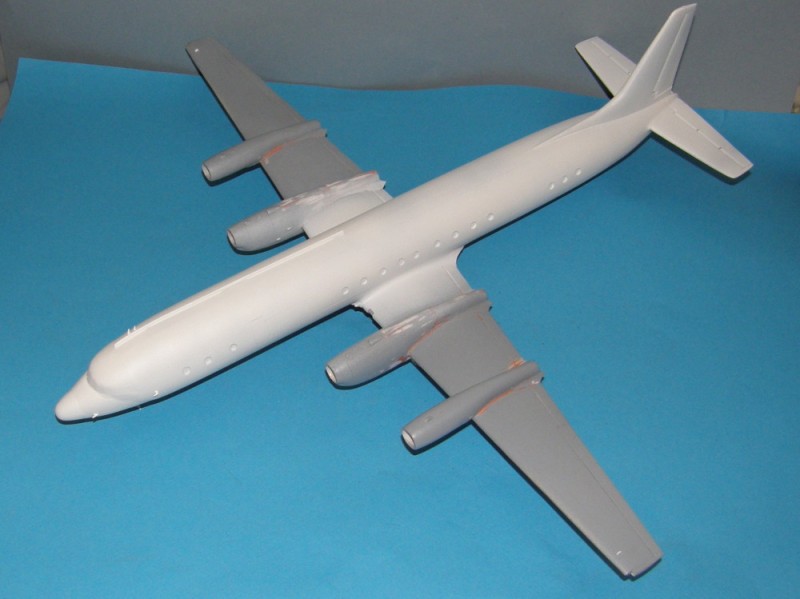
The IL-18 makes another of its rare appearances. Since Russian airplanes corroded quickly, I'm justified in using silver spray instead of meatiliser; the flatish finish is just what I'm after.
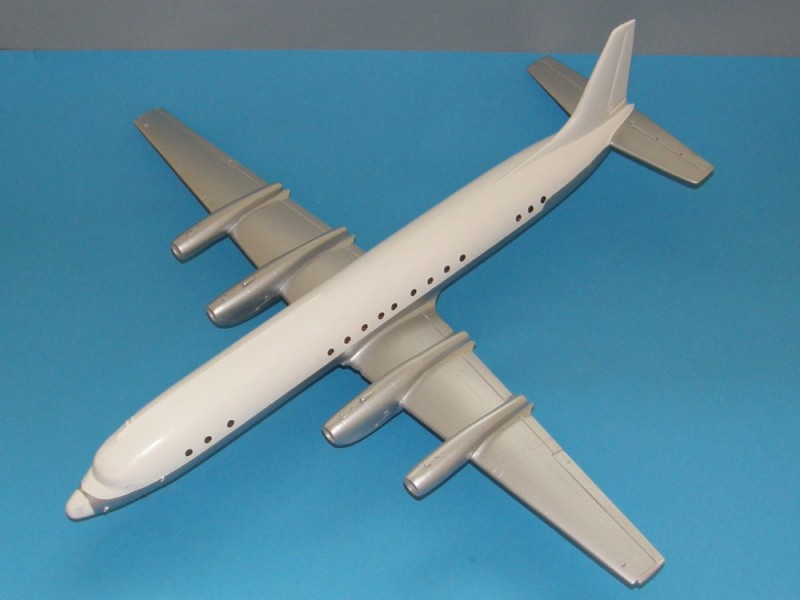
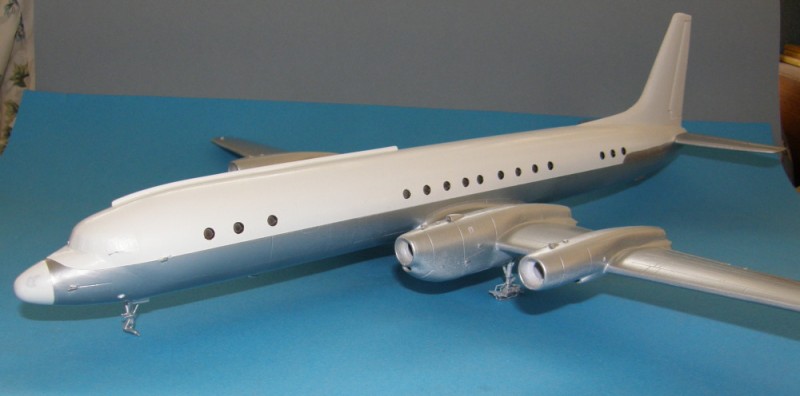
Not much to do now. I have to finish filling in all the divots in the propeller assemblies before painting them, glue the cabin windows into their depressions, apply decals and finish the wheels.
Oh, and that masking has to come off the cockpit windows. That's going to be fun
Not much to do now. I have to finish filling in all the divots in the propeller assemblies before painting them, glue the cabin windows into their depressions, apply decals and finish the wheels.
Oh, and that masking has to come off the cockpit windows. That's going to be fun

tinbanger
Joined: February 04, 2008
KitMaker: 2,507 posts
AeroScale: 1,814 posts

Posted: Tuesday, June 19, 2012 - 11:59 AM UTC
Hi Jessica
I like the flat silver look,to often i find that models are over done with alclad etc.
What make of white paint did you use?

I like the flat silver look,to often i find that models are over done with alclad etc.
What make of white paint did you use?

Jessie_C
Joined: September 03, 2009
KitMaker: 6,965 posts
AeroScale: 6,247 posts
Posted: Tuesday, June 19, 2012 - 12:31 PM UTC
It's a car paint that I got at Canadian Tire: Duplicolor Polar/Arctic White. It's a pretty hot paint, so ensure there's a good undercoat down and mist on a couple coats before applying a full one. It dries to a nice satin finish which is better than full gloss on these big monsters
tinbanger
Joined: February 04, 2008
KitMaker: 2,507 posts
AeroScale: 1,814 posts
Posted: Tuesday, June 19, 2012 - 10:36 PM UTC
Quoted Text
It's a car paint that I got at Canadian Tire: Duplicolor Polar/Arctic White. It's a pretty hot paint, so ensure there's a good undercoat down and mist on a couple coats before applying a full one. It dries to a nice satin finish which is better than full gloss on these big monsters
Thank you for the info.
I have a few models on my list that require white.
I get my primers from Canadian Tire so I should have no problem.
md72
#439
Joined: November 05, 2005
KitMaker: 4,950 posts
AeroScale: 3,192 posts
Posted: Wednesday, June 20, 2012 - 04:25 AM UTC
Wow Jess, that's looking good. Hmm Canadian Tire, I'm just a little too south for that. May have to try another source.
May have to try another source.windysean
Joined: September 11, 2009
KitMaker: 1,917 posts
AeroScale: 563 posts
Posted: Wednesday, June 20, 2012 - 06:11 AM UTC
Quoted Text
Wow Jess, that's looking good. Hmm Canadian Tire, I'm just a little too south for that.
So Washington state is actually too far south for something?
Sebastian welcome aboard! That's exactly the kind of plane we want to see here. Nice variant too, with the FGR (Federal German Republic, right?).
MLD I see your red racer made it into the gallery, so call that one done and back into the sky.
-Sean H.
29Foxtrot
Joined: September 19, 2003
KitMaker: 708 posts
AeroScale: 674 posts
Posted: Thursday, June 21, 2012 - 09:16 AM UTC
Hi All,
Jess, your Il-18 is looking good.
I tried a few different things out on 2 of my birds, in between my consignment builds, with the 'Black Cat' I used the RAAF Maketar Insignia Masks, [the O is a little out of sink with the X], while trying out the Tamiya 'Panel Line Color' on the TBF Avenger, I hope to get the Avenger turret painted over the weekend.


More later.
Jess, your Il-18 is looking good.
I tried a few different things out on 2 of my birds, in between my consignment builds, with the 'Black Cat' I used the RAAF Maketar Insignia Masks, [the O is a little out of sink with the X], while trying out the Tamiya 'Panel Line Color' on the TBF Avenger, I hope to get the Avenger turret painted over the weekend.
More later.
Middle_Franconian
Joined: January 02, 2011
KitMaker: 279 posts
AeroScale: 239 posts
Posted: Friday, June 22, 2012 - 06:39 PM UTC
Hi!
@ Sean: thanks! FGR means in this case Fighter/Ground Attack/Reconaissance. It is a British Phantom F-4 M. To me an iconic fighter of the Cold War. I think many of us have already seen photos of British Phantoms intercepting Russian Bears (or such planes Jessie always builds) over the Northern Sea. Click here: Bear Hunting
Regards,
Sebastian
Quoted Text
Sebastian welcome aboard! That's exactly the kind of plane we want to see here. Nice variant too, with the FGR (Federal German Republic, right?).
-Sean H.
@ Sean: thanks! FGR means in this case Fighter/Ground Attack/Reconaissance. It is a British Phantom F-4 M. To me an iconic fighter of the Cold War. I think many of us have already seen photos of British Phantoms intercepting Russian Bears (or such planes Jessie always builds) over the Northern Sea. Click here: Bear Hunting
Regards,
Sebastian
tinbanger
Joined: February 04, 2008
KitMaker: 2,507 posts
AeroScale: 1,814 posts
Posted: Friday, June 22, 2012 - 11:07 PM UTC
The Bear has outlived most of the AC's in the Photos!!!
woltersk
Joined: May 27, 2003
KitMaker: 1,026 posts
AeroScale: 215 posts
Posted: Saturday, June 23, 2012 - 03:38 AM UTC
Quoted Text
The Bear has outlived most of the AC's in the Photos!!!
I could swear I recently read that the B-52 will be in service until 2040!
woltersk
Joined: May 27, 2003
KitMaker: 1,026 posts
AeroScale: 215 posts
Posted: Saturday, June 23, 2012 - 04:21 PM UTC
Squeeze play? Medieval torture?

Dry fitting the wings in place led to adjusting the fuselage slots for the wing tabs resulting in a popped glue seam. The best way to get a grip on the compound curves of the blended wing root while the glue cured was with the vise.
Keith
Dry fitting the wings in place led to adjusting the fuselage slots for the wing tabs resulting in a popped glue seam. The best way to get a grip on the compound curves of the blended wing root while the glue cured was with the vise.
Keith
 |

WEB HOSTING BY


Copyright ©2021 AeroScale and Kitmaker Network, a subsidiary of Silver Star Enterprises
All Rights Reserved. Please read our Conditions of Use and Privacy Policy.
All Rights Reserved. Please read our Conditions of Use and Privacy Policy.