World War II
Discuss WWII and the era directly before and after the war from 1935-1949.
Hosted by Rowan Baylis
1/48 B-17F Build - 303rd BGs Luscious Lady
Dragon164
#226
_VISITCOMMUNITY
British Columbia, Canada
Joined: February 20, 2012
KitMaker: 1,909 posts
AeroScale: 508 posts
Posted: Tuesday, September 23, 2014 - 09:31 PM UTC
Brian,
It's coming along nicely lots of ideas for when I get to one of mine.

Cheers Rob.
This post was removed.
Joel_W
Staff MemberAssociate Editor
AUTOMODELER
_VISITCOMMUNITY
New York, United States
Joined: December 04, 2010
KitMaker: 11,666 posts
AeroScale: 7,410 posts
Posted: Wednesday, September 24, 2014 - 09:38 AM UTC
Brian,
Glad to see an update of any kind. I was starting to get that sinking feeling that you abandoned the B-17 project for the time being.

Your build plan looks very doable for you. Really a nice job cleaning up that bulkhead. Looking forward to how it looks once the details are added and painted.

Your B-29 looks amazing. Only 4 years in the making. Talk about being able to concentrate and stay focused.

Joel
Redhand
#522
_VISITCOMMUNITY
New Jersey, United States
Joined: January 20, 2013
KitMaker: 1,460 posts
AeroScale: 1,443 posts
Posted: Thursday, September 25, 2014 - 02:14 PM UTC
It would be hard to just up and stop with all the wonderful encouragement and support I've received in this build blog! Just have to reconcile myself to the fact that this is a major project that will take a lot of time. Guess it's a "the fun is in the journey" kinda thing.

Tonight I painted the radio room bulkhead bronze green and the rear bomb-bay bulkhead aluminum. Will start posting as details are added to the left rear bulkhead.

Thanks again everybody.
Redhand
#522
_VISITCOMMUNITY
New Jersey, United States
Joined: January 20, 2013
KitMaker: 1,460 posts
AeroScale: 1,443 posts
Posted: Tuesday, September 30, 2014 - 01:33 PM UTC
SLOW PROGRESS, BUT PROGRESS NONETHELESS

The left rear of the after bomb-bay bulkhead. You can easily see where I'm headed with the oxygen and fuel transfer stations here. Lots more details to come.


Oddly, the oxygen bracket appears to be wood. I painted it a darker shade than the standard plywood color for the sake of variety. That white pipe between the oxygen regulator and instruments will likely be painted chrome silver next time, and may be replaced with something a bit thinner.

Joel_W
Staff MemberAssociate Editor
AUTOMODELER
_VISITCOMMUNITY
New York, United States
Joined: December 04, 2010
KitMaker: 11,666 posts
AeroScale: 7,410 posts
Posted: Wednesday, October 01, 2014 - 06:23 AM UTC
Brian,
It actually looks like one of those old time wall mounted phones.

Joel
Redhand
#522
_VISITCOMMUNITY
New Jersey, United States
Joined: January 20, 2013
KitMaker: 1,460 posts
AeroScale: 1,443 posts
Posted: Monday, October 06, 2014 - 01:57 PM UTC
MORE SLOW SLOGGING

Man, this is tedious! Next B-17 I build will DEFINITELY be with the bomb-bay closed. Anyway, here you can see that I added wire simulating piping from the regulator dials to the regulator itself plus piping curling around the bottom of the portable bottle bracket to the left to the portable bottle connector. I used some of the True Details 1/48 fittings for this. I do like the touch where there is a connector to the lower bulkhead going through it. In the real thing that had to connect to a nest of fixed oxygen bottles that were under the radio room floor.


This stuff will actually be visible through the open bomb bay doors so I guess [?] it's worth the effort. Time will tell.

Next I'm going to be adding the base for the hand fuel pump and then curling the orygen hose around it, as the photo shows. Then it will be on the the pump itself and electrical wiring and piping. Plus, just for laughs, I will add the relief tube! (Only 1/4 inch kit I know that has one is the Accurate Miniatures SBD though, in our super detail age, that's probably not correct any longer).

I must tell you that the after bulkhead itself doesn't bear close scrutiny. As you can see even from this distance shot, it's pretty rough. Then again, these areas aren't going to get much scrutiny the way that exterior surfaces will, just an impression looking up from the bottom. I do have a large display case with glass shelves so some of it may be visible that way, in addition to the "pick it up and turn it over" method.

Later * * *

Joel_W
Staff MemberAssociate Editor
AUTOMODELER
_VISITCOMMUNITY
New York, United States
Joined: December 04, 2010
KitMaker: 11,666 posts
AeroScale: 7,410 posts
Posted: Tuesday, October 07, 2014 - 09:58 AM UTC
Brian,
What I can see of the Oxygen bottle and tubing, it does look good. But as you said, I do question just how much of your detailing one will see even looking up through the bomb bay on glass shelves. Can't imagine turning over the "beast" just so someone can see the super detailing in the bomb bay. Seems mighty risky to me.
Joel
Redhand
#522
_VISITCOMMUNITY
New Jersey, United States
Joined: January 20, 2013
KitMaker: 1,460 posts
AeroScale: 1,443 posts
Posted: Tuesday, October 07, 2014 - 10:06 AM UTC

Quoted Text

Can't imagine turning over the "beast" just so someone can see the super detailing in the bomb bay. Seems mighty risky to me.
Joel


Agreed. May work better on the glass shelf, or with a small mirror positioned under the bomb bay. Will continue a bit tonight on that pump base on the bulkhead.
Redhand
#522
_VISITCOMMUNITY
New Jersey, United States
Joined: January 20, 2013
KitMaker: 1,460 posts
AeroScale: 1,443 posts
Posted: Sunday, October 12, 2014 - 02:19 AM UTC
AND YET MORE SLOGGING

The extra detail - oxygen hose - added to the bomb-bay after bulkhead is self evident, as is the base for the hand fuel transfer pump. In this picture below you can see how it compares to the real thing.


Here is a close-up of the bulkhead.


Below the bulkhead is a mundane but actually very significant piece of work. I shortened the bomb-bay catwalk at each end and re-cut the attachment points to the forward and aft bulkheads so that there will be a perfect fit with the edges of the fore and aft bomb-bay door openings. Before, the after bulkhead actually was indented a bit, and I felt this really had to be corrected.

My day job is interfering with build progress, but have no fear: I'm continuing with this. In too deep to think of laying it aside.
dammodeus
_VISITCOMMUNITY
Colorado, United States
Joined: February 01, 2009
KitMaker: 19 posts
AeroScale: 18 posts
Posted: Sunday, October 12, 2014 - 10:10 AM UTC
Looks great! What did you use for the lettering on the round oxygen regulator? Hard to see closely on my comp screen.
Thanks!
Ted
Redhand
#522
_VISITCOMMUNITY
New Jersey, United States
Joined: January 20, 2013
KitMaker: 1,460 posts
AeroScale: 1,443 posts
Posted: Sunday, October 12, 2014 - 11:13 AM UTC
Hi Dammodeus:

The decal I put on the yellow oxygen bottle is a random two line stencil from the Revell B-17F kit decal sheet that doesn't say anything about "oxygen." It's there simply because the bottle should have a stencil and from the angle and distance it will be seen when the kit is done it can't be read.

The red decal below the regulator is from the Airscale 1/48 cockpit placard set.

The face of the oxygen regulator itself is a pre-colored part left over from some of the extra Eduard brass sets I acquired for this build.

The next bit will be the fuel pump, handle and related piping. Then I'll do the relief tube and move to the back of the bulkhead/radio room front bulkhead.

Cheers.
Joel_W
Staff MemberAssociate Editor
AUTOMODELER
_VISITCOMMUNITY
New York, United States
Joined: December 04, 2010
KitMaker: 11,666 posts
AeroScale: 7,410 posts
Posted: Sunday, October 12, 2014 - 11:32 AM UTC
Brian,
The bulkhead looks really spectacular, and really closely resembles the actually photograph. I was wondering when you were going to start some detailing on the left side of the bulk head, but you beat me to it with the fuel pump, handle, and related plumbing.
Joel
dammodeus
_VISITCOMMUNITY
Colorado, United States
Joined: February 01, 2009
KitMaker: 19 posts
AeroScale: 18 posts
Posted: Sunday, October 12, 2014 - 04:07 PM UTC
Fantastic work, love those old bombers! Thanks for the info!
Redhand
#522
_VISITCOMMUNITY
New Jersey, United States
Joined: January 20, 2013
KitMaker: 1,460 posts
AeroScale: 1,443 posts
Posted: Saturday, October 25, 2014 - 12:06 PM UTC
SOME PEOPLE MAKE MODEL AIRPLANES: I BUILD BULKHEADS

At least that's how I feel today. I am wondering when this will EVER get done at the pace my day job dictates.

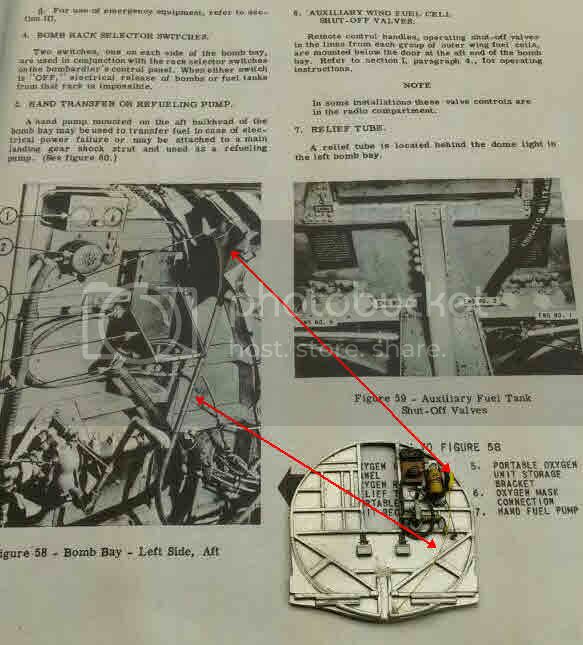
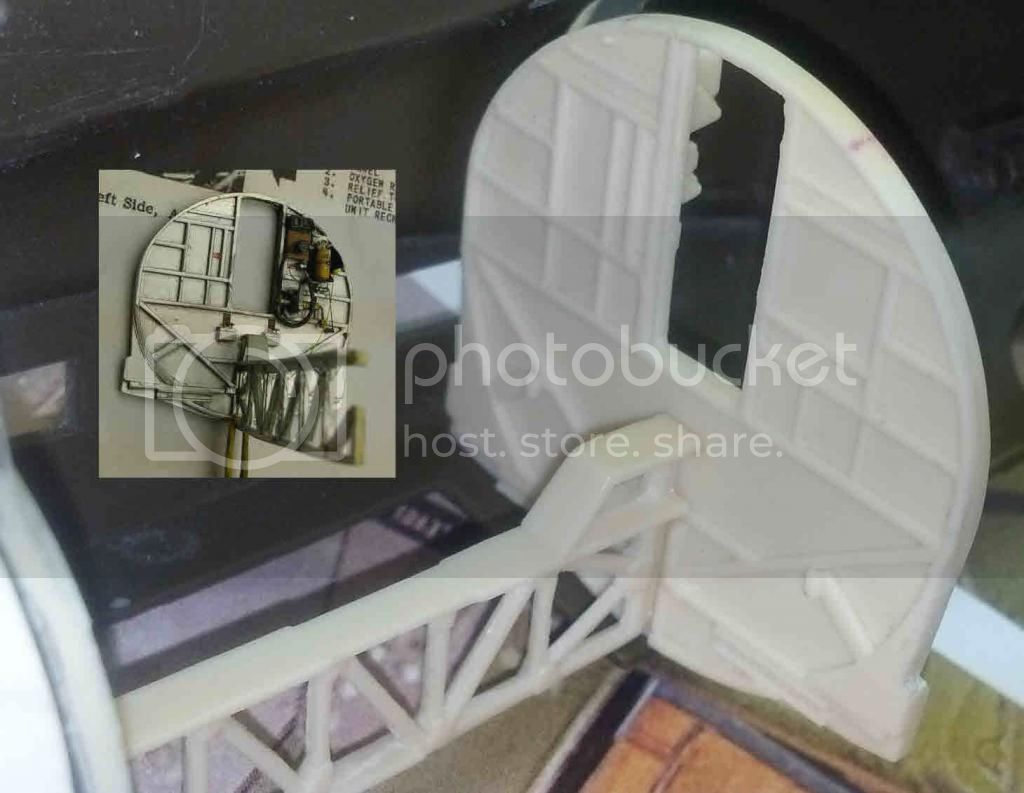
Anyway, tonight I basically finished the after bomb-bay bulkhead, except for a million other items that will have to be added when the space is complete, such as control cables. electrical wiring, and the bomb bay door actuators.

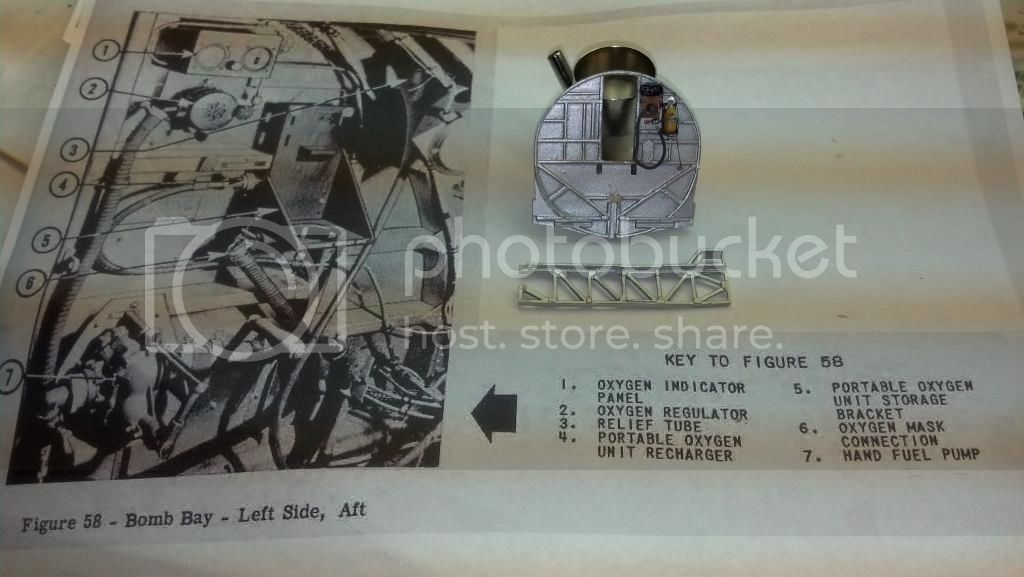
In general, I think the left rear fuel pump station, portable oxygen charging station, and "relief tube" came out OK. See below.


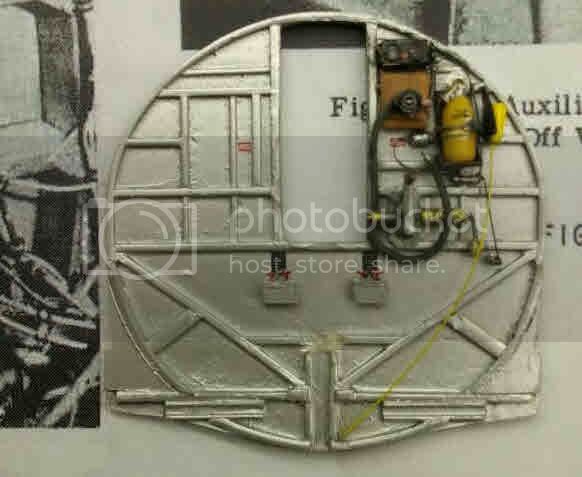
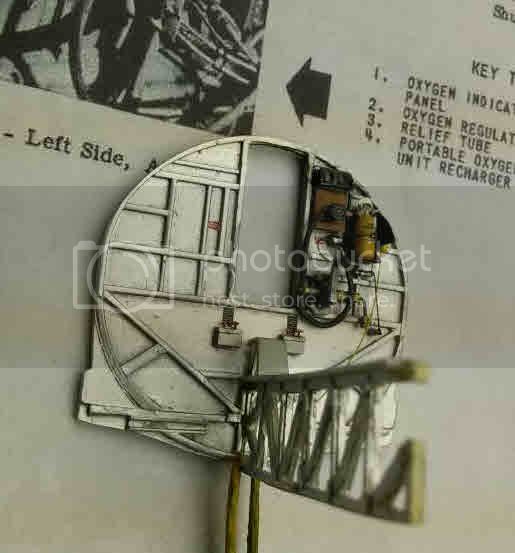
I was quite happy with how the pump came out. This shot gives an angled view with the catwalk in place.


The manual pump handle was scrounged from the spare parts box: it's the inertial starter handle from the venerable Monogram TBD kit. The other pump bits and pieces come from those helpful True Details connector sets I flogged in an earlier post.

I took a bit of artistic license with the dangling pump connector off to the right. Reason is that in the final build I am going to show the hose it connects to coiled and lashed to the catwalk. See below.


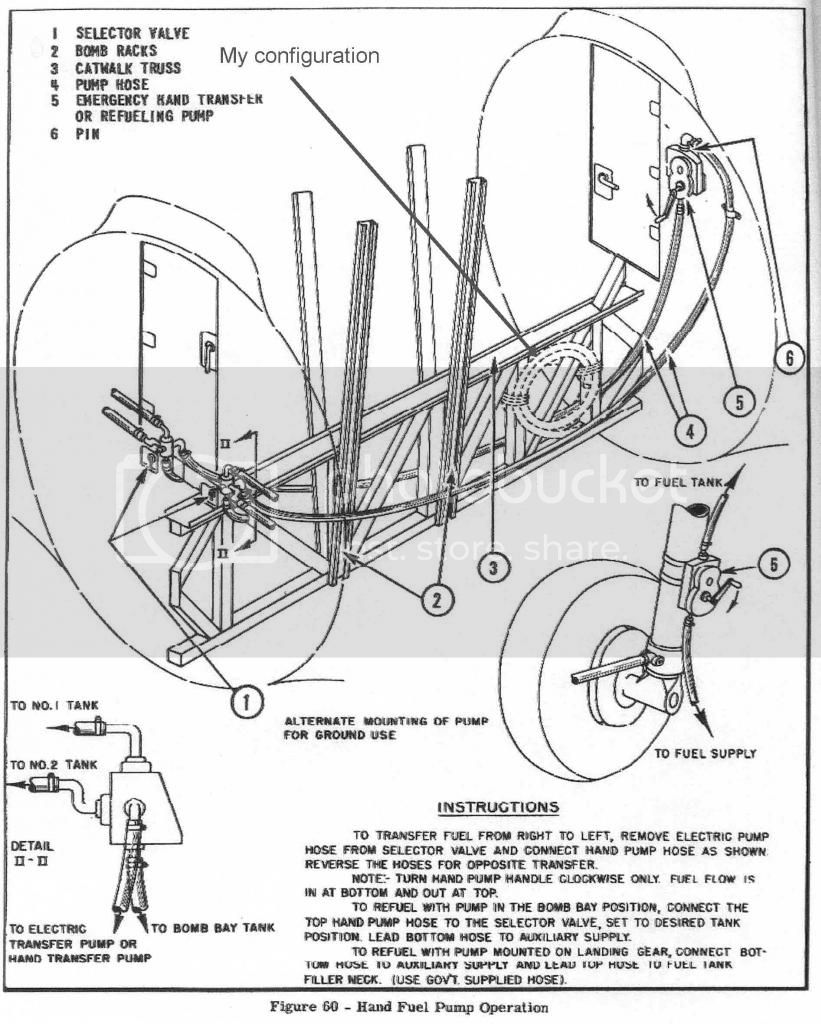
You will notice that the diagram configuration showing the pump is different from the photos. Well, we all know configurations changed over time. As for the hose, I figure there is no way it would have been fully deployed during a mission: it must have been stowed curled up during missions, available in the event the crew got REALLY desperate to transfer fuel manually. (Seems like quite a task while dodging fighters on the way back from "Target Germany"). Besides, ah, bombs are supposed to go in here.

I was originally going to curl the hose to the catwalk at this point in the build, but realized it will have to be offset from the door actuator drive-shaft that runs fore and aft under the catwalk where the hose curls around the top. Obviously, the shaft has to be installed first, and a clearance with the hose set up.

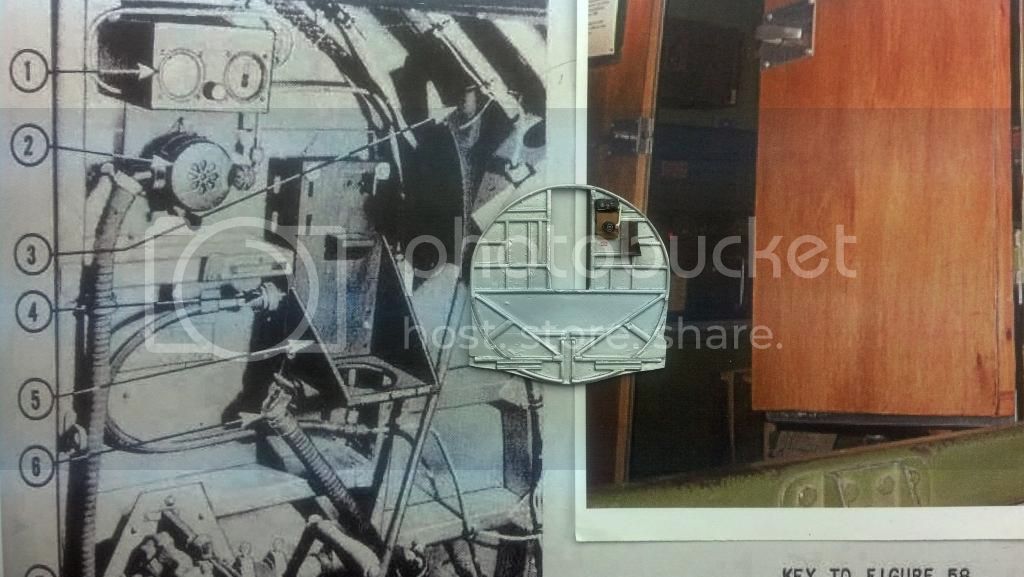
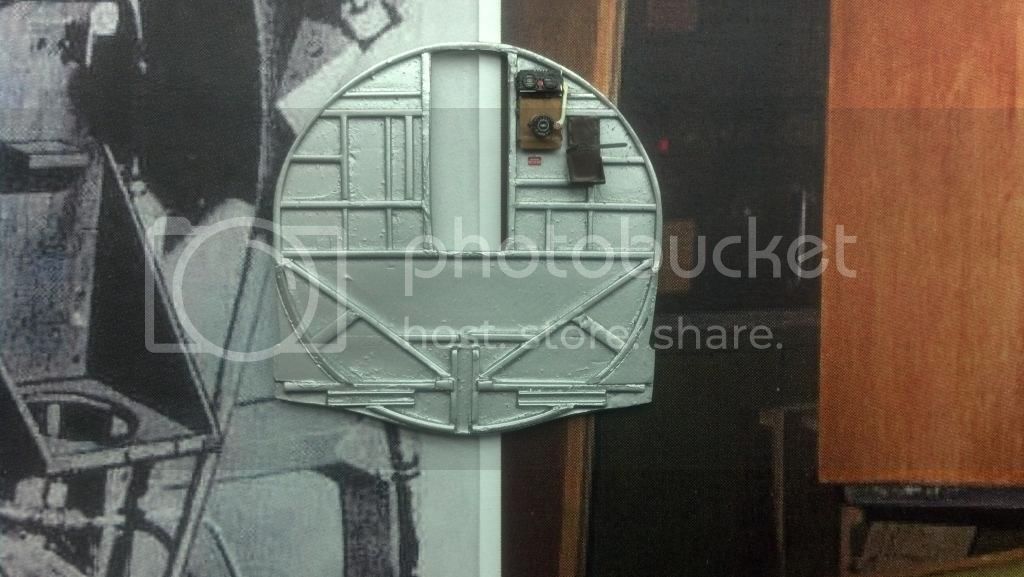
Which brings me to those little boxes and T-handles under the after bulkhead door. After doing all this work on the pump and hose, how could I leave out the valves to the fuel tanks? See below.


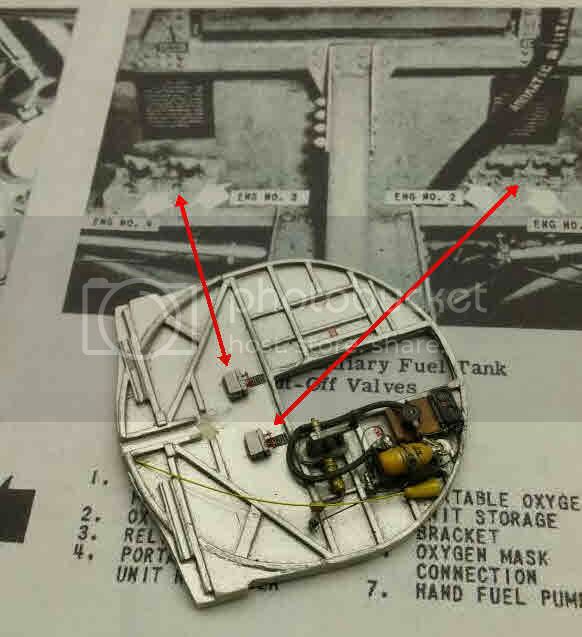
My scratch-built ones are a bit crude, but I'm not going for elegance in this space. Just look how grimy the space is in the maintenance manual picture.

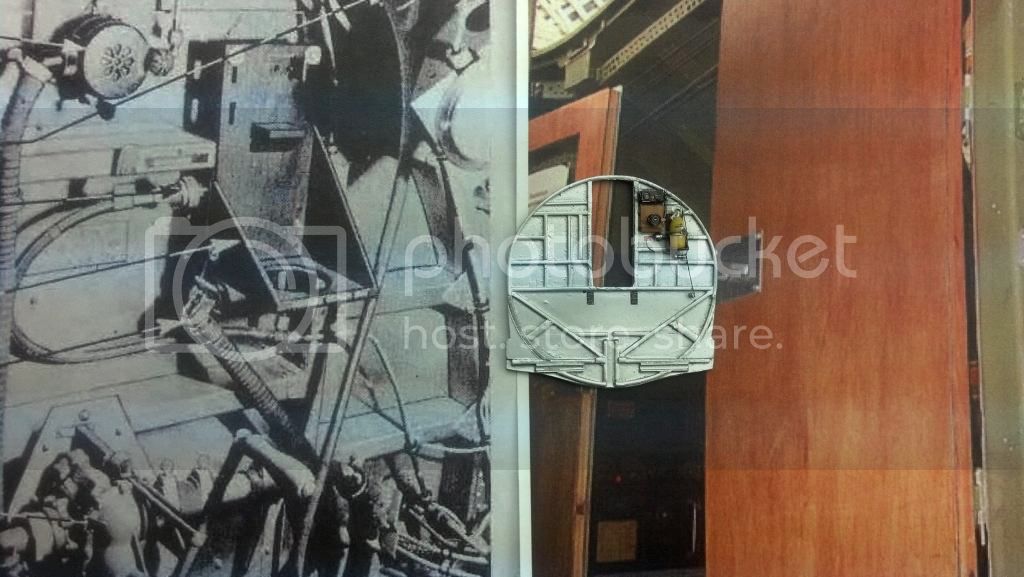
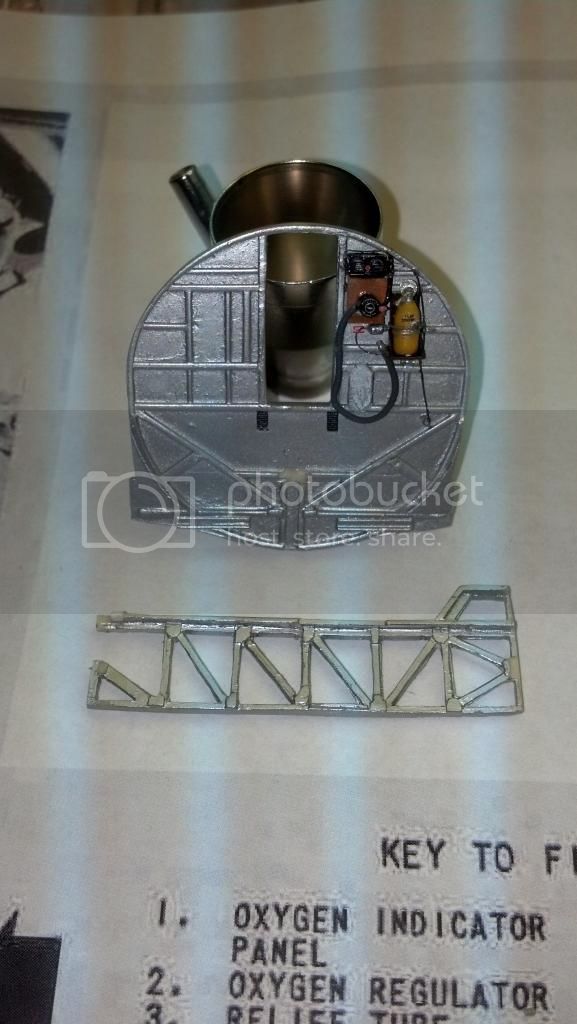
Finally, the relief tube, "located behind the dome light in the left bomb bay."


I took artistic licence again and decided to paint the tube and funnel at the top yellow: it seemed somehow appropriate. I do note that the hose in the picture is fairly light in color, so why not? Another bit of history lost in the "mists of time."

I do not know exactly where the relief tube exited the aircraft, so opted to place it at the bottom of the catwalk near the centerline. That's an "educated guess" because I know talking with the Hullar crew gunners when researching Half A Wing that there were engineering problems with this configuration.

Specifically, Merlin Miller, the tail gunner, told me a story that one of the crew just had to go, and when he used the tube the urine splashed all over the ball turret, and got inside the turret. He said everyone's earphones were ringing from the ball gunner's cursing when he realized why he suddenly got wet.

So, I guess the relief tube should be classified as a piece of "emergency equipment."

I will next be moving to the rear of this part to do the forward bulkhead of the radio room. Then I will return to the bomb-bay and side walls, etc. I close with a "before and after" shot of the after bulkhead.

Joel_W
Staff MemberAssociate Editor
AUTOMODELER
_VISITCOMMUNITY
New York, United States
Joined: December 04, 2010
KitMaker: 11,666 posts
AeroScale: 7,410 posts
Posted: Sunday, October 26, 2014 - 03:26 AM UTC
Brian,
The bomb bay bulkhead detailing is simply amazing. And once painted it just comes to life. Your build continues to reach new levels.

Now go quit your day job so that you can finish your build before I'm too old or gone to appreciate your efforts.

Joel
Scrodes
_VISITCOMMUNITY
Ontario, Canada
Joined: July 22, 2012
KitMaker: 771 posts
AeroScale: 763 posts
Posted: Sunday, October 26, 2014 - 05:16 AM UTC
Great progress. Nice clean build. Once you're done you can repeat this in 1/32nd scale.
Joel_W
Staff MemberAssociate Editor
AUTOMODELER
_VISITCOMMUNITY
New York, United States
Joined: December 04, 2010
KitMaker: 11,666 posts
AeroScale: 7,410 posts
Posted: Monday, October 27, 2014 - 01:19 AM UTC

Quoted Text

Great progress. Nice clean build. Once you're done you can repeat this in 1/32nd scale.


Now that's pretty funny

I'm not so sure that Brian has that many years of constructive modeling left to build another master piece in 1/32 scale, nor the room to house it if he did.
Joel
Redhand
#522
_VISITCOMMUNITY
New Jersey, United States
Joined: January 20, 2013
KitMaker: 1,460 posts
AeroScale: 1,443 posts
Posted: Monday, October 27, 2014 - 01:41 AM UTC

Quoted Text


Quoted Text

Great progress. Nice clean build. Once you're done you can repeat this in 1/32nd scale.


Now that's pretty funny

I'm not so sure that Brian has that many years of constructive modeling left to build another master piece in 1/32 scale, nor the room to house it if he did.
Joel


As the Brits would say, "Not bloody likely!" Plus, I'm a 1/48 man.
Joel_W
Staff MemberAssociate Editor
AUTOMODELER
_VISITCOMMUNITY
New York, United States
Joined: December 04, 2010
KitMaker: 11,666 posts
AeroScale: 7,410 posts
Posted: Monday, October 27, 2014 - 03:51 AM UTC

Quoted Text


As the Brits would say, "Not bloody likely!" Plus, I'm a 1/48 man.


Brian,
But just think at how much more detail you could add. It's mind boggling just contemplating that.
Joel
Redhand
#522
_VISITCOMMUNITY
New Jersey, United States
Joined: January 20, 2013
KitMaker: 1,460 posts
AeroScale: 1,443 posts
Posted: Saturday, November 01, 2014 - 12:51 AM UTC
ON THE CATWALK

I'm a model you know what I mean
And I do my little turn on the catwalk


With apologies to "Right Said Fred." https://www.youtube.com/watch?v=39YUXIKrOFk

Before turning to the Radio Room forward bulkhead, I decided to finish the Catwalk. Below shot will show where I'm going, and some of the parts I cut up to get there. The black cone at the top of the transmission come from the Monogram 1/48 P-38 kit blast tubes for the nightfighter version, sprue pictured off to the right of photo. Plan to do another post this weekend when it's done.