

brian,
The one picture of your work isn't working. Just the actual bomb hoist picture shows up.
Joel
World War II
Discuss WWII and the era directly before and after the war from 1935-1949.
Discuss WWII and the era directly before and after the war from 1935-1949.
Hosted by Rowan Baylis
1/48 B-17F Build - 303rd BGs Luscious Lady
Joel_W

Joined: December 04, 2010
KitMaker: 11,666 posts
AeroScale: 7,410 posts
Posted: Monday, November 17, 2014 - 01:33 AM UTC


Redhand

#522
Joined: January 20, 2013
KitMaker: 1,460 posts
AeroScale: 1,443 posts
Posted: Monday, November 17, 2014 - 01:56 AM UTC
Quoted Text
brian,
The one picture of your work isn't working. Just the actual bomb hoist picture shows up.
Joel
Odd. It shows up on my computer just fine. It isn't much to write home about other than to show "he's working on it." But here it is again:

Joel_W
Joined: December 04, 2010
KitMaker: 11,666 posts
AeroScale: 7,410 posts
Posted: Monday, November 17, 2014 - 02:08 AM UTC
Brian,
It's way more then he's just working on it once you really start to look at all the little details already added to it.
Joel
It's way more then he's just working on it once you really start to look at all the little details already added to it.
Joel

berndm

Joined: March 26, 2014
KitMaker: 844 posts
AeroScale: 630 posts
Posted: Monday, November 17, 2014 - 01:02 PM UTC
The next steps of your "WOW" build, still enjoying the "show"
Redhand
#522
Joined: January 20, 2013
KitMaker: 1,460 posts
AeroScale: 1,443 posts
Posted: Tuesday, November 18, 2014 - 08:39 AM UTC
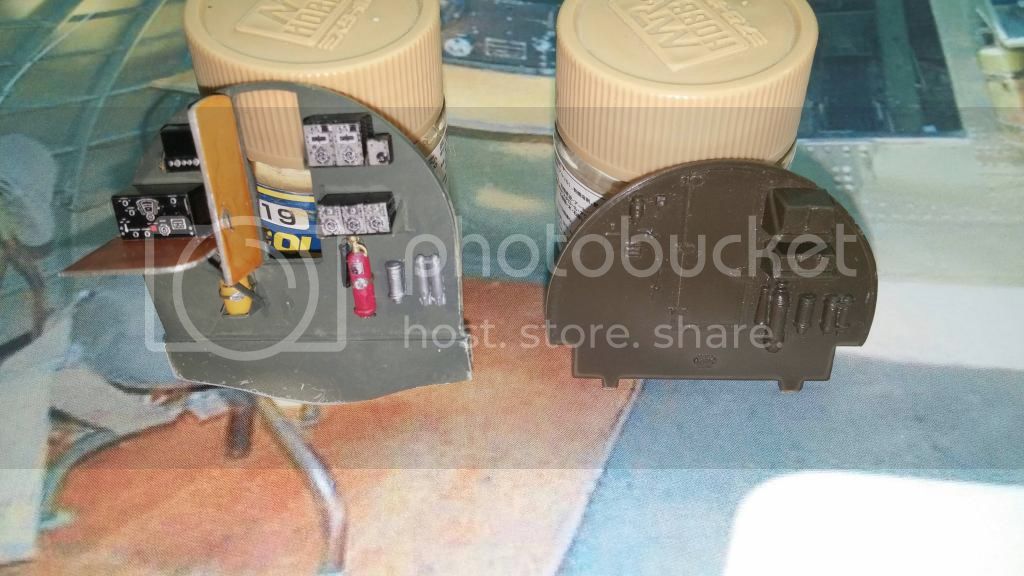
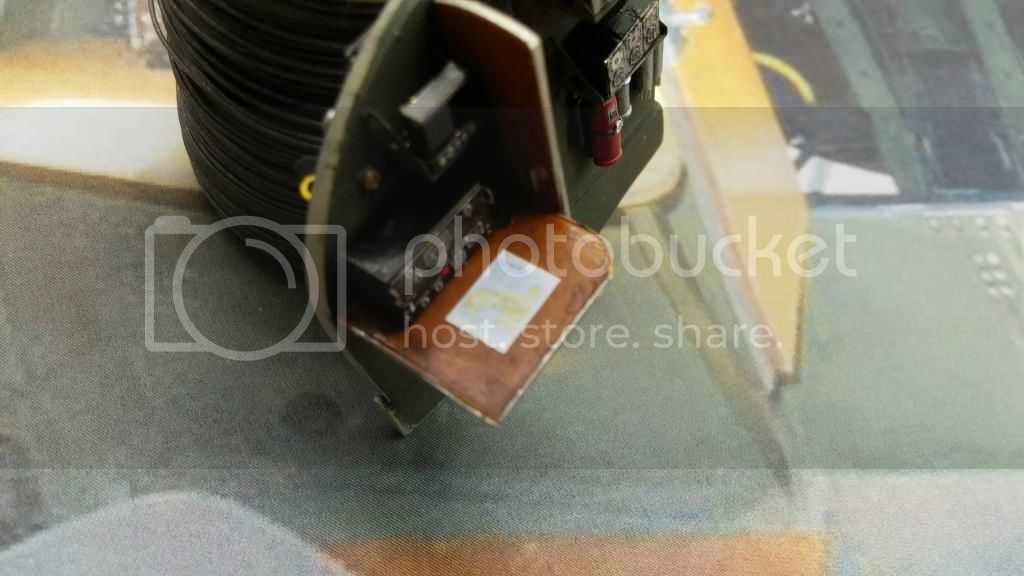
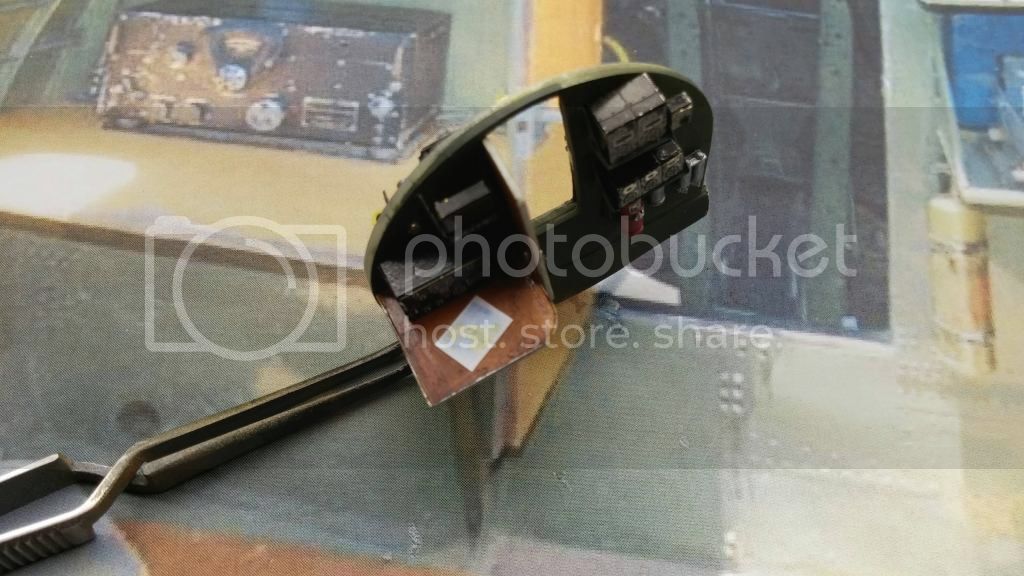
RADIO ROOM FRONT BULKHEAD: ALMOST DONE
The only thing left really at this point is painting the door and gluing it in the open position. Here are two views of the work so far.
When I get the door done and installed I'll show the completed part in comparison with the Monogram kit part, which is what this resin bulkhead is supposed to mimic.
Below is a better shot of the lower background picture that is the backdrop to the build bulkhead above.
I like the floor here! I have decided to paint the floor in the model in aluminum, but there will be segmented nonskid over the central door in the floor. [This leads to the belly camera that takes bomb strike shots, and to a large nest of oxygen bottles to port. And NO, I'm not opening that one, no way, no how.]
The other thing I will do on the radio room floor is glue segmented rectangles of painted sheet styrene that will look like a light series of plywood floor coverings, as in the above picture. It will break up the area, and look pretty good, I think.
But before that there is the little matter of returning to the bomb bay and finishing it. Ah, did I say before that the next 17 I build (a G model) will be with the bomb bay closed and all other doors leading to it closed too? Doing one of these open is enough for one lifetime. Trust me on this!
The only thing left really at this point is painting the door and gluing it in the open position. Here are two views of the work so far.
When I get the door done and installed I'll show the completed part in comparison with the Monogram kit part, which is what this resin bulkhead is supposed to mimic.
Below is a better shot of the lower background picture that is the backdrop to the build bulkhead above.
I like the floor here! I have decided to paint the floor in the model in aluminum, but there will be segmented nonskid over the central door in the floor. [This leads to the belly camera that takes bomb strike shots, and to a large nest of oxygen bottles to port. And NO, I'm not opening that one, no way, no how.]
The other thing I will do on the radio room floor is glue segmented rectangles of painted sheet styrene that will look like a light series of plywood floor coverings, as in the above picture. It will break up the area, and look pretty good, I think.
But before that there is the little matter of returning to the bomb bay and finishing it.
Ah, did I say before that the next 17 I build (a G model) will be with the bomb bay closed and all other doors leading to it closed too? Doing one of these open is enough for one lifetime. Trust me on this! berndm
Joined: March 26, 2014
KitMaker: 844 posts
AeroScale: 630 posts
Posted: Tuesday, November 18, 2014 - 05:15 PM UTC
Another fine lesson in modelling Brian ! The wireless and the extinguisher looks almost operable.
Redhand
#522
Joined: January 20, 2013
KitMaker: 1,460 posts
AeroScale: 1,443 posts
Posted: Tuesday, November 18, 2014 - 09:06 PM UTC
Quoted Text
Another fine lesson in modelling Brian ! The wireless and the extinguisher looks almost operable.
Thank you Bernd. There were, of course, the usual frustrations with tiny parts dropping on the rug, manipulating things with tweezers, etc. but I do like the radios.
The fire extinguisher is a donor part from the AM Vindicator kit. The black horn off to the left was originally on the Monogram bulkhead. I simply cut out that section and sanded the rear flush, then bent some wire to join it to the extinguisher.
Same with the drinking water dispenser to the right of the extinguisher. Cut it out and sanded it flush at the back. The things to the right of the water dispenser are supposed to be drinking cup holders. They are also from the Vindicator kit, and match other "cup holders" to the right of the top turret.
I am going to try and get the door done tonight.
Joel_W
Joined: December 04, 2010
KitMaker: 11,666 posts
AeroScale: 7,410 posts
Posted: Tuesday, November 18, 2014 - 11:44 PM UTC
Brian,
The bulkhead looks fantastic. Everything really has that scale look and effect to it. Your idea for the floor should really come very close to what the floor looks like in those pictures.
As for your next B-17 build, closing the bombays and doors from the cockpit back, is a smart move. Just concentrate on the cockpit and exterior for a different type of build. Like you said, once in a life time is more then enough.
I've been planning on building a 1/48 scale PBY-5A to replicate Strawberry 5 from the Battle of Midway for the last few years. I finally bought the kit, and have been doing research as needed on both the kit, and the real aircraft. While I wanted to detail the interior as much as my limited skills would allow, I'm going to stick to just the cockpit, blisters, and areas that can be easily seen through the few small windows. Hopefully, I'll actually start this build mid 2015.
Joel
Redhand
#522
Joined: January 20, 2013
KitMaker: 1,460 posts
AeroScale: 1,443 posts
Posted: Wednesday, November 19, 2014 - 12:05 AM UTC
Quoted Text
Brian,
The bulkhead looks fantastic. Everything really has that scale look and effect to it. Your idea for the floor should really come very close to what the floor looks like in those pictures.
As for your next B-17 build, closing the bombays and doors from the cockpit back, is a smart move. Just concentrate on the cockpit and exterior for a different type of build. Like you said, once in a life time is more then enough.
I've been planning on building a 1/48 scale PBY-5A to replicate Strawberry 5 from the Battle of Midway for the last few years. I finally bought the kit, and have been doing research as needed on both the kit, and the real aircraft. While I wanted to detail the interior as much as my limited skills would allow, I'm going to stick to just the cockpit, blisters, and areas that can be easily seen through the few small windows. Hopefully, I'll actually start this build mid 2015.
Joel
Thank you Joel!
Strawberry 5 is a cherished project of my own. One day, maybe, perhaps. Judging from your recent work here, don't understate your own skills! Good heavens! What decal sheet are you going to use?
BTW, though it may seem laughable, I also am trying not to do stuff here that can't be seen, from at least some angle. Trouble is the 17 has a lot of glass in it.
I am somewhat intrigued at the possibility of doing "Mercy's Madhouse" as the G model. Heavy exterior weathering, and she's a PFF ship:
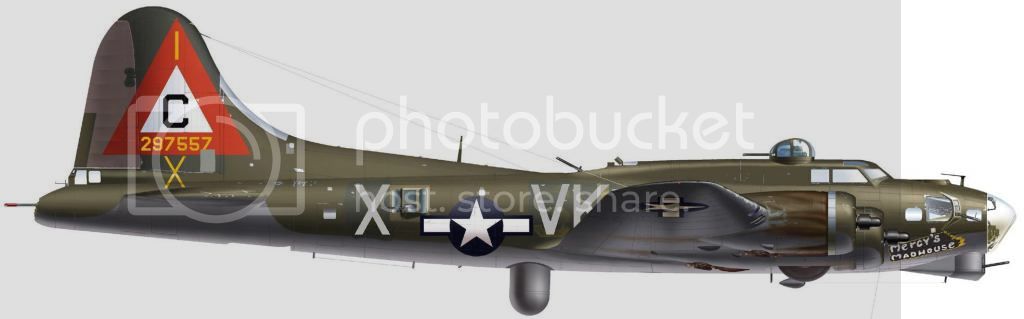
But that's a project for another day, assuming I beat the actuarial factor!
Joel_W
Joined: December 04, 2010
KitMaker: 11,666 posts
AeroScale: 7,410 posts
Posted: Wednesday, November 19, 2014 - 01:04 AM UTC
Quoted Text
Quoted TextBrian,
The bulkhead looks fantastic. Everything really has that scale look and effect to it. Your idea for the floor should really come very close to what the floor looks like in those pictures.
As for your next B-17 build, closing the bombays and doors from the cockpit back, is a smart move. Just concentrate on the cockpit and exterior for a different type of build. Like you said, once in a life time is more then enough.
I've been planning on building a 1/48 scale PBY-5A to replicate Strawberry 5 from the Battle of Midway for the last few years. I finally bought the kit, and have been doing research as needed on both the kit, and the real aircraft. While I wanted to detail the interior as much as my limited skills would allow, I'm going to stick to just the cockpit, blisters, and areas that can be easily seen through the few small windows. Hopefully, I'll actually start this build mid 2015.
Joel
Thank you Joel!
Strawberry 5 is a cherished project of my own. One day, maybe, perhaps. Judging from your recent work here, don't understate your own skills! Good heavens! What decal sheet are you going to use?
BTW, though it may seem laughable, I also am trying not to do stuff here that can't be seen, from at least some angle. Trouble is the 17 has a lot of glass in it.
I am somewhat intrigued at the possibility of doing "Mercy's Madhouse" as the G model. Heavy exterior weathering, and she's a PFF ship:
But that's a project for another day, assuming I beat the actuarial factor!
Brian,
Thank you for your vote of confidence, but my level of work is that one step up from hacker. It just looks better in photographs then it really is.
As for the decals and decal sheet, there isn't any. Actually, there never was a PBY-5A flown out of Midway 6/42 with the name of Strawberry 5. The BPYs that flew the out and back search mission that morning were given the code name: STRAWBERRY. #42-P-3 was the aircraft that spotted the Japanese fleet, and it's assigned call sign was Strawberry 5. I can't tell you how long it took to actually find that out.
I'm either going to try and make my own masks for the numbers and white stars with blue circles for the wings, or see how much Mal would charge for such a limited but time consuming project.
I have a long, long way to go just on the research of what stenciling a PBY-5A from Midway had. Photographs are few and are between.
The amount of glass on a PBY is no where what a B-17 has. Lucky me.
Joel
Redhand
#522
Joined: January 20, 2013
KitMaker: 1,460 posts
AeroScale: 1,443 posts
Posted: Wednesday, November 19, 2014 - 02:45 AM UTC
Quoted Text
As for the decals and decal sheet, there isn't any.
I'm either going to try and make my own masks for the numbers and white stars with blue circles for the wings, or see how much Mal would charge for such a limited but time consuming project.
I have a long, long way to go just on the research of what stenciling a PBY-5A from Midway had. Photographs are few and are between.
Joel
Check this out. There was a decal set for this A/C but it's REAL hard to find nowadays. http://www.florymodels.co.uk/148th-pby-5a-catalina/
And don't forget the Belcher Bits tail correction.
Joel_W
Joined: December 04, 2010
KitMaker: 11,666 posts
AeroScale: 7,410 posts
Posted: Wednesday, November 19, 2014 - 03:27 AM UTC
Brian,
I've been looking for that Yellowhammer sheet, but the company has long gone out of business. Who bought the company, which escapes me, has also gone out of business.
I've seen both the #43-P-3, and the #44-P-4 listed as the actual aircraft. I would assume that Yellowhammer has more specific references then I've found to date.
I've been spending more time actually researching issues with the kit, and need to order the tail correction kit from Belcher Bits.
Joel
Redhand
#522
Joined: January 20, 2013
KitMaker: 1,460 posts
AeroScale: 1,443 posts
Posted: Wednesday, November 19, 2014 - 07:06 PM UTC
RADIO ROOM FRONT BULKHEAD: COMPLETE
Well, here it is with the door attached and the B-17G kit part for comparison.
And here it is from another angle.
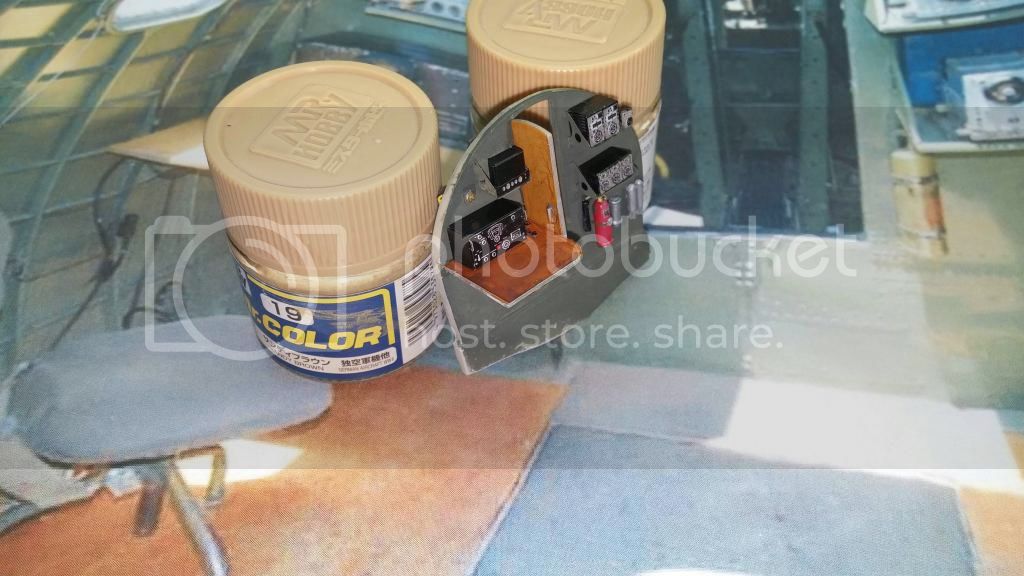
I will say that I'm happy with the viewing possibilities that the open door will afford to see into the bomb bay from the open radio room hatch. That will give some real "depth" to the completed build!
NOW DON'T LAUGH. Does anyone know where I might lay hands on something that looks like a 1/48 scale technical pub, magazine, map or chart that could be added to the table top?
I had hoped to move on to the bomb bay ceiling at this point but it makes more sense to scratchbuild the bomb hoist and glue it to the right (facing fwd) side of the after bomb bay bulkhead (D'oh, the other side of this part) at this time. I want to "get it over with" and think I have all I need by way of bits and pieces.
Stay tuned.
Well, here it is with the door attached and the B-17G kit part for comparison.
And here it is from another angle.
I will say that I'm happy with the viewing possibilities that the open door will afford to see into the bomb bay from the open radio room hatch. That will give some real "depth" to the completed build!
NOW DON'T LAUGH. Does anyone know where I might lay hands on something that looks like a 1/48 scale technical pub, magazine, map or chart that could be added to the table top?
I had hoped to move on to the bomb bay ceiling at this point but it makes more sense to scratchbuild the bomb hoist and glue it to the right (facing fwd) side of the after bomb bay bulkhead (D'oh, the other side of this part) at this time. I want to "get it over with" and think I have all I need by way of bits and pieces.
Stay tuned.
Dragon164

#226

Joined: February 20, 2012
KitMaker: 1,909 posts
AeroScale: 508 posts

Posted: Wednesday, November 19, 2014 - 07:32 PM UTC
Brian,
I found this:
http://www.8thafhsoregon.com/archive/Oregon-Chapter/Lawrence-Fick/Middlebrough-Gee-Map-Feb-1943.jpg
from here:
http://www.8thafhsoregon.com/archive/Oregon-Chapter/Lawrence-Fick/
Excellent work so far!
Cheers Rob.
I found this:
http://www.8thafhsoregon.com/archive/Oregon-Chapter/Lawrence-Fick/Middlebrough-Gee-Map-Feb-1943.jpg
from here:
http://www.8thafhsoregon.com/archive/Oregon-Chapter/Lawrence-Fick/
Excellent work so far!
Cheers Rob.

Redhand
#522
Joined: January 20, 2013
KitMaker: 1,460 posts
AeroScale: 1,443 posts
Posted: Wednesday, November 19, 2014 - 09:06 PM UTC
Quoted Text
Brian,
I found this:
http://www.8thafhsoregon.com/archive/Oregon-Chapter/Lawrence-Fick/Middlebrough-Gee-Map-Feb-1943.jpg
from here:
http://www.8thafhsoregon.com/archive/Oregon-Chapter/Lawrence-Fick/
Excellent work so far!
Cheers Rob.
Great!! I'll check them out.
Joel_W
Joined: December 04, 2010
KitMaker: 11,666 posts
AeroScale: 7,410 posts
Posted: Wednesday, November 19, 2014 - 10:25 PM UTC
Brian,
The differences are like night and day. The kit parts look like a bad toy. Yours looks like a true miniature.
I don't have the faintest idea of where you can get anything scaled down to 1/48 scale, as my printer would never be able to handle anything that small.
Joel
The differences are like night and day. The kit parts look like a bad toy. Yours looks like a true miniature.
I don't have the faintest idea of where you can get anything scaled down to 1/48 scale, as my printer would never be able to handle anything that small.
Joel
Redhand
#522
Joined: January 20, 2013
KitMaker: 1,460 posts
AeroScale: 1,443 posts
Posted: Wednesday, November 19, 2014 - 10:50 PM UTC
JUST FOR LAFFS - OFF THE CHARTS
I guess I have waaaaaay too much time on my hands today. Following up on Rob's links, I downloaded the below AAF "Aeronautical Chart":
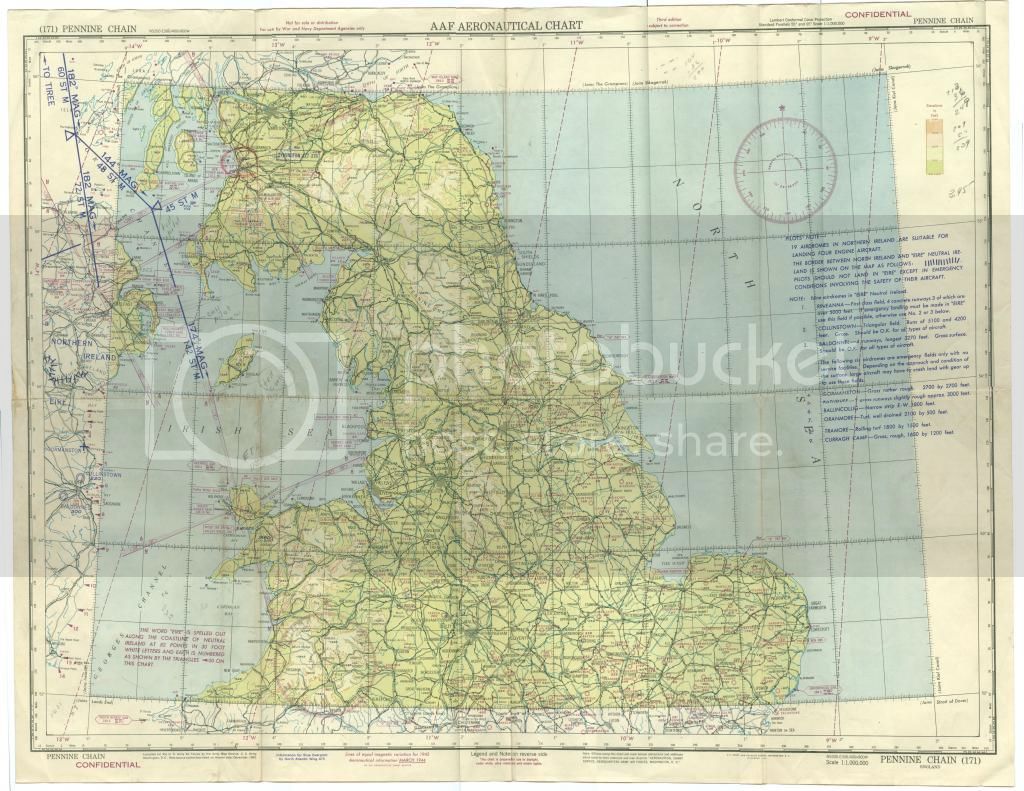
and then used Microsoft Word's wonderful ability to insert a photo into a document AND alter its size. I then shrunk the thing down to about 7% and transferred the image to a self adhesive mailing label. Snipper-snap with a #11 blade and, Voila! - on the table it went.
It is a nice counterpoint to the pencil and clipboard with paper up on the navigator's table. And close enough to 1/48th for me. Bawhawhaw!
I guess I have waaaaaay too much time on my hands today. Following up on Rob's links, I downloaded the below AAF "Aeronautical Chart":
and then used Microsoft Word's wonderful ability to insert a photo into a document AND alter its size. I then shrunk the thing down to about 7% and transferred the image to a self adhesive mailing label. Snipper-snap with a #11 blade and, Voila! - on the table it went.
It is a nice counterpoint to the pencil and clipboard with paper up on the navigator's table. And close enough to 1/48th for me. Bawhawhaw!
Joel_W
Joined: December 04, 2010
KitMaker: 11,666 posts
AeroScale: 7,410 posts
Posted: Wednesday, November 19, 2014 - 11:36 PM UTC
Amazing, simply amazing. And yes, today you have too much time on your hands. 
Joel
Joel

Scrodes
Joined: July 22, 2012
KitMaker: 771 posts
AeroScale: 763 posts
Posted: Thursday, November 20, 2014 - 02:29 AM UTC
Looks great, good call on the mailing label. I just wish the map was slightly askew. It's making me twitch because it's so square to the table.
Redhand
#522
Joined: January 20, 2013
KitMaker: 1,460 posts
AeroScale: 1,443 posts
Posted: Thursday, November 20, 2014 - 02:32 AM UTC
Quoted Text
Looks great, good call on the mailing label. I just wish the map was slightly askew. It's making me twitch because it's so square to the table.
I can fix that.
Redhand
#522
Joined: January 20, 2013
KitMaker: 1,460 posts
AeroScale: 1,443 posts
Posted: Friday, November 21, 2014 - 07:19 AM UTC
RADIO ROOM FRONT BULKHEAD: COMPLETE [AND THEN SOME]
A short post tonight.
By "popular demand" a shot of the radio room table with the chart at an undisciplined angle.
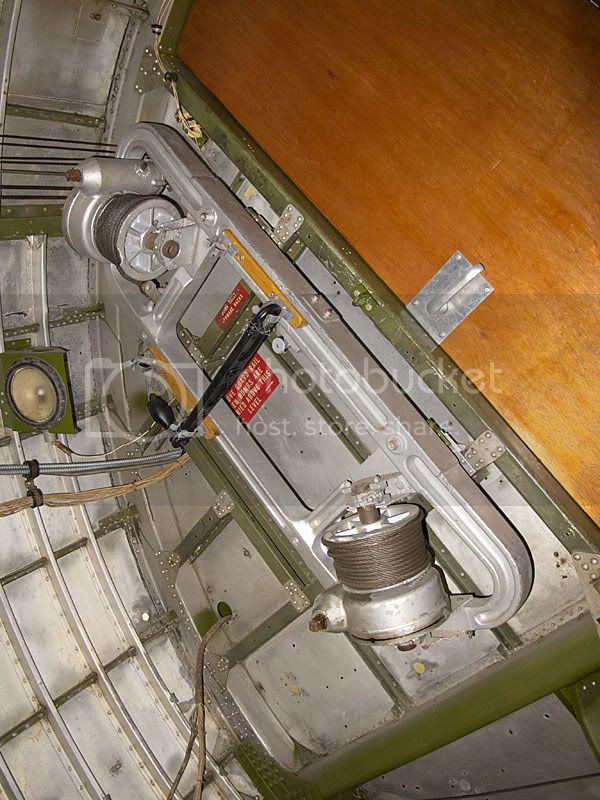
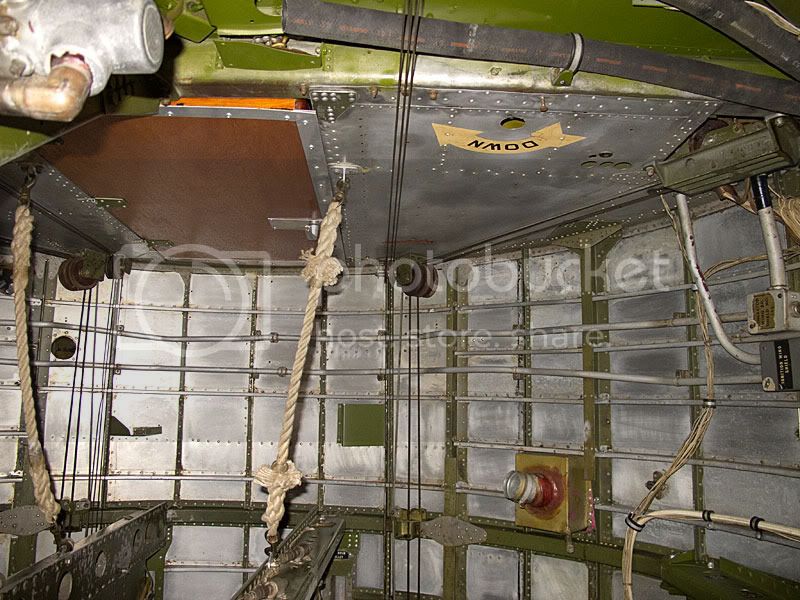
Of greater significance to me is the bomb hoist on the after bulkhead. See real thing below (again):
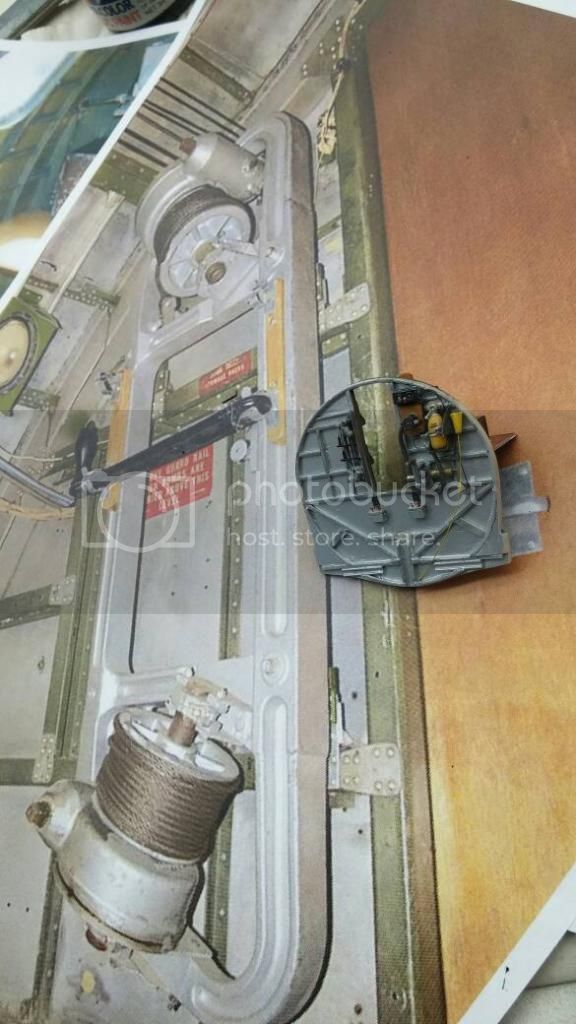
And here is my "get it over with" scratchbuilt version with wire, some styrene bar and bits and pieces from the True Details connector sets.
"Not my best work," but the dimensional outlines are correct as are the major parts, if you look closely. But the point of this is that one will NOT be looking closely. The only way it will be visible is through the open bomb bay doors looking up, and there the view is constricted. I decided to add this because (1) it is a genuine wartime B-17 fixture and (2) it does add an element of balance to the after bulkhead, what with all the stuff off to the right. So it's a "build for myself" part.
I am probably next going to get back into the forward bomb bay, up by the ceiling. This straight-up look shows you the piping that runs laterally across the ceiling from one side of the bomb bay to the other.
That has to go in before I think of running any of the control cables aft to the radio room.
And before I do any of this, I must see to the clean-up of my work table. PART of the chaos is shown below.

When I get really involved the junk just piles up all around me and the actual workspace on a large table shrinks to about a square foot. Then it's time to fall back and regroup (clean up the mess to make space and preserve the illusion of order, if only for ever so short a time!)
The B-17G in the picture is the 303rd's "Thunderbird," from the wall mural painted by Keith Ferris in the U.S. National Air and Space Museum "WWII Gallery" in Washington D.C. It goes way back to 1975, I think. I've had the print for ages. Fitting that I'm finally building a model of the 17 now, I suppose.
A short post tonight.
By "popular demand" a shot of the radio room table with the chart at an undisciplined angle.
Of greater significance to me is the bomb hoist on the after bulkhead. See real thing below (again):
And here is my "get it over with" scratchbuilt version with wire, some styrene bar and bits and pieces from the True Details connector sets.
"Not my best work," but the dimensional outlines are correct as are the major parts, if you look closely. But the point of this is that one will NOT be looking closely. The only way it will be visible is through the open bomb bay doors looking up, and there the view is constricted. I decided to add this because (1) it is a genuine wartime B-17 fixture and (2) it does add an element of balance to the after bulkhead, what with all the stuff off to the right. So it's a "build for myself" part.
I am probably next going to get back into the forward bomb bay, up by the ceiling. This straight-up look shows you the piping that runs laterally across the ceiling from one side of the bomb bay to the other.
That has to go in before I think of running any of the control cables aft to the radio room.
And before I do any of this, I must see to the clean-up of my work table. PART of the chaos is shown below.
When I get really involved the junk just piles up all around me and the actual workspace on a large table shrinks to about a square foot. Then it's time to fall back and regroup (clean up the mess to make space and preserve the illusion of order, if only for ever so short a time!)
The B-17G in the picture is the 303rd's "Thunderbird," from the wall mural painted by Keith Ferris in the U.S. National Air and Space Museum "WWII Gallery" in Washington D.C. It goes way back to 1975, I think. I've had the print for ages. Fitting that I'm finally building a model of the 17 now, I suppose.
berndm
Joined: March 26, 2014
KitMaker: 844 posts
AeroScale: 630 posts
Posted: Friday, November 21, 2014 - 08:19 PM UTC
Good luck with your desk, Brian.For me i have learned too much chaos is bad, too clean is also bad, everything must be at hand.After a total clean up i spend most of the time searching stuff on the usual places.
Your photos of the real thing inside are very helpful/intersting, i ever thought U.S birds were all over green inside.
The map is a really nice touch.
Cheers
Bernd
Your photos of the real thing inside are very helpful/intersting, i ever thought U.S birds were all over green inside.
The map is a really nice touch.
Cheers
Bernd
Redhand
#522
Joined: January 20, 2013
KitMaker: 1,460 posts
AeroScale: 1,443 posts
Posted: Saturday, November 22, 2014 - 08:53 PM UTC
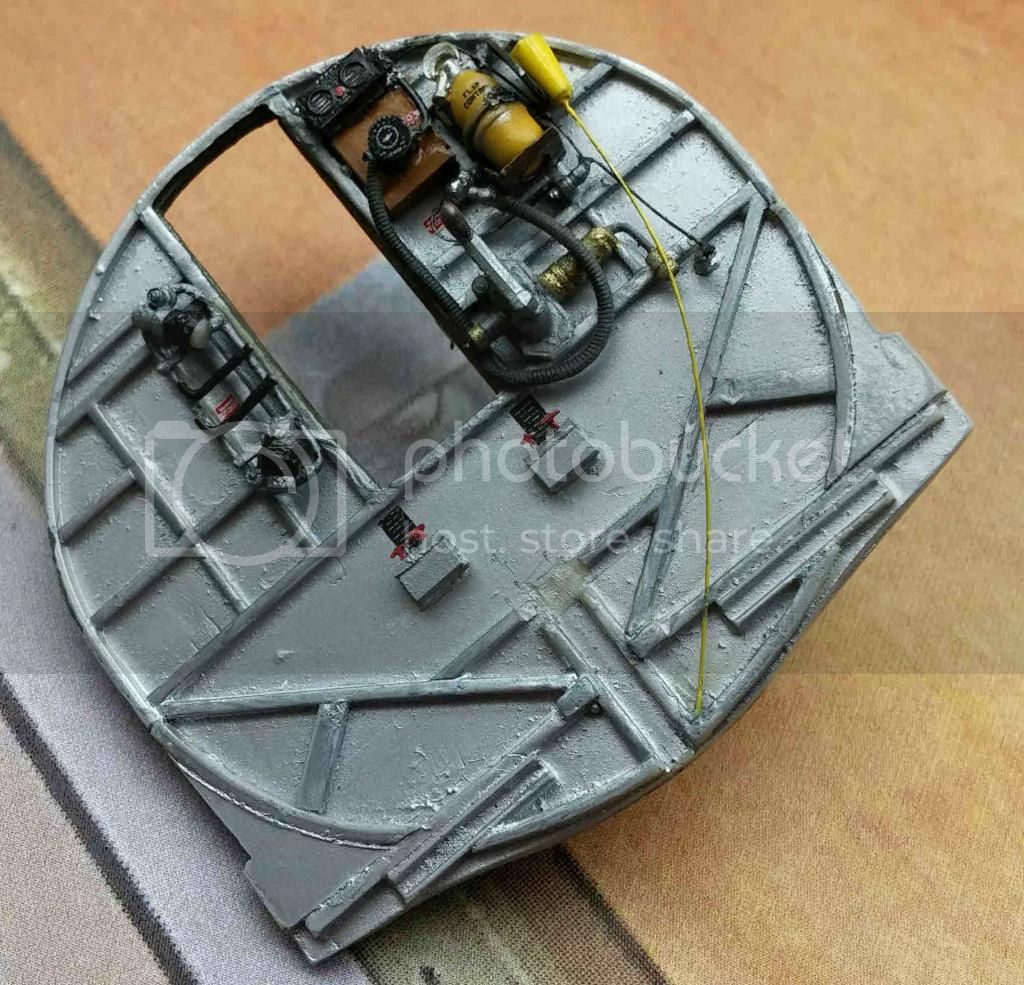
BOMB HOIST TAKE 2
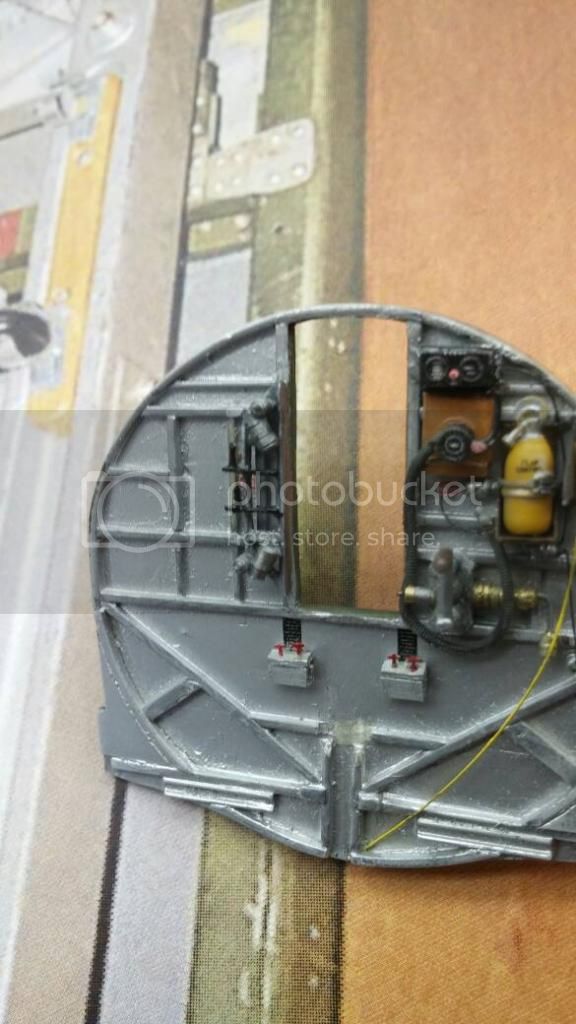
I suppose when I write "I build for myself" it really means I am unhappy with the finished work. Anyway, I really hated the first bomb hoist I made and popped it off the bulkhead. I made a second one using different materials and techniques. This one is acceptable IMO, though I will tell you that few things have aggravated me more than putting this subassembly together. I lost no less than two motor and wire drum assemblies to the carpet monster.
Anyway, here it is. Now it's glued on, I hope never to touch it again.
The big picture:
A close-up:
I'm going to take a short break, clean up the desk and then press on.
Joel_W
Joined: December 04, 2010
KitMaker: 11,666 posts
AeroScale: 7,410 posts
Posted: Monday, November 24, 2014 - 02:02 AM UTC
Brian,
The bulkhead looks great, as does the new and improved winches. Now go clean your desk. My son's room is cleaner, and I thought that was not possible. 
Joel
The bulkhead looks great, as does the new and improved winches. Now go clean your desk. My son's room is cleaner, and I thought that was not possible.
Joel
Redhand
#522
Joined: January 20, 2013
KitMaker: 1,460 posts
AeroScale: 1,443 posts
Posted: Wednesday, November 26, 2014 - 08:52 PM UTC
BOMB BAY SIDES
Happy Thanksgiving to those in the USA and Happy Thursday elsewhere. I cleaned the work table and am about to start on the bomb bay ceiling and side bulkheads. But first, a look at what I am modeling.
Best source is this shot from the B-17F pilot's manual:
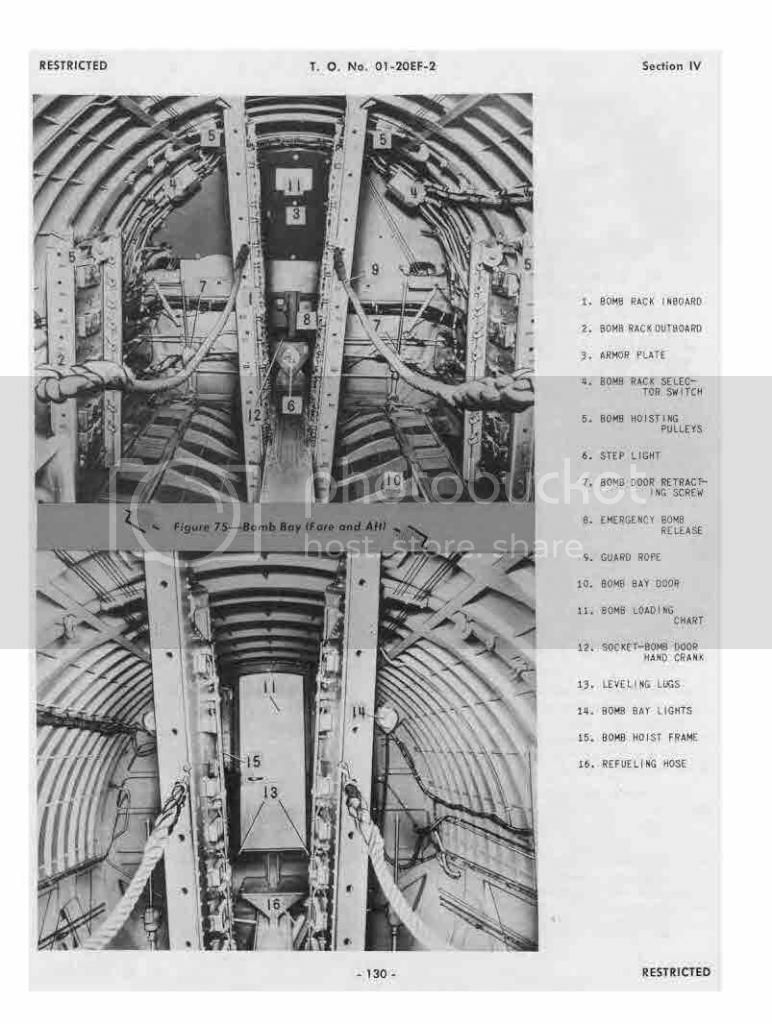
Note that the space is almost assuredly metallic. I'm opting for aluminum on the fore and aft bulkheads (as you've seen) and the bomb bay door interiors. However, these shots of the interior of the unrestored "Memphis Belle" suggest a grey on the side bulkheads. What I'm going to do to do is leave the resin parts in the Tamiya primer grey that comes in a can. Looks "close enough" for me.
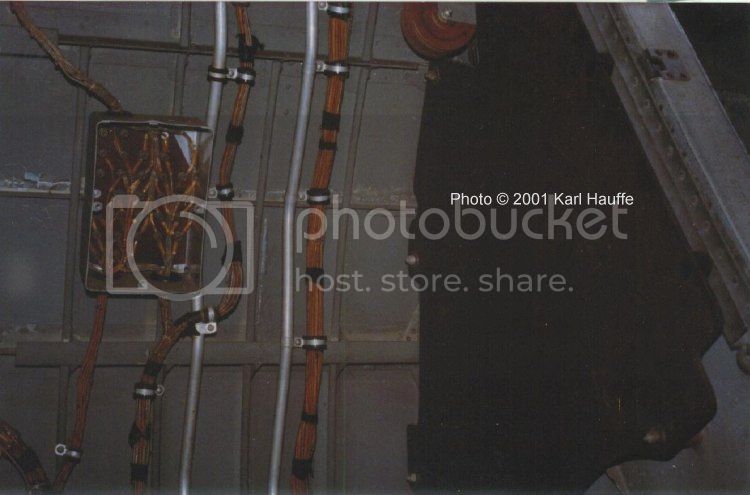
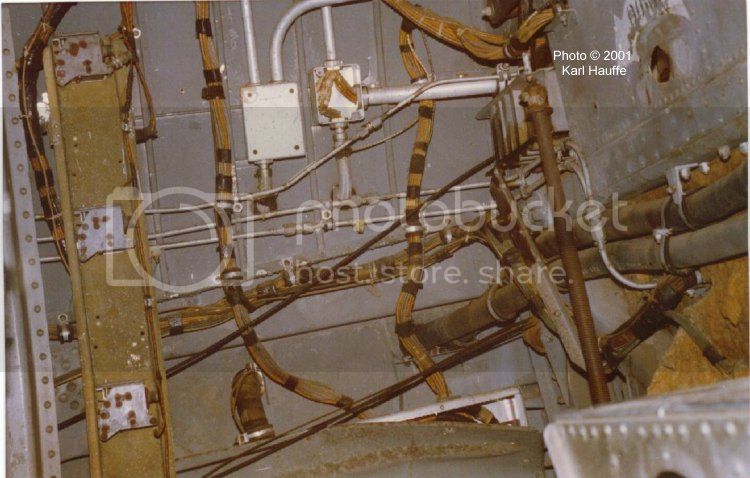
You can also see from the above pic that there is a ton of crap that goes forward. On both sides, unfortunately. That plus the overhead
is what I will be tackling first. I hope to have a build post later today.
Happy Thanksgiving to those in the USA and Happy Thursday elsewhere. I cleaned the work table and am about to start on the bomb bay ceiling and side bulkheads. But first, a look at what I am modeling.
Best source is this shot from the B-17F pilot's manual:
Note that the space is almost assuredly metallic. I'm opting for aluminum on the fore and aft bulkheads (as you've seen) and the bomb bay door interiors. However, these shots of the interior of the unrestored "Memphis Belle" suggest a grey on the side bulkheads. What I'm going to do to do is leave the resin parts in the Tamiya primer grey that comes in a can. Looks "close enough" for me.
You can also see from the above pic that there is a ton of crap that goes forward. On both sides, unfortunately. That plus the overhead
is what I will be tackling first. I hope to have a build post later today.
 |

WEB HOSTING BY


Copyright ©2021 AeroScale and Kitmaker Network, a subsidiary of Silver Star Enterprises
All Rights Reserved. Please read our Conditions of Use and Privacy Policy.
All Rights Reserved. Please read our Conditions of Use and Privacy Policy.