

Brian,
Another major sub assembly project. Looking at those pictures, you can see that there are many areas where the gray paint or primer has worn off to bare metal. Tamiya Gray Surface primer should do the trick. I usually air brush it on as I have much better control of the spray pattern. I do use the rattle an for small parts shot out in the Garage with the doors open.
Sure hope you really like cabling, because it's everywhere.
Joel
World War II
Discuss WWII and the era directly before and after the war from 1935-1949.
Discuss WWII and the era directly before and after the war from 1935-1949.
Hosted by Rowan Baylis
1/48 B-17F Build - 303rd BGs Luscious Lady
Joel_W

Joined: December 04, 2010
KitMaker: 11,666 posts
AeroScale: 7,410 posts
Posted: Wednesday, November 26, 2014 - 09:26 PM UTC


Redhand

#522
Joined: January 20, 2013
KitMaker: 1,460 posts
AeroScale: 1,443 posts
Posted: Saturday, November 29, 2014 - 08:36 PM UTC
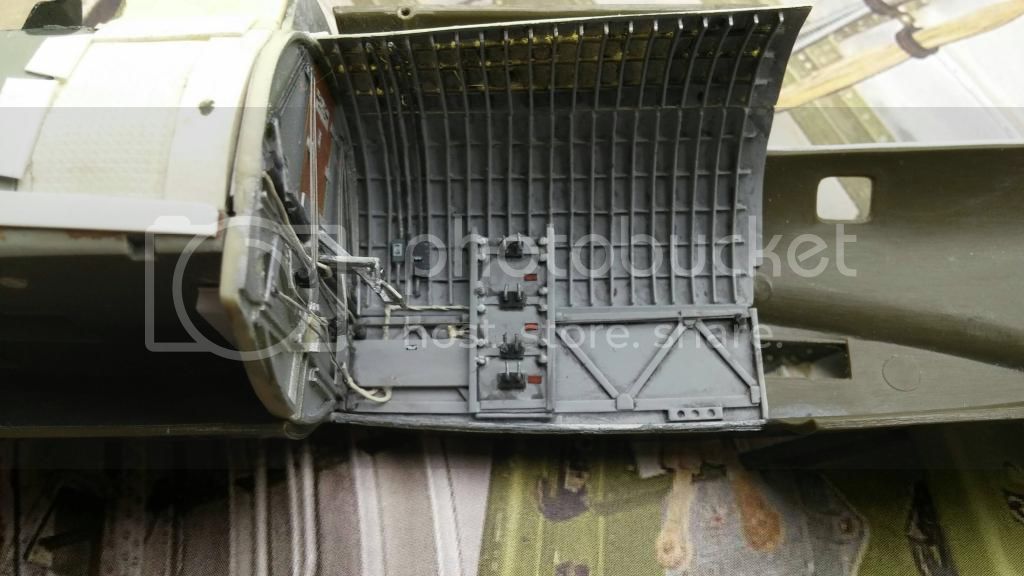
BOMB BAY SIDE BULKHEADS UNDERWAY
There is a lot to be annoyed about in this pic

which shows the first efforts to integtrate the side bulkheads into the kit. I will tone down some of the black wash, which is excessive. Only the forward part of the lower side bulkhead is actually glued in. When I finish work on the upper part, wires, cables, etc. I will glue that it too, forward. Gluing the after parts in must await careful positioning of the rear bulkhead.
I am EXTREMELY conscious of the lash-up nature of this build. The hassles of trying to integrate all these aftermarket components and scratch built assemblies into a fuselage shell that doesn't always cooperate means that I have to really think about what I'm doing, step by step. Right now all I see is a mess. Who knows whether it will look OK when I'm done? What a nightmare!
One positive note: on the top of the catwalk I added a railroad lens for the light. Looks better than the dried white glue that was there.
There is a lot to be annoyed about in this pic
which shows the first efforts to integtrate the side bulkheads into the kit. I will tone down some of the black wash, which is excessive. Only the forward part of the lower side bulkhead is actually glued in. When I finish work on the upper part, wires, cables, etc. I will glue that it too, forward. Gluing the after parts in must await careful positioning of the rear bulkhead.
I am EXTREMELY conscious of the lash-up nature of this build. The hassles of trying to integrate all these aftermarket components and scratch built assemblies into a fuselage shell that doesn't always cooperate means that I have to really think about what I'm doing, step by step. Right now all I see is a mess.
Who knows whether it will look OK when I'm done? What a nightmare!One positive note: on the top of the catwalk I added a railroad lens for the light. Looks better than the dried white glue that was there.

Joel_W
Joined: December 04, 2010
KitMaker: 11,666 posts
AeroScale: 7,410 posts
Posted: Saturday, November 29, 2014 - 08:45 PM UTC
Brian,
You're being way to hard on yourself. The Bombay looks like it's shaping up quite nicely. Those electrical boxes and conduit looks quite convincing.
I'll grant you that getting all the various AM component parts to fit as though they were designed by the kit manufacture should be a interesting journey.
Joel
Redhand
#522
Joined: January 20, 2013
KitMaker: 1,460 posts
AeroScale: 1,443 posts
Posted: Saturday, November 29, 2014 - 11:59 PM UTC
Thanks. It still sort of drives me nuts that one of the most iconic aircraft of WWII is so poorly represented in 1/48th scale, even after decades of the hobby "maturing" into stuff like the recent XUNTONG IL-4 kit in quarter inch and the Zveda Su-2. Even if we go back a few years to the Trumpeter Wellington kits and further still to the Tamiya Lancaster we are still light years ahead of the Revell-Monogram B-17F and G kits.
I normally do pretty "clean builds" so the weathering and dirtying-up of this one is almost a by-product of the build process rather than a matter of intention. Don't think I could have done this one "clean" if I tried. I have NEVER attempted anything nearly as complex as this, even the B-29, but I suppose "that's a good thing," right?
I feel it will look "OK" in the end, but the kit has been a struggle from the beginning. I do hope it looks better in the end than one of those F.M. kits where people are awe-struck that the builder even got it together and overlook the obvious problems due to what the modeler started with. Think F.M.'s Hampden, for example.
I'll plod along to get this space done, then go back to the radio room, which I feel will be the most difficult space of all.
Dragon164

#226

Joined: February 20, 2012
KitMaker: 1,909 posts
AeroScale: 508 posts

Posted: Sunday, November 30, 2014 - 10:56 AM UTC
Brian,
It's coming along nicely I believe it will look great when you are done.
I too do not understand how we got a 1/32 B-17 before a decent 1/48 scale one I have two of these to build as well as one that was almost done to fix if I can find all the parts. 
On one of my builds I plan on making the top forward section of the fuse removable, will see how that goes.
Cheers Rob.
It's coming along nicely
I believe it will look great when you are done. I too do not understand how we got a 1/32 B-17 before a decent 1/48 scale one
I have two of these to build as well as one that was almost done to fix if I can find all the parts. On one of my builds I plan on making the top forward section of the fuse removable, will see how that goes.
Cheers Rob.

Redhand
#522
Joined: January 20, 2013
KitMaker: 1,460 posts
AeroScale: 1,443 posts
Posted: Sunday, December 07, 2014 - 06:44 AM UTC
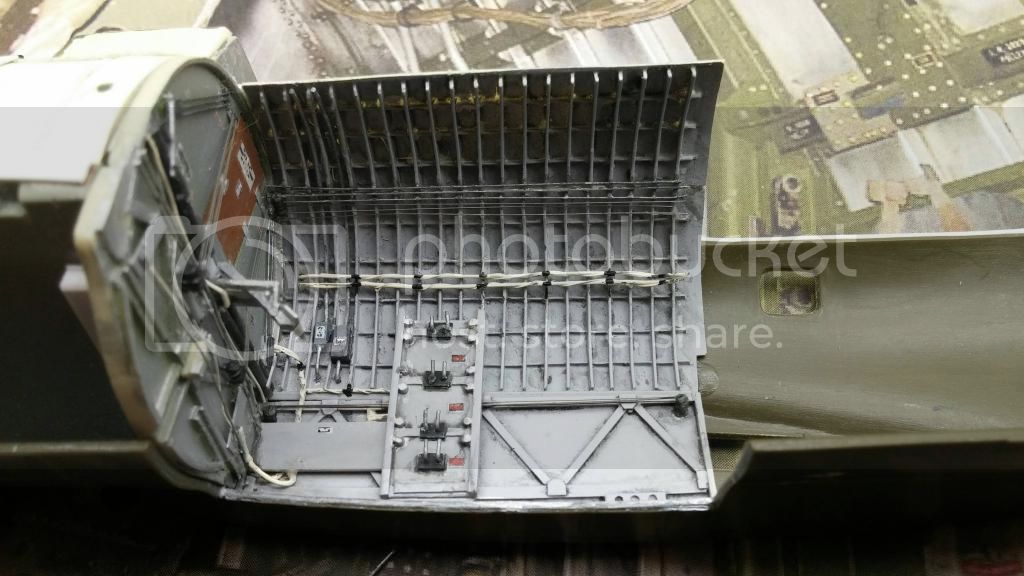
BOMB BAY - AT A SNAIL'S PACE
OK, so I glued the stbd sidewall in up to the ceiling and started detailing around the electrical junction panel stbd. lower left, forward.
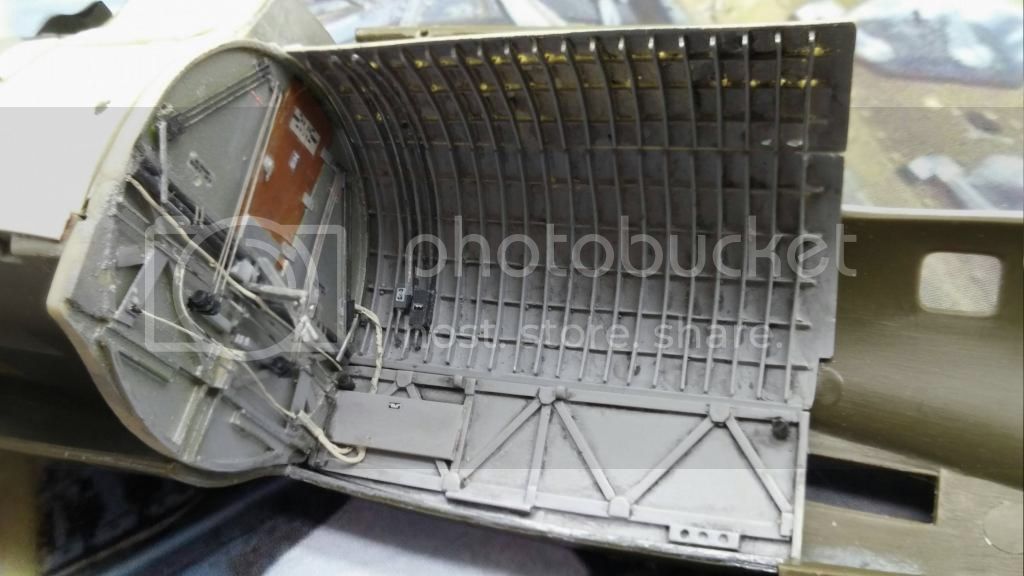
The knurled effect of the white wiring from the fwd. blkd. comes from twisting small wire around a larger strand and then painting it the cream white I'm using. Definitely created the impression of multiple strands.
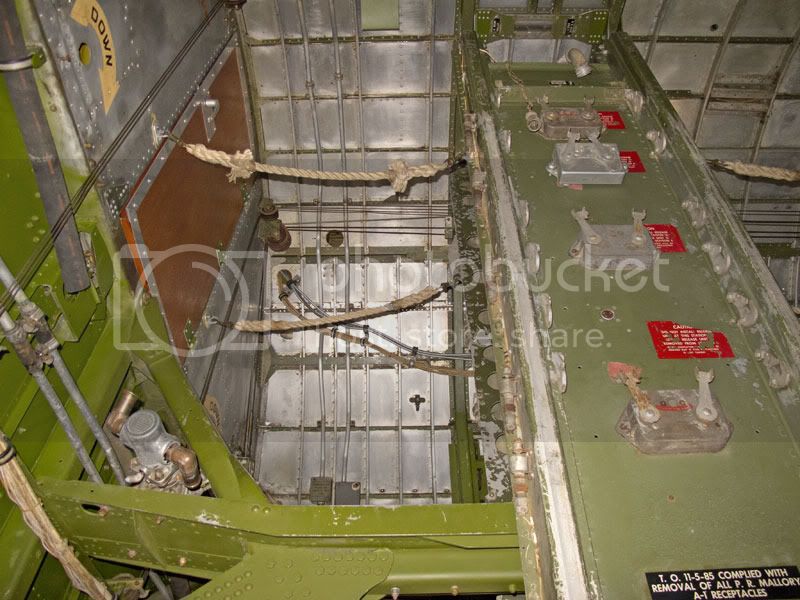
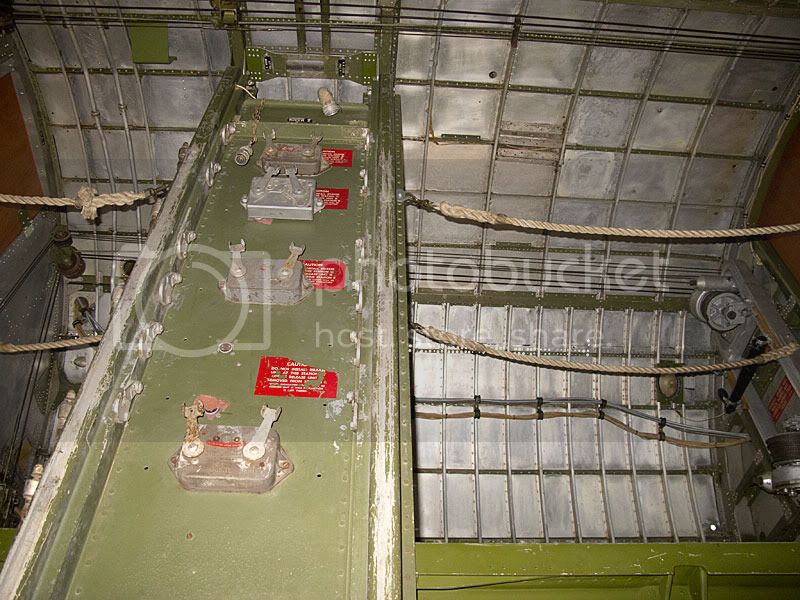
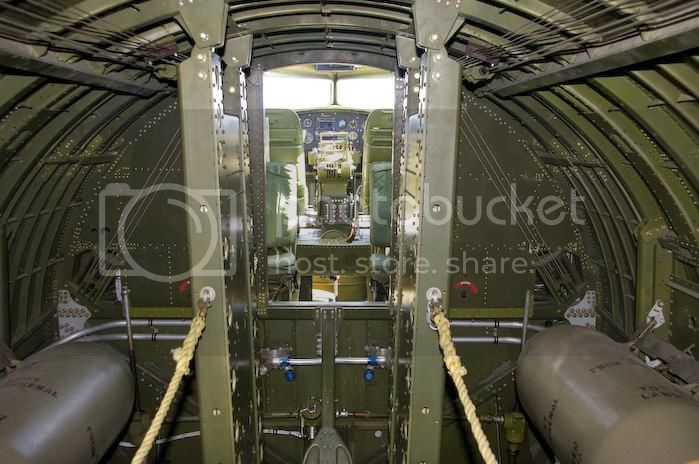
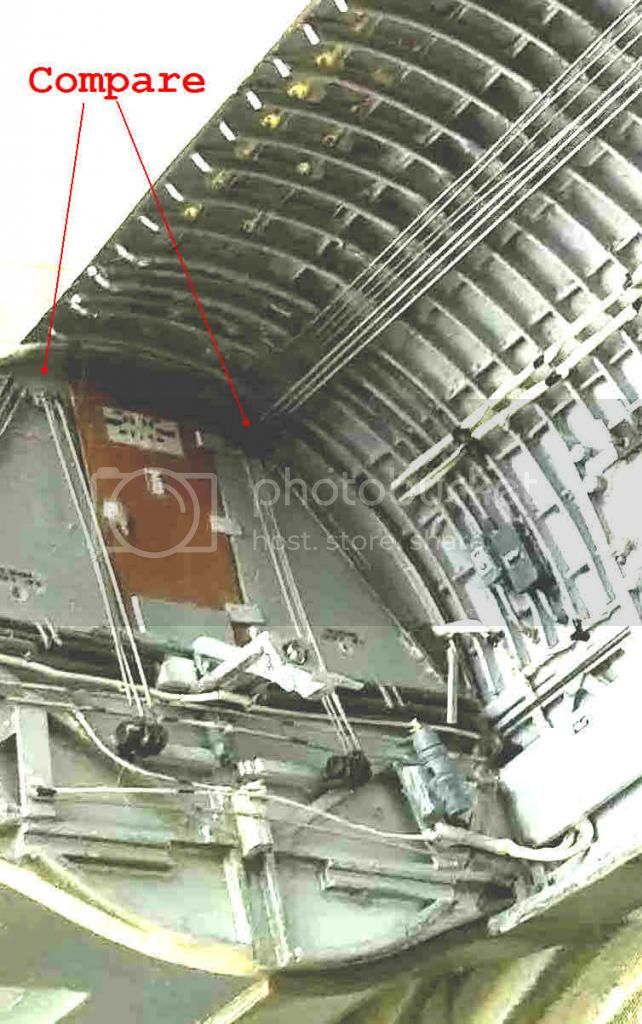
I will string some electrical wire fore and aft 2/3 the way up the bulkhead as you can see in the below two "real thing" pics.
With agonizing [well, that's too strong, say "frustrating"] slowness the details are beginning to come together here.
Below you can see the stbd bulkhead with the outer bomb rack placed. Note control cables running behind it fore and aft. Obviously the bomb rack needs to be weathered and there are wires and other do-dads to add, maybe.
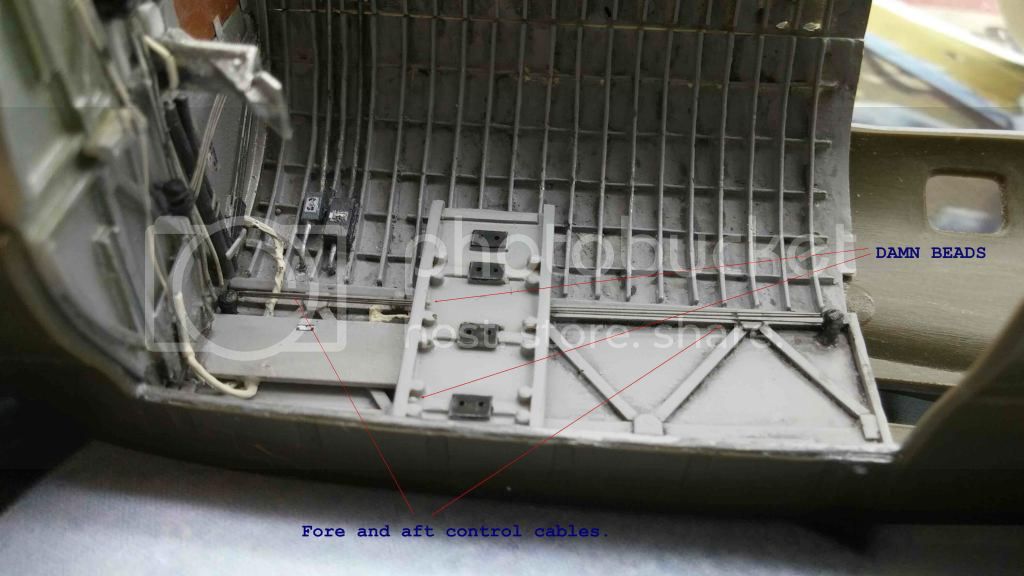
One thing I point out in these resin parts from the Czech "Detail Model" house where I got the bomb bay is the annoying resin beads that appear frequently in the corners and that have to be cut out with a #11 blade. It's easy to overlook some, as I did here. It is no exaggeration to say that I have probably popped out 150 of these buggers from the bomb-bay set so far, especially in the side bulkheads.
I suspect that the bomb bay is the dirtiest space I have made in the build so far. I am going to try and make the radio room cleaner, though still worn looking.
As "Bartles & Jaymes" would say lo those many years ago: "Thank you for your support."

OK, so I glued the stbd sidewall in up to the ceiling and started detailing around the electrical junction panel stbd. lower left, forward.
The knurled effect of the white wiring from the fwd. blkd. comes from twisting small wire around a larger strand and then painting it the cream white I'm using. Definitely created the impression of multiple strands.
I will string some electrical wire fore and aft 2/3 the way up the bulkhead as you can see in the below two "real thing" pics.
With agonizing [well, that's too strong, say "frustrating"] slowness the details are beginning to come together here.
Below you can see the stbd bulkhead with the outer bomb rack placed. Note control cables running behind it fore and aft. Obviously the bomb rack needs to be weathered and there are wires and other do-dads to add, maybe.
One thing I point out in these resin parts from the Czech "Detail Model" house where I got the bomb bay is the annoying resin beads that appear frequently in the corners and that have to be cut out with a #11 blade. It's easy to overlook some, as I did here. It is no exaggeration to say that I have probably popped out 150 of these buggers from the bomb-bay set so far, especially in the side bulkheads.
I suspect that the bomb bay is the dirtiest space I have made in the build so far. I am going to try and make the radio room cleaner, though still worn looking.
As "Bartles & Jaymes" would say lo those many years ago: "Thank you for your support."
Joel_W
Joined: December 04, 2010
KitMaker: 11,666 posts
AeroScale: 7,410 posts
Posted: Monday, December 08, 2014 - 12:36 AM UTC
Brian,
The continued cabling really adds to the overall effect. The ref pics continue to help neophytes like me understand what and how you're doing.
I try to look closely at your work pics, but I missed those nubs. Just thought that they were large weld marks.
Joel
The continued cabling really adds to the overall effect. The ref pics continue to help neophytes like me understand what and how you're doing.
I try to look closely at your work pics, but I missed those nubs. Just thought that they were large weld marks.
Joel
Redhand
#522
Joined: January 20, 2013
KitMaker: 1,460 posts
AeroScale: 1,443 posts
Posted: Monday, December 08, 2014 - 12:46 AM UTC
Thanks. Continues to be a "line by line" process. However, I am now confident it will all fit together, after all the planning.
Glad the "real thing" pics provide perspective: "There's a method to my madness."
Glad the "real thing" pics provide perspective: "There's a method to my madness."
Redhand
#522
Joined: January 20, 2013
KitMaker: 1,460 posts
AeroScale: 1,443 posts
Posted: Saturday, December 13, 2014 - 04:12 AM UTC
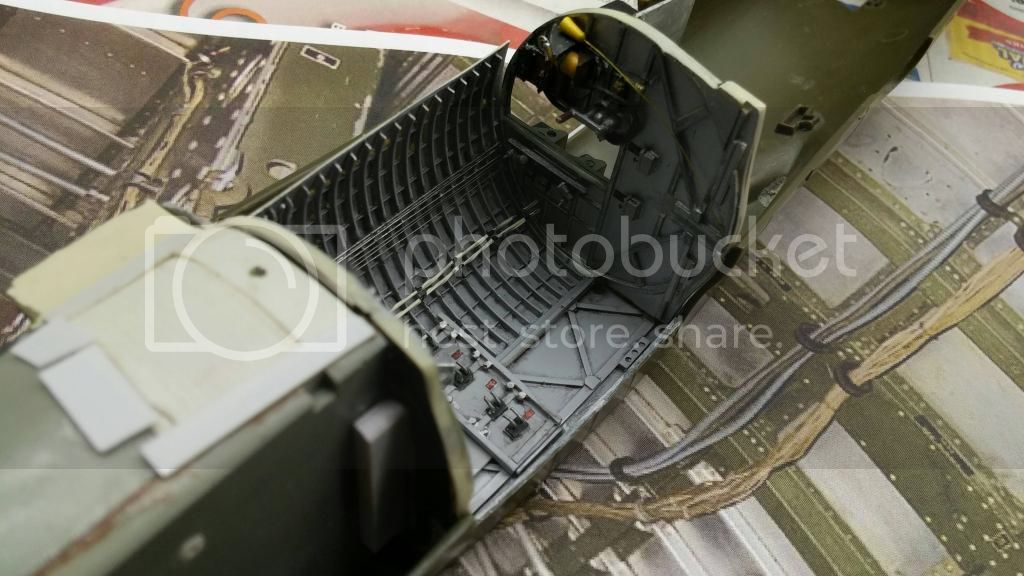
STILL AT A SNAIL's PACE
But at least I'm working on it. Here is some additional wiring to the back of the stbd. outer bomb rack and the rack itself glued in, with some extra details added.
I will do more work on this tonight and tomorrow, including a clean up of the bomb rack weathering (a bit); completion of fore and aft wiring on the stbd. bulkhead and installation of fore and aft control cables in the ceiling. I also expect to put a spotlight in the ceiling. Finally, I will complete the stbd front bulkhead by installing the right side bomb bay door opening mechanism.
Redhand
#522
Joined: January 20, 2013
KitMaker: 1,460 posts
AeroScale: 1,443 posts
Posted: Wednesday, December 17, 2014 - 09:12 AM UTC
MORE BOMB BAY WIRES AND CABLES
I think I am close to finished with the starboard side wiring and cabling of the bomb bay.
The loose ends of the white wires aft will have to be fit into a couple of holes I drilled into the after bulkhead.
As for the control cables in the ceiling, I show them warts and all.

They proved to be a real pain to install. I used two diameters of wire, because that is what appears in the real thing, but getting them to align was a fiddly nightmare. See above.
I take some consolation from the fact that they do not align perfectly in the real thing
But, I will probably continue poking around with a #11 blade to "clean them up" a bit and I think I'm going to paint them a darker hue. At this point they are close to being "good enough," especially given their limited visibility in the model, and it is time to move on. Just a bit more messing with these, I hope!
I have to do a double-check to see if anything else needs to be added to the rear bulkhead. If not, it's almost time to do THIS:
though before I do I will install something to represent the ball screw actuators
at least in the starboard bulkheads fore and aft. Since the transmissions for these actuators rest under the catwalk fore and aft I will save the actual connecting rods for later, when the catwalk is installed. That's going to prove tricky.
I think I am close to finished with the starboard side wiring and cabling of the bomb bay.
The loose ends of the white wires aft will have to be fit into a couple of holes I drilled into the after bulkhead.
As for the control cables in the ceiling, I show them warts and all.
They proved to be a real pain to install. I used two diameters of wire, because that is what appears in the real thing, but getting them to align was a fiddly nightmare. See above.
I take some consolation from the fact that they do not align perfectly in the real thing
But, I will probably continue poking around with a #11 blade to "clean them up" a bit and I think I'm going to paint them a darker hue. At this point they are close to being "good enough," especially given their limited visibility in the model, and it is time to move on. Just a bit more messing with these, I hope!
I have to do a double-check to see if anything else needs to be added to the rear bulkhead. If not, it's almost time to do THIS:
though before I do I will install something to represent the ball screw actuators
at least in the starboard bulkheads fore and aft. Since the transmissions for these actuators rest under the catwalk fore and aft I will save the actual connecting rods for later, when the catwalk is installed. That's going to prove tricky.

chris1

Joined: October 25, 2005
KitMaker: 949 posts
AeroScale: 493 posts

Posted: Wednesday, December 17, 2014 - 11:01 AM UTC
Hi Brian,
Just picked up on your thread.
A couple comments.
Between you and Chukw it's not fair (sounds of feet stamping and loud wails) your work puts mere mortal builders like me to shame,my idea of scratch building might be two pieces of tape mascerading as seat belts.
On the picture of Mercys Madhouse what's is that thing in the ball gunners position.
Be gentle I know nothing about B 17s and may have missed the obvious.
Keep up the great work and now am following with great interest.
Cheers
Chris.
Redhand
#522
Joined: January 20, 2013
KitMaker: 1,460 posts
AeroScale: 1,443 posts
Posted: Wednesday, December 17, 2014 - 05:10 PM UTC
Thanks for the comments but NO WAY am I in the same league as Chuck. I know my limitations.
"Mercy's Madhouse" was a "pathfinder" B-17G. The dome, where the ball turret normally is, is an H2X "Mickey" radar for "blind bombing." It was an American modification of the H2S radar used by the Brits in Bomber Command.
Cheers.
"Mercy's Madhouse" was a "pathfinder" B-17G. The dome, where the ball turret normally is, is an H2X "Mickey" radar for "blind bombing." It was an American modification of the H2S radar used by the Brits in Bomber Command.
Cheers.
chukw1
Joined: November 28, 2007
KitMaker: 817 posts
AeroScale: 729 posts
Posted: Wednesday, December 17, 2014 - 09:16 PM UTC
crikey, that bomb bay looks great! Now, Brian- don't be so humble. Chris is being way too kind to me and my stumbling efforts- we are all in this for the sheer enjoyment of making tiny parts and then dropping them on the carpet, no?  Cheers on a great build, my friend- and thanks again for all the great reference pics!
Cheers on a great build, my friend- and thanks again for all the great reference pics! 
Redhand
#522
Joined: January 20, 2013
KitMaker: 1,460 posts
AeroScale: 1,443 posts
Posted: Wednesday, December 17, 2014 - 09:42 PM UTC
My pleasure Chuck.
Brief verbal update. I got the overhead cable sizes reversed relative to what's against the forward bulkhead, so ripped them out and am starting fresh with less haste. Should look better when redone.
Brief verbal update. I got the overhead cable sizes reversed relative to what's against the forward bulkhead,
so ripped them out and am starting fresh with less haste. Should look better when redone. Joel_W
Joined: December 04, 2010
KitMaker: 11,666 posts
AeroScale: 7,410 posts
Posted: Wednesday, December 17, 2014 - 10:38 PM UTC
Brian & Chuck. No one is a bigger fan of your builds and your skills then this old man.
Brian, the only thing missing in your build, is one of Chuck's female helpers to stop by and have a up close and personal look.

Joel
Brian, the only thing missing in your build, is one of Chuck's female helpers to stop by and have a up close and personal look.
Joel
Redhand
#522
Joined: January 20, 2013
KitMaker: 1,460 posts
AeroScale: 1,443 posts
Posted: Wednesday, December 17, 2014 - 11:10 PM UTC
Quoted Text
Brian, the only thing missing in your build, is one of Chuck's female helpers to stop by and have a up close and personal look.
THIS is as close to that skill as I'll ever come.
The "Lady" Herself:
I DO like her painted townails, BTW.
Joel_W
Joined: December 04, 2010
KitMaker: 11,666 posts
AeroScale: 7,410 posts
Posted: Wednesday, December 17, 2014 - 11:38 PM UTC
Brian,
Close but no cigar.
Joel
Close but no cigar.
Joel
Redhand
#522
Joined: January 20, 2013
KitMaker: 1,460 posts
AeroScale: 1,443 posts
Posted: Sunday, December 21, 2014 - 06:36 AM UTC
WHY IS HE SHOWING THE SAME DAMN STUFF?
First, I ripped out the overhead bomb-bay cables, and reinstalled them, with cable pulleys at the top. Then, after a lot of measuring and messing around, I installed my first simulated ballscrew transmission in the forward bulkhead. See below:
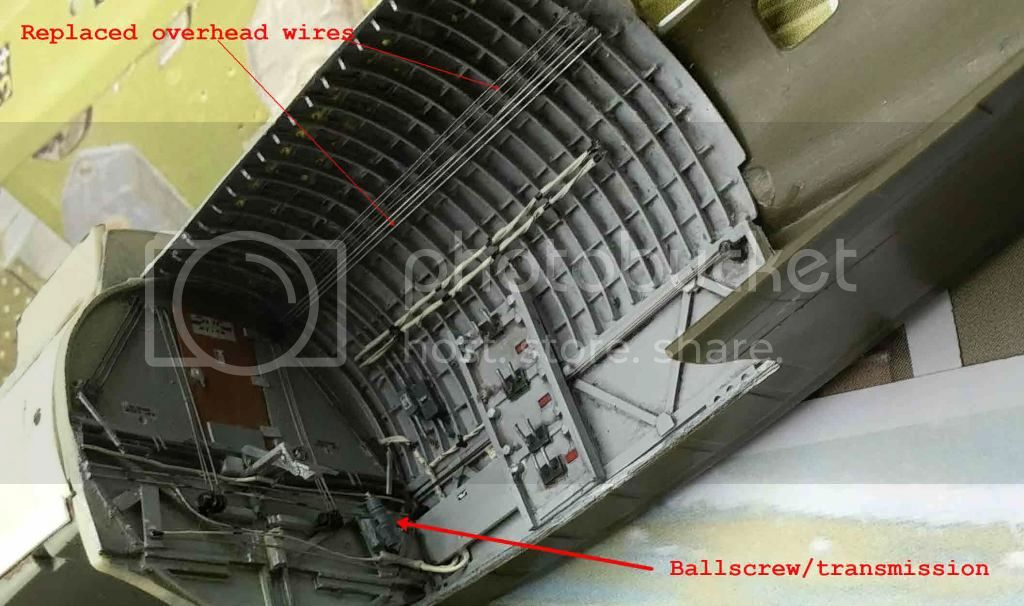
This is SLOW going folks. Real Once in a Lifetime "You may ask yourself, 'Well, how did I get here?'" and "You may say to yourself, 'My God, What Have I Done?!'" stuff.

Anyway, here is a shot showing the control cable pully location before and after. You can't see much except that there IS something that was added. I should have better shots of it later.
I have to repeat the ballscrew/transmission installations aft on both sides, then I may be in a position to glue the after bulkhead in. After that I will probably put in overhead spotlights aft and then the catwalk.
Then I will have the fun of repeating all this on the port side!
First, I ripped out the overhead bomb-bay cables, and reinstalled them, with cable pulleys at the top. Then, after a lot of measuring and messing around, I installed my first simulated ballscrew transmission in the forward bulkhead. See below:
This is SLOW going folks. Real Once in a Lifetime "You may ask yourself, 'Well, how did I get here?'" and "You may say to yourself, 'My God, What Have I Done?!'" stuff.
Anyway, here is a shot showing the control cable pully location before and after. You can't see much except that there IS something that was added. I should have better shots of it later.
I have to repeat the ballscrew/transmission installations aft on both sides, then I may be in a position to glue the after bulkhead in. After that I will probably put in overhead spotlights aft and then the catwalk.
Then I will have the fun of repeating all this on the port side!
Joel_W
Joined: December 04, 2010
KitMaker: 11,666 posts
AeroScale: 7,410 posts
Posted: Sunday, December 21, 2014 - 07:58 PM UTC
Brian,
The level of accuracy of your detail is amazing. I'm guessing that the black "something" is part of a pulley for the cables.
Joel
The level of accuracy of your detail is amazing. I'm guessing that the black "something" is part of a pulley for the cables.
Joel
Redhand
#522
Joined: January 20, 2013
KitMaker: 1,460 posts
AeroScale: 1,443 posts
Posted: Sunday, December 21, 2014 - 09:25 PM UTC
Quoted Text
Brian,
The level of accuracy of your detail is amazing. I'm guessing that the black "something" is part of a pulley for the cables.
Joel
Exactly. Couldn't fully replicate due to size limits, but it's similar in appearance to those at the bottom.

Scrodes
Joined: July 22, 2012
KitMaker: 771 posts
AeroScale: 763 posts
Posted: Monday, December 22, 2014 - 05:24 AM UTC
This is all just a practice run for a 32nd scale build ya?
*duck and cover*
I don't think the replication is the issue - they actually look quite good, I think the issue is the lack of a macro lens makes it impossible to get an accurate focus on such small details - especially in low light.
Beautiful build man.
*duck and cover*
Quoted Text
Exactly. Couldn't fully replicate due to size limits, but it's similar in appearance to those at the bottom.
I don't think the replication is the issue - they actually look quite good, I think the issue is the lack of a macro lens makes it impossible to get an accurate focus on such small details - especially in low light.
Beautiful build man.
chris1
Joined: October 25, 2005
KitMaker: 949 posts
AeroScale: 493 posts
Posted: Monday, December 22, 2014 - 05:43 AM UTC
Hi Brian,
Thanks for the reply,many thoughts as to what the housing but Radar wasn't one them.
Have great Xmas and build on.
Chris
Thanks for the reply,many thoughts as to what the housing but Radar wasn't one them.
Have great Xmas and build on.
Chris
Redhand
#522
Joined: January 20, 2013
KitMaker: 1,460 posts
AeroScale: 1,443 posts
Posted: Monday, December 22, 2014 - 07:18 AM UTC
Quoted Text
Hi Brian,
Thanks for the reply,many thoughts as to what the housing but Radar wasn't one them.
Have great Xmas and build on.
Chris
"Build on." Ah, yah.

As to the H2X, here's what it looked like inside where the ball turret was. A pretty rare pic.
Redhand
#522
Joined: January 20, 2013
KitMaker: 1,460 posts
AeroScale: 1,443 posts
Posted: Friday, December 26, 2014 - 12:37 AM UTC
ALMOST READY FOR SOMETHING BIG
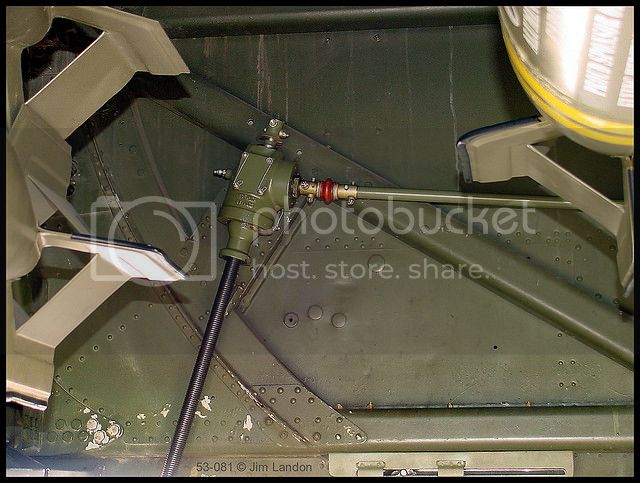
This shows the after bomb-bay bulkhead with ball screw transmissions attached. I cut down the "version" used in the prior post to make them look more like the real thing, as you can see, comparing my grey "thingee" to the real transmission painted green off to the right.

After a bit more cleanup, and installing a scratchbuilt fuel transfer pump (another plastic thingee, really) under the forward catwalk step, I really will be in a position to glue that after bulkhead in and install the catwalk. THAT will be a milestone in this build.
Happy Holidays to everyone.
This shows the after bomb-bay bulkhead with ball screw transmissions attached. I cut down the "version" used in the prior post to make them look more like the real thing, as you can see, comparing my grey "thingee" to the real transmission painted green off to the right.
After a bit more cleanup, and installing a scratchbuilt fuel transfer pump (another plastic thingee, really) under the forward catwalk step, I really will be in a position to glue that after bulkhead in and install the catwalk. THAT will be a milestone in this build.
Happy Holidays to everyone.
Joel_W
Joined: December 04, 2010
KitMaker: 11,666 posts
AeroScale: 7,410 posts
Posted: Friday, December 26, 2014 - 11:49 PM UTC
Brian,
The Bombay and bulkhead are just amazing. The amount of detailing is just unbelievable. Just one question. Why didn't you paint the ball screw transmission Green, or will you do that later before moving on from the Bombay sub assembly?
Joel
The Bombay and bulkhead are just amazing. The amount of detailing is just unbelievable. Just one question. Why didn't you paint the ball screw transmission Green, or will you do that later before moving on from the Bombay sub assembly?
Joel
 |

WEB HOSTING BY


Copyright ©2021 AeroScale and Kitmaker Network, a subsidiary of Silver Star Enterprises
All Rights Reserved. Please read our Conditions of Use and Privacy Policy.
All Rights Reserved. Please read our Conditions of Use and Privacy Policy.