Grems 1/24th Typhoon build
Joined: October 30, 2005
KitMaker: 3,897 posts
AeroScale: 564 posts
Posted: Friday, August 01, 2014 - 06:50 AM UTC
England - South West, United Kingdom
Joined: July 04, 2013
KitMaker: 430 posts
AeroScale: 18 posts
Posted: Friday, August 01, 2014 - 09:20 AM UTC
Hi Julian
Glad you've got your baby at last
Will be following with interest, don't think it's going to float though

Cheers Kev
Joined: October 30, 2005
KitMaker: 3,897 posts
AeroScale: 564 posts
Posted: Friday, August 01, 2014 - 05:23 PM UTC
Quoted Text
Hi Julian
Glad you've got your baby at last
Will be following with interest, don't think it's going to float though
Cheers Kev
Hi Kev,
yes, very much worth the wait too

It's definitely not a floater

Too many holes to plug on this monster


Joined: October 30, 2005
KitMaker: 3,897 posts
AeroScale: 564 posts
Posted: Saturday, August 02, 2014 - 01:27 AM UTC
Haute-Vienne, France
Joined: August 15, 2011
KitMaker: 57 posts
AeroScale: 55 posts
Posted: Saturday, August 02, 2014 - 02:49 AM UTC
Hi Julian, that's a quick start. I intend leaving mine for a couple of months in case there are any problems thrown up by the ongoing builds, and I've got plenty to be going on with anyway. I would like to finish mine in the same way as you, but not quite completely naked on one side.
Looking forward to seeing further progress.
John
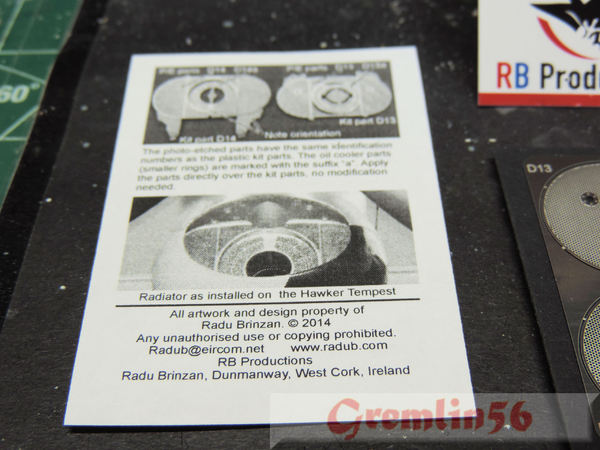
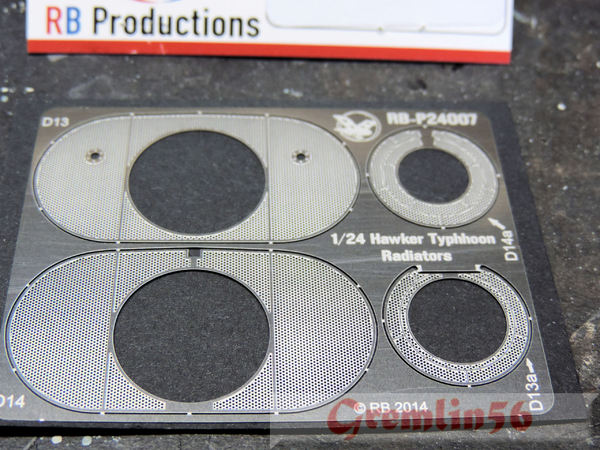
PS do the plastic parts come with the RB radiator set or just the etch?
Joined: October 30, 2005
KitMaker: 3,897 posts
AeroScale: 564 posts
Posted: Saturday, August 02, 2014 - 02:58 AM UTC
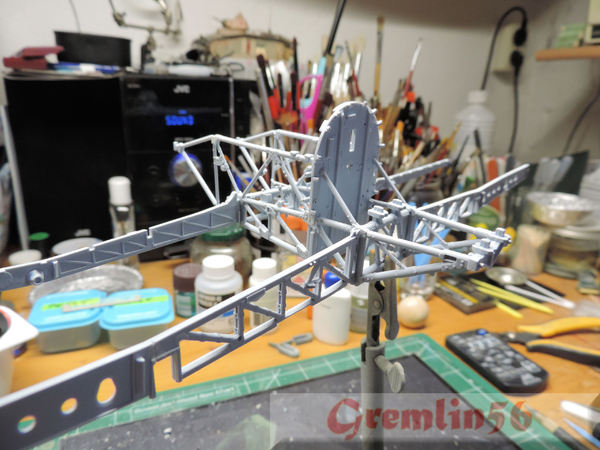
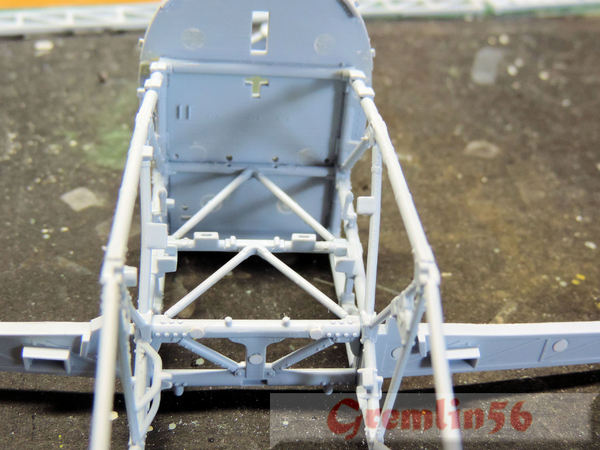
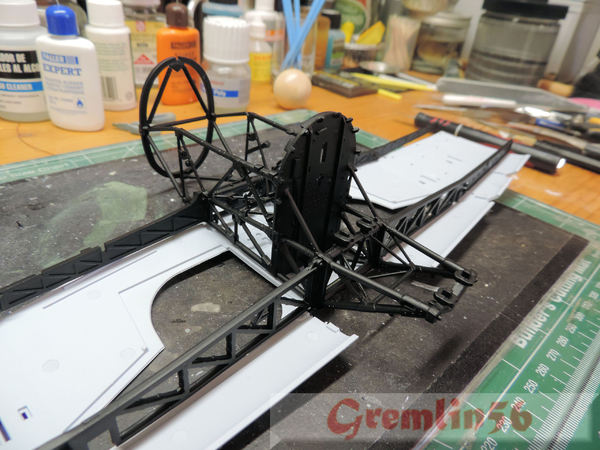
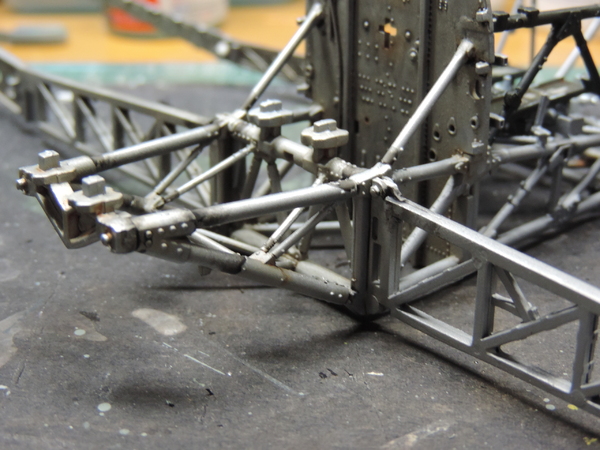
Hi John, Couldn't wait to dive in and get going. Still finishing off the 1/200th USS Hornet/"30 seconds over Tokyo" build over at Model Shipwrights at the same time so I am having a ball at the moment.
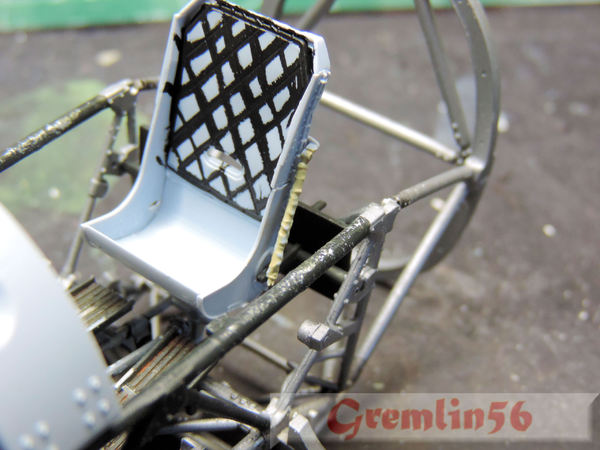
The PE sheet in the photo is what you get but it's a quantum leap compared to the OOB parts.
The black ground coat just went onto the cage and spars so I can break out the Alclad tomorrow I think. Meanwhile time for a cool white wine I think.
Joined: October 30, 2005
KitMaker: 3,897 posts
AeroScale: 564 posts
Posted: Saturday, August 02, 2014 - 06:52 PM UTC

#335
Auckland, New Zealand
Joined: September 03, 2013
KitMaker: 1,808 posts
AeroScale: 195 posts
Posted: Saturday, August 02, 2014 - 07:18 PM UTC
Hi julian,
Moving at speed but it look's great so far. I hope Airfix engineered that framing to carry all those extra goodies you have for this one
I will be watching with interest.
cheers
Michael
Campaign:
Strip, Track and Trail - Porsche 917/20 - On the bench
Phantoms at 60 - F-4J Marines
Below 1000 tons - M50 minesweeper - Sailed for duty
Joined: October 30, 2005
KitMaker: 3,897 posts
AeroScale: 564 posts
Posted: Saturday, August 02, 2014 - 07:31 PM UTC
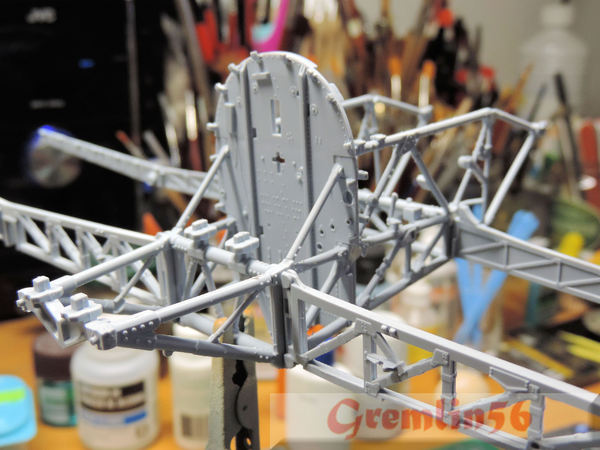
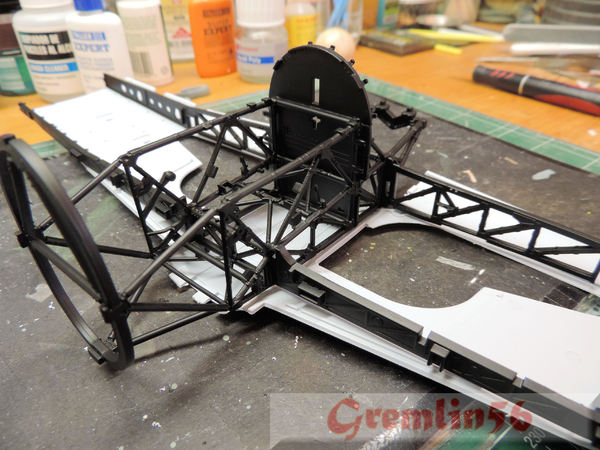
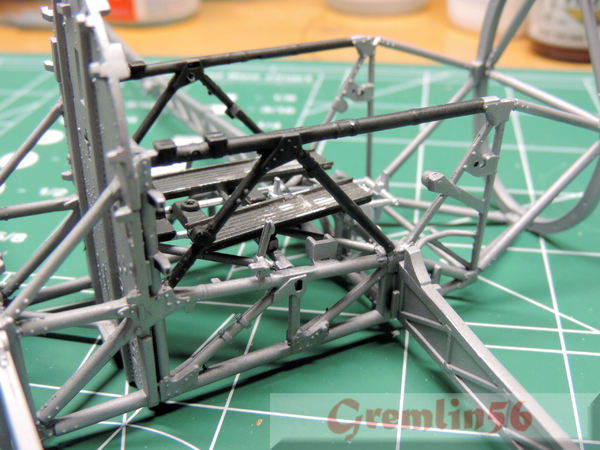
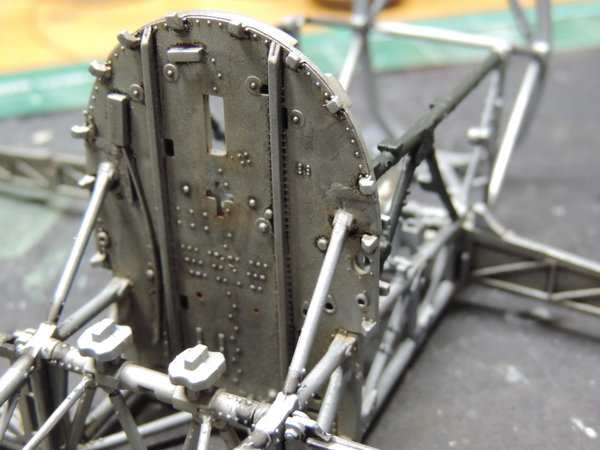
Good morning Michael, all straight forward and easy going so far. Most time went into cleaning up parts, filling sink holes and scraping flash. The pace will slow down when the detailing and weathering starts.
Joined: October 30, 2005
KitMaker: 3,897 posts
AeroScale: 564 posts
Posted: Sunday, August 03, 2014 - 03:07 AM UTC
Haute-Vienne, France
Joined: August 15, 2011
KitMaker: 57 posts
AeroScale: 55 posts
Posted: Sunday, August 03, 2014 - 06:50 PM UTC
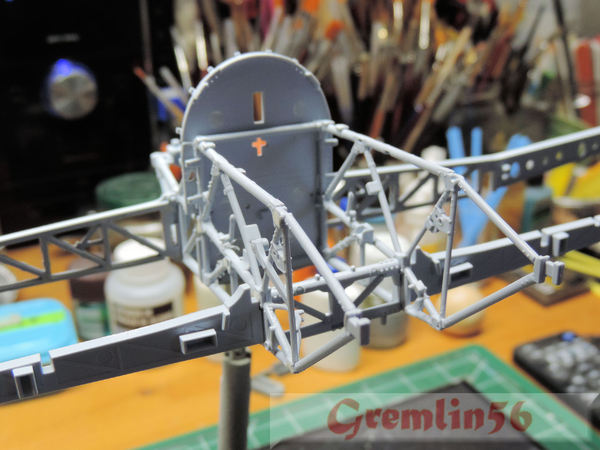
Hi Julian, I don't want to throw a spanner in the works but Chris Thomas reckons that the cockpit framing should be all silver lacquer, and that the RAF Museum Typhoon which Airfix took the interior colours from had been incorrectly restored.
At least if you want to change it you have n't gone too far yet.
All the best
John

Montevideo, Uruguay
Joined: August 22, 2011
KitMaker: 998 posts
AeroScale: 20 posts
Posted: Monday, August 04, 2014 - 02:17 AM UTC
" My bigger dread is to look at the history of my life and to ask me what I did with her "
Joined: October 30, 2005
KitMaker: 3,897 posts
AeroScale: 564 posts
Posted: Monday, August 04, 2014 - 04:54 AM UTC
Quoted Text
Hi Julian, I don't want to throw a spanner in the works but Chris Thomas reckons that the cockpit framing should be all silver lacquer, and that the RAF Museum Typhoon which Airfix took the interior colours from had been incorrectly restored.
At least if you want to change it you have n't gone too far yet.
All the best
John
Hi John, heck no, wouldn't consider this a spanner
I take it you are referring to the special supplement that was included with the Airfix magazine, Chris Thomas wrote a large chunk of the information included. I have in the meantime found several photos of what look like Typhoon cockpits with black framework and one with green framework so I shouldn't lose to much sleep over this. The aluminium colour gives a more sexy contrast to the black instrument panels so I might just change it. Thanks for the tip anyway,
Joined: October 30, 2005
KitMaker: 3,897 posts
AeroScale: 564 posts
Posted: Monday, August 04, 2014 - 04:58 AM UTC
Hi my friend, thanks for dropping in
I actually went to the North of Spain for the excellent wines, the great food and the amazing Basque "Pintzos". That I was let into the secret of Santa Justa was a bonus that I will treasure, it's the most beautiful location for a chapel I have ever seen.
http://www.nomadic-one.com/reflect/hermitage-and-chapel-ermita-santa-justa-cantabrica-spainJoined: October 30, 2005
KitMaker: 3,897 posts
AeroScale: 564 posts
Posted: Monday, August 04, 2014 - 06:37 AM UTC
England - South West, United Kingdom
Joined: July 04, 2013
KitMaker: 430 posts
AeroScale: 18 posts
Posted: Monday, August 04, 2014 - 06:42 PM UTC
Haute-Vienne, France
Joined: August 15, 2011
KitMaker: 57 posts
AeroScale: 55 posts
Posted: Monday, August 04, 2014 - 07:03 PM UTC
Hi John, heck no, wouldn't consider this a spanner
I take it you are referring to the special supplement that was included with the Airfix magazine, Chris Thomas wrote a large chunk of the information included. I have in the meantime found several photos of what look like Typhoon cockpits with black framework and one with green framework so I shouldn't lose to much sleep over this. The aluminium colour gives a more sexy contrast to the black instrument panels so I might just change it. Thanks for the tip anyway,
[/quote]
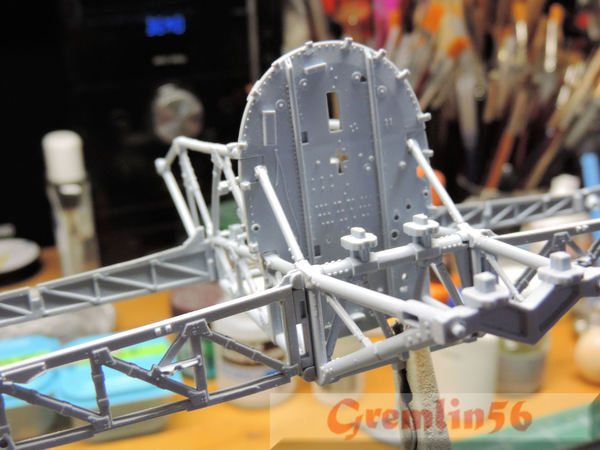
Hi, there's a debate starting on another site now about Typhoon cockpit colours and it does look like there's evidence of several different combinations, but I think the original Hawker spec was aluminium lacquer.
Excellent progress by the way, keep it coming.

Joined: October 30, 2005
KitMaker: 3,897 posts
AeroScale: 564 posts
Posted: Tuesday, August 05, 2014 - 03:32 AM UTC
Thanks Kev, lets hope its a case of great things coming from humble beginnings
Joined: October 30, 2005
KitMaker: 3,897 posts
AeroScale: 564 posts
Posted: Tuesday, August 05, 2014 - 03:35 AM UTC
Quoted Text
Hi, there's a debate starting on another site now about Typhoon cockpit colours and it does look like there's evidence of several different combinations, but I think the original Hawker spec was aluminium lacquer.
Excellent progress by the way, keep it coming.
Thanks John,
I am a bit wary of posting the cockpit photos here due to copy write issues but if you Google around you can find plenty of color photos. The different colors being the case gives you a little bit more leeway for the build.
Haute-Vienne, France
Joined: August 15, 2011
KitMaker: 57 posts
AeroScale: 55 posts
Posted: Tuesday, August 05, 2014 - 04:46 AM UTC
I've just looked at my Tamiya 'car door' Typhoon from several years ago and I painted the cockpit framing interior grey/green, presumably following the kit instructions. Doh!!
Ontario, Canada
Joined: July 22, 2012
KitMaker: 771 posts
AeroScale: 763 posts
Posted: Tuesday, August 05, 2014 - 04:59 AM UTC
What size punch did you use for the styrene disks? I'm just curious if the sinkholes are as big as they are in the Mosquito.
Also, what thickness styrene sheet worked?
Matt Odom
I've been known to build a few things
Joined: October 30, 2005
KitMaker: 3,897 posts
AeroScale: 564 posts
Posted: Tuesday, August 05, 2014 - 05:08 AM UTC
Quoted Text
I've just looked at my Tamiya 'car door' Typhoon from several years ago and I painted the cockpit framing interior grey/green, presumably following the kit instructions. Doh!!
That's the way it works John. I was absolutely convinced that underside of the Typhoon was Sky. I would have taken some flak here if I had sprayed the underside in that color............
Joined: October 30, 2005
KitMaker: 3,897 posts
AeroScale: 564 posts
Posted: Tuesday, August 05, 2014 - 05:13 AM UTC
Quoted Text
What size punch did you use for the styrene disks? I'm just curious if the sinkholes are as big as they are in the Mosquito.
Also, what thickness styrene sheet worked?
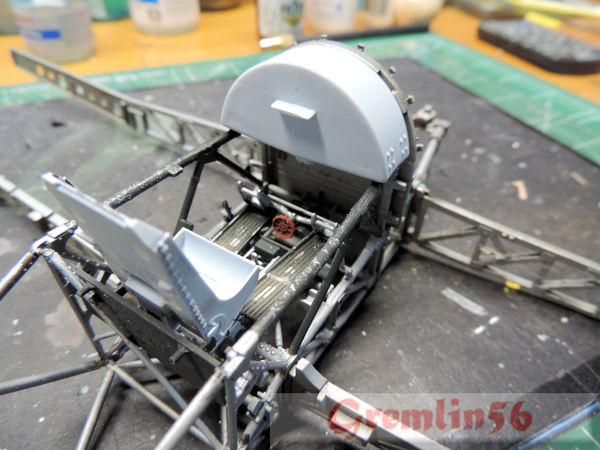
I used Evergreen .010" sheet, slightly too thick but sands down easily. Size of punch I would have to measure, I have an "El-Cheapo" Micromark P&D set. Not wanting to sound crude but I checked what fit in the hole

How's the Mossie coming on? The photos so far are fantastic.
Joined: October 30, 2005
KitMaker: 3,897 posts
AeroScale: 564 posts
Posted: Thursday, August 07, 2014 - 06:11 AM UTC
Ontario, Canada
Joined: July 22, 2012
KitMaker: 771 posts
AeroScale: 763 posts
Posted: Thursday, August 07, 2014 - 07:48 AM UTC
Okay cool. I have a Waldron set, but I didn't have a punch large enough for the mosquito.
Speaking of which it's coming along nicely. I'm working out the fitting of the nacelles to the wing and the nose had a giant step in it that I'm working on correcting - that's what's taking up all my time. It's one of those things where there are a lot of hours but not much to see, which is why there haven't been any new photos.
Matt Odom
I've been known to build a few things