


Air Campaigns
Want to start or join a group build? This is where to start.
Want to start or join a group build? This is where to start.
Hosted by Frederick Boucher, Michael Satin
OFFICIAL:- Airfx III campaign

tinbanger

Joined: February 04, 2008
KitMaker: 2,507 posts
AeroScale: 1,814 posts

Posted: Monday, June 08, 2015 - 12:48 AM UTC
Great model John!

Striker

Joined: August 21, 2003
KitMaker: 94 posts
AeroScale: 6 posts

Posted: Monday, June 08, 2015 - 11:57 PM UTC
Thanks. I tried the "dot filter" shading technique but I don't think it came out much in the pic. The wash got a little bit out of control on the barrel. Overall not bad and if I wasn't invested in 28mm for WWII gaming I'd go 1/72-1/76.

firstcircle

Joined: November 19, 2008
KitMaker: 2,249 posts
AeroScale: 34 posts
Posted: Thursday, June 11, 2015 - 10:00 PM UTC
Can't believe the Jaguar got finished so quickly... especially not looking like that!
John, the Tiger paint work looks good - shame about those tracks, surely a kit that has to be somewhere near the top of Airfix's to do list.
Detailed update follows from the "other site"
A couple of weeks to go to the end of the campaign so I should be wrapping up so as not to miss the end like I did in the last Airfix campaign.
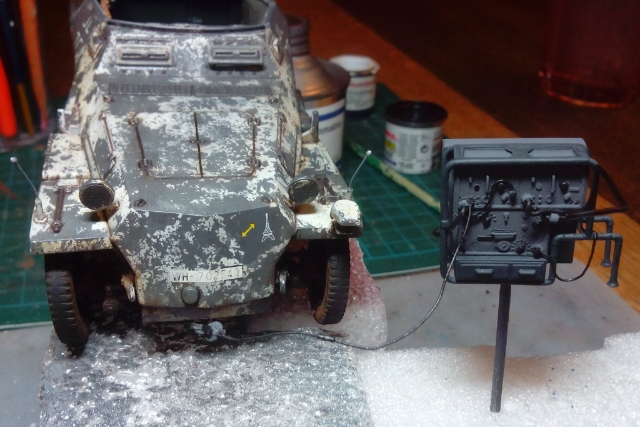
However when I took the plastic sheet that has been masking the interior off for weeks I decided I was no longer happy with the radio - seemed a bit flat in there compared to the quite busy looking exterior and even worse it looked a bit wonky.
So I pulled it out, which necessitated a bit of "re-decorating":
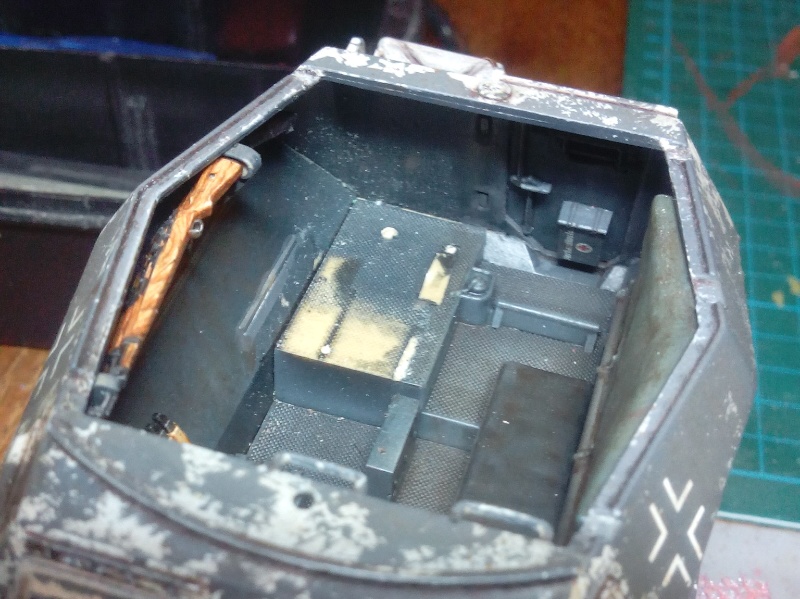
Built up slightly more authentic looking racking for the radio:
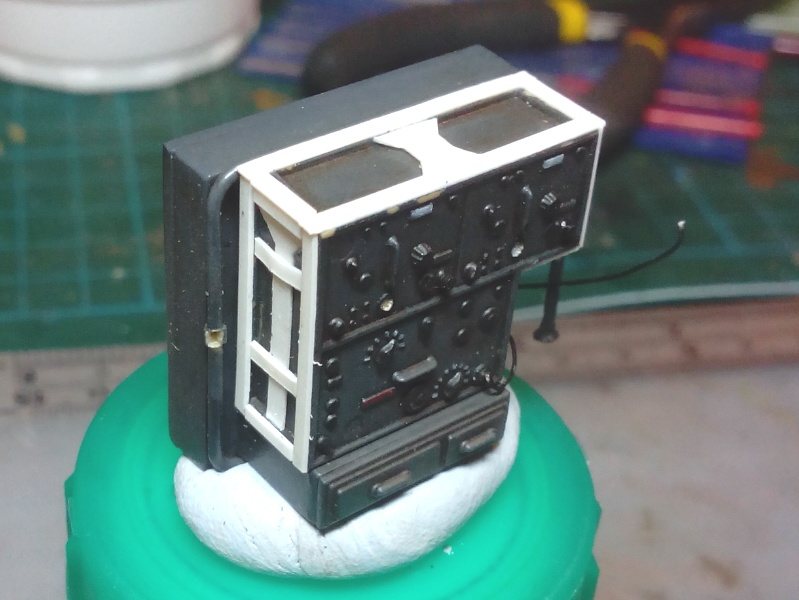
Then re-did the cabling, including some very thick cables and plugs (presume these are the aerial and power cables) which are probably a bit oversize, but probably better to over than underdo it. Reworked the bottom surface to get it sit straight on the vehicle floor. Also added some headphones, with earpieces made from handles from Airfix's 1/76 Pak40 kit.
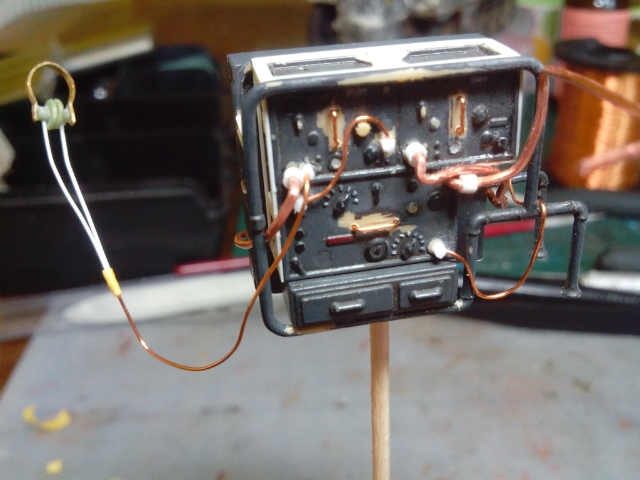
Made a bit of a mess of the new handles and despite stripping all the paint off the radio front, the surface around them remains a bit messy. Oh well. Meanwhile the width indicators were fabricated from wire and glued on carbon beads from a water filter (thanks to Val "r2d2", I think, for the tip) and then inserted into the drilled rod bases that have been sitting patiently for months. I'm sure I'm going to snap them off before the end, but they've survived masking and painting so far:

John, the Tiger paint work looks good - shame about those tracks, surely a kit that has to be somewhere near the top of Airfix's to do list.
Detailed update follows from the "other site"
A couple of weeks to go to the end of the campaign so I should be wrapping up so as not to miss the end like I did in the last Airfix campaign.
However when I took the plastic sheet that has been masking the interior off for weeks I decided I was no longer happy with the radio - seemed a bit flat in there compared to the quite busy looking exterior and even worse it looked a bit wonky.
So I pulled it out, which necessitated a bit of "re-decorating":
Built up slightly more authentic looking racking for the radio:
Then re-did the cabling, including some very thick cables and plugs (presume these are the aerial and power cables) which are probably a bit oversize, but probably better to over than underdo it. Reworked the bottom surface to get it sit straight on the vehicle floor. Also added some headphones, with earpieces made from handles from Airfix's 1/76 Pak40 kit.
Made a bit of a mess of the new handles and despite stripping all the paint off the radio front, the surface around them remains a bit messy. Oh well. Meanwhile the width indicators were fabricated from wire and glued on carbon beads from a water filter (thanks to Val "r2d2", I think, for the tip) and then inserted into the drilled rod bases that have been sitting patiently for months. I'm sure I'm going to snap them off before the end, but they've survived masking and painting so far:

Northern_Lad

Joined: September 17, 2012
KitMaker: 462 posts
AeroScale: 42 posts
Posted: Thursday, June 11, 2015 - 10:44 PM UTC
Have done a quick fix on the RE8
This is a before shot. I'm not sure it could even fly like this

And now I have removed the struts so the ailerons can move freely again

And now the struts are repositioned properly

I hope to lay down some paint this evening.
Cheers
Matthew
This is a before shot. I'm not sure it could even fly like this

And now I have removed the struts so the ailerons can move freely again

And now the struts are repositioned properly

I hope to lay down some paint this evening.
Cheers
Matthew
firstcircle
Joined: November 19, 2008
KitMaker: 2,249 posts
AeroScale: 34 posts
Posted: Thursday, June 11, 2015 - 11:14 PM UTC
Now at home I can see all the images that get blocked at work... The RE8 looks great, and I like what you said:
Just how I feel about my radio cabling. Looking forward to the painting.
Brian, first for 38 years... Incredible to think that 38 years before that, these planes were in action. Hope it's the first of many more, and looking forward to seeing it finished.
Quoted Text
It is not a complete rigging, but rather a flavour... It's a model after all, not a scale replica
Just how I feel about my radio cabling. Looking forward to the painting.
Brian, first for 38 years... Incredible to think that 38 years before that, these planes were in action. Hope it's the first of many more, and looking forward to seeing it finished.
Northern_Lad
Joined: September 17, 2012
KitMaker: 462 posts
AeroScale: 42 posts
Posted: Friday, June 12, 2015 - 02:49 AM UTC
@ Matthew - thanks. I like your sdkfz 250/3. I also have the same kit in the stash. My plan is at some point to build it as Rommel's Grief. One day...
RE8 progress...
paint!


Bit of weathering tomorrow. Guns nowhere in sight I'm not even sure they've been dispatched by the vendor from Ukraine....
Cheers
Matthew
RE8 progress...
paint!


Bit of weathering tomorrow. Guns nowhere in sight I'm not even sure they've been dispatched by the vendor from Ukraine....
Cheers
Matthew

bm4247

Joined: December 29, 2014
KitMaker: 88 posts
AeroScale: 26 posts

Posted: Sunday, June 14, 2015 - 11:50 PM UTC
Some photos of my Curtiss P40-B Warhawk. Only second model built since a 38 year gap. Attempted weathering. Had some trouble with masking of canopy. Did the interior colour on canopy first followed by exterior colour. Painted all by hand. Not sure if 1/72nd scale is good for me but had fun with the build. Maybe weathered too much. Here are the photos of the completed build.


tinbanger
Joined: February 04, 2008
KitMaker: 2,507 posts
AeroScale: 1,814 posts
Posted: Monday, June 15, 2015 - 02:02 AM UTC
Welcome back to the hobby Brian!
Nice work and rigging as a bonus.
Post your photos in the gallery.
Keep up the good work.
Nice work and rigging as a bonus.
Post your photos in the gallery.
Keep up the good work.
Northern_Lad
Joined: September 17, 2012
KitMaker: 462 posts
AeroScale: 42 posts
Posted: Wednesday, June 17, 2015 - 04:52 PM UTC
@ Richard
Is there any chance of an extension? I won't be able to finish the RE8 until mid/late July owing to work obligations and the fact that the aftermarket Lewis and Vickers guns are slow arriving...
If it's not possible - I will move this model to the unfinished business campaign. I would rather finish it in the Airfix III one though.
Cheers
Matthew

OEFFAG_153

Joined: February 19, 2010
KitMaker: 1,473 posts
AeroScale: 1,450 posts

Posted: Wednesday, June 17, 2015 - 07:58 PM UTC
Matthew, Nicke bild on the RE.8 It is a favourite of mine.
Just a hint on the struts though, You had them right first time around. The single "strut" is actually the linkage between the aerlions, so should be palced between them...
Hope you don't mind. 😉
Mikael
PS, yes the gunner had à small stool to sit on... Have a look over at WingNut Wings, Even though the RE is OOP, you still van download the instructions for their kit:
http://www.wingnutwings.com/ww/productdetail?productid=3003&cat=4
Northern_Lad
Joined: September 17, 2012
KitMaker: 462 posts
AeroScale: 42 posts
Posted: Wednesday, June 17, 2015 - 08:35 PM UTC
Quoted Text
Matthew, Nicke bild on the RE.8 It is a favourite of mine.
Just a hint on the struts though, You had them right first time around. The single "strut" is actually the linkage between the aerlions, so should be palced between them...
Hope you don't mind. 😉
Mikael
PS, yes the gunner had à small stool to sit on... Have a look over at WingNut Wings, Even though the RE is OOP, you still van download the instructions for their kit:
http://www.wingnutwings.com/ww/productdetail?productid=3003&cat=4
Thanks, Mikael, for pointing this out. It is a bit frustrating... I guess I should have checked more reference photos to start with... Darn Aileron struts!
Thanks also for the link to the wingnutwings instructions. I still intend to add the gunner's stool.
Cheers
Matthew
tinbanger
Joined: February 04, 2008
KitMaker: 2,507 posts
AeroScale: 1,814 posts
Posted: Thursday, June 18, 2015 - 04:26 AM UTC
Update on my entry,some touch up and then ready to decal:-

tinbanger
Joined: February 04, 2008
KitMaker: 2,507 posts
AeroScale: 1,814 posts
Posted: Thursday, June 18, 2015 - 04:33 AM UTC
"Is there any chance of an extension? I won't be able to finish the RE8 until mid/late July owing to work obligations and the fact that the aftermarket Lewis and Vickers guns are slow arriving..."
Matthew I will extend the awarding of ribbons for the builds underway that will not be completed by the end of the campaign untill the 2nd of Aug 2015.
All completed entrys that are posted in the gallery will be awarded ribbons on the 1st of July 2015
Matthew I will extend the awarding of ribbons for the builds underway that will not be completed by the end of the campaign untill the 2nd of Aug 2015.
All completed entrys that are posted in the gallery will be awarded ribbons on the 1st of July 2015
Mecenas
Joined: December 23, 2007
KitMaker: 1,596 posts
AeroScale: 1,275 posts
KitMaker: 1,596 posts
AeroScale: 1,275 posts

Posted: Thursday, June 18, 2015 - 11:53 PM UTC
Here's a short update of my Spitfire. It's not quite what I wanted to achieve but for this moment I give up with improvements and just carry on. I will just tone down a bit the chipping and scratches on machine gun panels on the Dark Earth patches and proceeding to decals. It's high time to finish this kit.


tinbanger
Joined: February 04, 2008
KitMaker: 2,507 posts
AeroScale: 1,814 posts
Posted: Friday, June 19, 2015 - 05:53 AM UTC
Michal I have not yet tried chipping on any models yet, I like the Machine gun panels on yours.
Mecenas
Joined: December 23, 2007
KitMaker: 1,596 posts
AeroScale: 1,275 posts
KitMaker: 1,596 posts
AeroScale: 1,275 posts
Posted: Friday, June 19, 2015 - 01:09 PM UTC
Quoted Text
Michal I have not yet tried chipping on any models yet, I like the Machine gun panels on yours.
It was the AK "worn effect" agent, but in contrary to the use instruction I started adding chips after 2 weeks instead of 20 minutes. The effect is much otherdone. I have toned it down already on the green but DE is still not touched yet. It would look much better if I would use it just like the producer suggests but the 5 day long visit in a hospital set me back a bit, so I'm trying to catch up with the lost time now.
For this weekend I have the painting gloss varnish and placing decals so I could do all the weathering and remaining bits and touch ups next week.
firstcircle
Joined: November 19, 2008
KitMaker: 2,249 posts
AeroScale: 34 posts
Posted: Friday, June 19, 2015 - 01:25 PM UTC
Richard, I guess you mean you will award ribbons on the 1st July, rather than June.
Michal, I used the AK Worn Effects fluid on a small number of parts of my half track, the back door, the gun shield and exhaust cover, and found it much less predictable to use than the toothpaste I used on rest of the body. Although I tried to chip it immediately after applying it and the paint, it only really came off easily where the fluid was very thick, in fact where it wasn't really dry at all. If you look closely you can see the worn patches on the door and the shield follow where the fluid pooled a bit... I wasn't too pleased about it, but decided to live with it. Toothpaste by contrast always chips, so long as you get it only where you want the chip...
Michal, I used the AK Worn Effects fluid on a small number of parts of my half track, the back door, the gun shield and exhaust cover, and found it much less predictable to use than the toothpaste I used on rest of the body. Although I tried to chip it immediately after applying it and the paint, it only really came off easily where the fluid was very thick, in fact where it wasn't really dry at all. If you look closely you can see the worn patches on the door and the shield follow where the fluid pooled a bit... I wasn't too pleased about it, but decided to live with it. Toothpaste by contrast always chips, so long as you get it only where you want the chip...
tinbanger
Joined: February 04, 2008
KitMaker: 2,507 posts
AeroScale: 1,814 posts
Posted: Saturday, June 20, 2015 - 12:27 AM UTC
Thanks Matthew!
"Richard, I guess you mean you will award ribbons on the 1st July, rather than June."
1st July is ribbon day (Also Canada Day )
)
"Richard, I guess you mean you will award ribbons on the 1st July, rather than June."
1st July is ribbon day (Also Canada Day
) tinbanger
Joined: February 04, 2008
KitMaker: 2,507 posts
AeroScale: 1,814 posts
Posted: Saturday, June 20, 2015 - 12:36 AM UTC
My build is complete!
The model went together well and the decals went on with no problems except they had yellowed.
I built this model first time around back when I was in high school after a school trip to RAF Stradishall in 1969!
The base closed the following year.
We got to go inside the Domine and check things out!

An old kit that brought back memorys!
The model went together well and the decals went on with no problems except they had yellowed.
I built this model first time around back when I was in high school after a school trip to RAF Stradishall in 1969!
The base closed the following year.
We got to go inside the Domine and check things out!
An old kit that brought back memorys!
MichaelSatin

Joined: January 19, 2008
KitMaker: 3,909 posts
AeroScale: 2,904 posts
Posted: Saturday, June 20, 2015 - 03:47 AM UTC
Main airframe painting done on the 1/72 Typhoon. Can I get it done? It's gonna be close!


Michael


Michael

almonkey

Joined: March 23, 2003
KitMaker: 2,124 posts
AeroScale: 788 posts

Posted: Saturday, June 20, 2015 - 02:50 PM UTC
time for a harrier update!
but first a quick story about the first time i built this kit, which would have been in early 1976, now anyone of a certain age will remember the long hot summer of that year. now it just happened that i left my harrier and a bunch of wax crayons on the parcel shelf of dads Mk 1 escort when we went on a trip somewhere, when we got back to the car the crayons were a multi coloured pool of melted wax, whilst the harrier's wings and tailplane had melted and softened enough so the wingtips were touching the shelf!
the melted crayons eventually set and were still visible under a coat of black paint dad put on to hide them for the next five years!
now on to the 2015 harrier that will definitely be kept out of direct sunlight!

not quite older than me!

interior going in, the engine compressor face looks like its a leftover wheel from one of airfix's locomotive kits

fuselage together, the nozzles will turn,but the front pair are so stiff i'm leaving them pointing down

jumping forward,the transfers cover paper had stuck to the sheet itself, but thankfully due to the decals being as tough as old boots, after they had been in water for a while i was able to scrape the residue off without damaging them.
and where i am now-

thanks to the fact that the hardpoints pegs fit the weapons and tanks snugly i can mix and match them without fixing them permanently

but first a quick story about the first time i built this kit, which would have been in early 1976, now anyone of a certain age will remember the long hot summer of that year. now it just happened that i left my harrier and a bunch of wax crayons on the parcel shelf of dads Mk 1 escort when we went on a trip somewhere, when we got back to the car the crayons were a multi coloured pool of melted wax, whilst the harrier's wings and tailplane had melted and softened enough so the wingtips were touching the shelf!
the melted crayons eventually set and were still visible under a coat of black paint dad put on to hide them for the next five years!
now on to the 2015 harrier that will definitely be kept out of direct sunlight!
not quite older than me!
interior going in, the engine compressor face looks like its a leftover wheel from one of airfix's locomotive kits
fuselage together, the nozzles will turn,but the front pair are so stiff i'm leaving them pointing down
jumping forward,the transfers cover paper had stuck to the sheet itself, but thankfully due to the decals being as tough as old boots, after they had been in water for a while i was able to scrape the residue off without damaging them.
and where i am now-
thanks to the fact that the hardpoints pegs fit the weapons and tanks snugly i can mix and match them without fixing them permanently

MichaelSatin
Joined: January 19, 2008
KitMaker: 3,909 posts
AeroScale: 2,904 posts
Posted: Sunday, June 21, 2015 - 01:04 AM UTC
Underside decals on the Tiffy! I started here to ensure I got the fuselage D-Day stripes on correctly so I can line up the side decals when the time comes. SolvaSet works very well on these new Airfix decals.

Michael

Michael

eMan

#298

Joined: August 08, 2002
KitMaker: 1,182 posts
AeroScale: 351 posts
Posted: Sunday, June 21, 2015 - 12:33 PM UTC
Progress update of my Buccaneer S2B.


EHAM0624

Joined: January 27, 2014
KitMaker: 200 posts
AeroScale: 85 posts
Posted: Monday, June 22, 2015 - 02:58 AM UTC
I had set myself to enter this campaign with a F-111 however the re-scribing and wing modification that I had in mind didn't went as planned,.. But no worry the stash contained also this oldie of which we already see a couple nice builds. Mine will if all go's well end up in a Siberian lake.

The progress so far, the kit needs some plaster and sanding

Some modification of the tail ruder made from aluminum (red) wine cap


The painting progress and first (original out the box) US decals


And the second set of decals after delivery to the Red Army with some ware and tear

Insulation foam for the base of the setting


And that is it for now
eMan
#298
Joined: August 08, 2002
KitMaker: 1,182 posts
AeroScale: 351 posts
Posted: Tuesday, June 23, 2015 - 12:35 PM UTC
More Buccaneer progress pics.


 |

WEB HOSTING BY


Copyright ©2021 AeroScale and Kitmaker Network, a subsidiary of Silver Star Enterprises
All Rights Reserved. Please read our Conditions of Use and Privacy Policy.
All Rights Reserved. Please read our Conditions of Use and Privacy Policy.