OFFICIAL: WWII Twins Campaign
Illinois, United States
Joined: January 25, 2010
KitMaker: 110 posts
AeroScale: 88 posts
Posted: Tuesday, April 12, 2016 - 08:32 PM UTC

#424
Queensland, Australia
Joined: April 23, 2015
KitMaker: 4,648 posts
AeroScale: 1,938 posts
Posted: Wednesday, April 13, 2016 - 01:16 PM UTC
Nice looking Henschel, Tom. Can't wait to see more!
"Artillery adds dignity, to what would otherwise be an ugly brawl."
Frederick The Great
AussieReg
 Associate Editor
#007
Victoria, Australia
Joined: June 09, 2009
KitMaker: 8,156 posts
AeroScale: 3,756 posts
Posted: Thursday, April 14, 2016 - 03:16 AM UTC
Lovely paint job Tom, a mist coat will blend and tone it down beautifully.
6 weeks to go folks, time has rushed by but there is still plenty of time to get these birds flying!
Cheers, D
ON the bench
Revell 1/24 '53 Corvette (building as '54)
Revell 1/24 BMW 507 Coupe and Cabrio
Italeri 1/48 Me262 B-1a/U1 Nightfighter
Monogram 1/24 '57 Chevy Nomad
Dragon 1/350 USS Frank Knox DD-742
Nordrhein-Westfalen, Germany
Joined: March 22, 2015
KitMaker: 671 posts
AeroScale: 614 posts
Posted: Thursday, April 14, 2016 - 06:08 PM UTC
Sean and Damian: Thank You very much. Hopefully the shading will be visible after the weathering and after a flat coat.
Raj: Nice kit You have there. What scale is it?
Tom: Nice result on You Henschel!
For my anteater I had to buy new decals, as I lost the old one (the kit was bought in 2001, I guess). After opening the decals the crosses for the wings were far too big in their dimension

. I checked the instruction, but it was 1/72.
So I tried the other crosses, but the decals were so thin, the main colour shines through and the white colour becomes a gray one


Even the spare box had no decals in the right size. Than I decided to paint them on. I tried this already before with Japanese circles, but here, it is more difficult.

After a long session of masking. I reckognized the white paint was empty

. Not my day.
Oliver

On the desk: Probably a Panzer III.
#439
Washington, United States
Joined: November 05, 2005
KitMaker: 4,950 posts
AeroScale: 3,192 posts
Posted: Thursday, April 14, 2016 - 07:22 PM UTC
Hanger Queens in Waiting:
Monogram 1/72 F8F-1
Corsair the Sky Pirate - 1/72 Ace A-7D
Century Series - Airfix 1/72 F-105G
Anti Shipping - Academy 1/72 PBJ-1D
Academy 1/72 F-84E
Wisconsin, United States
Joined: September 11, 2009
KitMaker: 1,917 posts
AeroScale: 563 posts
Posted: Thursday, April 14, 2016 - 07:42 PM UTC
Quite a tale of woe! Keep at it, Oliver! It's bound to get better.

Current: model railroad layout
Stalled a while ago:
. 1950's Chrome, WW II Twins
Last completed: Police Car
Berlin, Germany
Joined: October 12, 2008
KitMaker: 709 posts
AeroScale: 651 posts
Posted: Thursday, April 14, 2016 - 10:35 PM UTC
Hi! Good work and progress here

Oliver, good work on the Do and bad luck with the decals.
Hope your massive Mask-erade will success.

Raj, nice choice for your kit!
Tom, well done so far on Your Henschel! Don't dust it too much, that won't be the biggest problem in Africa. There were probably more from fading in the direct sun.
Sean, great cutouts and a neat idea! Curious how this will turn out at the end.
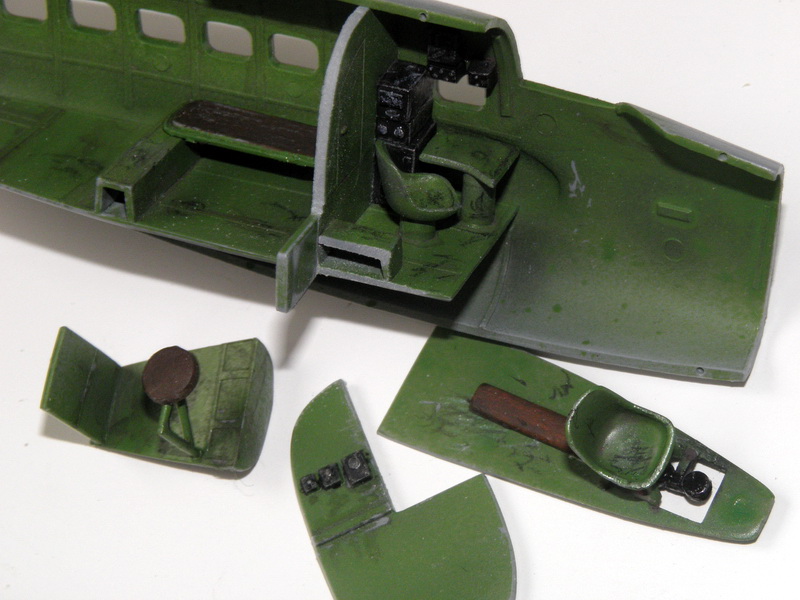
My interior will mostly disappear after I closed the halves. Dryfitting showed a long gap between the upper sides and of course the already mentioned gap at the nose. The hole for the astrodome had to be drilled out - used my Dremel.
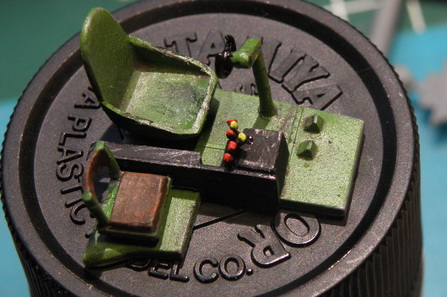
Gave the inside alredy a few signs of usage and added some scratched control sticks in red 'n yellow. Now all the side windows had to be installed before the final interior assembly and closing the fuselage


Thomas
Sometimes you need to distance yourself to see things clearly - Lao Tzu -
... in scale and in real life -T.
#424
Queensland, Australia
Joined: April 23, 2015
KitMaker: 4,648 posts
AeroScale: 1,938 posts
Posted: Friday, April 15, 2016 - 02:50 AM UTC
Thomas,
Nice looking interior detail!
Gaz
"Artillery adds dignity, to what would otherwise be an ugly brawl."
Frederick The Great
#372
United Kingdom
Joined: March 10, 2010
KitMaker: 2,568 posts
AeroScale: 1,619 posts
Posted: Friday, April 15, 2016 - 03:21 AM UTC
Some fantastic builds.
My modelling room / man-cave is nearing completion so I should be able to get back to the Whitley soon.
On the bench: 1/72 Mosquito, Lightning F.6, DH.2,
AMT Vulcan Shuttle Surak.
Cyber-Hobby 1:35 Sherman Firefly IC - still stalled.
#305
Christchurch, New Zealand
Joined: February 01, 2006
KitMaker: 1,673 posts
AeroScale: 1,517 posts
Posted: Friday, April 15, 2016 - 03:53 PM UTC
Buenos Aires, Argentina
Joined: May 21, 2012
KitMaker: 765 posts
AeroScale: 316 posts
Posted: Friday, April 15, 2016 - 04:54 PM UTC
Chris teh Mystel is looking good!!!!!!!!!
Tom, excellent cammo!!
Those Radial Fighters Campaign: 1/72 FW 190 A5
Delta 2 Campaign: 1/48 Hobby Boss Mirage IIIC
Navy Boys on those Postage Stamps 1/72 Airfix Sea Harrier FA2
Working: Trumpeter A-5 Vigilante
Waiting: Phantom 60 Campaign
#305
Christchurch, New Zealand
Joined: February 01, 2006
KitMaker: 1,673 posts
AeroScale: 1,517 posts
Posted: Saturday, April 16, 2016 - 02:20 AM UTC
Gracias amigo! It's coming along nicely, I had an unfortunate disaster with one of the call sign decals which hit the plastic and literally stuck itself in place and broke apart. I'm waiting for it to dry and then I'll remove with masking tape ...I hope. And look for suitable replacement letters in my surplus decal stash.
AussieReg
Associate Editor #007
Victoria, Australia
Joined: June 09, 2009
KitMaker: 8,156 posts
AeroScale: 3,756 posts
Posted: Saturday, April 16, 2016 - 03:57 AM UTC
Oliver, you look to be making a really good job to recover from your troubles, keep pushing on!
Thomas, very nice interior detail, there is plenty of glass there so some of it should still be visible once it is buttoned up.
Chris, nice progress, your twin twin build is looking good. A quick question at the risk of creating disharmony, have you installed the engine mounts on the 328 backwards? The angle of the engines under the wings doesn't look right.
Cheers, D
ON the bench
Revell 1/24 '53 Corvette (building as '54)
Revell 1/24 BMW 507 Coupe and Cabrio
Italeri 1/48 Me262 B-1a/U1 Nightfighter
Monogram 1/24 '57 Chevy Nomad
Dragon 1/350 USS Frank Knox DD-742
#305
Christchurch, New Zealand
Joined: February 01, 2006
KitMaker: 1,673 posts
AeroScale: 1,517 posts
Posted: Saturday, April 16, 2016 - 04:17 AM UTC
They are installed as per the instructions D, I agree the thrust line is all wrong, however they are angled sharply downward. I tried rotating the mounts but they simply reversed the angle the engines tilted at. Moving them further out didn't help either. I'm still tossing up whether I should rework them completely or just leave them as they are. In the original trials they were actually attached to the fuselage.
After looking at the kit and putting it on it's wheeled undercarriage the thrust line is straight with it on it's wheels so this might be intentional by Encore. This is purely conjectural as it is anyway so I guess poetic licence has to be expected.
AussieReg
Associate Editor #007
Victoria, Australia
Joined: June 09, 2009
KitMaker: 8,156 posts
AeroScale: 3,756 posts
Posted: Saturday, April 16, 2016 - 11:22 AM UTC
All good Chris, it looks great! I was just comparing the build with the drawings in the instructions.
As you say, it is all conjectural anyway!
Cheers, D
ON the bench
Revell 1/24 '53 Corvette (building as '54)
Revell 1/24 BMW 507 Coupe and Cabrio
Italeri 1/48 Me262 B-1a/U1 Nightfighter
Monogram 1/24 '57 Chevy Nomad
Dragon 1/350 USS Frank Knox DD-742
#392
Hessen, Germany
Joined: January 09, 2013
KitMaker: 696 posts
AeroScale: 608 posts
Posted: Saturday, April 16, 2016 - 08:53 PM UTC
Hi friends, finally I decided what to build for this campaign, here's my candidate:

On the bench:
EE(BAC) Lightning F.2A (Airfix 1:72)
#392
Hessen, Germany
Joined: January 09, 2013
KitMaker: 696 posts
AeroScale: 608 posts
Posted: Saturday, April 16, 2016 - 09:04 PM UTC

I will use some detailing parts which I bought at different exhibitions, even before I got the actual kit

The cowlings of Quickboost are for the A-26K, but at least I have the better engines and exhausts.
Looking forward to cutting and glueing
You have a lot of fine models on your benches, so let's have fun, mates!

On the bench:
EE(BAC) Lightning F.2A (Airfix 1:72)
AussieReg
Associate Editor #007
Victoria, Australia
Joined: June 09, 2009
KitMaker: 8,156 posts
AeroScale: 3,756 posts
Posted: Sunday, April 17, 2016 - 02:42 AM UTC
Hi Peter. Excellent choice, I have read some good things about this kit and one of my club members built one up a while back, he said it went together really nicely, no major issues.
One thing to note, only one of the marking sets in this kit is valid for a WWII aircraft, the other 3 are for post-war and Korean War options.
Good luck with the build, I am looking forward to following your progress.
Cheers, D
ON the bench
Revell 1/24 '53 Corvette (building as '54)
Revell 1/24 BMW 507 Coupe and Cabrio
Italeri 1/48 Me262 B-1a/U1 Nightfighter
Monogram 1/24 '57 Chevy Nomad
Dragon 1/350 USS Frank Knox DD-742
#305
Christchurch, New Zealand
Joined: February 01, 2006
KitMaker: 1,673 posts
AeroScale: 1,517 posts
Posted: Sunday, April 17, 2016 - 02:45 AM UTC
Yeah the drawings show them as horizontal but the actual build pics on the box show it as horizontal when on it's wheels ....... shrugs so I'm of two minds where to go with it.
AussieReg
Associate Editor #007
Victoria, Australia
Joined: June 09, 2009
KitMaker: 8,156 posts
AeroScale: 3,756 posts
Posted: Sunday, April 17, 2016 - 02:52 AM UTC
Quoted Text
Yeah the drawings show them as horizontal but the actual build pics on the box show it as horizontal when on it's wheels ....... shrugs so I'm of two minds where to go with it.
I think I've worked it out! The clever engineers at Messerschmitt worked out a way to link the angle of the engines with the elevators and flaps, which increased the responsiveness and manoeuvrability hugely! At rest, they both angled downwards at the front due to the weight balance.
Given that, I would leave them and move on
Cheers, D
ON the bench
Revell 1/24 '53 Corvette (building as '54)
Revell 1/24 BMW 507 Coupe and Cabrio
Italeri 1/48 Me262 B-1a/U1 Nightfighter
Monogram 1/24 '57 Chevy Nomad
Dragon 1/350 USS Frank Knox DD-742
#305
Christchurch, New Zealand
Joined: February 01, 2006
KitMaker: 1,673 posts
AeroScale: 1,517 posts
Posted: Sunday, April 17, 2016 - 11:07 AM UTC
By Jove I think he's got it .... well that's our story and we're sticking with it!
#392
Hessen, Germany
Joined: January 09, 2013
KitMaker: 696 posts
AeroScale: 608 posts
Posted: Monday, April 18, 2016 - 01:05 AM UTC
[quote]....One thing to note, only one of the marking sets in this kit is valid for a WWII aircraft, the other 3 are for post-war and Korean War options.....
Thanks for the hint, Damian, unfortunately I've already decided to build the Korean War option...so I have to take that kit out of the campaign. There is still a P-38 Lightning in my stash, maybe...?
Have to think about it
Anyway have fun and I will follow the campaign
On the bench:
EE(BAC) Lightning F.2A (Airfix 1:72)
Warszawa, Poland
Joined: March 12, 2013
KitMaker: 125 posts
AeroScale: 85 posts
Posted: Monday, April 18, 2016 - 01:53 AM UTC
Good evening

I see lots of great updates. Pity that some of you guys are struggling with your kits of choice, but so far I see you dealt with problems fantastically.
So far I was lucky with only minor issues... Quite unusual, I'd say, taking into consideration it's me vs Airfix kit
but if it's not the Airfix kit other thing had to hit me. My compressor doesn't like me and it keeps steady pressure only if it's more than 25 psi ... So I painted with one hand on aibrush and second on pressure gauge on compressor... quite comfy

It didn't go that bad though, so I can consider painting as complete. Here are results:


I'll let it dry for a day or two, then gloss coat and decals.
Cheers,
Radek
PS. Dang it... just saw on picture I broke top antenna and front machine gun...
On the bench: some armour ... and a plane... Oh and you would probably find some unfinished ships somewhere around the mancave ;)
#392
Hessen, Germany
Joined: January 09, 2013
KitMaker: 696 posts
AeroScale: 608 posts
Posted: Monday, April 18, 2016 - 12:56 PM UTC
Hi Radek,
your Dornier looks splendid so far!
And things like that happen to us modellers
but we know how to deal with it, don't we?
Keep going!
On the bench:
EE(BAC) Lightning F.2A (Airfix 1:72)
Buenos Aires, Argentina
Joined: May 21, 2012
KitMaker: 765 posts
AeroScale: 316 posts
Posted: Monday, April 18, 2016 - 04:13 PM UTC
Excellent choice Peter, I follow you
Those Radial Fighters Campaign: 1/72 FW 190 A5
Delta 2 Campaign: 1/48 Hobby Boss Mirage IIIC
Navy Boys on those Postage Stamps 1/72 Airfix Sea Harrier FA2
Working: Trumpeter A-5 Vigilante
Waiting: Phantom 60 Campaign


