

I doubt that amount of work went into the full size part!
Unbelivable!
Hosted by Rowan Baylis
1/48 Hasegawa Ki 43 Hayabusa build

lawzer

Joined: November 17, 2016
KitMaker: 64 posts
AeroScale: 59 posts
Posted: Saturday, February 11, 2017 - 12:29 AM UTC

c4willy

#305

Joined: February 01, 2006
KitMaker: 1,673 posts
AeroScale: 1,517 posts

Posted: Saturday, February 11, 2017 - 05:56 AM UTC
Simply stunning work Richard the new part looks the real deal.

AussieReg

#007

Joined: June 09, 2009
KitMaker: 8,156 posts
AeroScale: 3,756 posts
Posted: Saturday, February 11, 2017 - 01:21 PM UTC
Wow, just wow!


rdt1953

Joined: February 06, 2015
KitMaker: 1,098 posts
AeroScale: 900 posts
Posted: Saturday, February 11, 2017 - 07:03 PM UTC
Joel , Ian , Chris and D -
I'm more than a little embarrassed by all this praise but a big thank you to all- seriously. This hobby of ours is great fun and sharing it with each other brings a whole new level to it . I'm very glad to have discovered this venue .
Cheers with a red face - Richard
I'm more than a little embarrassed by all this praise but a big thank you to all- seriously. This hobby of ours is great fun and sharing it with each other brings a whole new level to it . I'm very glad to have discovered this venue .
Cheers with a red face - Richard

berndm

Joined: March 26, 2014
KitMaker: 844 posts
AeroScale: 630 posts
Posted: Sunday, February 12, 2017 - 05:15 PM UTC
Awesome and jaw dropping work !
Kendzior

Joined: January 29, 2016
KitMaker: 96 posts
AeroScale: 91 posts
Posted: Sunday, February 12, 2017 - 11:43 PM UTC
That's exactly what I love this workshop thread for.
Splendid idea, perfectly executed.
I wonder if this jewel could be replicated in resin?
Looks much better than what can be achieved with the photoetched parts from Eduard for 1/32nd scale kit.
Keep it up, Richard
Best regards
Hubert
Splendid idea, perfectly executed.
I wonder if this jewel could be replicated in resin?
Looks much better than what can be achieved with the photoetched parts from Eduard for 1/32nd scale kit.
Keep it up, Richard
Best regards
Hubert
rdt1953
Joined: February 06, 2015
KitMaker: 1,098 posts
AeroScale: 900 posts
Posted: Monday, February 13, 2017 - 03:27 AM UTC
Quoted Text
That's exactly what I love this workshop thread for.
Splendid idea, perfectly executed.
I wonder if this jewel could be replicated in resin?
Looks much better than what can be achieved with the photoetched parts from Eduard for 1/32nd scale kit.
Keep it up, Richard
Best regards
Hubert
Hubert - Thank you for the compliments! One of the vendors at the IPMS National Contest this summer had 3D printed oil coolers for the Hayabusa in 1/32 scale - I regret that I don't know who made them as I didn't take note of it as I work in 1/48 but if you are interested perhaps an Internet search will help.
The Ki -43 II early production still had an annular cooler in the cowl but it was a horse collar type in addition to another under the cowl. In one of my earlier posts I stated that the -II cooler had 4 rings but I was mistaken and now believe it had 5 or more - my photos are very grainy and it is difficult to count .
Cheers - Richard
rdt1953
Joined: February 06, 2015
KitMaker: 1,098 posts
AeroScale: 900 posts
Posted: Monday, February 13, 2017 - 06:19 AM UTC
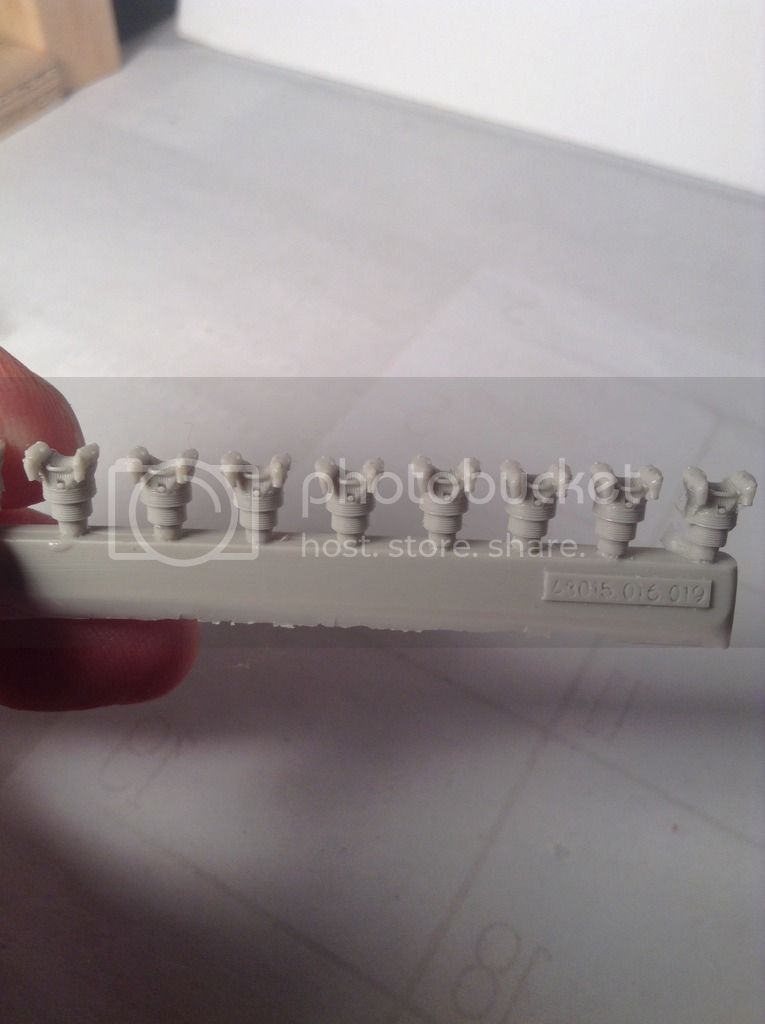
A little more work on the engine - Nakajima Sakae
The kit cylinders suffer from pin marks on the cylinders - not a problem on the front bank as the marks face the rear but on the rear bank they can be seen between the cylinders of the front bank.
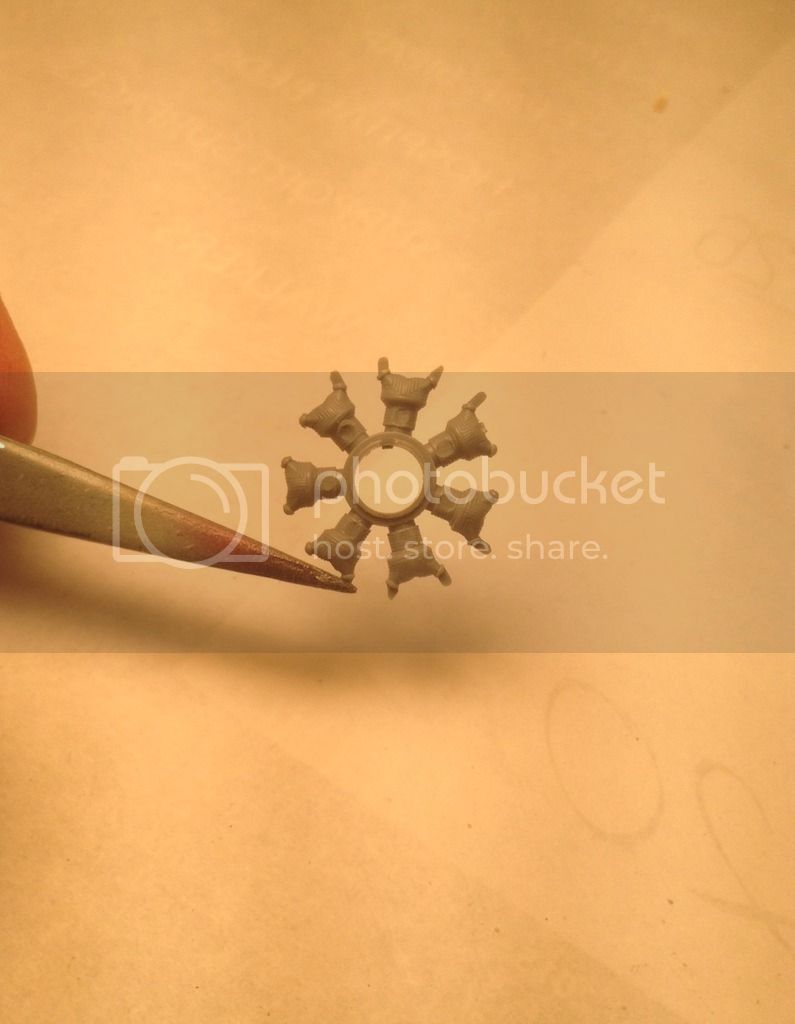
This was cause for concern as it marred the fin detail which is difficult to replace. Then I found this -
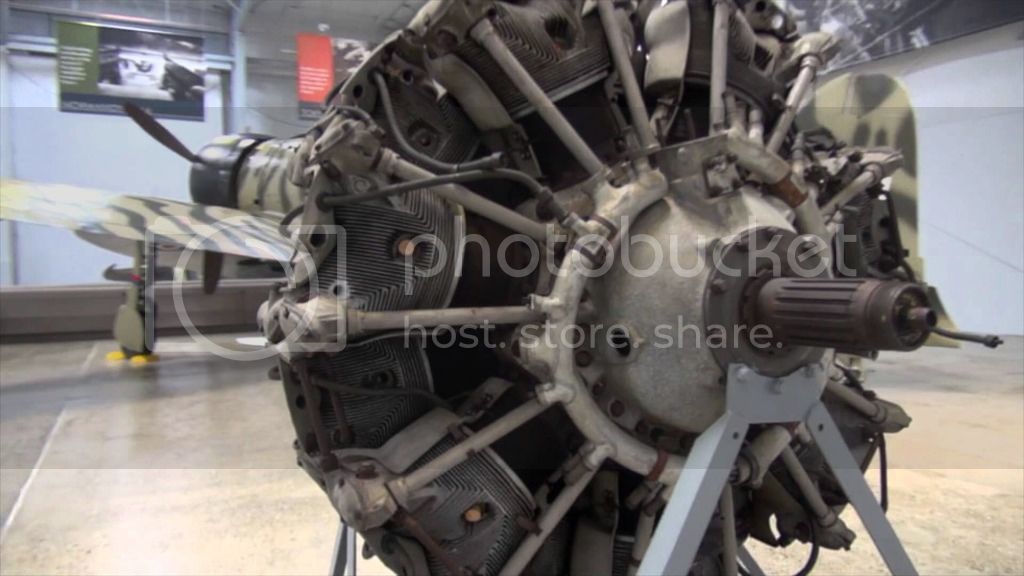
This is an original in the Flying Heritage Collection and as can be seen there is very little finning evident on the cylinders themselves which are likely cast iron- prominent finning only on the aluminum cylinder heads.
The solution was then very simple- I just sanded all the cylinders.
Here is the engine in paint ready to receive the spark plug leads-
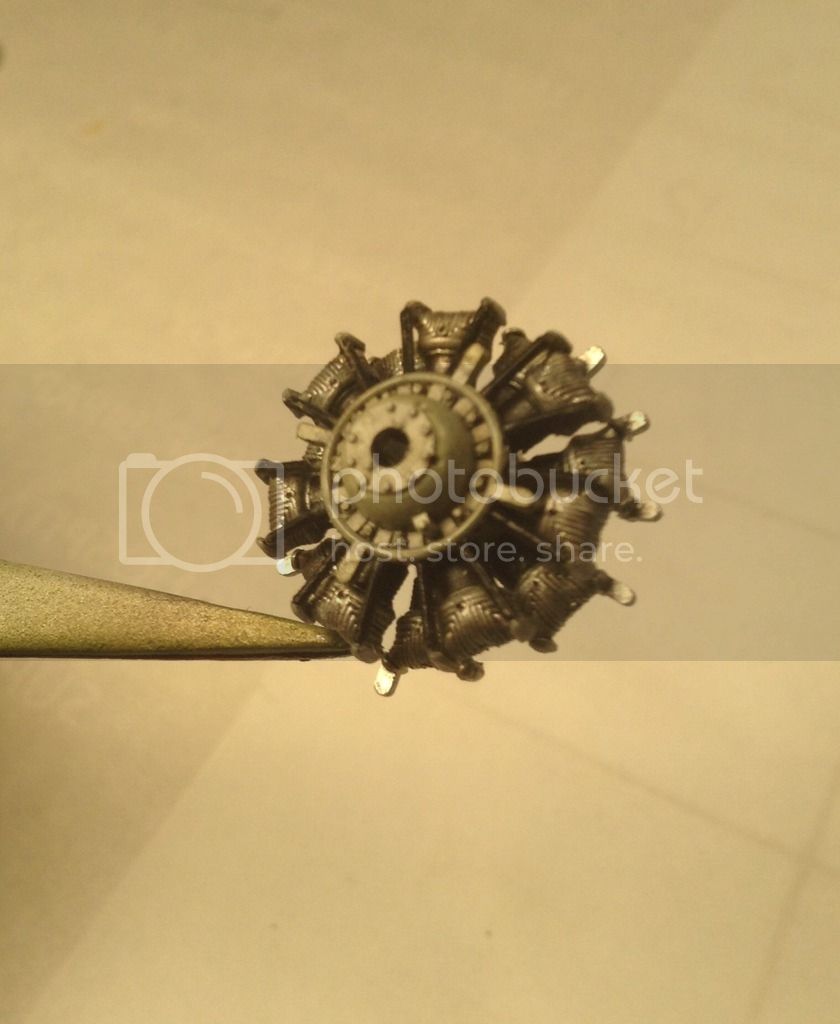
I drilled 14 holes in the outer circumference of the ignition harness tube for 14 pairs of wires - two leads for the dual plugs in each cylinder.
I had purchased a Vector engine as a possibility for this build but as most of it will be hidden by the spinner and the oil cooler I will save it for an early zero project that is resting in my someday pile. Thought I would share some pics of it though for comparisons sake - it's incredible !
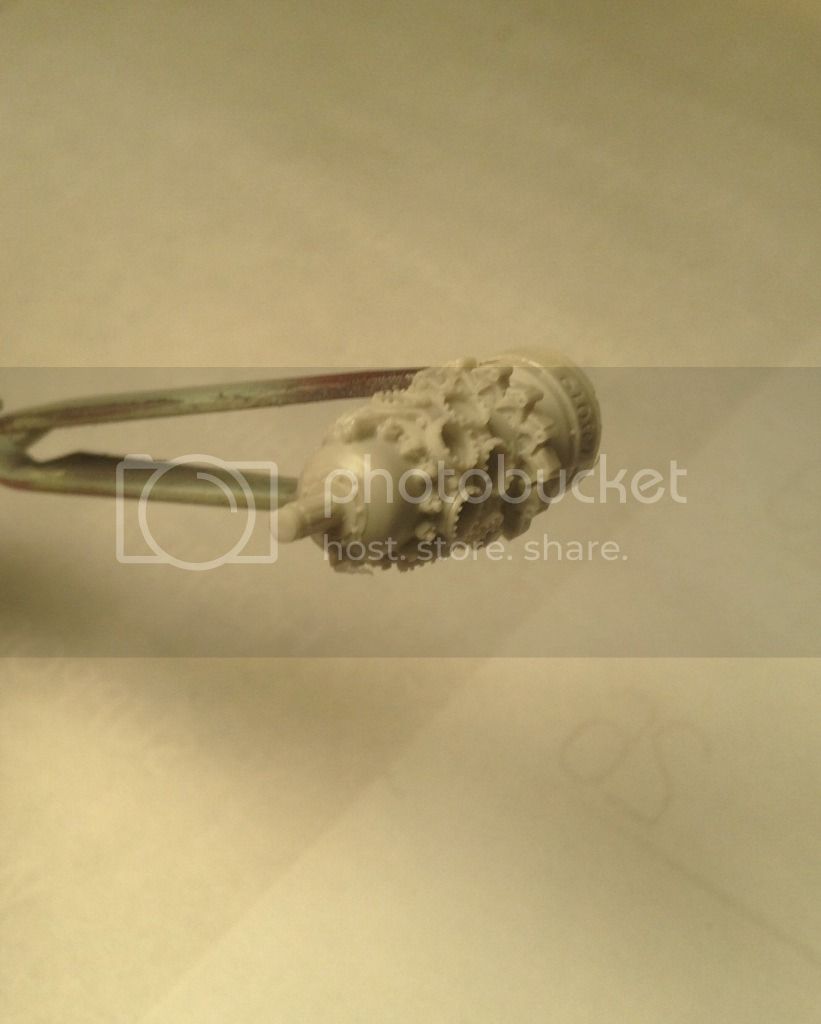
As can be seen the crankcase is complete down to the cylinder base flange nuts , splines on the prop shaft , cylinders complete with rocker shaft oil feeds - all of the engine accessories on the back side of the crankcase are supplied as are all the induction runners. The only thing missing is
exhaust manifolds which of course would be different on each aircraft type any way .
Thanks for looking in and as always all comments welcome -Richard
The kit cylinders suffer from pin marks on the cylinders - not a problem on the front bank as the marks face the rear but on the rear bank they can be seen between the cylinders of the front bank.
This was cause for concern as it marred the fin detail which is difficult to replace. Then I found this -
This is an original in the Flying Heritage Collection and as can be seen there is very little finning evident on the cylinders themselves which are likely cast iron- prominent finning only on the aluminum cylinder heads.
The solution was then very simple- I just sanded all the cylinders.
Here is the engine in paint ready to receive the spark plug leads-
I drilled 14 holes in the outer circumference of the ignition harness tube for 14 pairs of wires - two leads for the dual plugs in each cylinder.
I had purchased a Vector engine as a possibility for this build but as most of it will be hidden by the spinner and the oil cooler I will save it for an early zero project that is resting in my someday pile. Thought I would share some pics of it though for comparisons sake - it's incredible !
As can be seen the crankcase is complete down to the cylinder base flange nuts , splines on the prop shaft , cylinders complete with rocker shaft oil feeds - all of the engine accessories on the back side of the crankcase are supplied as are all the induction runners. The only thing missing is
exhaust manifolds which of course would be different on each aircraft type any way .
Thanks for looking in and as always all comments welcome -Richard
Kendzior
Joined: January 29, 2016
KitMaker: 96 posts
AeroScale: 91 posts
Posted: Monday, February 13, 2017 - 02:09 PM UTC
Quoted Text
Quoted TextThat's exactly what I love this workshop thread for.
Splendid idea, perfectly executed.
I wonder if this jewel could be replicated in resin?
Looks much better than what can be achieved with the photoetched parts from Eduard for 1/32nd scale kit.
Keep it up, Richard
Best regards
Hubert
Hubert - Thank you for the compliments! One of the vendors at the IPMS National Contest this summer had 3D printed oil coolers for the Hayabusa in 1/32 scale - I regret that I don't know who made them as I didn't take note of it as I work in 1/48 but if you are interested perhaps an Internet search will help.
The Ki -43 II early production still had an annular cooler in the cowl but it was a horse collar type in addition to another under the cowl. In one of my earlier posts I stated that the -II cooler had 4 rings but I was mistaken and now believe it had 5 or more - my photos are very grainy and it is difficult to count .
Cheers - Richard
Quick Google Search brought nothing with respect to the 3d printed oil coolers, but anyway I think, that 3d printing is lacking in artistic soul, which is definitely visible in your work.
Best regards
Hubert
Joel_W
Joined: December 04, 2010
KitMaker: 11,666 posts
AeroScale: 7,410 posts
Posted: Tuesday, February 14, 2017 - 02:43 AM UTC
Richard,
Nice find and solution to the cylinder sleeves. Looking forward to finally seeing it wired up.
Joel
Nice find and solution to the cylinder sleeves. Looking forward to finally seeing it wired up.
Joel

rdt1953
Joined: February 06, 2015
KitMaker: 1,098 posts
AeroScale: 900 posts
Posted: Friday, February 17, 2017 - 04:24 AM UTC
Here is the engine with all 28 ignition leads while they can be seen -
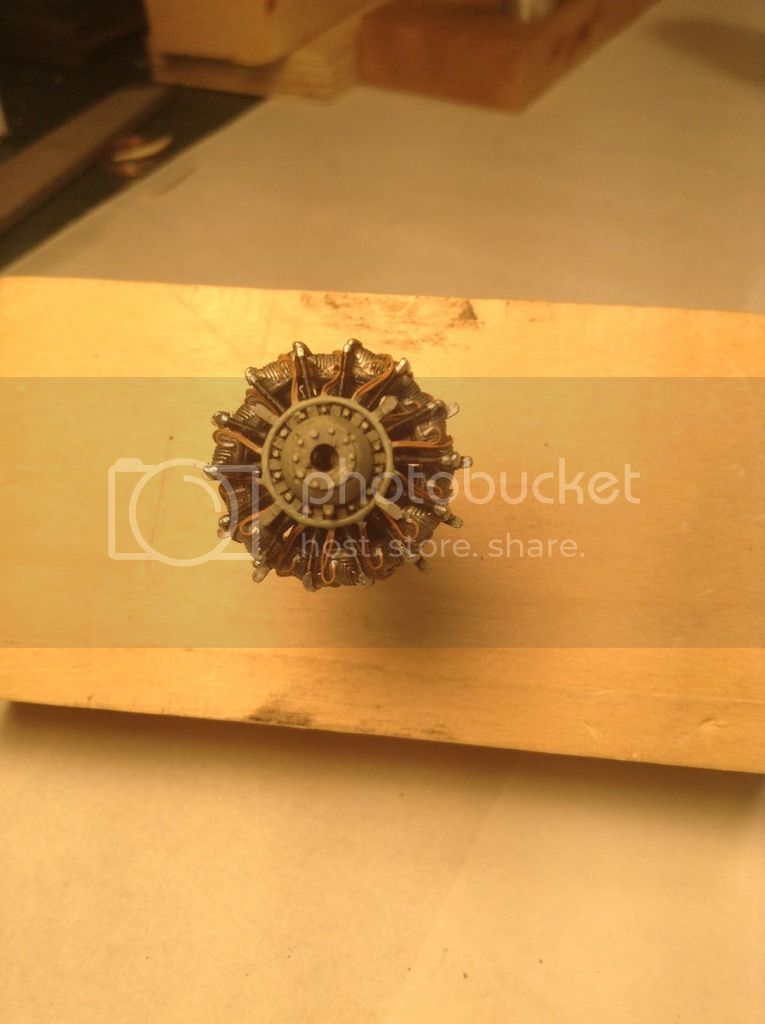
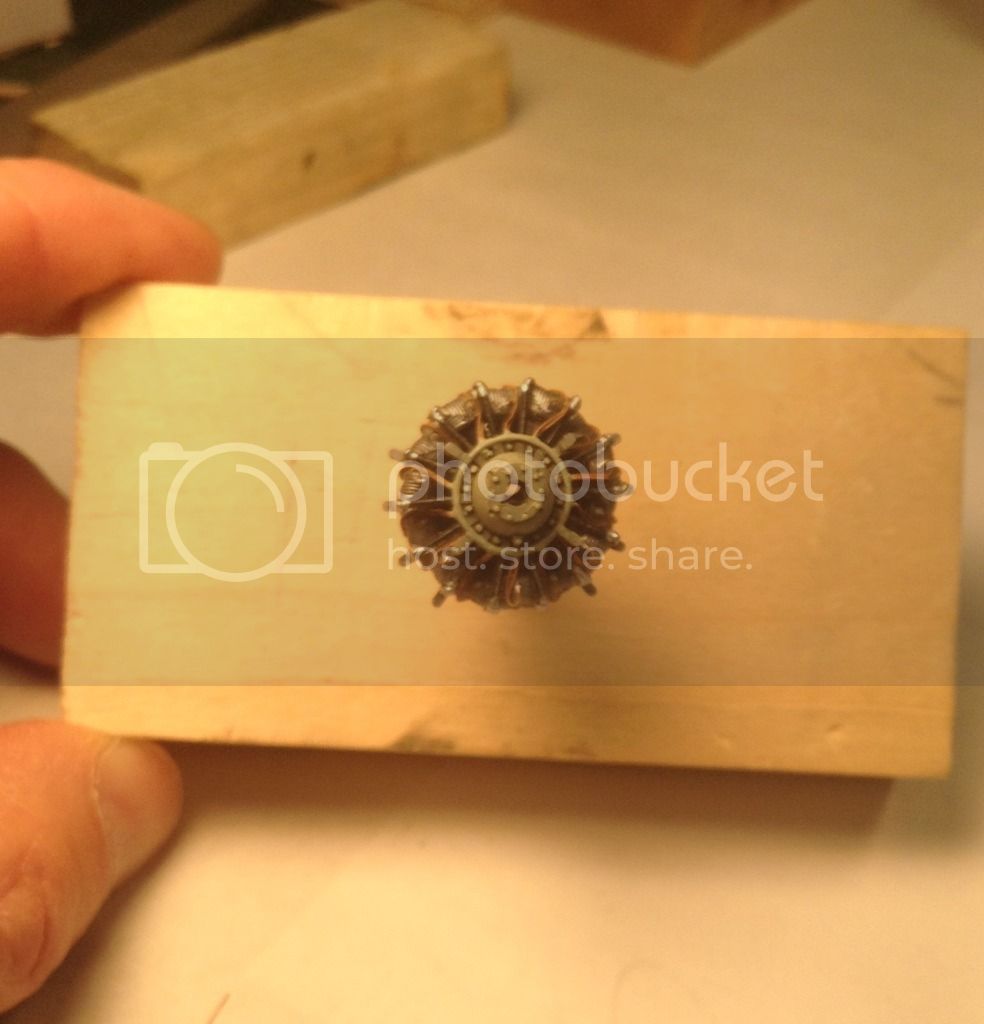
And here it is with the annular oil cooler installed . The mounting clamps/struts were made by flattening one end of a piece of brass wire and bending the flat part around the radiator coils and inserting the round part into predrilled holes in the propeller boss. All was fastened with medium CA.
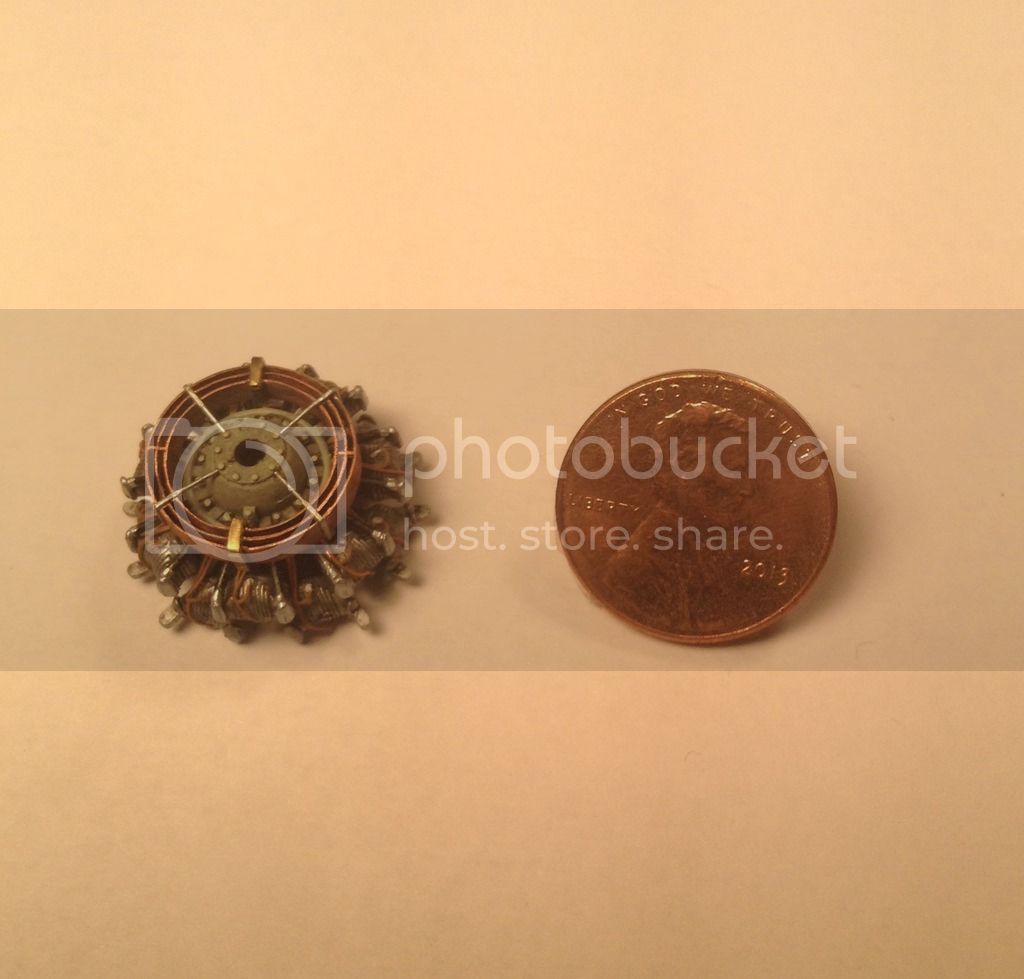
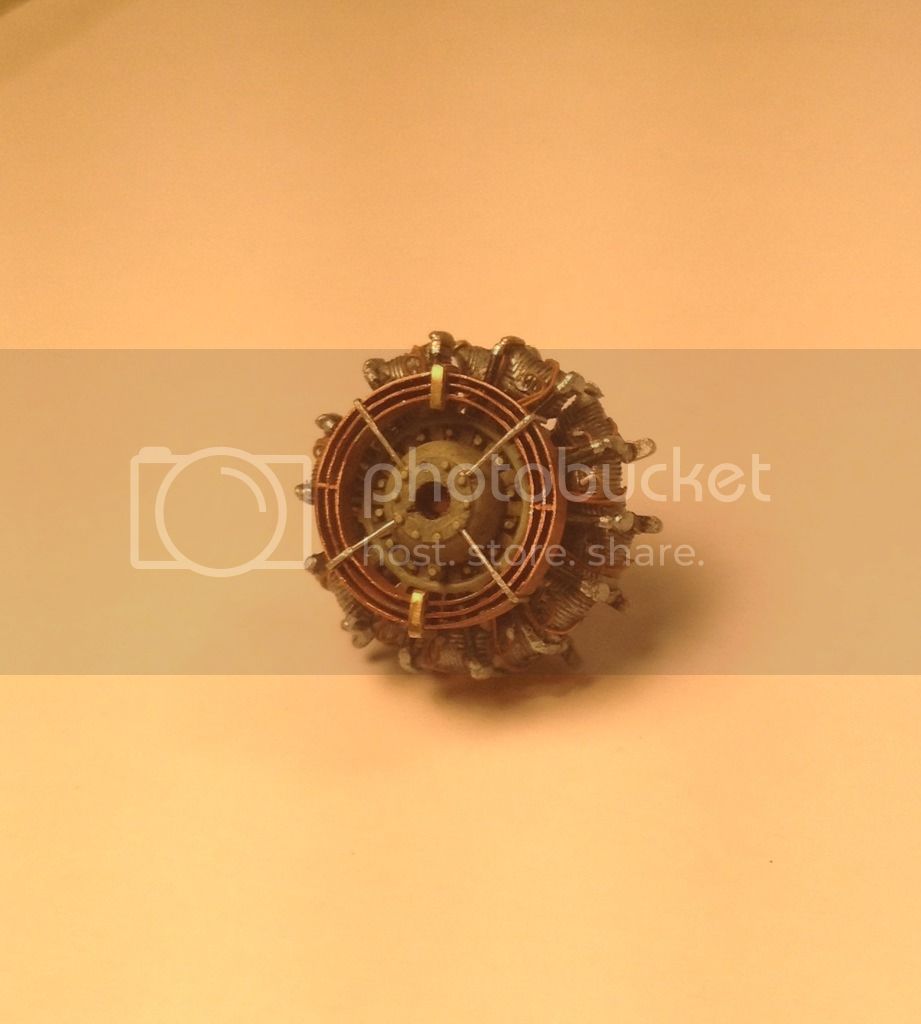
I still need to add the oil feed and return lines to the cooler.
I think I will build up the main landing gear next then it will be time for some paint.
More to follow and thanks for looking in ! Richard
And here it is with the annular oil cooler installed . The mounting clamps/struts were made by flattening one end of a piece of brass wire and bending the flat part around the radiator coils and inserting the round part into predrilled holes in the propeller boss. All was fastened with medium CA.
I still need to add the oil feed and return lines to the cooler.
I think I will build up the main landing gear next then it will be time for some paint.
More to follow and thanks for looking in ! Richard
rdt1953
Joined: February 06, 2015
KitMaker: 1,098 posts
AeroScale: 900 posts
Posted: Friday, February 24, 2017 - 08:12 AM UTC
Brief update -
I have begun paintwork on the cowl/fuselage by priming with Vallejo light grey primer- I have only recently started using their products and my first experience was my last build using their Metalcolor gloss black primer and aluminum shades. Old ideas die hard for this Luddite and I distrusted their instructions that no thinning was needed so I tried both ways- thinned to different ratios and straight from the bottle. To my amazement it worked best nearly straight from the bottle- just a drop or so of Vallejo airbrush thinner in the airbrush cup.
Fast forward to this build and the consequences of not doing a test with an untried product. Primer in the cup - a drop or two of thinner - stir - spray . worked well for a moment then the spitting began. No worries - I'll thin it a little further and keep going . I'll let it cure for a few days then sand out the spit drops right ? WRONG ! This product does not like sanding in nearly any form. Wet sand it , and keep your abrasives from clogging so they stay sharp and cut well ,right ? WRONG ! This just makes a slurry that softens every thing and all comes off in skins. No adhesion to the bare plastic whatsoever . Before priming the model was washed with water and a drop of detergent as I have always done,rinsed and dried thoroughly , wiped with a lint free cloth dampened with isopropyl alcohol - just as I have been doing for years. NO ADHESION ! The instructions on the bottle warn not to do any masking for 24 hours so I waited 48 hrs . NO ADHESION ! Ultimately I was able to achieve some success by cutting up an entire sheet of 1500 wet/dry silicone carbide into 1 inch squares and dry sanding very lightly and constantly changing to fresh squares to knock down the spit drops and pebbly texture. If I broke through to plastic the primer just rolled away and tore off leaving hard edges that defied feathering with abrasive. Try feathering one edge of a rubber band with sand paper and you'll have a good idea of what working with this stuff is like.
In a very discouraged state I mention my problem to Joel W and at his suggestion I tried denatured alcohol. With a q-tip moistened with alcohol I was able to wipe away all affected areas and even used it to feather the various hard edges so my hat's off to you buddy Joel -you may very well have saved all my effort.
I returned to the primer this evening and experimented with different ratios and the answer seems to be a very standard 1 part thinner /2 parts primer which is what I should have done in the first place. Feel free to vote for me in the next " Who's the Jackass " poll.
I think I may have dodged a pretty high caliber bullet so here it is all redone - I hope !
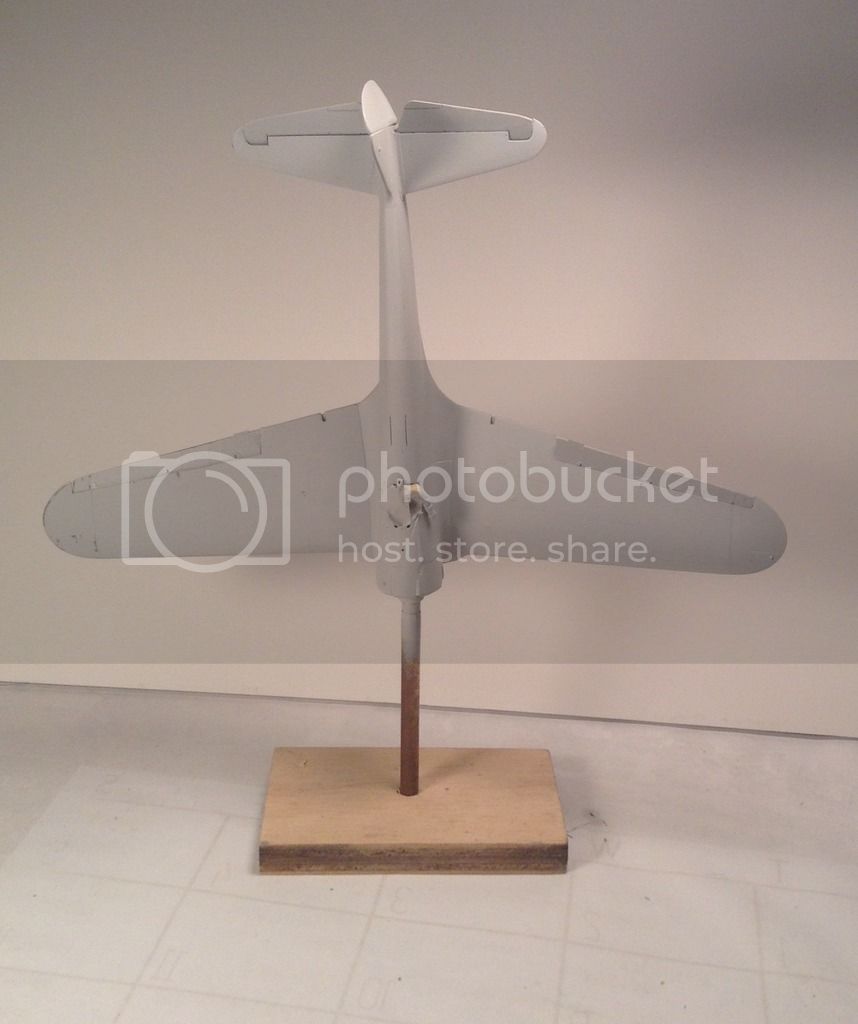
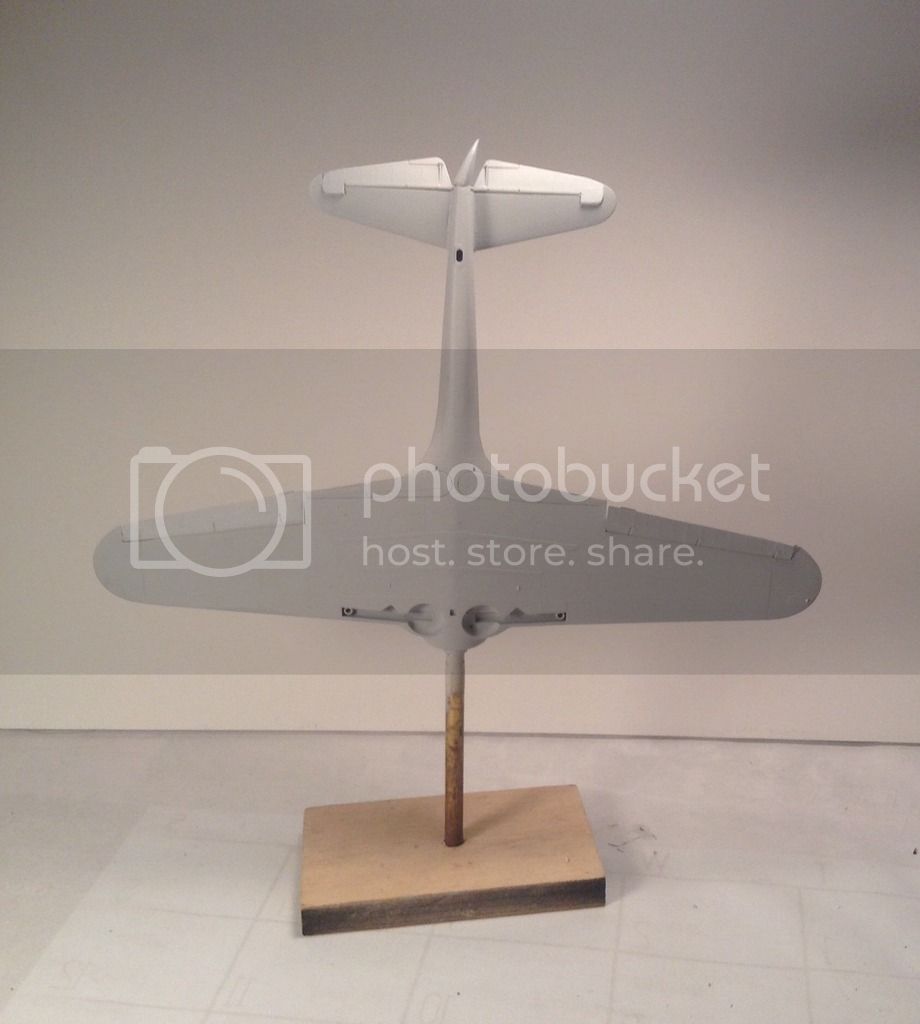
Thanks for looking and putting up with my rant ! Richard
I have begun paintwork on the cowl/fuselage by priming with Vallejo light grey primer- I have only recently started using their products and my first experience was my last build using their Metalcolor gloss black primer and aluminum shades. Old ideas die hard for this Luddite and I distrusted their instructions that no thinning was needed so I tried both ways- thinned to different ratios and straight from the bottle. To my amazement it worked best nearly straight from the bottle- just a drop or so of Vallejo airbrush thinner in the airbrush cup.
Fast forward to this build and the consequences of not doing a test with an untried product. Primer in the cup - a drop or two of thinner - stir - spray . worked well for a moment then the spitting began. No worries - I'll thin it a little further and keep going . I'll let it cure for a few days then sand out the spit drops right ? WRONG ! This product does not like sanding in nearly any form. Wet sand it , and keep your abrasives from clogging so they stay sharp and cut well ,right ? WRONG ! This just makes a slurry that softens every thing and all comes off in skins. No adhesion to the bare plastic whatsoever . Before priming the model was washed with water and a drop of detergent as I have always done,rinsed and dried thoroughly , wiped with a lint free cloth dampened with isopropyl alcohol - just as I have been doing for years. NO ADHESION ! The instructions on the bottle warn not to do any masking for 24 hours so I waited 48 hrs . NO ADHESION ! Ultimately I was able to achieve some success by cutting up an entire sheet of 1500 wet/dry silicone carbide into 1 inch squares and dry sanding very lightly and constantly changing to fresh squares to knock down the spit drops and pebbly texture. If I broke through to plastic the primer just rolled away and tore off leaving hard edges that defied feathering with abrasive. Try feathering one edge of a rubber band with sand paper and you'll have a good idea of what working with this stuff is like.
In a very discouraged state I mention my problem to Joel W and at his suggestion I tried denatured alcohol. With a q-tip moistened with alcohol I was able to wipe away all affected areas and even used it to feather the various hard edges so my hat's off to you buddy Joel -you may very well have saved all my effort.
I returned to the primer this evening and experimented with different ratios and the answer seems to be a very standard 1 part thinner /2 parts primer which is what I should have done in the first place. Feel free to vote for me in the next " Who's the Jackass " poll.
I think I may have dodged a pretty high caliber bullet so here it is all redone - I hope !
Thanks for looking and putting up with my rant ! Richard

thegirl

Joined: January 19, 2008
KitMaker: 6,743 posts
AeroScale: 6,151 posts
Posted: Friday, February 24, 2017 - 06:39 PM UTC
Rant away Richard . I have mixed feelings on some of the Vallejo Air as well . I had nothing but issues with the black basing for the Metalcoat . No matter what I did it wouldn't spray right . So I don't use it anymore and just spray the Metalcoat with out it . Some of their colours you do have to thin in order for them to spray nice . It took me a bit on the learning curve side of things on working with their Air paints .
Terri
Terri
Joel_W
Joined: December 04, 2010
KitMaker: 11,666 posts
AeroScale: 7,410 posts
Posted: Friday, February 24, 2017 - 09:11 PM UTC
Richard,
Nice try, but I have you beat by a mile and then some in the infamous & Famous "Whose the Jackass". Almost everything I've learned in modeling came from trial and error, and most of that was from the error part of the equation. It's the final results that count, and from what I can see, the primer coat looks real good. You know my preference is Mig Ammo's Acrylic primers followed by Tamiya Lacquer Gray primer. To each his own.
Your engine detailing just blew me away. The ignition wires look near on perfect, and the installed oil cooler rings turned out dead on perfect.
Looking forward to your next update.
Joel
rdt1953
Joined: February 06, 2015
KitMaker: 1,098 posts
AeroScale: 900 posts
Posted: Saturday, February 25, 2017 - 05:31 PM UTC
Quoted Text
Rant away Richard . I have mixed feelings on some of the Vallejo Air as well . I had nothing but issues with the black basing for the Metalcoat . No matter what I did it wouldn't spray right . So I don't use it anymore and just spray the Metalcoat with out it . Some of their colours you do have to thin in order for them to spray nice . It took me a bit on the learning curve side of things on working with their Air paints .
Terri
Terri - thanks for the support - oddly I had great results with the Metalcolor system from Vallejo which led to my foolish overconfidence trying their grey primer.
A lesson learned a long time ago but apparently the modeling gods felt I needed to learn it again- Richard
rdt1953
Joined: February 06, 2015
KitMaker: 1,098 posts
AeroScale: 900 posts
Posted: Saturday, February 25, 2017 - 05:44 PM UTC
Quoted Text
Richard,
Nice try, but I have you beat by a mile and then some in the infamous & Famous "Whose the Jackass". Almost everything I've learned in modeling came from trial and error, and most of that was from the error part of the equation. It's the final results that count, and from what I can see, the primer coat looks real good. You know my preference is Mig Ammo's Acrylic primers followed by Tamiya Lacquer Gray primer. To each his own.
Your engine detailing just blew me away. The ignition wires look near on perfect, and the installed oil cooler rings turned out dead on perfect.
Looking forward to your next update.
Joel
Joel -
Thanks again for your tip and also for your continuing interest - I'm learning about the Vallejo primer and disliking it less but I don't know if I'll use it again . The fact that you really can't sand it limits it's use for disclosing where corrections are needed. This time of year I spray in the kitchen because of unheated space in the shop so that means acrylics only but by next fall that will change.
I guess we never stop learning - Richard
rdt1953
Joined: February 06, 2015
KitMaker: 1,098 posts
AeroScale: 900 posts
Posted: Saturday, February 25, 2017 - 10:11 PM UTC
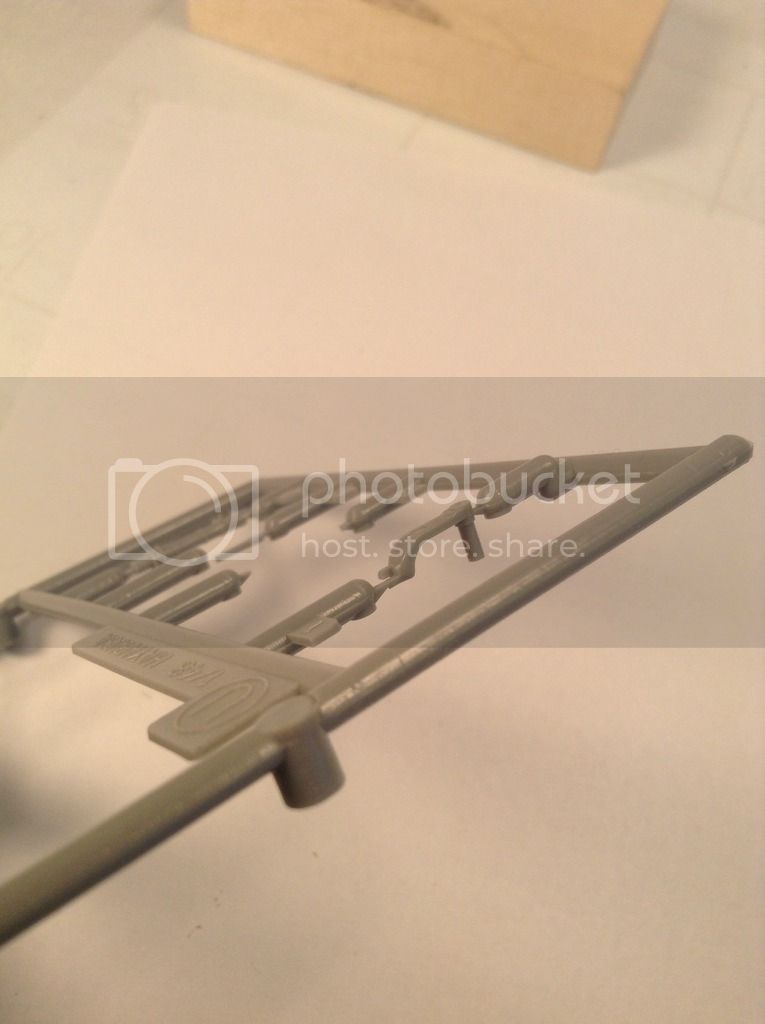
I have started on the main gear - Hasegawa molded these in a clever but structurally weak way so that both the left and right gear can be made from the same molding - duplicate sprues. The yokes are joined to the bottom of the oleos below the torque links with a cruciform interlocking butt joint that allows the yoke to be rotated 180 degrees. This allows the spindles to face outward on either side with the torque links trailing aft . I suppose this saved Hasegawa a few bucks in tooling but I wish they hadn't done it this way as it is not only weak at a critical area but it also makes axial alignment between the oleo and the yoke difficult as the keys in the butt joint have considerable play in their fit.
here are the components -
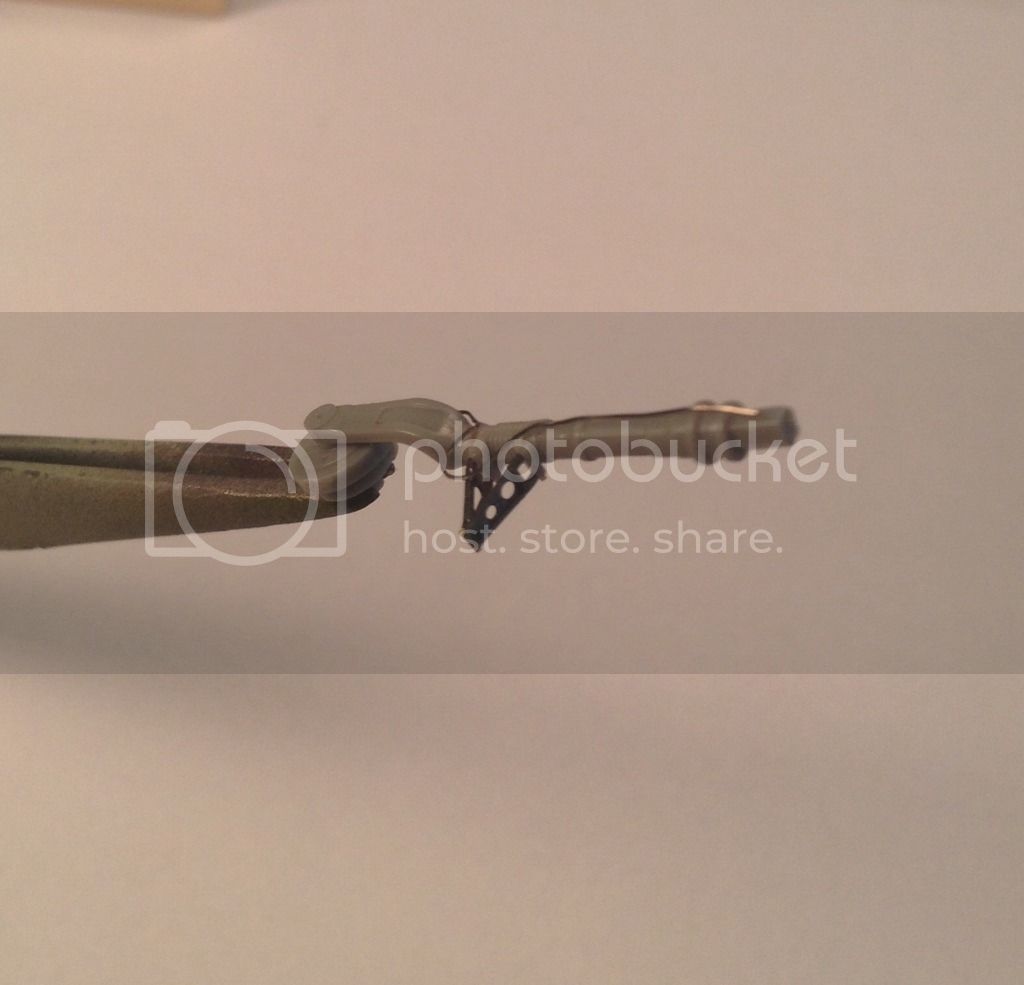
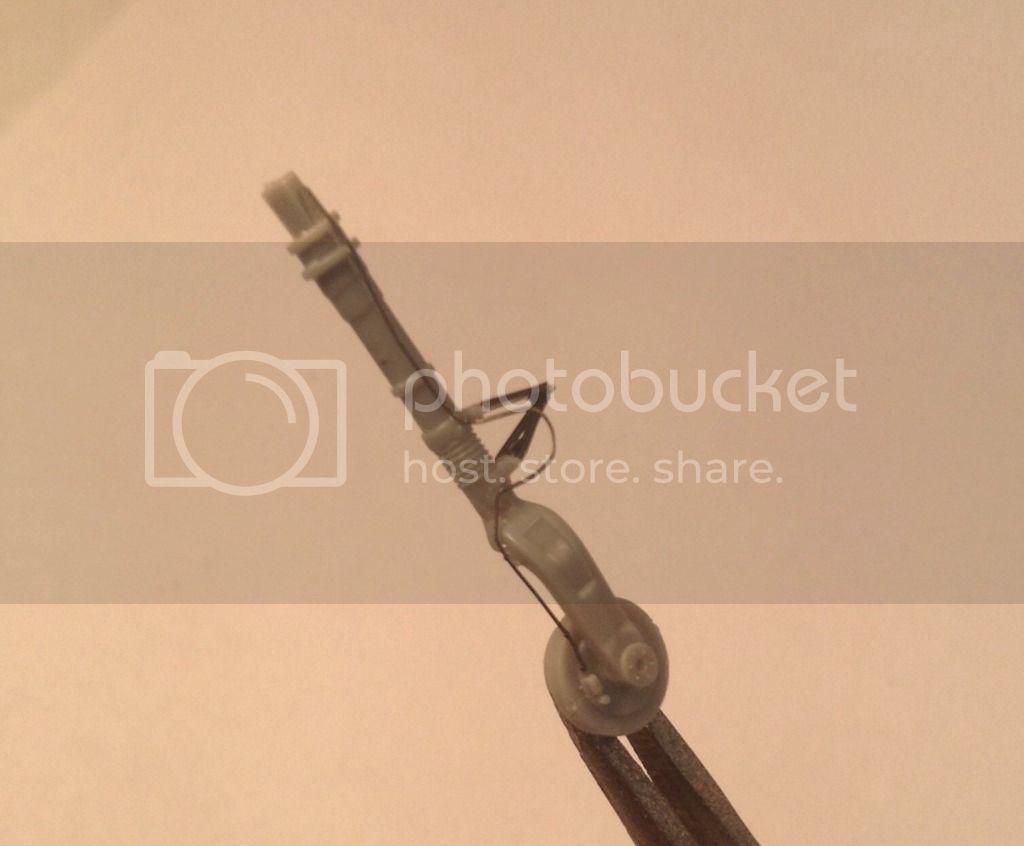
Here is one main gear leg with Eduard's photo etch torque link scissors and brake line added-
I have also added more photo etch to the fuselage - rivet detail wrap and gusset plate to the headrest area and actuator horns for the flaps.
As it is nearly time for paint I am going to have to choose which unit/markings. I have it narrowed down to three from two different Lifelike sheets.
Thanks for looking in ! Richard
here are the components -
Here is one main gear leg with Eduard's photo etch torque link scissors and brake line added-
I have also added more photo etch to the fuselage - rivet detail wrap and gusset plate to the headrest area and actuator horns for the flaps.
As it is nearly time for paint I am going to have to choose which unit/markings. I have it narrowed down to three from two different Lifelike sheets.
Thanks for looking in ! Richard
Joel_W
Joined: December 04, 2010
KitMaker: 11,666 posts
AeroScale: 7,410 posts
Posted: Saturday, February 25, 2017 - 10:32 PM UTC
Richard,
Agreed that the almighty dollar played a big part in the decision to do the gear the way that they did, as the geometry does lend itself to it. The result can't be the strongest strut.
With you machining skills why not drill a hole from top to bottom after the glue joint is dry for a steel rod. That would make the strut 100% stronger.
Joel

Antilles
Joined: March 22, 2015
KitMaker: 671 posts
AeroScale: 614 posts
Posted: Tuesday, February 28, 2017 - 03:51 AM UTC
Richard,
I just have seen the engine with the annular oil cooler and all I can say is: wow, amazing!
Oliver
I just have seen the engine with the annular oil cooler and all I can say is: wow, amazing!
Oliver
rdt1953
Joined: February 06, 2015
KitMaker: 1,098 posts
AeroScale: 900 posts
Posted: Tuesday, February 28, 2017 - 06:54 AM UTC
Quoted Text
Richard,
Agreed that the almighty dollar played a big part in the decision to do the gear the way that they did, as the geometry does lend itself to it. The result can't be the strongest strut.
With you machining skills why not drill a hole from top to bottom after the glue joint is dry for a steel rod. That would make the strut 100% stronger.
Joel
Joel -
Reinforcing the joint with metal would definitely be stronger but drilling all the way through the oleo from the top to the bottom would be very difficult to do without the bit wandering off and coming out the side , and the wheel spindle prevents drilling from the bottom . In hind site the thing to do would have been drilling down through the yoke and up into the oleo before they were joined - but alas I didn't.
I let the joints cure a long time before proceeding so I hope they won't be problematic.
Richard
rdt1953
Joined: February 06, 2015
KitMaker: 1,098 posts
AeroScale: 900 posts
Posted: Tuesday, February 28, 2017 - 06:55 AM UTC
Quoted Text
Richard,
I just have seen the engine with the annular oil cooler and all I can say is: wow, amazing!
Oliver
Oliver - Thanks for kind words !
Richard
rdt1953
Joined: February 06, 2015
KitMaker: 1,098 posts
AeroScale: 900 posts
Posted: Friday, March 03, 2017 - 04:56 AM UTC
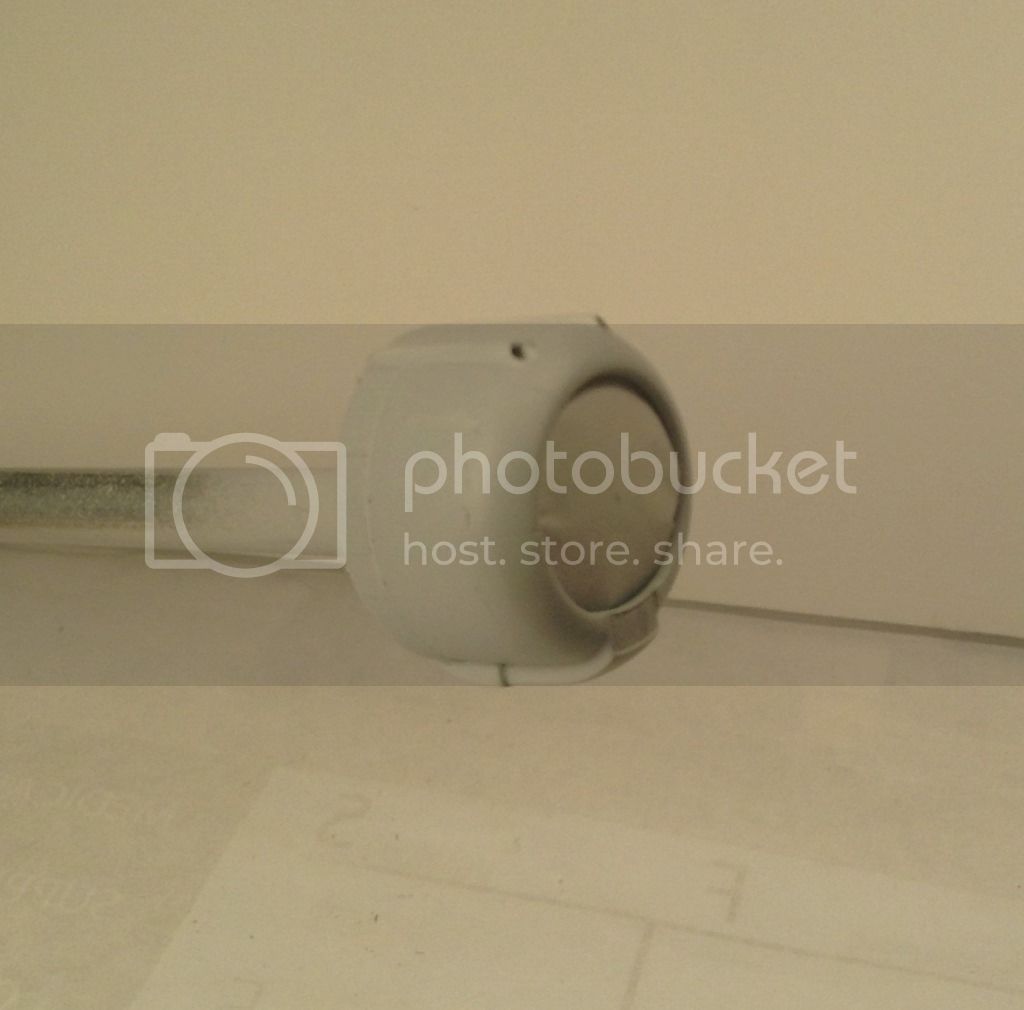
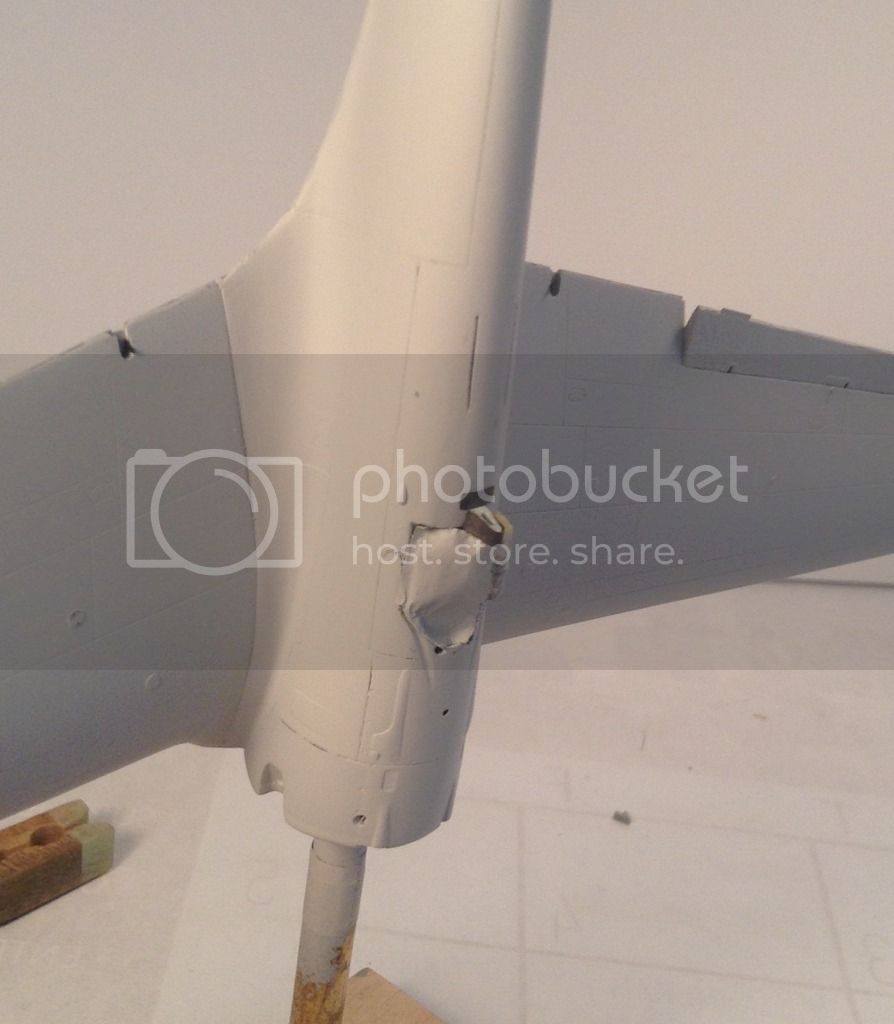
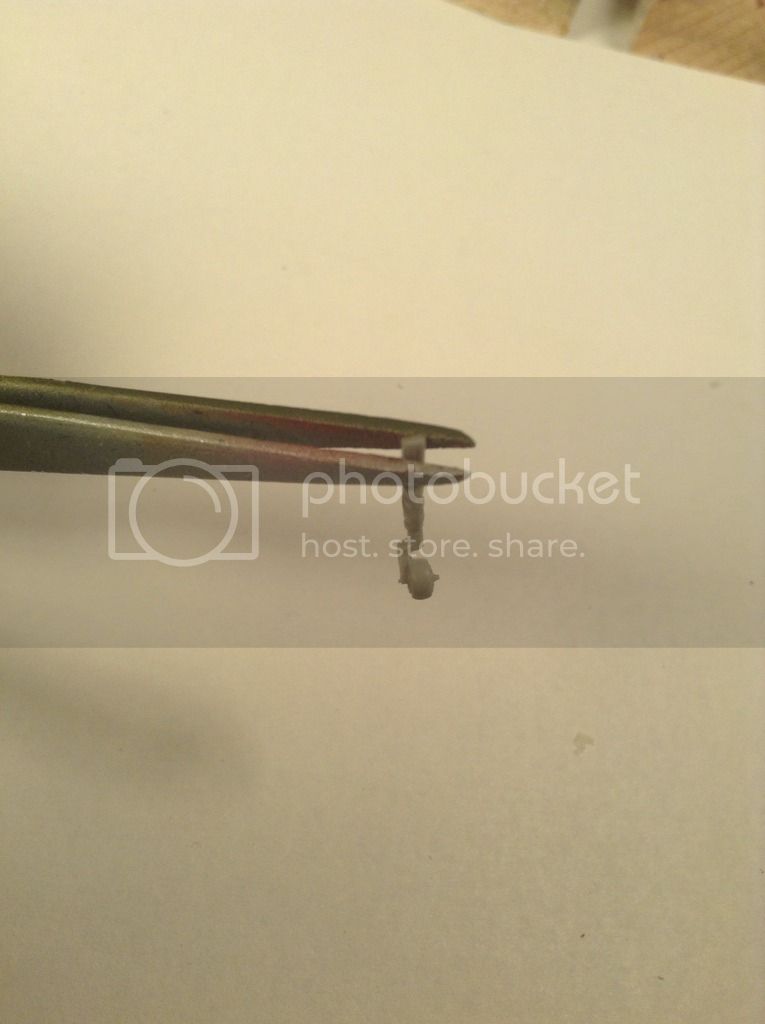
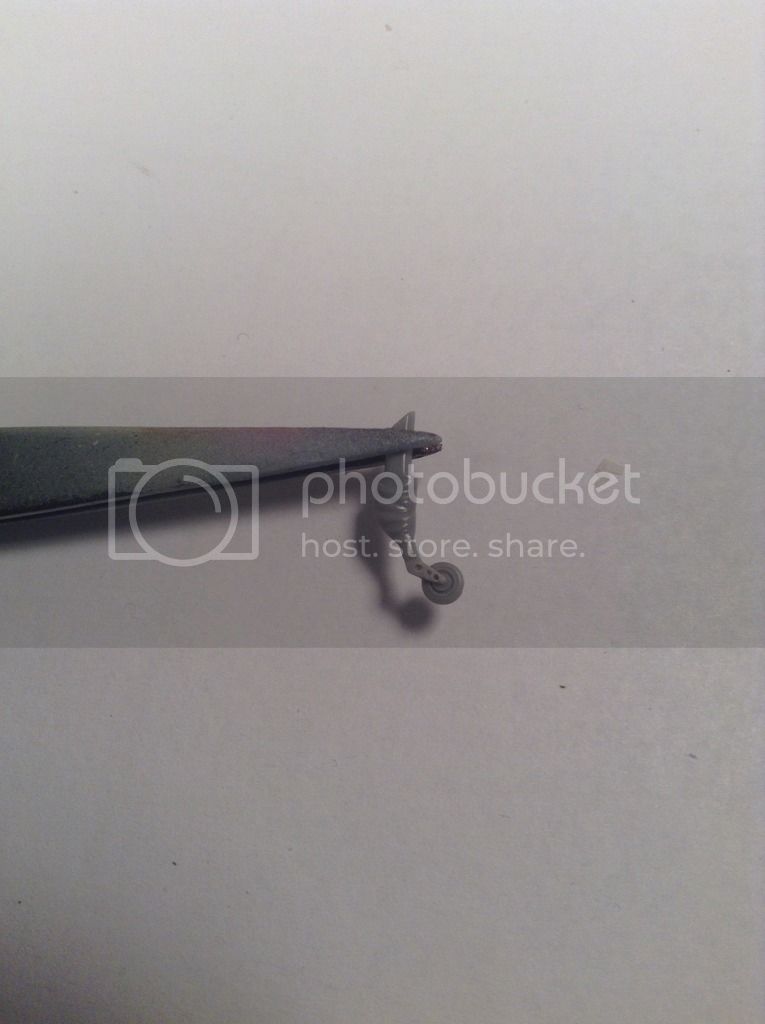
I've spent a few minutes improving the tailwheel by carving the top of the yoke away from the tire and ading the three lightening holes in the side of the yoke - don't know how much will be seen with the wheel in the grass .
here is the tailwheel as it comes from Hasegawa -
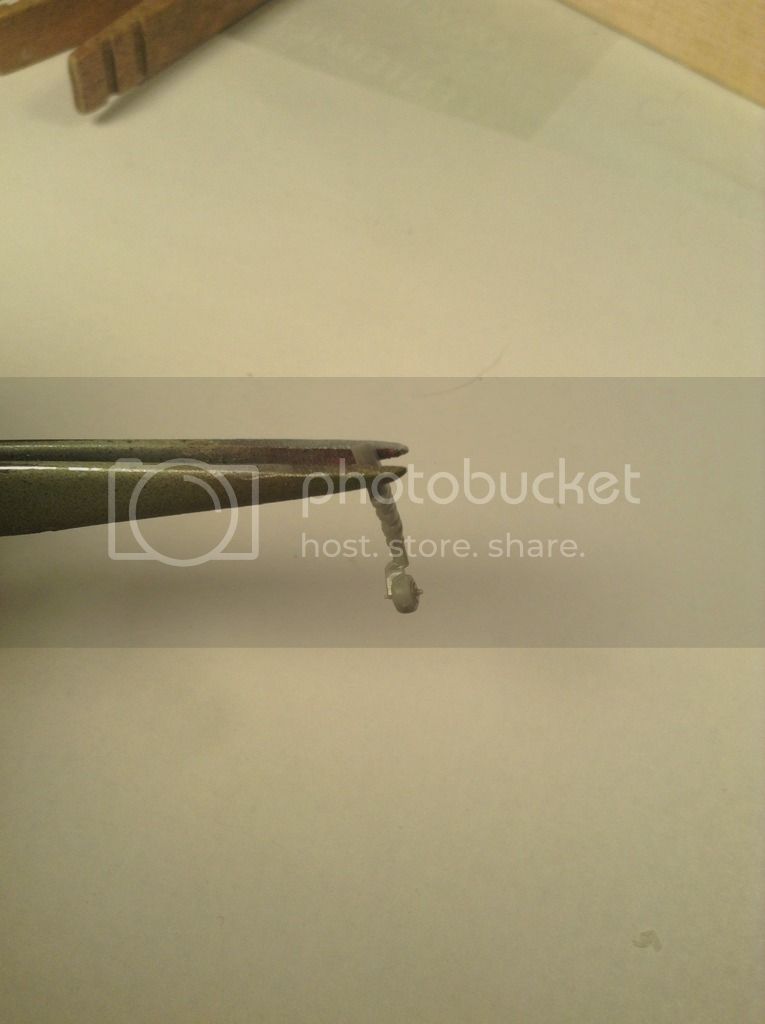
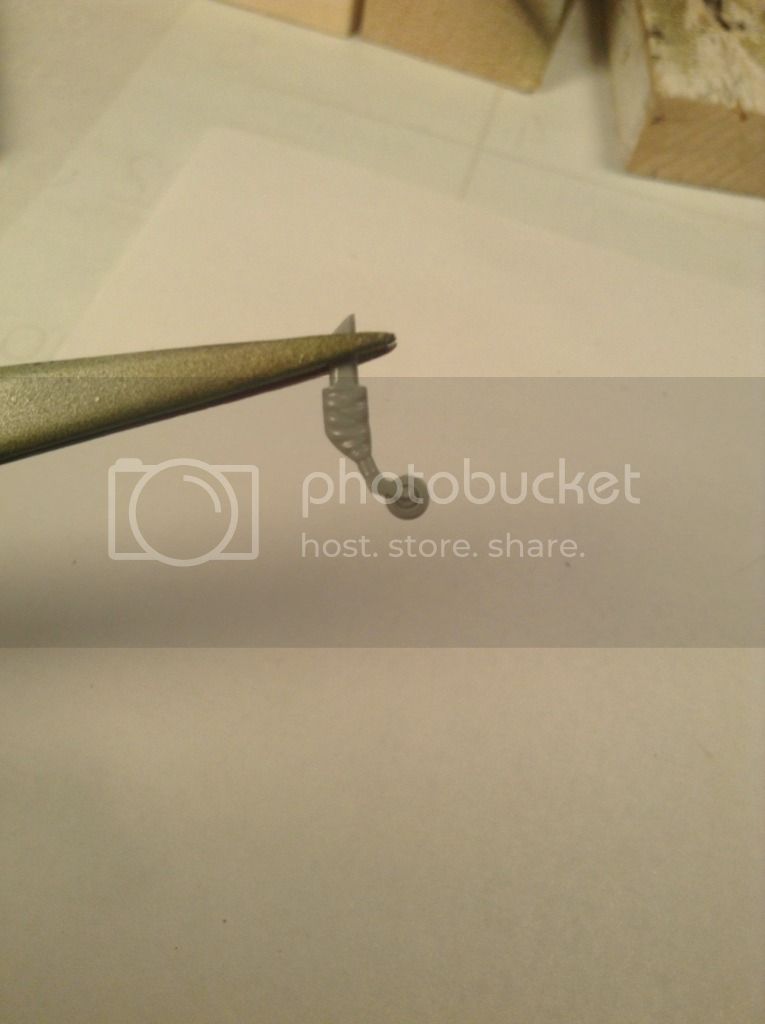
and after tweaking -
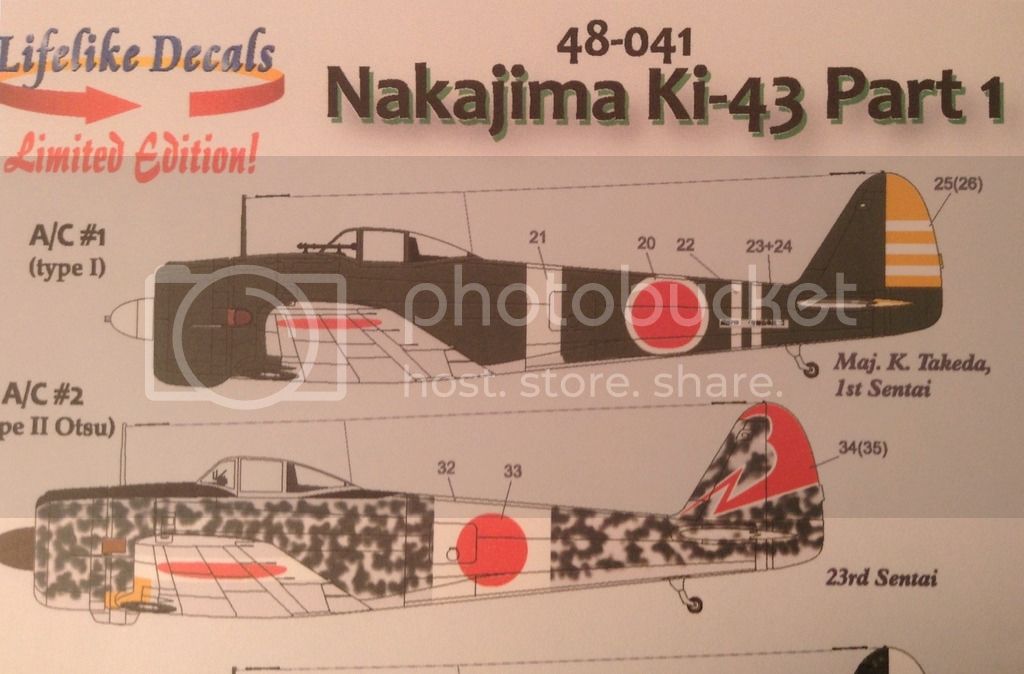
I've decided on this scheme - A/C # 1 on Lifelike's sheet 48-041-
Flown by Major Kinshiro Takeda , Commander of 1st Sentai operating out of Hanoi AB/Indochina 1942. I like the overall IJAAF dark green wrapping around the leading edges /wingtips and on to the lower wing surfaces and the lack of the anti- glare panels on the fuse deck and no yellow ID panels on the leading edges. This speaks to me of early Hayabusa.
I've sprayed the control surfaces at the tail in white as a base for the yellow -
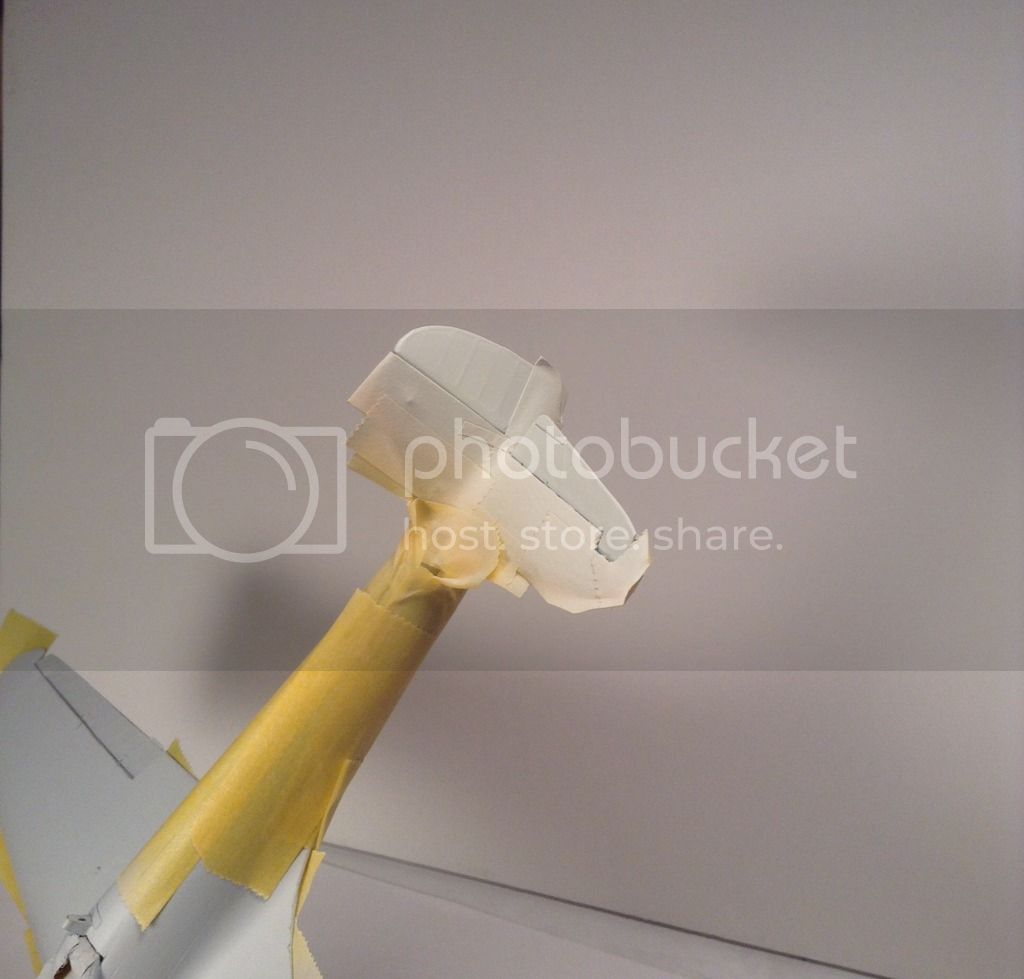
and the underside of the ailerons in IJAAF light grey green -
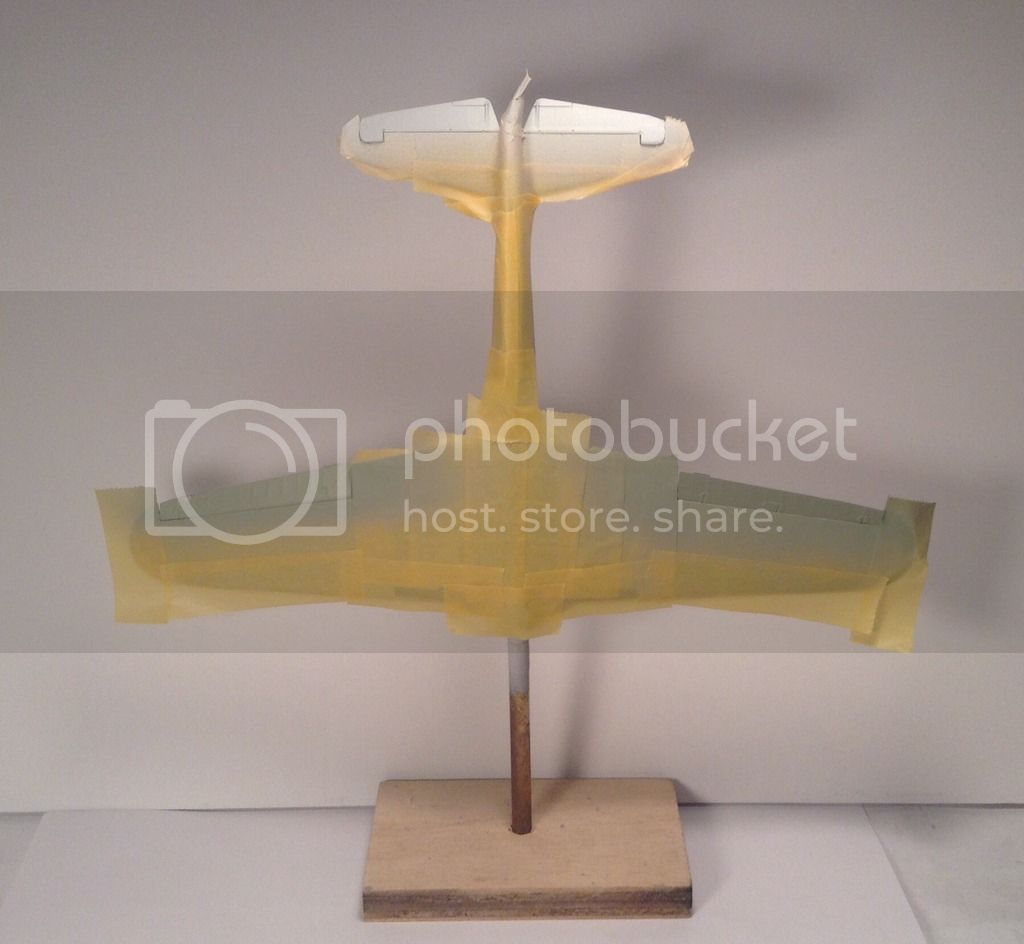
All colors so far Vallejo Model Air.
Thanks for looking in - Richard
here is the tailwheel as it comes from Hasegawa -
and after tweaking -
I've decided on this scheme - A/C # 1 on Lifelike's sheet 48-041-
Flown by Major Kinshiro Takeda , Commander of 1st Sentai operating out of Hanoi AB/Indochina 1942. I like the overall IJAAF dark green wrapping around the leading edges /wingtips and on to the lower wing surfaces and the lack of the anti- glare panels on the fuse deck and no yellow ID panels on the leading edges. This speaks to me of early Hayabusa.
I've sprayed the control surfaces at the tail in white as a base for the yellow -
and the underside of the ailerons in IJAAF light grey green -
All colors so far Vallejo Model Air.
Thanks for looking in - Richard
thegirl
Joined: January 19, 2008
KitMaker: 6,743 posts
AeroScale: 6,151 posts
Posted: Friday, March 03, 2017 - 06:15 AM UTC
Nice scheme choice Richard , very colourful . Tail wheel turned out not bad ether .
That is one thing I will have to get is colours for Japanese aircraft , don't have any . What is your opinion on the Vallejo Air shades ?
Terri
That is one thing I will have to get is colours for Japanese aircraft , don't have any . What is your opinion on the Vallejo Air shades ?
Terri
rdt1953
Joined: February 06, 2015
KitMaker: 1,098 posts
AeroScale: 900 posts
Posted: Friday, March 03, 2017 - 05:03 PM UTC
Quoted Text
Nice scheme choice Richard , very colourful . Tail wheel turned out not bad ether .
That is one thing I will have to get is colours for Japanese aircraft , don't have any . What is your opinion on the Vallejo Air shades ?
Terri
Terri - I've only just begun with the Vallejo colors so it is a little early to tell. They certainly lay on beautifully - just a drop or two of their thinner in the air brush cup each time . I bought both the IJN and IJAAF sets. There is no interior color included in either set other than Aotake. As I have stated before I like the hue of their Aotake but the high clear content used for a transparent effect limits its use for smaller scales.
I plan on shooting the entire airframe ( other than the fabric covered portions of the control surfaces) in MetalColor white aluminum then painting chipped areas with liquid mask to be followed with various tones of IJAAF Dark Green -
Fingers crossed- Richard

mrockhill
Joined: June 17, 2009
KitMaker: 566 posts
AeroScale: 507 posts

Posted: Saturday, March 04, 2017 - 11:28 PM UTC
Richard your work on this hayabusa has been an absolute pleasure to follow. Especially your tackling of the radiator. Im going to resort to some paint or color pencil trickery to detail the sides of my Hayabusa's plastic part. Just so its not so plain
I wanted to attempt something similar though a bit cruder but couldnt devise something I felt confident would work and be presentable. Your use of mandrels was a far better solution. So im looking to try that when I build my nichimo kit somewhere down the road. I need to reaquaint myself with soldering too, seems a handy thing for modeling
I have to admit its been tough to try and keep my build simple and progressing smoothly while peeking in on this awesomness. I truly almost waffled when you showed the different canopies. I had no idea the rob taurus canopy was that much nicer! Im still resisting but its been tough
Keep up the beautiful work!
 |

WEB HOSTING BY


Copyright ©2021 AeroScale and Kitmaker Network, a subsidiary of Silver Star Enterprises
All Rights Reserved. Please read our Conditions of Use and Privacy Policy.
All Rights Reserved. Please read our Conditions of Use and Privacy Policy.