

Air Campaigns
Want to start or join a group build? This is where to start.
Want to start or join a group build? This is where to start.
Hosted by Frederick Boucher, Michael Satin
Official tread: Rumble in the East Asian Sky

CaptainA

Joined: May 14, 2007
KitMaker: 3,117 posts
AeroScale: 2,270 posts
Posted: Sunday, August 12, 2007 - 03:20 AM UTC
Carlos-Looks great so far. I have never built a Mosquito. Seeing yours makes me want to go ahead and order one.


Emeritus

Joined: March 30, 2004
KitMaker: 2,845 posts
AeroScale: 1,564 posts

Posted: Sunday, August 12, 2007 - 06:18 AM UTC
Quoted Text
For priming I use Mr. Surfacer 1200 (Spray Can). It´s a little tricky to apply but when you get practice it´s a fantastic stuff.
I knew it was surfacer!

Now my primer problem is solved, one fellow modeler helped me out by ordering some spray mr. surfacer 1000 from HLJ.
Some time ago I bought a small can of it from one LHS to test it out (much more I couldn't even do with those prices, 10 per can (100ml) is pretty salty). It turned out to be really good stuff.
Of course I could thin the regular bottled stuff and airbrush that (it's more reasonably priced here), but I prefer spray cans when priming (especially when I would have to deal with harsh thinners), they're just so convenient.
Btw, now when I'm posting in the pacific campaign thread, I've got to say I've been mentally preparing for the British Brewster I'm going to build. A brewster without a Finnish warpaint? That's going to be really weird project!


csch

Joined: December 27, 2002
KitMaker: 1,941 posts
AeroScale: 1,040 posts
Posted: Sunday, August 12, 2007 - 06:57 AM UTC
Quoted Text
Quoted TextFor priming I use Mr. Surfacer 1200 (Spray Can). It´s a little tricky to apply but when you get practice it´s a fantastic stuff.
I knew it was surfacer!
Now my primer problem is solved, one fellow modeler helped me out by ordering some spray mr. surfacer 1000 from HLJ.
project!
Hi Eetu:
The one I use is 1200 not the 1000. Mr. Surfacer 1200 Spray Can is thin enough to apply over aircraft surfaces without need of sanding after applying it.
 Some practice is important before applying it directly over your model. It´s a little tricky.
csch
Joined: December 27, 2002
KitMaker: 1,941 posts
AeroScale: 1,040 posts
Posted: Sunday, August 12, 2007 - 07:07 AM UTC
Quoted Text
Carlos-Looks great so far. I have never built a Mosquito. Seeing yours makes me want to go ahead and order one.

Hi Carl:
Don´t doubt. Build one or more than one of this fantastic aircraft.
See them doing one of their jobs:
http://www.youtube.com/watch?v=IZ-a8U1QWUw&feature=PlayList&p=D3A023606BBC8398&index=3
SGTJKJ

#041

Joined: July 20, 2006
KitMaker: 10,069 posts
AeroScale: 3,788 posts

Posted: Sunday, August 12, 2007 - 07:31 PM UTC
Carlos, looks very good with your Mossie. Thanks for the update
Eetu, great to hear you are mentally gearing up and moving your buffalos to the East Asian sky
Eetu, great to hear you are mentally gearing up and moving your buffalos to the East Asian sky

Emeritus
Joined: March 30, 2004
KitMaker: 2,845 posts
AeroScale: 1,564 posts
Posted: Sunday, August 12, 2007 - 09:38 PM UTC
You know, it was true, preparing yourself mentally isn't that overrated. Especially when dealing with limited-run kits.
I made a carefull start on my Brewster yesterday, mostly cleaning up resin parts and the largest plastic parts and doing some dryfitting.
The resin interior is just gorgeus. I hope it'll fit between the fuselage halves as well. The fit of the styrene bulkheads in the frontal fuselage on the other hand looks, well, interesting...
Also, some more fit problems are looming ahead. While the most of the kit pretty much free of flash, the little there is apparently just had to accumulate to the ends of the lower wing halves, where they attach to the fuselage. (It's another modeling-related Murphy's law: the probability of flash occurring to a part is directly related to the difficulty of fitting the given part if flash is present)
This calls for careful sanding to retain the correct hidedral of the wings. Unfortunately, adding wing spars from tubing or something is nearly impossible because of the cockpit's position. Another, altough smaller, problem area seems to be the separate front of the engine cowling, it's shape doesn't match that of the fuselage 100%.
Strangely, there's some strange omissions and inaccuracies in the kit, although they're minor and quite easily fixed.
First, there's no PE parts. A small fret with seatbelts and the instrument panels would have been nice. (out of the box, there's no seatbelts, and instrument panels are all resin with blank gauges.
No gunsight is provided either, and the canopy's sliding portion is missing the oval flat view panel, and there's only one landing light in the wing. Hasegawa's kit had two. Filling and sanding one away is much more pleasant than making one. Then the instructions point out to use the glass panel for the belly, while only Dutch B-339's had them, according to my references.
And another thing that I can't really figure out, is that why are the main landing gears moulded in two parts, while hasegawa's kit had single-part legs.
But let's not nit-pick, let's build it!
This is third on my to-do list at the moment, so progress might be a little slow at first. (got an La-7 and a T-34 to finish)

Gaucho

Joined: April 13, 2003
KitMaker: 416 posts
AeroScale: 55 posts

Posted: Sunday, August 12, 2007 - 11:00 PM UTC
Hi,
Well, here we go.
I'm introducing my subject for this campain. A Pearl Harbor P-40B.
So much effort and the engine will be hidden.


Ramao
Well, here we go.
I'm introducing my subject for this campain. A Pearl Harbor P-40B.
So much effort and the engine will be hidden.
Ramao

SGTJKJ
#041
Joined: July 20, 2006
KitMaker: 10,069 posts
AeroScale: 3,788 posts
Posted: Sunday, August 12, 2007 - 11:07 PM UTC
Hi Eetu,
It surely sounds like a kit with a lot of potential, but also a lot of work. I am looking forward to seeing it getting started. Also I am looking forward to see that Finnish T-34 get into shape, but that is a story for the armorama forum.
I am taking a small brake from the Eduard aircraft kits after the YAK-3 1000 PE part cockpit (well, maybe a little exaggerated). After that I will start on my Eduard KI-115. Now I am just finishing up a couple of campaigns on Armorama.
Ramao, what a lovely engine. To bad to hidde it away. Isn't possible to have the engine cowlings open? Looking forward to see more.
Emeritus
Joined: March 30, 2004
KitMaker: 2,845 posts
AeroScale: 1,564 posts
Posted: Sunday, August 12, 2007 - 11:35 PM UTC
Quoted Text
Hi Eetu,
It surely sounds like a kit with a lot of potential, but also a lot of work. I am looking forward to seeing it getting started. Also I am looking forward to see that Finnish T-34 get into shape, but that is a story for the armorama forum.
Yes, to put it shortly, the kit seems as detailed as Hasegawa's (which I highly suspect special hobby's kit is based on), with a stunning interior, but lacking in locating pins and ease of assembly.
I'll finish my La-7 for the VVS campaign, then I'll tackle that Finnish T-34 (and write that feature about the project. Conveniently, there's this feature competition at armorama with the deadline being 30th of September) After that, it's time I concentrate on this campaign.
I'll probably be working on the Brewster along the T-34, but at a slower pace because of the feature competition deadline.
CaptainA
Joined: May 14, 2007
KitMaker: 3,117 posts
AeroScale: 2,270 posts
Posted: Monday, August 13, 2007 - 05:49 AM UTC
Carlos-Thanks, great film. I guess you dont want to be firing that cannon when you are near your stall speed.
I am building a gun nose B-25 for this campaign. I am close to closing up the fuselage. I will post some pics of the interior soon. After spending over a week working on the interior, I want to be sure somebody sees it.
I am building a gun nose B-25 for this campaign. I am close to closing up the fuselage. I will post some pics of the interior soon. After spending over a week working on the interior, I want to be sure somebody sees it.
csch
Joined: December 27, 2002
KitMaker: 1,941 posts
AeroScale: 1,040 posts
Posted: Monday, August 13, 2007 - 09:07 AM UTC
Quoted Text
Carlos-Thanks, great film. I guess you dont want to be firing that cannon when you are near your stall speed.
I am building a gun nose B-25 for this campaign. I am close to closing up the fuselage. I will post some pics of the interior soon. After spending over a week working on the interior, I want to be sure somebody sees it.
Hi Carl:
Did you see what a firing power !!! I love the Mossie !!!
Good idea posting some pics of the interior because after closing the fuselage I guess it will be imposible to see somthing through the windows. Is your B 25 in 1/72 ? I got the one from Revell that´s a reboxing of the Hasegawa in 1/72.


29Foxtrot

Joined: September 19, 2003
KitMaker: 708 posts
AeroScale: 674 posts

Posted: Monday, August 13, 2007 - 05:00 PM UTC
Carlos,
Good progress on the FB VI Mossie, doing the cam version will look good in SEAC markings. I intend one day to do the BOAC version in the same cam scheme.
Ramao,
Excellent detail on the P 40b, pity the kit is missing the clear cowlings as supplied in some of their 24 scale kits.
I'll post pix of my progress on the Val soon.

Emeritus
Joined: March 30, 2004
KitMaker: 2,845 posts
AeroScale: 1,564 posts
Posted: Monday, August 13, 2007 - 06:19 PM UTC
Quoted Text
Excellent detail on the P 40b, pity the kit is missing the clear cowlings as supplied in some of their 24 scale kits.
If my memory serves me right, some 1:32 scale kits have clear cowls as well, at least the corsairs.
That engine indeed looks gorgeus. Wouldn't it be possible to display it separately, since it the whole assembly won't be visible in the finished model? But then, if only one set of exhaust pipes are provided, it makes thing more complicated.
CaptainA
Joined: May 14, 2007
KitMaker: 3,117 posts
AeroScale: 2,270 posts
Posted: Tuesday, August 14, 2007 - 06:39 AM UTC

It is Accurate Miniatures 1/48 B-25 Gun Nose. It has a lot of detail that will never be seen. So far the build is progressing without any problems, at least no problems with the kit. I blew out my knees again so it is uncomfortable to sit for too long. But that is a personal problem, and we are here for the kit. The interior has been enhanced with Eduard PE. It is not pre-painted, so I spent 3 days painting the dashboard and othe interior details under a microscope. It really works. Doesn't that 105mm gun look menacing under the cockpit floor?
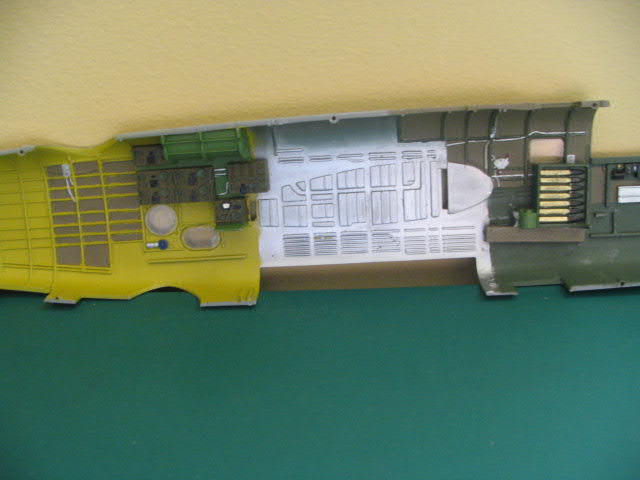
The port side fuselage interior. The stowage box for the 105 shells is jst aft of the pilots seat.
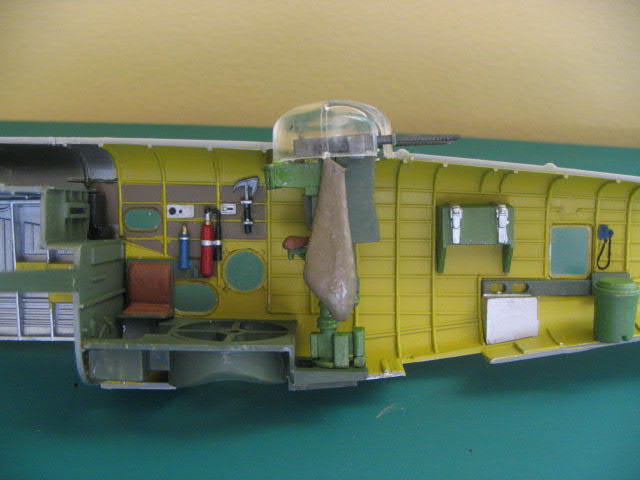
Everything dryfitted in place. The chemical Toilet is at the far right side of the picture. At least you have some nice windows to look out.
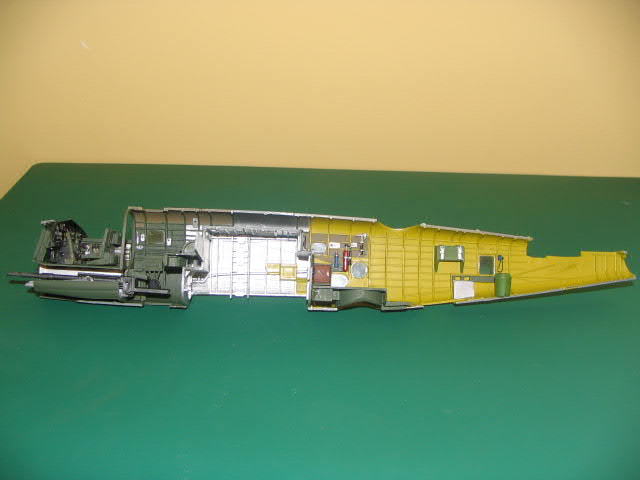 The starbord side with the bomb bay in place. Everything is in its assigned spot (except the dorsal gun turret which was removed for the picture) so it is about time to close up the fuselage.
 BTW. I am really enjoying this kit. I just ordered its sister kit "Red Wrath" I don't know how long it will sit in the closet, but I will build it again. I can't give higher praise than that.

sweaver
Joined: April 19, 2007
KitMaker: 759 posts
AeroScale: 184 posts
Posted: Tuesday, August 14, 2007 - 10:09 PM UTC
Nice job, Carl. Your instrument panel is really good.
Well, i'm finally getting around to starting my entry, Accurate Miniature's SBD-3 Dauntless. I'll try to post some in-progress pics.
Well, i'm finally getting around to starting my entry, Accurate Miniature's SBD-3 Dauntless. I'll try to post some in-progress pics.
csch
Joined: December 27, 2002
KitMaker: 1,941 posts
AeroScale: 1,040 posts
Posted: Wednesday, August 15, 2007 - 04:06 AM UTC
Hi Carl:
Very good and fine job done in that interior. It´s a pitty that when closed not all that details would be appreciated, but you know they are there and that´s what counts
keep on posting the fine job
Very good and fine job done in that interior. It´s a pitty that when closed not all that details would be appreciated, but you know they are there and that´s what counts
keep on posting the fine job

Bigskip

Joined: June 27, 2006
KitMaker: 2,487 posts
AeroScale: 575 posts

Posted: Wednesday, August 15, 2007 - 07:41 AM UTC
Well i've started Kit No 1 - Tamiya's 48 Scale Brewster Buffalo.


Andy
Andy

29Foxtrot
Joined: September 19, 2003
KitMaker: 708 posts
AeroScale: 674 posts
Posted: Wednesday, August 15, 2007 - 08:31 AM UTC
Andy,
Good progress on your Buffalo, are you doing the version depicted on the boxart with the dragon motif ?.
Good progress on your Buffalo, are you doing the version depicted on the boxart with the dragon motif ?.
Bigskip
Joined: June 27, 2006
KitMaker: 2,487 posts
AeroScale: 575 posts
Posted: Wednesday, August 15, 2007 - 08:43 AM UTC
Rob
G'day mate. Yes i'm slavishly following the easy option on this one - straight out of the box, in the box art finish. I also plan on a 72 scale helldiver for the campaign if time allows.
Andy
G'day mate. Yes i'm slavishly following the easy option on this one - straight out of the box, in the box art finish. I also plan on a 72 scale helldiver for the campaign if time allows.
Andy

eerie

Joined: September 26, 2004
KitMaker: 1,008 posts
AeroScale: 106 posts

Posted: Wednesday, August 15, 2007 - 02:14 PM UTC
I m submitting in a P-40 Warhawk. From the RAAF

SGTJKJ
#041
Joined: July 20, 2006
KitMaker: 10,069 posts
AeroScale: 3,788 posts
Posted: Wednesday, August 15, 2007 - 09:05 PM UTC
Quoted Text
I m submitting in a P-40 Warhawk. From the RAAF
Great to have you onboard. What manufacturer and scale is it?
Welcome to the campaign
SGTJKJ
#041
Joined: July 20, 2006
KitMaker: 10,069 posts
AeroScale: 3,788 posts
Posted: Wednesday, August 15, 2007 - 09:11 PM UTC
@Carl: good to see you are making good progress on your "guns with wings" B25 The interior looks very good. Too bad it will be hidden. It will be the aircraft equivalent of the Golden heart campaign at armorama.
Hope your knees get well quickly.
@Andy: good to see your build is coming along.The cockpit looks fine.
Looking forward to see more
The interior looks very good. Too bad it will be hidden. It will be the aircraft equivalent of the Golden heart campaign at armorama. Hope your knees get well quickly.
@Andy: good to see your build is coming along.The cockpit looks fine.
Looking forward to see more
sweaver
Joined: April 19, 2007
KitMaker: 759 posts
AeroScale: 184 posts
Posted: Wednesday, August 15, 2007 - 10:50 PM UTC
Yesterday, I started my Dauntless. It is very well detailed and all the parts fit together very nicely. Here are some pics.


29Foxtrot
Joined: September 19, 2003
KitMaker: 708 posts
AeroScale: 674 posts
Posted: Thursday, August 16, 2007 - 02:22 AM UTC
Eerie,
The RAAF flew the P40's in E, K, M and N versions, is your kit the Italeri P40N [old AMT tooled kit] as 'Cleopatra III' flown by Geof Atherton or is it something else ?.

The P 40N 'Cleopatra III'
Hope the pic helps.
The RAAF flew the P40's in E, K, M and N versions, is your kit the Italeri P40N [old AMT tooled kit] as 'Cleopatra III' flown by Geof Atherton or is it something else ?.
The P 40N 'Cleopatra III'
Hope the pic helps.
CaptainA
Joined: May 14, 2007
KitMaker: 3,117 posts
AeroScale: 2,270 posts
Posted: Thursday, August 16, 2007 - 04:47 AM UTC
Andy-That Buf is looking good. I almost did one for this campaign myself. Ther is just something about this airplane that evokes strong emotions in people. A faithful mount that was old before its time.
Sam-Nice start on the Dauntless.
Thanks Jesper. Yes I have put a HoG in it. The fuselage is sealed up. The wings are glued together. I am working on the nacelles and rescribing now. I might be ready for the prepaint assembly by the weekend and final assembly by the end of the weekend. Then I can go back to work on my, dare I say it, Tank.
 |

WEB HOSTING BY


Copyright ©2021 AeroScale and Kitmaker Network, a subsidiary of Silver Star Enterprises
All Rights Reserved. Please read our Conditions of Use and Privacy Policy.
All Rights Reserved. Please read our Conditions of Use and Privacy Policy.