Air Campaigns
Want to start or join a group build? This is where to start.
Official tread: Rumble in the East Asian Sky
Emeritus
_VISITCOMMUNITY
Uusimaa, Finland
Joined: March 30, 2004
KitMaker: 2,845 posts
AeroScale: 1,564 posts
Posted: Thursday, August 16, 2007 - 06:55 AM UTC
I made a slow but steady start with my brewster. I got the wings together and the dihedral sorted by careful sanding.
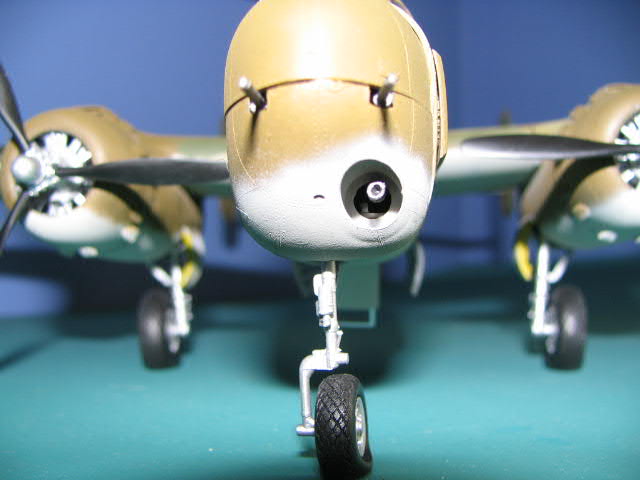
The only actual assembly so far has been the prop. I really don't know why can't manufacturers make single-part propellers. They can cast this kind of resin parts:

But still the prop has plastic blades and a resin hub.

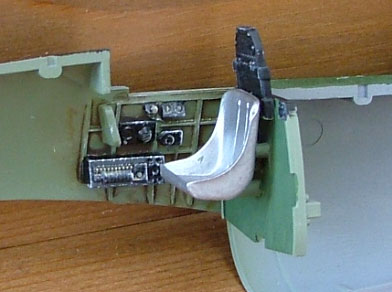
Okay, the hub is nicely cast, detailed and all, but it's useless since it will be completely hidden under the large spinner, and complicates assembly. (a good example of improving kits MPM's Fokker D.XXI's, the 3rd series fit had a resin hub & plastic blades, the later 4th series kit has an all-plastic single-piece prop assembly)

The spinner provided some small problems on it's own. The holes where the prop blades go through were too small and required some filing, and the hole inside for mounting the hub wasn't centered, so I just cut off the locating pin from the hub. Strangely, the instructions don't mention the backing plate that is provided, and clearly shown in reference pictures.
CaptainA
_VISITCOMMUNITY
Indiana, United States
Joined: May 14, 2007
KitMaker: 3,117 posts
AeroScale: 2,270 posts
Posted: Saturday, August 18, 2007 - 06:18 AM UTC
I am painted. Now I am adding details. Next will be decals and weathering (hopefully on Monday). I will post some new pictures when I find some motivation.
Moeggo
_VISITCOMMUNITY
Wellington, New Zealand
Joined: March 15, 2005
KitMaker: 169 posts
AeroScale: 132 posts
Posted: Saturday, August 18, 2007 - 12:48 PM UTC
Hi there,

I'm new here, and I would like to join in...

I take it, this is were you post your in-progess and completed pic's?

I just started a 1/48 P-47D, 2 Big and To Heavy - 333rd Fighter Sqdn, 381th Figther Grp. Ie Shima 1945,
Emeritus
_VISITCOMMUNITY
Uusimaa, Finland
Joined: March 30, 2004
KitMaker: 2,845 posts
AeroScale: 1,564 posts
Posted: Saturday, August 18, 2007 - 10:20 PM UTC

Quoted Text


I take it, this is were you post your in-progess and completed pic's?


Yes, alhough you can start and build thread of your own and mark it as a build blog so it gets more visibility.
CaptainA
_VISITCOMMUNITY
Indiana, United States
Joined: May 14, 2007
KitMaker: 3,117 posts
AeroScale: 2,270 posts
Posted: Sunday, August 19, 2007 - 07:44 AM UTC

It is painted, but no decals yet.


Big gun
SGTJKJ
#041
_VISITCOMMUNITY
Kobenhavn, Denmark
Joined: July 20, 2006
KitMaker: 10,069 posts
AeroScale: 3,788 posts
Posted: Monday, August 20, 2007 - 12:10 AM UTC

Quoted Text

Hi there,

I'm new here, and I would like to join in...

I take it, this is were you post your in-progess and completed pic's?

I just started a 1/48 P-47D, 2 Big and To Heavy - 333rd Fighter Sqdn, 381th Figther Grp. Ie Shima 1945,


Great to have you onboard

As already pointed out you can use this tread for updates on your build. However, if you are doing a blow by blow account of your build with lots of photos and text you could also start a blog for people to follow.
It is all up to you how you want it

Looking forward to see the first pics

@Carl: looks good. I did not want to be on the receiving end of that gun! Looking forward to see more.
Moeggo
_VISITCOMMUNITY
Wellington, New Zealand
Joined: March 15, 2005
KitMaker: 169 posts
AeroScale: 132 posts
Posted: Monday, August 20, 2007 - 11:26 AM UTC
Well heres a couple of shots for you.

I started this kit last week, Its 1/48 Academy's P-47D. I building most of it out of the box, I did get a small Eduard etch kit for it thou.


Bigskip
_VISITCOMMUNITY
England - South East, United Kingdom
Joined: June 27, 2006
KitMaker: 2,487 posts
AeroScale: 575 posts
Posted: Tuesday, August 21, 2007 - 07:56 AM UTC
Latest progress shots


Andy
CaptainA
_VISITCOMMUNITY
Indiana, United States
Joined: May 14, 2007
KitMaker: 3,117 posts
AeroScale: 2,270 posts
Posted: Tuesday, August 21, 2007 - 11:00 AM UTC

It almost looks like you are walking up to start your pre-flight checks. I didn't turn it over to photograph the underside, but rest assured there are two 1000 pound bombs in the bay.


The front strut looks crooked, but it is just camera angle. The point of this shot is the big gun.

Well folks. I am calling this one finished. It was a fantastic kit. A real pleasure to build. I only had one fit problem on the front machine gun bay to fuselage join. I really think that is my fault, not a kit problem. This is a fantastic kit, and I am suprised we didn't hear more about it. Accolades to AM. As stated earlier, I ordered "Red Wrath" and plan to build it soon. I think I might also do an earlier B/C model. Perhaps a Dolittle Raider.

Great Campaign Jesper. Do I need to post elswhere?

Now I gotta go make a tank.

SGTJKJ
#041
_VISITCOMMUNITY
Kobenhavn, Denmark
Joined: July 20, 2006
KitMaker: 10,069 posts
AeroScale: 3,788 posts
Posted: Tuesday, August 21, 2007 - 09:44 PM UTC
David, looks good. A really nice cockpit.


Quoted Text


Great Campaign Jesper. Do I need to post elswhere?
Now I gotta go make a tank.


Thanks, Carl. Glad you enjoyed it.

You need to upload photos of your model in the Aeroscale campaign gallery under the "photos" folder. Maybe also a couple of photos of the topside of the aircraft?

Good luck on the tank
CaptainA
_VISITCOMMUNITY
Indiana, United States
Joined: May 14, 2007
KitMaker: 3,117 posts
AeroScale: 2,270 posts
Posted: Wednesday, August 22, 2007 - 01:14 AM UTC
I will get them in there. There are more in my gallery space if you are interested.
SGTJKJ
#041
_VISITCOMMUNITY
Kobenhavn, Denmark
Joined: July 20, 2006
KitMaker: 10,069 posts
AeroScale: 3,788 posts
Posted: Wednesday, August 22, 2007 - 07:56 PM UTC
I just checked out your gallery. Looks great, Carl.

Thanks for participating
Emeritus
_VISITCOMMUNITY
Uusimaa, Finland
Joined: March 30, 2004
KitMaker: 2,845 posts
AeroScale: 1,564 posts
Posted: Friday, August 24, 2007 - 01:14 AM UTC
I fiddled with the engine firewall bulkhead on my brewster yesterday. I can tell you it doesn't look that good.

That's after one gluing attempt. I pulled off the part after realizing that it's not going to fit, at least for now. There was some quite awful gaps, but those could been made worse by my sanding mold misaligment seams. Anyway, there's not much in the way of alignment aids, one raised line in one fuselage half, nothing in the other. The instructions show two raised lines, which could suggested the part being glued between them.

But with only one line, the correct position is hard to determine.
Interestingly, the instructions don't care to mention the framework making up the engine mount should probably attach to the firewall....

After taking a look at the engine/landing gear mount parts, I started thinking. Fitting the several small and fragile parts to be glued between the two bulkheads will undoubtedly lead to frustration and harsh words.
One possibility would be to ditch the forward bulkhead, make a crude but working engine mount from scratch, and scratching the framework inside the gear well space as well, as I did with hasegawa's kit.
Talking about hasegawa's brewster's, I think their fuselage solution is a better one. The forward fuselage is a separate three-part assembly, which includes the forward bulkhead, ensuring the engine will sit right. But then, there's no framework in the gear bay and the cockpit's spartan.
Moeggo
_VISITCOMMUNITY
Wellington, New Zealand
Joined: March 15, 2005
KitMaker: 169 posts
AeroScale: 132 posts
Posted: Friday, August 24, 2007 - 10:45 AM UTC
I started to decal her this week, got one side done...


CaptainA
_VISITCOMMUNITY
Indiana, United States
Joined: May 14, 2007
KitMaker: 3,117 posts
AeroScale: 2,270 posts
Posted: Saturday, August 25, 2007 - 06:00 AM UTC
The right side decal seems to have some bubbles under it. Looks great. That scheeme would really "pop out" on one of the 1/32 scale "jugs". That last sentence is loaded with conotations, isn't it?
SGTJKJ
#041
_VISITCOMMUNITY
Kobenhavn, Denmark
Joined: July 20, 2006
KitMaker: 10,069 posts
AeroScale: 3,788 posts
Posted: Sunday, August 26, 2007 - 06:14 PM UTC
@Eetu: seems like you have quite a beast of a kit there with some tough decisions ahead to make it work out right in the end. However, having seen some of your other kits I habve no doubt you will work it out

@David: looks really cool with the decals! Those decals are super cool, loaded with multiple interpretations, and will look stunning on the finished aircraft.

Looking forward to see more
Moeggo
_VISITCOMMUNITY
Wellington, New Zealand
Joined: March 15, 2005
KitMaker: 169 posts
AeroScale: 132 posts
Posted: Sunday, August 26, 2007 - 07:26 PM UTC

Quoted Text

The right side decal seems to have some bubbles under it.


Yeap, it does.... I have been working on that today...
PolarBear
_VISITCOMMUNITY
Västra Götaland, Sweden
Joined: February 23, 2005
KitMaker: 820 posts
AeroScale: 629 posts
Posted: Monday, August 27, 2007 - 04:23 AM UTC
Hi all,

Back from the vacation. One good thing about working in a tiny scale is that you kan bring your hobby with you! I brought a small box with the basic tools and managed to get a couple of hours in when the rain fell in the Swedish Archipelago.

Here's some progress shots of the 1/144 Zero. For the first time, I tried decals for canopy frames. It was fiddly indeed, but I think the result was excellent for the scale!


I dipped the finished canopy in future in order to make the decals stick properly. Problem is that the canopy is now so clear that I might have to detail the cockpit!!! Here, the canopy is only dry-fitted. With a little touch-up and some additional paint, I think that it will look pretty good!


I've decided to make this model in-flight (as part of a bigger scheme - you'll understand later). Now, does anybody know where can I find pilots in this scale!?!? Please...

Cheers!
CaptainA
_VISITCOMMUNITY
Indiana, United States
Joined: May 14, 2007
KitMaker: 3,117 posts
AeroScale: 2,270 posts
Posted: Monday, August 27, 2007 - 11:07 AM UTC
1/144 scale amazes me. I won't even do 1/72 because that is to small for my enormous digits. How do you guys do it?

By the way, it looks great.
Tigerbait
_VISITCOMMUNITY
North Carolina, United States
Joined: September 28, 2005
KitMaker: 347 posts
AeroScale: 179 posts
Posted: Monday, August 27, 2007 - 12:55 PM UTC
All I can say is WOW!!!
SGTJKJ
#041
_VISITCOMMUNITY
Kobenhavn, Denmark
Joined: July 20, 2006
KitMaker: 10,069 posts
AeroScale: 3,788 posts
Posted: Monday, August 27, 2007 - 06:52 PM UTC
Bjorn, that looks great. Very impressive to get this level of detail into a 1/144 kit.

Looking forward to see more
goldstandard
_VISITCOMMUNITY
California, United States
Joined: March 29, 2007
KitMaker: 208 posts
AeroScale: 186 posts
Posted: Monday, August 27, 2007 - 08:02 PM UTC
I was able to get some more work done on the Ki-83 after finishing my He-45. I added all the nacelles and air scoops to the engines, and masked and attached the canopy. The canopy fit is decent, with only some gap filling need on the back end of it. Because it is protected by a coat of Future, I was able to get away with using CA glue to attach it without any fogging. Tomorrow I will be having fun at the California State Fair, so the next update likely won't come until Wednesday.


sweaver
_VISITCOMMUNITY
Kentucky, United States
Joined: April 19, 2007
KitMaker: 759 posts
AeroScale: 184 posts
Posted: Tuesday, August 28, 2007 - 10:20 PM UTC
Nice work, Michael!

Just an update on my build...


Any comments appreciated!:)
Moeggo
_VISITCOMMUNITY
Wellington, New Zealand
Joined: March 15, 2005
KitMaker: 169 posts
AeroScale: 132 posts
Posted: Sunday, September 02, 2007 - 09:21 PM UTC
Well, I have both side's of the Jug decal'ed.

I just added another Gloss coat, I will let it dry for a couple of days and I will give a wash and then finish off the little items.....


Some of the kits decals when on nicely and some were ! the main ones that I had problems with were the prop emblems, so I have taking them off as they didn't want to stick....


The prop stenciling is the dry transfer's from Hobbydecal, I have'nt master the art of putting them on let!
29Foxtrot
_VISITCOMMUNITY
Victoria, Australia
Joined: September 19, 2003
KitMaker: 708 posts
AeroScale: 674 posts
Posted: Monday, September 03, 2007 - 02:20 AM UTC
Been AWL for a couple of weeks and hope to get back to my campaign projects.

Excellent workmanship on the shown birds.

Moeggo:
What BMF finish did you use on the P 47N build ?