Air Campaigns
Want to start or join a group build? This is where to start.
Twin Spinner Approved
SGTJKJ
#041
_VISITCOMMUNITY
Kobenhavn, Denmark
Joined: July 20, 2006
KitMaker: 10,069 posts
AeroScale: 3,788 posts
Posted: Tuesday, March 04, 2008 - 09:00 PM UTC
I got another idea for a cool diorama. I remember seeing a picture with a CH-46 or CH-47 lifting a semi burried Iraqi aircraft out of the sand somewhere in an airfield. The Iraqi had burried the aircraft to hide it - although this would obviously require major clean up before it could be flown again 
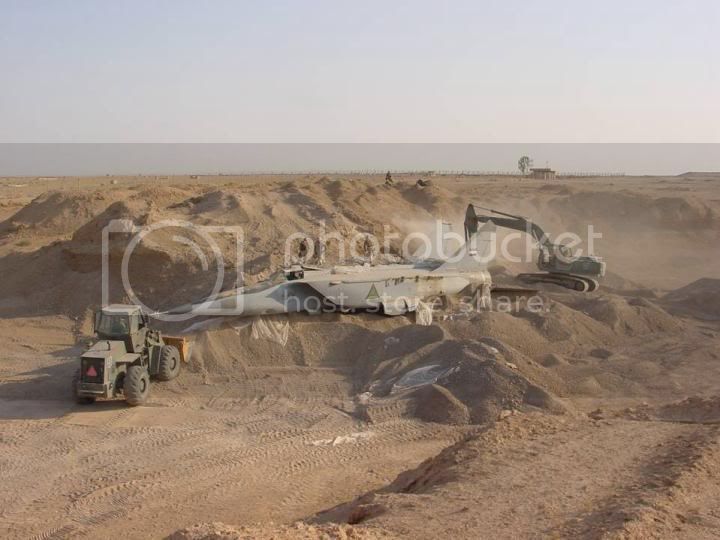
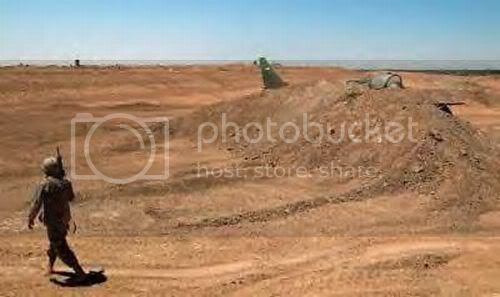
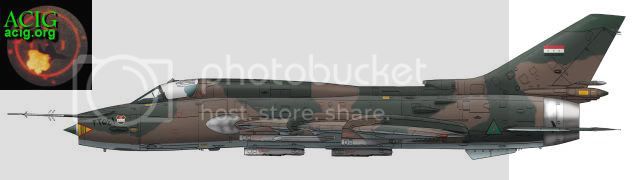
I think it was an SU-7 or MiG 21. Now that could be a cool diorama!

I have tried to find the picture, but cannot relocate it......
jaypee
_VISITCOMMUNITY
Scotland, United Kingdom
Joined: February 07, 2008
KitMaker: 1,699 posts
AeroScale: 1,384 posts
Posted: Tuesday, March 04, 2008 - 10:01 PM UTC
Started my Dornier at the weekend. I've cleaned and test fitted the major fuselage parts, built the cockpit and engines, primed and washed the interior. This is a really nice kit so far. And the first time I've use resin and PE. Looking forward to seeing the cockpit when it is assmebled. The wash looks kind of messy, I'm not too worried as it is inside. I used black enamel and thinner. I've not done a wash on the undercarriage area, I'll experiment with some other washes there.
Here are the results so far.
img_1289.jpg
Dornier Cockpit wash

Next putting the PE details in the cockpit. It should look like this when I'm done.
Yeti123
_VISITCOMMUNITY
Michigan, United States
Joined: February 11, 2008
KitMaker: 311 posts
AeroScale: 278 posts
Posted: Wednesday, March 05, 2008 - 06:18 AM UTC

Quoted Text

Lets take a vote. How many people would like to see Jesper do that diorama?


Jesper:
That would make an incredible diorama. You must have a huge area to display your handi work. My wife would kill me if my stuff comes out of the basement

My vote is yes
vanize
_VISITCOMMUNITY
Texas, United States
Joined: January 30, 2006
KitMaker: 1,954 posts
AeroScale: 1,163 posts
Posted: Wednesday, March 05, 2008 - 06:48 AM UTC
Well, since another Blenhiem is being built for this campaign (even if it is 72nd scale), some dtail part I found at the LHS last night, and the fact that I am a great proponent of diversity, I have decided I will do my Ju-188E for this campaign.

This will be my 3rd build up of the Dragon/Pro Modeler Ju-88/188 kit series, so hopefully it will go faster than it did the first time thru. I am still a little anxious about masking that extensive greenhouse canopy though! The paint job I have planned will be pushing my airbrushing skills as well (given that I've been using airbrushes for more than 25 years, I really should be better at it than I am).
Yeti123
_VISITCOMMUNITY
Michigan, United States
Joined: February 11, 2008
KitMaker: 311 posts
AeroScale: 278 posts
Posted: Wednesday, March 05, 2008 - 04:10 PM UTC
Vance:
I for one am anxious to see this one done. There are alot of cool schemes and I have always been hesitant to try it myself.
SGTJKJ
#041
_VISITCOMMUNITY
Kobenhavn, Denmark
Joined: July 20, 2006
KitMaker: 10,069 posts
AeroScale: 3,788 posts
Posted: Wednesday, March 05, 2008 - 07:05 PM UTC
Great choice, Vance. I have been tempted several times myself by this kit, but have so far resisted. I am looking forward to see this one take to the sky

Regarding my Chinook, work is stalled due to family arrangements and waiting for paint masks. However, planning on a possible diorama is still ongoing. I have still not found the picture of a CH-47 or CH-46 helicopter lifting a captured Iraqi aircraft, but I have found something on these buried Iraqi aircraft.
I have a SU-22M4 in my stash in 1/48 that can be used as a load for the Chinook, but I still need that picture mentioned above. Can anybody help? - I have not been able to locate it.


Blackwulf
_VISITCOMMUNITY
Ohio, United States
Joined: April 20, 2004
KitMaker: 215 posts
AeroScale: 120 posts
Posted: Thursday, March 06, 2008 - 11:09 AM UTC


I looked for ya Jesper but could not find the pic where it was lifting the plane. I did find the above pic which was interesting--I have never seen a chinook do this. This would make a nice water dio!
magnusf
_VISITCOMMUNITY
Stockholm, Sweden
Joined: May 02, 2006
KitMaker: 1,953 posts
AeroScale: 1,902 posts
Posted: Thursday, March 06, 2008 - 06:49 PM UTC
Regarding the Chinook doing that party trick, here are two videos from YouTube showing it:

" TARGET="_blank">

" TARGET="_blank">

Looks a bit risky to mee...

Regards

Magnus
Phantom2
_VISITCOMMUNITY
Östergötland, Sweden
Joined: April 18, 2006
KitMaker: 708 posts
AeroScale: 678 posts
Posted: Friday, March 07, 2008 - 02:16 AM UTC
Hi all!

Wow, those Chinook movies were a real treat!

The Italeri Chinook looks like a really good and well detailed kit!
Jesper, If you want a Colorful Chinook, take a look at the US coast guard´s machines!
Red, white and black!
I´m getting into a Chinook mode too now...


My N9-M is progressing rapidly.
Chuck, Thanks for the info!
I found quite a lot abot Northrops´flying wings in "Wings of Fame" vol2 and in a recently Issue of Aeroplane, and lots of pics.
As you said the N-9MB was not a two-seater from the beginning, but a passenger seat was installed, even Jack Northrop himself got a ride in his flying wing!
And that was the fourth aircraft with the yellow on top/blue under scheme, the same machine that are now restored and still flying!


Now to my build;

Cockpit parts painted;


Floor and side walls were made of wood;


The (VERY SMALL) instrument panel was painted gloss black, then I used some of Mike Grant´s excellent instrument decals.
Finally, I sealed the panel with a flat clear.


The small cockpit assembled;


I decided to make the wing as seperate upper and lower parts, to get a better fit and easier alignment.


Now you can get the sieze of the thing, It´s quite a large aircraft!


Even tough this is a short run kit, fit has been almost perfect, with no need for any filler so far!

More pics to follow...

Cheers!

Stefan E

Blackwulf
_VISITCOMMUNITY
Ohio, United States
Joined: April 20, 2004
KitMaker: 215 posts
AeroScale: 120 posts
Posted: Friday, March 07, 2008 - 11:15 AM UTC
Those were sweet videos--I dont think the guy in the first boat ever cut power until he was inside the heli-lol. Evidently the cargomaster had dealt with that guy before because of how he climbed the wall-lol

I've started my ME-410, cut off some parts and painted the cockpit interior with rlm66. I ordered the eduard color kit for this model and hope it gets here soon so I can get moving on it! I'm still deciding whether I will build the version with rockets under wing or the 30mm gun pod underneath. I would like to build the one with the rockets but I would like to find some decals for one that has a little bit of color on it or maybe some spirals on the spinners. The decals provided are for a rather bland looking plane. (Not that I expect all warplanes to be decked out like Nigel's Spotted Cow build)
SGTJKJ
#041
_VISITCOMMUNITY
Kobenhavn, Denmark
Joined: July 20, 2006
KitMaker: 10,069 posts
AeroScale: 3,788 posts
Posted: Saturday, March 08, 2008 - 06:26 AM UTC
Cool clips. Quite risky - especially since I know the down draft from these rotors. Keep it steady and do not miss the opening when speeding towards the ramp

Thanks for sharing the clips
jaypee
_VISITCOMMUNITY
Scotland, United Kingdom
Joined: February 07, 2008
KitMaker: 1,699 posts
AeroScale: 1,384 posts
Posted: Sunday, March 09, 2008 - 12:02 PM UTC
Didn't get much done this weekend in terms of building, but worked on the Do-17 for a few hours Sunday evening. Detailed the cockpit, opened a hole in the fuselage for the obs window, and closed up the fuselage, no pictures, maybe tomorrow, time for sleep now. Once the wings go on it'll start looking like progress is being made.

Was the first time I've used PE. The instrument panel looks really nice, and the printed seatbelts are really detailed. Looks good under a magnifier, but you probably wont see anything under the canopy. Ach well, I know it is in there and the parts came with the kit. Let me ask this though, is using printed PE parts cheating? It feels like cheating.
Yeti123
_VISITCOMMUNITY
Michigan, United States
Joined: February 11, 2008
KitMaker: 311 posts
AeroScale: 278 posts
Posted: Sunday, March 09, 2008 - 02:15 PM UTC
Some say its cheating. I use them because I could never get the same effect with my own ham-fisted painting style. Anything to help me actually finish a project is a good thing, so they must be ok
magnusf
_VISITCOMMUNITY
Stockholm, Sweden
Joined: May 02, 2006
KitMaker: 1,953 posts
AeroScale: 1,902 posts
Posted: Monday, March 10, 2008 - 03:19 AM UTC
Hello friends!

No plastic progress but at least some electronic one: I have started my Br 693 blog

No, using pre-printed photoetch isn't cheating, it is modern and means going with the times! 30 years ago people thought the same about airbrushes (well, that is a tool, that is different but anyway...), 20 years ago it was etch, 10 years ago it was resin... Go on and use it if you like it!

:-H

Magnus
SGTJKJ
#041
_VISITCOMMUNITY
Kobenhavn, Denmark
Joined: July 20, 2006
KitMaker: 10,069 posts
AeroScale: 3,788 posts
Posted: Monday, March 10, 2008 - 03:53 AM UTC
Prepainted PE is definently not cheating in my opinion. I use it, but only when it is already included in the kit.
vanize
_VISITCOMMUNITY
Texas, United States
Joined: January 30, 2006
KitMaker: 1,954 posts
AeroScale: 1,163 posts
Posted: Monday, March 10, 2008 - 04:02 AM UTC

Quoted Text

Prepainted PE is definently not cheating in my opinion. I use it, but only when it is already included in the kit.


As I see things, it is not cheating any more than using decals for instruments really, which is not at all (in my opinion).

jaypee
_VISITCOMMUNITY
Scotland, United Kingdom
Joined: February 07, 2008
KitMaker: 1,699 posts
AeroScale: 1,384 posts
Posted: Monday, March 10, 2008 - 09:05 PM UTC
Fair enough, since my guilt from using artificial aids (heavens no, will I end up as a scratch builder?) is assuaged, here are some pictures of the cockpit with the fuselage halves closed. The "reading the seams" thread in the beginners section of the forums is a great education as to how cement is actually supposed to work as opposed to how I've been using it.

Spent an hour or so last night cleaning up the the seams on the fuselage and engines, then fitted the wings.
No locater pins on the fuselage or the wings but after lots of test fitting it went together very nicely. Will need a little filler around the wings but otherwise looks passable. Far easier than the old sb6 and i-153 kits I've made recently, they had massive steps.

Next, clean up the wings fit the canopies and apply masking to all that glass, hmmm wonder if there are commercial masks for this? oh yes! eduard do one. Ooh and Extratech do PE flaps too. Tempting... need to find a site that does both, or maybe the local shop might piggyback them on their next order.

img_1303.jpg
img_1307.jpg
img_1312.jpg

CaptainA
_VISITCOMMUNITY
Indiana, United States
Joined: May 14, 2007
KitMaker: 3,117 posts
AeroScale: 2,270 posts
Posted: Wednesday, March 12, 2008 - 10:42 AM UTC
I have seen the cheating comment pop up a few times. I am very sincere in my belief that using PE is not cheating. It is not much different than a decal as stated, but actually harder to do right. So, if it is harder to use, more expensive, and yields better results than decals-How can it be cheating? The goal is to obtain the best possible results on a build. To this end, we purchase the best kit available, AM accessories, scratchbuild, cast resin parts, acquire bucket loads of paint, boxes full of decals, and a library full of references. After all this effort, how can somebody say it is cheating to use a particular type of prepainted PE. To make it clear, cheating is what I do on a golf course, not at the work bench.

Magnus)- I look forward to watching this build. It should be very well researched.

JP)- Nice progress.

Remember, cheating is highly encouraged if the results are good.
betheyn
Staff MemberSenior Editor
AEROSCALE
#019
_VISITCOMMUNITY
England - South East, United Kingdom
Joined: October 14, 2004
KitMaker: 4,560 posts
AeroScale: 2,225 posts
Posted: Wednesday, March 12, 2008 - 10:57 AM UTC
I have started a build thread for my Beaufighter here .
Great progress everyone.
As for cheating, the way I see it is if you have to glue it, it can't be cheating .
Andy
mj
_VISITCOMMUNITY
Illinois, United States
Joined: March 16, 2002
KitMaker: 1,331 posts
AeroScale: 325 posts
Posted: Saturday, March 15, 2008 - 05:18 AM UTC
Hello all. Just a quick progress pic of my Lorna. This is a FineMolds 1/72 kit. The detail in the cockpit is better than I have seen in other similar scale kits, and given the rather large canopy area, a good thing. My skills in this area need serious upgrades, but for some of you out there, this cockpit would be something you can really go to town on. The fit has been very good throughout, except for a little problem with the right wing root not matching up quite right. Easily fixed if you are paying attention, which I was not 
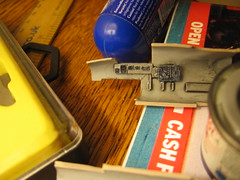
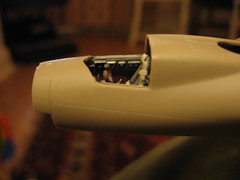
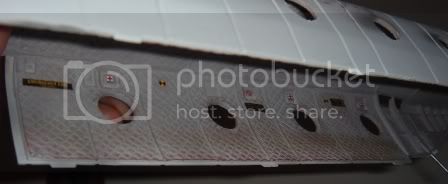
. Oh well, pics shot from the other side will look outstanding . This was taken just after I finished masking off the canopy and nose. And yes, I still have one or two fingers with complete fingerprint data...man that is work!


So, things are moving along. Next up is masking off the wheel wells and engines, and we may be ready to fire up the airbrush.

Cheers,
Mike

gbyrnsie
_VISITCOMMUNITY
Canada
Joined: July 12, 2006
KitMaker: 770 posts
AeroScale: 22 posts
Posted: Saturday, March 15, 2008 - 02:41 PM UTC
Here's some progress on my "Dirty Dora" B-25. The two halves are now together.


GB
CMOT70
_VISITCOMMUNITY
Victoria, Australia
Joined: August 23, 2007
KitMaker: 629 posts
AeroScale: 539 posts
Posted: Saturday, March 15, 2008 - 04:17 PM UTC
Not as much modelling time for as usual just now, but i've got the basic airframe together on the Heinkel He115. Very easy to put together kit, fit is just perfect so far. And the heavy handed Matchbox surface detail isn't all that noticeable under the primer coat. I think simply not emphasing the scribed lines as much as usual will work our OK.

Pretty much no interior detail, but the clear parts are so thick you can't see anything anyway. Plus i'll be ussing the supplied aircrew- something that Matchbox always was good at in my opinion.

After assembling the floats i then read the intructions and realised i forgot to put weight in the front of them, so now i'm going to have to think of a way of putting it in the fuselage instead...read the intructions BEFORE assembling, must remember that one in future.


Andrew

betheyn
Staff MemberSenior Editor
AEROSCALE
#019
_VISITCOMMUNITY
England - South East, United Kingdom
Joined: October 14, 2004
KitMaker: 4,560 posts
AeroScale: 2,225 posts
Posted: Sunday, March 16, 2008 - 01:14 AM UTC
Gary, is that the Accurate Miniatures B-25 your building. A lovely kit and the interior looks great. I started mine years ago then ran into trouble after i broke the front landing gear leg, been in the box since then.
My Tamiya 1/48th Bristol Beaufighter Mk VI is finished.
A superb kit that just falls together. I am definitely getting another one of these as I want to build a nightfighter version.
I have uploaded the pic in the campaign gallery and put some more pics on my build blog here .
Andy
SGTJKJ
#041
_VISITCOMMUNITY
Kobenhavn, Denmark
Joined: July 20, 2006
KitMaker: 10,069 posts
AeroScale: 3,788 posts
Posted: Sunday, March 16, 2008 - 09:15 PM UTC
Andy, excellent build. You are surely a fast builder.

A small update on my Chinook. I have now definently decided to go for the Falklands war version. British Grey and green camouflage over black undersides were too good to be missed

The interior is completed. Not much of it will be seen on the finished model, but there are still some nice detail there. I gave the cargo compartment a heavy wash and added some pastels to the floor and lower sides of the walls. Moving troops and cargo around the Falklands were a dirty job I suspect 
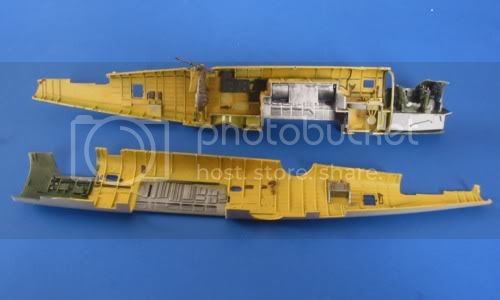
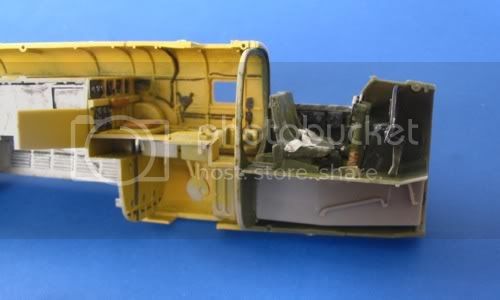
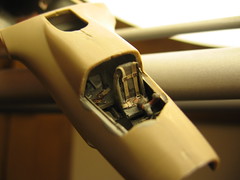
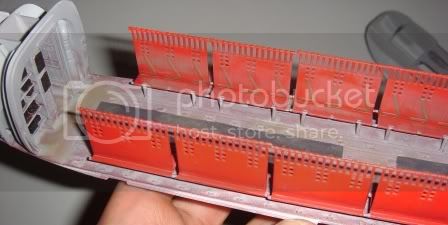
The Italeri instructions are contradictory to the reference pictures in the small "walk around" booklet included in the kit. The seats, walls, etc have different colours in the booklet compared to what the instructions suggest. A bit confusing.
For some reason the wash looks very red in the pictures. In reality it is dark brown. Maybe it is the flash 
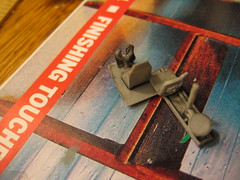
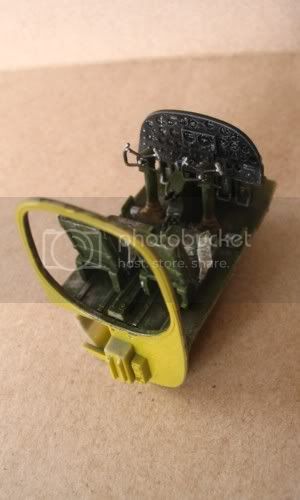
The contrasts between the colurs also seem extremely sharp, which is probably also due to the flash. This is turning into an episode of: "if you cannot build nice models just blame the flash" The finished model will be photographed in daylight.
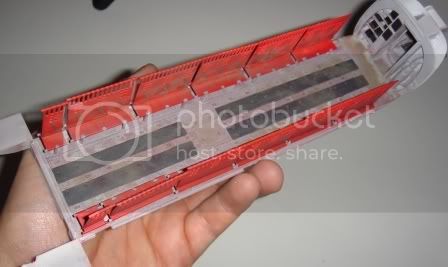
The cockpit is rather basic and I feel Italeri could have done a little more here. I added the decal seatbelts, but kind of regret that now. They do not look that well.

More to follow later.....


Holdfast
Staff MemberPresident
IPMS-UK KITMAKER BRANCH
#056
_VISITCOMMUNITY
England - South West, United Kingdom
Joined: September 30, 2002
KitMaker: 8,581 posts
AeroScale: 4,913 posts
Posted: Monday, March 17, 2008 - 08:20 AM UTC
I have just signed up for this campaign, not sure why because I have a very bad record for finishing them. However I plan on building the Promodeller 1/48 Do 217E-5, pics soon

Mal