Hi Jesper
I have 2 or 3 options, but I guess I will go for the Groth c&m in the kit ...
The pit could have been slightly better, but I lost one or two etched parts... and I want to close it up. I will know tomorrow if i can make it, because I need 2 days for C&M .. at least. Hope I can try to fit the engine nacelles before the start of THE game ..
cheers
Steffen
Air Campaigns
Want to start or join a group build? This is where to start.
Want to start or join a group build? This is where to start.
Hosted by Frederick Boucher, Michael Satin
Twin Spinner Approved
Posted: Thursday, June 19, 2008 - 05:53 AM UTC

Emeritus

Joined: March 30, 2004
KitMaker: 2,845 posts
AeroScale: 1,564 posts

Posted: Thursday, June 19, 2008 - 05:56 AM UTC
Looking good indeed! 
But four days left? Isn't the campaign deadline the 30th?
If the campaign truly is ending in 4 days, then I have absolutely no chances of getting my Blenheim done. In fact, I'm already now considering asking about the possibility of getting an extension to the deadline...

But four days left? Isn't the campaign deadline the 30th?
If the campaign truly is ending in 4 days, then I have absolutely no chances of getting my Blenheim done. In fact, I'm already now considering asking about the possibility of getting an extension to the deadline...

Posted: Thursday, June 19, 2008 - 06:28 AM UTC
Hi Eetu
don't panic ... 4 days for me ...
cheers
Steffen
don't panic ... 4 days for me ...
cheers
Steffen
AIRGUNNER

Joined: September 27, 2006
KitMaker: 246 posts
AeroScale: 234 posts

Posted: Thursday, June 19, 2008 - 07:41 AM UTC
Hi Steffen,
110 is looking good so far, cockpit looks really cool. Are you fitting AM slats and elevators or are you using modified kit parts. Can't wait to see the outcome.
Steve
PS. Come on Germany, dump the Portugese!! Damn, never though 'd hear myself say that..
110 is looking good so far, cockpit looks really cool. Are you fitting AM slats and elevators or are you using modified kit parts. Can't wait to see the outcome.
Steve
PS. Come on Germany, dump the Portugese!! Damn, never though 'd hear myself say that..
Posted: Thursday, June 19, 2008 - 07:48 AM UTC
Hi Steve
Many thanks! (also for the PS )
)
I will use the kit parts .. I am not aware of any AM parts yet. Only AM Stuff will be the Quickboost exhaust stacks .. wish I had bought the rear gunners ammo drums too
off to the TV
cheers
Steffen
Many thanks! (also for the PS
 )
)I will use the kit parts .. I am not aware of any AM parts yet. Only AM Stuff will be the Quickboost exhaust stacks .. wish I had bought the rear gunners ammo drums too
off to the TV
cheers
Steffen

AIRGUNNER

Joined: September 27, 2006
KitMaker: 246 posts
AeroScale: 234 posts

Posted: Thursday, June 19, 2008 - 09:41 AM UTC
Hi Steffen,
Well, there you go, the right result for you
What ammo drums are you referring to, I thought the ones in the kit were included. I have the 110C and intend to get going on it as soon as my Do17 is done. I want to get a few more bits for it as I want it to look as good as possible.
Steve
Well, there you go, the right result for you

What ammo drums are you referring to, I thought the ones in the kit were included. I have the 110C and intend to get going on it as soon as my Do17 is done. I want to get a few more bits for it as I want it to look as good as possible.
Steve
Posted: Thursday, June 19, 2008 - 09:51 AM UTC
Hi Steve
YESSS, great match!!
I mean these:

this is a 20+ parts assembly in the kit and you see almost nothing of it ... need one of those Do 17 too ..
cheers


Steffen
YESSS, great match!!
I mean these:

this is a 20+ parts assembly in the kit and you see almost nothing of it ... need one of those Do 17 too ..
cheers


Steffen

AIRGUNNER

Joined: September 27, 2006
KitMaker: 246 posts
AeroScale: 234 posts

Posted: Thursday, June 19, 2008 - 10:32 PM UTC
Hi Steffen,
I checked those out on the Hannants website last night, I also saw the exhaust set. They are much better than the kit items, and, as I am going to Hendon tomorrow, I have ordered a set of each and I will collect then. Hopefully the 17 will be done today, so I can get stuck into the 110. The Classic Airframes Do17 is a great kit, a few fit issues around the cockpit tub and rear wing to fuselage area, but great detail and superb molding more than makes up for it. I think it is a must have for any early Luftwaffe bomber fan.
Steve
Posted: Friday, June 20, 2008 - 02:01 AM UTC
Hi All
a small building update.
1. glued the nacelles using Uhu acrylit plus and some clamps to avoid a step between the wing and the engine covers .. worked out quite well.
2. slat areas were filled with Magic Sculp (a two part modelling clay) to add strength to the wing (I already had glue a piece of sprue when assembling the wing)
3. rudimentary glued in the nose MG and mounts and added the cover. All fit well, but I have a small step to the upper fuselage .. guess I sanded it a little too much.
4. mounted the MG drums in the rear pit, but I left off the etched parts .. it was just not worth the hassle .. for my Bf 110 E I will buy the quickboost parts
5. rudders and elevators are glued on, but need a little rework.


cheers
Steffen
a small building update.
1. glued the nacelles using Uhu acrylit plus and some clamps to avoid a step between the wing and the engine covers .. worked out quite well.
2. slat areas were filled with Magic Sculp (a two part modelling clay) to add strength to the wing (I already had glue a piece of sprue when assembling the wing)
3. rudimentary glued in the nose MG and mounts and added the cover. All fit well, but I have a small step to the upper fuselage .. guess I sanded it a little too much.
4. mounted the MG drums in the rear pit, but I left off the etched parts .. it was just not worth the hassle .. for my Bf 110 E I will buy the quickboost parts
5. rudders and elevators are glued on, but need a little rework.


cheers
Steffen
CaptainA

Joined: May 14, 2007
KitMaker: 3,117 posts
AeroScale: 2,270 posts

Posted: Monday, June 23, 2008 - 12:09 PM UTC
Steffan)- Looking great. I really hope you get to finish this campaign.
For anybody else out there)- These Eduard Me 110 series kits are fantastic.
For anybody else out there)- These Eduard Me 110 series kits are fantastic.
Posted: Monday, June 23, 2008 - 12:23 PM UTC
Hi Carl
Well, I tried, but I won't make it in time. The canopy is 80% masked the underside is RLM 65 blue .. but tomorrow is my last day (I will be away for a week starting on wednesday). If everything goes well I can lay the 70/71 camo on, but there is no way to do all the decals, clear layers and weathering tomorrow .. too bad. I will post some pix tomorrow (its 0122 local)
go(o)d speed to all others
cheers
Steffen
Well, I tried, but I won't make it in time. The canopy is 80% masked the underside is RLM 65 blue .. but tomorrow is my last day (I will be away for a week starting on wednesday). If everything goes well I can lay the 70/71 camo on, but there is no way to do all the decals, clear layers and weathering tomorrow .. too bad. I will post some pix tomorrow (its 0122 local)
go(o)d speed
 to all others
cheers
Steffen
Posted: Monday, June 23, 2008 - 06:18 PM UTC
Hi all!
I noticed this Campaign is only 4 months long. Couldn't it be possible to extend it to July 30th instead of June 30th? This would give more time to Steffen and the others and also allow me to enter a 1/48 scale Siebel Si 204 I'm currently working on...
Jean-Luc
I noticed this Campaign is only 4 months long. Couldn't it be possible to extend it to July 30th instead of June 30th? This would give more time to Steffen and the others and also allow me to enter a 1/48 scale Siebel Si 204 I'm currently working on...

Jean-Luc

Posted: Monday, June 23, 2008 - 09:48 PM UTC
Hi All
another building update.
1. added several small touch ups: seat belts rear MG and some other parts in the cockpit
2. trim tabs cut in with a razor saw and bent down with pliers
3. had to re-enforce the wing to fuselage joint, one uc leg went loose (its kind of a flimsy construction) and had to be fixed .. all with CA
4. Antennas added .. front MG re-bent several times


5. underside sprayed RLM 65
6. cockpit masks added (what a work)


cheers
Steffen
another building update.
1. added several small touch ups: seat belts rear MG and some other parts in the cockpit
2. trim tabs cut in with a razor saw and bent down with pliers
3. had to re-enforce the wing to fuselage joint, one uc leg went loose (its kind of a flimsy construction) and had to be fixed .. all with CA
4. Antennas added .. front MG re-bent several times


5. underside sprayed RLM 65
6. cockpit masks added (what a work)


cheers
Steffen

Emeritus

Joined: March 30, 2004
KitMaker: 2,845 posts
AeroScale: 1,564 posts

Posted: Monday, June 23, 2008 - 10:58 PM UTC
Coming along nicely, Steffen. 
Sorry to hear you're running out of time. In fact, so am I. Even though I've got until the official end of the campaign, I'm far behind you in progress; I haven't been able to even start painting. I think it's that I've underestimated that limited-run kit, I'm lazy, or both.
I second Jean-Luc, an extension to the campaign time would really hit the spot.

Oh, the landing gear needing to the scratch-built, cockpit and engine details to be added, the fit of the glasshouse canopy...

Sorry to hear you're running out of time. In fact, so am I. Even though I've got until the official end of the campaign, I'm far behind you in progress; I haven't been able to even start painting. I think it's that I've underestimated that limited-run kit, I'm lazy, or both.

I second Jean-Luc, an extension to the campaign time would really hit the spot.

Oh, the landing gear needing to the scratch-built, cockpit and engine details to be added, the fit of the glasshouse canopy...

vanize

Joined: January 30, 2006
KitMaker: 1,954 posts
AeroScale: 1,163 posts

Posted: Tuesday, June 24, 2008 - 07:32 AM UTC
Quoted Text
I second Jean-Luc, an extension to the campaign time would really hit the spot.
[IMG]
uhm... I THIRD the motion (if that is possible)!
CaptainA

Joined: May 14, 2007
KitMaker: 3,117 posts
AeroScale: 2,270 posts

Posted: Tuesday, June 24, 2008 - 08:19 AM UTC
Quoted Text
Hi all!
I noticed this Campaign is only 4 months long. Couldn't it be possible to extend it to July 30th instead of June 30th? This would give more time to Steffen and the others and also allow me to enter a 1/48 scale Siebel Si 204 I'm currently working on...
Jean-Luc
That is fine with me. Will the Campaign Gurus please extend it.
Victor

Joined: July 27, 2006
KitMaker: 32 posts
AeroScale: 24 posts

Posted: Tuesday, June 24, 2008 - 10:03 AM UTC
Hi All,
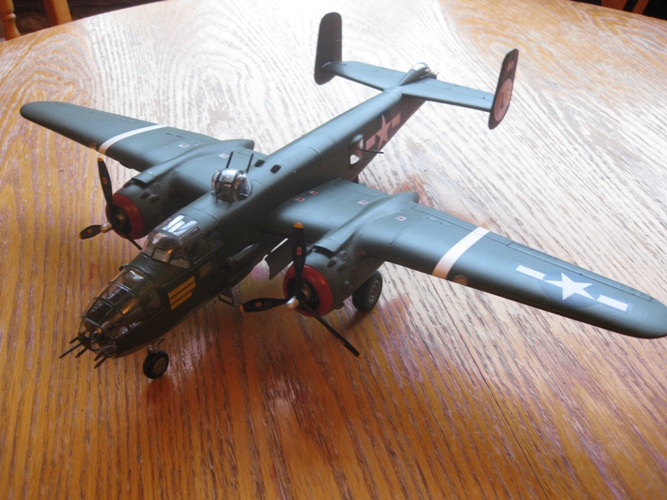
Well my B-25J Mitchell is done, I've posted 3 pictures in the campaign gallery one of which is below. This is only the 4th Model I've done so any contructive comments would be welcomed.
Victor.
Well my B-25J Mitchell is done, I've posted 3 pictures in the campaign gallery one of which is below. This is only the 4th Model I've done so any contructive comments would be welcomed.

Victor.
vanize

Joined: January 30, 2006
KitMaker: 1,954 posts
AeroScale: 1,163 posts

Posted: Tuesday, June 24, 2008 - 10:45 AM UTC
Quoted Text
Hi All,
Well my B-25J Mitchell is done, I've posted 3 pictures in the campaign gallery one of which is below. This is only the 4th Model I've done so any contructive comments would be welcomed.
looks pretty darned good to me. factory fresh maybe, but that never bothered me.
Victor

Joined: July 27, 2006
KitMaker: 32 posts
AeroScale: 24 posts

Posted: Tuesday, June 24, 2008 - 11:17 AM UTC
Thanks Vance,
You're right, i think I need to start working on some weathering skills for future builds.
Victor.
You're right, i think I need to start working on some weathering skills for future builds.
Victor.

vanize

Joined: January 30, 2006
KitMaker: 1,954 posts
AeroScale: 1,163 posts

Posted: Tuesday, June 24, 2008 - 04:08 PM UTC
Quoted Text
Thanks Vance,
You're right, i think I need to start working on some weathering skills for future builds.
Victor.
just remember that a little bit of weathering goes a long way! It is easy to get carried away with it. better to not weather than to overdo it as far as i am concerned.
Posted: Tuesday, June 24, 2008 - 08:08 PM UTC
Victor
Sweet looking model, like the factory fresh finish, it takes a big leap of faith to start doing the weathering, especially when you're happy with the finished model.
my constructive criticism is to do with the photography, rather than the model. the reflected shine on the table is quite off putting. when i take finished shots of models i try to do it in natural light, but not direct. In your case, if you put a sheet of tracing paper over the window it would diffuse the light and reduce the shine. A lot of people, Myself included, also use a sheet of blue card/paper (from an art shop, i use kingfisher blue) as a background to help with the colour balance, and draw attention to the model. Have a look in my gallery and you'll see what i mean (not that i'm the worlds best photographer)
Hope these tips help you with that side of things, no criticism of the model from me.
Cheers
Andy
Posted: Tuesday, June 24, 2008 - 09:54 PM UTC
Really nice model, Victor. As the others I cannot really come with any criticism.
Model on!
Model on!

Posted: Wednesday, June 25, 2008 - 12:29 AM UTC
Quoted Text
Will the Campaign Gurus please extend it.
Hi all!
I will ask Chuck (CRS) to extend the Campaign until July 30th.
Here are some pictures of the kit I will enter. It is MPM's old vacuform Siebel Si204...
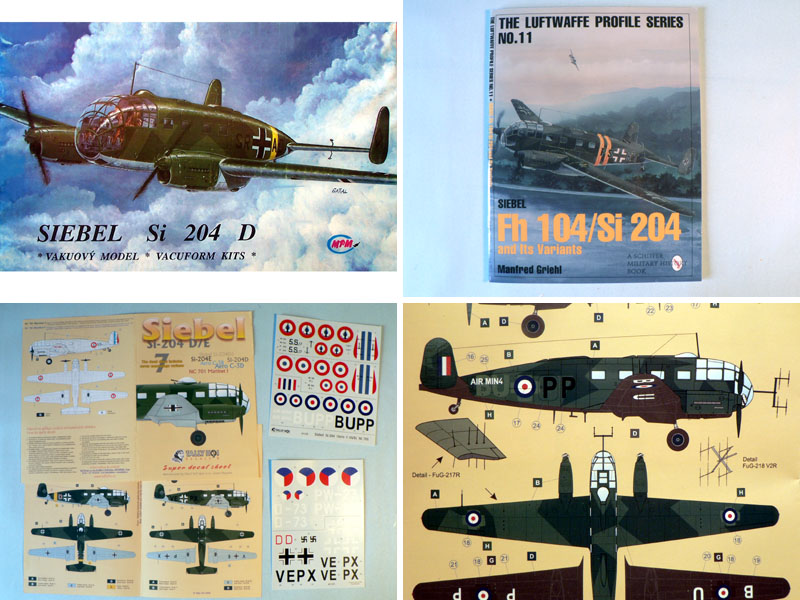
I didn't found tons of references on the web so I purchased a copy of M. Griehl's book. It will be very usefull as the instructions are rather vague in some places. I also managed to find replacement decals from Tally Ho! (ref. 48025). I will do a captured Siebel in RAF Air Ministry markings...
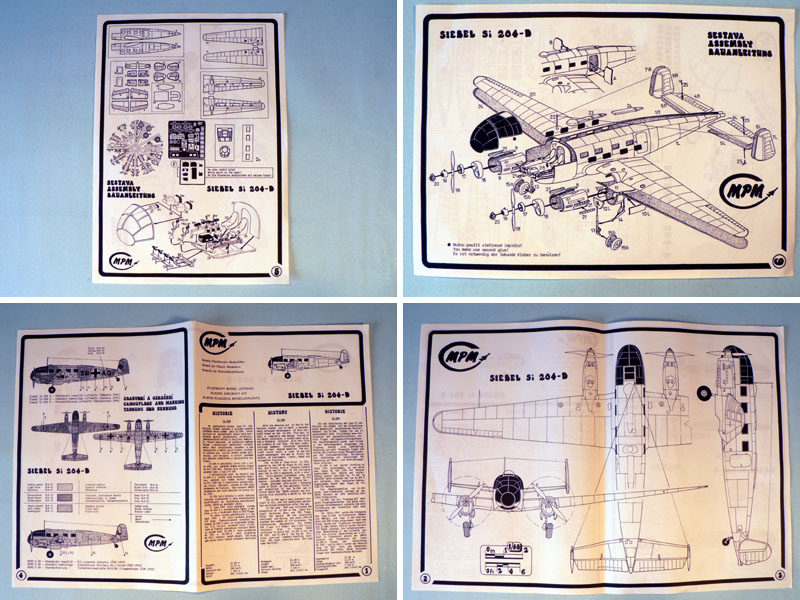
So far I've cut the vacuform parts using a strong knife. You can also notice the detail parts made from plastic and the two piece vacuform front section. The PE fret is mainly composed of parts for the cockpit...
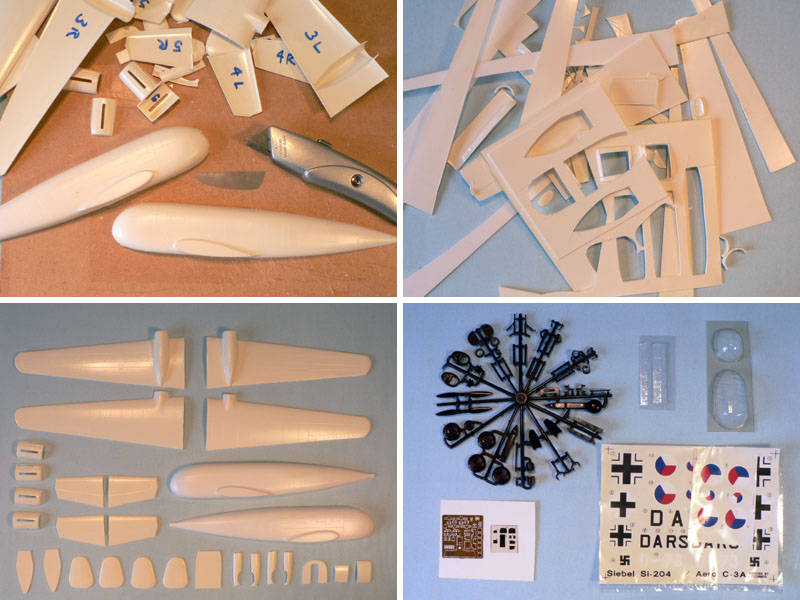
More to follow soon...
Jean-Luc

Victor

Joined: July 27, 2006
KitMaker: 32 posts
AeroScale: 24 posts

Posted: Wednesday, June 25, 2008 - 01:57 AM UTC
Thanks for all the feedback Guys.
I'll work on the Photography tips thanks Andy. It's very different trying to photograph a small inanimate object well, Compared to the Kids on Holiday, another new skill to be learned.
Thanks again,
Victor
I'll work on the Photography tips thanks Andy. It's very different trying to photograph a small inanimate object well, Compared to the Kids on Holiday, another new skill to be learned.
Thanks again,
Victor

AirLedge

Joined: July 26, 2007
KitMaker: 292 posts
AeroScale: 265 posts

Posted: Wednesday, June 25, 2008 - 04:14 AM UTC
The B-25 looks great Victor, well done 

 |


