

..wrong Wagner I'm afraid.....
Jesper's Wagner was Gefreiter Walter Wagner ...and unfortunately he was a very 'green' airman with not a single victory, as far as I can establish...he had joined II./JG 4 during the summer of 1944 when this Gruppe was being established as a Sturm unit under von Kornatzki. His previous unit was I./ZG1 flying Ju 88s on anti-shipping & U-Boot escort sorties from Brest & Lorient on the French Atlantic coast....(info from Eric Mombeek's two volume German language history of JG 4)
Air Campaigns
Want to start or join a group build? This is where to start.
Want to start or join a group build? This is where to start.
Hosted by Frederick Boucher, Michael Satin
Official "Aces High" Campaign Thread

FalkeEins

Joined: March 07, 2005
KitMaker: 868 posts
AeroScale: 690 posts
Posted: Friday, May 23, 2008 - 08:34 PM UTC
SGTJKJ

#041

Joined: July 20, 2006
KitMaker: 10,069 posts
AeroScale: 3,788 posts

Posted: Saturday, May 24, 2008 - 01:43 AM UTC
Thanks for the info, Eetu and Neil. Very nice of you to help me out.
I guess I will have to make "White 11" for some other campaign. Maybe for the upcoiming"Battle for Europe" campaign.
Anyway, I will have to go for Bar's 200th victory "red 23" aircraft.
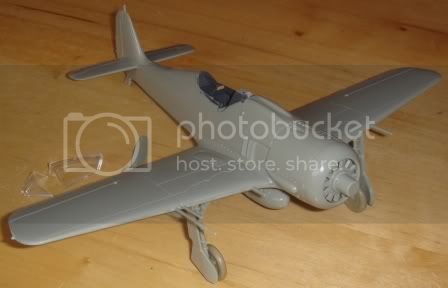
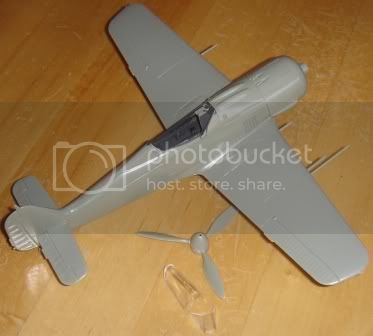
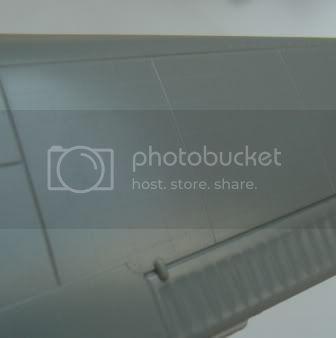
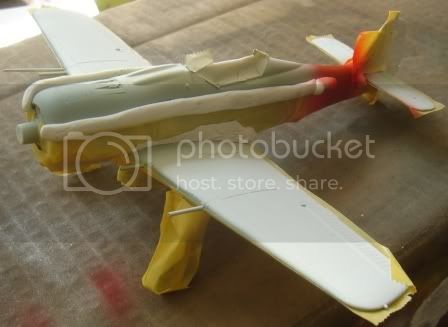
Here is my FW 190 A7 with basic construction finished. It is a very basic kit - especially the cockpit and the wheel bays. I can live with that as this kit is a nice warm up for Eduards FW 190s in my stash. The exterior of the kit is actually surprisingly good. Very nice surfaces of the fuselage and wings with nice fine rivets. I have tried to show it in one of the below pictures, but might be difficult to see.
I have exchanged the wheels in the kit with a set of wheels from Eduard's FW 190. This is easy as there are four sets included in the kit.
More to follow...
I guess I will have to make "White 11" for some other campaign. Maybe for the upcoiming"Battle for Europe" campaign.
Anyway, I will have to go for Bar's 200th victory "red 23" aircraft.
Here is my FW 190 A7 with basic construction finished. It is a very basic kit - especially the cockpit and the wheel bays. I can live with that as this kit is a nice warm up for Eduards FW 190s in my stash. The exterior of the kit is actually surprisingly good. Very nice surfaces of the fuselage and wings with nice fine rivets. I have tried to show it in one of the below pictures, but might be difficult to see.
I have exchanged the wheels in the kit with a set of wheels from Eduard's FW 190. This is easy as there are four sets included in the kit.
More to follow...

SGTJKJ
#041
Joined: July 20, 2006
KitMaker: 10,069 posts
AeroScale: 3,788 posts
Posted: Sunday, May 25, 2008 - 07:37 PM UTC
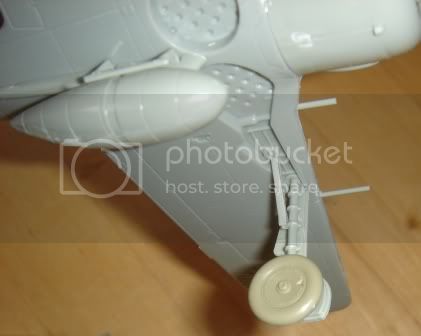
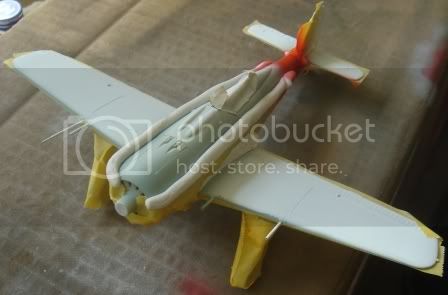
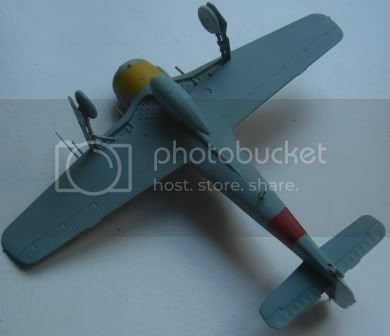
A little more progress over the weekend on my FW 190 A7. I still need to correct a few oversprays and some details I missed before painting, but progress is good.
I will now for certain go for Heinz Bars "Red 23" or "Red 13". I have a good colour plate of "Red 13" so I used that for my painting. "Red 13" has almost no mottling on the sides of the fuselage and a very straight demarkation line on the sides of the fuselage. Therefore I went with a combination of masking tape and rolled modelling clay.
More to follow.....
Is that a sausage on your aircraft or are you just happy to see me

magnusf

Joined: May 02, 2006
KitMaker: 1,953 posts
AeroScale: 1,902 posts
Posted: Monday, May 26, 2008 - 09:27 AM UTC
Great progress all, and some very nice finished entries!
I have run into trouble, only because of my own lack of planning... I will have to ask you fellow campaigners to decide if the following is acceptable:
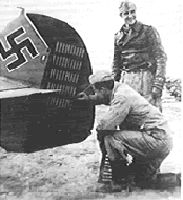
I have only one photo of the aircraft I am building and that photo only shows a small part of it. This is what I have:

I suspect there are more out there somewhere since this aircraft is included both in the Fine Molds boxing and in Aeromaster's "Luftwaffe Top Guns" sheet but I have none in my quite substantial 109-library. What do you think, is this OK?
A bit more progress, detail painting has started:

The build blog
MoM May is the goal!

Magnus
I have run into trouble, only because of my own lack of planning... I will have to ask you fellow campaigners to decide if the following is acceptable:
I have only one photo of the aircraft I am building and that photo only shows a small part of it. This is what I have:
I suspect there are more out there somewhere since this aircraft is included both in the Fine Molds boxing and in Aeromaster's "Luftwaffe Top Guns" sheet but I have none in my quite substantial 109-library. What do you think, is this OK?
A bit more progress, detail painting has started:
The build blog
MoM May is the goal!
Magnus

lampie
#029

Joined: December 23, 2005
KitMaker: 6,249 posts
AeroScale: 3,270 posts

Posted: Monday, May 26, 2008 - 06:24 PM UTC
Hi all.
Quick check in from the road!
All looking good, I wish I had got more done on my own entry!
Magnus, thats perfectly acceptable sir! Upload your photos into the gallery if you havent already done so please.
Another Ace and a fantastic job on that camo scheme
Nige
Quick check in from the road!
All looking good, I wish I had got more done on my own entry!
Magnus, thats perfectly acceptable sir! Upload your photos into the gallery if you havent already done so please.
Another Ace and a fantastic job on that camo scheme
Nige

magnusf
Joined: May 02, 2006
KitMaker: 1,953 posts
AeroScale: 1,902 posts
Posted: Monday, May 26, 2008 - 06:32 PM UTC
Quoted Text
Hi all.
Quick check in from the road!
All looking good, I wish I had got more done on my own entry!
Magnus, thats perfectly acceptable sir! Upload your photos into the gallery if you havent already done so please.
Another Ace and a fantastic job on that camo scheme
Nige
Not so fast Nige, it has to get a prop first to be able to take-off
I'll do the finishing touches the next few evenings. Thanks to both you Nigel and the rest of you who have commented on the camo!
Magnus

Littorio
Joined: September 15, 2004
KitMaker: 4,728 posts
AeroScale: 1,351 posts

Posted: Tuesday, May 27, 2008 - 09:33 AM UTC
Well its about time I started on my build but first its been great looking at all the beautiful finished aircraft for this campaign.
OK on to my build (s)
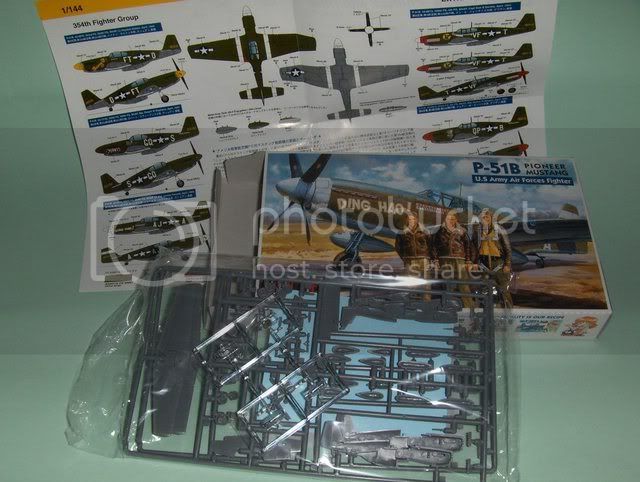
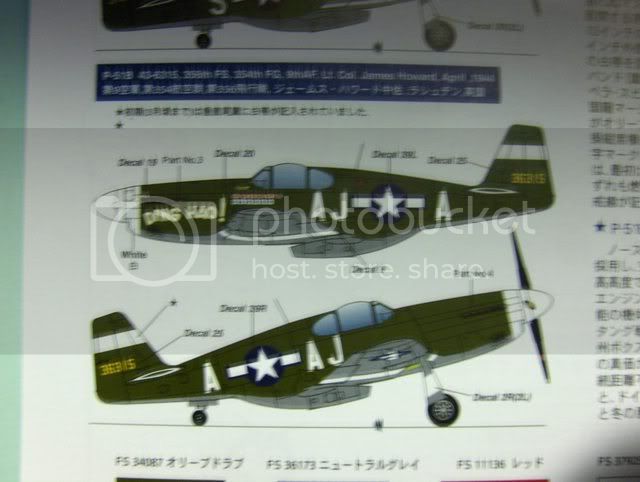
First will be a P-51B 'Ding Hao!' as flown by Lt. Col. James Howard of the 356FS, 354FG 9th AF.

Second will be P-51B of Capt Don S. Gentile of 336FS, 4FG 8th AF.

The kits are from Sweet in 1/144, pictures to follow.
Ciao
Luciano
OK on to my build (s)
First will be a P-51B 'Ding Hao!' as flown by Lt. Col. James Howard of the 356FS, 354FG 9th AF.
Second will be P-51B of Capt Don S. Gentile of 336FS, 4FG 8th AF.
The kits are from Sweet in 1/144, pictures to follow.
Ciao
Luciano


Apex1701

Joined: July 08, 2007
KitMaker: 38 posts
AeroScale: 30 posts
Posted: Tuesday, May 27, 2008 - 03:29 PM UTC
Bonjour jean-Luc,
Ah, nice trick. Merci.
I just get a look from time to time. I have no callsign.
Maybe someday ;-)
But since my modeling time is quite short I prefer to spend it building rather than writing.
Anyway Master194 is a fine forum.
À+
Jean
Quoted Text
I've separated the gear legs at the bottom of the oleos. Then I drilled a hole 1 mm inside the gear leg and glued the two pieces together with CA glue. This way the legs are still strong enough to hold the weight of the model.
Ah, nice trick. Merci.
Quoted Text
You visit Master194 as well? Do you have the same callsign there?
I just get a look from time to time. I have no callsign.
Maybe someday ;-)
But since my modeling time is quite short I prefer to spend it building rather than writing.
Anyway Master194 is a fine forum.
À+
Jean

magnusf
Joined: May 02, 2006
KitMaker: 1,953 posts
AeroScale: 1,902 posts
Posted: Wednesday, May 28, 2008 - 09:32 AM UTC
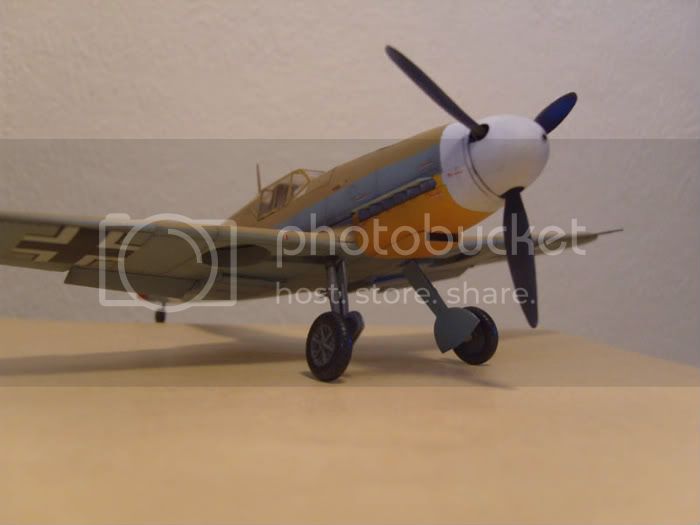
Almost there!
I will put the finishing touches to this one on Friday night, then on to the Phantom!

Magnus
I will put the finishing touches to this one on Friday night, then on to the Phantom!
Magnus
lampie
#029
Joined: December 23, 2005
KitMaker: 6,249 posts
AeroScale: 3,270 posts
Posted: Wednesday, May 28, 2008 - 10:23 AM UTC
Quoted Text
Not so fast Nige, it has to get a prop first to be able to take-off
I'll do the finishing touches the next few evenings. Thanks to both you Nigel and the rest of you who have commented on the camo!
Magnus
See,,thats what happens when I reply to threads at half past five in the morning on way out to work !!
Nige

LongKnife
Joined: April 25, 2006
KitMaker: 831 posts
AeroScale: 688 posts
Posted: Wednesday, May 28, 2008 - 06:50 PM UTC
Finally done. My third campaign, but the first finished in time.
This is supposted to be Hans-Joachim Marseilles steed from february 1942 but I will not swere on the dates since there are so many references to certain paint schemes at certain times. I stick to the facts on these two pics. He had a dark rudder once and he had a tan and blue main paint scheme.
And this is my interpretation of it. It's a lot of colours but I like it. If I had a Messerschmitt 3-wheel kabinenroller it would look just like this!
There are more things to do, and also to better, but I'm rather satisfied with this and leave the lessons for next campaign. For instance "paint won't fill gaps", "brush painted canopies stick out from sprayed fuselages", "glue solves paint" and such things.
magnusf
Joined: May 02, 2006
KitMaker: 1,953 posts
AeroScale: 1,902 posts
Posted: Wednesday, May 28, 2008 - 07:07 PM UTC
Tony!
VERY NICE! I like it all: The paint job, the colours, detail level!
There will be lots of 109s in this month's MOM I think
Magnus
VERY NICE! I like it all: The paint job, the colours, detail level!
There will be lots of 109s in this month's MOM I think
Magnus
LongKnife
Joined: April 25, 2006
KitMaker: 831 posts
AeroScale: 688 posts
Posted: Wednesday, May 28, 2008 - 07:47 PM UTC
Thanks Magnus. Never thought of MoM really, but I guess I'll have to have a go at it.
SGTJKJ
#041
Joined: July 20, 2006
KitMaker: 10,069 posts
AeroScale: 3,788 posts
Posted: Wednesday, May 28, 2008 - 08:36 PM UTC
Very nice 109, Tony.
Looks great!
Looks great!
lampie
#029
Joined: December 23, 2005
KitMaker: 6,249 posts
AeroScale: 3,270 posts
Posted: Wednesday, May 28, 2008 - 10:02 PM UTC
Very nice job Tony!
The coloured rudder certainly adds to the overall scheme.
Please upload your photos into the
ACES HIGH GALLERY
Jean Luc, could you do this as well please, and dont forget to include a photo of the real aircraft
Im slowly making progress on my own entry.
Nige
The coloured rudder certainly adds to the overall scheme.
Please upload your photos into the
ACES HIGH GALLERY
Jean Luc, could you do this as well please, and dont forget to include a photo of the real aircraft
Im slowly making progress on my own entry.
Nige

almonkey
Joined: March 23, 2003
KitMaker: 2,124 posts
AeroScale: 788 posts

Posted: Thursday, May 29, 2008 - 08:47 AM UTC
eek! errrm......is a photo of the real aircraft definitely needed?
and three guess's why i ask this question
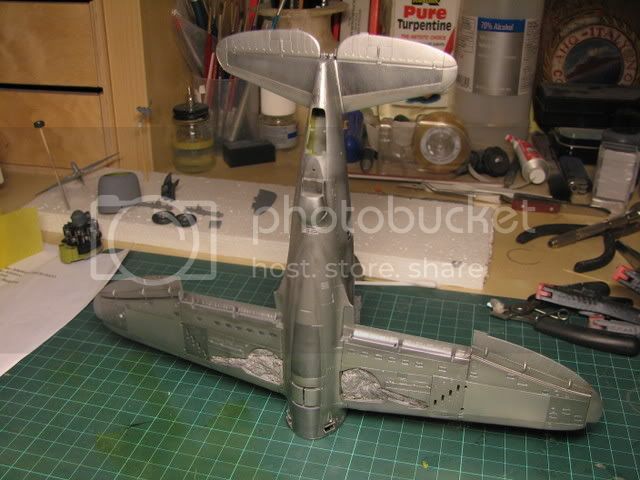
anyhoo thanks to a totally lousy bank holiday weekend i've got my tempest almost done.
i did'nt think this model would turn out too well as i was building it, but once it was painted i really started to like how its turned out-
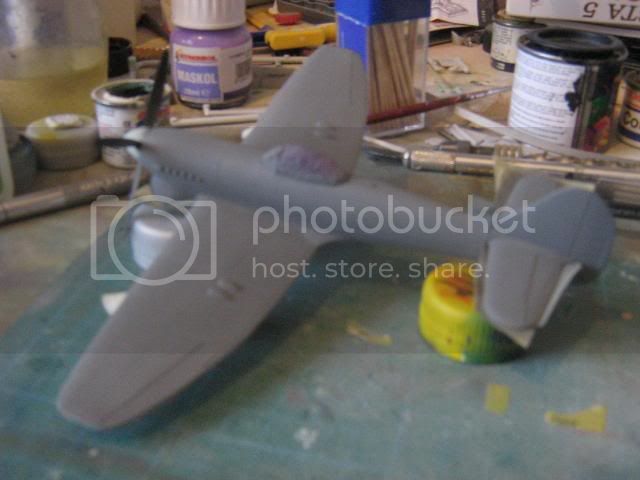
first coat of grey on the upper surfaces
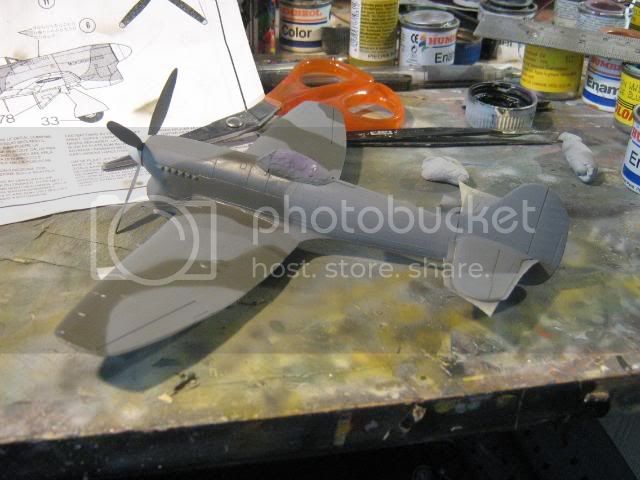
green in progress, i have been advised that humbrol 163 is a better match than the H30 the instructions tell you to use, and looking at the colour here i have to agree

on the subject of colours, i ran out of H90 and found this emergency replacement in homebase! hello to the rivit counters
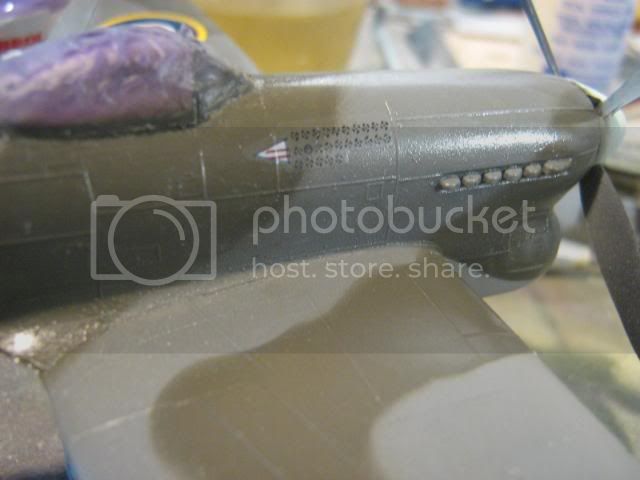
the all important bit!
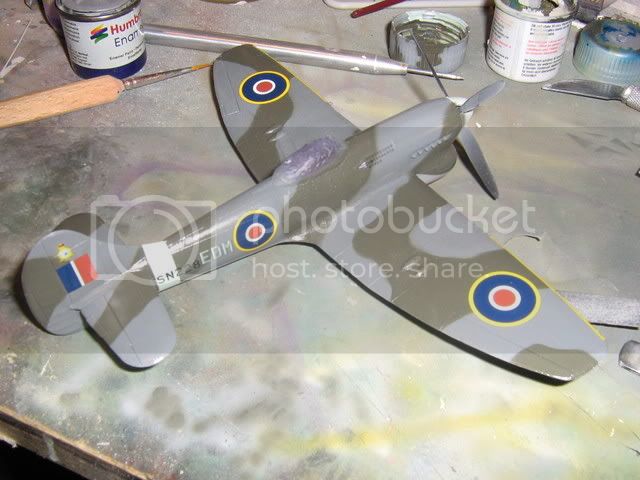
as she is now, just need to flat coat then get the wheels and aerials on. almost forgot all the national markings came from an xtradecal sheet due to the outer yellow rings on the kit decals being quite noticably off centre
and three guess's why i ask this question
anyhoo thanks to a totally lousy bank holiday weekend i've got my tempest almost done.
i did'nt think this model would turn out too well as i was building it, but once it was painted i really started to like how its turned out-
first coat of grey on the upper surfaces
green in progress, i have been advised that humbrol 163 is a better match than the H30 the instructions tell you to use, and looking at the colour here i have to agree
on the subject of colours, i ran out of H90 and found this emergency replacement in homebase! hello to the rivit counters
the all important bit!
as she is now, just need to flat coat then get the wheels and aerials on. almost forgot all the national markings came from an xtradecal sheet due to the outer yellow rings on the kit decals being quite noticably off centre


Emeritus

Joined: March 30, 2004
KitMaker: 2,845 posts
AeroScale: 1,564 posts

Posted: Thursday, May 29, 2008 - 09:08 AM UTC
Great-looking models everyone!
That Messerschmitt reminds me I have to fish out a photo of my MT-437. I think I saw one in a book. Not the most flattering, as it was of the plane after an emergency landing, but if I can't find anything else, it'll have to do.
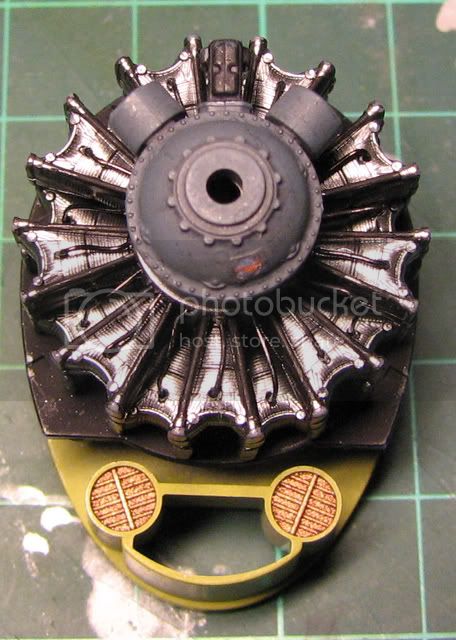
I've been making some progress on my entry, working on the cockpit mostly.
First the wheels.
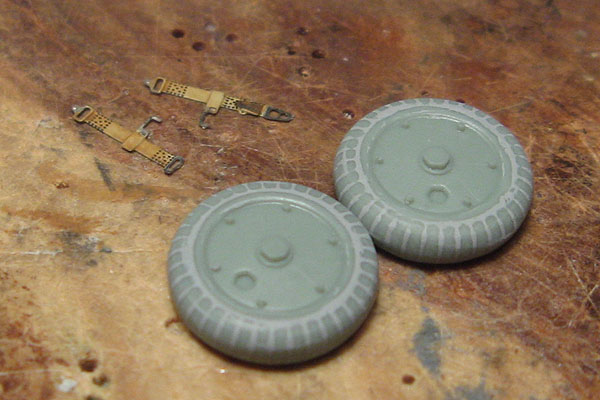
Most of the Finnish-operated G6s had smooth tires, and instead of going looking for aftermarket or swiping suitable wheels from the AML K4 in my stash, I chose to fill the tread pattern on the kit parts.
Milliput would have allowed smoothing with a wet finger, but applying the stuff was probably such a chore I chose to just slap on some mr. surfacer and sand away the excess until the filler was showing only in the recesses. This pic shows the wheels after two applications of surfacer followed by a sanding. I hope I didn't sand away the side contours of the tires too badly...
Btw, notice the seatbelts. I applied a wash to them to add some variation to the monotonic prepainted shade. The rest I treated while still in the fret.
There's not much detail to write home about in the wheel wells. Filling the open sides before joining the wing halves would have probably been a better option, but here we are. I guess I'll mix up some milliput, stuff it in there and smooth the sides. The wing roof detail looks better represented with some left-over PE.
Moving to the cockpit components, there's some pretty tiny parts here.
The gunsight mount on the instrument panel is simply a piece of styrene sheet; most likely not realistic, but more robust. I also pinned the joint with brass wire to ease assembly and painting of the gunsight. The instruments are still to receive a drop of varnish to represent the glass at this point.
With this build, I didn't varnish the prepainted instrument panel PE parts before assembly and learned that it's best done if you're planning to use superglue for assembly. Superglue apparently has the tendency to remove the prepainted finish. I think you don't need to be guessing how I know...
Fortunately, I didn't get any damage on the actual instrument sections of the parts.
In the pic there's also my new pitot-tube, made from steel wire and a hypo needle, and the modified supercharger intake. Making the opening smaller was much trickier than I thought.
"Just fill the part with milliput and drill a new hole"
Yes, in theory.
In reality, it was the third time applying putty and drilling when I got it right. First I used a too large drill and ripped off the putty. Second time I accidentally drilled a second hole in the wrong place.
The third time went well, although I didn't have the correct size drill bit for the opening, so I had to drill the hole with the largest I had (well, in that set I have, one heavy-duty drill sets has much too large bits on the other hand), then do the final shaping by hand with a knife and some sandpaper.
As the last bit for this update, here's a shot of the cockpit side walls, still in progress:
Xtracrylics' RLM66 is much too dark to go with Eduard's prepainted parts' shade, but I'll have to live with that. I did some drybrushing with a lighter shade after a black wash to tone down the paint, but it didn't help that much.
Until next time.
That Messerschmitt reminds me I have to fish out a photo of my MT-437. I think I saw one in a book. Not the most flattering, as it was of the plane after an emergency landing, but if I can't find anything else, it'll have to do.
I've been making some progress on my entry, working on the cockpit mostly.
First the wheels.
Most of the Finnish-operated G6s had smooth tires, and instead of going looking for aftermarket or swiping suitable wheels from the AML K4 in my stash, I chose to fill the tread pattern on the kit parts.
Milliput would have allowed smoothing with a wet finger, but applying the stuff was probably such a chore I chose to just slap on some mr. surfacer and sand away the excess until the filler was showing only in the recesses. This pic shows the wheels after two applications of surfacer followed by a sanding. I hope I didn't sand away the side contours of the tires too badly...
Btw, notice the seatbelts. I applied a wash to them to add some variation to the monotonic prepainted shade. The rest I treated while still in the fret.
There's not much detail to write home about in the wheel wells. Filling the open sides before joining the wing halves would have probably been a better option, but here we are. I guess I'll mix up some milliput, stuff it in there and smooth the sides. The wing roof detail looks better represented with some left-over PE.
Moving to the cockpit components, there's some pretty tiny parts here.
The gunsight mount on the instrument panel is simply a piece of styrene sheet; most likely not realistic, but more robust. I also pinned the joint with brass wire to ease assembly and painting of the gunsight. The instruments are still to receive a drop of varnish to represent the glass at this point.
With this build, I didn't varnish the prepainted instrument panel PE parts before assembly and learned that it's best done if you're planning to use superglue for assembly. Superglue apparently has the tendency to remove the prepainted finish. I think you don't need to be guessing how I know...
Fortunately, I didn't get any damage on the actual instrument sections of the parts.
In the pic there's also my new pitot-tube, made from steel wire and a hypo needle, and the modified supercharger intake. Making the opening smaller was much trickier than I thought.
"Just fill the part with milliput and drill a new hole"
Yes, in theory.
In reality, it was the third time applying putty and drilling when I got it right. First I used a too large drill and ripped off the putty. Second time I accidentally drilled a second hole in the wrong place.
The third time went well, although I didn't have the correct size drill bit for the opening, so I had to drill the hole with the largest I had (well, in that set I have, one heavy-duty drill sets has much too large bits on the other hand), then do the final shaping by hand with a knife and some sandpaper.
As the last bit for this update, here's a shot of the cockpit side walls, still in progress:
Xtracrylics' RLM66 is much too dark to go with Eduard's prepainted parts' shade, but I'll have to live with that. I did some drybrushing with a lighter shade after a black wash to tone down the paint, but it didn't help that much.
Until next time.
magnusf
Joined: May 02, 2006
KitMaker: 1,953 posts
AeroScale: 1,902 posts
Posted: Thursday, May 29, 2008 - 10:00 AM UTC
Good evening!
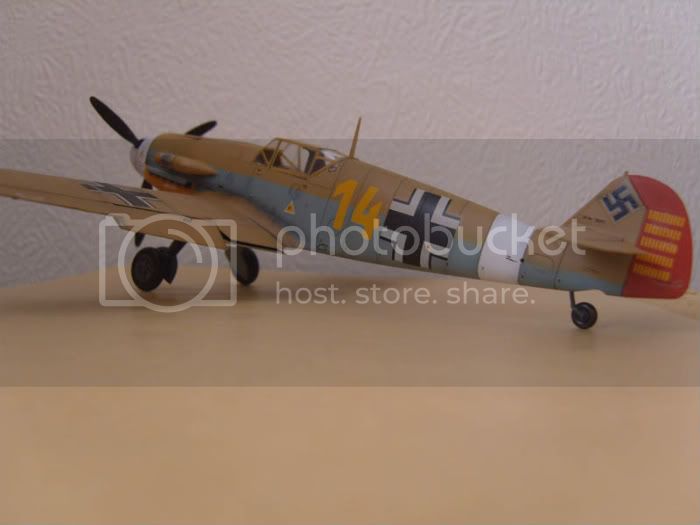
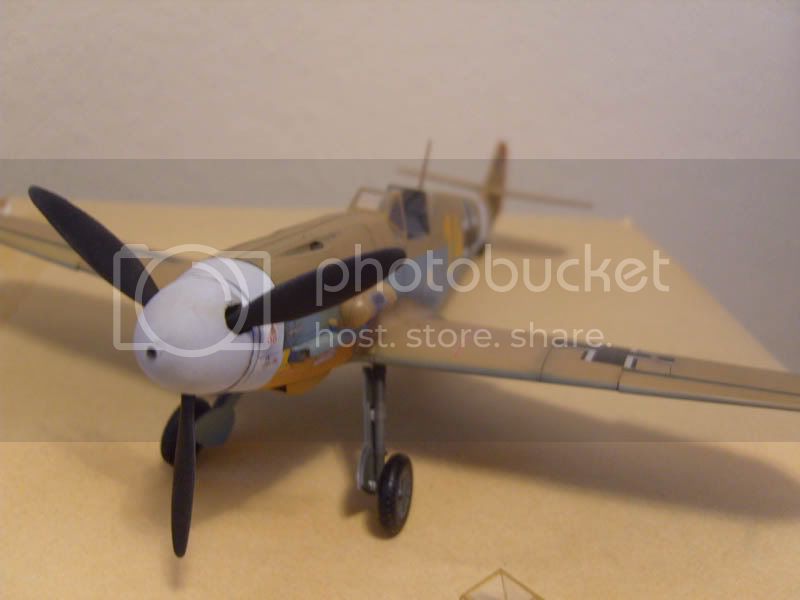
Just casually passing by to tell all that I have finished !

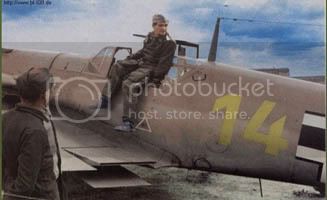
And my reference photo (again):
This was my first German aircraft in a long time, I have had great fun (that camo...) and will probably do some more in the near future. Thanks to all for comments and help!
For those of you who haven't been there before, build blog is here!
Phil: I might be able to help you with a photo of Evan Mackie's Tempest, PM me if you need one.
Eetu: First rate detail work as usual!
Magnus
Just casually passing by to tell all that I have finished !
And my reference photo (again):
This was my first German aircraft in a long time, I have had great fun (that camo...) and will probably do some more in the near future. Thanks to all for comments and help!
For those of you who haven't been there before, build blog is here!
Phil: I might be able to help you with a photo of Evan Mackie's Tempest, PM me if you need one.
Eetu: First rate detail work as usual!
Magnus
SGTJKJ
#041
Joined: July 20, 2006
KitMaker: 10,069 posts
AeroScale: 3,788 posts
Posted: Thursday, May 29, 2008 - 08:02 PM UTC
Great progress, Phil and Eetu. As already pointed out by Magnus the details are great.
Excellent result, Magnus. Especially since the camouflage is not exactly the easiest one for Luftwaffe aircraft.
Excellent result, Magnus. Especially since the camouflage is not exactly the easiest one for Luftwaffe aircraft.

TedMamere

Joined: May 15, 2005
KitMaker: 5,653 posts
AeroScale: 4,347 posts

Posted: Thursday, May 29, 2008 - 09:10 PM UTC
Quoted Text
Jean Luc, could you do this as well please, and dont forget to include a photo of the real aircraft
Hi Nigel!
It's done...
I think this will be the most spectacular Group Build Gallery of Aeroscale when I see all the fantastic models presented!
Jean-Luc

propwash
Joined: July 06, 2007
KitMaker: 289 posts
AeroScale: 231 posts
Posted: Friday, May 30, 2008 - 12:02 AM UTC
Here's my finished entry:
P-39N 'White 100' flown by the second-ranking allied ace, Col. Aleksandr Ivanovich Pokryshkin of 9 GIAD.


P-39N 'White 100' flown by the second-ranking allied ace, Col. Aleksandr Ivanovich Pokryshkin of 9 GIAD.
SGTJKJ
#041
Joined: July 20, 2006
KitMaker: 10,069 posts
AeroScale: 3,788 posts
Posted: Friday, May 30, 2008 - 11:17 PM UTC
Great entry, Alex. A striking scheme with all those stars on the fuselage.
almonkey
Joined: March 23, 2003
KitMaker: 2,124 posts
AeroScale: 788 posts
Posted: Saturday, May 31, 2008 - 10:57 PM UTC
and it all goes slightly wrong!
in order to paint the undercarridge doors what i usually do is put some blu tac in the wheel well then push the doors into place, which is fine until you lever the smallest door up (less than a centimetre across)...........
and you know what happens next! the thing is at the sides and back of my modelling desk i have anti pinged part shielding i heard it hit this and i reckon it must have bounced back onto the desk, but you know how this story ends! after 20 minutes of searching no joy, so i cut out another from plastic sheet, no real big problem. then i cut off the smaller actuators from the sprue, first one comes off no bother, next one pings. i saw it go across my desk, where it hit the instruction sheet that was partly on top of some stuff making it an excellent ski ramp!
more searching. no joy. this part absolutly could not have got off my desk.
but it did.
more scratchbuilding.
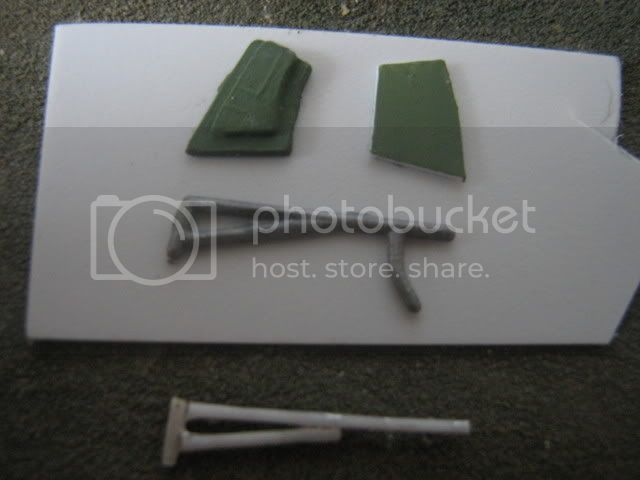
on the plus side i ended up cleaning up my desk
the anti pinging part shielding is the plywood across the back which stops stuff going between the desk and the wall and the big screen/shelf on the side with pegs and clamps stuck all over
in order to paint the undercarridge doors what i usually do is put some blu tac in the wheel well then push the doors into place, which is fine until you lever the smallest door up (less than a centimetre across)...........
and you know what happens next! the thing is at the sides and back of my modelling desk i have anti pinged part shielding i heard it hit this and i reckon it must have bounced back onto the desk, but you know how this story ends! after 20 minutes of searching no joy, so i cut out another from plastic sheet, no real big problem. then i cut off the smaller actuators from the sprue, first one comes off no bother, next one pings. i saw it go across my desk, where it hit the instruction sheet that was partly on top of some stuff making it an excellent ski ramp!
more searching. no joy. this part absolutly could not have got off my desk.
but it did.
more scratchbuilding.
on the plus side i ended up cleaning up my desk
the anti pinging part shielding is the plywood across the back which stops stuff going between the desk and the wall and the big screen/shelf on the side with pegs and clamps stuck all over
lampie
#029
Joined: December 23, 2005
KitMaker: 6,249 posts
AeroScale: 3,270 posts
Posted: Sunday, June 01, 2008 - 05:26 AM UTC
Great entry Alex!
Your building is coming on in leaps and bounds.
One last step before you become the 8th ACE of the campaign is to upload your photos into the ACES HIGH GALLERY
Phil,,Im sure you'll overcome this "tiny" hurdle
Thanks Jean-Luc. The gallery is starting to look really good isnt it?
Nige
Your building is coming on in leaps and bounds.
One last step before you become the 8th ACE of the campaign is to upload your photos into the ACES HIGH GALLERY
Phil,,Im sure you'll overcome this "tiny" hurdle
Thanks Jean-Luc. The gallery is starting to look really good isnt it?
Nige
Littorio
Joined: September 15, 2004
KitMaker: 4,728 posts
AeroScale: 1,351 posts
Posted: Sunday, June 01, 2008 - 10:37 AM UTC
OK first pictures, the kit and the first colour scheme.
I'll be making a start tomorrow.
Ciao
Luciano
I'll be making a start tomorrow.
Ciao
Luciano
 |

WEB HOSTING BY


Copyright ©2021 AeroScale and Kitmaker Network, a subsidiary of Silver Star Enterprises
All Rights Reserved. Please read our Conditions of Use and Privacy Policy.
All Rights Reserved. Please read our Conditions of Use and Privacy Policy.