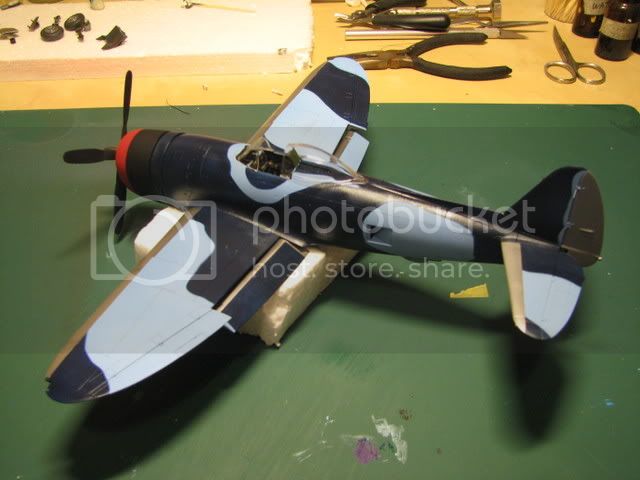
La-5fn progress report;
It's moving ahead slowly.
Here's two more pics:
You'll notice that I was not planning to use the engine.
Next work, closing the fuselage.
Jean

Air Campaigns
Want to start or join a group build? This is where to start.
Hosted by Frederick Boucher, Michael Satin
Official "Aces High" Campaign Thread
Apex1701
Quebec, Canada
Joined: July 08, 2007
KitMaker: 38 posts
AeroScale: 30 posts
Joined: July 08, 2007
KitMaker: 38 posts
AeroScale: 30 posts
Posted: Sunday, June 01, 2008 - 03:10 PM UTC
Posted: Monday, June 02, 2008 - 08:07 AM UTC
First inprogress pictures,
Comments welcome
Ciao
Luciano
Comments welcome
Ciao
Luciano
PolarBear
Västra Götaland, Sweden
Joined: February 23, 2005
KitMaker: 820 posts
AeroScale: 629 posts
Joined: February 23, 2005
KitMaker: 820 posts
AeroScale: 629 posts
Posted: Monday, June 02, 2008 - 10:48 AM UTC
Wow, Nige and everyone else!
I do not think that I have seen as many excellent entries in any previous campaign here at Aeroscale! Well done, Nige!!!
Personally, I keep working hard on my 1/72 AML Mirage IIICJ. I've been filling and sanding and polishing and rubbing... hoping to acheive a polished yet realistic metall finish. If you have followed my previous posts, you know that I have been fighting a modell with a most questionable fit!
This is the result so far. Lots of work remain. But that will have to wait until after my wedding in two weeks!
Cheers! // PolarBear
LongKnife
Jönköping, Sweden
Joined: April 25, 2006
KitMaker: 831 posts
AeroScale: 688 posts
Joined: April 25, 2006
KitMaker: 831 posts
AeroScale: 688 posts
Posted: Monday, June 02, 2008 - 10:34 PM UTC
Wow! Gone a few days and things roll on like thunder.
Edward Scissorhands must have a brother in Finland. Eetu Tweezerhands. Pit is coning out nice Eetu.
Magnus: You pulled it off nicely. I feel like I have to fail a few models so that I have subjects to test on in the future.
Alex: You really got the P 39 to look russian. Worn but working. Nice!
Björn: Wedding in two weeks might put the Mirage far out on the other side of the campaign. First a honeymoon, then house restoration and finally all the tthings she won't do, now that she caught you for real Congrats anyway, and may the sun shine over Skåne! Mirage is looking good too. Hard to see traces of your labour.
Posted: Tuesday, June 03, 2008 - 12:47 AM UTC
Looks great, Bjoern. A very nice and very shiny finish.
Congratulations on the wedding.
Posted: Tuesday, June 03, 2008 - 07:38 AM UTC
Ok day two a little bit more progress
Ciao
Luciano
Ciao
Luciano
vanize
Texas, United States
Joined: January 30, 2006
KitMaker: 1,954 posts
AeroScale: 1,163 posts
Joined: January 30, 2006
KitMaker: 1,954 posts
AeroScale: 1,163 posts
Posted: Tuesday, June 03, 2008 - 07:39 AM UTC
Quoted Text
Looks great, Bjoern. A very nice and very shiny finish.
Congratulations on the wedding.
i second both notions!
however, how come we weren't invited to the wedding?
huh?
really!
but seriously, congradulations!
Emeritus
Uusimaa, Finland
Joined: March 30, 2004
KitMaker: 2,845 posts
AeroScale: 1,564 posts
Joined: March 30, 2004
KitMaker: 2,845 posts
AeroScale: 1,564 posts
Posted: Wednesday, June 04, 2008 - 04:34 AM UTC
Quoted Text
Edward Scissorhands must have a brother in Finland. Eetu Tweezerhands. Pit is coning out nice Eetu.
Thanks, but isn't that a little early for compliments, I'm not done yet.
And yes, if you're wondering, it just gets worse...
When I got the bundle of cables going to the panel on the cockpit sidewall glued, I realized that the prominent fuel pipe with the clear section was missing altogether. So, I made one from copper wire, stretched clear sprue and masking tape. Out of fear that the instrument panel wouldn't fit with the pipe of the correct length, I made the front end shorter, in vain as I found out later and fixed that.
But before getting there, I got the main cockpit component finished.
Academy's kit was missing the bomb rack control panel from the cockpit, but AML's K4 kit has it both as a PE and resin part. The latter I took for this build, leaving the better detailed PE part for the original.
Before finally closing the fuselage, I'll have to do some research in case this particular plane didn't have it, although many Finnish G6s were supplied with the Jabo equipment.
While I was at it, I noticed the K4 kit had much better looking landing gear doors, and proceeded to swipe those to this build as well, as the limited edition kit offered both plastic and PE landing gear doors.
The AML parts are much better shaped, but also slightly thick (it's a limited-run kit), but fortunately that was easy to fix with a little work with sanding sticks.
And finally for this update, here's a shot of the cockpit, ready for closing the fuselage halves.
After the instrument panel fit just fine with fuel pipe in place, I replaced the missing piece with a length of stretched sprue painted yellow. (still to be cut down to size in this pic)
Posted: Wednesday, June 04, 2008 - 09:47 AM UTC
Ok last update for this week (back to work tomorrow night), any way they have been painted in all the base colours and given a coat of Klear ready for some more detail painting and decals.
Ciao
Luciano
Ciao
Luciano
Posted: Wednesday, June 04, 2008 - 08:33 PM UTC
Excellent cockpit detail, Eetu. I am glad my cockpit is closed up, so nobody can compare it to yours
Looks very nice, Luciano. It is a nice little pair and you do not have to worry about finding space for them in your home Looking forward to see them with markings on.
Here is an update on my FW 190 A7 "Red 23" flown by Heinz Bar with JG 1. This was apparently an extra aircraft for Heinz Bar. His normal aircraft being a FW 190 A7 "Red 13".
This kit is probably 20+ years old, but it fits together surprisingly well.
I used the old Fujimi decals. They worked quite well and settled down easily. The swastikas for the tail were extremely big and the crosses for the top of the wings looked wrong, so these were replacement with something from the spare decal box.
Next is a flat coat of varnish and then some light weathering. More to follow....
Looks very nice, Luciano. It is a nice little pair and you do not have to worry about finding space for them in your home Looking forward to see them with markings on.
Here is an update on my FW 190 A7 "Red 23" flown by Heinz Bar with JG 1. This was apparently an extra aircraft for Heinz Bar. His normal aircraft being a FW 190 A7 "Red 13".
This kit is probably 20+ years old, but it fits together surprisingly well.
I used the old Fujimi decals. They worked quite well and settled down easily. The swastikas for the tail were extremely big and the crosses for the top of the wings looked wrong, so these were replacement with something from the spare decal box.
Next is a flat coat of varnish and then some light weathering. More to follow....
Posted: Thursday, June 05, 2008 - 07:58 PM UTC
Here is my entry for this campaign. Fujimi's old FW 190 A7 kit. A nice kit although very basic regarding the landing gear and the cockpit.
I am very satisfied with the result despite a bit of (very) small air bubbles under two of the decals and too little contrast between the RLM 74 and RLM 75 camouflage colours. The weathering process went great by my standards, as I normally overdo it being primary an AFV modeller.
Now I have soon gathered enough experience and courage to try out some of the Eduard FW 190s in my stash.
My FW 190 A7 is build as Heinz Bar's reserve aircraft "Red 23". Most of the time Heinz Bar flew in "Red 13", but "Red 23" is still significant as it was the aircraft in which he scored his 200th air victory.
It has been a fun campaign although it messed up with my first FW 190 D9 entry. Well, things went well for the second try. Great and well run campaign by Nige. The level of the builds in this campaign are outstanding!
Posted: Friday, June 06, 2008 - 12:31 PM UTC
Thanks Bjorn and everyone else for the comments. Im very pleased with how my first campaign is coming along.
Very best of luck for your wedding Bjorn, I presume my invites in the post?
Lucky,those TINY P-51's are looking great. I dont know how you manage to work in that small a scale.
Congratulations Jesper!
A fabulous looking 190 and a great job on an old kit.
Thanks for posting the excellent photos in the ACES HIGH GALLERY
Your the 9th Ace of the campaign sir, a space awaits you at the bar of the officers club along with.
Captain A
CMOT70
FalkeEins
Longknife
Magnusf
Propwash
Tedmamere
Vanize
Who'll be next out of the sun and become Ace number 10?
Fabulous work everyone
Nige
Posted: Sunday, June 08, 2008 - 06:29 AM UTC
Thanks Nige. I will buy the first round of beers at the officers club.
It was fun participating. I am already looking forward to the Thunderbolt campaign, but first my F-4 Phantom needs to get airborne
LongKnife
Jönköping, Sweden
Joined: April 25, 2006
KitMaker: 831 posts
AeroScale: 688 posts
Joined: April 25, 2006
KitMaker: 831 posts
AeroScale: 688 posts
Posted: Sunday, June 08, 2008 - 10:49 PM UTC
Nice butcher bird there, Jesper. As for myself I recommend we have the beer in Randers, since that seems to be the only place in the world where the bar taps on the street are directly hooked up to the brewerys own lines. We won't run dry as fast that way.
Posted: Monday, June 09, 2008 - 04:32 AM UTC
Thanks Jesper, thats one fine 190 if only the Eduard 1/144 190 was as nice. This campaign is a very nice one for me and getting my P-51's finished is being a pleasure.
Well done to Nige.
Well back to the bench, hope to have the 'stangs finished tomorrow.
Ciao
Luciano
Well done to Nige.
Well back to the bench, hope to have the 'stangs finished tomorrow.
Ciao
Luciano
Posted: Monday, June 09, 2008 - 05:21 AM UTC
Looks like Luciano is on track to take the Aces into double figures, unless his Mustangs get bounced by another Ace
The usual burst of building activity between tours has seen my entry reach this stage.
Keep up the great work guys!
Nige
The usual burst of building activity between tours has seen my entry reach this stage.
Keep up the great work guys!
Nige
Posted: Monday, June 09, 2008 - 09:24 AM UTC
Nige
Thats a spectacular camo scheme. Hope to catch up with you at a show and see this in the flesh
Decided that a single kit for a campaign wasn't enough, so i've started the Hobby Boss F4F-3 Wildcat in 48 Scale.
If i can find a suitable kit, i'll try to add a 72 scale kit in as well
Andy
Thats a spectacular camo scheme. Hope to catch up with you at a show and see this in the flesh
Decided that a single kit for a campaign wasn't enough, so i've started the Hobby Boss F4F-3 Wildcat in 48 Scale.
If i can find a suitable kit, i'll try to add a 72 scale kit in as well
Andy
Posted: Monday, June 09, 2008 - 12:10 PM UTC
Andy thats looking great.
Im hoping to have the P-47 done for Medway, but Ive got a lot of work booked in and theres plenty of potential for me to **** it up!
NIge
Im hoping to have the P-47 done for Medway, but Ive got a lot of work booked in and theres plenty of potential for me to **** it up!
NIge
LongKnife
Jönköping, Sweden
Joined: April 25, 2006
KitMaker: 831 posts
AeroScale: 688 posts
Joined: April 25, 2006
KitMaker: 831 posts
AeroScale: 688 posts
Posted: Monday, June 09, 2008 - 10:07 PM UTC
Nigel: Your "blueberries in milk" is looking kool. Your'e starting to convince me that I have to join the Jug-fest later.
Andy: Nice engine compartment. Is that straight from the kit, or aftermarket or scratch?
Posted: Tuesday, June 10, 2008 - 12:56 AM UTC
Quoted Text
Nigel: Your "blueberries in milk" is looking kool. Your'e starting to convince me that I have to join the Jug-fest later.
Hi Tony.
Only "starting" to convince you to join in my Jug-fest?
Will this help convince you?
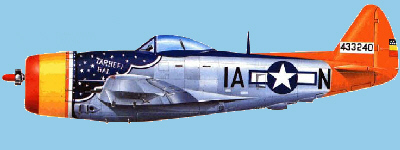
"Tarheel Hal" the mount of Ike Davis 366thFS 358th FG.
Decals are available in 1:72 and 1:48th scale.
Nige
LongKnife
Jönköping, Sweden
Joined: April 25, 2006
KitMaker: 831 posts
AeroScale: 688 posts
Joined: April 25, 2006
KitMaker: 831 posts
AeroScale: 688 posts
Posted: Tuesday, June 10, 2008 - 01:39 AM UTC
Well Nigel, I have plans to pass the hobbyshop tonight before we beat Greece in football. If there are any P47, I'll get one and join in. I'd like to build something big sometime, preferrebly with open engine cowlings (since I see Andys Wildcat here), and a Jug in 1:48 should equal a 109 in 1:32, don't you think?
Posted: Tuesday, June 10, 2008 - 01:55 AM UTC
Quoted Text
Andy: Nice engine compartment. Is that straight from the kit, or aftermarket or scratch?
Me? Scratchbuilding?? As if. Straight from the kit, but with the wiring harness added, at the cost of two drill bits (must do better).
thanks for the comments, shame it'll all be hidden once the cowling is on, but i'll know it's there.
Andy
Emeritus
Uusimaa, Finland
Joined: March 30, 2004
KitMaker: 2,845 posts
AeroScale: 1,564 posts
Joined: March 30, 2004
KitMaker: 2,845 posts
AeroScale: 1,564 posts
Posted: Tuesday, June 10, 2008 - 02:33 AM UTC
Good progress everyone.
That wildcat looks sweet with that busy interior. Is it related to the Tamiya kit or is it a whole new kit?
I've been making some more progress on my 109.
The main landing gear well were void, so I filled in the open sides with milliput and made details with styrene strip. The characteristic recesses needed because of the larger tires (and resulting in the bulges on top of the wings) I didn't attempt to replicate, as I remembered them only after gluing the wing halves together, they would have been very tricky to carve at this point.
if there's one aircraft fuselage shape that means business, it's this!
Unlike on my first Academy Bf-109 G6, now I devoted some more time on the nose, as there's a few areas to fix. First, the seam pointed by the arrow was filled and sanded smooth on both sides, as it wasn't there on the real thing.
There was also a missing panel line needing scribing (indicated by the vertical red line).
Although not visible in the pic, the panel / hinge line in the middle of the separate upper nose piece is also missing and needs to be scribed.
And to close this update, here the cockpit opening with the PE lining glued in. The missing seam between the fuselage halves (pointed by the arrow) in the rear I made before gluing the halves together by scraping the edges of the gluing surfaces, this conveniently eliminates the need for tricky scribing later.
That wildcat looks sweet with that busy interior. Is it related to the Tamiya kit or is it a whole new kit?
I've been making some more progress on my 109.
The main landing gear well were void, so I filled in the open sides with milliput and made details with styrene strip. The characteristic recesses needed because of the larger tires (and resulting in the bulges on top of the wings) I didn't attempt to replicate, as I remembered them only after gluing the wing halves together, they would have been very tricky to carve at this point.
if there's one aircraft fuselage shape that means business, it's this!
Unlike on my first Academy Bf-109 G6, now I devoted some more time on the nose, as there's a few areas to fix. First, the seam pointed by the arrow was filled and sanded smooth on both sides, as it wasn't there on the real thing.
There was also a missing panel line needing scribing (indicated by the vertical red line).
Although not visible in the pic, the panel / hinge line in the middle of the separate upper nose piece is also missing and needs to be scribed.
And to close this update, here the cockpit opening with the PE lining glued in. The missing seam between the fuselage halves (pointed by the arrow) in the rear I made before gluing the halves together by scraping the edges of the gluing surfaces, this conveniently eliminates the need for tricky scribing later.
Posted: Tuesday, June 10, 2008 - 02:38 AM UTC
Quoted Text
Good progress everyone.
That wildcat looks sweet with that busy interior. Is it related to the Tamiya kit or is it a whole new kit?
I don't know if it has anything to do with the Tamiya Kit. my only problem with it so far is that the styrene is very brittle.
Andy
Phantom2
Östergötland, Sweden
Joined: April 18, 2006
KitMaker: 708 posts
AeroScale: 678 posts
Joined: April 18, 2006
KitMaker: 708 posts
AeroScale: 678 posts
Posted: Tuesday, June 10, 2008 - 11:11 AM UTC
Tally ho ´ol chaps!
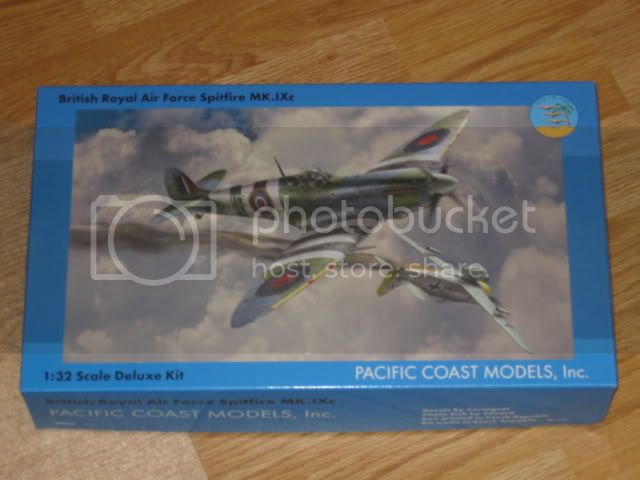
I changed my mind on the subject when I got the PCM Spitfire kit in my hands.
I just knew that I had to build it immidiatly, so I cleared the bench and dug in!
I have started a more detailed "bow by blow" blog here;
https://aeroscale.kitmaker.net/forums/120353&page=1
I will build this kit;
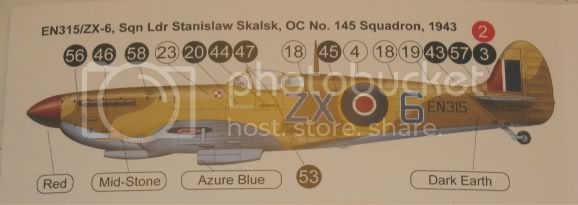
And the subject of the Campaign will be ZX o 6 flown by Stanislaw Skalski in Desert Camouflage.
Skalski was a true ace, and this individual aircraft had six victories, so it´s an ace in it´s own right!
I have the cockpit almost done;
More pics coming!
Cheers!
Stefan E